How to Take Product Photos That Sell | DIY Tips
 ProdShot Creator
Learning how to take product photos that truly sell comes down to one thing: creating clean, well-lit images that show your product honestly. This means working with soft, diffused light, keeping your camera steady on a tripod, and composing your shots to highlight what makes your product special and build customer trust.
Why Great Product Photos Are Your Best Sales Tool
Before you even think about picking up your camera, let’s get one thing straight: in the world of ecommerce, your product photos are everything. They are your most direct line to a customer's wallet in a very crowded digital marketplace. Think of them as your silent salesperson, working around the clock to convince shoppers that your product is the one they need.
After all, customers can't touch, feel, or test your product through a screen. Your photography has to do all the heavy lifting to bridge that sensory gap. High-quality images instantly build trust and signal professionalism, which can level the playing field for smaller brands competing against established giants. These aren't just pictures; they're a fundamental investment in a brand people feel confident buying from.
The Data Behind the Clicks
The effect of photography on how people shop online is staggering. With over 2.71 billion people shopping online, the numbers speak for themselves.
- 9 out of 10 shoppers say high-quality photos are a critical factor when they decide to buy something.
- High-resolution images don't just look good; they get shared on social media 40% more often.
- Even more impressive, they can boost conversion rates by an incredible 94%.
And what about returns? Roughly 22% of all returned products are sent back simply because the item looked different in person. That's a problem that accurate, detailed photography can directly solve. Want to dig deeper? You can discover more photography insights and their impact on sales from recent studies.
Your product photos aren't just there to show what an item looks like. They’re meant to stop a customer mid-scroll and make them feel something. They should create desire, answer questions before they're asked, and wipe out any hesitation.
Setting the Stage for Success
When you nail your photography, you’re doing more than just showing off your product; you’re setting clear expectations for your customer. This makes the whole buying process smoother. When a shopper sees clear, detailed, and attractive images, they feel more secure in their decision. That security leads directly to higher satisfaction and, you guessed it, lower return rates.
This is especially true on competitive platforms like Amazon, where visual consistency is key. We cover this in-depth in our guide to professional Amazon product photography.
To give your product visuals that final polish and really drive sales, it's worth looking into specialized AI tools like Sellerpic. These platforms can help you achieve a consistent, professional look across your entire product gallery, even if you don't have a background in photo editing. It makes getting pro-level results more accessible than ever before.
Setting Up Your At-Home Photo Studio on a Budget
Forget what you’ve heard—you don't need to rent a high-end studio to get professional-grade product photos. With a bit of resourcefulness, you can turn a small corner of your home into a surprisingly capable photography space. The real secret isn't the gear; it's learning how to master your environment, especially the light.
Your first move is to scout the best light in your house. Look for a large window that provides bright, indirect sunlight. A north-facing window is often ideal. You want to avoid harsh sunbeams hitting your setup, as that creates unflattering, hard shadows. In fact, a slightly overcast day is a gift for product photographers because the clouds act as a giant, natural diffuser, giving you soft, even light that flatters every detail.
Before you start, turn off every lamp and overhead light in the room. Mixing natural light with artificial light creates weird color shifts that are a nightmare to correct in editing.
The Essential Gear You Actually Need
You can easily get the same results as pricey professional equipment with some smart, affordable stand-ins. Here’s a no-fluff list of what you'll need to get started.
- A Solid Surface: Any plain old folding table will do the trick. Something around 24 to 27 inches wide is perfect—enough space to work but not so large it takes over the room.
- A Simple Tripod: For sharp, consistent photos, a steady camera is non-negotiable. A basic smartphone tripod is one of the best $20 investments you can make. It completely eliminates blurry shots and ensures your angles are identical every time.
- White Foam Board Reflectors: This is your secret weapon. A simple white foam board from any craft store is the best tool for manipulating light. You’ll use it to bounce light back onto your product, filling in dark shadows for a bright, clean, and professional look.
- Black Foam Board: The opposite of the white board, a black foam board absorbs light. It’s perfect for creating deeper, more dramatic shadows when you need them. This is especially handy for adding contrast and definition to white or light-colored products.
This simple kit gives you an incredible amount of control, which is the foundation of taking product photos that truly sell.
The infographic below shows a classic two-light setup—a standard in professional studios—that you can easily replicate with just your window and a single reflector.
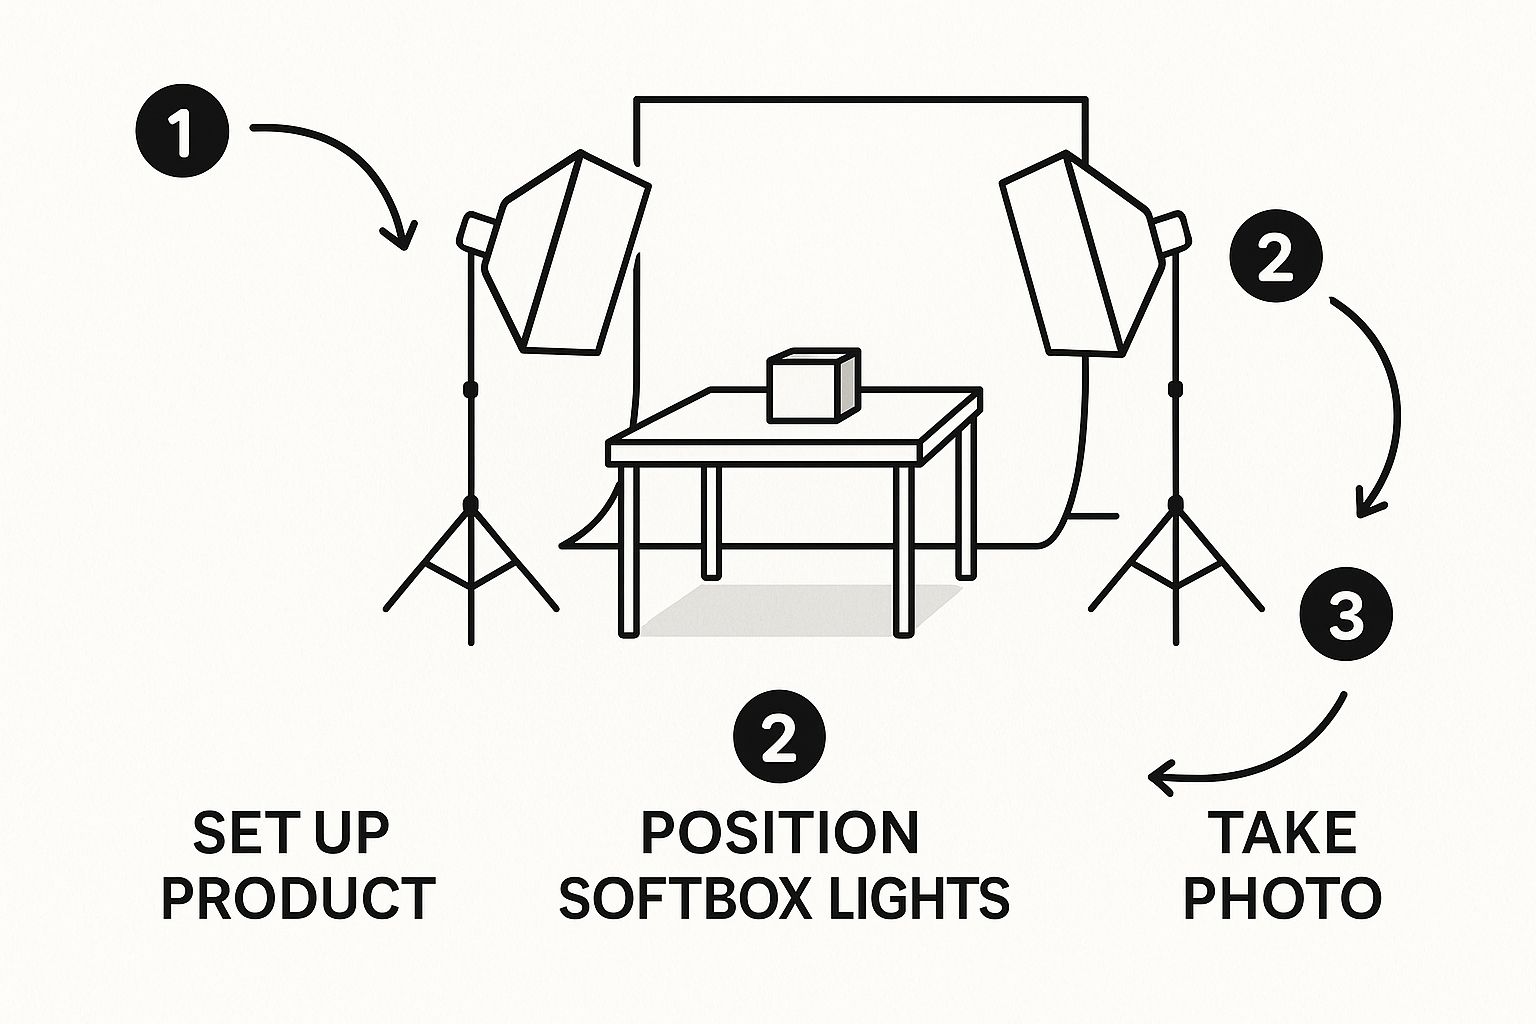
As you can see, placing your main light and a fill light (your reflector) at roughly 45-degree angles to your product creates beautifully balanced lighting. This technique defines the product's shape without casting those harsh, distracting shadows.
For anyone serious about getting professional results without the professional price tag, here's a quick look at how affordable DIY tools stack up against their studio counterparts.
DIY vs. Professional Studio Equipment
| Equipment | Professional Option | Affordable DIY Alternative | Pro Tip |
| Lighting | Studio Strobes ($500+) | A large window with natural light | An overcast day is your best friend for soft, diffused light that minimizes shadows. |
| Light Modifier | Softbox ($100+) | White foam board or poster board ($5) | Position the foam board opposite your light source to bounce light back and fill in shadows. |
| Background | Seamless Paper Roll ($60+) | White poster board or craft paper ($5) | Tape it to a wall and curve it down onto your table to create a seamless "sweep." |
| Camera Stand | C-Stand with Boom Arm ($200+) | Basic Smartphone Tripod ($20) | Use the tripod's timer or a remote shutter to avoid camera shake from tapping the screen. |
| Shadow Control | Black "Flags" ($40+) | Black foam board ($5) | Place it strategically to absorb light and create deeper, more defined shadows for drama. |
This table proves that with a little creativity, you can build a highly effective setup for a fraction of the cost. It's not about how much your gear costs, but how you use it.
Creating the Perfect Backdrop
To make your product the absolute star of the show, you need a clean, distraction-free background. The go-to method for this is creating a sweep, which gives you that "infinity" look where there's no horizon line.
A sweep is just a fancy name for a background that curves smoothly from the vertical wall down to the horizontal tabletop. It gets rid of that distracting line where the table meets the wall, making your product the sole focus.
Making your own is incredibly easy. Grab a large piece of flexible white poster board. Using painter’s tape (so you don’t damage your walls), secure the top edge of the board to the wall behind your table. Let the rest of the board curve down naturally onto the table's surface.
Just like that, you have a clean, professional stage. Place your product right in the middle, and you’re ready to shoot. For smaller items like jewelry, you can even build a simple lightbox from a cardboard box lined with white paper to get perfectly diffused light from all sides. Your entire goal here is to create a controlled environment where your product can shine.
Ditch "Auto" Mode and Take Control of Your Smartphone Camera
Let's be real—the camera in your pocket is a powerhouse. Modern smartphones pack some serious photographic muscle, but just pointing and shooting on "Auto" isn't going to cut it for photos that actually sell. If you want to learn how to take product photos that look truly professional, you have to get your hands dirty with manual controls.
Don't let that scare you. This isn't as complicated as it sounds. Most phones, whether you're on an iPhone or an Android, have a "Pro" or "Manual" mode that puts you in the driver's seat. A few minutes spent here will make a night-and-day difference in your final images.
The whole point is to get the shot looking as good as possible in the camera. This simple shift in mindset makes editing way faster and preserves the precious image quality you'll need. After all, 83% of US consumers say photos are a huge factor in their decision to buy.
The Only Three Manual Controls You Really Need to Know
Forget about all the confusing dials and sliders. For crisp, clean product shots, you just need to nail these three settings. Master them, and you’ll have the power to create bright, sharp, and true-to-life images every time.
- ISO (Light Sensitivity): Think of this as your sensor's sensitivity to light. A high ISO can be a lifesaver in a dark room, but it introduces a grainy texture called digital noise. For product photos, you should have plenty of light, so always crank your ISO down to the lowest possible setting—usually 100 or even 50. This is the secret to getting that super clean, noise-free look.
- Exposure (Brightness): This is your brightness control. Instead of letting your phone guess, you can fine-tune it. Is your white background looking a little dingy and gray? Just nudge the exposure up until it’s a clean white, but be careful not to "blow out" the details on your actual product.
- White Balance (Color Tone): Ever take a photo that looks oddly blue or way too yellow? That's a white balance problem. The "Auto" setting does a decent job, but it can be surprisingly inconsistent between shots. By manually setting it to match your light source (like "Daylight" or a specific Kelvin temperature), you guarantee that all your photos have the same, accurate colors.
Expert Tip: Lock it in! Once you've dialed in your ISO, exposure, and white balance, look for a lock icon or a function called "AE/AF Lock" (Auto-Exposure/Auto-Focus Lock). Tapping this freezes your settings, which is absolutely critical for maintaining consistency across an entire set of product images.
Two Built-In Features That Make a Huge Difference
Beyond the manual settings, your phone has a couple of simple tools that are game-changers for composition.
Turn on Your Gridlines This is probably the easiest win you'll get. Toggling on the 3x3 grid overlays a simple grid on your screen. It instantly helps you center your product perfectly and makes sure your camera is level. It also gives you a visual guide for using compositional rules like the rule of thirds to create more dynamic shots.
Lock Your Focus Before you press the shutter, tap and hold on your product right on the screen. You'll see a confirmation that the focus is locked. Now, even if you shift your position slightly, the camera will keep your product perfectly sharp. This is non-negotiable when you're shooting multiple angles and need every single shot to be tack-sharp.
By taking charge of these simple settings, you stop being someone who just takes pictures and become a photographer who creates images. This is the foundation that separates forgettable product listings from those that stop a customer's scroll and get them to click "add to cart."
How to Compose Product Shots That Actually Sell

A stunning photo is so much more than a clear image; it's a visual story. This is where you graduate from simply documenting your product to actively persuading someone to buy it. How you arrange everything inside that frame—the composition—can grab a shopper's attention, communicate quality, and help them imagine your product in their own life.
Good composition is about controlling where the viewer looks. It’s what separates a photo that gets scrolled past in a heartbeat from one that makes someone stop and say, "Ooh, what's that?" When you think like a storyteller, your photos stop being a list of features and start creating genuine desire.
And the impact of getting this right is massive. E-commerce product photography isn't just a niche; it makes up nearly 45% of the entire global commercial photography market. As that market continues to expand, the pressure to create truly compelling images will only get more intense. If you're curious, you can read more about how product photos drive e-commerce and see the complete data.
Build a Smart and Versatile Shot List
You can't tell the whole story with just one photo. A well-thought-out shot list is your game plan, ensuring you capture every angle a customer would want to see. Think of it as answering their questions before they even have to ask. I always aim for a solid mix of clean studio shots for detail and lifestyle shots for inspiration.
For every single product, make sure you capture these essentials:
- The Hero Shot: Your main event. This is a crisp, clear shot on a simple background, typically white or light gray, showing the product head-on.
- The 45-Degree Angle: This simple turn gives the product a sense of depth and dimension. It reveals its shape in a way a flat, front-on shot just can't.
- The Top-Down Shot: Often called a "flat lay," this is brilliant for showing off all the items in a kit, the design of a rug, or the shape of a plate.
- Detailed Close-Ups: Get right in there. Show off the texture of the fabric, the quality of the stitching, a beautifully designed logo, or the fine grain of a wooden handle. These details scream quality.
- The In-Context Shot: Show your product in its natural habitat! This is where you sell the experience. A blanket looks cozier on a couch; a water bottle looks more refreshing next to a trail map.
Having this variety gives shoppers a complete, almost tactile understanding of what they're buying. It builds confidence and, from my experience, dramatically cuts down on returns.
I see this all the time: sellers who only post one or two photos and wonder why sales are slow. Your photo gallery is your best salesperson. It works 24/7, showing off the product from every angle and building trust through total transparency.
Frame Your Product for Maximum Impact
How you position your product within the frame can make or break the shot. Leaning on classic composition rules is a great way to create a photo that feels balanced and professional. The rule of thirds is your best friend here—just imagine a tic-tac-toe grid over your screen and place your product on one of the intersecting lines instead of dead center. Your phone's built-in gridlines make this incredibly easy.
When you're shooting those lifestyle or in-context shots, think carefully about your props. Selling a premium hand soap? A sprig of eucalyptus and a neatly folded linen towel can create a spa-like vibe. The golden rule is that props must support the story, not steal the spotlight. They are there to add context and help the customer see the product in their world, but your product must always remain the hero.
Bringing Your Photos to Life with Modern AI Editors
Taking the picture is really just the beginning. The real magic—what turns a decent smartphone shot into a professional-grade product photo—happens during the editing process. Not long ago, this meant spending hours hunched over complex software like Photoshop. Thankfully, that's no longer the case. A new generation of AI-powered tools has completely leveled the playing field, putting pro-level results within everyone's reach.
These intelligent apps are built to handle the most common—and often most tedious—editing jobs with just a few taps. You don't need a design degree to get a clean, commercial look anymore. Straightening a slightly crooked shot, cropping it just right, or tweaking the brightness are now simple, one-click affairs.
The Game-Changer: One-Click Background Removal
For anyone selling online, one of the most powerful AI features is easily the instant background remover. Trying to get that pure white background required by marketplaces like Amazon used to be a painstaking process of tracing and masking. Now, it's done in seconds.
Take a tool like PhotoRoom or Fotor, for example. They can instantly identify your product in the photo and lift it cleanly from its original surroundings. This lets you place your item on a perfect, distraction-free white backdrop or even drop it into a completely new, AI-generated scene that fits your brand.
You can see for yourself just how simple the interface for a modern background remover is.
It really is that straightforward. You upload your image, the AI does the heavy lifting, and you're left with a clean PNG file ready for your next move.
This kind of technology is a massive time-saver and a key reason the e-commerce photography market is booming. In fact, the global e-commerce product photography market is projected to double, from USD 1 billion in 2024 to an incredible USD 2 billion by 2033, driven largely by innovations like this. You can discover more insights about the e-commerce photography market to see just how fast things are moving.
Going Deeper with AI Color and Shadow Tools
Today's AI editors do so much more than just the basics. They can analyze your photo with a surprisingly sophisticated eye and make adjustments that truly make your product pop.
- Intelligent Color Correction: Nothing kills a sale faster than inaccurate colors. AI tools can automatically fix white balance problems, making sure your product’s colors look true-to-life and vibrant, not washed out or oversaturated.
- Realistic Shadow Generation: Once you've removed a background, your product can look like it's just floating in space. Smart AI tools can generate natural-looking, soft shadows beneath your item, giving it weight and making it look grounded and professional.
- Smart Retouching: Many tools can even spot and erase tiny imperfections like dust specks, fingerprints, or weird reflections with a single tap. It's an instant cleanup for your image.
AI editing isn't about faking it. It's about enhancing reality. The idea is to remove the distracting imperfections so you can present your product in its best, most accurate light—and do it quickly so you can focus on running your business.
By making these tools a regular part of your workflow, you can consistently produce a full gallery of polished, high-impact photos for any marketplace. And while these apps make things dramatically easier, if you run into a particularly tricky edit or just need to scale up quickly, dedicated photo editing services for ecommerce are always a great option. This blend of smart shooting and even smarter editing means pro-quality results are no longer out of reach.
Your Top Product Photography Questions, Answered
Even with a solid game plan, you're going to have questions as you dive into product photography. Let's walk through some of the most common hurdles I see beginners struggle with. Getting a handle on these will save you a world of time and headaches down the road.
The first thing everyone asks about is lighting. What's the secret? Honestly, the best light source you can find is almost always soft, diffused natural light. Find a large window, set up your product nearby, and if possible, shoot on a day that’s slightly overcast. This kind of light wraps around your product beautifully, giving you bright, even illumination without the hard, distracting shadows from direct sun.
What if the natural light just isn't cooperating? Whatever you do, don't use your camera's built-in flash—it's way too harsh. A simple trick is to grab a piece of white foam board and use it as a reflector. Just position it opposite your light source to bounce light back into the shadows, giving your product a clean, well-lit look without any fancy equipment.
How Do I Get That Perfect White Background?
Getting that crisp, pure white background you see on Amazon or Shopify is another common challenge. It’s actually a two-step process that’s much easier than you think.
First, you need to create what’s called a sweep. Just get a piece of white poster board and let it curve up from your table surface to form a seamless backdrop. This simple setup completely eliminates that distracting horizontal line where the table meets the wall.
After you've taken the picture, the real magic happens in editing. Modern AI background remover tools can instantly cut your product out and place it on a perfect, pure white (#FFFFFF) background with just one click.
The secret to a great product photo isn't a flawless studio setup. It's the combination of smart shooting techniques and efficient post-production editing. Your goal is to capture a clean image that gives your editing tools a great foundation to work with.
Do I Actually Need a Fancy Camera?
This question comes up all the time, and I can tell you with confidence: no, you don't. The camera in your smartphone is more than powerful enough to create incredible, professional-quality product photos. The real difference-maker isn't the camera body, but how you control the environment.
You can get stunning results with the phone in your pocket by focusing on three key areas:
- Great Lighting: Learning to work with natural light and reflectors is everything.
- A Steady Shot: A simple tripod eliminates blur and keeps your shots consistent.
- Smart Composition: Being deliberate about how you frame your product tells a story.
Spending a little time learning your phone's manual camera settings will improve your photos far more than buying a brand-new DSLR. And for those times when you're dealing with tricky shots or just need to edit a large batch of images, you can always turn to specialized product photo editing services to handle the post-production for you.
Ready to stop worrying about photography and start getting stunning, sales-ready images in seconds? Try ProdShot today and see how our AI can transform your smartphone pictures into professional product photos, no studio required. Get started for free at https://prodshot.net.
Subscribe to my newsletter
Read articles from ProdShot Creator directly inside your inbox. Subscribe to the newsletter, and don't miss out.
Written by