Pro White Background for Product Photography: Expert Guide
 ProdShot Creator
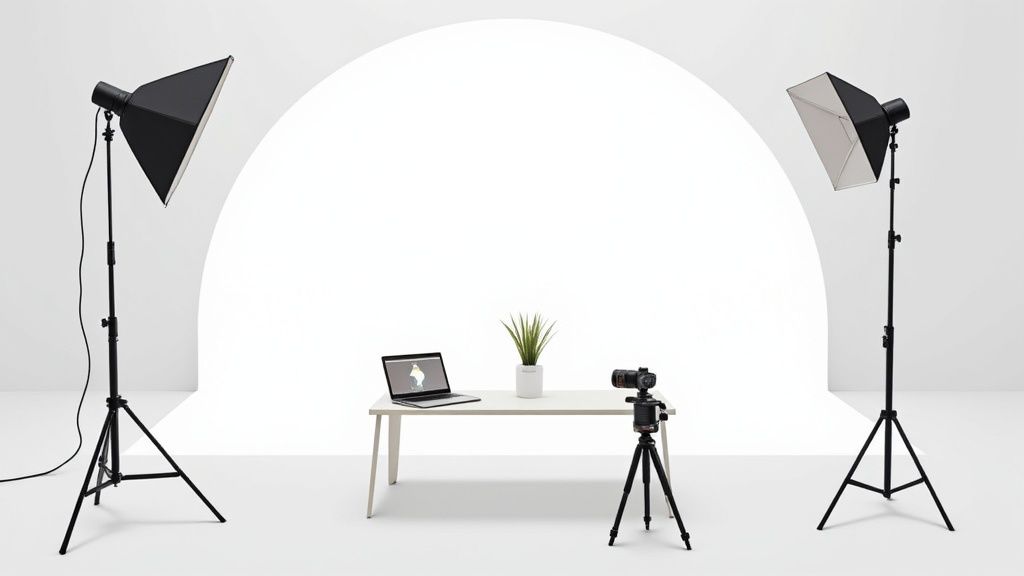
A clean white background for product photography isn't just a popular choice—it's the gold standard for a reason. For top e-commerce brands, it's a powerful sales tool that strips away all distractions, forcing a customer's attention directly onto your product's quality and features. Think of it less as a trend and more as a foundational strategy for building a credible brand that converts.
Why White Backgrounds Just Work for Ecommerce
In a bustling online marketplace, a crisp white background is your secret weapon. It’s not simply about looking good; it's a strategic move that creates a professional, clean canvas. This allows customers to zero in on what really matters: your product. It's a simple change that can have a huge impact on credibility and, ultimately, your sales.

Putting Your Product in the Spotlight
When a potential buyer lands on your product page, you have just a few seconds to make an impression. A busy or even a beautifully styled lifestyle background can sometimes steal the show, pulling focus from the very thing you're trying to sell.
A white backdrop, on the other hand, acts like a spotlight. It makes the fine textures, true colors, and all the little details pop. This is how you show off the delicate stitching on a leather wallet or the sharp facets of a gemstone, which is crucial for communicating real value to your customers.
Building a Brand People Trust
Consistency is everything when you're building a brand people feel good about buying from. When every product in your catalog is shot against a clean white background, it creates a sense of order and professionalism. That visual harmony tells shoppers you’re a serious and reliable business.
Here's a powerful stat: A detailed analysis of seven million product images revealed that a staggering 76% used a pure white background after the original was removed. Why? Because it kills distractions and lets the product details shine—a key factor in building trust and encouraging that final click to "buy."
Major marketplaces like Amazon even require a pure white background for main listing images. Following these guidelines doesn't just keep you in compliance; it positions your brand alongside established, polished retailers. To get this right, you can learn more about https://prodshot.net/professional-amazon-product-photography.
Keeping Colors True and Images Versatile
One of the trickiest parts of selling online is making sure colors look right on screen. A white background offers a neutral canvas that prevents weird color casts, so the cherry red of a dress or the soft beige of a sofa looks as true-to-life as possible. Getting this right can dramatically cut down on returns from customers disappointed by color differences.
Plus, these images are incredibly flexible. An item isolated on white can be dropped into social media posts, email newsletters, or digital ads without clashing with the design. Once you have these great shots, it’s a good idea to tag products on Instagram to turn that engagement into actual sales.
Building Your DIY Photography Studio
You don't need to rent a massive, expensive studio to get professional-looking shots. In my experience, a simple and effective shooting space can be carved out of just about any corner of your home or office. The whole point is to control the light and create a clean, seamless backdrop for your products. Get this right, and you've laid the foundation for high-quality white background for product photography.
First things first, you need to find the right material for your background. What you choose really comes down to your budget, the size of your products, and how often you'll be shooting.
Here are a few solid options I've used over the years:
- Seamless Paper: This is the industry standard for a reason. It comes on big rolls, gives you a perfectly smooth surface, and if it gets scuffed or dirty, you just pull a fresh section down. It’s a lifesaver for larger items or if you're doing photoshoots regularly.
- Poster Board: For smaller products like jewelry, cosmetics, or electronics, a simple sheet of white poster board from any craft store works wonders. It's incredibly cheap, easy to manage, and a great starting point.
- Fabric: A wrinkle-free white fabric, like a good quality muslin or even a clean, ironed bedsheet pulled tight, can work if you're in a bind. The catch? You have to be absolutely meticulous about eliminating every single wrinkle. They will show up in your photos and become a major headache in post-production.
And don't forget about props. When you're shooting apparel, for example, using clean, non-distracting props like white female dressmakers' dummies helps the garment hold its shape and look its best.
Creating the Perfect Seamless Sweep
Ever wonder how photographers get that "floating" product look? The secret is a technique called a sweep, or an infinity curve. It’s all about getting rid of that hard, distracting line where the floor meets the wall.
Creating a sweep is much easier than it sounds. Just let your background material—whether it’s paper or poster board—curve gently from a vertical surface down onto the horizontal surface where your product will sit. You can tape the top of the paper to a wall or prop it up with some books, then let it drape naturally onto a table. This simple setup creates a horizon-less effect that makes your product the one and only hero of the shot.
Pro Tip: I always use A-clamps or even just strong tape to secure the edges of my sweep. This keeps the background from shifting around while I’m adjusting the product and lights, giving me a consistent setup for every single photo.
Positioning Your Product for Success
With your background firmly in place, it's time to position your product. Place it right in the center of the sweep's flat surface, making sure to leave plenty of white space all around it. This breathing room gives you more flexibility when you need to crop the image later and helps keep stray shadows off the backdrop.
Getting the positioning right from the start is your best defense against common photo issues. By setting the product far enough forward from the vertical part of the sweep, you gain the ability to light the background and the product independently. This is a crucial technique for getting that pure, brilliant white finish and will save you a ton of time during the editing phase.
Mastering Your Lighting and Camera Setup

Alright, your DIY studio space is ready. Now comes the fun part, where the real magic happens: dialing in your lighting and camera. This is the step that turns a simple white sheet into a bright, clean, professional backdrop. If you get this right, you'll dodge those murky gray backgrounds and get that crisp, clean look that makes products really stand out.
It doesn’t matter if you're working with gorgeous natural light from a big window or a couple of studio strobes. The core principle is always the same.
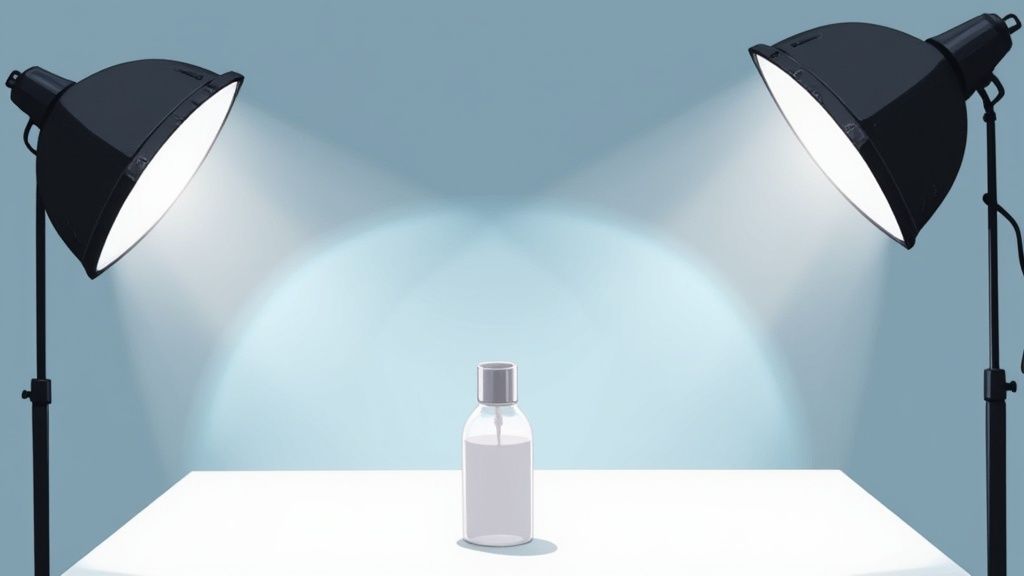
The secret? Light your background and your product separately. This one trick is what separates the pros from the amateurs. It stops your product from casting a tell-tale shadow onto the background, which is what turns a beautiful white into a dull gray.
Lighting Your White Background
To get that pure white look, you need to slightly overexpose the background, making it just a bit brighter than your subject. If you have two lights, this is easy. Dedicate one light entirely to the white sweep behind your product. Your goal is to make that background look pure white through the viewfinder, without completely blowing out the details on the product itself.
Working with just a single light source, like a window? No problem. Grab a large piece of white foam core or a reflector. Place it opposite your light source to bounce light back onto the background, filling in any shadows. It’s a simple move, but it can make a massive difference without you having to buy more gear.
Dialing in Your Camera Settings
Your camera settings are a team effort, all working together to create a sharp, perfectly lit image. You don't need a top-of-the-line camera, but you absolutely need to take control by shooting in Manual Mode.
Here’s where you should focus your attention:
- Aperture (f-stop): Start with a higher f-stop, somewhere around f/8 or f/11. This gives you a deep depth of field, which is just a technical way of saying your whole product will be in sharp focus, from front to back. For detailed product shots, this is non-negotiable.
- ISO: Keep this as low as your camera will go, ideally ISO 100 or 200. A low ISO minimizes digital noise (that grainy look), giving you a much cleaner, higher-quality photo.
- Shutter Speed: Once your aperture and ISO are locked in, you’ll adjust your shutter speed until the exposure looks just right. Since you’re using a tripod, you can get away with slower shutter speeds without any fear of camera shake.
The Tripod Rule: A tripod isn't a suggestion; it's essential for white background product photography. It locks your camera in place, killing any chance of blur and letting you use that low ISO for maximum image quality. It also keeps every shot perfectly consistent.
Nailing the Perfect White Balance
One of the biggest reasons brands rely on white backgrounds is for accurate color representation. You need to be sure that the white in your photo is actually white, not tinted slightly blue or yellow. This is where your camera's white balance setting is your best friend.
"Auto White Balance" can get you close, but for perfect color, a gray card is the way to go. Just snap a photo of the gray card under your exact lighting setup. Then, dive into your camera’s menu and use the custom white balance function, referencing that photo. This tells your camera precisely what neutral gray looks like in your light, allowing it to render every other color with near-perfect accuracy.
It's interesting to note that while the technical precision of a white background is an industry standard, some brands are seeing that lifestyle photos can boost consumer engagement by up to 40%. Still, for core e-commerce listings, the consistency and color fidelity of a white backdrop remain king—it’s why retailers like Zara use neutral backgrounds for items with subtle color variations. You can learn more about trends in product photography on fjaphotographer.com.
Polishing Your Photos with AI Editing
Even when you’ve nailed your camera settings and lighting, the real magic for a classic white background for product photography happens on the computer. Post-production is where good images become truly great. The good news? You no longer need to spend years mastering complex software like Photoshop to get professional results.
AI editing tools have completely changed how we approach this. I remember spending countless hours meticulously tracing product outlines with a pen tool. Now, that entire process can be automated. This shift from tedious manual work to smart automation is a massive win for any e-commerce seller trying to save time and money.
Your New AI-Powered Editing Workflow
The process is refreshingly straightforward. You take your raw photo, straight from the camera, and upload it to an AI-powered editor. From there, the tool’s algorithm intelligently identifies your product and separates it from the original background with incredible accuracy. In just a few seconds, you have a clean cutout, ready for its new home.
Once your product is isolated, applying a pure white (#FFFFFF) background is usually just a single click. This guarantees that crisp, consistent look across your entire product catalog—a non-negotiable for marketplaces like Amazon and a cornerstone of a polished brand image.
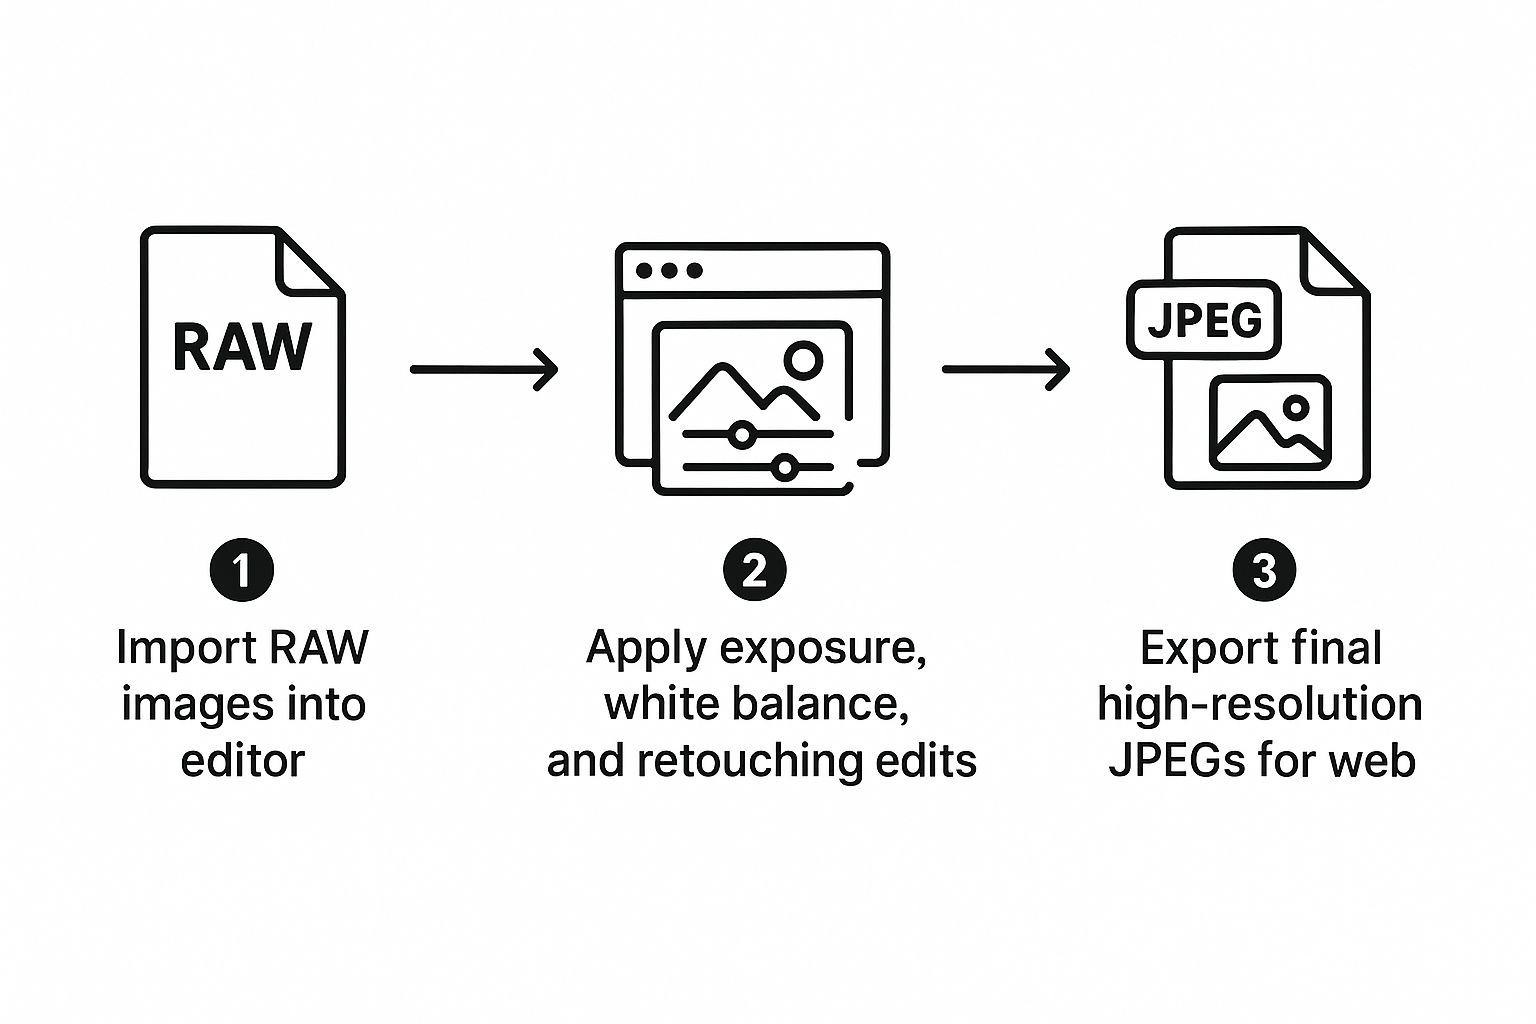
The real takeaway here is efficiency. A faster, more streamlined process means your products get online and start selling that much quicker.
More Than Just Background Removal
But the best AI tools don't just stop at cutting and pasting. They bring features to the table that were once only available to professional retouchers, making them accessible to literally anyone.
One of the biggest giveaways of a poorly edited photo is the lack of a realistic shadow. Modern AI tools are smart enough to generate natural-looking shadows based on your product’s shape and a virtual light source. This simple touch grounds the item in the scene, adding a crucial layer of depth and realism.
Here are a few other game-changing features to look for:
- Instant Color Correction: The AI can analyze your photo and automatically tweak the exposure, contrast, and white balance. This ensures your product colors pop and look just as they do in real life.
- Batch Processing: This is the ultimate time-saver. You can apply the same set of edits—like background removal, shadow generation, and color adjustments—to hundreds of photos at once. Think about it: an entire product line edited in the time it used to take for a single image.
An AI product photo generator like ProdShot, for example, lets you upload one basic photo and generates dozens of on-brand, conversion-ready images almost instantly. It's a way to sidestep expensive photoshoots and tedious editing entirely.
To really get the most out of your final images, especially when you're posting across different platforms, using an AI social media content generator for photography can be a smart move. These tools help repurpose your pristine product shots for various marketing channels, ensuring your visual branding stays consistent no matter where customers find you. This connection between editing and content creation is what really gives modern brands an edge.
Common Mistakes and How to Fix Them
Even with the best intentions, your first go at white background for product photography can be a bit of a letdown. It's totally normal to end up with images that just don't pop. But don't get discouraged—most of these issues are super common and surprisingly easy to fix. Getting the shot right in-camera will save you a world of hurt in post-production.
The classic rookie mistake? A background that comes out looking more like a dull gray than a crisp, clean white. This happens because the background isn't getting enough light compared to your product. Your camera tries to find a happy medium for the whole scene, and in doing so, it dials down the exposure on your bright white backdrop.
Another frequent headache is dealing with harsh, distracting shadows. While a subtle, soft shadow can give your product a nice sense of depth, hard-edged shadows just look amateurish and steal attention from your item. This is almost always the result of a single, direct light source without any modification.
Solving the Gray Background Problem
To banish that dreaded gray background, the trick is to light it separately from your product. You're aiming to make the background about one or two stops brighter than whatever you're shooting.
If you have a two-light setup, this is simple: dedicate one light entirely to the white sweep. Point it right at the background to get a bright, even wash of light. Working with just one light? No problem. Grab a white reflector—even a cheap piece of foam board works wonders—and use it to bounce light back onto the background. This fills in the space and brightens everything up. You can also play with your camera's exposure compensation dial to intentionally overexpose the shot a touch, which often solves the issue instantly.
Taming Harsh Shadows and Reflections
Harsh shadows and nasty reflections on shiny products are a dead giveaway that your light is too direct. The solution, in a word, is diffusion.
- Soften Your Light: Put something between your light and your product to scatter the rays. A proper softbox is ideal, but in a pinch, even a thin white bedsheet will do the trick. This wraps the light around your product, creating much softer and more flattering shadows.
- Change Your Angle: For pesky reflections on glossy surfaces, sometimes all it takes is a small adjustment. Try moving your light source higher, lower, or off to the side until you see that glare vanish.
Getting these details right isn't just for looks—it's for your bottom line. The global commercial photography market is projected to hit US$6.4 billion by 2035, a clear sign that brands are doubling down on high-quality visuals that sell. A pro-level image builds trust and has a direct impact on sales. You can read more about this trend on electroiq.com.
These manual fixes take practice and a bit of patience, which costs you both time and money. If you find yourself spinning your wheels trying to get consistent results, it’s worth looking into the cost of professional product photography to weigh it against your own investment. Sometimes, outsourcing or turning to a smart AI tool is the quickest path to a perfect shot.
Got Questions? We've Got Answers
Even with a solid plan, a few tricky questions always come up when you're aiming for that perfect white background. Let's tackle some of the most common ones we hear from sellers who are right where you are.
Can I Really Just Use My Smartphone?
You absolutely can. Honestly, the cameras in today's smartphones are fantastic and more than enough to get professional-looking shots for your store. The real secret isn't the camera itself, but how you manage the lighting and keep things steady.
Your best friends here are a tripod to prevent any hint of blur and a camera app that gives you manual control. You'll want to adjust settings like ISO, shutter speed, and white balance yourself. When you combine that control with a good lighting setup and a smart editing tool like ProdShot, your phone can deliver images that easily compete with those from a pricey DSLR.
Why Does My White Background Look Gray in the Photo?
This is, without a doubt, the most common headache. It almost always boils down to one thing: lighting. Your camera is trying to be helpful by finding an average, "correct" exposure for the whole picture. When it sees that massive, bright white background, it panics and darkens everything to avoid blowing out the highlights. The result? A dull, sad-looking gray.
The fix is to light your background and your product separately. Make the background significantly brighter than the product. If you're working with just one light, position a white reflector card to bounce some of that light directly onto the background. Another quick trick is to use your camera's exposure compensation setting (look for a little +/- button) and intentionally overexpose the shot by a stop or two.
Key Takeaway: A gray background is an underlit background. Your goal is to make the background so bright that the camera has no choice but to see it as pure white.
Do I Actually Need to Add Shadows?
It sounds a bit backward, doesn't it? You work so hard to get a pure white background, and now I'm telling you to add something back in. But yes, a subtle, realistic shadow is critical. Without one, your product looks like it's just floating in a white abyss, which can feel fake and digitally slapped on. A soft shadow gives the item a sense of weight and makes it look grounded in reality.
This is where AI-powered editing tools are a game-changer. Creating natural-looking shadows in a program like Photoshop is a skill that takes a lot of practice to get right. An AI tool, on the other hand, can analyze your product and generate a perfect, convincing drop shadow in seconds. It’s that final touch of realism that builds trust and helps a customer imagine the product in their own hands.
Ready to stop wrestling with complicated editing software and get perfect white background images in seconds? ProdShot uses advanced AI to automatically remove backgrounds, add realistic shadows, and create stunning, conversion-ready photos from a single smartphone snapshot. Try ProdShot for free today and see how easy professional product photography can be.
Subscribe to my newsletter
Read articles from ProdShot Creator directly inside your inbox. Subscribe to the newsletter, and don't miss out.
Written by