How to Make Product Photos Look Professional: Expert Tips
 ProdShot Creator
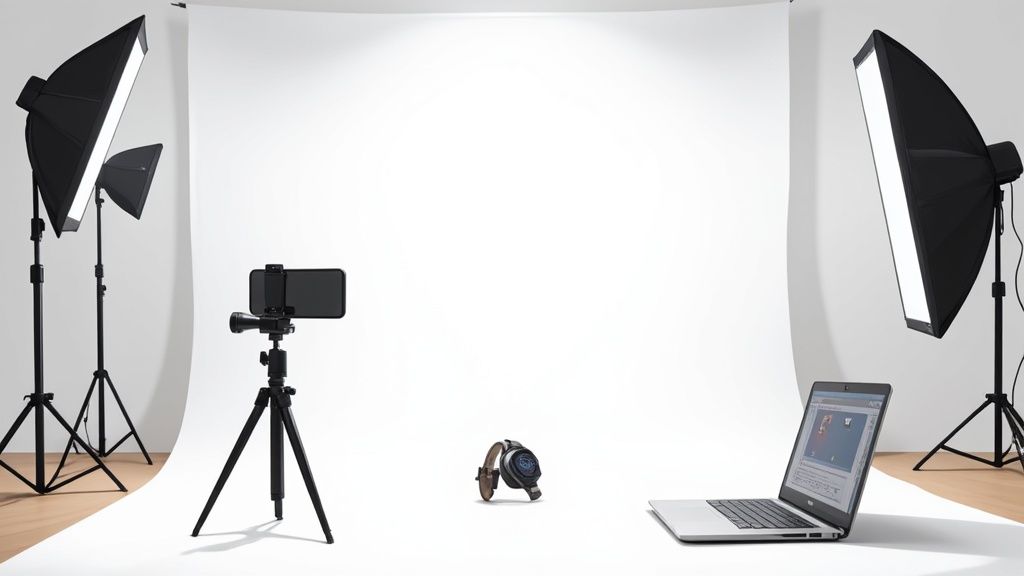
To really make your product photos look professional, it's not about one magic trick. It's about getting four key things right: solid planning, controlled lighting, creative composition, and a final polish in post-processing. A truly great image is born long before you ever touch the camera; it starts with a clear idea of how your visuals will build trust and, ultimately, drive sales.
Why Professional Photos Are Your Silent Salesperson
Before we get into the nitty-gritty of camera settings and editing software, let's talk about the why. In a packed online marketplace, stellar product photos do so much more than just display what you're selling—they create an instant sense of trust and perceived value.
Think of your photos as your most effective, hardest-working salesperson. They're on the clock 24/7, convincing customers without saying a word.
A crisp, well-lit photo can make a higher price point feel justified, help a hesitant customer click "add to cart," and even reduce returns by showing the product exactly as it is. It's a fact of online retail: shoppers connect with what they see long before they read your carefully crafted descriptions. That first visual impression is incredibly powerful and it happens in a split second.
Your photos are often the first—and sometimes only—interaction a customer has with your product before buying. They need to count.
The Core Elements of Professional Product Photography
So, how do we transform basic snapshots into compelling sales tools? It all boils down to mastering a few fundamental pillars. Think of this as your roadmap for creating images that don't just show a product, but sell it.
Let's break down these core elements.
| Pillar | Why It Matters | Key Takeaway |
| Planning | A shot list ensures you capture every angle and style needed for your listings, ads, and social media. | Never start a shoot without a clear plan. It's your blueprint for success. |
| Lighting | Light is everything. It shapes the mood, defines texture, and gets rid of ugly, distracting shadows. | Soft, diffused light is the secret sauce for achieving that high-end, professional look. |
| Composition | How you arrange your product and props guides the customer's eye and tells a story about your brand. | Use creative angles and thoughtful styling to make your product irresistible. |
| Editing | This is where the magic gets its final polish. Post-processing creates consistency and a flawless finish. | A clean background and true-to-life colors are absolutely non-negotiable. |
Mastering these areas is what separates amateur efforts from professional results that genuinely grow a business.
With the explosion of online shopping, this visual-first approach is more critical than ever. The e-commerce product photography market isn't just a niche; it's a huge piece of the commercial photography industry, valued at around US$163.91 million in 2025 and set to keep growing.
Your product photos are a direct reflection of your brand's quality and professionalism. An amateur photo suggests an amateur product. It's that simple.
But great photos don't just live on product pages; they are powerful assets for driving engagement online. When you understand strategies to increase social media engagement, you can get so much more mileage out of every shot.
Ultimately, whether you're selling on a huge marketplace or your own website, a strong visual strategy is essential. For those building their brand on specific platforms, diving into the nuances of professional Shopify product photography can give you a significant edge over the competition.
Building Your At-Home Photography Studio
You don't need a high-end commercial space to produce incredible product photos. Honestly, the real secret is turning a small corner of your home into a controlled, predictable environment. You're not just taking a picture; you're crafting an image, and that process starts long before you press the shutter button.
And let's clear up a common myth: you don’t need to rush out and buy an expensive camera. Whether you're using a modern smartphone or a DSLR you've had for years, what truly makes a difference are the fundamentals—good lighting and stability. The key is to get your camera off its automatic settings and start telling it what to do.
Taking Control of Your Camera
Before you even think about placing your product, get comfortable with a few core settings. If you’re using a smartphone, your first move should be to tap the screen to lock the focus and exposure right on your product, not whatever is behind it. For those with a DSLR, switching over to Aperture Priority (Av) or full Manual (M) mode is a complete game-changer.
You’ll want to set your f-stop to a high number, like f/16 or higher. This creates a large depth of field, which is just a technical way of saying your entire product will be sharp and in focus from front to back. At the same time, keep your ISO as low as possible—ideally at 100—to avoid that grainy, noisy look in your final images.
This is where a tripod becomes non-negotiable. It eliminates camera shake, which allows you to use the slower shutter speeds required by a low ISO and high f-stop. The result? Crisp, perfectly clear shots, every single time.
A well-lit, stable photo from a smartphone will always look more professional than a blurry, poorly-lit shot from an expensive DSLR. Your technique matters far more than your gear.
How to Master Your Lighting
Light is the single most important element in product photography. It’s what defines the shape of your product, shows off its texture, and sets the entire mood. For an at-home setup, you basically have two options: natural light or artificial light.
Working with Natural Light
Your best, most affordable light source is a big window.
- Set up your shooting area near a window, but make sure you’re out of direct, harsh sunlight.
- What you're after is that soft, indirect light that seems to wrap around your product beautifully.
- If the sunlight is a bit too strong, you can easily diffuse it. Just hang a simple white, sheer curtain or a thin bedsheet over the window. This acts just like a professional softbox, softening shadows and giving you that high-end, polished look for free.
Creating an Artificial Light Setup
If you need consistent results at any time of day or night, an artificial light setup is the way to go. You don't need a complicated, multi-light rig to get started. A single, affordable softbox light placed at a 45-degree angle to your product can produce fantastic, professional-looking results. This setup mimics the soft quality of window light but gives you total control.
This simple diagram shows how a key light (the softbox) and a reflector work together to light a product evenly.
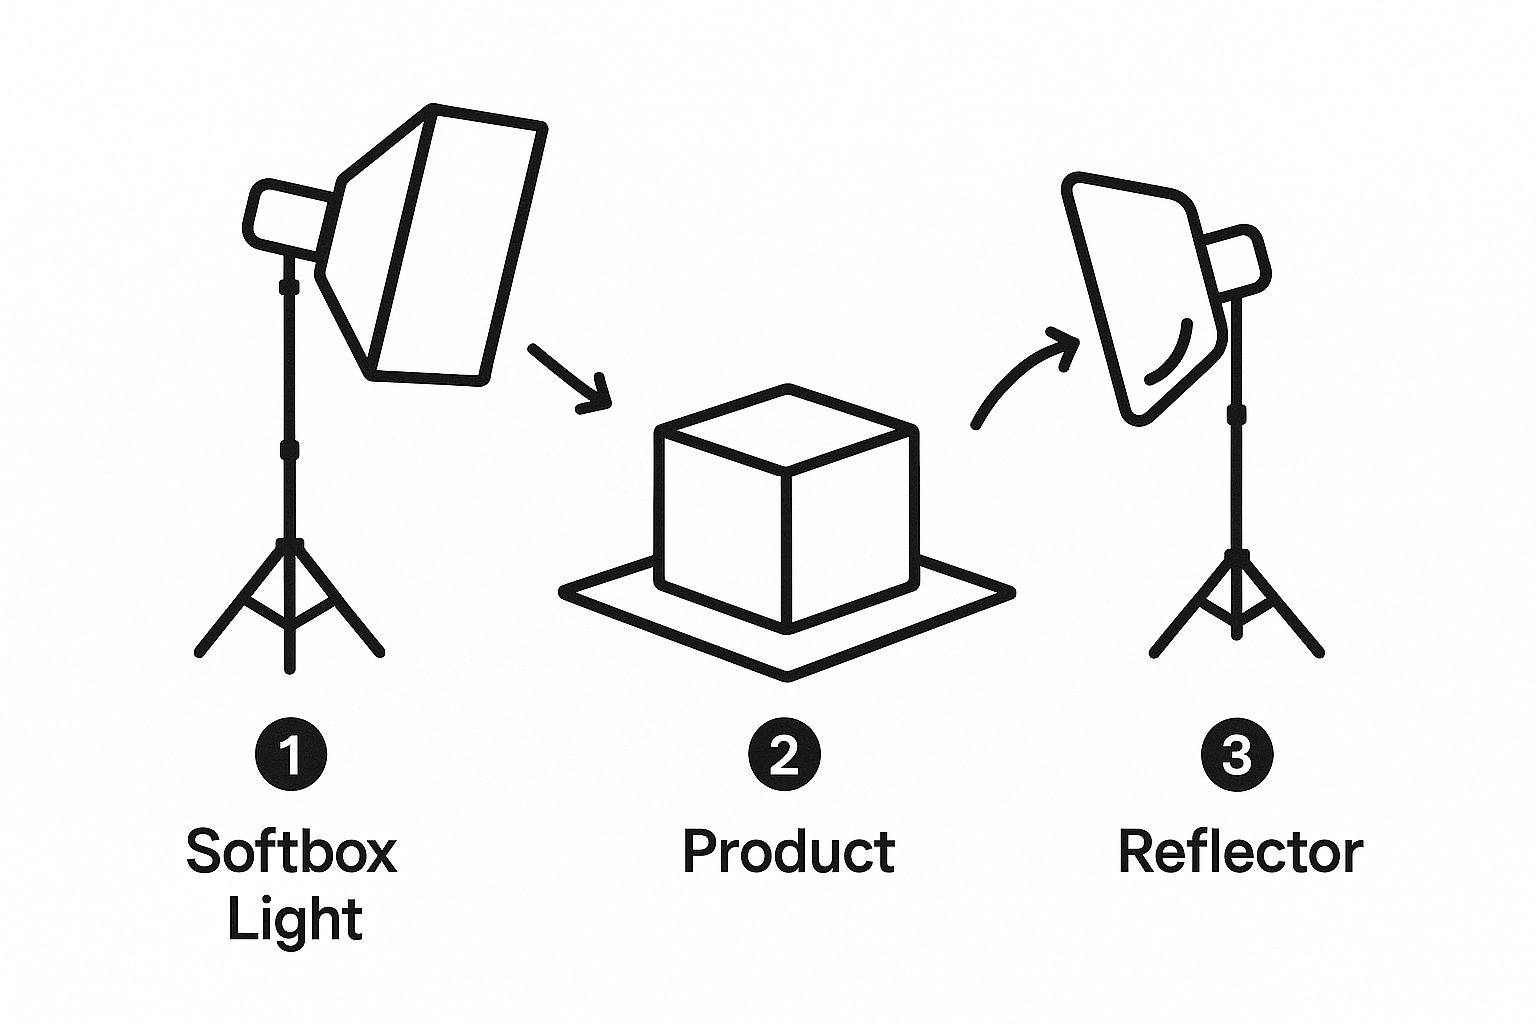
The main light provides the primary illumination, while the reflector on the opposite side bounces that light back, filling in and softening any dark shadows. It's a classic technique for a reason—it works.
The Essential White Sweep Background
For those clean, distraction-free "product-on-white" images that are standard for Amazon and other marketplaces, a white sweep is essential. This is nothing more than a flexible piece of white material—a large sheet of poster board or a roll of paper works perfectly—that curves seamlessly from behind your product down to underneath it.
This simple trick creates an "infinity" background, completely eliminating any distracting corners or horizons in your shot. Just tape the top of the paper to a wall or prop it up against some books, then let it curve gently onto your table. Place your product right in the middle, and you’ve instantly elevated your shot from a casual snapshot to a professional e-commerce photo.
Composition Techniques That Guide The Eye

This is where the real artistry begins. You can have the perfect lighting and a great camera, but if your composition is off, the photo will feel lifeless. To truly make your product photos pop, you need to think less like someone just taking a picture and more like a photographer intentionally guiding the viewer's gaze.
How you arrange your product in the frame is a powerful, silent communicator. It tells a story and creates a visual flow that makes your photos far more dynamic and engaging.
The Rule of Thirds in Product Photography
One of the oldest tricks in the book—and for good reason—is the Rule of Thirds. Imagine your screen is split into a 3x3 grid by two horizontal and two vertical lines. The goal is simple: place your product or its most important features along those lines or at the points where they intersect.
Why? Because placing a product dead-center can feel static and, honestly, a bit boring. Shifting it slightly off-center creates tension and balance, making the image more pleasing to the eye. For example, try positioning a skincare bottle along the left vertical line. This leaves some breathing room (or negative space) on the right, which you could use for text or just to give the shot a more elegant, minimalist feel.
When you use the Rule of Thirds, you're not just snapping a photo; you're designing a visual experience. It’s a subtle adjustment that immediately elevates your work, making it look deliberate and professional.
Using Leading Lines and Angles
Another powerful composition tool is leading lines. Look for elements in your scene that naturally draw the eye toward your product. This could be anything—the edge of a rustic wooden table, the gentle curve of a silk ribbon, or even the pattern on a tile floor.
Let's say you're shooting a pair of sneakers. Instead of placing them flat on the ground, you could position them at an angle on a set of stairs. The lines of the steps create a direct visual path straight to the shoes, adding a sense of depth and movement that makes the photo feel much more professional.
Varying your camera angles is just as important. Don't fall into the trap of shooting everything from eye-level.
- Front-On Angle: This is your essential, no-frills e-commerce shot. It shows the product clearly and is a non-negotiable for product pages.
- 45-Degree Angle: A fantastic way to show depth. This angle reveals the sides and top of a product, giving customers a better sense of its three-dimensional form.
- High Angle (Bird's Eye): Shooting from directly above is perfect for flat lays. Think watches, dinner plates, or any collection of items arranged beautifully.
- Detailed Close-Ups: Get in close. Really close. Highlight the unique details that justify the price tag—the texture of hand-stitched leather, the sparkle of a gemstone's facet, or the embossed logo on a piece of tech.
Develop a Comprehensive Shot List
Before you even think about picking up your camera, map out your game plan with a shot list. This simple document is your best defense against finishing a shoot and having that sinking feeling you forgot a critical angle.
Your list should cover the essential angles we just talked about, but it also needs to include in-context lifestyle shots. Showing your product in a real-world setting is how you help customers imagine it in their own lives. A wool blanket looks fine on a white background, but it looks irresistible draped over a comfy armchair next to a book and a steaming mug. That’s how you sell the feeling, not just the product.
By blending clean, informative e-commerce shots with evocative lifestyle images, you tell a complete story. This is the key to making your product photos look not just professional, but truly compelling.
Post-Processing Polish With AI Photo Editors
Snapping the picture is really just the first step. The magic that turns a decent shot into a great one—the kind that makes people click "Add to Cart"—happens in the editing phase. This is where you polish your images until they're clean, consistent, and ready to make an impact. A few years ago, this meant sinking hours into complicated software. Today, AI-powered photo editors have put professional-grade results within everyone's reach.
The editing workflow is what truly separates amateur-hour photos from the polished, professional images that drive sales. It’s not about just slapping on a filter; it's about making specific, intentional tweaks that make your product shine without distracting the buyer.
Creating The Perfect E-commerce Background
For e-commerce, the single most important edit you'll make is to the background. On marketplaces like Amazon or Walmart, a pure white background isn’t just a nice-to-have; it's often a strict requirement. This standard creates a clean, uniform shopping experience and puts all the attention exactly where it belongs: on your product.
I remember spending hours tracing product outlines with a pen tool to cut out a background. It was tedious, to say the least. Now, AI-powered tools can nail this in a single click. These smart editors identify your product's edges and cleanly remove the background with stunning accuracy, saving you an incredible amount of time.
Being able to generate a clean, white background in an instant is a total game-changer for sellers. It saves hours of work and ensures your listings meet marketplace standards, which makes your entire brand look more professional and trustworthy.
But it's not just about white backgrounds. Maybe you want to create a more compelling scene for your own website or a social media post. AI can also swap your original background with a custom lifestyle shot. Imagine placing a new skincare product on a sleek marble countertop or a ceramic vase in a beautifully lit room—all without an expensive photoshoot.
Essential Adjustments For a Flawless Finish
Once you’ve got the background sorted, a few final adjustments will really make your photo pop. These are the finishing touches that take a product from looking "good" to looking irresistible.
- Color Correction: This one is absolutely non-negotiable. Your photo must show the product's true color. Use your editing tools to adjust the white balance, saturation, and hue until what you see on screen is a perfect match for the item in your hand. Getting this right is fundamental to building trust and, more practically, reducing returns from disappointed customers.
- Realistic Shadows: When you remove a background, your product can sometimes look like it's just floating in space. Good AI tools can add subtle, realistic drop shadows that give the item a sense of weight and place, making the whole image feel more grounded and believable.
- Minor Retouching: Let's be honest, nothing is ever perfect. Tiny dust specks, a stray fingerprint, or minor scratches can catch a shopper's eye for the wrong reason. A quick pass with a spot healing or clone tool can wipe away these little imperfections for a truly flawless look.
These edits, which once demanded a lot of technical skill, are now built into many modern tools. For instance, a dedicated Shopify photo editor often integrates these features directly into your e-commerce platform, letting you handle everything without disrupting your workflow.
If you're interested in going even further, exploring the wider world of AI for content creation can give you even more ideas for creating visuals that stop the scroll. At the end of the day, a thoughtful editing process turns every single photo you post into a hard-working asset for your business.
Optimizing Your Images For SEO And Speed

You’ve done the hard work and captured some fantastic shots. But here’s something a lot of people miss: a gorgeous photo is only half the battle. If that beautiful image is so big it slows your website to a crawl, or if Google has no idea what it's looking at, all your effort goes to waste.
This final step is about making sure your visuals actually work for you. We’re talking about optimizing them for speed and search engines, which is absolutely critical for any online store. Slow-loading pages are conversion killers. The goal is to shrink your image file sizes without sacrificing that crisp, professional quality you worked so hard to achieve. Get this right, and you’ll see a direct impact on your site's performance and, ultimately, your search rankings.
Choose The Right File Format
First things first, you need to pick the right file format. This isn't just a technical detail; it’s a foundational piece of the puzzle. Each format has its own job, and using the right one from the start makes a huge difference.
- JPEG (or JPG): This is your workhorse for most product photos. JPEGs are brilliant at handling millions of colors, making them perfect for detailed shots. Best of all, they compress beautifully, giving you a great balance between quality and a small file size.
- PNG: Reach for a PNG when you need a transparent background. If you've shot your product on a white background and want to remove it for that clean, "floating" look on your site, PNG is the format that preserves that transparency. Just be aware that the file sizes are typically larger than JPEGs.
- WebP: This is the new kid on the block, developed by Google itself. WebP often delivers even better compression than both JPEG and PNG, and it handles transparency too. It's fantastic for speed, but you’ll want to double-check that your e-commerce platform or website builder fully supports it.
Tell Search Engines What They’re Seeing
Here’s a crucial fact: search engines can’t see your images. They read code. That’s where image SEO comes in. You need to give Google and other search engines clear, text-based clues about what your photos show. This is how you get your products to show up in image search results, which can be a huge source of traffic.
It starts with the file name. Never, ever upload a photo named IMG_8475.jpg. Before you upload, rename it to something descriptive that includes keywords. Think like a customer. A much better name would be blue-suede-ankle-boots.jpg.
Next up is alt text. This is a short description you add to the image in your website's backend. It’s what shows up if an image fails to load, and it’s what screen readers use to describe the image to visually impaired users. It’s also a massive signal for SEO.
A simple, effective formula I always recommend for alt text is: [Product Name] - [Key Feature or Angle]. For instance: "Crosley C6 Turntable in Walnut shown from a 45-degree angle." It’s descriptive, genuinely helpful, and packed with relevant keywords.
Remember, your professional product photos are a key asset. By integrating these small technical tweaks into a comprehensive ecommerce SEO strategy, you ensure your visuals don’t just look good—they actively contribute to higher rankings and more sales.
Common Questions About Product Photography
Even with a solid guide, a few questions always seem to pop up. Getting started with product photography can feel a little overwhelming, but you'll find that most of the common roadblocks have pretty simple solutions. Let’s walk through some of the most frequent questions I hear to get you shooting with confidence.
Can I Really Take Professional Photos With My Phone?
Yes, absolutely. The quality of modern smartphone cameras is genuinely impressive. But here's the secret: it’s less about the phone and more about how you control the environment. The real key to getting that professional look from your phone is to nail your lighting and eliminate any chance of blur.
First, always use a tripod. It’s non-negotiable for getting consistently sharp, stable images. When you're setting up your shot, tap the screen and hold your finger on the product. This simple trick locks both the focus and the exposure, stopping your phone's camera from making weird auto-adjustments mid-shoot. Trust me, a well-lit photo from an iPhone on a tripod will beat a poorly lit shot from a fancy DSLR any day.
What Is The Best Background For Product Photos?
This one really comes down to where the photo will live online. If you're shooting for an e-commerce platform like Amazon or Walmart, a pure white background is the gold standard. It’s clean, it’s consistent, and it puts all the focus squarely on your product.
But when you're creating images for your own website, social media, or ad campaigns, that's where you can get creative. A contextual background can tell a much richer story. Imagine a luxury skincare line on a cool marble slab or a rustic, handmade wallet on a warm wooden plank. The idea is to find a setting that elevates the product and reinforces your brand's story, not one that distracts from it.
Your background choice should be intentional. Pure white is for clear commerce, while styled backgrounds are for building your brand's unique identity.
How Do I Avoid Reflections On Shiny Products?
Ah, reflections. They’re the bane of many a product photographer's existence, but they’re definitely manageable. The problem isn’t your shiny product; it’s the harsh, direct light hitting it. The solution is to make your light source as large, soft, and diffused as possible.
Instead of pointing a bare light at your item, you need to soften that light. You can do this with a professional softbox, or you can DIY it by hanging a white bedsheet between the light and your setup. Another pro trick is to surround your product with white foam boards to gently bounce light back onto the object, filling in harsh shadows. Conversely, you can use black boards to absorb light and block specific, distracting reflections. It's all about experimenting with angles until you find that sweet spot. For those really tricky situations, sometimes looking into product photo editing services is the most efficient path forward.
Ready to skip the complex setups and tedious edits? ProdShot uses AI to turn your simple product pictures into stunning, professional-quality photos in seconds. Remove backgrounds, add realistic shadows, and generate custom scenes with a single click. Try it free and see the difference at https://prodshot.net.
Subscribe to my newsletter
Read articles from ProdShot Creator directly inside your inbox. Subscribe to the newsletter, and don't miss out.
Written by