Unity UI Interaction in MetaQuest
 Takashi Yoshinaga
Table of contents
- 0. Contents of This Article
- 1. Duplicating the Scene
- 2. Creating UI
- 3. Making Canvas Quest-Compatible
- 4. UI Detection Area Settings in 3D Space
- 5. Selecting Interaction Method
- 6. Button Event Settings
- 7. Testing Operation
- 8. Summary of Quest UI Interaction Setup Key Points
- 9. Complete List of Meta XR SDK Articles

0. Contents of This Article
This article introduces button interaction as an example of operating Unity UI with Meta Quest. First, we'll confirm that hands and controllers can interact with buttons, then explain how to make a Cube disappear when a button is pressed as an example of interaction.
You can also check the operation in the 05-UiInteraction or 05-UiInteraction-AR scene of the sample published on GitHub.
*This video is the AR version but supports both AR/VR.
This article assumes manipulation of cubes displayed in VR or AR scenes created in the following articles. Starting from cubes without special components added, in a state where they can only be viewed with Quest, you can achieve object manipulation by implementing the content of this article and subsequent articles if you have a similar situation in other projects.
[VR Version]
Displaying Objects in MetaQuest
[AR Version]
AR Display Using MetaQuest Passthrough
1. Duplicating the Scene
While it's possible to edit the scene created in the above articles, to try UI operation without destroying the existing scene, I'll introduce how to duplicate the scene. Skip this if unnecessary.
- Open the VR or AR scene created above
- Click File -> Save As... to save the current scene with a new name
This article uses *UiInteraction - Confirm that the scene name displayed in Hierarchy is UiInteraction
2. Creating UI
Create a button and place it in 3D space.
[Creating a Button]
- Right-click in the empty space of the Hierarchy
- Click UI -> Button - TextMeshPro
- If TMP Importer (Text Mesh Pro installer) appears, click Import TMP Essentials
- Close TMP Importer
- Confirm that Canvas and EventSystem have been added

[3D Space Placement Settings]
- Select Canvas and find the Canvas component in the Inspector
- Change Canvas Render Mode from World Space
*By default, UI is placed on screen, but this change places it in 3D space - Change Button child element PosX and PosY to 0
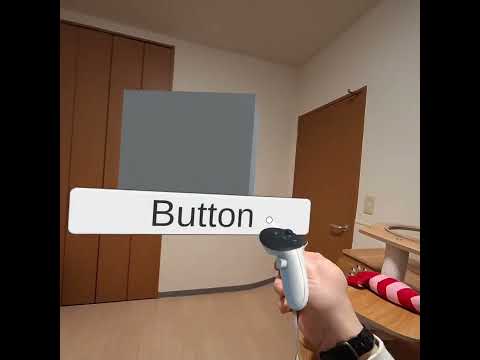
- Operate Canvas Inspector parameters to adjust UI size as follows
Position X: 0 Y: 1.2 Z: 0.8
Size Width: 200 Height: 90
Scale X: 0.003 Y: 0.003 Z: 0.003
*The white frame in the figure represents the Canvas area

3. Making Canvas Quest-Compatible
At this stage, we've only created UI and can't interact with controllers or hands used in Meta Quest, so we'll configure basic interaction settings.
[Pointable Canvas Settings]
- Click Canvas and click Add Component at the bottom of the Inspector
- Search for Pointable and click Pointable Canvas from the displayed candidates to add
- Drag and drop the Canvas object in Hierarchy to the right area of Canvas in the added Pointable Canvas

[EventSystem Settings]
- Select EventSystem in Hierarchy
- Click Add Component and search for Pointable Canvas
- Click Pointable Canvas Module to add
*Uses Pointable Canvas input provided by Meta instead of normal input - Turn ON the Exclusive Mode checkbox in Pointable Canvas Module
4. UI Detection Area Settings in 3D Space
With Meta XR SDK, you need to separately set detection areas in 3D space for interaction between UI (Canvas) and hands or controllers.
[Creating Contact Detection Object]
- Right-click in the empty space of Hierarchy and click Create Empty
- Name the generated GameObject Surface
*Any name is fine - Click Surface and pay attention to Transform
- Set Surface object position and size same as Canvas
Position X: 0 Y: 1.2 Z: 0.8
Scale X: 0.6 Y: 0.27 Z: 1
Scale is calculated as Canvas Width × Scale(x), Height × Scale(Y). Z can be anything It's okay to make it slightly larger or smaller than Canvas
[Adding Surface-Related Components]
- Click Add Component in Surface's Inspector
Search for Plane Surface and click Plane Surface to add
*This prepares the plane at Surface position (= Canvas position) for pointer contactClick Add Component in Surface's Inspector
Click Clipped Plane Surface from candidates to add
*Pointer contact detection will only occur in the clipping areaClick Add Component in Surface's Inspector
- Search for Bounds and click Bounds Clipper to add
*Script to set clipping area is added
[Associating Components]
- Pay attention to Plane Surface in Clipped Plane Surface
- Drag and drop Surface object
*Applies clipping to Surface object's plane - Open Clippers in Clipped Plane Surface and click + button
- Drag and drop Surface object to Element 0
*Clips with the area set by Bounds Clipper

[Optional]
- Finally, drag and drop Surface object to Canvas to make it a child element
- Confirm that the child Surface Position is 0 0 0 just to be safe
5. Selecting Interaction Method
Set whether UI responds to Rays from controllers or hands, or Poke operations touching UI directly nearby. You can set either one or both.
[Remote Operation Using Ray]
- Click Canvas and click Add Component at the bottom of the Inspector
- Search for Ray Interactable and add Ray Interactable from displayed candidates
- Drag and drop Canvas object to Pointable Element in the added Ray Interactable
*Links Ray operation and Pointable Canvas to enable UI operation within Canvas - Drag and drop Surface object to Surface in Ray Interactable
- If a dialog appears, select ClippedPlaneSurface
*Enables interaction only in the area set by Clipped Plane Surface
[Proximity Operation Using Poke]
- Click Canvas and click Add Component at the bottom of the Inspector
- Search for Poke Interactable and add Poke Interactable from displayed candidates
- Drag and drop Canvas object to Pointable Element in the added Poke Interactable
*Links Poke operation and Pointable Canvas to enable UI operation within Canvas - Drag and drop Surface object to Surface Patch in Poke Interactable
- If a dialog appears, select ClippedPlaneSurface
*Enables interaction only in the area set by Clipped Plane Surface

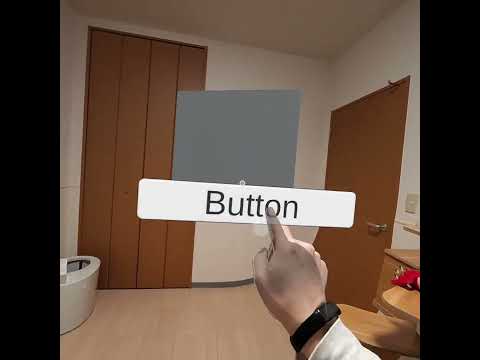
[Basic Interaction Confirmation]
With the above operations, interaction with buttons becomes possible. When testing operation, you can confirm that the button color changes slightly when clicking the button as in the following video.
6. Button Event Settings
The settings here are not specific to Meta XR SDK but relate to general Unity UI behavior. As an example, let's make the Cube disappear when a button is pressed.
- Click Button and find On Click in the Inspector
- Click the + button at the bottom right
- Drag and drop Cube to the area marked None in the newly added area
- Open the dropdown menu marked No Function
- Click GameObject -> SetActive
- Confirm that the checkbox is OFF
- This will make Cube inactive when the button is pressed
7. Testing Operation
[Installing on Actual Device]
- Connect Quest and PC with USB cable
- Click File -> Build Settings in Unity Editor
- Click Build And Run
- Set installer (apk) name in alphanumeric characters and save
[Using Meta Quest Link (Windows)]
- Connect Quest and PC with USB cable
- Start Quest Link in Quest
- Click the Play button in Unity Editor
You can confirm that the Cube disappears when clicking the button with either Ray or Poke.

8. Summary of Quest UI Interaction Setup Key Points
Since the operation procedures were numerous, here's a summary of key points required for Quest UI interaction.
[Making Canvas Quest-Compatible]
- Attach Pointable Canvas to Canvas
[Making EventSystem Quest-Compatible]
- Attach Pointable Canvas Module to EventSystem
[Define UI Position and Range for Quest Interaction]
- Define plane with Plane Surface (infinite plane)
- Limit range with Clipped Plane Surface and Bounds Clipper
[Specify Interaction Method]
- Ray Operation: Add Ray Interactable to Canvas
- Poke Operation: Add Poke Interactable to Canvas
With the above settings, Unity UI interaction with Meta Quest becomes possible.
9. Complete List of Meta XR SDK Articles
Subscribe to my newsletter
Read articles from Takashi Yoshinaga directly inside your inbox. Subscribe to the newsletter, and don't miss out.
Written by