Ray Interaction in MetaQuest
 Takashi Yoshinaga
0. Contents of This Article
This time we'll cover interaction with pointers (Rays) emitted from controllers or hands in Meta Quest. Specifically, we'll introduce procedures to implement Hover (pointing) and selection (click) detection using Rays.
You can also check the operation in the 04-RayInteraction or 04-RayInteraction-AR scene of the sample published on GitHub.
*This video is the AR version but supports both AR/VR.
This article assumes manipulation of cubes displayed in VR or AR scenes created in the following articles. Starting from cubes without special components added, in a state where they can only be viewed with Quest, you can achieve object manipulation by implementing the content of this article and subsequent articles if you have a similar situation in other projects.
[VR Version]
Displaying Objects in MetaQuest
[AR Version]
AR Display Using MetaQuest Passthrough
1. Duplicating the Scene
While it's possible to edit the scene created in the above articles, this chapter introduces how to duplicate the scene to try Ray interaction without destroying the existing scene. Skip this if unnecessary.
- Open the VR or AR scene created in the above articles
- Click File -> Save As... to save the current scene with a new name
*This article uses RayInteraction - Confirm that the scene name displayed in Hierarchy is RayInteraction
2. Enabling Ray-Object Intersection Detection
To implement interaction with Rays, add a script to the object that detects interaction with Rays.
- Select the target object (Cube) in the Hierarchy
- Confirm that BoxCollider is applied in the Cube details displayed in the Inspector
For objects other than Cube, set Colliders appropriate for each object For custom models, manually add Colliders - Click the Add Component button at the bottom of the Inspector
- Enter Interactable in the search area
- Select Ray Interactable from the displayed candidates
When you check the added Ray Interactable, the Surface item shows None. This item is required as it registers the shape for determining Ray intersection with Ray Interactable.
- Click Add Component at the bottom of Cube's Inspector
- Search for Collider and select Collider Surface
- Drag and drop Cube to Collider Surface
*Uses Cube's collider shape as the shape for intersection detection - Drag and drop Cube to Surface in RayInteractable
*Registers the shape information (Surface) created above to RayInteractable

3. Getting Ray Interaction Events
With the above operations, you're ready for Ray interaction, so add functionality to receive Hover (pointing) and selection (click) as events.
- Select Cube in the Hierarchy
- Search for Interactable in Add Component at the bottom of Cube's Inspector
- Select Interactable Unity Event Wrapper
- Drag and drop Cube to Interactable View in Interactable Unity Event Wrapper
*Registers Ray Interactable to connect to Hover and Select event firing
4. Testing Ray Interaction Operation
Actually receive events and test operation. This article displays Hover and Select states as text.
- Right-click in the empty space of the Hierarchy
- Click 3D Object -> Text - TextMeshPro
*If TextMeshPro is not installed, install TextMeshPro following the dialog instructions. (Sample installation is unnecessary) - Change Text(TMP) settings in the Inspector as follows to display text above the Cube

- Pay attention to TextMeshPro-Text in the Inspector
- Change text alignment to center in Alignment
- Click Cube and pay attention to Interactable Unity Event Wrapper in the Inspector
- Click + at the bottom right of WhenHover
- Drag and drop Text(TMP) to the area marked None
- Open the dropdown menu marked NoFunction
- Click TextMeshPro -> string text
- Enter the text you want to display when Hover starts in the text area below the dropdown menu (example: Hover)

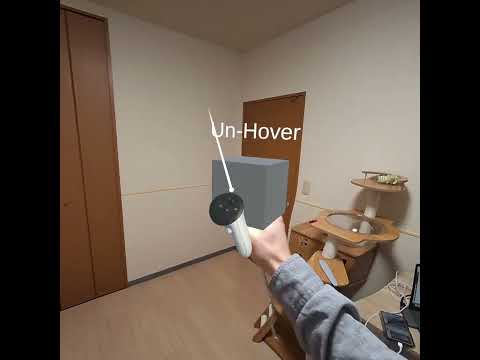
- The above operation will display Hover when Hover (pointing) starts. Set text to display for the following events in the same way
When Unhover() : Un-Hover
When Select() : Select
When Unselect() : Un-Select

When testing operation, Hover or Un-Hover is displayed when Ray intersection starts and ends as in the opening video, and Select, Un-Select is displayed when finger pinch or controller trigger press starts and ends.
5. Complete List of Meta XR SDK Articles
Subscribe to my newsletter
Read articles from Takashi Yoshinaga directly inside your inbox. Subscribe to the newsletter, and don't miss out.
Written by