Displaying Objects in VR with MetaQuest
 Takashi Yoshinaga
0. Contents of This Article
This article introduces the steps to display 3D objects (cubes) in VR with Meta Quest. You'll learn the fundamentals of VR applications, from basic camera setup with Meta XR SDK to object placement and testing on actual hardware.
You can also check the operation in the 01-ShowObject scene of the sample published on GitHub.
This article continues from the following. Please check if your settings match.
Meta XR SDK Installation and Project Setup
1. Creating a Scene
[Creating a New Scene]
- Click File -> New Scene
- Select Basic(URP) in the New Scene window and click Create

- Click File -> Save
- Set the scene name and save
This article uses *ShowObject
2. Setting Up the Quest Camera
[Placing the Camera Rig]
- Delete the Main Camera in the Hierarchy
- Enter CameraRig in the Project tab search area
- Select All from Search: directly under the search area
- Drag and drop OVRCameraRig into the Hierarchy
- If Project Setup Tool Fix Available appears, click Fix

[OVR Manager Configuration]
- Click OVRCameraRig in the Hierarchy
- Find OVR Manager in the Inspector to set detailed information for Quest
- Select Floor Level for Tracking Origin Type in the Tracking item
*Tracking Origin Type is important for determining the origin height
| Mode | Description |
| Floor Level | Floor height is the origin |
| Eye Level | Quest height when the app starts is the origin |
Select Floor Level if you want to fix object display height relative to the room, and select *Eye Level if you want to fix objects relative to Quest's initial position.
3. Displaying Controllers and Hands
This article doesn't introduce interactions with hands or controllers, but these will be used in subsequent articles. Also, it's enjoyable to visually confirm that hands and controllers are recognized by Quest during testing, so I'll introduce the setup procedure.
[Adding Interaction Features]
- Enter OVRInteractionComprehensive in the Project tab search area
- Select All from Search: directly under the search area
- Drag and drop OVRInteractionComprehensive into OVRCameraRig as a child element

[Hand Tracking Configuration]
- Click OVRCameraRig in the Hierarchy
- Find OVR Manager in the Inspector to set detailed information for Quest
- Find Hand Tracking Support in the Quest Features section and select your preferred mode
This series assumes *Controllers and Hands is selected.
| Setting Name | Description |
| Controllers Only | Only controllers work, hand tracking is disabled |
| Controllers and Hands | Both controllers and hand tracking work |
| Hands Only | Only hand tracking works |
[Always Display Controller Ray (Optional)]
The Ray object that indicates the controller's pointing direction is not always displayed. Of course, this is fine as is, but if you want the Ray object to always be displayed, you can set it up with the following procedure.
- Open LeftInteractions child element of OVRInteractionComprehensive
- Further open Interactors -> Controller -> ControllerRayInteractor -> Visuals
- Click ControllerRay child element of Visuals
- Pay attention to Controller Ray Visual in the Inspector
- Turn OFF the Hide When No Interactable checkbox
- Perform the same operation for RightInteractions to set the right hand Ray

4. Object Placement
[Creating a Cube]
- Right-click in the empty space of the Hierarchy with no other objects selected
- Click 3D Object -> Cube

[Position and Size Adjustment]
- Click the Cube added to the Hierarchy
- Set the Cube's position, rotation, and size in the Transform section of the Inspector
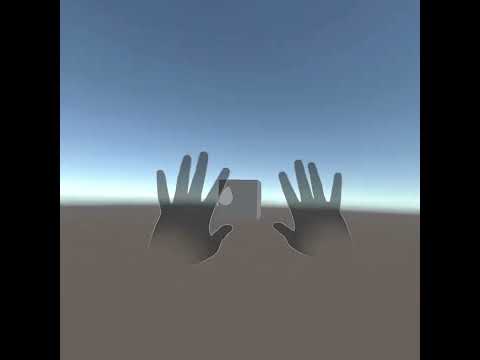
*This article uses the following settings to display a slightly tilted 0.3m cube at 1.3m height from the floor, 1m ahead from the origin
| Item | X | Y | Z |
| Position | 0 | 1.3 | 1 |
| Rotation | 0 | 20 | 0 |
| Scale | 0.3 | 0.3 | 0.3 |

5. Testing
[Installing on Actual Device]
- Connect Quest and PC with USB cable
- Click File -> Build Settings in Unity Editor
- Click Build And Run
- Set installer (apk) name in alphanumeric characters and save
- After installer generation and installation complete, the app automatically starts in Quest
- A cube should appear in front of you. If it appears in a different direction, press and hold the meta (oculus) button on the right controller to reset orientation
- If installation errors occur, review settings or create only the apk with Build and install the app from SideQuest or MetaQuestDeveloperHub
[Using Meta Quest Link (Windows)]
For details, see the official page.
- Connect Quest and PC with USB cable
- Start Quest Link in Quest
- Click the Play button in Unity Editor
- A cube should appear in front of you. If it appears in a different direction, press and hold the meta (oculus) button on the right controller to reset orientation
6. Next Steps
You've now achieved basic object display in VR. Next, we'll explain AR display using the passthrough feature.
AR Display Using MetaQuest Passthrough
7. Complete List of Meta XR SDK Articles
Subscribe to my newsletter
Read articles from Takashi Yoshinaga directly inside your inbox. Subscribe to the newsletter, and don't miss out.
Written by