🍃 Understanding Node.js Streams and Buffers: A Practical Guide 🍃
 Soumadip Majila
Table of contents

Streams and buffers are essential concepts in Node.js that help handle data efficiently—especially for large files, real-time applications (like YouTube or Netflix 🎥), and network operations.
Let’s break them down step by step so you understand how they work, why they matter, and how to use them in real-world apps. 💡
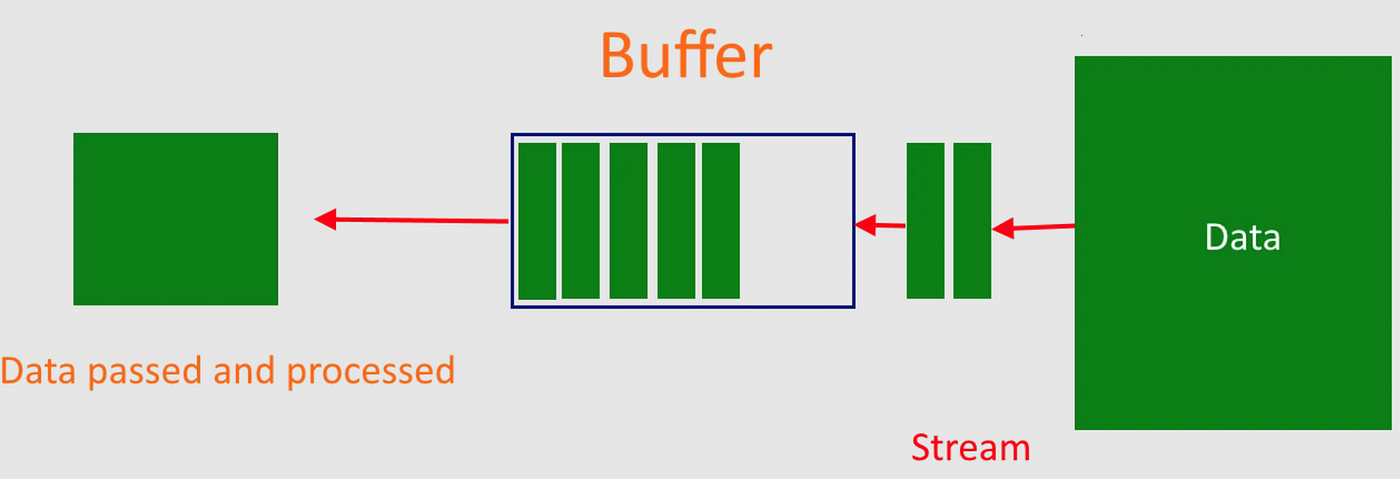
1. What is a Buffer? 🧠 (Temporary Data Storage)
Definition
A Buffer is a temporary storage area in memory that holds binary data (0s and 1s) while it’s being moved from one place to another.
Why Do We Need Buffers?
Computers process data faster than networks can transfer it. ⚡
Without a buffer, data could be lost if the sender is too fast or the receiver is too slow. 🚫
Buffers balance speed differences between data producers (senders) and consumers (receivers). ⚖️
Buffers in Node.js
Node.js has a built-in Buffer class to work with binary data.
Example:
When you read a file or receive data over the internet, Node.js stores chunks of data in a buffer before processing them.
// Creating a buffer from a string
const buf = Buffer.from('Hello', 'utf8');
console.log(buf); // <Buffer 48 65 6c 6c 6f> (binary representation)
48 65 6c 6c 6fis the hexadecimal (binary) form of "Hello".
Key Takeaway:
Buffers store raw binary data temporarily before it’s processed. 🔄
2. What Are Streams? 🌊 (Data in Motion)
Definition
A Stream is a way to read or write data in small chunks instead of loading everything at once.
Why Use Streams?
Efficient Memory Usage: No need to load a 10GB file fully into RAM. 🐘➡️🐜
Faster Processing: Start working on data immediately (e.g., video streaming). ⏩
Real-Time Data Handling: Useful for live data (chat apps 💬, stock prices 📈).
How Streams Work?
Instead of waiting for all data to load:
Data is split into small chunks (buffers).
Each chunk is processed one by one.
📌 Real-World Example:
When you watch Netflix:
The video doesn’t download fully before playing.
Instead, small chunks load continuously (streaming).
3. Types of Streams in Node.js 🔄
There are 4 main types of streams:
| Type | Description | Example |
| Readable | Can read data (but not write) | Reading a file (fs.createReadStream) 📖 |
| Writable | Can write data (but not read) | Writing to a file (fs.createWriteStream) ✍️ |
| Duplex | Can both read & write (like a two-way pipe) | WebSocket connections 🔄 |
| Transform | A modified duplex stream (changes data while reading/writing) | Compression (e.g., zlib) 🏗️ |
4. Practical Example: Reading a File with Streams 📂
Problem:
If you try to read a 5GB file at once:
Your app will crash (out of memory). 💥
It will be slow (waits for full load). 🐢
Solution: Use a Readable Stream
const fs = require('fs');

// Create a readable stream (reads in chunks)
const readStream = fs.createReadStream('bigfile.txt', {
  highWaterMark: 90000, // Chunk size = ~90KB
});

// Process each chunk
readStream.on('data', chunk => {
  console.log(`Received ${chunk.length} bytes of data.`);
});
What Happens?
File is read in small chunks (90KB each).
Each chunk is stored in a buffer.
The
'data'event fires for each chunk.
Output:
Received 90000 bytes of data.
Received 90000 bytes of data.
...
Handling Binary Data
By default, streams return binary (Buffer) data. To convert it:
// Option 1: Set encoding to 'utf8'
const readStream = fs.createReadStream('file.txt', { encoding: 'utf8' });

// Option 2: Convert chunk to string
readStream.on('data', chunk => {
  console.log(chunk.toString()); // Convert buffer to text
});
5. Creating Custom Streams 🛠️
A. Writable Stream (Writing Data)
A Writable Stream lets you send data to a destination (file, network, console, etc.).
How to Create One?
const { Writable } = require('stream');

// Step 1: Create a writable stream
// The configuration object has several important methods, but write is the most crucial
const writableStream = new Writable({
  // Step 2: Define the 'write' function (required)
  write(chunk, encoding, callback) {
    // chunk = data being written (Buffer by default)
    // encoding = string format (like 'utf8')
    // callback = MUST call when done processing

    console.log(`Received data: ${chunk.toString()}`); // Process data
    callback(); // Signal completion
  },
});

// Step 3: Write data to it
writableStream.write('Hello! 👋');
writableStream.write('Node.js is awesome!');
writableStream.end(); // Close the stream
Key Points:
✔ write() is the core method—it processes incoming data.
✔ callback() must be called to avoid memory leaks.
✔ Real-world use: Writing to files, sending HTTP responses.
B. Readable Stream (Producing Data)
A Readable Stream lets you read data from a source (file, keyboard input, etc.).
How to Create One?
const { Readable } = require('stream');

// Step 1: Create a readable stream
// The configuration object has several important methods, but read is the most crucial
const readableStream = new Readable({
  // Step 2: Define the 'read' function (required)
  read(size) {
    // 'size' = how many bytes to read (optional)
    // Here, we manually push data
  },
});

// Step 3: Add data to the stream
readableStream.push('First chunk 🍕');
readableStream.push('Second chunk 🍔');
readableStream.push(null); // Signals "no more data"

// Step 4: Read the data (using 'data' event)
readableStream.on('data', chunk => {
  console.log(`Chunk received: ${chunk.toString()}`);
});
Key Points:
✔ push() adds data to the stream.
✔ push(null) means "done sending data."
✔ Real-world use: Reading files, HTTP requests.
C. Transform Stream (Modifying Data)
A Transform Stream modifies data while passing it through (like a filter).
How to Create One?
const { Transform } = require('stream');

// Step 1: Create a transform stream
const uppercaseTransform = new Transform({
  // Step 2: Define the 'transform' function (this is a required method for custom Transform streams)
  transform(chunk, encoding, callback) {
    // Convert the chunk (Buffer or string) to a string and then to uppercase
    const uppercased = chunk.toString().toUpperCase();

    // Pass the transformed data (in uppercase) to the next stream
    callback(null, uppercased); // First argument is error (null means no error)
  },
});

// Step 3: Use it in a pipeline(discuss letter)
process.stdin // Read from keyboard
  .pipe(uppercaseTransform) // Transform to uppercase
  .pipe(process.stdout); // Write to console
Try It Out:
Run this code in Terminal.
Type anything → it gets uppercased instantly!
Key Points:
✔ transform() modifies data before passing it forward.
✔ callback() must be called to avoid memory leaks. It passes data to the next stream.
✔ Real-world use: Compression, encryption, data parsing.
6. Piping Streams 🔗 (Connecting Streams Easily)
The pipe() method creates a direct connection between streams - imagine linking garden hoses to move water from source to destination. It's the simplest way to move data between streams.
Example: Copy a File
const fs = require('fs');

// 1. Create a readable stream (water source)
const reader = fs.createReadStream('input.txt');

// 2. Create a writable stream (water destination)
const writer = fs.createWriteStream('output.txt');

// 3. Connect them with pipe
reader.pipe(writer);

console.log('Copying started... check output.txt!');
What's happening:
readerpulls data in chunks from input.txtEach chunk automatically flows through the "pipe"
writerreceives and saves each chunk to output.txtNo manual chunk handling needed!
Using pipeline() (Better Error Handling)
While pipe() works great, pipeline() is better because:
Properly cleans up all streams when done
Handles errors in any connected stream
Supports multiple streams in chain
const { pipeline } = require('stream');
const zlib = require('zlib');

// Chain multiple streams safely:
pipeline(
  fs.createReadStream('bigfile.txt'), // 1. Read
  zlib.createGzip(), // 2. Compress
  fs.createWriteStream('archive.gz'), // 3. Write
  err => {
    if (err) {
      console.error('Oops!', err.message);
    } else {
      console.log('File compressed successfully! 🎉');
    }
  }
);
7. 🧠 What is Object Mode in Streams?
By default, Node.js streams work with Buffer or string data — especially useful for files, network streams, etc.
But when you want to stream JavaScript objects, you need to enable Object Mode.
✅ Why Do We Need Object Mode?
Regular streams treat all data as binary (Buffer) or strings.
If you try to push a JavaScript object (
{name: 'Alice'}), it will throw an error.With objectMode: true, streams can handle non-buffer, non-string data — like full objects, arrays, numbers, etc.
🧪 Example Without Object Mode
const { Readable } = require('stream');

const readableStream = new Readable({
  read() {},
});

readableStream.push({ name: 'John Doe', age: 30 }); // ❌ Throws an error: Invalid non-string/buffer chunk

readableStream.on('data', chunk => {
  console.log(`Chunk received: ${chunk}`);
});
This will crash because streams by default expect Buffer or string chunks.
✅ Enabling Object Mode
const { Readable } = require('stream');

const readableStream = new Readable({
  objectMode: true, // 🔑 Enabling object mode
  read() {},
});

readableStream.push({ name: 'Alice' });
readableStream.push({ name: 'Bob' });
readableStream.push(null); // end the stream

readableStream.on('data', chunk => {
  console.log(`Chunk received: ${JSON.stringify(chunk)}`); //JSON.stringify converts the object to a string
});
🟢 Output:
Chunk received: {"name":"Alice"}
Chunk received: {"name":"Bob"}
📦 Object Mode in Other Stream Types
Readable Streams – For reading objects (like rows from DB, lines, or JSON).
Writable Streams – To write objects (e.g., send logs or write to a DB).
Transform Streams – Transform objects from input to output (like modifying JSON records).
Example: Object Mode Transform Stream
const { Transform } = require('stream');

const toUpperCase = new Transform({
  objectMode: true,
  transform(chunk, encoding, callback) {
    chunk.name = chunk.name.toUpperCase();
    callback(null, chunk);
  },
});

toUpperCase.on('data', data => console.log(data));

toUpperCase.write({ name: 'alice' }); // ➜ { name: 'ALICE' }
toUpperCase.write({ name: 'bob' }); // ➜ { name: 'BOB' }
🛠 Use Cases for Object Mode
Streaming data from a database (e.g., MongoDB rows)
JSON API response processing
Logging systems
Processing IoT sensor data
Pipelines for data processing (ETL)
The Bottom Line 🏁
Node.js streams and buffers aren’t magic—they’re smart engineering for handling data efficiently:
✔️ Buffers store binary data temporarily (no data loss!)
✔️ Streams process data in chunks (perfect for large files)
✔️ Object Mode lets you stream full JavaScript objects
✔️ Pipe & Transform for easy data workflows
Next time you process a big file or stream real-time data, remember—it’s not just about moving data, it’s about doing it smarter with Node.js streams! 🚀
Thanks for reading! 🙏 If this helped, share the knowledge! 📢💡 Got Q’s? Ask away! 💬👇
Catch you in the next one – keep coding & having fun! 🎉
Subscribe to my newsletter
Read articles from Soumadip Majila directly inside your inbox. Subscribe to the newsletter, and don't miss out.
Written by