How to Do Product Photography: Tips to Boost Sales
 ProdShot Creator
Getting the hang of product photography isn't as complicated as it sounds. At its core, it's about nailing three things: good lighting, a clean background, and a steady camera. If you can master those basics, even just with your smartphone, you're already on your way to creating images that can seriously lift your brand and boost your sales.
Your Photos Are Your Hardest-Working Salesperson
Before we get into the nuts and bolts, let's talk about why this is so important. In the world of e-commerce, your product photos are doing the heavy lifting. They're on the clock 24/7, grabbing attention, building trust, and convincing shoppers to hit that "add to cart" button. In most cases, they're the very first handshake between your brand and a potential customer.
Just think about how you shop online. When you land on a product page, you probably head straight for the images, right? You want to see the item from every conceivable angle, zoom in on the textures, and picture it in your own hands. If you’re met with blurry, dark, or just plain unappealing photos, it creates an instant sense of doubt.
The bottom line is, your customers can't physically touch or try out your product. It’s up to your photos to fill that gap. They have to do all the work of conveying quality, detail, and value to help someone make a confident buying decision.
This isn't just about aesthetics; it's a core business strategy that directly impacts your revenue.
The Numbers Don't Lie
The power of great visuals isn't just a gut feeling; the data is crystal clear. There's a reason the commercial photography market is a massive, multi-billion dollar industry. Simply put, great images sell.
Studies have found that a staggering 67% of online shoppers say image quality is the most important factor in their decision to buy. That means they care more about the photos than the product description or even customer reviews. You can dig into more of these fascinating product photography statistics on electroiq.com.
So, what does that mean for your business? Better images deliver real, measurable results:
- More Sales: Switching to professional-quality photos can bump up your conversion rate by nearly 9.5%. It's simple—good photos signal a quality product and a trustworthy brand.
- Fewer Returns: When your pictures are clear, detailed, and accurate, customers know exactly what they’re getting. This sets the right expectations from the start and can dramatically lower your return rate.
- A Stronger Brand: Consistent, polished imagery across your website, social media, and marketplaces like Amazon is how you build a memorable brand. Our guide to professional Amazon product photography dives deeper into creating that cohesive look.
This principle extends everywhere you show up online. For example, if you're trying to figure out how to effectively grow your Instagram followers, you'll quickly find that a feed full of stunning product shots is non-negotiable.
Ultimately, taking the time to learn product photography is one of the single most impactful things you can do for your e-commerce business.
Your Smart Product Photography Toolkit
Let's debunk a myth right away: you don't need a professional studio to create product photos that actually sell. In my experience, some of the best, most compelling shots come from scrappy setups using items you probably already own. The key isn't a massive budget; it's about being smart with your resources.
The most important tool for the job is already in your pocket. Modern smartphones have phenomenal cameras, packing features that, just a few years ago, would have required a pricey DSLR. Dive into your phone's camera settings and find the "Pro" or "Manual" mode—this gives you direct control over focus, exposure, and white balance, which is where the magic really happens.
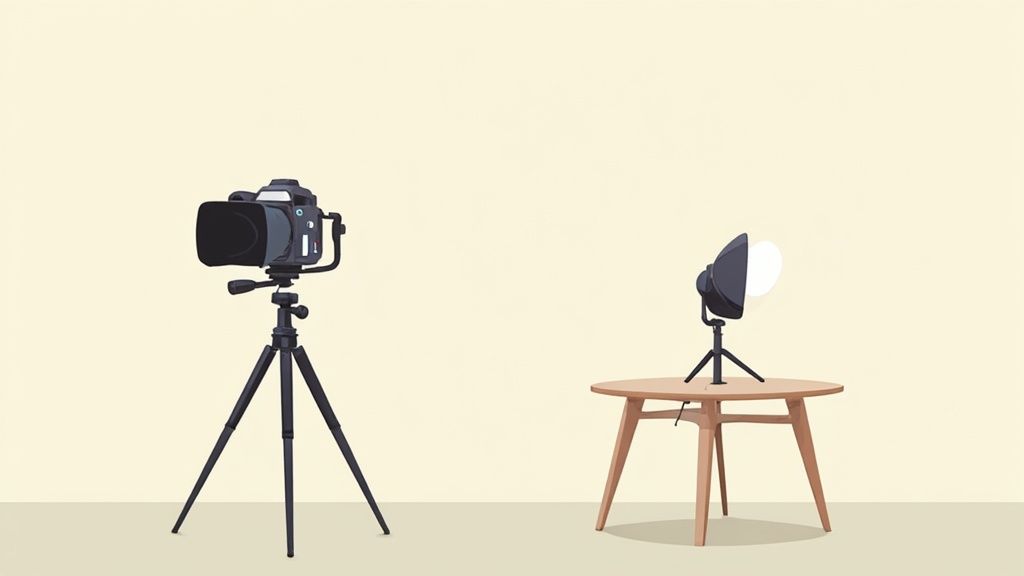
Building Your Mini-Studio on a Budget
With your camera ready, the next move is to create a small, controlled space. Don't overthink it. Your mission is simple: achieve total stability and get a handle on your lighting and background. Get these right, and you've won half the battle.
Here’s what I consider the absolute bare-bones starter kit:
- A Basic Tripod: This is non-negotiable. Shaky hands are the #1 enemy of crisp, professional photos. You can grab a solid smartphone tripod online for less than $30, and it will immediately improve your consistency.
- White Poster Board: This is your secret weapon for a clean, seamless look. Just grab a flexible piece of white poster board, tape one end to a wall, and let it curve down onto a table. This creates an "infinity sweep" that makes your product look like it's floating in a professional studio.
- Natural Light: The best light source is completely free. Set up your little studio near a large window to capture that soft, diffused light that makes almost any product look incredible. Just be sure to avoid direct, harsh sunlight, which creates distracting, hard-edged shadows.
My Favorite Pro-Tip: I always keep a couple of cheap foam boards from the craft store on hand. A white one is perfect for bouncing light back onto your product, filling in any dark shadows. A black one does the opposite—it absorbs light, helping you add depth and create more dramatic, moody shots.
Essential vs. Optional Photography Gear
It’s easy to get caught up in buying fancy gear, but it's important to know what you truly need versus what’s just nice to have. I always advise starting with the basics. Master them first, and you'll have a much better idea of what to upgrade later on, if you even need to.
Here’s a quick table to help you distinguish between the essentials and the upgrades.
Essential vs. Optional Photography Gear
| Gear Category | Essential Item (Budget-Friendly) | Optional Upgrade (For Better Results) |
| Camera | Your existing smartphone with manual controls | A dedicated DSLR or mirrorless camera |
| Stability | A simple, lightweight smartphone tripod | A sturdier tripod with a fluid head for smoother adjustments |
| Background | White poster board or seamless paper roll | A dedicated pop-up lightbox or various fabric backdrops |
| Lighting | Natural light from a large window | An external LED light panel with a softbox |
| Light Control | White and black foam boards for reflection/absorption | Professional-grade reflectors and diffusers |
By starting with these core, budget-friendly items, you’re building a repeatable process that will deliver consistently great results. This simple toolkit gives you all the control you need to shape your product's visual story. It's proof that you don't need to break the bank to produce images that stop the scroll and build your brand.
Setting the Scene for Perfect Product Shots
Alright, you’ve got your simple toolkit ready. Now comes the fun part: bringing your products to life. We’re moving from theory to practice here, and the goal is to build a repeatable process that delivers consistently great photos. This isn't about getting lucky with one good picture; it's about creating a system you can count on every single time.
This hands-on stage is where many people feel a bit intimidated, but honestly, it’s the most creative part of the job. It’s all about shaping light, finding killer angles, and making your product the undeniable star of the show.
Crafting the Perfect Background
First things first, let’s get that background sorted. Remember that white poster board we talked about? This is its moment to shine. The idea is to create a seamless “infinity sweep” that completely eliminates distracting lines and corners. This simple trick makes your product look like it’s floating in a clean, professional space.
Here’s how I always set mine up:
- Grab a table and push it up against a wall.
- Tape the top edge of your poster board to the wall, maybe two or three feet up.
- Let the rest of the board curve down naturally onto the table. The key is to avoid a hard crease—you want a gentle, smooth slope.
- A little tape on the front corners of the board will keep it from curling up.
That’s it. This quick setup instantly removes any background clutter, guiding the customer's eye right where you want it: on your product.
The Art of Product Positioning
With your stage set, it's time for the main event—placing your product. This sounds easy, but tiny adjustments can make a world of difference. Place your item right in the center of the flat part of your poster board, making sure there's enough breathing room around it so you don't feel cramped when shooting.
For things like bottles or jars, a common mistake is getting the label just slightly off-center. Take a moment to rotate it until it’s facing the camera head-on. If you’re shooting clothing, make sure it’s ironed and folded neatly. These tiny details communicate a level of care and quality that customers absolutely notice.
A well-composed shot begins before you even touch your camera. Spend a minute or two making tiny adjustments to your product’s position. A slight turn or a minor shift can reveal a more flattering angle or highlight a key feature.
This is also where you start thinking about the story you want to tell. With the e-commerce market growing so rapidly, visual storytelling is more critical than ever. In fact, the international product photography market was valued at $129 million in 2021 and is projected to hit $275 million by 2028, largely driven by this need for compelling imagery. Your careful positioning is the first step in creating a photo that doesn't just show a product but actually sells it. You can dig into this trend by checking out these photography industry insights on greatbigphotographyworld.com.
Mastering Light with a Single Window
Your lighting will either make or break your photos. The good news? The best light source is completely free. All you need is a large window with indirect sunlight. Direct, harsh sun creates dark, ugly shadows that hide important details. You want the soft, diffused light you get on a slightly overcast day or from a window that isn't getting blasted by direct sun.
Set up your table so the window is to the side of your product, at about a 90-degree angle. This is called side lighting, and it’s fantastic for creating depth and dimension. The side of your product closer to the window will be nicely lit, while the other side will fall into a soft shadow.
Now, grab that white foam board. Place it on the side of your product opposite the window. Its job is to act as a reflector, bouncing that beautiful window light back into the shadows and brightening them up.
- Move the reflector closer to your product to fill in more shadow for a brighter, more even look.
- Move it farther away to increase the shadow for a more dramatic, moody effect.
This one simple technique gives you an incredible amount of control over your lighting with almost no gear.
Smartphone Camera Tricks for Pro-Level Shots
Your smartphone is way more powerful than you probably think. The secret to unlocking its potential is to take back control from the automatic settings.
Lock Your Focus and Exposure
One of the most important tricks in the book is locking your focus and exposure. On most phones, you just tap and hold on the screen right where your product is. You'll see a box or circle appear, often with a little sun icon next to it.
- AE/AF Lock: This stands for Auto Exposure/Auto Focus Lock. It tells your camera to stop trying to readjust if you move slightly, which is key for consistent shots.
- Adjust Brightness: Once it's locked, you can usually slide your finger up or down to manually make the image brighter or darker. Tweak it until your product looks perfectly lit.
Use Gridlines for Better Composition
Hop into your camera’s settings and turn on the gridlines. This overlays a simple 3x3 grid on your screen, which is a massive help for using the Rule of Thirds—a fundamental principle of great composition. Instead of sticking your product dead center, try positioning it along one of the vertical lines or at a point where two lines intersect. It almost always creates a more dynamic and visually interesting image.
Capturing a Complete Set of Images
A single photo is rarely enough to close a sale. Online shoppers want to see your product from every angle, just like they would if they could pick it up in a store. Your goal should be to create a full set of images for every single product.
Make sure you capture these key shots:
- The Hero Shot: A clean, straight-on front view.
- Profile Shots: From both the left and right sides.
- The Back Shot: Don't leave customers guessing what the back looks like.
- 45-Degree Angle: This is a classic shot for showing depth.
- A Top-Down View: Perfect for flat items or showing everything in a kit.
- Macro/Detail Shot: Get in close to highlight texture, materials, or quality details like stitching or an engraving.
Shooting this full set proactively answers customer questions, builds trust, and removes any hesitation to buy. By creating this simple workflow—from background setup to capturing every angle—you’ll have a reliable system for producing amazing product shots every single time.
Editing Like a Pro with AI Photo Tools
Getting the shot is a big win, but the real transformation from "good enough" to "must-have" happens during the edit. This is where you polish your product photos until they shine. Not too long ago, this meant sinking hours into complex software like Photoshop. Today, AI-powered tools have completely flipped the script, putting professional-grade editing power into everyone's hands.
This couldn't have come at a better time. The visual standards for eCommerce are higher than ever. In fact, the eCommerce product photography market is expected to balloon from $1 billion in 2024 to $2 billion by 2033. This surge is largely thanks to AI image optimization raising the bar for what customers expect to see. If you want to dive deeper into the numbers, you can explore the full report on businessresearchinsights.com. The takeaway is clear: incredible visuals aren't just a nice-to-have anymore; they're essential for staying in the game.
The Power of One-Click Editing
I think the single biggest gift AI editors have given us is automation. Tasks that used to be tedious and required a skilled hand are now done in seconds. Manually tracing a product to cut it out from its background? That’s a thing of the past.
This is where a tool like ProdShot really flexes its muscles.
You can take a photo on your phone—messy living room background and all—upload it, and the AI will cleanly and precisely remove the background in a single click. What you get back is a perfectly isolated product with crisp, clean edges, ready for any marketplace. This feature alone is a massive time-saver and removes a huge barrier for so many sellers.
Generating Stunning Backgrounds Instantly
Once your product is free from its original background, you can really start getting creative. A simple white background is a classic for a reason, especially on sites like Amazon, but AI lets you dream bigger. You can conjure up custom backgrounds that tell your product's story or match your brand's vibe.
Here’s how you can put this to work:
- Create a Lifestyle Scene: Selling artisanal coffee beans? Just type a prompt like, "cozy kitchen counter with morning sunlight and a ceramic mug." The AI will build a photorealistic scene and drop your product right into it.
- Reinforce Your Brand: If your brand has a specific color scheme, you can generate endless backgrounds using those exact colors. Add subtle textures or gradients to keep things visually interesting without being distracting.
- Set a Seasonal Mood: Got a new line of summer swimwear? Instantly place it on a sun-drenched beach with gentle waves in the background. Holiday-themed products? A festive, decorated mantle is just a few words away.
This image here gives you a great visual of how a simple, well-composed photo can be the perfect starting point for AI enhancement.
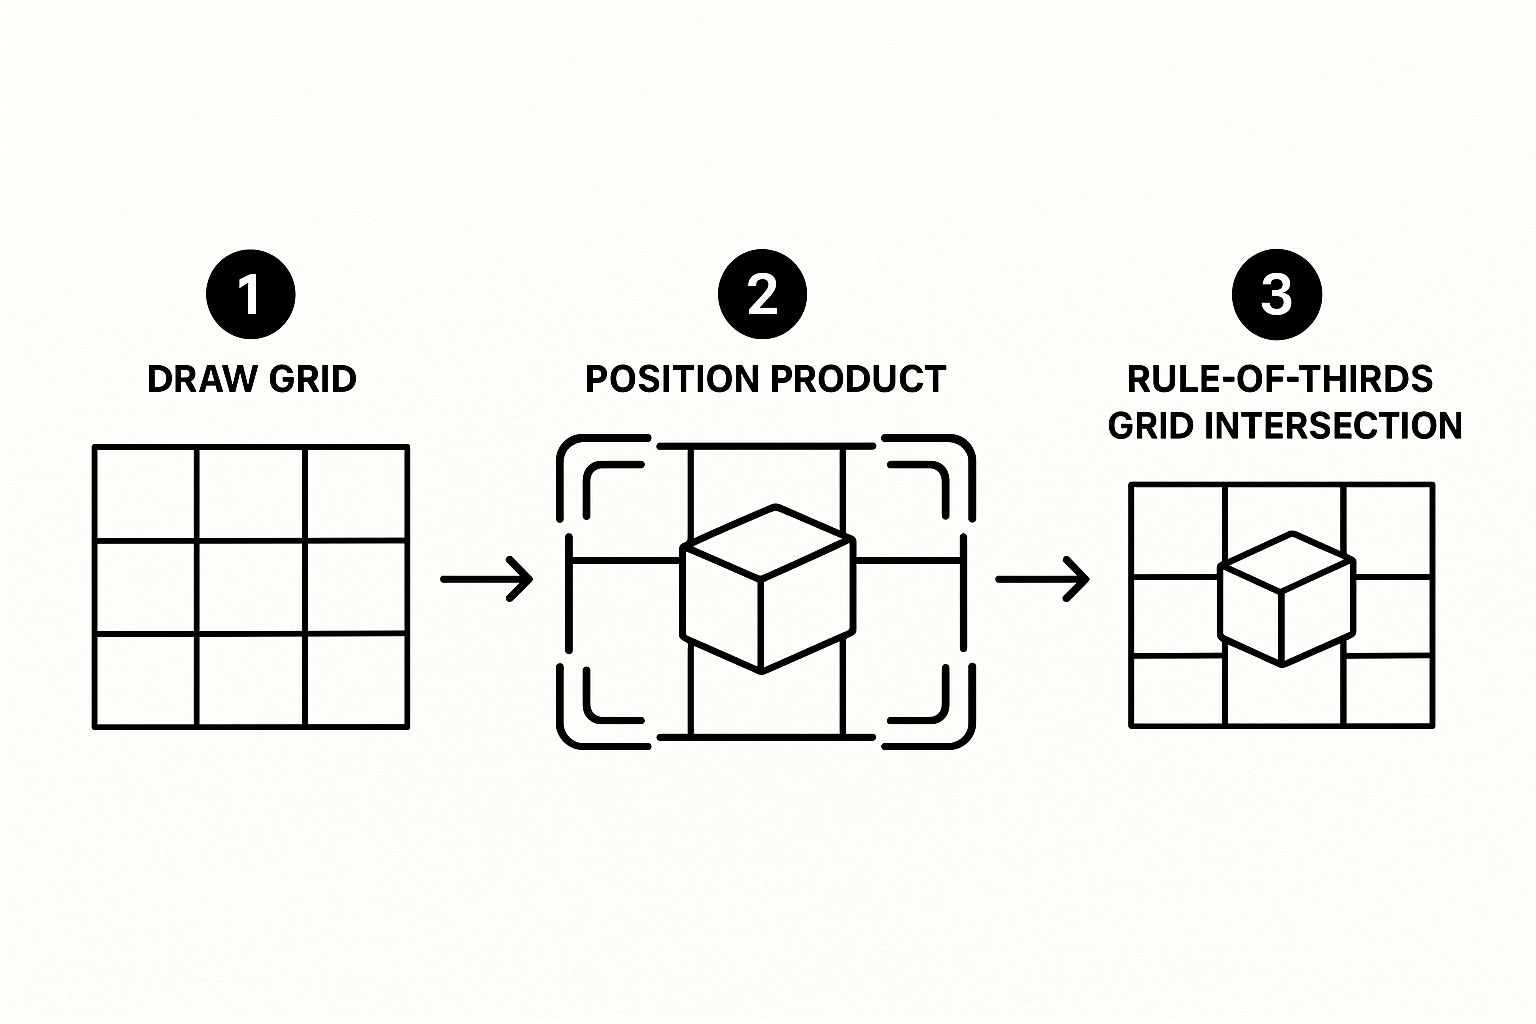
It shows that when you start with a good composition—like using the rule of thirds—the AI has a stronger foundation to work with, leading to a final image that just feels right.
Perfecting Light and Shadow with AI
Lighting is notoriously tricky to nail on shoot day. Even with a decent setup, you can end up with harsh shadows or lighting that makes your product look flat and uninspired. Thankfully, AI editing tools are smart enough to fix these problems for you.
If your product lacks a sense of dimension, the AI can analyze its form and add realistic shadows, giving it weight and making it look like it truly belongs in its new environment. It’s a subtle touch, but it’s what separates a believable composite from something that looks like a cheap cut-and-paste job.
The AI doesn’t just randomly add a drop shadow. It’s smart enough to analyze the light source in the generated background and cast shadows that match its direction and softness. This is what creates a truly cohesive and professional-looking image.
On the flip side, the AI can also remove distracting shadows from your original photo or intelligently brighten parts of the product to make key features pop. Getting this level of control automatically is a game-changer. This kind of detailed work is a core part of what we do with our product photo editing services, where the goal is always to create images that are ready to convert.
Upscaling for Crystal-Clear Quality
One of the classic drawbacks of smartphone photography has been resolution. A photo might look great on your phone, but what happens when a customer tries to use the zoom feature on your website, or you want to use it for a large homepage banner? It can quickly become a pixelated mess.
AI image upscalers are the solution. These tools use machine learning to intelligently add new pixels to your image, increasing its size and resolution without the usual blurriness. You can take a standard phone photo and upscale it by 2x or even 4x, ending up with a razor-sharp, high-resolution image that looks incredible on any device.
By bringing AI into your workflow, you’re essentially closing the gap between the photos you can take and the photos you need to succeed. It’s about taking your good smartphone shots and elevating them to a commercial standard, without the headache or the high price tag of traditional methods.
You’ve captured a great shot and edited it to perfection. That’s a huge win, but we're not quite at the finish line yet. The final, and arguably most critical, step is optimizing that beautiful photo for the web.
A stunning image is worthless if it takes forever to load or gets completely lost in the vast sea of Google search results. This is where the behind-the-scenes magic happens—the small tweaks that transform a great photo into a workhorse for your business, ensuring it loads fast, looks sharp on any screen, and actively helps customers find you.
Getting the File Format Right
First things first, you need to decide whether to save your image as a JPEG or a PNG. They might seem interchangeable, but they have very different jobs in the world of e-commerce.
- JPEG (or JPG): Think of this as your default setting for most product photos. JPEGs are brilliant at compressing images with a lot of color and detail—like lifestyle shots or close-ups of your product—into a much smaller file. That smaller size is your ticket to faster-loading pages.
- PNG: The superpower of a PNG is its ability to handle transparency. If you've used a tool to knock out the background and plan to place your product on a colored banner or a patterned section of your site, PNG is what you need. The trade-off is that PNG files are usually quite a bit larger than JPEGs.
For the vast majority of your main product shots sitting on a simple white or colored background, JPEG is the way to go. It strikes the perfect balance between quality and performance.
The Balancing Act: Image Quality vs. File Size
Nothing kills a sale faster than a slow website. And what's one of the biggest culprits of a sluggish site? Bloated image files. The data doesn't lie: a page load time that creeps from 1 second to 3 seconds can increase the chance of a visitor leaving by 32%.
Your goal is to find that perfect sweet spot where your image is crisp and clear, but the file size is lean. After you finish editing, a photo can easily be several megabytes (MB). You need to shrink that down—ideally under 200 kilobytes (KB)—without turning it into a pixelated mess.
This is where compression comes in. Tools like Photoshop have a "Save for Web" feature, and there are plenty of online compressors that can drastically reduce file size.
Always, and I mean always, check the compressed image on a full-size monitor before you upload it. You want to compress it enough to be zippy, but not so much that it looks cheap or unprofessional.
Don't Skip This: Naming Your Files for SEO
Please, never upload a photo named IMG_8432.JPG. Search engines like Google can’t see your photo, but they absolutely read its file name. This is one of the easiest SEO wins you can get, and it’s a shame to waste it.
Before you upload a single image, get into the habit of renaming the file with descriptive, keyword-rich titles. Put yourself in your customer's shoes: what would they type into Google to find what you're selling?
| Bad File Name | Good File Name |
DSC_0012.jpg | mens-waterproof-leather-hiking-boot.jpg |
Photo-1.png | handmade-ceramic-coffee-mug-blue.png |
Final_Edit.jpg | organic-lavender-soy-wax-candle.jpg |
This tiny bit of effort helps search engines understand what your product is, making it far more likely to pop up in image search results and drive free, organic traffic straight to your store.
Tying It All Together with a Cohesive Look
Finally, zoom out and look at the big picture. How do all your product photos look together on your category pages and homepage? Consistency is the secret sauce for building a brand that feels trustworthy and professional. A cohesive visual style makes your entire store look more curated and intentional.
This means sticking to the same choices for lighting, angles, and backgrounds across all your listings. If you find yourself drowning in hundreds of photos and struggling to maintain that polish, exploring professional photo editing services for ecommerce can be a massive time-saver. Of course, the technical details matter, too; choosing the best image format for web is a foundational step for ensuring every photo looks great and loads quickly.
By mastering these final optimization steps, you ensure that all the hard work you’ve put into your product photography actually translates into what matters most: more traffic, better conversions, and a brand that people remember.
Common Product Photography Questions Answered
Even with the best guide, you're bound to have questions. That's a normal part of learning any new skill, and product photography is no different. Think of this as your personal cheat sheet for tackling those common "what if" moments that pop up along the way.
Let’s get those nagging questions answered so you can get back to shooting with confidence.
What Are the Most Common DIY Mistakes?
From my experience, the number one mistake I see is inconsistent lighting. Nothing screams "amateur" faster than a photo with deep, ugly shadows on one side and glaring, washed-out spots on the other. This usually happens when someone just uses the overhead light in their room instead of a single, soft light source like a window.
Another huge pitfall is a busy, distracting background. Your product is the star of the show, but it's amazing how easily a wrinkled sheet, a cluttered desk, or even the corner of a wall can steal the spotlight. The goal is to draw the eye to your product, not away from it.
Finally, not shooting enough angles is a massive missed opportunity. Your customer can't pick up the item and turn it over in their hands, so your photos have to do that for them. One lonely, front-facing picture just doesn't build enough trust to convince someone to click "buy."
How Many Photos Should I Have for Each Product?
There isn't a single magic number, but a great goal to aim for is 5 to 10 photos per product. This gives you enough variety to show off every important feature and answer questions visually before a customer even thinks to ask.
A solid photo gallery should always include:
- The Hero Shot: Your main image. It should be crisp, perfectly lit, and usually on a clean white background.
- Different Angles: Give them the full tour—front, back, sides, and a nice 45-degree angle shot.
- A Detail Shot: Get in close! A macro or zoomed-in shot highlights quality details like fabric texture, intricate stitching, or a unique material.
- An In-Context Shot: Show your product in its natural habitat. This lifestyle photo helps people imagine using it themselves.
By mixing clean, straightforward e-commerce shots with more aspirational lifestyle photos, you give shoppers a complete understanding of what they're buying. This builds trust and can even help reduce returns.
You’re not just showing what a product looks like; you're helping a customer visualize it in their own life. A complete photo set bridges the gap between seeing an item online and holding it in your hands.
Can I Really Get Professional Results with a Smartphone?
Yes, you absolutely can. The cameras in modern smartphones are phenomenal, but the secret weapon isn't the phone itself—it's how you control everything around the phone. Professional-looking photos come from a repeatable process, not just expensive equipment.
Consistency is everything. When you use a tripod to keep your shots steady, learn to manipulate natural light with simple reflectors, and create a clean, dedicated background, you've already won half the battle.
Pair that solid foundation with a smart AI editing tool for the finishing touches, and you can produce images that are virtually indistinguishable from ones shot on a pricey DSLR.
Tired of battling complicated editing software? You can get studio-quality images in just a few seconds. ProdShot is an AI tool designed to instantly remove backgrounds, generate beautiful custom scenes, and fix your lighting. It turns basic smartphone pictures into professional product shots that stop the scroll.
Subscribe to my newsletter
Read articles from ProdShot Creator directly inside your inbox. Subscribe to the newsletter, and don't miss out.
Written by