Create Stunning White Background for Product Photos
 ProdShot Creator
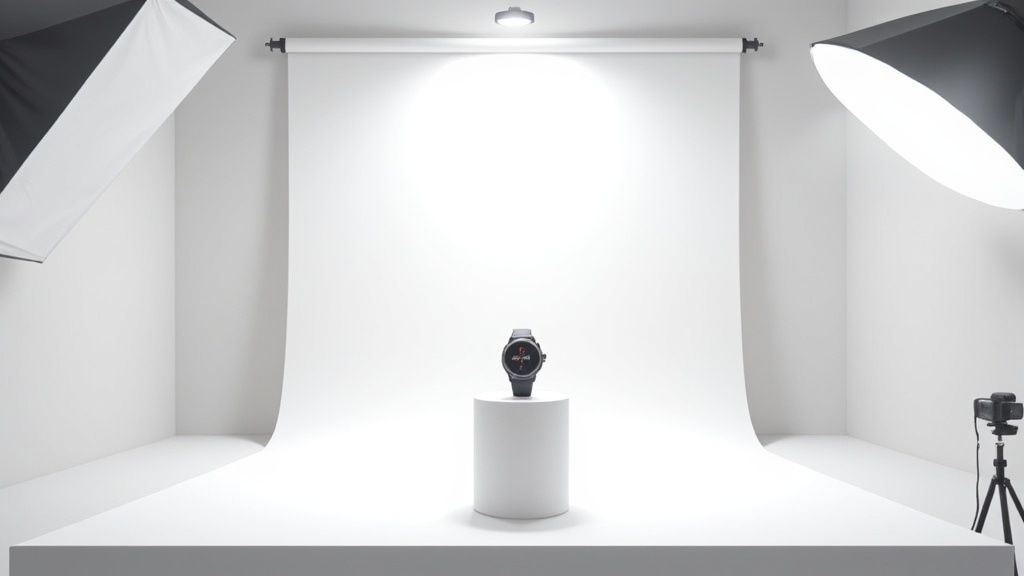
A simple white background for product photos isn't just about a clean aesthetic; it's a powerful business move that can directly boost your sales. This minimalist approach puts your product in the spotlight, builds immediate trust with shoppers, and happens to be the gold standard on major marketplaces like Amazon and Shopify.
Why White Backgrounds Are a Secret Weapon for Ecommerce Sales
Think about it from the customer's perspective. When someone lands on your product page, you have a tiny window—just a few seconds—to grab their attention and convince them you're legit. Your best tool for the job? A sharp, professional product photo on a crisp white background. This is much more than a style choice; it’s a proven sales driver.
A white background strips away all the distracting noise. It forces the shopper's eye right where you want it: on your product. Every detail, from the texture of the fabric to the gleam of the metal, becomes crystal clear. This clarity telegraphs professionalism and builds a subtle but powerful sense of trust. It tells the customer you’re a serious and reliable brand.
The Unspoken Rule of Online Marketplaces
It's no coincidence that e-commerce giants like Amazon and Shopify often require this look for primary product listings. They know it works. Following their lead ensures your products look consistent and professional everywhere they appear, which is crucial for building a cohesive brand. For a deeper dive into this, our guide on https://prodshot.net/professional-shopify-product-photography explains why this consistency is so vital for platforms like Shopify.
This isn't just anecdotal, either. The numbers back it up in a big way.
Key Takeaway: An analysis of seven million product images revealed that 92% had their backgrounds removed. Of those, a massive 76% opted for a pure white background, all to make the product the undeniable star of the show.
How Better Photos Lead to More Sales
Let’s connect the dots. A clean, clear presentation makes the buying journey smoother. When shoppers can see exactly what they're getting, with no questions or doubts, they feel more confident hitting that "add to cart" button.
Here's a quick breakdown of how this simple photographic choice directly impacts your business.
How White Backgrounds Impact Your Bottom Line
| Benefit | Business Impact |
| Increased Focus | Keeps customer attention on the product, showcasing its value and reducing bounce rates. |
| Enhanced Professionalism | Builds brand trust and credibility, leading to higher perceived value and customer loyalty. |
| Marketplace Compliance | Ensures your listings are approved and look consistent across platforms like Amazon and Shopify. |
| Improved Clarity | Reduces customer uncertainty and questions, which can lower return rates and support inquiries. |
Ultimately, great product presentation is a pillar of e-commerce success. If you're interested in learning more, these visual merchandising guidelines offer fantastic insights into how small visual tweaks can make a big difference.
By making this one strategic change, you can turn casual browsers into confident buyers. It's one of the simplest yet most effective moves you can make.
Your DIY Product Photography Studio Setup

You really don't need a high-end, expensive studio to get those crisp, clean white background product photos. Honestly, with a few smart choices, you can put together a killer setup at home that delivers professional-grade results without draining your wallet. It all comes down to controlling your environment, and that starts with the backdrop.
Your secret weapon here is a white sweep. It sounds fancy, but it's just a piece of material that curves smoothly from a vertical wall down onto your table. This creates a seamless, infinity-style background, getting rid of any harsh lines or corners that can distract from your product.
For a super affordable option, just grab a large sheet of white poster board or a roll of seamless white paper from a craft store. They work perfectly. And if they get a little dirty? No big deal, they're cheap to replace. If you're shooting smaller items like jewelry or makeup, a portable lightbox is a fantastic all-in-one solution that bundles the backdrop and lighting together.
Finding the Perfect Light
Now, let's talk about the single most important part of your setup: lighting. Forget about the overhead light in your room—it's almost always going to cast ugly, yellowish shadows. Instead, the real pro move is to set up your table and backdrop right next to a large window. This gives you beautiful, soft, natural light, which is the key to that bright, airy look.
Position your setup so the window is at a 90-degree angle to your product. This creates gentle, natural-looking shadows that give your item some depth and dimension. To keep those shadows from getting too dark, you'll just need one more simple tool.
Pro Tip: Use a plain piece of white foam board as a reflector. Just prop it up on the side of your product opposite the window. It will bounce light back into the shadows, softening them up and making sure your product looks fantastic from every angle.
This hands-on setup process is what truly separates good photos from great ones. It's about more than just pointing your camera; it's about carefully placing your shooting table, using natural light to your advantage, and tweaking things with tools like reflector cards. As you'll see in guides like the one on Shopify's blog, this attention to detail is everything.
By combining a simple white backdrop with smart, natural lighting techniques, you're building a powerful foundation. This DIY approach gives you the control to create consistently high-quality images that make your products shine.
Camera Settings for Crisp Product Shots
Getting your camera settings right from the very beginning will save you a world of headaches later on. When you nail the shot in-camera, you spend far less time wrestling with it in post-production, especially when the goal is a perfect white background for product photos. It doesn't matter if you're using a high-end DSLR or a smartphone with manual controls; these core principles are universal.
The whole point here is to capture a photo that's sharp, clean, and has true-to-life colors. This all starts with the big three settings that work in tandem: Aperture, ISO, and White Balance. Get these right, and you've built the foundation for a fantastic product shot.
Aperture and ISO For Maximum Clarity
Your aperture, often shown as an "f-stop" number, dictates how much of your product is in focus. For product shots, you almost always want the entire thing to be tack-sharp, from the closest edge to the furthest. The trick is to use a high f-stop number, something like f/8 or even f/11. This gives you a deep "depth of field," which is just a technical way of saying everything will be in focus.
Next up is ISO. You need to set your ISO to its lowest possible setting, which is usually ISO 100 or 200. Keeping the ISO low is the secret to avoiding digital "noise"—that grainy, pixelated look that can ruin a photo. Since your camera should be on a tripod, you don't need a fast shutter speed, so a low ISO is perfect.
Key Takeaway: A high f-stop (like f/11) paired with a low ISO (like 100) is the gold-standard formula for sharp, noise-free product photos. This isn't just a suggestion; it's a must for professional-looking results.
Get Your Colors Right with White Balance
White balance (WB) is what makes or breaks your colors. It’s the setting that tells your camera what "white" actually is, so it doesn't end up looking slightly yellow or blue. Most cameras have a decent "Auto" white balance, but it can get fooled, especially if you're shooting with mixed lighting or near a window.
If you notice your white background has a color cast, it's time to take manual control. You can start by trying a preset like "Daylight" or "Cloudy," depending on your light source. For the most accurate results, set a custom white balance. This usually involves taking a photo of your plain white background and telling the camera, "This is white."
Finally, a pro tip: always shoot in the highest quality format available. If your camera gives you the option, choose RAW over JPG. A RAW file is like a digital negative; it holds a massive amount of image data, giving you incredible flexibility to adjust colors and exposure in editing without degrading the quality.
4. Editing Your Way to a Perfect White Background
Once the photoshoot is wrapped up, it's time for the real magic. This is where we take a good shot and transform it into a great one, complete with that crisp, pure white background every e-commerce marketplace demands. You've basically got two ways to tackle this: the traditional, hands-on path with software like Adobe Photoshop, or the much faster route using modern AI tools.
The Old School Way: Manual Editing
For anyone with a background in graphic design, Photoshop's Pen Tool is the gold standard. It gives you absolute control, letting you painstakingly trace every curve and corner of your product to create a pixel-perfect cutout.
The catch? It takes forever. Seriously. If you’re dealing with anything complex—like a fuzzy sweater, a person's hair, or a bicycle with all its spokes—you're signing up for a long, tedious process. It’s powerful, but it's a huge time investment and has a steep learning curve.
The Smarter Way: AI-Powered Editing
This is where AI background removers have completely changed the game. For the vast majority of e-commerce sellers, especially those who don't have a design team on standby, AI is a lifesaver. These tools analyze your image, instantly identify the subject, and cleanly slice out the background with a single click.

As you can see, shooting with even, consistent lighting makes the AI's job much easier, giving you a cleaner result right from the start.
Now, are they perfect every single time? Not always, but they get incredibly close. Most AI tools include simple refinement options to touch up a stray edge or clean up a small spot the algorithm missed. The end goal is that perfect, pure white—hex code #FFFFFF—that makes your product pop.
Manual Editing vs. AI Tools: A Quick Comparison
So, which path is right for you? It really comes down to your priorities: time, budget, and the level of control you need. Here’s a quick breakdown to help you decide.
| Feature | Manual Editing (e.g., Photoshop) | AI Tools |
| Speed | Slow; can take minutes to hours per image | Extremely fast; seconds per image |
| Skill Required | High; requires technical skill and practice | Low; designed for beginners, often one-click |
| Control | Absolute pixel-perfect control over edges | High, but limited to the tool’s capabilities |
| Cost | Software subscription + time investment | Often subscription-based or pay-per-image; very cost-effective |
| Consistency | Can vary depending on the editor's skill | Highly consistent results across all images |
| Best For | Highly complex images, professional retouchers | E-commerce sellers, high-volume batches, quick turnarounds |
Ultimately, AI tools offer an unbeatable combination of speed, ease of use, and quality for most e-commerce needs. They make professional-looking photos accessible to everyone.
Key Takeaway: Using AI for editing isn't about cutting corners; it's about being smart with your time. A task that used to eat up hours in Photoshop can now be finished in the time it takes to grab a coffee, freeing you up to focus on growing your business.
If you’re staring at a mountain of product photos and the whole process just feels overwhelming, don't be afraid to call in the pros. Outsourcing to professional product photo editing services is a fantastic option for getting flawless results without any of the hands-on work, especially when you're dealing with a large catalog.
That clean, pure white background is the gold standard for e-commerce, and for good reason. It's clean, consistent, and required by major marketplaces like Amazon. But let's be honest—sometimes it can leave your products looking a little... flat. Like they're just floating in a sterile, white abyss.
The trick isn't to ditch the white background. It's to add a touch of reality back into the shot with a subtle, natural shadow. This simple addition grounds your product, giving it weight and dimension. It stops looking like a digital cutout and starts looking like a real, tangible item a customer can imagine holding.
Grounding Your Product with a Natural Shadow
Think about how objects look in the real world. A bottle sitting on a table casts a soft shadow, right? Recreating that effect is what separates good product photos from great ones. It adds a layer of professional polish that many competitors just don't bother with.
You can actually create this effect right in your camera. The key is to avoid harsh, distracting shadows. Instead, aim for a soft, gentle gradient. Try moving your main light source slightly to one side of the product. Then, use a simple white reflector card on the opposite side to bounce some light back and soften the shadow that forms. You'd be surprised what a difference this makes.
Adding Shadows in Post-Production
If you didn't quite nail the shadow during the shoot, don't worry. Many modern AI editing tools now give you the power to add incredibly realistic drop shadows after you’ve removed the background. When using these tools, look for settings that let you fine-tune the effect. You'll want control over a few key things:
- Opacity: This controls how see-through the shadow is. Lower opacity is usually better for a more subtle look.
- Blur/Feather: This softens the shadow's edges, which is crucial for a natural feel.
- Direction & Distance: This lets you control where the light seems to be coming from, making the shadow fall realistically.
This method gives you the best of both worlds: a clean white background for product photos that meets all the marketplace requirements, plus a touch of realism that helps shoppers connect with what you’re selling.
We're seeing a major shift in e-commerce visuals toward authenticity. Shoppers are gravitating to brands that feel more real and less corporate. You can dive deeper into how product photography trends like this are influencing what sells online.
Mastering the art of the natural shadow is a small detail, but it has a huge impact. It shows you care about quality and helps your customers see your product not just as an image on a screen, but as something they can bring into their own lives.
Your Product Photography Questions, Answered
Even after walking through the process, it’s completely normal to have a few lingering questions. When you're trying to nail that perfect white background for product photos, a lot of little "what ifs" can come up. Let's dig into some of the most common questions we hear from sellers just like you.
One of the biggest questions is always about gear: "Do I really need to buy a fancy, expensive camera?" Honestly, no. While a DSLR gives you a ton of manual control, the camera in your pocket is probably more than powerful enough. Modern smartphones produce incredibly sharp images, and when you pair one with good lighting and a simple tripod, the results are fantastic for any online store.
Of course, the other big question is about money. Is it actually cheaper to do it yourself versus hiring a pro? Yes, a DIY setup will have a lower upfront cost. But don't forget to factor in the value of your own time. To get a clearer picture, it’s helpful to understand the typical cost of professional product photography. That way, you can weigh the real trade-offs between your budget and your time.
Platform Rules and Protecting Your Work
A common worry I hear is, "Will the photos I take work everywhere—on Amazon, Shopify, and my Etsy shop?" This is exactly why shooting on a pure white background is such a great idea. It's the industry standard for a reason. It gives your products a clean, professional look that meets the requirements for virtually every major e-commerce platform.
Key Insight: If you're going to invest in one thing, make it lighting. Great lighting can make a smartphone photo look like it came from a professional studio. Bad lighting will make even a top-of-the-line DSLR shot look amateur. Master your light first.
Finally, there’s a crucial step that’s easy to forget in the excitement of getting your photos done: protecting them. Imagine putting in all that effort just to lose the files to a hard drive crash. It’s a nightmare. Take a few minutes to look into some reliable cloud backup strategies for your photos. It’s a small step that protects your valuable work and gives you peace of mind.
Ready to skip the hassle of DIY setups and complex editing? With ProdShot, you can turn simple smartphone pictures into flawless, market-ready product photos in seconds. Let our AI handle the background removal, lighting adjustments, and shadow creation, so you can focus on selling. Try it for free and see the difference at https://prodshot.net.
Subscribe to my newsletter
Read articles from ProdShot Creator directly inside your inbox. Subscribe to the newsletter, and don't miss out.
Written by