The "Why" of Kubernetes
 Kartik Mehta
Table of contents
- Why I Even Did This (Context for You if You Are Like Me)
- Installing Kubernetes (Minikube)
- Why Should I Care about Kubernetes as a Backend Developer?
- Basic Terms You Keep Seeing in YAML
- What I referred?
- Docker vs Minikube Docker
- Project Structure
- Backend Code
- The “Why” of Each YAML Line
- Run the Cluster
- Big Picture
- Final Thoughts

Yes, I've always wanted to learn more about Kubernetes. I've had a long-standing passion for it. However, what is the reality? The inner workings of the system, including the pods, services, DNS, and how these tiny, unseen components enable large software to function like magic, have always captivated me more.
So this isn’t “just another Kubernetes guide.”
This is me, as a backend developer, sharing my journey of why each YAML line matters and how it fits together when you’re connecting a Python app to Redis inside Kubernetes.
Why I Even Did This (Context for You if You Are Like Me)
I did this because:
Instead of merely deploying from ChatGPT or AI responses, I wanted to fully comprehend Kubernetes.
I was interested in the communication between pods of a basic application using Redis (any database).
That's all. No fancy objective. Just the curiosity of a backend nerd. :)
Installing Kubernetes (Minikube)
If you’re starting from scratch, here’s how I did it:
Install Minikube (Local Kubernetes)
brew install minikube
Install kubectl (Kubernetes CLI)
brew install kubectl
Start Minikube
minikube start
Test:
kubectl get nodes
You're all set if you see minikube Ready. This is the troubleshooting guide if not.
Why Should I Care about Kubernetes as a Backend Developer?
You are undoubtedly already aware of the hype surrounding Kubernetes if you are reading this. Let's face it, though: Kubernetes isn't some magical device. Fundamentally, it is merely a system for safely running and managing your apps in containers, whether you have one app or a thousand.
Consider Kubernetes to be the babysitter for your app. It manages how apps locate and communicate with one another, keeps things running, and restarts things when they malfunction. No-fluff features:
Scalability: One instance or 100 across machines can be run with ease.
Self-healing: Kubernetes automatically revives your app if it crashes.
Networking: Makes app-to-app communication easier.
Portability: It can operate on any platform, including Google Cloud, AWS, and your laptop.
Declarative Infrastructure: You specify your needs (in YAML), and Kubernetes determines how to fulfil them.
Basic Terms You Keep Seeing in YAML
(Image Credits: ByteByteGo)
Pod: Smallest deployable unit. Think: 1 running container, or sometimes a small group sharing resources.
Deployment: Defines how many pods you want, what image to run, and keeps them alive.
Example from our YAML:
replicas: 2
Kubernetes will guarantee precisely two pod runs. if it passes away? automatically changed. There is a comprehensive YAML file in the following section, so don't worry.
- Service: A stable network address for your pods. Even if pods restart or change, services keep your app reachable.
Example:
name: redis-service
This allows your backend to always find Redis, even if the Redis pod changes under the hood.
What I referred?
Nana’s one-shot video gave me a clear understanding of how Kubernetes works under the hood. I referred to it and got a clear picture of every aspect of Kubernetes that I should know as a backend developer. I’d love for you to hold on to this blog, check out the video, and then come back later. :)
Note from me (Backend Dev to Backend Dev):
These aren’t just terms. They’re how you control your infra with YAML, not manual commands.
Once you understand Pods, Deployments, and Services, you understand 80% of Kubernetes workflows.
Docker vs Minikube Docker
Why this matters:
Your Mac’s Docker and Minikube’s Docker are separate. Kubernetes doesn’t care about your host machine’s images unless you explicitly build inside Minikube’s Docker.
eval $(minikube docker-env) # Do this!
Now you are building inside Minikube.
# You will get the contxt for this command, hold on!
# Run this inside /backend folder.
docker build -t backend:latest .
Project Structure
So this is the project structure:
.
├── backend/                    # Flask Application.
│   ├── app.py                  # Entry Point for Flask Application.
│   ├── requirements.txt        # Python Dependencies.
│   └── Dockerfile              # Dockerfile to Containerize Flask Application.
└── kubernetes/
    ├── backend-deployment.yaml # Deployment for Flask Application.
    ├── backend-service.yaml    # Service to Expose Flask Application.
    ├── redis-deployment.yaml   # Deployment for Redis DB.
    └── redis-service.yaml      # Service to Expose Redis DB.
If you need the code, it is here:
Backend Code
A basic Flask app talking to Redis. Nothing fancy, just enough to understand Kubernetes.
from flask import Flask, request
import redis
import os

app = Flask(__name__)
redis_host = os.getenv('REDIS_HOST', 'localhost')
redis_port = int(os.getenv('REDIS_PORT', 6379))

r = redis.Redis(host=redis_host, port=redis_port, decode_responses=True)

@app.route('/set', methods=['POST'])
def set_value():
    key = request.json.get('key')
    value = request.json.get('value')
    r.set(key, value)
    return {'status': 'ok'}

@app.route('/get/<key>')
def get_value(key):
    value = r.get(key)
    return {'key': key, 'value': value}

if __name__ == "__main__":
    app.run(host='0.0.0.0', port=5000)
and a Dockerfile,
# Use the official Python 3.11 slim image as the base.
FROM python:3.11-slim

# Set the working directory inside the container to /app.
WORKDIR /app

# Copy all files from the current directory to /app in the container.
COPY . .

# Install Python dependencies from requirements.txt.
RUN pip install -r requirements.txt

# Define the default command to run the Flask app.
CMD ["python", "app.py"]
The “Why” of Each YAML Line
Yes, YAML looks scary at first. I used to feel the same.
But once you read it like "what is this telling Kubernetes to do for me?", it becomes super logical.
Let me break it down line-by-line for both Redis and Backend.
Redis Deployment
apiVersion: apps/v1
Inform Kubernetes of the API version you use for deployments.
The standard for deployments is apps/v1. Kubernetes won't even understand what you're attempting to explain without this.
kind: Deployment
This tells Kubernetes: "I want you to manage pods for me."
A Deployment keeps pods running, replaces them if they crash, and scales them up or down.
metadata:
  name: redis
Human-friendly name for this deployment.
Later when I run kubectl get deployments, this name shows up.
spec:
  replicas: 1
How many copies (pods) do I want?
Here, just 1. For learning, that’s enough. If Redis crashes, Kubernetes will recreate it.
selector:
  matchLabels:
    app: redis
The question, "Which pods does this deployment manage?" must be answered by Kubernetes.
The link is labels. For this deployment to manage pods, they must match this label.
template:
  metadata:
    labels:
      app: redis
These labels are what actually get stamped onto the pods.
The selector above looks for this. (IMPORTANT)
spec:
  containers:
  - name: redis
    image: redis:7
This runs the official Redis Docker image.
No magic, no AI, no abstraction. This is literally pulling Redis from Docker Hub and running it.
    ports:
    - containerPort: 6379
Tells Kubernetes this container listens on 6379 inside the pod.
Later, Services will use this info to direct traffic properly.
Redis Service
apiVersion: v1
Standard API version for Services.
kind: Service
This is saying: “Expose this pod internally via stable networking.”
Otherwise, pods restart and change names/IPs constantly.
metadata:
  name: redis-service
This becomes the internal DNS name: Your backend will call redis-service:6379.
spec:
  selector:
    app: redis
Connect this service to pods labeled app: redis.
That’s how Kubernetes knows which pod to route traffic to.
  ports:
    - protocol: TCP
      port: 6379
      targetPort: 6379
Exposes 6379 inside the cluster.
Traffic on this Service’s port 6379 goes to the Redis pod’s 6379.
type: ClusterIP
Internal-only networking.
No exposure to the outside world. Only pods inside Kubernetes can reach this Redis.
Backend Deployment
apiVersion: apps/v1
kind: Deployment
metadata:
  name: backend
Same logic as Redis. Just this time it’s our Python application. :)
spec:
  replicas: 1
One instance for now. In production, this might be 3+ for resilience.
selector:
  matchLabels:
    app: backend
template:
  metadata:
    labels:
      app: backend
Same as Redis: Deployment looks for pods with app: backend.
spec:
  containers:
  - name: backend
    image: backend:latest # The command you ran in the previous section inside backend folder.
    imagePullPolicy: Never
This runs our Docker image built locally in Minikube.imagePullPolicy: Never forces Kubernetes to use our local image, not look for it on Docker Hub.
    ports:
    - containerPort: 5000
Our Flask app listens on 5000 inside the pod.
    env:
    - name: REDIS_HOST
      value: redis-service
    - name: REDIS_PORT
      value: "6379"
Environment variables inside the container.
Our Python code uses REDIS_HOST to find Redis through Kubernetes DNS: redis-service:6379.
Backend Service
apiVersion: v1
kind: Service
metadata:
  name: backend-service
Service name we will port-forward to.
spec:
  selector:
    app: backend
Routes traffic to pods labeled app: backend.
  ports:
    - protocol: TCP
      port: 80
      targetPort: 5000
Exposes 80 inside the cluster, forwards traffic to 5000 on the pod.
Why? Because most HTTP tools assume port 80 unless told otherwise.
type: ClusterIP
Again, internal-only networking in the cluster.
But I want to test this locally. So I run:
kubectl port-forward svc/backend-service 8000:80
Now localhost:8000 connects to Kubernetes Service → Pod.
Run the Cluster
In the project root directory, run the following commands:
kubectl apply -f kubernetes/redis-deployment.yaml
kubectl apply -f kubernetes/redis-service.yaml
kubectl apply -f kubernetes/backend-deployment.yaml
kubectl apply -f kubernetes/backend-service.yaml
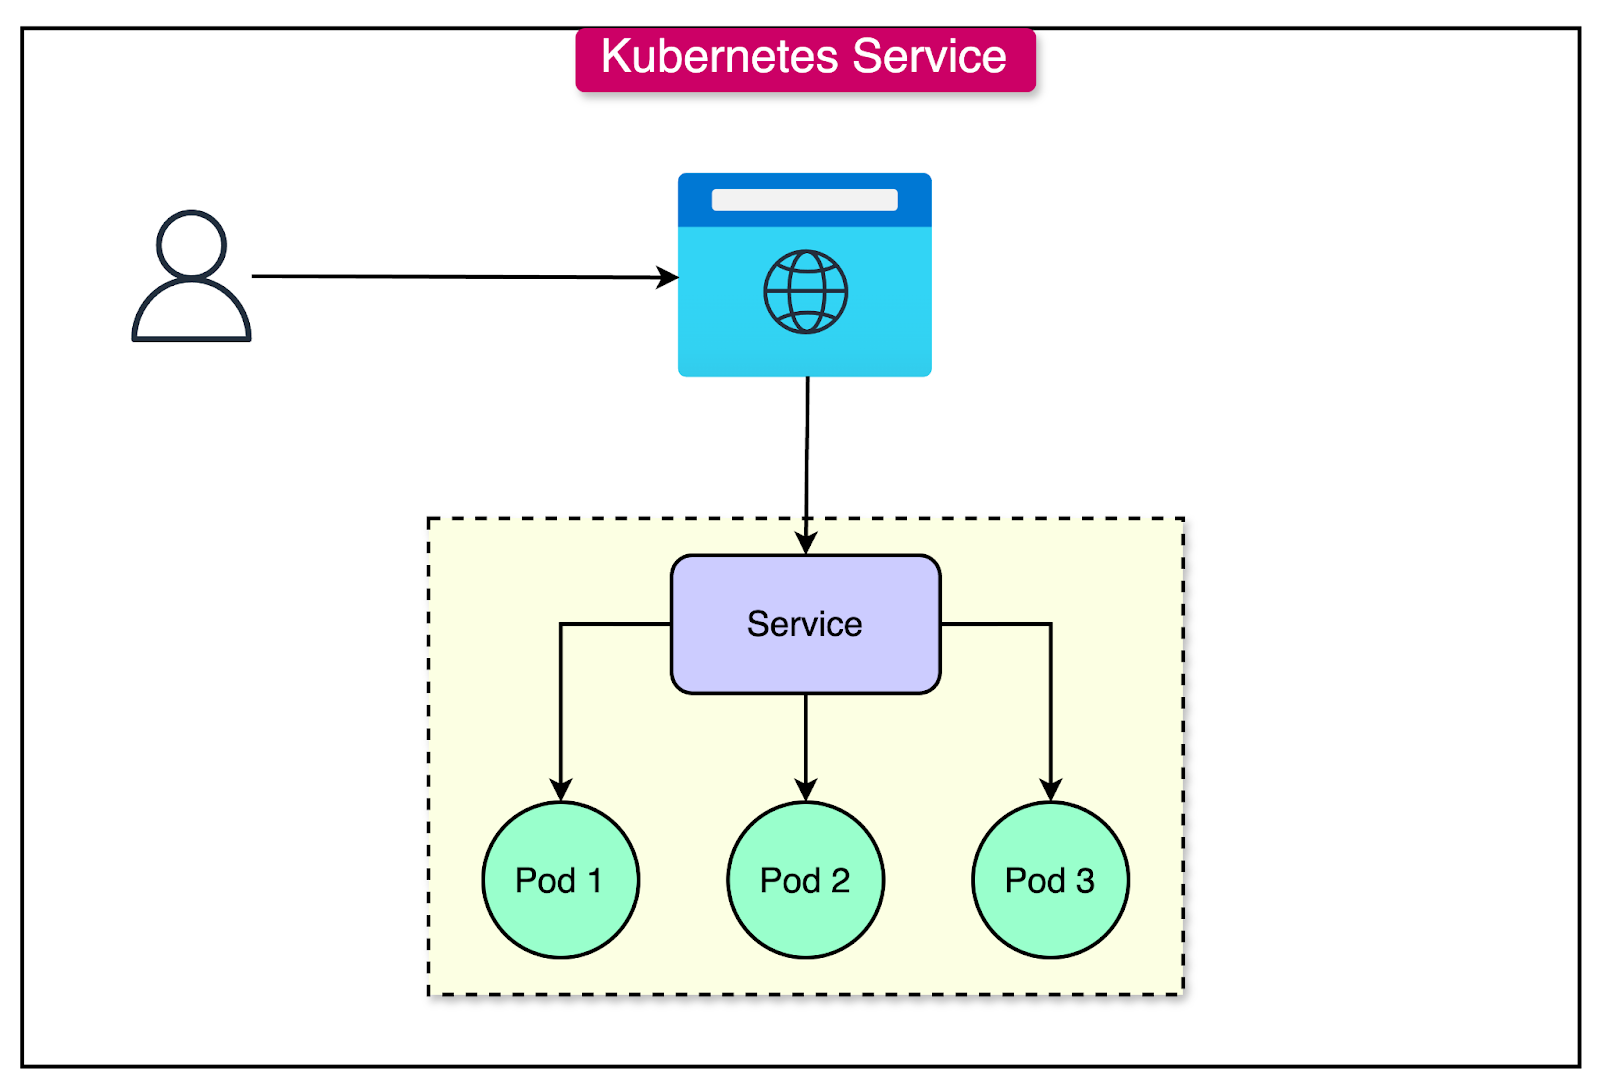
Big Picture

This simple flow explains exactly how traffic moves inside Kubernetes when you run this project. When you access localhost:8000, Kubernetes uses port-forwarding to route your request to the backend-service on port 80. That service knows how to find the backend-pod, where your Python Flask app is running on port 5000. When your Flask app needs to access Redis, it doesn't use IPs — it simply calls redis-service:6379, and Kubernetes handles the networking behind the scenes. The redis-service then forwards traffic to the redis-pod running the Redis server.
This is how Kubernetes DNS and services keep everything connected cleanly.
Final Thoughts
Congratulations if you've made it this far. Most backend developers keep putting off doing this because Kubernetes seems "too big," "too enterprise," or "too confusing."
While developing this small Python + Redis project on Kubernetes, I came to the straightforward conclusion that: Kubernetes is not difficult. It's merely methodical.
There is a purpose behind each YAML line. Each deployment, pod, and service fits together like a puzzle.
You cease to be afraid of the larger picture once you comprehend these little details.
Kubernetes is no longer seen as "DevOps magic," but rather as a potent instrument that allows you to manage the infrastructure of your applications.
And truthfully?
That is the most fulfilling feeling a backend developer can have.
You are aware of what is operating, how it operates, and why it functions.
If you ever need help or just want to chat, DM me on Twitter / X or LinkedIn.
Subscribe to my newsletter
Read articles from Kartik Mehta directly inside your inbox. Subscribe to the newsletter, and don't miss out.
Written by
Kartik Mehta
Kartik Mehta
A code-dependent life form.