Set up AWS IoT Secure Tunneling in Seconds with Tunnelmole
 Robbie Cahill
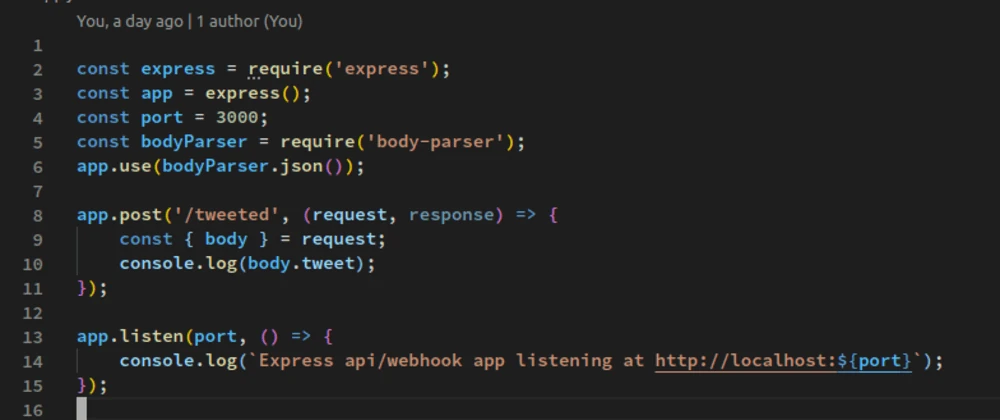
Introduction to AWS IoT and Remote Access Challenges
In the world of the Internet of Things (IoT), connecting and managing devices remotely is a fundamental requirement. AWS IoT provides a robust platform for managing billions of devices, but accessing these devices directly for debugging, maintenance, or direct interaction can be a significant challenge. Most IoT devices operate behind restrictive firewalls, Network Address Translation (NAT), or on private networks, making inbound connections from the public internet nearly impossible without complex network configurations.
For developers, engineers, and hobbyists looking for a simpler, faster way to achieve secure remote access, there's a powerful open-source tool: Tunnelmole. This guide will walk you through what AWS IoT secure tunneling is, why it's essential, and how you can set up a secure connection to your IoT devices in seconds using Tunnelmole, without the need for complex configurations or deep networking expertise. Whether you're debugging a sensor in the field, managing a fleet of industrial IoT (IIOT) devices, or simply want to access a project running on your Raspberry Pi from anywhere, Tunnelmole offers a straightforward and effective solution.
What is AWS IoT Secure Tunneling?
At its core, secure tunneling for IoT devices is about establishing a private, bidirectional communication channel between a remote device and a user or service that needs to interact with it. Think of it as creating a secure "wormhole" through the public internet that connects your computer directly to a device, no matter where it is or what kind of network it's on.
Traditionally, if you wanted to access a web server or SSH service running on an IoT device from outside its local network, you would need to configure port forwarding on the network's router. This process can be cumbersome, insecure if not done correctly, and often impossible if you don't have administrative access to the network hardware—a common scenario in enterprise or public environments.
Secure tunneling solves this problem by having the IoT device initiate an outbound connection to a publicly accessible endpoint (a tunnel server). Because the connection is outbound, it is almost never blocked by firewalls. Once this connection is established, data can flow in both directions through the tunnel.
This capability is vital for a wide range of IoT applications:
- Remote Troubleshooting and Debugging: Instead of trying to replicate field issues in a lab, engineers can connect directly to a malfunctioning device to view logs, run diagnostics, or attach a live debugger.
- Interactive Device Management: Many IoT devices host a local web interface for configuration and management. A secure tunnel allows you to access this web UI from your browser, securely, from anywhere in the world.
- Firmware Updates and Maintenance: Securely push over-the-air (OTA) firmware updates or perform maintenance tasks without exposing sensitive ports like SSH or FTP to the public internet.
- Webhook and API Integration: Enable cloud services to send real-time notifications (webhooks) directly to an application running on your IoT device, allowing for powerful, event-driven architectures.
Tunnelmole simplifies this entire process down to a single command. It handles the creation of the secure endpoint and the management of the tunnel, giving you a public HTTPS URL that connects directly to any service running on your IoT device.
How to Set Up a Secure Tunnel with Tunnelmole for AWS IoT
One of the biggest advantages of Tunnelmole is its simplicity. You can get a secure tunnel up and running in under a minute. Let's walk through a practical example using a Raspberry Pi, a common choice for IoT projects.
Imagine you have a simple web application or a monitoring dashboard running on your Raspberry Pi on port 80. Here’s how you can make it securely accessible from the internet.
Prerequisites
- An IoT device running a Linux-based OS (like a Raspberry Pi with Raspberry Pi OS).
- An active internet connection on the device.
- A local service running on the device. For this example, we'll start a basic Python web server.
Step 1: Install Tunnelmole on Your IoT Device
Tunnelmole is a lightweight, native NodeJS application that can be installed through npm.
To install, open a terminal on your IoT device and run the following commands.
# Fetch and run the NodeSource setup script for v22:
curl -fsSL https://deb.nodesource.com/setup_22.x | sudo -E bash –

# Install nodejs (this gives you node v22.x + npm)
sudo apt-get install -y nodejs

# Install Tunnelmole
npm install -g tunnelmole
Step 2: Start Your Local Service
If you don't already have a service running, you can easily start a simple web server for testing purposes. Python's built-in HTTP server is perfect for this.
In your terminal, run this command to serve the contents of your current directory on port 8080:
python3 -m http.server 8080
Your device is now hosting a simple website on http://localhost:8080. You could replace this with any application, such as a Node.js Express app, a Flask API, or a device management dashboard.
Step 3: Launch the Secure Tunnel with Tunnelmole
This is where the magic happens. With your service running locally, open a new terminal window (or use a tool like screen or tmux to run it in the background) and execute the following command:
tmole 8080
Tunnelmole will start, connect to its cloud service, and generate a unique public URL that forwards to your local port 8080. The output will look something like this:
$ tmole 8080
Your Tunnelmole Public URLs are below and are accessible internet wide. Always use HTTPs for the best security

https://cqcu2t-ip-49-185-26-79.tunnelmole.net ⟶ http://localhost:8080
http://cqcu2t-ip-49-185-26-79.tunnelmole.net ⟶ http://localhost:8080
You now have a live, secure, public HTTPS URL for your device!
Step 4: Access Your Device Remotely
Copy the https:// URL provided by Tunnelmole and paste it into any web browser on any device (your laptop, your phone, etc.). You will see the web page being served by the Python web server on your IoT device.
You have successfully established a secure tunnel. Any requests sent to this public URL are securely forwarded to the service running on your device, no matter what network it's on.
How It Works: A Look Under the Hood
The architecture behind Tunnelmole is designed to be both simple and robust. The diagram below illustrates the flow of data.
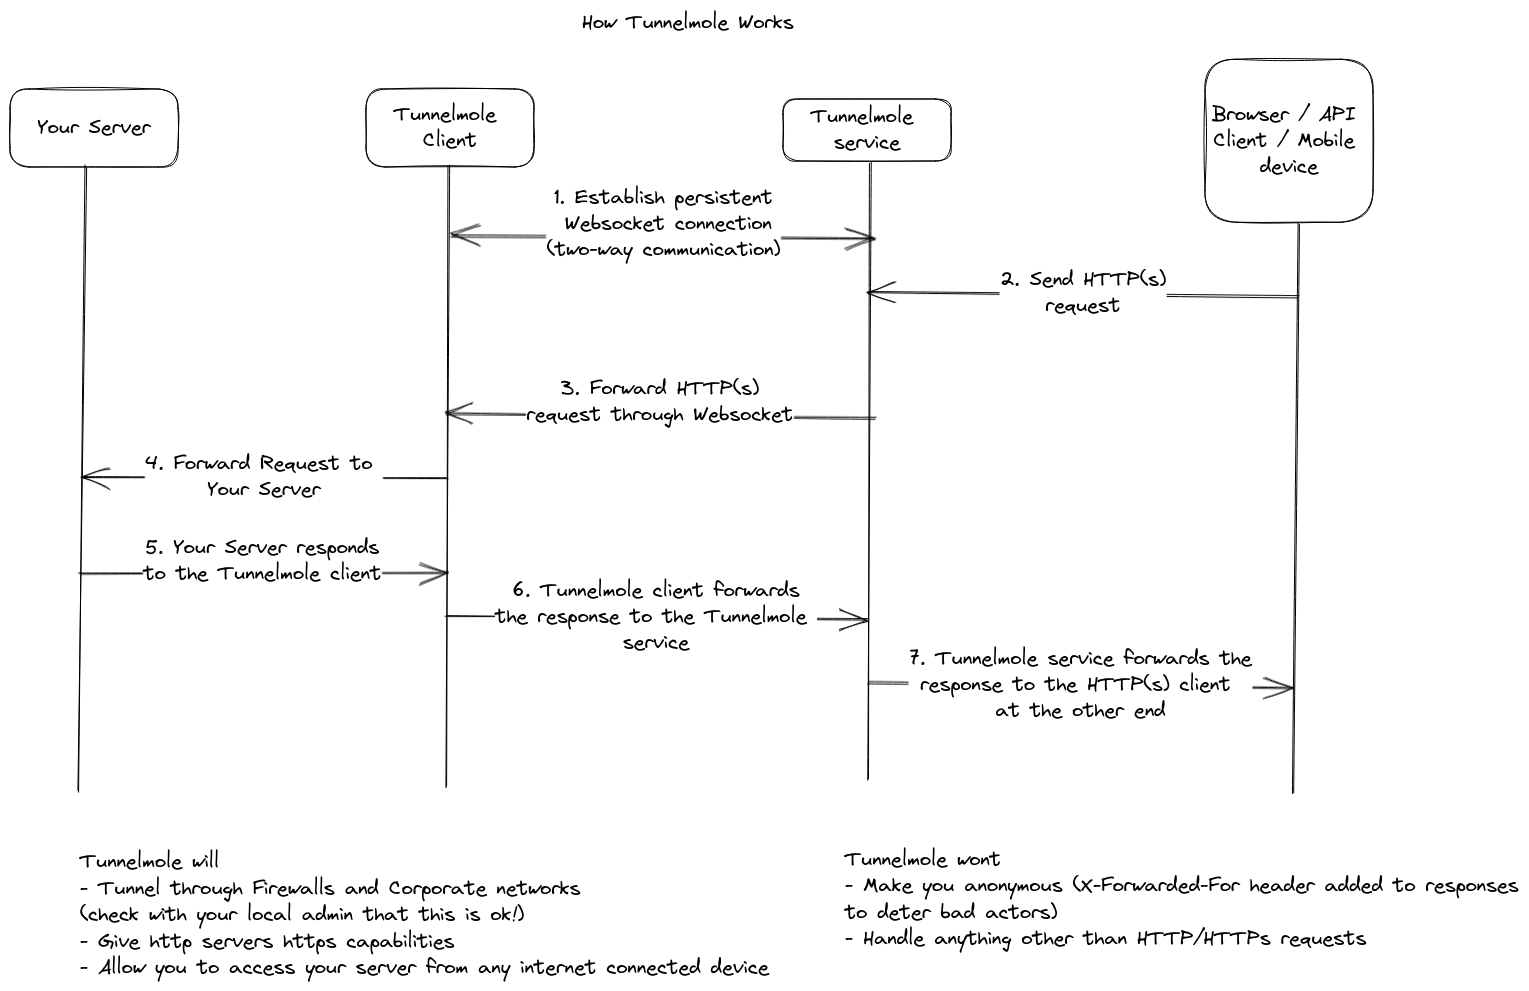
Here’s a breakdown of the process:
Client Initiation: When you run
tmole 8080on your IoT device, the Tunnelmole client initiates a secure, outbound WebSocket connection to the Tunnelmole cloud service. This connection is persistent and serves as the foundation for the tunnel. Because it's an outbound connection on a standard web port (443), it easily traverses almost any firewall or NAT configuration without special rules.Public URL Registration: The Tunnelmole service receives the connection request and assigns a unique public URL (e.g.,
https://random-string.tunnelmole.net). It maps this URL to your specific client connection.Incoming Public Request: A user or service on the internet makes an HTTP/S request to your public URL. This request first hits the Tunnelmole cloud service.
Request Forwarding: The Tunnelmole service receives the request and forwards it down the established WebSocket tunnel to the Tunnelmole client running on your IoT device.
Local Service Hit: The Tunnelmole client receives the forwarded request and translates it back into a standard HTTP request. It then sends this request to the local service you specified (e.g.,
http://localhost:8080).Response Path: The local service processes the request and sends its response back to the Tunnelmole client. The client then sends this response back up the WebSocket tunnel to the Tunnelmole service, which in turn delivers it to the original user.
This entire process happens in milliseconds, creating a seamless and responsive experience for the end-user. By leveraging WebSockets, Tunnelmole provides a low-latency, full-duplex communication channel that is highly efficient for interactive applications.
Common Use Cases for AWS IoT Secure Tunneling with Tunnelmole
The ability to create instant, secure tunnels to IoT devices unlocks a vast range of possibilities. Here are some of the most common and powerful use cases:
1. Remote Device Management and Configuration
Many IoT devices, from home routers to industrial controllers, are configured through a web-based administrative interface. Normally, you have to be on the same local network to access it. With Tunnelmole, you can expose this local web UI to the internet securely.
- Example: An agricultural tech company deploys soil moisture sensors across hundreds of farms. Each sensor runs a small web server to display its status and calibration settings. Instead of sending a technician to the field, they can use Tunnelmole to create a secure tunnel to any sensor, access its web UI from their central office, and perform diagnostics or updates remotely.
2. Live Application Debugging
Debugging code on a remote IoT device can be a nightmare. Developers often resort to guesswork based on logs. Secure tunneling revolutionizes this process by enabling live, interactive debugging.
3. Developing and Testing Webhook Integrations
Modern IoT solutions are often event-driven, relying on webhooks from services like Stripe, Twilio, or AWS Lambda to trigger actions on a device. However, webhook providers require a public URL to send their notifications, which is a problem for devices on a local network.
- Example: A developer is creating a smart doorbell that takes a picture when rung and sends it to a cloud storage service. An AWS Lambda function processes the image and needs to send a webhook back to the doorbell to confirm the upload was successful. The developer runs a local Flask or Express server on the doorbell to receive this webhook. By running
tmole 5000, they get a public HTTPS URL (https://some-url.tunnelmole.net/webhook) that they can provide to the AWS Lambda function. They can now test the entire end-to-end flow live.
4. Rapid Prototyping and Customer Demos
When you're building a new IoT product, you often need to share your progress with stakeholders, team members, or potential customers. Deploying a full staging environment is time-consuming.
- Example: A startup is building a connected pet feeder. They have a prototype running on a device in their lab. To demo the feeder's web interface to an investor on a video call, they simply run
tmole 80on the device. They can then share the public URL, and the investor can interact with the live prototype from their own browser, providing a powerful and immediate demonstration of the product.
Security and Self-Hosting
Security is paramount in IoT. When you create a public endpoint for a device, you must be mindful of the implications.
Tunnelmole's Security Model
- Encrypted Tunnels: By default, Tunnelmole provides a public
https://URL. All traffic between the end-user and the Tunnelmole service is encrypted with standard TLS (SSL). The WebSocket connection between the client on your device and the service is also secure (WSS). This protects your data in transit from snooping. - Obscure URLs: The randomly generated URLs are difficult to guess, providing a layer of security through obscurity. However, this should not be your only line of defense.
- Application-Level Security: It is crucial to remember that Tunnelmole gets traffic to your device; it does not secure the application running on the device. If you are exposing a web interface, that interface should have its own authentication and authorization mechanisms (e.g., a login page). Never expose an unauthenticated, sensitive service to the internet.
The Power of Self-Hosting
For ultimate control over security, privacy, and performance, Tunnelmole is fully open source and can be self-hosted. The Tunnelmole service can be run on your own server, whether it's a cheap VPS or a machine in your AWS account.
Benefits of self-hosting include:
- Complete Privacy: No traffic ever passes through a third-party service. All data stays within your own infrastructure.
- Custom Domains: Use your own domains and subdomains for your tunnel endpoints.
- Enhanced Security: You can place your self-hosted tunnel server behind your own firewall, apply custom access rules, and integrate it with your own monitoring and logging systems.
- No Rate Limits: You are only limited by the capacity of your own server.
- Cost-Effective: Custom subdomains are free when you self-host. You only pay for the cost of your server.
Setting up a self-hosted instance gives you a powerful, private alternative for AWS IoT secure tunneling that you completely own and control.
Conclusion
AWS IoT secure tunneling is a foundational technology for building, managing, and maintaining modern IoT solutions. It bridges the gap between the public cloud and devices hidden in private networks. While traditionally complex, tools like Tunnelmole have democratized this capability, making it accessible to everyone.
With a single command, Tunnelmole provides an instant, secure, and reliable tunnel to any of your IoT devices. It dramatically accelerates development cycles by simplifying remote debugging and testing. It empowers you to build more powerful, event-driven applications by making webhooks viable on-device. And for those who need it, its open-source and self-hostable nature provides a path to complete ownership and control over your IoT infrastructure.
Whether you're a hobbyist working on a weekend project or an engineer managing a fleet of production devices, Tunnelmole is an indispensable tool in your IoT toolkit.
Ready to get started? Install Tunnelmole and create your first secure tunnel in minutes.
Subscribe to my newsletter
Read articles from Robbie Cahill directly inside your inbox. Subscribe to the newsletter, and don't miss out.
Written by