Build Smarter, Faster Apps with DeepSeek AI And Blazor Smart Components
 syncfusion
TL;DR: Struggling to add AI capabilities to your Blazor applications? This blog post is your solution! It demonstrates how to seamlessly integrate the DeepSeek local AI model with Syncfusion® Smart Components. Follow our detailed, step-by-step guide to set up DeepSeek locally and connect it to Smart Components like Smart TextArea and Smart Paste Button for enhanced AI-driven text processing and intelligent pasting.
Enhancing Smart Components with local AI processing
As AI-powered applications become more popular, running AI models locally provides better control and privacy compared to cloud-based solutions. The DeepSeek AI model enhances applications by enabling AI-assisted text completion and smart pasting when integrated with Syncfusion Smart Components. This setup allows users to take advantage of AI-powered features without relying on cloud services, ensuring faster performance and greater data security.
In this blog post, we’ll guide you through setting up DeepSeek AI on your local machine, integrating it with Syncfusion® SmartPaste Button and Smart TextArea, and optimizing its performance for a smooth experience. By the end, you’ll have a fully functional AI-powered Smart Componentsthat provides real-time AI suggestionsand intelligent content processing in your Blazor application, running locally.
Overview
Integrating the DeepSeek local AI model with Syncfusion® Blazor Smart Components brings AI-powered automation to text-based applications. It enhances sentence completion, content pasting, and real-time suggestions directly within your Blazor Server app.
Key features
1. AI-powered sentence completion(Smart TextArea)
Automatically suggests contextually relevant text as users type, reducing manual input.
Enhances writing efficiency with real-time AI-generated completions.
2. Smart clipboard integration(SmartPaste Button)
Extracts structured data from clipboard content, reducing the need for manual input.
Autofills multiple form fields in one click.
Developers can define custom rules to control how clipboard data is processed.
By integrating DeepSeek with Smart TextArea and SmartPaste Button, applications can provide a seamless, AI-powered text experience, making writing, editing, and data entry faster and more user-friendly.
Integrating DeepSeek AI with Blazor Smart Components
The Smart Paste Button and Smart TextArea components integrate seamlessly into a Blazor Server application. Let’s walk through the process of creating and implementing it.
Note: Syncfusion® Blazor Smart Components are compatible with OpenAI and Azure OpenAI and fully support Server Interactivity mode apps.
Prerequisites
.NET SDK: Ensure you have installed the .NET 8 or .NET 9 SDK.
Blazor Application: Create a new Blazor Web App with Server Interactivity.
DeepSeek Model: Install on your system.
Installing and setting up the DeepSeek model
To integrate DeepSeek with Syncfusion® Smart Components, you must install and run the model locally on your system. Follow these steps to get started:
Step 1: Install Ollama
Download and install Ollama from https://ollama.com based on your operating system.
Step 2: Install the DeepSeek model
After installing Ollama, open a command prompt or terminal and run the following command to install and start the DeepSeek model:
ollama run <model-name>
Replace with the specific DeepSeek model you want to use. For example:
ollama run deepseek:7b
Once the model runs, it will be hosted locally and used within Syncfusion® Smart Components for AI-powered assistance.
Step 1: Create a new Blazor project
You can create a Blazor Web App Interactive Server using Visual Studio via Microsoft Templates, or the Syncfusion® Blazor Extension.
Step 2: Install Syncfusion® Blazor Smart Components and themes NuGet in the app
To add the Blazor Smart Paste Button component in the app, open the NuGet package manager in Visual Studio (Tools → NuGet Package Manager → Manage NuGet Packages for Solution), search and install Syncfusion.Blazor.SmartComponents and Syncfusion.Blazor.Themes. Alternatively, you can utilize the following package manager command to achieve the same.
Package Manager:
Install-Package Syncfusion.Blazor.SmartComponents -Version 29.1.33
Install-Package Syncfusion.Blazor.Themes -Version 29.1.33
Step 3: Register Syncfusion® Blazor service
Open ~/_Imports.razor file and import the Syncfusion.Blazor and Syncfusion.Blazor.SmartComponents namespace.
_Imports.razor:
@using Syncfusion.Blazor
@using Syncfusion.Blazor.SmartComponents
Now, register the Syncfusion® Blazor Service in the ~/Program.cs file of your Blazor App.
Program.cs:
using Microsoft.AspNetCore.Components;
using Microsoft.AspNetCore.Components.Web;
using Syncfusion.Blazor;
var builder = WebApplication.CreateBuilder(args);

// Add services to the container.
....
builder.Services.AddSyncfusionBlazor();
var app = builder.Build();
....
Step 4: Configure AI service
To configure the AI service, add the following settings to the ~/Program.cs file in your Blazor
using Microsoft.AspNetCore.Components;
using Microsoft.AspNetCore.Components.Web;
using Syncfusion.Blazor;
using Syncfusion.Blazor.SmartComponents;using Syncfusion.Blazor.AI;
var builder = WebApplication.CreateBuilder(args);
....
builder.Services.AddSyncfusionBlazor();
builder.Services.AddSyncfusionSmartComponents()
       .ConfigureCredentials(new AIServiceCredentials { SelfHosted = true, Endpoint = new Uri("Your local endpoint"), DeploymentName = "your model name" })
       .InjectOpenAIInference();
var app = builder.Build();
....
Set SelfHosted to true and provide the Endpoint URL where the model is hosted (e.g., http://localhost:11434). Before proceeding, ensure the DeepSeek model is installed and running locally. You can install the model using the following command:
ollama run <model-name>
Once the model runs, set the DeploymentName to match the installed model (e.g., deepseek-r1:1.5b, deepseek-r1:7b, mistral:7b, etc.).
Step 5: Add stylesheet and script resources
The theme stylesheet and script can be accessed from NuGet through Static Web Assets. Reference the stylesheet and script in the and of the main page as follows:
- For Blazor Server app, include it in the ~Components/App.razor
_Layout.cshtml (or) App.razor:
<head>
    ....
    <link href="_content/Syncfusion.Blazor.Themes/tailwind.css" rel="stylesheet" />
</head>

    ....
<body>
    ....
    <script src="_content/Syncfusion.Blazor.Core/scripts/syncfusion-blazor.min.js" type="text/javascript"> </script>
</body>
Step 6: Add Syncfusion® Blazor Smart Paste Button component
Add the Syncfusion® Blazor Smart Paste Button component with form components in the ~/Pages/Index.razor file. In this example, the Syncfusion ® Blazor DataForm component is used to manage the Bug Report form input fields. To get started, install Syncfusion.Blazor.DataForm package.
Index.razor:
@using Syncfusion.Blazor.DataForm
@using System.ComponentModel.DataAnnotations
@using Syncfusion.Blazor.Inputs

<SfDataForm ID="MyForm" Model="@bugReportDetails" ColumnCount="3">
    <FormValidator>
        <DataAnnotationsValidator></DataAnnotationsValidator>
    </FormValidator>
    <FormItems>
        <FormItem Field="@nameof(bugReportDetails.Subject)" ColumnSpan="2" Placeholder="Enter the subject" />
        <FormItem Field="@nameof(bugReportDetails.Control)" ColumnSpan="1" Placeholder="Enter control name" />
        <FormItem Field="@nameof(bugReportDetails.Category)" ColumnSpan="1" Placeholder="Enter category" />
        <FormItem Field="@nameof(bugReportDetails.Type)" ColumnSpan="1" Placeholder="Enter bug type" />
        <FormItem Field="@nameof(bugReportDetails.Priority)" ColumnSpan="1" Placeholder="Enter priority" />
        <FormItem Field="@nameof(bugReportDetails.Description)" ColumnSpan="3">
            <Template>
                <label class="e-textarea-label">Bug Description</label>
                <SfTextArea Placeholder="Describe the bug in detail..." />
            </Template>
        </FormItem>
        <FormItem Field="@nameof(bugReportDetails.ProductVersion)" ColumnSpan="1" Placeholder="Enter product version" />
        <FormItem Field="@nameof(bugReportDetails.OperatingSystem)" ColumnSpan="1" Placeholder="Enter operating system" />
        <FormItem Field="@nameof(bugReportDetails.Browser)" Placeholder="Enter browser name" />
        <FormItem Field="@nameof(bugReportDetails.VisualStudio)" ColumnSpan="1" Placeholder="Enter Visual Studio version" />
        <FormItem Field="@nameof(bugReportDetails.BlazorProjectTemplate)" ColumnSpan="1" Placeholder="Enter Blazor project template name" />
    </FormItems>
    <FormButtons>
        <SfSmartPasteButton IsPrimary="true" Content="Submit Bug Report" IconCss="e-icons e-paste" />
    </FormButtons>
</SfDataForm>

<br/>

<h5 style="text-align:center;">Sample Content</h5>
@* The content presented below is for demonstration purposes only and does not represent real-time data. *@
<div>
    Hi, my name is Alex Johnson. I'm reporting a critical issue with the DataGrid component in the Blazor Web App. The subject of the Query is "Issue with DataGrid Rendering." I have set the priority to High due to its impact on the application's usability. The bug type is categorized as a Bug Report, as it prevents users from viewing the data properly. In my description, I've noted that the DataGrid does not render data correctly when bound to a large dataset, causing the application to freeze and display an empty grid. The issue falls under the Blazor category and specifically pertains to the DataGrid control. I am currently using Product Version 27.1.48, and I developed the application in Visual Studio 2022 on a Windows 10 operating system. I tested the application in Google Chrome and utilized the Blazor Project Template called Blazor Web App. I'm eager to see this issue resolved as it significantly hinders productivity.
</div>

@* For Form Decoration *@
<style>
    #MyForm {
        max-width: 800px;
        margin: 0 auto;
        padding: 20px;
        background-color: #f9f9f9;
        border-radius: 8px;
        box-shadow: 0 0 10px rgba(0, 0, 0, 0.1);
    }
</style>

@code{
    private BugReport bugReportDetails = new BugReport();
    public class BugReport
    {
        [Required(ErrorMessage = "Please enter the subject.")]
        [Display(Name = "Subject")]
        public string? Subject { get; set; }
        [Required(ErrorMessage = "Please select a priority.")]
        [Display(Name = "Priority")]
        public string? Priority { get; set; }
        [Required(ErrorMessage = "Please specify the type.")]
        [Display(Name = "Type")]
        public string? Type { get; set; } = "Bug report";
        [Required(ErrorMessage = "Please describe the issue.")]
        [Display(Name = "Description")]
        public string? Description { get; set; }
        [Required(ErrorMessage = "Please select a category.")]
        [Display(Name = "Category")]
        public string? Category { get; set; }
        [Required(ErrorMessage = "Please specify the control.")]
        [Display(Name = "Control")]
        public string? Control { get; set; }
        [Required(ErrorMessage = "Please enter the product version.")]
        [Display(Name = "Product Version")]
        public string? ProductVersion { get; set; }
        [Required(ErrorMessage = "Please enter the Visual Studio version.")]
        [Display(Name = "Visual Studio")]
        public string? VisualStudio { get; set; }
        [Required(ErrorMessage = "Please enter the operating system.")]
        [Display(Name = "Operating System")]
        public string? OperatingSystem { get; set; }
        [Required(ErrorMessage = "Please enter the browser.")]
        [Display(Name = "Browser")]
        public string? Browser { get; set; }
        [Required(ErrorMessage = "Please specify the Blazor project template.")]
        [Display(Name = "Blazor Project Template")]
        public string? BlazorProjectTemplate { get; set; }
    }
}
Press Ctrl+F5 (Windows) or ⌘+F5 (macOS) to launch the application. This will render the Syncfusion® Blazor Smart Paste Button component in your default web browser. We’ll get the output that resembles the following image.
Copy the Sample Content and click on Submit Bug Report to see how the form is instantly filled.
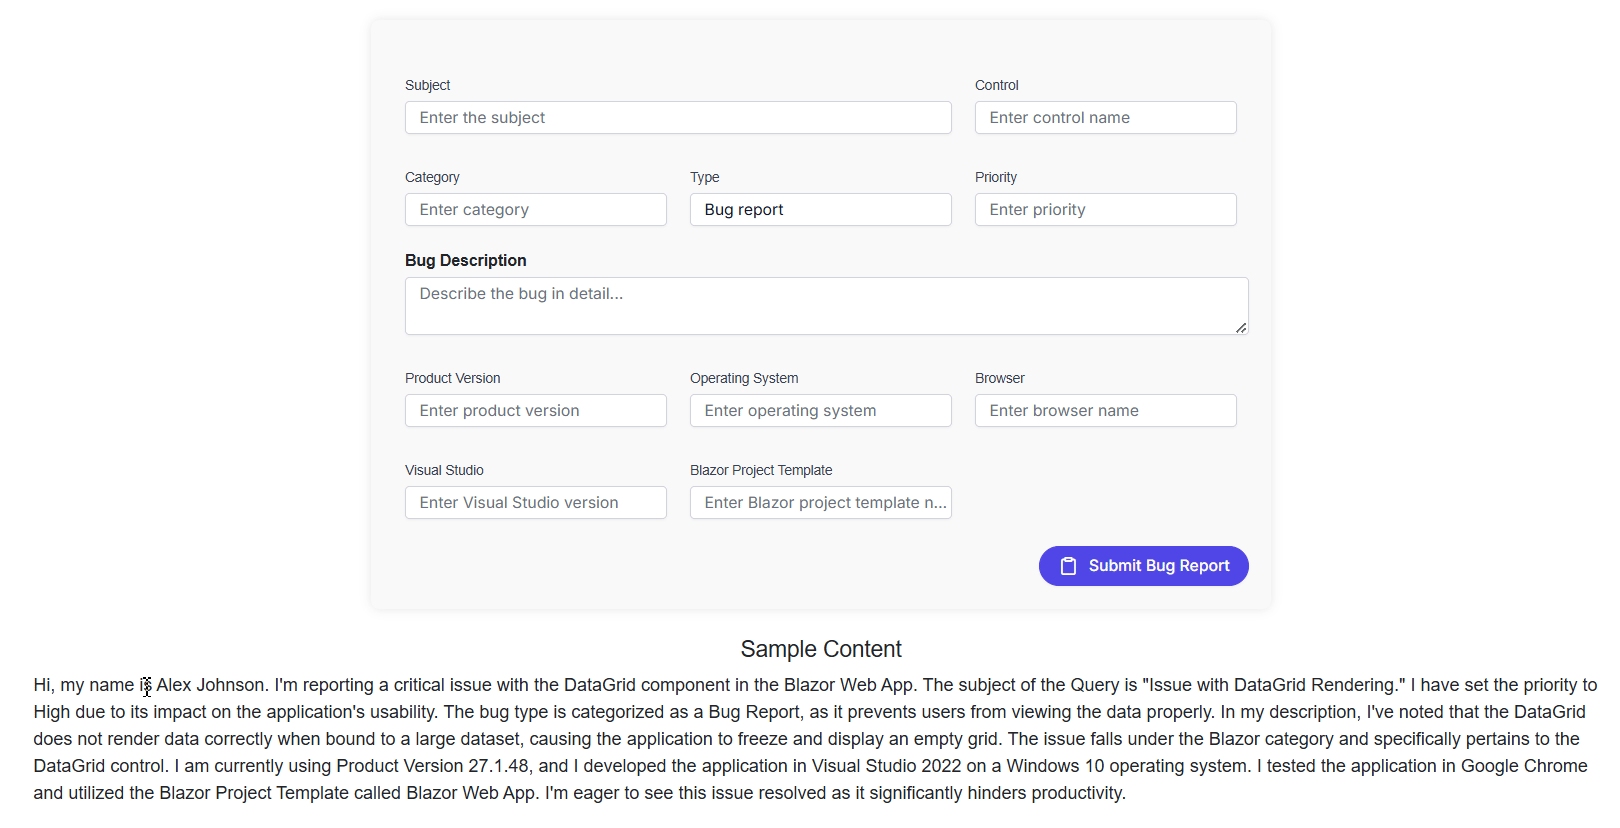
SmartPaste Button auto-filling bug report form
Step 7: Add Syncfusion® Blazor Smart TextArea component
Add the Syncfusion® Blazor Smart TextArea component in the ~Pages/Index.razor file.
Index.razor:
<SfSmartTextArea UserRole="@userRole" UserPhrases="@userPhrases" Placeholder="Enter your queries here" @bind-Value="prompt" Width="75%" RowCount="5">
</SfSmartTextArea>

@code {
    private string? prompt;
    public string userRole = "Maintainer of an open-source project replying to GitHub issues";
    public string[] userPhrases = [
        "Thank you for contacting us.",
        "To investigate, we will need a reproducible example as a public Git repository.",
        "Could you please post a screenshot of NEED_INFO?",
        "This sounds like a usage question. This issue tracker is intended for bugs and feature proposals. Unfortunately, we can't answer general usage questions and would recommend StackOverflow for a faster response.",
        "We do not accept ZIP files as reproducible examples.",
        "Bug report: File not found error occurred in NEED_INFO"
    ];
}
UserRole: This attribute is required to define the context of the autocompletion based on the role of the person typing.
UserPhrases: This attribute is optional to provide predefined expressions that align with the user’s/application’s tone and frequently used content.
Press Ctrl+F5 (Windows) or ⌘** +F5 (macOS)** to launch the application. This will render the Syncfusion Blazor Smart TextArea component in your default web browser.
Type ‘ We are working’ to experience instant sentence autocompletion.

SmartTextArea with AI text completion
GitHub reference
For more details, refer to the complete sample in our GitHub demo.
FAQs
Q1: What is the DeepSeek AI model?
The DeepSeek AI model is a powerful local AI model designed to enhance text processing and smart pasting functionalities in applications. It provides AI-assisted text completion and intelligent clipboard integration.
Q2: How do I integrate DeepSeek with Syncfusion® Smart Components?
To integrate DeepSeek with Syncfusion® Smart Components, install the DeepSeek model locally, set up a Blazor application, and configure the Syncfusion Blazor service with the AI service credentials. Detailed steps are provided in the blog post.
Q3: What are the benefits of using local AI models like DeepSeek?
Local AI models offer better control, privacy, and faster performance than cloud-based solutions. They allow developers to leverage AI-powered features without relying on external services, ensuring greater data security.
Q4: Do I need an internet connection to use DeepSeek with Blazor?
No. Once DeepSeek is installed and running locally, it works entirely offline.
Q5: Can I customize how the Smart Paste Button processes clipboard data?
Yes. Developers can define custom rules to control how clipboard content is parsed and used.
Conclusion
Integrating the DeepSeek AI model with Syncfusion Smart Components offers a powerful way to enhance your Blazor applications with AI-driven features. By following the steps outlined in this guide, you can leverage local AI models to improve text processing and smart pasting functionalities using the Smart Paste Button and Smart TextArea components. Don’t miss the opportunity to elevate your applications—start integrating DeepSeek with Syncfusion Smart Components today!
For more Syncfusion® AI Solutions for Blazor, Angular, React, Vue, and TypeScript/JavaScript platforms, check out here. Feel free to experiment further with different AI models and Syncfusion® components to tailor the solution to your needs. Happy coding!
The newest version of Essential Studio® is available from the license and downloads page for existing customers. If you are not yet a Syncfusion® customer, you can try our 30-day free trial to explore the available features.
If you have questions, contact us through our support forums, support portal, or feedback portal. We are always happy to assist you!
Related Blogs
Subscribe to my newsletter
Read articles from syncfusion directly inside your inbox. Subscribe to the newsletter, and don't miss out.
Written by
syncfusion
syncfusion
Syncfusion provides third-party UI components for React, Vue, Angular, JavaScript, Blazor, .NET MAUI, ASP.NET MVC, Core, WinForms, WPF, UWP and Xamarin.