How to Build a Student Attendance App with .NET MAUI ListView and DataGrid
 syncfusion
TL;DR: This blog provides a step-by-step guide to developing a student attendance management app using .NET MAUI. It covers tracking attendance dates using the Scheduler, marking attendance with a user-friendly ListView and status chips, and generating monthly reports using a DataGrid. The implementation leverages custom data models and Syncfusion® controls to create an interactive and efficient experience for educators.
Efficiently managing student attendance is vital for educational institutions. In this blog, we’ll explore how to build a student attendance app using .NET MAUI and Syncfusion® UI components like Scheduler, ListView, and DataGrid. By the end, you’ll see how easy it is to create a modern, responsive UI for tracking, marking, and reporting attendance across devices.
Let’s explore each part in detail.
To track attendance, we define AttendanceInfoByMonth. To mark attendance, we define AttendanceInfoByDate for the Students. The Student attendance report is prepared using a dynamic object, as we need to show the report for more Columns. For all the above, we need a base business object, StudentInfo.
public class StudentInfo : INotifyPropertyChanged
{
    private DateTime? _date;
    private ImageSource _image;
    private string _name;
    private string _rollNum;
    private string _status = string.Empty;
    public ImageSource Image
    {
        get { return _image; }
        set {
          _image=value;
          OnPropertyChanged(nameof(Image));
        }
    }
    public string Name
    {
        get { return _name; }
        set
        {
            _name = value;
            OnPropertyChanged(nameof(Name));
        }
    }
    public string RollNum
    {
        get { return _rollNum; }
        set
        {
            _rollNum = value;
            OnPropertyChanged(nameof(RollNum));
        }
    }
    public string Status
    {
        get
        {
            return _status;
        }
        set
        {
            _status = value;
            OnPropertyChanged(nameof(Status));
        }
    }
    public DateTime? Date
    {
        get { return _date; }
        set
        {
            _date = value;
            OnPropertyChanged(nameof(Date));
        }
    }
    private void OnPropertyChanged(string propertyName)
    {
        if (PropertyChanged != null)
        {
            PropertyChanged(this, new PropertyChangedEventArgs(propertyName));
        }
    }
    public event PropertyChangedEventHandler? PropertyChanged;
}
Other model classes or business object definitions will be explained in the corresponding module.
Tracking student attendance using the Scheduler
The Scheduler component in .NET MAUI is pivotal in organizing and tracking attendance dates. It provides a calendar view that allows teachers to add and view attendance, helping them track which days need to be recorded.
Here, we consider preparing the attendance report for each month, using a student collection to generate the report, and showing the present and absent counts for each day as appointments to track the attendance.
The attendance report for each month is populated using the Scheduler’s Month view and ViewChangedCommand. When the view changes, it starts populating the current month’s student collection using an ExpandoObject collection internally.
Here is the code snippet:
<syncfusion:SfScheduler TappedCommand="{Binding SchedulerTappedCommand}"
                        View="Month"
                        ViewChangedCommand="{Binding SchedulerViewChangedCommand}"
                        AppointmentsSource="{Binding Appointments}">
</syncfusion:SfScheduler>
Custom appointments added as we need to show appropriate background color and count based on present and absentees.
<syncfusion:SchedulerMonthView.AppointmentTemplate>
    <DataTemplate>
        <Grid Background="{Binding Background}">
            <Label Text="{Binding Subject}"
                   TextColor="{Binding TextColor}"
                   HorizontalOptions="Center"
                   VerticalOptions="Center"
                   FontFamily="Bold"/>
        </Grid>
    </DataTemplate>
</syncfusion:SchedulerMonthView.AppointmentTemplate>
Refer to the following image.
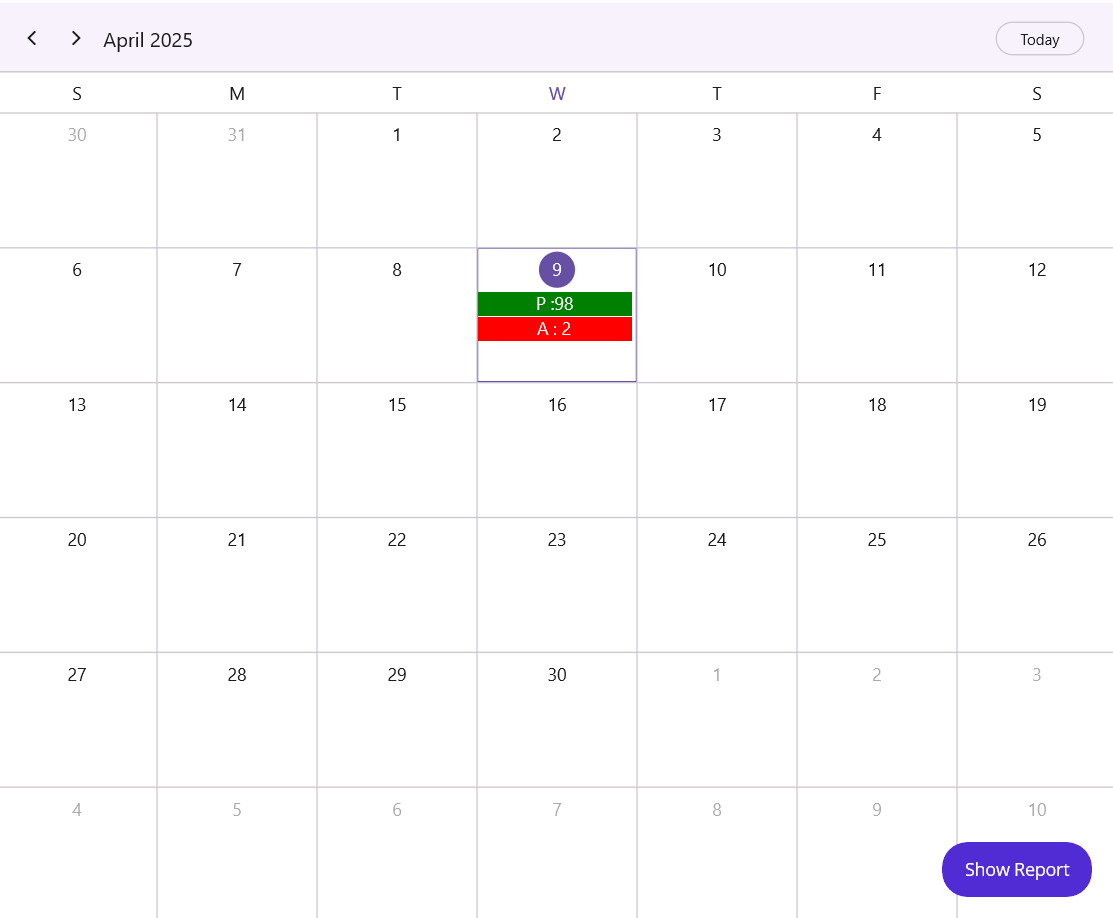
Monthly view with color-coded days
Marking student attendance using ListView
ListView is an excellent control for marking attendance, allowing you to display a list of students alongside chips to mark their attendance status. This component facilitates a smooth user experience for teachers as they take roll call.
Current tapped date attendance will be displayed in the ListView by the AttendanceInfoByDate property update from the ViewModel.
Define the model to show the tapped data student list, as shown below.
public class AttendanceInfoByDate : INotifyPropertyChanged
{
    private string selectedItem;
    private List<string> status;
    private DateTime? attendanceDate;
    private ObservableCollection<StudentInfo> students;
    public string SelectedItem
    {
        get { return selectedItem; }
        set
        {
            selectedItem = value;
            OnPropertyChanged(nameof(SelectedItem));
            UpdateStatus(SelectedItem);
        }
    }
    public DateTime? AttendanceDate
    {
        get
        {
            return attendanceDate;
        }
        set
        {
            attendanceDate = value;
            OnPropertyChanged(nameof(AttendanceDate));
        }
    }
    public ObservableCollection<StudentInfo> Students
    {
        get
        {
            return students;
        }
        set
        {
            students = value;
            OnPropertyChanged(nameof(Students));
        }
    }
    public List<string> Status
    {
        get { return status; }
        set
        {
            status = value; OnPropertyChanged(nameof(Status));
        }
    }
    private void UpdateStatus(string status)
    {
        foreach (var student in Students)
            student.Status = status;
    }
    private void OnPropertyChanged(string propertyName)
    {
        if (PropertyChanged != null)

            PropertyChanged(this, new PropertyChangedEventArgs(propertyName));
        }
    }
    public event PropertyChangedEventHandler? PropertyChanged;
}
AttendanceDate will denote the current tapped date. The Students collection will hold the list of students’ information for marking attendance, with the Status being Present or Absent. This collection will be bound to the Chips items source to handle attendance.
The status will be updated using the SfComboBox. This can be saved to the Appointment collection or deleted to remove the appointment. The Save and Delete commands are defined in the marking page’s binding context.
public class AttendanceInfoByDate : INotifyPropertyChanged
{
    private StudentAttendance trackStudenntAttendance;
    public StudentAttendance TrackStudentAttendance
    {
        get
        {
            return trackStudenntAttendance;
        }
        set
        {
            trackStudenntAttendance = value;
            OnPropertyChanged(nameof(TrackStudentAttendance));
        }
    }
    public ICommand SaveCommand { get; set; }
    public ICommand DeleteCommand { get; set; }
    public AttendanceInfoByDate()
    {
        this.SaveCommand = new Command(ExecuteSaveCommand);
        this.DeleteCommand = new Command(ExecuteDeleteCommand);
    }
    private void ExecuteSaveCommand()
    {
        DoTrackAttendance();
        Application.Current.MainPage.Navigation.PopAsync();
    }
    private void ExecuteDeleteCommand()
    {
        TrackStudentAttendance = null;
        AttendanceDate = null;
        Application.Current.MainPage.Navigation.PopAsync();
    }
    private void DoTrackAttendance()
    {
        var presentCount = Students.Where(o => o.Status.Equals("Present")).Count();
        var absentCount = Students.Where(o => o.Status.Equals("Absent")).Count();
        if (TrackStudentAttendance == null)
            TrackStudentAttendance = new StudentAttendance() { IsAllDay = true, PresentCount = presentCount, AbsentCount = absentCount, From = AttendanceDate.Value.Date, To = AttendanceDate.Value.Date };
        else
        {
            TrackStudentAttendance.PresentCount = presentCount;
            TrackStudentAttendance.AbsentCount = absentCount;
        }
    }
}
Students will be populated from the scheduler tapping itself. Attendance will be marked using the chip in each list view team. Based on the marked attendance, appointments will be updated using the DoTrackAttendance method.
<syncfusion:SfListView x:Name="listView"
                       ItemsSource="{Binding Students}"
                       HeaderSize="70"
                       IsStickyHeader="True"
                       FooterSize="60"
                       SelectionBackground="Transparent"
                       IsStickyFooter="True"
                       ItemSize="72">
    <syncfusion:SfListView.HeaderTemplate>
        <DataTemplate>
            <Label Text="Profile"
                   VerticalOptions="Center"
                   HorizontalOptions="Center"
                   Grid.Column="0"
                   FontAttributes="Bold"
                   FontSize="Medium"/>
            <Label VerticalOptions="Center"
                   HorizontalOptions="Center"
                   Text="Student Name / Roll Number"
                   Grid.Column="1"
                   FontAttributes="Bold"
                   FontSize="Medium" />
            <Label FontSize="Medium" Grid.Column="2" FontAttributes="Bold"
    Text="Status"/>
            <editors:SfComboBox Placeholder="Mark All" Grid.Row="1" Grid.Column="2" HorizontalOptions="End" IsClearButtonVisible="False" ItemsSource="{Binding BindingContext.Status, Source={x:Reference listView}}" SelectedItem="{Binding BindingContext.SelectedItem, Source={x:Reference listView}}"/>
        </DataTemplate>
    </syncfusion:SfListView.HeaderTemplate>
    <syncfusion:SfListView.ItemTemplate>
        <DataTemplate x:DataType="local:StudentInfo">
            <Image Source="{Binding Image}"
                   HeightRequest="40"
                   WidthRequest="40"
                   Grid.Column="0"
                   VerticalOptions="Center"
                   HorizontalOptions="Center" />
            <Label LineBreakMode="TailTruncation"
                   Text="{Binding Name}"
                   FontFamily="Roboto-Regular"
                   CharacterSpacing="0.15"
                   FontSize="{OnPlatform Default=16,WinUI=14}" />
            <Label Grid.Row="1"
                   Grid.Column="0"
                   LineBreakMode="NoWrap"
                   FontFamily="Roboto-Regular"
                   CharacterSpacing="0.25"
                   Text="{Binding RollNum}"
                   Margin="0,2,0,0"
                   FontSize="14"
                   Opacity="0.8" />
                <core:SfChipGroup Grid.Column="2"
                                  Margin="10"
                                  ChipType="Choice"
                                  VerticalOptions="Center"
                                  SelectedItem="{Binding Status}"
                                  ItemsSource="{Binding BindingContext.Status, Source={x:Reference listView}}"
                                  HorizontalOptions="Center">
                </core:SfChipGroup>
          </Grid>
        </DataTemplate>
    </syncfusion:SfListView.ItemTemplate>
    <syncfusion:SfListView.FooterTemplate>
        <DataTemplate>
            <Button Text="Save" Command="{Binding BindingContext.SaveCommand, Source={x:Reference listView}}" WidthRequest="100" HeightRequest="40" />
            <Button Text="Delete" Command="{Binding BindingContext.DeleteCommand, Source={x:Reference listView}}" WidthRequest="100" HeightRequest="40"/>
        </DataTemplate>
    </syncfusion:SfListView.FooterTemplate>
</syncfusion:SfListView>
The footer template contains a Save and Delete button to handle appointment and report updates. The header template contains column header values for names, register numbers, profiles, and status, as shown in the image below.
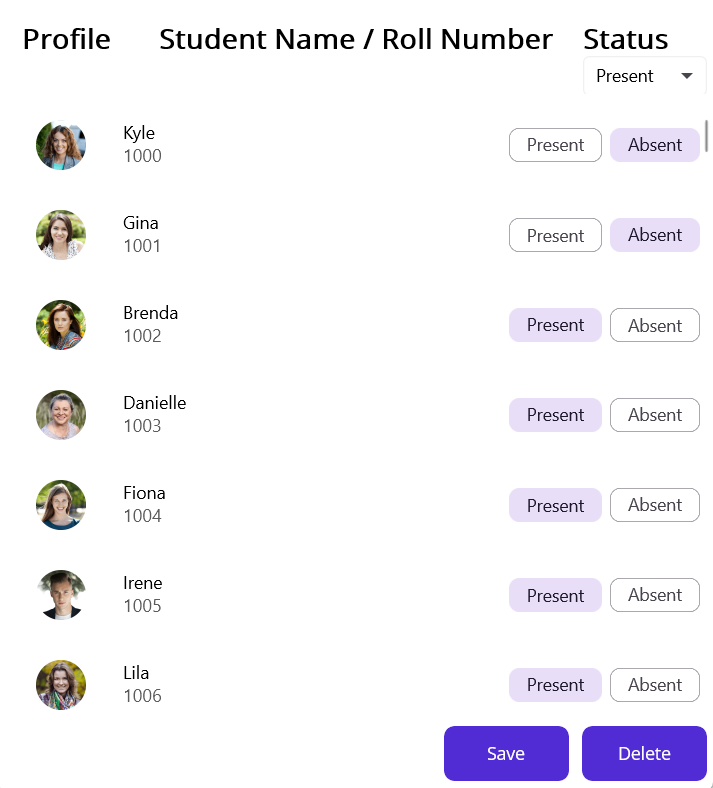
Student list
Generate a report using the DataGrid
DataGrid is an essential component for generating attendance reports. It allows for the structured and tabulated display of data. It provides a clear overview of each student’s attendance record over time, making it easy to identify patterns or issues.
ItemsSource for DataGrid will be populated when attendance is marked. Below, we will see the DataGrid definition and customization done to display the monthly report.
<syncfusion:SfDataGrid ItemsSource="{Binding AttendanceInfoByMonth.StudentAttendanceCollection}" Loaded="SfDataGrid_Loaded" FrozenColumnCount="2" Grid.Row="1" AutoGeneratingColumn="SfDataGrid_AutoGeneratingColumn" >
    <syncfusion:DataGridHeaderCell>
        <syncfusion:DataGridHeaderCell FontAttributes="Bold"/>
    </syncfusion:DataGridHeaderCell>
</syncfusion:SfDataGrid>
The Name and RollNum columns will be frozen using the FrozenColumnCount property to ensure proper visibility of attendance data for all 30 or 31 days in the month while scrolling horizontally.
Column mapping name and width mode are customized in the AutoGeneratingColumn event.
private void SfDataGrid_AutoGeneratingColumn(object sender, Syncfusion.Maui.DataGrid.DataGridAutoGeneratingColumnEventArgs e)
{
    if (!(e.Column.MappingName == "Name" || e.Column.MappingName == "RollNum"))
        e.Column.ColumnWidthMode = ColumnWidthMode.FitByHeader;
    e.Column.MappingName = "[" + e.Column.MappingName + "]";
}
As we have bound dynamic objects, property change is not supported by default. So, we have refreshed the grid data on loading.
private void SfDataGrid_Loaded(object sender, EventArgs e)
{
    (sender as SfDataGrid).Refresh();
}
Refer to the following image.
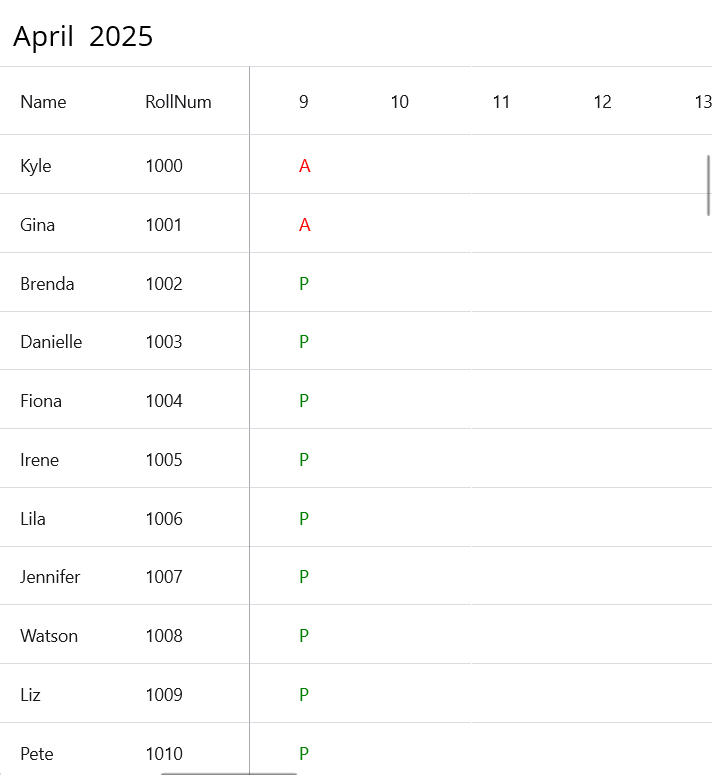
Attendance report by date
Refer to the final output.

App view with Scheduler, ListView, and DataGrid
GitHub reference
For more details, refer to the GitHub demo.
FAQs
Q1: What is the purpose of the student attendance management app built with .NET MAUI?
The app is designed to help educators efficiently track, mark, and report student attendance across multiple platforms using .NET MAUI and Syncfusion controls like Scheduler, ListView, and DataGrid.
Q2: How does the Scheduler component assist in tracking attendance?
The Scheduler component provides a calendar view (Month view) to organize and track attendance dates. It allows teachers to add and view attendance records, displaying present and absent counts as appointments with customized background colors based on the data.
Q3: How is the ListView used to mark attendance in the app?
The ListView displays a list of students with their details and status chips for marking attendance (Present or Absent). It integrates with an SFComboBox for bulk status updates and includes Save and Delete commands to manage attendance records for a selected date.
Q4: How does the DataGrid contribute to generating attendance reports?
The DataGrid presents a tabulated view of monthly attendance data, with columns for student names, roll numbers, and daily attendance status. It supports frozen columns for better visibility and uses dynamic objects to display data for each day of the month, refreshed on load to ensure accuracy.
Conclusion
Building a student attendance app with .NET MAUI and Syncfusion® controls provides a robust solution for educators. Our focus was on efficiently tracking attendance using the Scheduler, marking attendance with the ListView, and generating comprehensive reports with the DataGrid. By leveraging these tools, you can efficiently track, mark, and report attendance, enhancing the overall management process. The result is a highly efficient, cross-platform solution that empowers educators to manage and track student attendance effortlessly.
For existing Syncfusion® customers, the newest version of Essential Studio® is available from the license and downloads page. If you are not a customer, try our 30-day free trial to check out these new features.
If you need a new widget for the Flutter framework or new features in our existing widgets, you can contact us through our support forums, support portal, or feedback portal. As always, we are happy to assist you!
Related Blogs
Subscribe to my newsletter
Read articles from syncfusion directly inside your inbox. Subscribe to the newsletter, and don't miss out.
Written by
syncfusion
syncfusion
Syncfusion provides third-party UI components for React, Vue, Angular, JavaScript, Blazor, .NET MAUI, ASP.NET MVC, Core, WinForms, WPF, UWP and Xamarin.