Amazon Product Image Guidelines: Boost Your Listings Today
 ProdShot Creator
If you’re a busy seller and just need the essential specs without the fluff, you've come to the right place. This is your quick reference guide to the core Amazon product image guidelines. Think of it as a checklist to make sure your images are compliant right from the start, saving you from having to fix listing errors later.
A Quick Look at Amazon's Image Rules
Getting these fundamental rules right is the first and most important step in creating visuals that actually sell. This quick overview will help you double-check your images against Amazon's main standards so your products look professional and meet all the platform's requirements.
The image below gives you a great visual breakdown of the key framing and resolution specs for your main product photo.
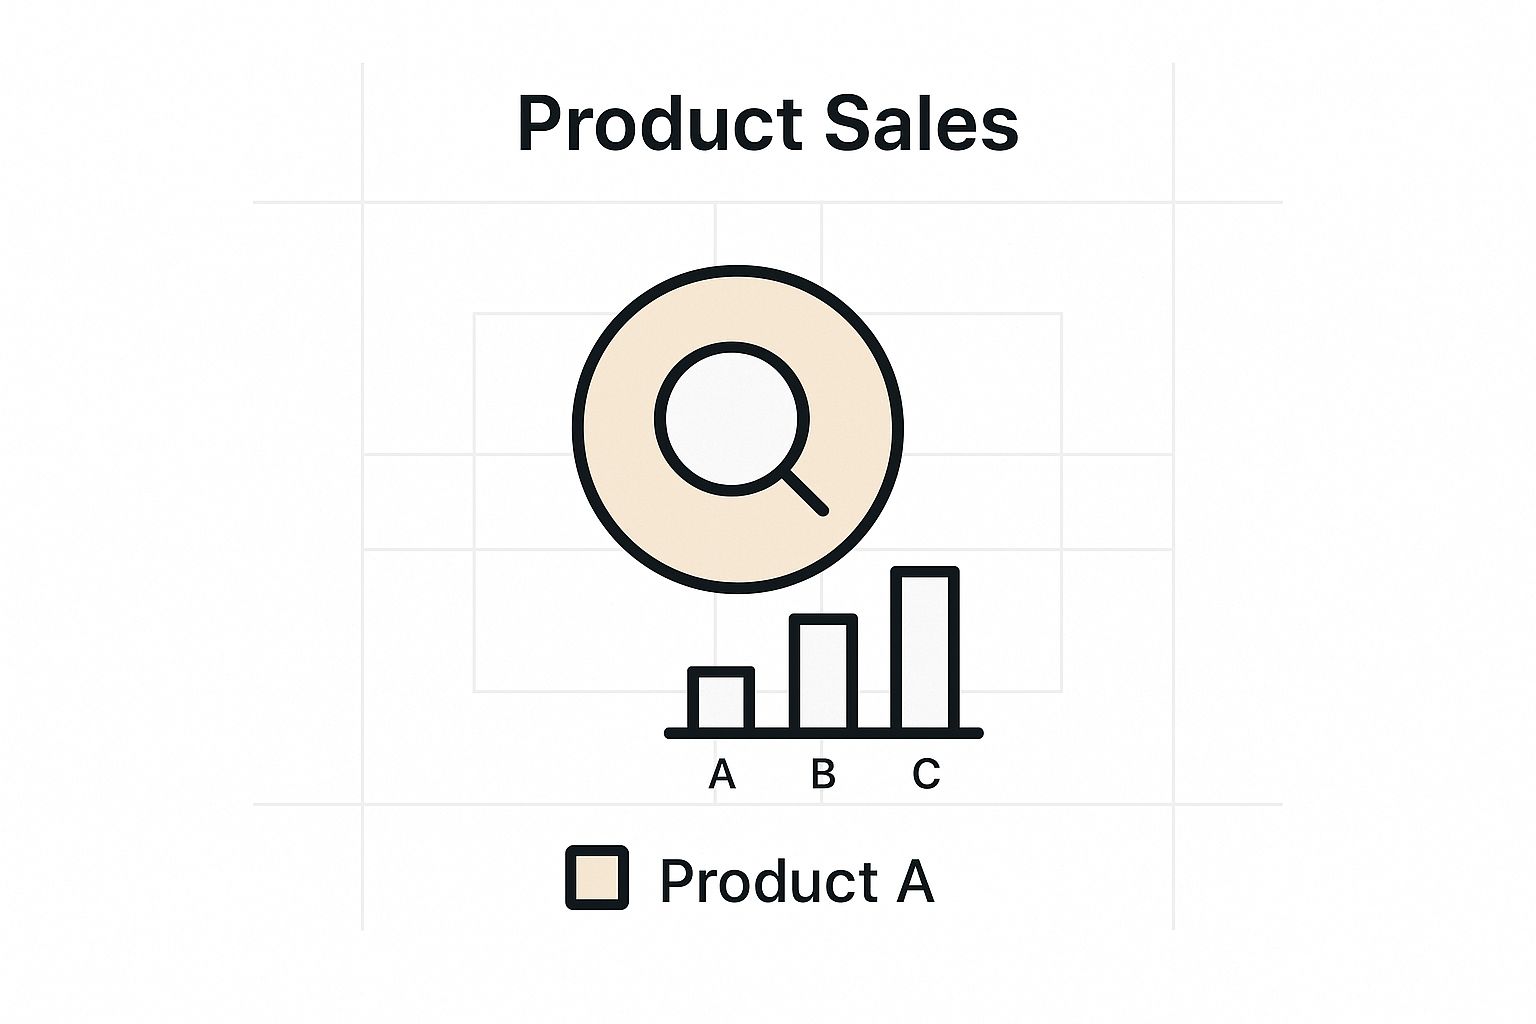
It perfectly illustrates how the 85% frame fill rule and the minimum 1600-pixel size are prerequisites for enabling Amazon's valuable zoom feature.
Core Technical Specifications
These technical details aren't just suggestions; they're firm rules for getting your listing approved and optimized. I've seen firsthand how high-resolution, zoom-enabled images can make a huge difference. In fact, some studies suggest that listings with zoomable images can boost conversion rates by up to 30%, so it's a detail you can't afford to ignore.
Here’s a simple table I put together that you can use as a final check before uploading any image.
Amazon Image Requirements at a Glance
This table breaks down the absolute must-haves for every image you upload to Amazon Seller Central.
| Requirement | Specification | Notes |
| File Format | JPEG (preferred), PNG, TIFF, or non-animated GIF | JPEG is usually the best choice for a good mix of quality and file size. |
| Pixel Dimensions | Minimum 1000px on the longest side | To activate the zoom feature, you absolutely need 1600px or larger. |
| Color Mode | sRGB | This is the web standard and ensures your colors look right on screen. |
| Frame Fill | Product must occupy at least 85% of the image frame | This rule is most critical for your main "HERO" image. |
Following these guidelines ensures your images are not only compliant but also set up to give customers the best possible view of your product.
And if you want to create stunning visuals without breaking the bank, you can pick up some great affordable product photography tips that work well for any budget.
Understanding Core Technical Specifications
Let’s get into the nitty-gritty of Amazon's technical rules. It's easy to see these as just a checklist to get through, but understanding why these specs exist is what separates the pros from the amateurs. Every single rule is there to make the shopping experience better for the customer, which, in turn, helps you sell more.
Think of it this way: Amazon has figured out exactly what makes an image load quickly and look great on any device. When you nail these core technical details, you're essentially plugging your product directly into their high-performance sales engine.
Dimensions and The Power of Zoom
If you remember only one number, make it this one: 1600 pixels. Your image must be at least 1600 pixels on its longest side. This isn't just a random number Amazon picked; it's the key that unlocks the zoom feature, one of the most powerful conversion tools on the platform.
Shoppers want to see what they're buying up close. They want to inspect the texture of the fabric, read the tiny print on the label, and see the quality of the stitching. When your image is large enough for them to zoom in, their confidence skyrockets.
Here's the breakdown: an image under 1000 pixels might get rejected outright. One between 1000 and 1599 pixels will show up, but the zoom function will be disabled. You're leaving a massive sales opportunity on the table by not meeting that 1600-pixel threshold.
File Format and Color Mode
So, what kind of file should you upload? Amazon's go-to format is JPEG (or JPG), and for good reason. It hits the sweet spot between high-quality visuals and small file size, meaning your images load fast without looking fuzzy. Slow-loading images kill engagement.
While Amazon also accepts PNG, TIFF, and non-animated GIFs, JPEG is almost always your best bet for performance.
Just as important is the color mode. You absolutely must use sRGB. This is the universal standard for web images, ensuring your product’s colors look accurate and consistent across different screens. If you upload an image in CMYK (which is for printing), you risk your product looking washed out or having weird, unnatural colors online—a surefire way to cause customer confusion and returns.
A Quick Word on File Naming
While shoppers will never see your file names, getting your internal organization right from the start will save you countless headaches. A chaotic folder of images is a nightmare to manage, especially as you add more products.
Adopting a simple, clear naming convention is a lifesaver. Here’s a structure I’ve seen work wonders:
- File Naming Convention:
ProductID_View_Color.jpg - Real-World Example:
B08N5N275F_Main_Blue.jpgorB08N5N275F_Lifestyle1_Red.jpg
This system makes it incredibly easy to find, update, or replace specific images in Seller Central.
Getting these technical specs right isn't optional; it's foundational. For sellers who want to guarantee every image is perfectly optimized from day one, investing in professional Amazon product photography can give you a serious leg up on the competition.
Mastering Your Main Image for Maximum Clicks
Your main image, often called the "HERO" image, is without a doubt the most important visual on your entire product detail page. It's the first thing a potential customer sees in the search results, making it the deciding factor for whether they click on your listing or scroll right past it. If you don't nail this image and meet Amazon's strict rules, you're not just risking a policy violation—you're actively losing sales before anyone even gets a chance to learn more about your product.
Think of it this way: your HERO image has one job and one job only. It needs to present your product clearly and professionally. Anything else, like extra branding or accessories, just gets in the way and distracts from that core mission.
The Pure White Background Rule
Amazon is an absolute stickler about the main image background, and there's no room for interpretation here. It must be pure white, which translates to RGB 255, 255, 255. We're not talking about off-white, light grey, or a photo taken against a white-ish wall. It has to be perfectly, digitally white. This policy creates a consistent, clean shopping experience across the site, ensuring all products pop without any visual noise.
Honestly, the easiest way to get this right is by using a background removal tool. Many sellers I know rely on AI-powered software to cleanly cut out the product and place it on a compliant background. This saves a ton of time and guarantees you get a perfect result without needing to be a Photoshop wizard.
What Is Strictly Forbidden on Main Images
To keep the shopping experience clean and focused, Amazon has a clear list of what you can't include in your HERO image. Adding any of the following is a fast track to getting your image rejected and your listing suppressed from search results.
- No Text or Graphics: This means no promotional callouts like "Sale" or "New," and you can't even put your brand name on the image.
- No Logos or Watermarks: Your company logo is a definite no-go. Keep it off the image.
- No Inset Images: Don't try to cram multiple views or smaller detail shots into the main image frame.
- No Props or Accessories: The product has to stand on its own. The only exception is if props are absolutely essential to show how the product is used, like a phone case displayed on a phone.
- No People: Unless you're selling in categories like Clothing, Apparel, or Jewelry, you can't show your product on a model.
Following these rules is fundamental to your success, impacting everything from organic ranking to ad performance. Getting the visual presentation right is a cornerstone of any good strategy. In fact, after you've polished your images, you should explore these essential Amazon PPC tips for e-commerce success to see how powerful visuals tie into winning campaigns.
Using Secondary Images to Tell a Compelling Story
If your main image is what earns you the click, it's your secondary images that will ultimately close the deal. The HERO shot has to follow some pretty strict rules, but your other image slots—and you can have up to six of them—give you a lot more creative freedom. This is your chance to stop just showing the product and start telling a real visual story that builds trust, highlights value, and answers a shopper's questions before they even think to ask them.
Think about each secondary image slot as an opportunity to tackle a potential objection or emphasize a key selling point. A well-curated set of images works like your best salesperson, guiding a customer from initial curiosity all the way to confident purchase. Listings with more high-quality images consistently get higher conversion rates, so it’s critical to make every single slot count.
Types of High-Converting Secondary Images
To build that complete visual narrative, you'll want to use a smart mix of different image types. Each one has a specific job to do when it comes to educating and persuading your customer.
Lifestyle Images: Show your product being used in a real-world setting. A photo of someone actually using your kitchen gadget or wearing your jacket helps customers picture the item in their own lives. You're selling an experience, not just an object.
Infographics and Text Overlays: These are perfect for calling out key features, dimensions, or specific benefits. A simple, clean infographic can communicate technical specs or show off the contents of a multi-pack in a way that's much more engaging than a wall of text.
Scale Shots: This is a simple but powerful one. Place your product next to a universally recognized object (like a coin or a person's hand) to give an immediate and clear sense of its true size. This little trick helps manage customer expectations and can dramatically cut down on returns from "item not as described" complaints.
A huge mistake sellers make is just uploading different angles of the product on a plain white background. While a few of those are good to have, they don't tell a story. A truly effective secondary image gallery should feel like a guided tour, showing not just what the product is, but what it does and how it will make the customer's life better.
Bringing Your Visual Story to Life
Creating this much variety might seem like a lot of work, but it’s a non-negotiable part of following the complete amazon product image guidelines. You want to get ahead of every question a customer might have and answer it visually. Show off the premium materials with a detailed close-up shot, explain a complicated feature with a simple infographic, and prove its ease of use with a great lifestyle photo.
Of course, executing this strategy only works if the visuals themselves are clean and sharp. If your infographics or lifestyle photos look unprofessional, they can do more harm than good and undermine customer trust. For sellers who need to produce top-tier, varied images without getting bogged down by complex software, professional product photo editing services can be a fantastic way to ensure every single image is working as hard as possible to turn shoppers into buyers.
Navigating Category-Specific Image Requirements
Just when you think you’ve mastered Amazon’s core technical specs, you might be surprised to find they aren’t a one-size-fits-all deal. Many product categories come with their own unique set of image rules, and overlooking them is a surefire way to get your listing suppressed. It’s absolutely critical to know the specific requirements for what you're selling.
For instance, if you're in Clothing, Accessories, and Jewelry, you'll face much stricter standards for your main images. These categories often demand that the product is shown on a live model, which helps shoppers visualize fit and scale in a way a simple product shot can't. Some apparel even has mandatory angles, requiring you to provide front, back, and side views.

This attention to detail carries over into other niches, all with the goal of creating a better, more informed shopping experience for the customer.
Common Category-Specific Rules
I’ve seen countless sellers get tripped up by these rules, leading to frustrating and entirely avoidable listing rejections. My best advice? Before you even think about a photoshoot, dive into the specific style guides for your category inside Seller Central.
To give you an idea of what to look for, here are a few common examples:
- Shoes: You'll need to provide multiple views. It’s standard practice to show the left shoe by itself, facing left, at a 45-degree angle. You'll also likely need shots of the pair together, a view of the sole, and a top-down angle.
- Jewelry: For pieces like necklaces or earrings, the main image has to show the product either worn by a model or laid perfectly flat. If the piece is intricate, expect to provide detailed close-ups to highlight gemstones and metal craftsmanship.
- Books, Music, and Video (BMVD): This one is straightforward but strict. The main image must be the front cover art, and it has to fill 100% of the image frame. Photos showing the physical book or case at an angle just won't fly for the main "HERO" image.
Always treat the main image rules and your specific category guidelines as two parts of a whole. Cross-referencing them ensures you’re fully compliant, saving you from the headache of getting your product live.
How to Avoid Common Image Violations and Suppressions
Few things are more frustrating for an Amazon seller than seeing a listing suppressed over an image violation. It’s a costly problem, but thankfully, it's almost always preventable. When your images don't play by Amazon's rules, your product can vanish from search results, bringing sales to a grinding halt.
The best way to keep your listings live and healthy is to understand the common pitfalls other sellers fall into.
Diagnosing and Fixing Frequent Errors
A surprising number of suppressions come from a simple mistake: treating the main image like any other photo on the listing. Sellers might be tempted to add a "20% Off" banner, slap their logo in the corner, or show the product with accessories that aren't actually included. These are all huge no-nos for the main image and will get your listing flagged almost instantly.
The fix is straightforward. Keep your main image 100% focused on the product itself, sitting on a pure white background. No extra text, no graphics, no props.
Another common slip-up involves technical specs. An image might look perfect to the naked eye, but if it's only 900 pixels on its longest side, you lose the zoom feature. That's a massive disadvantage when shoppers want a closer look before buying.
Amazon is very particular about its guidelines, and for good reason. One of the most important rules is that the product must fill at least 85% of the image frame. This ensures your product is the star of the show. Crisp, high-quality images free of any blur or pixelation don't just help with conversions; they're your first line of defense against suppression.
The most common violations are often the easiest to fix. Regularly auditing your own listings for these simple mistakes—like an off-white background or a small watermark—can save you from significant headaches and lost revenue down the line.
Proactively managing your images is always a better strategy than reacting to a problem. If things go wrong, you might find yourself needing help with fixing a suspended Amazon account.
Investing in quality photography from the start is one of the smartest moves you can make. Understanding the https://prodshot.net/cost-of-professional-product-photography can help you budget for this essential element of your Amazon business.
Frequently Asked Questions About Amazon Images
Even with a solid grasp of the rules, specific questions about Amazon's product image requirements always come up. Below are some of the most common ones I hear from sellers, along with straightforward answers to help you stay compliant and optimize your listings.
What Happens if My Images Violate Amazon's Guidelines?
If your images don't follow the rules—especially your main image—Amazon can suppress your listing from its search results. This means your product becomes invisible to shoppers, and your sales will flatline until you fix the problem.
Repeated violations could even lead to warnings on your account's health dashboard. It's always a good practice to proactively check your images in Seller Central to make sure they're compliant and avoid any interruptions to your business.
Success on Amazon is often a game of details. Consistently adhering to image policies isn't just about avoiding penalties; it's about maximizing your visibility and presenting a trustworthy, professional brand image to millions of potential customers.
Can I Use My Smartphone for Amazon Product Photos?
Absolutely. The cameras on most modern smartphones are more than capable of producing images that meet Amazon’s technical specs. The key isn't the camera itself, but how you use it.
To get professional-grade results, you'll need a solid setup. This includes:
- Excellent lighting (a lightbox or soft, natural light works best)
- A tripod to keep the camera perfectly still and prevent blur
- Editing apps or software to refine the image and create that pure white background
You can definitely create compliant, high-quality photos without dropping a ton of money on a DSLR camera.
How Many Product Images Should I Upload?
You should always aim to fill all the available image slots, which is usually 6 to 7. Time and time again, data shows that listings with a full set of images have significantly higher conversion rates.
A great image stack gives shoppers a complete picture of your product. Use a mix of studio shots on a white background, lifestyle photos showing the product in its element, and infographics that call out key features and benefits. This comprehensive approach builds trust, answers questions visually, and can even help reduce returns.
What Is the Difference Between an Infographic and a Lifestyle Image?
While both are secondary images, they serve very different purposes.
A lifestyle image shows your product being used in a real-world context. This helps customers imagine it in their own lives and sells the experience of owning your product. Think of a coffee mug on a kitchen counter or a backpack on a hiker's back.
An infographic, on the other hand, uses text overlays, icons, and graphics directly on the image to communicate specific information. It highlights dimensions, explains features, or lists benefits, selling the product's function. Both are vital for creating a well-rounded and persuasive product listing.
Transform your basic product photos into high-converting, compliant images automatically with ProdShot. Stop worrying about complex editing and let our AI handle the work. Try it free today and see the difference professional visuals can make. Learn more at https://prodshot.net.
Subscribe to my newsletter
Read articles from ProdShot Creator directly inside your inbox. Subscribe to the newsletter, and don't miss out.
Written by