How to Automate Your Social Media Posts with MCP and N8N: A Complete Guide
 Developer Harsh
Table of contents

Introduction
MCP have been town of talk recently and No code space isn’t left behind. Following these few days back MCP released 2 MCP nodes - MCP Client Node & MCP Server Node (little ol). As a developer and automation lover, I had to try them out.
Lately I am hardly getting time to post on my social media (X, LinkedIn , Reddit), so I built a social media automation agent using Composio MCP in N8N using the new nodes! (X, L)
So, in this blog I will teach how you can build it from scratch and share my own learning building it.
So, let’s begin!
TL; DR
🚀 Built a social media automation agent using Composio MCP and N8N.
🛠️ Automatically generates and posts content to LinkedIn, X, and Reddit.
⚡ Uses MCP Client + Custom MCP Server—no need to define separate tools.
🧠 Leverages LLM prompts for platform-specific post generation.
💼 Ideal for businesses saves time, cuts setup effort, and boosts productivity.
What’s the build?
We will build an automation agent, that can:
Take a topic.
Generate platform specific personalized posts for LinkedIn, X, Reddit.
Post it on to social media on auto.
Can be modified to any style - For example Naval Ravikant on X.
Fully customizable for your own needs.
Best part - With MCP servers, no need to define separate tools / function for each call.
Sample flow to keep in mind
Topic -> Content Generator(x3) -> MCP Servers Calls(x3) -> LinkedIn, Reddit, X -> Done
With this let’s start defining the workspace
Workspace Setup
Our workspace setup will consist of 3 key steps:
Install / Host N8N
Activate Community MCP Client Node (now defaults)
Define Custom MCP Server
So, let’s get started
1. Install / Host N8N
There are 2 ways to use N8N - Cloud (Paid) / Self Host (Free + License). We will go for 2nd and that too with easiest: *npm hosting!*
Ensure you have node install (npm req).
Head to the N8N Self Host Docs.
Copy the NPM command and paste it in the terminal:
npm install n8n -g- Installs N8N globally.Wait for 5 min, let it install - this isn’t a bug!
Run command
n8nin terminal & when prompted presso.
Once done the interface will open
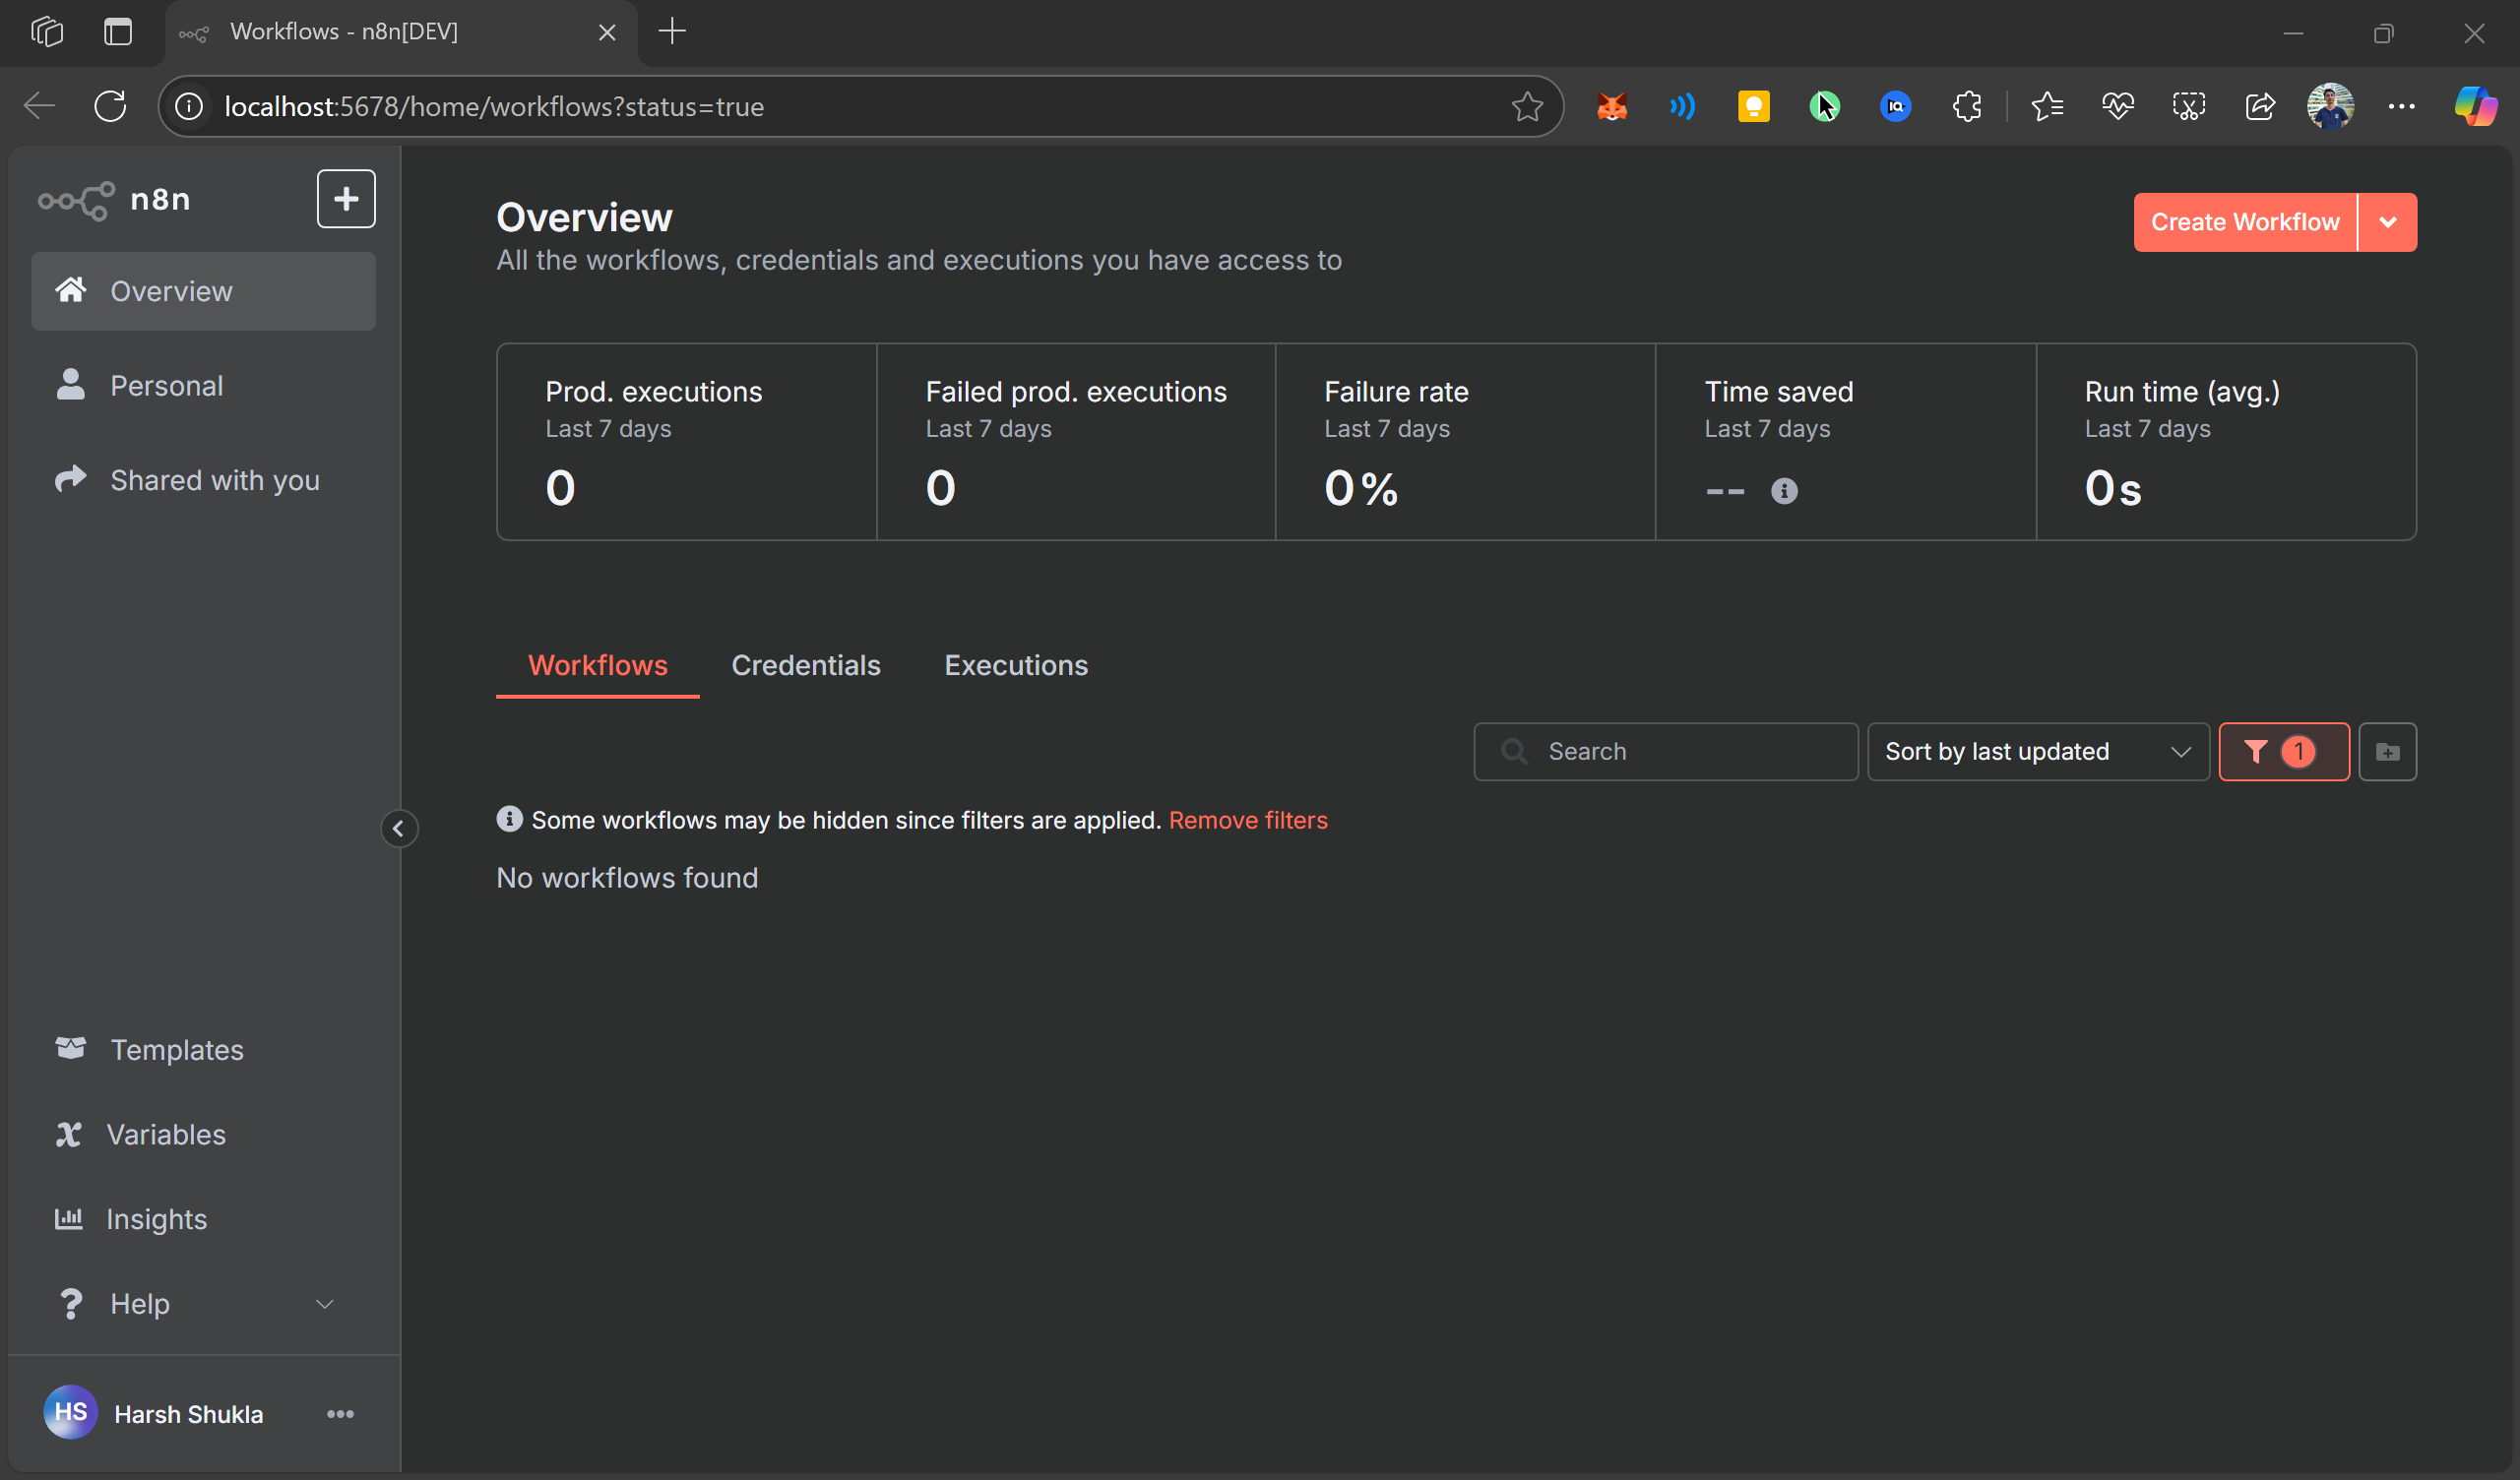
Head to setting and in Usage Tab enter email and paste in the received license code. Though its optional!
Next, we will activate MCP Client Node!
2. Activate MCP Client Node
MCP client node is part of the official N8N nodes, but in case you don’t find it due to version mismatch or other, follow the step to enable it.
Go to Settings → Community Node → Install
Add
npm i n8n-nodes-mcpin text box (npm Package Name) → select tick box → InstallCheck if the node shows up in Community Node Section!
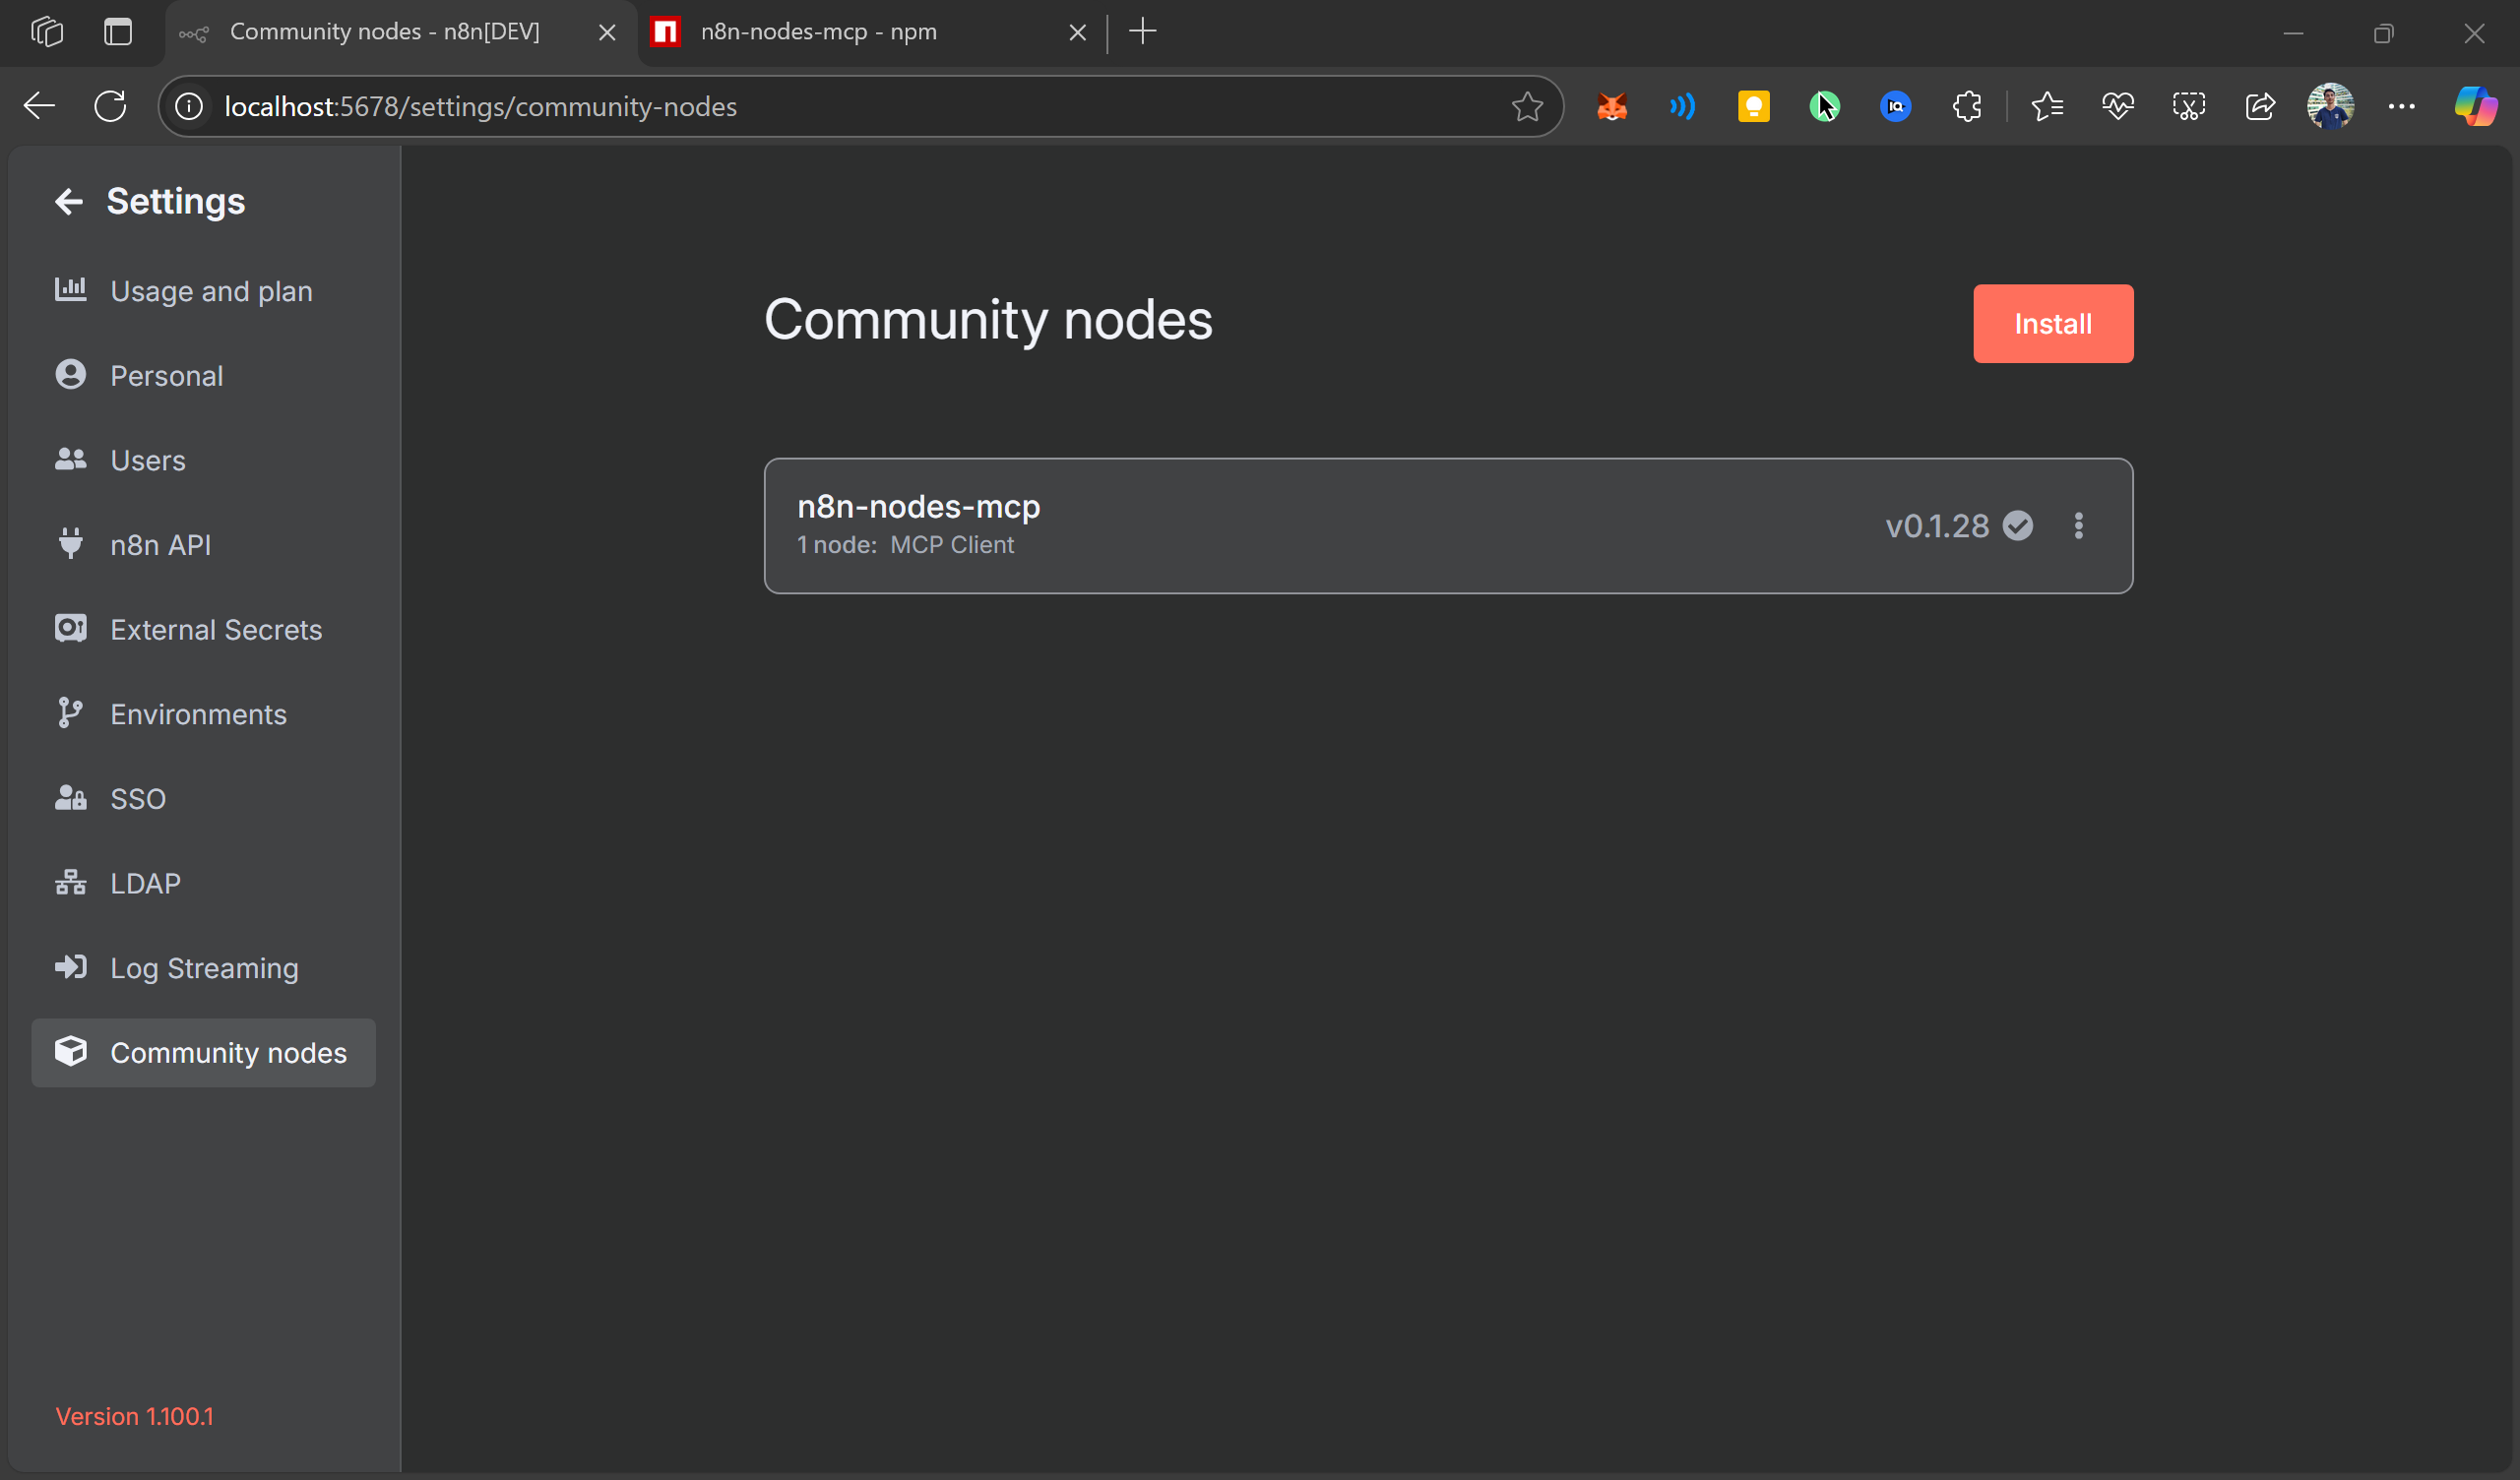
Now you can use it like any normal node.
Now to put MCP client to good use, we need MCP’s servers, let’s add them next!
3. Define Custom MCP Server Using Composio
There 2 ways to define mcp server’s - Local (Self Hosted) & Hosted (Online). In production Hosted ones are used.
There are many ways to get hosted mcp servers, but I prefer using composio as it provided one click setup with O-Auth and Token based authentication built in. Not to mention 200+ tools integrations as well!
Any way’s we will use composio’s custom mcp building feature - perfect for our use case.
In case you want to have 3 separate servers for management feel free to do so, process remain same
Head to Composio MCP
Sign in to account (make one if not - its free!)
Head to dashboard and follow along
Follow the tutorial to set your own one 👇
Note: You need to authenticate all your MCP Server tools (as demonstrated in video), cause right now N8N doesn’t support calling OAuth Modal!
With this we are set to build!
Automation Workflow
For simplicity we will build the workflow in 3 steps corresponding to 3 social media channels - LinkedIn, Reddit, X.
Let’s start by connecting N8N with Custom MCP made earlier!
Note: For beginner’s kindly go through this n8n playlist before proceeding to subsection - its important!
Connect Composio MCP & N8N
With MCP Client tool having HTTP support, connecting Composio mcp’s is simple, follow me:
Create a MCP Client Node - Do a search after clicking + button in editor
From drop down select:
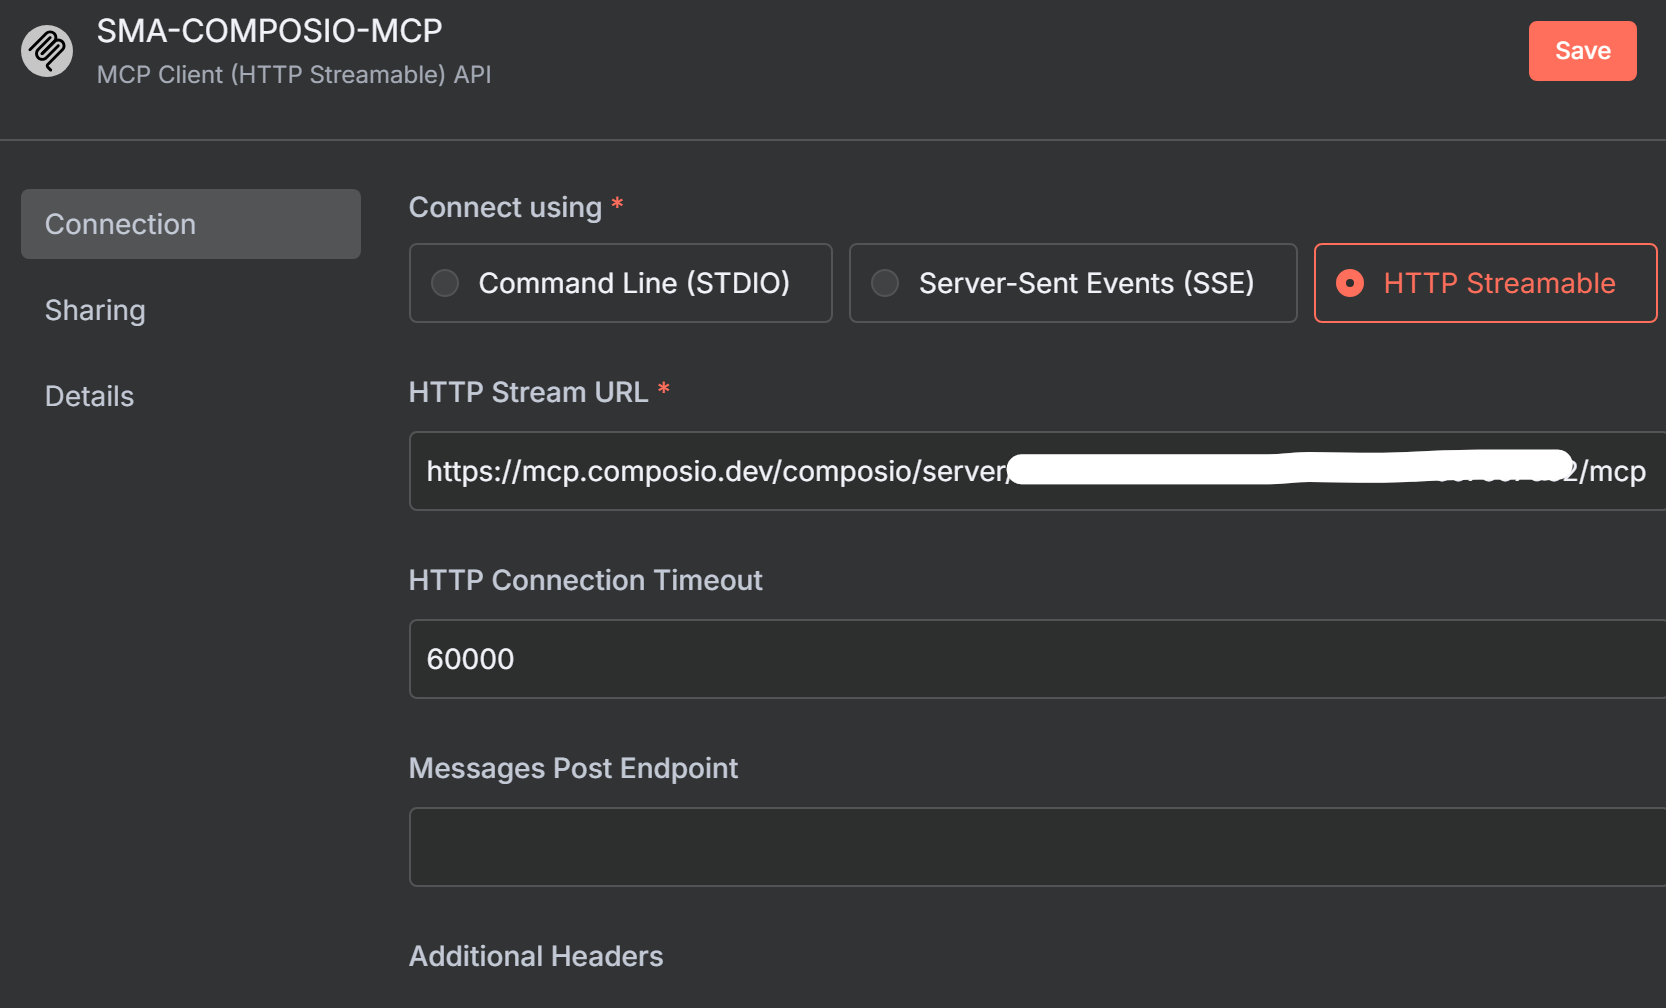
Create new CredentialsIn credential window add the following:
Connect using - HTTP Streamable
HTTP Stream URL - composio server url you copied → till
\mcponly. Ensure a green bar appears at top!Change name to something meaningful - say sma-automation or anything you like!
Save & Done
Here is mine one 😁
For verification, head back and select → List tools and Execute Step. If you get a JSON output, you are good to go 👇
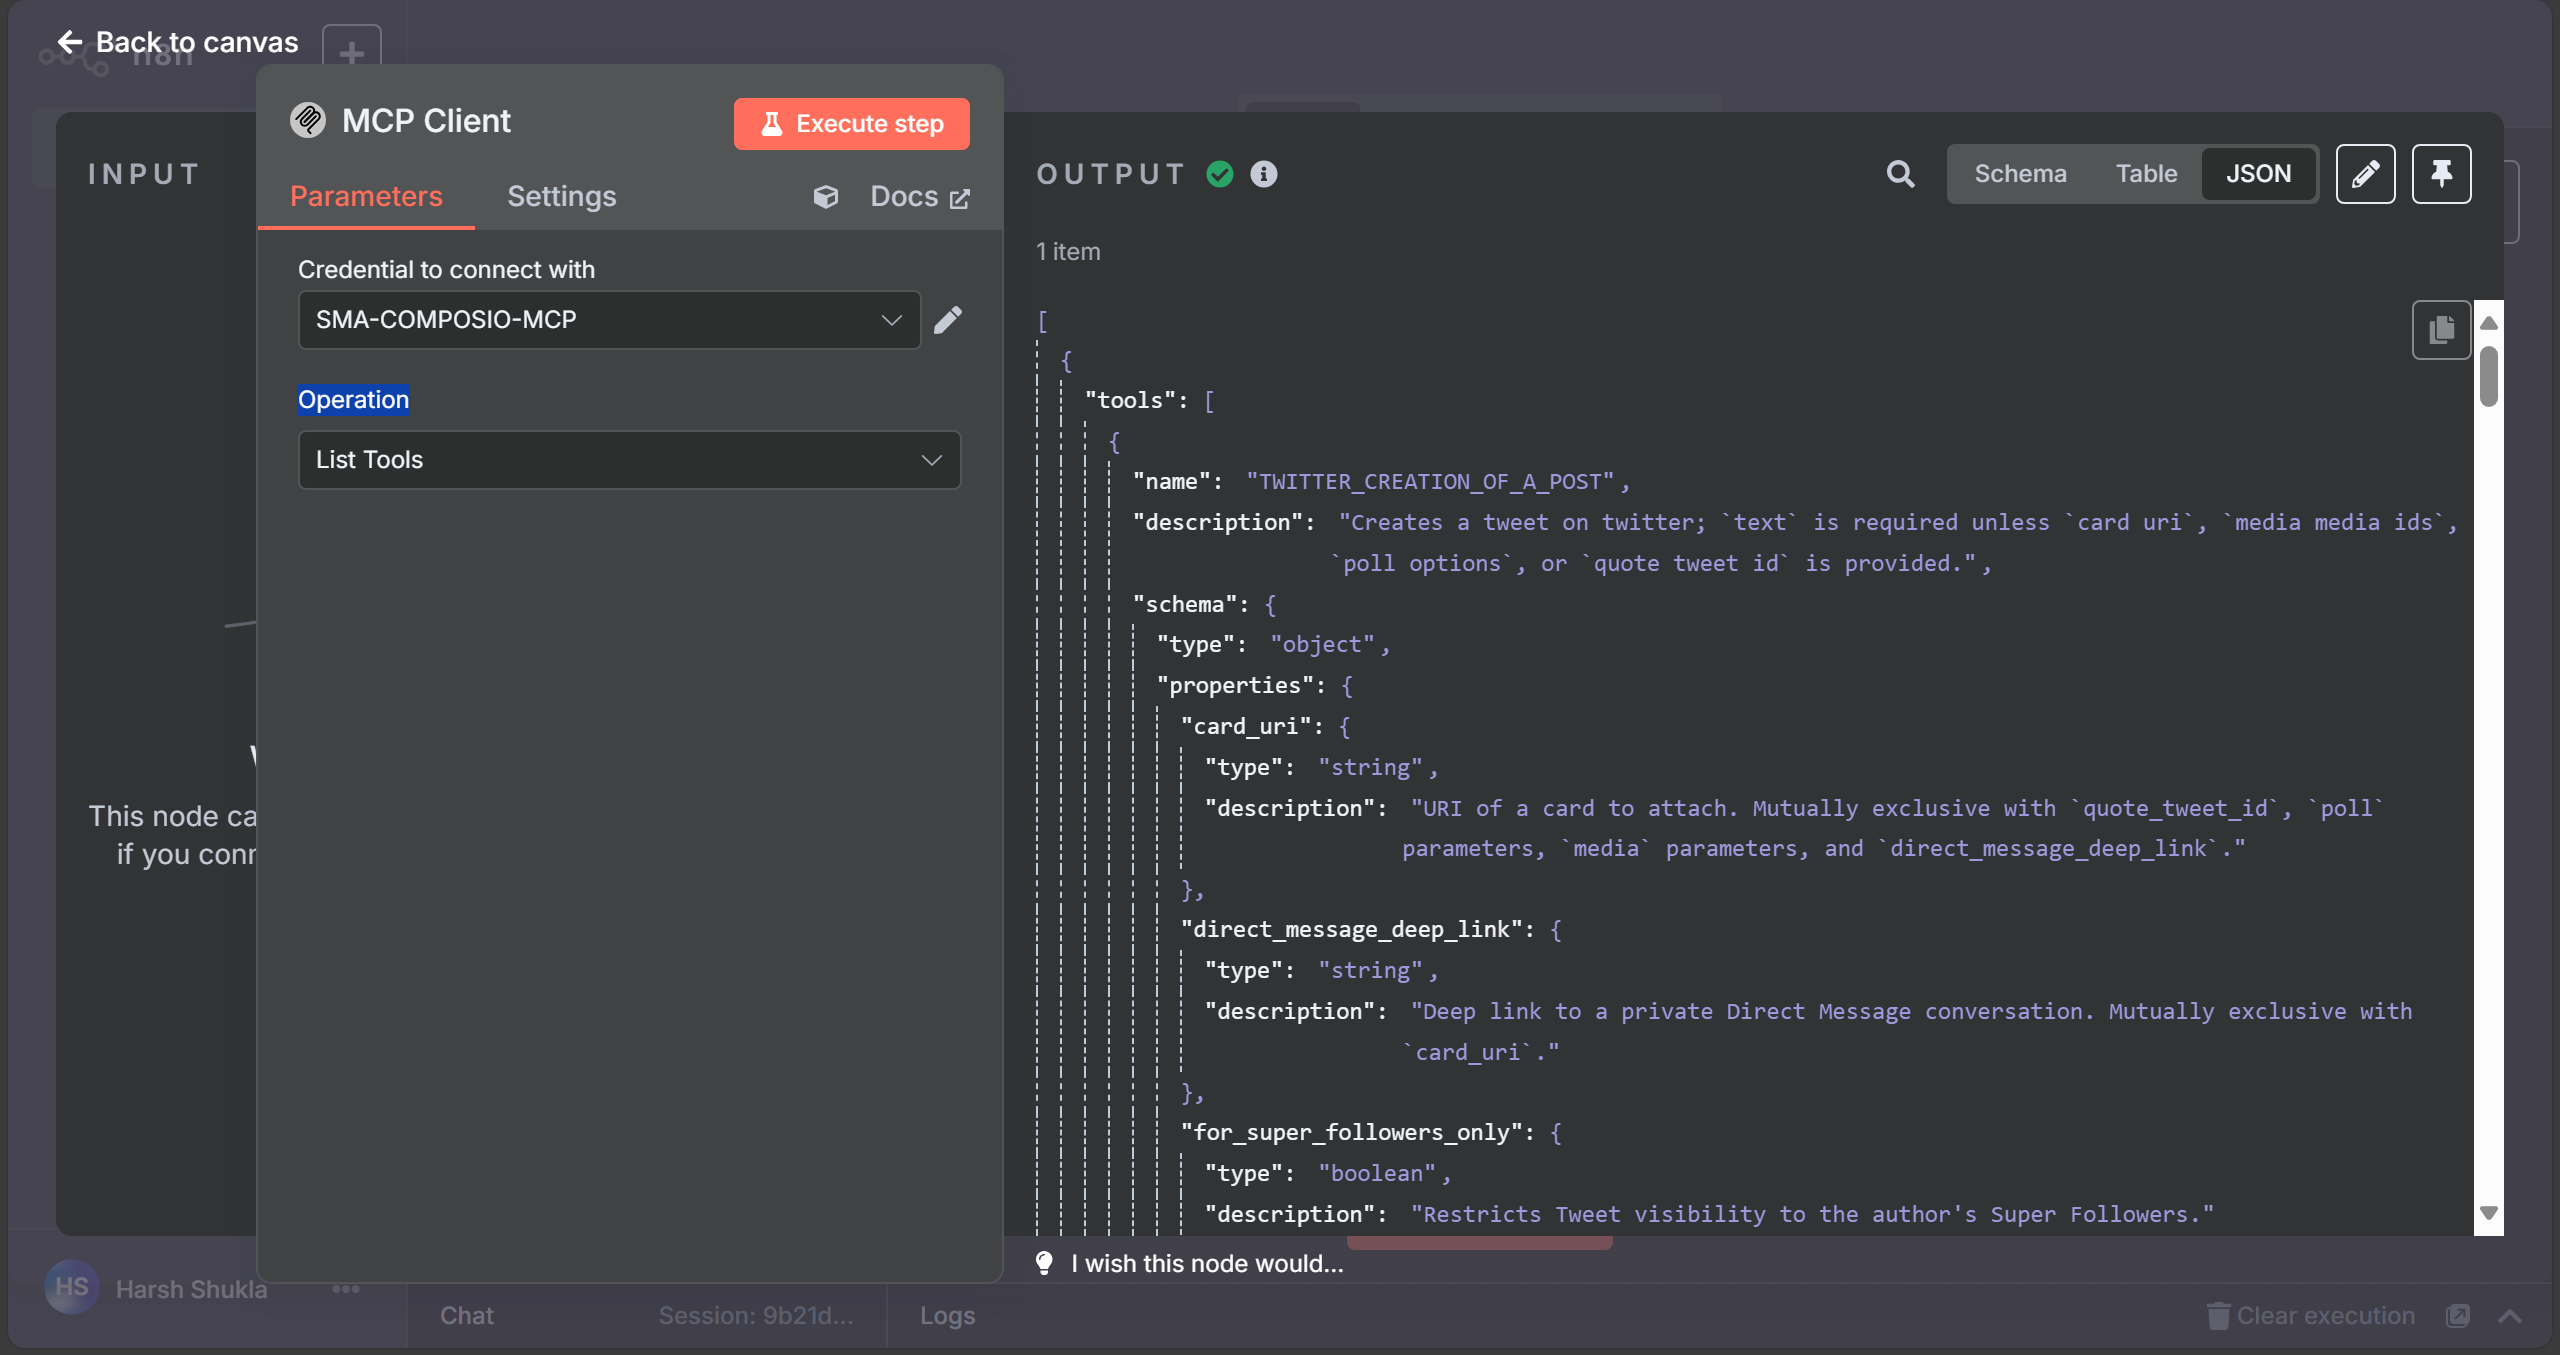
With MCP set and running, let’s start with LinkedIn Automation
LinkedIn Automation Graph
Here is the overview of the flow
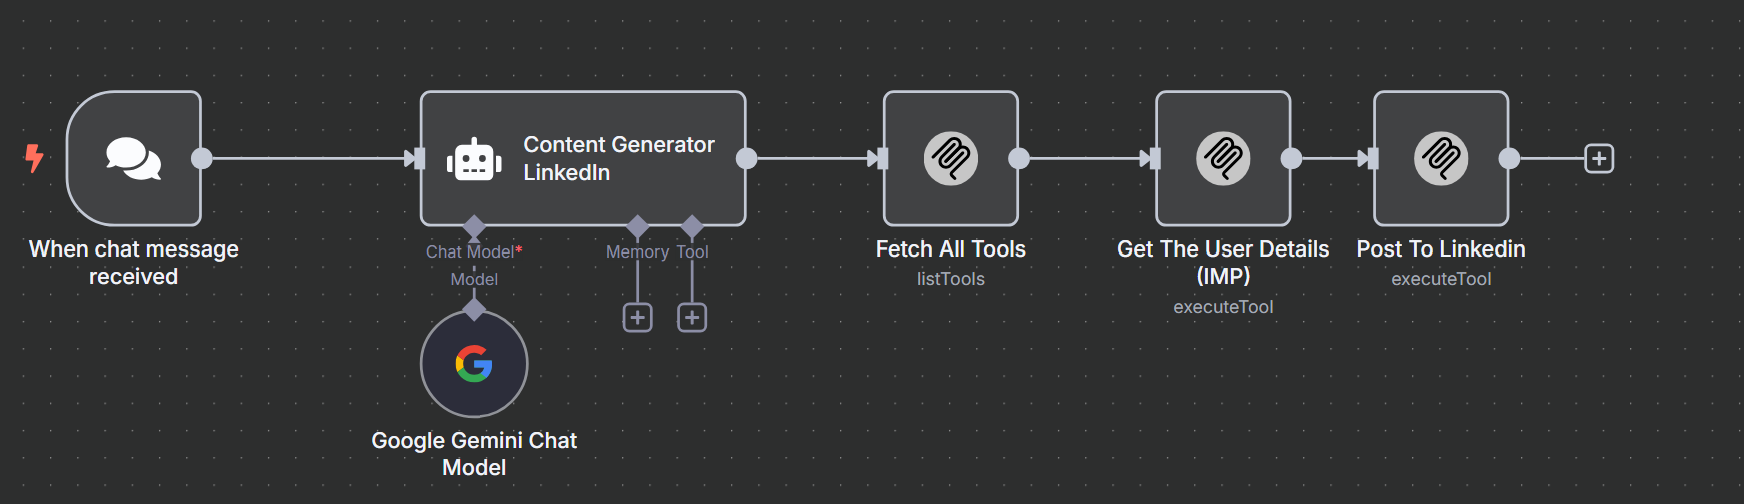
Explanation
→ Chat input Node: Takes in a topic via chat.
→ Agent LLM Node: Uses the topic to generate the content for LinkedIn. Handled via prompt provided in Agent Node - powered by Gemini Model.
→ MCP Client Node: Uses the MCP HTTP URL (copied during workspace section) to handle 3 operations:
Fetch all tools: Fetches all tools present in MCP Server (
sma-composio) - OptionalGet User Details: Fetches the connected account urn using
LINKEDIN_GET_MY_INFO. Very important - required in next step.Post to LinkedIn: Post the generated content to the LinkedIn account authenticated in composio dashboard and verified via urn using the following schema:
Tool Name: LINKEDIN_CREATE_LINKED_IN_POST
Note: You need to select Execute tool in MCP Client Node and feed in the Tool Name as input
{
  "author": "{{ JSON.parse($json.result.content[0].text).data.response_dict.author_id }}",
  "commentary": "{{ JSON.stringify($('Content Generator LinkedIn').item.json.output).slice(1, -1) }}",
  "lifecycleState": "PUBLISHED",
  "visibility": "PUBLIC"
}
important params are author → fetch author_id (urn), commentary → generated content with special character escaped, keep rest default
With this our LinkedIn automation workflow is done - you can test it out yourself!
Reddit Automation Graph
Here is the overview of the flow:
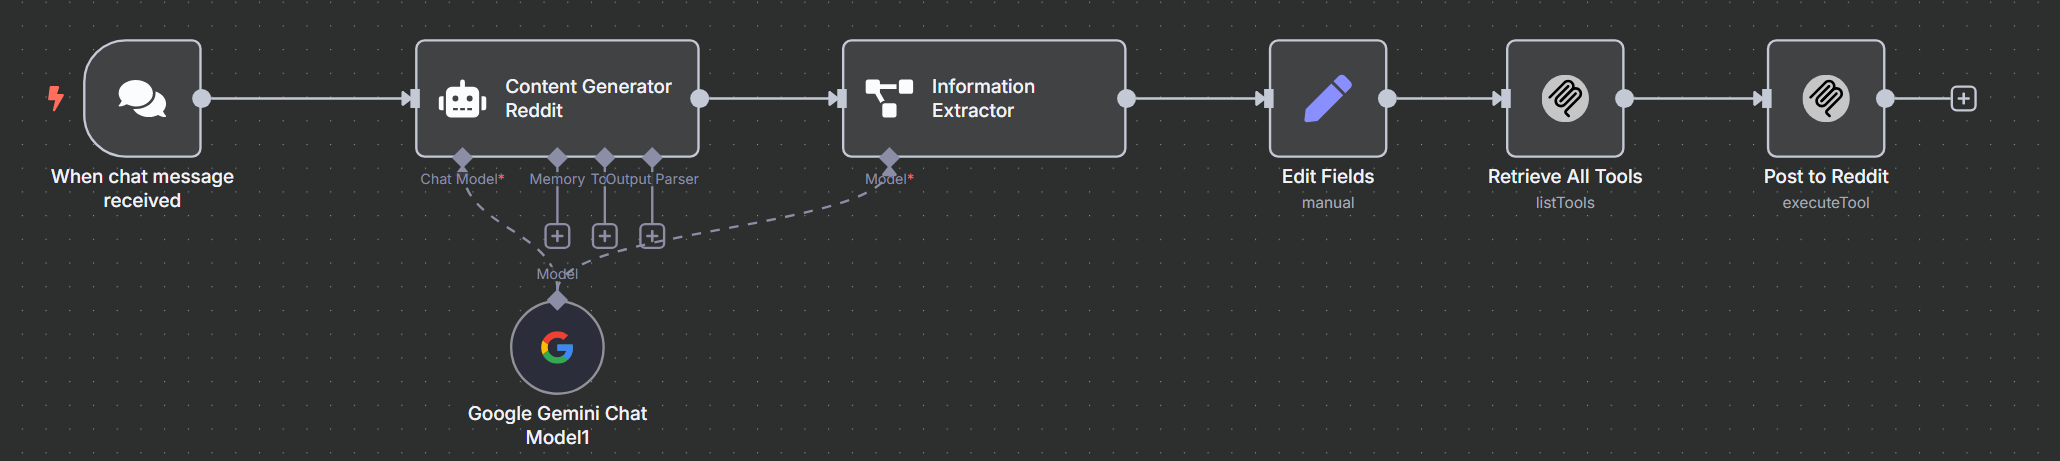
Explanation
→ Chat input Node: Takes in a topic via chat.
→ Agent LLM Node: Uses the topic to generate personalized content for Reddit. Handled via prompt provided in Agent Node & powered by Gemini Model. Returns a json text output.
→ Information Extractor Node: Extract the title and content from the generated JSON text and stores in JSON. - powered by Gemini Model.
→ Set Node: Fetches the title and content and maps the two JSON Schema. - Optional node to ensure data integrity.
→ MCP Client Node: Uses the MCP HTTP URL (copied during workspace section) to handle 2 operations:
Fetch all tools: Fetches all tools present in MCP Server (
sma-composio) - OptionalPost to Reddit: Post the generated title & content to the Reddit account authenticated in composio dashboard using the following schema:
Tool Name: REDDIT_CREATE_REDDIT_POST
{
  "flair_id": "",
  "kind": "self",
  "subreddit": "n8n_test_demo",
  "title": "{{ $('Information Extractor').item.json.output.title }}",
 "text": "{{ JSON.stringify($('Information Extractor').item.json.output.content).slice(1, -1) }}"
}
Important params are title → extract title from the information extractor / set node; text → generated content with special character escaped, subreddit: subreddit name; keep rest default.
Note: Its highly recommended you use your own subreddit, cause low quality post to any public sub reddit affect your karma points.
With this our Reddit automation workflow is done - you can test it out yourself!
X Automation Graph
Here is the overview of the flow:
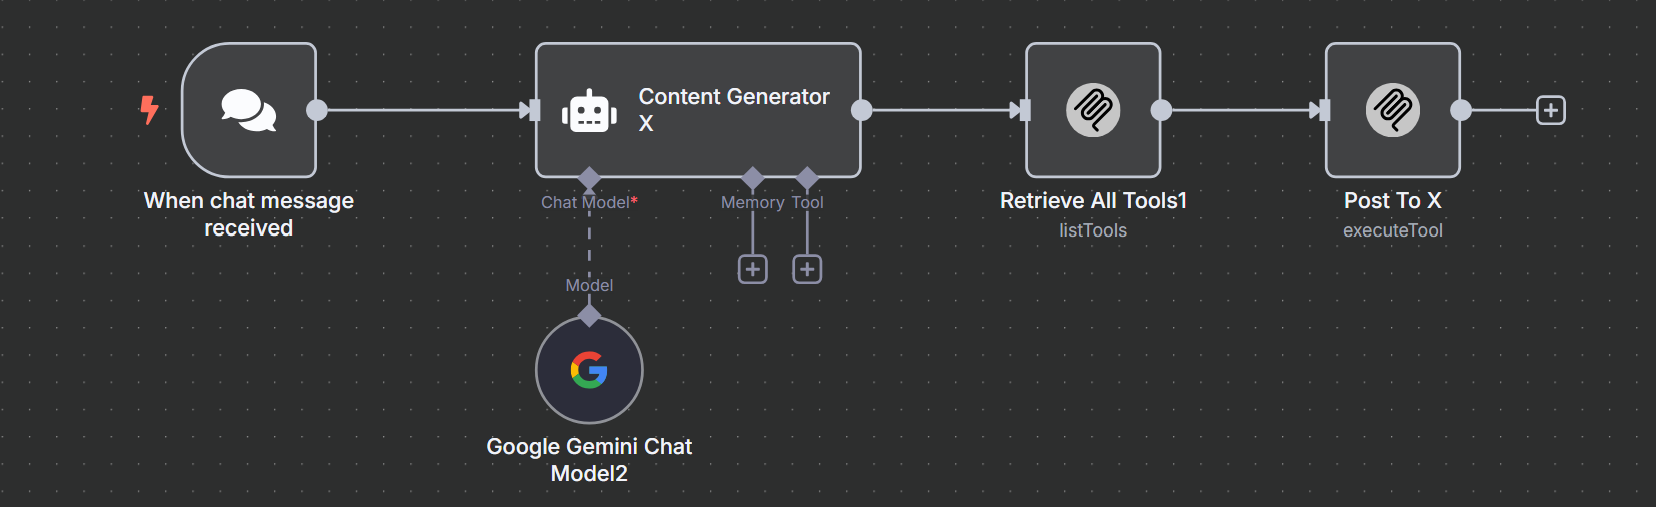
Explanation
→ Chat input Node: Takes in a topic via chat.
→ Agent LLM Node: Uses the topic to generate personalized content for Reddit. Handled via prompt provided in Agent Node - powered by Gemini Model. I have tuned it generated Naval Ravikant style post - personally like a lot!
→ MCP Client Node: Uses the MCP HTTP URL (copied during workspace section) to handle 2 operations:
Fetch all tools: Fetches all tools present in MCP Server (
sma-composio) - OptionalPost to X: Post the generated content to the X account authenticated in composio dashboard using the following schema:
Tool Name: TWITTER_CREATION_OF_A_POST
{
  "text": "{{ JSON.stringify($('Content Generator X').item.json.output).slice(1, -1) }}"
}
Important params is text → generated content with special character escaped, for now media only supported as base64 format, but a native support will be available soon as per composio docs.
Testing The Flow!
The final flow looks like this:
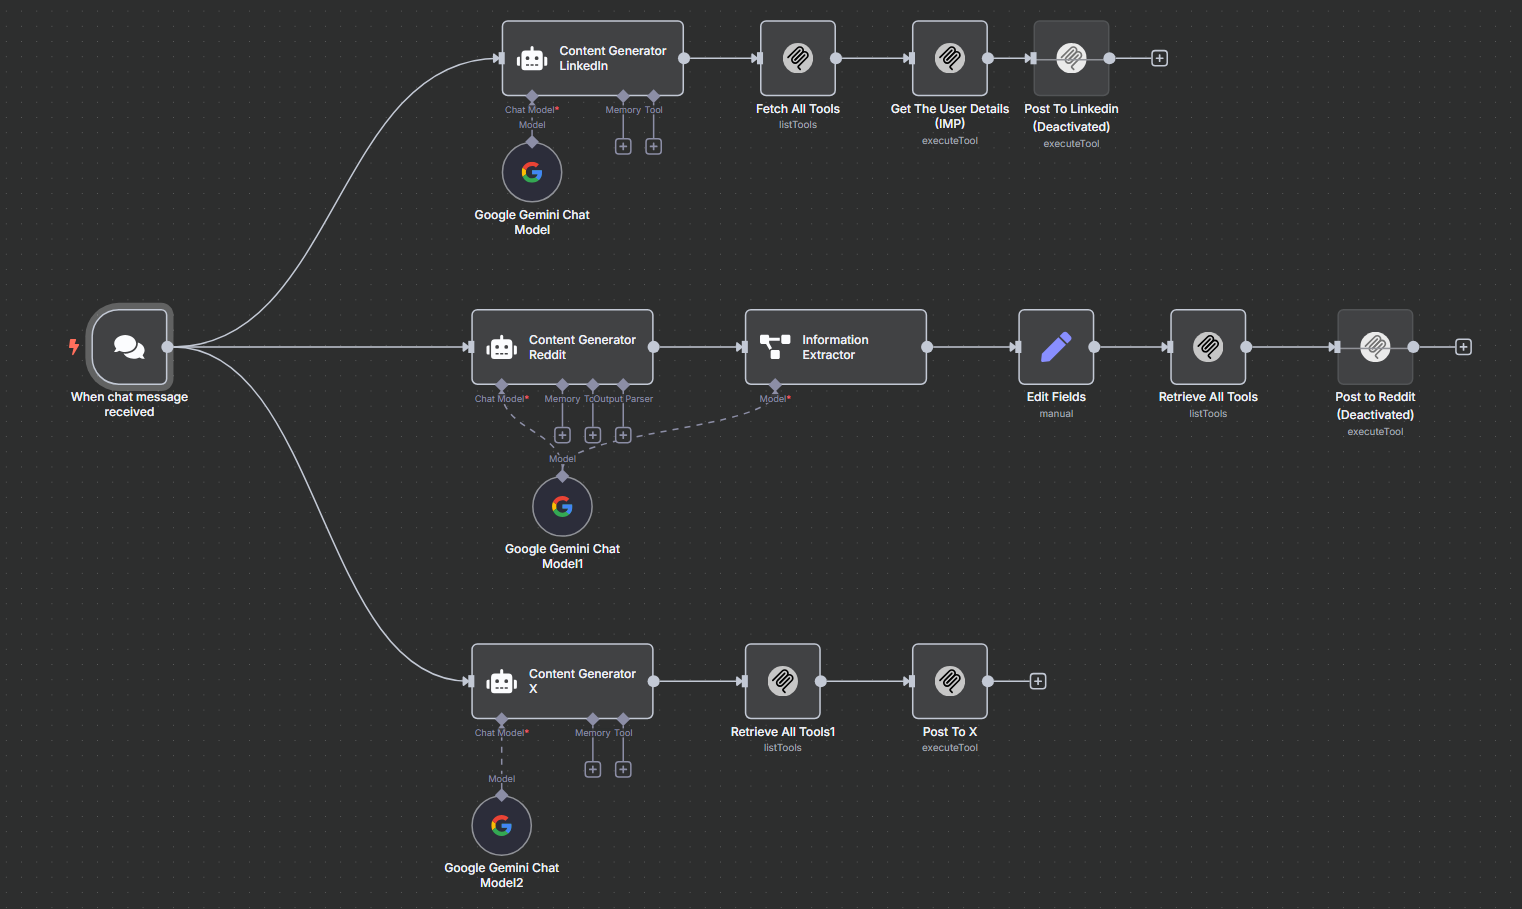
Only thing changed is connecting all the automation graphs with chat node!
Now let’s execute the flow - testing on Topic: AI Agent!
SMA Automation Agent Demo
Perfect. the agent generated content specific to all platform, used mcp to post to relative platforms.
Not the best flow for production, but definitely a step forward building automations!
Final Thoughts
With Composio MCP & N8N, you didn’t have to worry about defining tools, linking them to LLMs, or wiring multiple nodes in n8n.
Just spinning up a single, self-hosted MCP server was enough—it took care of all the heavy lifting.
For businesses, that translates to faster automation delivery, lower setup cost, and better developer productivity.
That wraps up this article!
Want the exact flow I used? Drop a comment and I’ll be happy to share it.
Subscribe to my newsletter
Read articles from Developer Harsh directly inside your inbox. Subscribe to the newsletter, and don't miss out.
Written by
Developer Harsh
Developer Harsh
Harsh who runs YouTube channel, loves Deep learning. Currently he works as a freelance Gen AI developer to help business leverage gen-ai products. In free time he loves to share his knowledge around the glob