Learning Linux: Week 3 – IP Addresses, Web Servers & Mail Servers
 MRIDUL TIWARI
Table of contents

From here on out, I stick with one Udemy course named: https://www.udemy.com/course/complete-linux-training-course-to-get-your-dream-it-job , following the curriculum from it and learning from articles and official docs
Hostname and IP Lookup
The hostname of a server is intended to provide a human readable name. Many services make use of the hostname. by just typing hostname
Type the following on systems with the hostname binary:
hostname <new-hostname>
Where <new-hostname> is the hostname you would like to use. This change is only temporary and will be written over next time you reboot. To make it permanent edit the /etc/hostname file with the hostname you would like to use.
Type the following on systems with the hostnamectl binary:
hostnamectl set-hostname <new-hostname>There are 4 useful tools for testing name resolution
ping
provided by
iputilspackage , installed by default-c→ the number of packets to trasnferIf the
pingby IP address fails, you have a network connectivity problem rather than a name resolution problem, and you can troubleshoot in that direction.
nslookup
provided by
bind-utilspackagehas two modes
interactive
non-interactive
this mode resembles functionality of dig and host commands
nslookup server01
This output should display the IP address for server01, along with information about which server resolves the name. If this fails, it indicates a name resolution problem.
dig

It is showing non-authoritative, as we do not have any information about google.com stored on my local computer
Server, Address at start is of our DNS resolver
dig→ a lot more information can be found via dig than nslookup
host
Here is the basic syntax for a forward lookup:
host server01
Here's the syntax for a reverse lookup:
host 192.168.1.101
Querying for SOA records relies on the
-Coption:host -C example.com
The
-toption causes thehostcommand to display the specified record type. The following example queries for the MX records of example.com:host -t mx example.com
If you're not sure which record types you need or if you want to see them all, use the
-a(any) option:host -a example.com
To narrow the query's scope to either IPv4 or IPv6 records, add the -4 or -6 options to the regular syntax. This may speed up query results in large networks or provide the focused information you need for additional troubleshooting.
Network Time Protocol
Also known as NTP, purpose → time synchronization with external clock within you organization
Configuration file can be set to →
/etc/ntp.confService is named
ntpdAfter making changes in configuration file run:
systemctl restart ntpd
systemctl enable ntpd
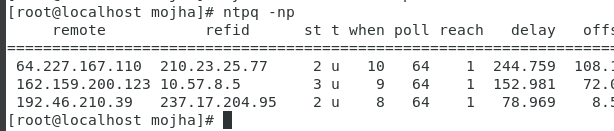
Command → ntpq
-n→ ths is used for displaying output of all host addresses in dotted-quad format-p→ this is used to display peers which are identified by servers
chronyd
latest package or software that is used nowadays as alternative to NTP
Purpose →Time Synchronization
Package-name → chronyd
configuration file →
/etc/chronyd.conflog file →
/var/log/chronyservice →
systemctl start/restart chronydprogram command →
chronycsources
| Aspect | chronyd | ntpd |
| Network Access | Works well with intermittent access to time sources | Requires regular polling of time sources |
| Performance Under Congestion | Performs well under network congestion | Performance may degrade |
| Sync Speed & Accuracy | Faster and more accurate synchronization | Slower to stabilize after clock changes |
| Clock Drift Handling | Quickly adapts to sudden clock rate changes (e.g., temperature) | Takes longer to adapt |
| Post-Sync Time Stepping | Never steps time after initial sync (default) | Can avoid stepping but with accuracy trade-offs |
| Clock Adjustment Range | Can adjust time over a larger range; handles unstable clocks well (e.g., VMs) | Limited range of clock adjustment |
| Resource Usage | Lightweight, low memory, power-efficient | More resource-heavy |
| Manual Time Corrections | Supports manual time entry and learns drift rate | No support for manual entry correction |
| RTC (Real-Time Clock) Drift Compensation | Learns RTC drift and uses it at boot (Linux only) | No support |
| Hardware Timestamping | Supports hardware timestamping (Linux) | No support |
| NTP Operating Modes | Limited; does not support all NTP v4 modes | Supports broadcast, multicast, manycast modes |
| Public Key Authentication | No support for Autokey, but likely to adopt NTS | Supports Autokey (RFC 5906) (insecure, deprecated) |
| Reference Clock Support | Depends on external tools like gpsd | Has built-in drivers for reference clocks. |
timedatectl (New system utility)
timedatectlcommand is a new utility for RHEL/CentOS 7/8 based distributions, which comes as a part of systemd system and service managemerIt is a replcaement for old traditional date command
it will show/change date,time and timezone
It synchronizes the time with NTP server as well
You can either use chronyd or ntpd and make the ntp setting in timedatectl as yes
Or you can use systemd-timesyncd daemon to synchronize time which is a replacement for ntpd and chronyd
Redhat/CentOs doesn’t provide this daemon in its standard repo. You will have to download it separately
to check time status
timedatectl
to view all available time zones
timedatectl list-timezones
to set the time zone
timedatectl set-timezone "America/New_York"
to set date
timedatectl set-time YYYY-MM-DD
to set date and time
timedatectl set-time '2015-11-20 16:14:50'
to set automatic time synchronization with a remote NTP Server
timedatectl set-ntp true
Mail Server
Mail server is a computer system that sends and receives emails
Purpose of mail server is to handle storage , processing , delivery of emails between users and domains
Postfix is a program that runs on your linux system that is used to send or receive emails but primarily used to send emails
config file for postfix →
/etc/postfix/main configuration file →
/etc/postfix/main.cfThis is where we define out “Mail-Relay Server”
its a server that setup in company env that accepts a mail and then delivers it
it can be a windows or a linux server
once configuration changes done (add relayhost) , you should restart the postfix service to apply those changes
systemctl restart postfix
once of those programs that don’t have
din the end of its name but still runs as a daemon in the backgroundto send a mail →
mail -s <subjectLine> <email>Press enter it will bring you to an interactive mode similar to
vimWhen done type press → Ctrl + D → to send the email
Another package that you need to install other than
postfixiss-nail(Simple nail)why?
well postfix handles emails on server, while s-nail provides the command that allow us to write and send emails on terminal
Web Server
a network service that serves content to a client over web.
purpose = serve webpages
There are two available ways for serving web pages:
Apache HTTP Server
httpdopen source web serverThe
systemdunit file forhttpdhas different behavior from init scriptA graceful restart is used by default when service is reloaded
A graceful stop is used by default when service stopped
config files ⇒
/etc/httpd/conf/httpd.confhttp file →
/var/www/html/index.htmllog files →
/var/log/httpd
in configuration files its mention that it
- Listens of 80 or for secure website on 443
open the port in firewall or SG
/var/cache/httpd→ directory is packaged withproxyandsslsubdirectory/usr/share/httpd/icons→ directory containing set of icons used with directory indices/usr/share/httpd/manual→ This directory , contained inhttpd-manualpackage, contains HTML version of manual/usr/share/httpd/error→ Custom multi-language HTTP error pages.
Nginx
Apache HTTP Server is more flexible , but server admin prefer NGINX for two main reasons:
It can handle a higher number of concurrent requests
It has faster static content delivery with low resource usage
powerful high performance webserver that helps websites to handle large number of visitors efficiently
can be used as reverse-proxy, mail-proxy, loadbalancer and http cache
Reverse Proxy
act as a middle man between internet and backend server
when you make a request , that first goes to reverse-proxy which then route it to where the actual content of server is stored
Nginx makes sure that websites load fast and can manage a lot of traffic even at peak times
Nginx was developed to solve the problem (C10k : handling 10k concurrent connections)
- as Apache struggled to handle high traffic
Nginx core is still free on linux servers
configuration file →
/etc/nginx/nginx.conf/etc/nginx/conf.d/myfirstlinux.conf
Test the nginx →
nginx -tWhy we create a sepate configuration file?, so that in case the custom file gets corrupted or has some issue, the main configuration file remains untouched and unaffected
Many a times you encounter
403 Forbidden, in most cases , the files in the web directory don’t have rightselinux context: meaning nginx or any other process isn’t allowed to access them due strict SE Linux Policycheck via
sestatusif mode of config is in enforcing mode, then we need to tell the linux that these are for nginx to access via
chcon -R -t httpd_sys_content_t /var/www/centosserver/htmlin case of 502 Bad Gateway
setsebool -P httpd_can_network_connect 1
Nginx is faster and relatively lighter on resources because it doesn’t embed a dynamic programming language processor, when a request for static content comes, it simply responds with the file without running any additional processes
In cases where it need to handle requests that require dynamic programming language processor, it simply delegates the task to seperate processes such as PHP-FPM, Node.js , Python.
- when the process finishes NGINX reverse proxies the response back to client

Directives
everything inside NGINX config is a directive
Simple Directive
contains Directive name and space delimited parameters
listenreturnTerminated by
;
Block Directive
similar to simple directive except they end with a pair of curly braces
{}enclosing additional instructionDirective inside block directive is called “Context”
Four Main context in NGINX:
events { } → used for setting global config, as to how NGINX is going to handle request
- can be only one event context in a valid config file
http { } → used for defining configuration regarding how the server is going to handle HTTP and HTTPS requests
- can be only one http context in a valid config file
server { } → nested inside http context and used for configuring specific virtual server within a single host
- can be multiple server context in a valid config file each server context is considered a virtual host
type {} → nested inside http context, this helps tell the nginx that we have included html adn css files not plain text files.
- Its too cumbersome to write it for everytime we add a new extension file, so NGINX made it easy for us by having a file name mime.types in the nginx folder, we can simply
include /etc/nginx/mime.types, to get all the extensions at one,
- Its too cumbersome to write it for everytime we add a new extension file, so NGINX made it easy for us by having a file name mime.types in the nginx folder, we can simply
                    events {

                    }
                    http {
                            #types {
                            #       text/html html;
                            #       text/css css;
                            #}
                            include /etc/nginx/mime.types;

                            server {
                                    listen 80;
                                    server_name nginx-handbook.text;
                                    #return 200 "Bonjour!";
                                    root /srv/nginx-handbook-projects/static-demo;

                            }
                    }
main → anything written outside of the three context specified above will be on main context (its config file itself)
Dynamic Routing
location { } → this allows us to tell NGINX what to return for specific paths via either prefix or exact matches
There can be multiple location context within a server context
                location /agatha {
                    return 200 "Working!";
                } # prefix , means ever path starting with /agatha will respond this

                location =/agatha {
                    return 200 "Working Agatha";
                } # exact match , only /agatha will return this nothing else

                location ~ /agatha[0-9] {
                    return 200 "Working Regex Agatha";
                } # regex match, used to check location URLs against complex regular expressions (case-sensitive by default)

                location ~* /agatha[0-9] {
                    return 200 "Working Regex Agatha";
                }# regex match with case-insensitive

                # to change priority of match you can use '^~'
                 location ^~ /Agatha8 {
                            return 200 "prefix matched.\\n";
                } # now this will have higher priority
Variables in NGINX
variables are similar to variables in other programming languages
set directive → used to declare new variables anywhere within the configuration file
            set $<variable_name> <variable_value>;

            # set name "Farhan"
            # set age 25
            # set is_working true
Variables → 3 types
String
Integer
Boolean
$hostand$urivariables hold the root address and requested URI relative to the root$argsvariable , contains all query strings- Redirect and rewrite
location = /about_page { return 307 /about.html; } # redirecting to a page when a certain route is hit server { listen 80; server_name nginx-handbook.test; root /srv/nginx-handbook-projects/static-demo; rewrite /index_page /index.html; rewrite /about_page /about.html; } # rewrite operation are more expensive as when a rewrite happens, the server context gets re-evaluation by NGINXtry_filesdirective
lets you check for existence of multiple fieles
            try_files /the-nginx-handbook.jpg /not_found;

            location /not_found {
                return 404 "Not found!";
            } # instructing to look for the jpf file but if doesn't exist , go to the /not-found
no matter what URL you visit, as long as request is received by server and the-nginx-handbook.jpg file is found on the disk, NGINX will send that back.
Usually written as
try_files $uri /not_found→ instructing to try the uri request by client first, if doesn’t exist then try /not_foundIssue: it will show Not Found for http://nginx-handbook.test
solution:
try_files $uri $uri/ /not_found→ you’re instructing to first try requested URI , if not works then try for requested uri as a directory, whenever NGINX endsup into a directory it automatically looks forindex.html
- Logging in NGINX
by default logs are located in
/var/log/nginxreload → NGINX Signal , if not dispatched, it will keep writing logs to previously open streams and new files will remain empty
/var/log/nginx/access.log→ any request to the server will be logged to this file by default, can change this behaviour by usingaccess_log offinside location directive oraccess_log /var/log/nginx/admin.logto log inside this file/var/log/nginx/error.log→ holds failure logs , you’ll need to crash NGINX to make entry logsError logs have level
emerghas to be addressed right away, system is unstable state and requires immediate actionalertprompt action is requiredcritthere are problems that need to be critically addressederrorsomething was unsuccessfulwarn– Something unexpected happened, however is not a cause for concern.noticeentry is harmless , somwthing normal happened that is worth notinginfoinformaiton messagedebuguseful debugging information to help determine where the problem lies
can override the behavior of recording all levels using
error_logdirectiveevents { } http { include /etc/nginx/mime.types; server { listen 80; server_name nginx-handbook.test; error_log /var/log/error.log warn; return 200 "..." "..."; } }- NGINX as Reverse proxy
NGINX sits between client and backend server.
client sends request to NGINX , which passes the request to backend
Once backend server finishes processing the request, it sends back to NGINX which return the response to client
            events {

            }

            http {

                include /etc/nginx/mime.types;

                server {
                    listen 80;
                    server_name nginx.test;

                    location / {
                            proxy_pass "<https://nginx.org/>";
                    }
                }
            }
when you go to nginx.test , the content shown will be from nginx.org page while the URI remains unchanged
- for websocket connection
events {

}

http {
  listen 80;
  server_name nginx-handbook.test

  location / {
      proxy_pass <http://localhost:3000>;
      proxy_http_version 1.1;
      proxy_set_header Upgrade $http_upgrade;
      proxy_set_header Connection 'upgrade';
  }
}
proxy_http_version → directive set HTTP version for server
- default → 1.0 , for web socket requires it to be atleast 1.1
proxy_set_header → directive, used for setting header on backend server
- Generic Syntax:
proxy_set_header <header name> <header value>
- Generic Syntax:
By default, the connection will be closed if the proxied server does not transmit any data within 60 seconds
- NGINX as Load Balancer
events {

}

http {

  upstream backend_servers {
      server localhost:3001;
      server localhost:3002;
      server localhost:3003;
  }

  server {

      listen 80;
      server_name nginx-handbook.test;

      location / {
          proxy_pass http://backend_servers;
      }
  }
}
upsteam → collection of servers taht can be treated as a single backend
- Maximum Performance
NGINX can spawn multiple worker processes capable of handling thousands of requests each
You can add
worker_processes 2;in the beginning of configration file or yourmaincontext to change the number of worker_processes runningTo Determining owrker_processes required: A rule of thumb in determining the optimal number of worker processes is number of worker process = number of CPU cores.
Apart from the worker processes there is also the worker connection, indicating the highest number of connections a single worker process can handle.
  events {
      worker_connections 1024;
  }
Cache Static Content
static content don’t change often so its a good idea to cache them for a certain amount of timr
  http {

      include /env/nginx/mime.types;

      server {

          listen 80;
          server_name nginx-handbook.test;

          root /srv/nginx-handbook-demo/static-demo;

          location ~* \\.(css|js|jpg)$ {
              access_log off;

              add_header Cache-Control public;
              add_header Pragma public;
              add_header Vary Accept-Encoding;
              expires 1M;
          }
      }
  }
by writing location like thi you are instruucting nginx to match reqests askign for jpg , css, js → try saving in WebP format , as configuring static cache becomes even easier
You can use the
add_headerdirective to include a header in the response to the client. Previously you've seen theproxy_set_headerdirective used for setting headers on an ongoing request to the backend server. Theadd_headerdirective on the other hand only adds a given header to the response.By setting the
Cache-Controlheader to public, you're telling the client that this content can be cached in any way. ThePragmaheader is just an older version of theCache-Controlheader and does more or less the same thing.Vary→ lets client know that this cached content may varyAccept-Encoding→ content may vary defpending on the content encoding accepted by client.expires→ directive allows you to set Expires header , → the time this cache will be valid
Compress Responses
  http {
      include /env/nginx/mime.types;

      gzip on;
      gzip_comp_level 3;

      gzip_types text/css text/javascript;

      server {

          listen 80;
          server_name nginx-handbook.test;

          root /srv/nginx-handbook-demo/static-demo;

          location ~* \\.(css|js|jpg)$ {
              access_log off;

              add_header Cache-Control public;
              add_header Pragma public;
              add_header Vary Accept-Encoding;
              expires 1M;
          }
      }
  }
gzip on→ compress responsesgzip_comp_level→ set level of compression, setting number between 1-4 gives efficient resultby default gzip only compress HTML responses
to compress other formats :
gzip_types
- Main Configurations
pid /run/nginx.pid;sets the process ID forsendfile on;disables buffering for static files.tcp_nopush on;allows sending response header in one packet.tcp_nodelay on;disables Nagle's Algorithm resulting in faster static file delivery.The
keepalive_timeoutdirective indicates how long to keep a connection open and thetypes_hash_maxsizedirective sets the size of the types hash map. It also includes themime.typesfile by default.mailcontext to configure NGINX as a mail server./etc/nginx/sites-available→ meant to store configuration files for your virtual hosts./etc/nginx/sites-enabled→ meant for storing symbolic links to the files fromsites-availableThe idea is to write multiple virtual hosts inside the
/etc/nginx/sites-available/directory and make some of them active by symbolic linking them to the/etc/nginx/sites-enabled/directory.files inside
/sites-availableare meant to included within the mainhttpcontext so they should contain server blocks only
Subscribe to my newsletter
Read articles from MRIDUL TIWARI directly inside your inbox. Subscribe to the newsletter, and don't miss out.
Written by
MRIDUL TIWARI
MRIDUL TIWARI
Software Engineer | Freelancer | Content Creator | Open Source Enthusiast | I Build Websites and Web Applications for Remote Clients.