The Ultimate Guide to Docker: From Containers and Architecture to Hands-On Projects
 Saurabh Pawar
Table of contents
- Part I: The Container Revolution: Why Modern Development Runs on Containers
- Part II: Under the Hood: Deconstructing Docker's Architecture
- Part III: Mastering the CLI: Your Docker Command Toolkit
- Part IV: Hands-On Project: Building and Running a Containerized Flask Application
- Part V: Conclusion: Your Journey with Docker Has Just Begun

Part I: The Container Revolution: Why Modern Development Runs on Containers
In modern software development, one of the most persistent and frustrating challenges has been ensuring that an application runs reliably across different computing environments. The infamous phrase, "but it works on my machine," has been the source of countless delays and headaches for development and operations teams alike. This problem arises from subtle differences in operating systems, library versions, and configurations between a developer's laptop, a testing server, and the production environment. Containerization emerged as the definitive solution to this problem, and Docker is the platform that brought this powerful technology to the masses.1
A. What is a Container? Beyond the Buzzword
At its core, a software container is a standard, executable unit of software that packages an application's code along with all its necessary dependencies, such as libraries, system tools, and runtime environments.1 This package is a self-sufficient, lightweight executable that is abstracted away from the host operating system, allowing it to run consistently on any infrastructure.3
The most effective analogy for understanding a software container is the physical shipping container. Before standardization, shipping goods was a chaotic process. Goods of different shapes and sizes were difficult to load, move, and unload. The invention of the standardized shipping container revolutionized global trade by providing a uniform box that could be handled by any crane, ship, train, or truck, regardless of its contents. A software container does the same for applications.5 It provides a standard "box" that can be moved from a developer's laptop (running macOS) to a staging server (running a specific Linux distribution) and finally to a public cloud provider (running on different hardware) with the guarantee that the application inside will behave identically in every location.1
Software containers are analogous to physical shipping containers, providing a standard unit for any application. 7
This remarkable consistency is achieved through a form of operating system (OS) virtualization. Unlike traditional virtual machines that virtualize the hardware, containers virtualize the OS itself. They leverage features of the host OS kernel—such as cgroups and namespaces in Linux—to create isolated environments for processes.9 This allows each container to have its own private view of the filesystem, network, and process tree, all while sharing the kernel of the single host operating system.1
B. The Core Benefits: Speed, Portability, and Consistency
The architectural design of containers directly translates into a set of transformative benefits for software development and deployment.
Portability and Consistency: This is the paramount advantage. Because a container bundles an application with all its dependencies, it creates a predictable and repeatable environment.5 This eliminates entire classes of bugs caused by environment discrepancies and dramatically simplifies the deployment process. Developers can be confident that what they build and test locally is exactly what will run in production.1 This portability extends across operating systems (Linux, Windows, macOS) and infrastructures (on-premises data centers, public clouds).3
Speed and Efficiency: Containers are exceptionally lightweight. Since they don't need to bundle a full guest operating system, their image sizes are typically measured in megabytes, compared to the gigabytes required for virtual machines.1 This smaller footprint leads to significantly faster startup times—containers can launch in seconds, whereas VMs can take minutes to boot their entire OS.4 This efficiency also allows for higher server density, meaning more applications can be run on a single host machine, leading to better resource utilization and reduced server and licensing costs.3
Agility and DevOps Enablement: The speed and consistency of containers are foundational to modern DevOps practices. The ability to quickly build, test, and deploy applications in isolated units makes them a perfect fit for Continuous Integration and Continuous Delivery (CI/CD) pipelines.3 Containerization also promotes a clear separation of responsibilities: developers focus on the application logic and its dependencies inside the container, while operations teams focus on the platform that runs and manages these containers.3 Furthermore, containers are the natural architectural unit for building microservices. Each microservice can be packaged, deployed, updated, and scaled independently in its own container, enabling teams to develop and release services at their own pace.6
The underlying technology for containers, such as Linux control groups (cgroups) and namespaces, existed for years before Docker's rise.1 However, these kernel features were complex and difficult for the average developer to use. Docker's revolutionary impact, starting with its open-source launch in 2013, was not in inventing containerization but in democratizing it.1 It provided a simple, high-level API and an intuitive command-line interface (CLI) that abstracted away the low-level complexity.10 This brilliant simplification of a powerful concept, combined with the simultaneous rise of microservice architectures and cloud computing, created a perfect storm. Docker provided the right tool at the exact moment the industry needed it most, catalyzing a fundamental shift in how software is built and shipped.
C. Containers vs. Virtual Machines: A Definitive Comparison
To fully appreciate the innovation of containers, it is essential to compare them with their predecessor, virtual machines (VMs). Both are virtualization technologies, but they operate at different levels of the system stack, leading to critical trade-offs in performance, portability, and security.12
The architectural divide is the most important distinction. Virtual machines virtualize the hardware. A piece of software called a hypervisor runs on the host machine and creates fully independent guest machines. Each VM contains a complete copy of a guest operating system, along with the necessary binaries, libraries, and the application itself.3 In contrast, containers virtualize the
operating system. They share the kernel of the host OS and run as isolated user-space processes.1 This fundamental difference is the source of all other distinctions.
This architectural choice has profound implications for resource utilization. Because each VM includes a full OS, it is inherently resource-intensive, consuming a large amount of CPU, memory, and storage—often tens of gigabytes.1 Containers, by sharing the host kernel, have a dramatically smaller footprint, typically measured in megabytes, and consume far fewer resources.3
This trade-off also extends to security. VMs provide superior security isolation because each VM is a fully sandboxed environment with its own kernel. An exploit or crash within one VM is highly unlikely to affect other VMs on the same host.12 Containers, on the other hand, share the host OS kernel. While they are isolated from each other at the process level, a severe vulnerability in the shared kernel could theoretically be exploited to compromise the host or other containers.16
The choice between containers and VMs depends on the specific use case. VMs are better suited for scenarios requiring full OS isolation, running applications that need a different operating system from the host, or housing large, traditional monolithic workloads.6 Containers excel in the world of modern, cloud-native applications, packaging microservices, and powering fast-paced CI/CD pipelines where speed, efficiency, and portability are the highest priorities.6 It is also a common and powerful pattern to run containers
inside of VMs, combining the hardware-level isolation of VMs with the lightweight agility of containers.6
Architectural difference between Virtual Machines (left) and Containers (right). 2
Attribute | Containers | Virtual Machines (VMs) |
Virtualization Level | Operating System 1 | Hardware 3 |
Size | Lightweight (Megabytes) 1 | Heavyweight (Gigabytes) 1 |
Startup Time | Seconds 4 | Minutes 1 |
Resource Overhead | Low (shares host kernel) 3 | High (includes full guest OS) 12 |
Security Isolation | Process-level isolation 3 | Full hardware-level isolation 12 |
Portability | High (runs on any OS with a container engine) 3 | Lower (tied to specific hypervisor/OS) 12 |
Ideal Use Case | Microservices, CI/CD, cloud-native apps 6 | Monoliths, multi-OS environments, high-security isolation 6 |
Part II: Under the Hood: Deconstructing Docker's Architecture
While the concept of a container is straightforward, the Docker platform that builds, runs, and manages them is a sophisticated system with a clear and powerful architecture. Understanding its components is key to using Docker effectively.
A. Introducing Docker: The Engine of Containerization

Docker was launched as an open-source project in 2013 and quickly became the de facto standard for containerization.1 Its popularity is so immense that the terms "Docker" and "container" are often used interchangeably, a testament to its market dominance.15 Docker is a set of Platform as a Service (PaaS) products that provide a complete ecosystem for developing, shipping, and running applications inside containers.10
B. The Client-Server Model: How Docker Works
At its heart, Docker operates on a client-server architecture.2 This model consists of three main components that work in concert:
The Docker Daemon (
dockerd): This is the server component of Docker. It is a persistent, long-running background process that listens for API requests from Docker clients and manages all the heavy lifting.10 The daemon is responsible for building images, running and monitoring containers, configuring networks, and managing storage volumes. It is the core engine that brings containers to life.19The Docker Client (
docker): This is the primary interface through which users interact with Docker. It is a command-line interface (CLI) tool that allows you to issue commands likedocker runordocker build.10 The client takes these commands and translates them into API requests that are sent to the Docker daemon for execution.21The REST API: This is the communication layer that connects the Docker client and the Docker daemon. The client uses this API to send instructions to the daemon.19 This interaction can happen over a local UNIX socket or a network interface, which means the Docker client can control a daemon running on the same machine or on a remote server.2 This API-driven architecture is what makes Docker so extensible and easy to integrate with other tools and automation scripts.
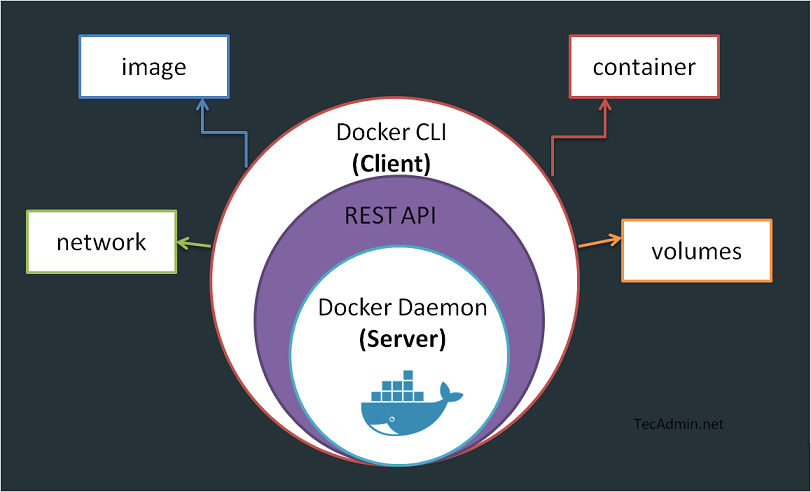
Docker's client-server architecture.
C. The Building Blocks: Docker's Core Objects
When working with Docker, you will constantly interact with a few fundamental objects that form the building blocks of any containerized application.
Images: A Docker image is a read-only template that contains a set of instructions for creating a container.10 It is a complete, executable package that includes everything an application needs to run: the application code, a runtime (like Python or Node.js), system tools, libraries, and settings.1 Images are the "build" part of the Docker lifecycle; they are what you store and distribute.
Containers: A container is a runnable, live instance of an image.2 When you execute the
docker runcommand, the Docker daemon uses an image as a blueprint to create and start a container. The container is the isolated environment where your application actually executes. It has its own filesystem, network stack, and process space, logically separated from the host and other containers.3Volumes: The filesystem inside a container is ephemeral by default. This means that any data created or modified inside a container is lost when that container is removed. To solve this, Docker provides volumes, which are the preferred mechanism for persisting data.23 Volumes are managed by Docker and exist on the host filesystem, outside the container's lifecycle. They can be attached to one or more containers to store application data, such as a database file or user uploads, ensuring that the data persists even if the container is stopped and removed.23
Networks: By default, containers are isolated. Docker networks provide the communication layer that allows them to connect with each other, with the host machine, and with the outside world.21 Docker includes several built-in network drivers, such as
bridge(the default for isolating containers on a private network) andhost(for sharing the host's network stack). This networking capability is crucial for building multi-container applications where different services (like a web frontend and a database backend) need to communicate securely.20
The remarkable efficiency of Docker is deeply rooted in its use of a layered filesystem for images. An image is not a single monolithic file but is composed of multiple read-only layers stacked on top of each other.23 Each instruction in a
Dockerfile (like adding a dependency or copying code) creates a new layer. When you run a container from an image, Docker doesn't create a full copy. Instead, it adds a thin, writable layer on top of the immutable image layers. Any changes made inside the running container, such as writing a log file, are stored in this writable layer. This "copy-on-write" system is incredibly efficient. It means that if you run ten containers from the same image, they all share the same underlying image layers in memory. Only the differences for each container are stored separately. This is why you can launch numerous containers almost instantly without consuming a proportional amount of disk space, and why pulling updates to an image is often very fast—Docker only needs to download the layers that have changed.23
D. The Ecosystem: Docker Hub and Registries
The final piece of the Docker architecture is the registry, which is a system for storing and distributing Docker images.11
Docker Hub: This is the default public registry provided by Docker, Inc., and it serves as a massive central library for container images.20 It hosts thousands of "official" images for popular software (like Python, Ubuntu, Redis, and Nginx) that are maintained and vetted by the software vendors. It also contains countless community-contributed images for a vast range of applications and tools.26 For most developers, Docker Hub is the primary source for pulling base images to build upon.
Public vs. Private Registries: While Docker Hub is invaluable, most organizations need a place to store their own proprietary application images. For this, they use private registries.21 A private registry provides a secure, access-controlled location to store and share images within a team or company. Major cloud providers (like AWS ECR, Google Artifact Registry, and Azure Container Registry) offer managed private registry services, or organizations can host their own.
Part III: Mastering the CLI: Your Docker Command Toolkit
The Docker command-line interface (CLI) is your primary tool for interacting with the Docker daemon. While it has a large number of commands and options, a relatively small subset will cover the vast majority of your daily development tasks. This section provides a practical guide to the most important commands.
A. Essential Commands for Daily Use (Image & Container Lifecycle)
These are the commands you will use constantly to build, run, and manage your applications.
docker build: Builds a new image from the instructions in aDockerfile. The-tflag is used to tag the image with a name and optional version (e.g.,my-app:1.0).26- Example:
docker build -t my-app:1.0.
- Example:
docker run: Creates and starts a new container from a specified image. This is a powerful command with many useful flags.24-d: Runs the container in detached mode (in the background).-p <host_port>:<container_port>: Maps a port on the host machine to a port inside the container.--name <container_name>: Assigns a custom name to the container for easy reference.Example:
docker run -d -p 8080:80 --name my-web-server nginx
docker ps: Lists all currently running containers. To see all containers, including those that have stopped, use the-aflag.24docker stop: Gracefully stops one or more running containers by sending aSIGTERMsignal, giving the application a chance to shut down cleanly.27- Example:
docker stop my-web-server
- Example:
docker start: Starts one or more stopped containers.27docker rm: Removes one or more stopped containers. You cannot remove a running container without first stopping it or using the-f(force) flag.24docker images: Lists all of the Docker images stored on your local machine.27docker rmi: Removes one or more images from your local machine.24docker pull: Downloads an image from a registry (Docker Hub by default) to your local machine.24docker push: Uploads an image from your local machine to a registry.24
Many developers learn docker run as their first command, but it's helpful to understand that it's a convenience command that combines two distinct actions: creating a container and starting it. Docker also provides separate commands for these steps: docker create and docker start.24
docker create builds the container's filesystem from the image and prepares it to run, but does not start it. docker start then executes the created container. This separation can be useful in automation scripts where you might want to configure a set of containers first and then start them all together. Understanding this run = create + start relationship provides a clearer mental model of the container lifecycle.
B. Advanced Commands and Techniques (Interaction & Management)
Once your containers are running, you'll need commands to interact with them, manage their resources, and clean up your system.
Interacting with Containers:
docker logs: Fetches the standard output logs from a container. This is essential for debugging. The-fflag allows you to "follow" the log stream in real-time.27docker exec: Executes a command inside a running container. Using the-itflags provides an interactive TTY, which is perfect for opening a shell (/bin/shor/bin/bash) inside a container to debug its state.27docker cp: Copies files and folders between a container's filesystem and your host machine's local filesystem.26
Inspection and Stats:
docker inspect: Provides detailed, low-level information about any Docker object (container, image, volume, network) in JSON format. This is useful for finding a container's IP address or inspecting its configuration.24docker stats: Displays a live stream of resource usage statistics (CPU, memory, network I/O) for your running containers.24
Data and Network Management:
docker volume: A group of commands for managing volumes, includingcreate,ls(list),inspect, andrm(remove).24docker network: A group of commands for managing networks, includingcreate,ls,inspect,connect(attach a container to a network), anddisconnect.26
System Cleanup:
docker system prune: A very useful command for reclaiming disk space. It removes all unused Docker objects: stopped containers, dangling images (layers with no associated tagged image), unused networks, and build cache. Adding the-aflag will also remove all unused images.26
C. Quick Reference: The Docker CLI Cheat Sheet
This table serves as a quick reference for the most common Docker commands and their functions, organized by category.
Category | Command | Common Flags | Description |
Image Management |
|
| Build an image from a Dockerfile.27 |
|
| List all local images.27 | |
|
| Remove one or more local images.24 | |
| Pull an image from a registry.27 | ||
| Push an image to a registry.27 | ||
| Tag an image with a new name/version.27 | ||
Container Lifecycle |
|
| Create and start a new container from an image.24 |
|
| List running containers ( | |
| Start one or more stopped containers.27 | ||
| Stop one or more running containers.27 | ||
| Restart a container.27 | ||
|
| Remove one or more stopped containers ( | |
Inspection & Interaction |
|
| Fetch the logs of a container ( |
|
| Execute a command in a running container ( | |
| Display low-level information on Docker objects.24 | ||
| Display a live stream of container resource usage.24 | ||
| Copy files/folders between a container and the host.27 | ||
Network & Volume Mgmt |
| List all networks.26 | |
| List all volumes.24 | ||
| Remove all unused local volumes.26 | ||
System Cleanup |
|
| Remove unused data (stopped containers, networks, images).28 |
Part IV: Hands-On Project: Building and Running a Containerized Flask Application
Theory is essential, but the best way to learn Docker is by doing. This hands-on project will guide you through containerizing a simple Python web application using Flask. We will start by building and running a single container, then advance to a multi-service application using Docker Compose.
A. Project Setup: The Anatomy of Our Flask App
First, let's create the files for our simple web application. Create a new directory for your project and inside it, create the following two files.
1. app.py
This file contains the code for a minimal Flask web server. It will display a simple welcome message.python
from flask import Flask

app = Flask(name)

@app.route('/')

def home():

return "Welcome to Flask with Docker!"

if name == "main":

app.run(host="0.0.0.0", port=5000, debug=True)
The line `host="0.0.0.0"` is critical here. It tells the Flask development server to listen on all available network interfaces, which makes the application accessible from outside the Docker container.[29]

**2. `requirements.txt`**
This file lists the Python dependencies our project needs. For now, it's just Flask.
### B. Crafting the Blueprint: Writing the Dockerfile

The `Dockerfile` is a text-based script that contains the instructions for building our application's Docker image.[30, 31] Create a file named `Dockerfile` (with no file extension) in your project directory with the following content.

```dockerfile
# Step 1: Use an official lightweight Python image as a base
FROM python:3.9-slim

# Step 2: Set the working directory inside the container
WORKDIR /app

# Step 3: Copy the requirements file and install dependencies
COPY requirements.txt.
RUN pip install -r requirements.txt

# Step 4: Copy the rest of the application's source code
COPY..

# Step 5: Expose the port that the application runs on
EXPOSE 5000

# Step 6: Define the default command to run when the container starts
CMD ["python", "app.py"]
Let's break down each instruction:
FROM python:3.9-slim: This specifies the base image for our build. Using an official,slimvariant is a best practice as it results in a smaller and more secure final image.30WORKDIR /app: This sets the working directory for all subsequent commands inside the container. It's likecd /app.31COPY requirements.txt.: This copies therequirements.txtfile from our host machine into the/appdirectory inside the image.30 We copy this file first to take advantage of Docker's layer caching. If our dependencies don't change, this layer won't need to be rebuilt.RUN pip install -r requirements.txt: This executes thepip installcommand during the image build process to install our dependencies.32COPY..: This copies the rest of our project files (justapp.pyin this case) into the/appdirectory.EXPOSE 5000: This instruction serves as documentation, informing Docker that the container listens on port 5000 at runtime. It does not actually publish the port to the host.32CMD ["python", "app.py"]: This specifies the default command that will be executed when a container is started from this image.30
C. The First Build: Creating and Running a Single Container
With our Dockerfile ready, we can now build the image and run our application.
1. Build the Image
Open your terminal in the project directory and run the docker build command. We'll tag (-t) our image as flask-hello-world. The . at the end tells Docker to use the current directory as the build context.
Bash
docker build -t flask-hello-world.
2. Run the Container
Now, use the docker run command to create and start a container from our new image.
Bash
docker run -d -p 5001:5000 --name my-flask-app flask-hello-world
Here, -d runs the container in detached mode, and -p 5001:5000 is the crucial part. It maps port 5001 on your host machine to port 5000 inside the container, which is the port our Flask app is listening on.
3. Verify Success
Open a web browser and navigate to http://localhost:5001. You should see the message "Welcome to Flask with Docker!" You can also run docker ps in your terminal to see your my-flask-app container running.
D. Scaling Up: Introducing Docker Compose for Multi-Service Applications

Managing a single container is straightforward, but real-world applications often consist of multiple interconnected services, like a web server, a database, and a caching layer. Managing the lifecycle and networking of these services with individual docker run commands becomes complex and error-prone.33
This is where Docker Compose comes in. It is a tool for defining and running multi-container Docker applications using a single, simple YAML configuration file.10
Let's enhance our application to use a Redis cache for a simple hit counter. This will demonstrate a realistic multi-service setup.
1. Update Project Files
requirements.txt: Addredisto the list of dependencies.flask redisapp.py: Modify the application to connect to Redis and increment a counter on each visit.Python
  import time
  import redis
  from flask import Flask

  app = Flask(__name__)
  # Connect to the redis service, using the service name 'redis' as the hostname
  cache = redis.Redis(host='redis', port=6379)

  def get_hit_count():
      retries = 5
      while True:
          try:
              # The 'hits' key will be incremented in Redis
              return cache.incr('hits')
          except redis.exceptions.ConnectionError as exc:
              if retries == 0:
                  raise exc
              retries -= 1
              time.sleep(0.5)

  @app.route('/')
  def hello():
      count = get_hit_count()
      return f'Hello World! I have been seen {count} times.\n'

  if __name__ == "__main__":
      app.run(host="0.0.0.0", port=5000, debug=True)
2. Create the compose.yaml File
Now, create a file named compose.yaml in your project directory. This file will define our two services: web (our Flask app) and redis.
YAML
services:
  web:
    build:.
    ports:
      - "8000:5000"
    volumes:
      -.:/app
  redis:
    image: "redis:alpine"
services: This is the top-level key where we define all the containers in our application stack.33web: This is the name of our Flask application service.build:.: Tells Compose to build an image using theDockerfilein the current directory.34ports: - "8000:5000": Maps port 8000 on the host to port 5000 in thewebcontainer.34volumes: -.:/app: This is a powerful feature for development. It mounts the current directory on the host into the/appdirectory in the container. Any changes you make to your code on the host will be immediately reflected inside the container, without needing to rebuild the image.33
redis: This is the name of our Redis cache service.image: "redis:alpine": Tells Compose to pull theredis:alpineimage from Docker Hub, rather than building it locally.34
The most powerful, yet seemingly magical, part of Docker Compose is its handling of networking. When you run docker compose up, Compose automatically creates a dedicated bridge network for your project and attaches both the web and redis containers to it. Within this network, Docker provides an internal DNS resolver. This means that the web container can find and communicate with the redis container simply by using its service name, redis, as a hostname. This is why the line redis.Redis(host='redis', port=6379) in our Python code works seamlessly. This built-in service discovery eliminates the need for manual IP address management and is a core reason why Compose is so effective for local development.
3. Running with Compose
With the compose.yaml file in place, running the entire application stack is incredibly simple.
To build the images and start the services in the foreground:
Bash
docker compose up --buildTo run in detached (background) mode:
Bash
docker compose up -dTo stop and remove all containers, networks, and volumes created by the project:
Bash
docker compose down
Run docker compose up --build. Now, navigate to http://localhost:8000 in your browser. You should see the message "Hello World! I have been seen 1 times." Each time you refresh the page, the counter will increment, proving that your Flask container is successfully communicating with the Redis container.
Part V: Conclusion: Your Journey with Docker Has Just Begun
This guide has taken you on a comprehensive journey through the world of Docker. You began by understanding the fundamental "why" of containerization—how it solves the age-old problem of environmental inconsistency by providing portable, lightweight, and efficient units of software. You deconstructed the differences between containers and virtual machines, explored the client-server architecture of the Docker engine, and learned about its core objects: images, containers, volumes, and networks.
You then moved from theory to practice, mastering the essential Docker CLI commands for managing the entire container lifecycle. Finally, you put it all together in a hands-on project, containerizing a simple Flask application and then evolving it into a multi-service stack with Docker Compose, experiencing firsthand the power of automated builds, networking, and service discovery.
Your journey with Docker is far from over; it has just begun. The skills you have acquired are a foundation for exploring more advanced and powerful concepts in the cloud-native ecosystem. Here are some paths to explore next:
Production Deployment: While Docker Compose is excellent for development, production environments require more robustness. Investigate how to use multiple Compose files (e.g., a
compose.production.yaml) to override development settings for production deployments, and explore strategies for running Compose on a single server.35Orchestration at Scale: For managing applications across a cluster of multiple machines, providing high availability and fault tolerance, the next logical step is a container orchestrator. Kubernetes is the industry standard for this, and understanding it is a crucial skill for any modern DevOps or backend engineer.9
Security Best Practices: Dive deeper into securing your containers. Learn about scanning images for vulnerabilities, the principle of least privilege by running containers as a non-root user, and managing secrets securely.26
Optimizing Builds: To create smaller, faster, and more secure production images, learn about advanced
Dockerfiletechniques like multi-stage builds. This practice allows you to separate the build-time dependencies from the runtime environment, resulting in a lean final image.32
By mastering Docker, you have unlocked a new level of efficiency and reliability in your development workflow. You are now equipped with one of the most fundamental tools in modern software engineering. Keep building, keep learning, and continue to explore the vast possibilities that containerization offers.
Subscribe to my newsletter
Read articles from Saurabh Pawar directly inside your inbox. Subscribe to the newsletter, and don't miss out.
Written by