GFG Day 15: Collections and Exception Handling
 sri parthu
Table of contents

Collection in Java
The Java Collections Framework is a unified architecture for representing and manipulating groups of objects. It provides classes and interfaces to store, retrieve, and manipulate data efficiently.
In Java, the Collection interface (java.util.Collection) and Map interface (java.util.Map) are the two main “root” interfaces of Java collection classes.
Why Use Collections?
Dynamic in size (unlike arrays)
Ready-to-use data structures (List, Set, Map, Queue)
Built-in methods for sorting, searching, and iteration
Improved code efficiency and readability
Advantages of the Java Collection Framework
Since the lack of a collection framework gave rise to the above set of disadvantages, the following are the advantages of the collection framework.
Consistent API: Interfaces like List, Set, and Map have common methods across classes (ArrayList, LinkedList, etc.).
Less Coding Effort: Developers focus on usage, not designing data structures—supports OOP abstraction.
Better Performance: Offers fast, reliable implementations of data structures, improving speed and quality of code.
Hierarchy of the Collection Framework in Java
- The Collection interface extends Iterable and serves as the root, defining common methods inherited by all collection classes.

Interfaces that Extend the Java Collections Interface
- Each of the several interfaces in the collection framework is used to store a certain kind of data. The interfaces included in the framework are as follows.
1. Iterable Interface
- Iterable interface is the root of the Collection Framework. It is extended by the Collection interface, making all collections inherently iterable. Its primary purpose is to provide an Iterator to traverse elements, defined by its single abstract method iterator().
Iterator iterator();
2. Collection Interface
- Collection interface extends Iterable and serves as the foundation of the Collection Framework. It defines common methods like add(), remove(), and clear(), ensuring consistency and reusability across all collection implementations.
3. List Interface
- List interface extends the Collection interface and represents an ordered collection that allows duplicate elements. It is implemented by classes like ArrayList, Vector, and Stack. Since all these classes implement List, a list object can be instantiated using any of them
For example:
List <T> al = new ArrayList<> ();
List <T> ll = new LinkedList<> ();
List <T> v = new Vector<> ();
Where T is the type of the object
The classes which implement the List interface are as follows:
ArrayList
- ArrayList provides a dynamic array in Java that resizes automatically as elements are added or removed. Although slower than standard arrays, it is efficient for frequent modifications. It supports random access but cannot store primitive types directly—wrapper classes like Integer or Character are required
Let's understand the ArrayList with the following example:
import java.io.*;
import java.util.*;

public class DemoArrayList {

    // Main Method
    public static void main(String[] args)
    {

        // Declaring the ArrayList with initial size n
        ArrayList<Integer> al = new ArrayList<Integer>();

        // Appending new elements at the end of the list
        for (int i = 1; i <= 5; i++)
            al.add(i);

        // Printing elements
        System.out.println(al);

        // Remove element at index 3
        al.remove(3);

        // Displaying the ArrayList after deletion
        System.out.println(al);

        // Printing elements one by one
        for (int i = 0; i < al.size(); i++)
            System.out.print(al.get(i) + " ");
    }
}
Output
[1, 2, 3, 4, 5]
[1, 2, 3, 5]
1 2 3 5
LinkedList:
- LinkedList is a linear data structure where elements (nodes) are stored non-contiguously. Each node contains data and a reference to the next (and optionally previous) node, forming a chain of elements linked by pointers.
Let's understand the LinkedList with the following example:
import java.io.*;
import java.util.*;

public class DemoLinkedList {

    // Main Method
    public static void main(String[] args)
    {

        // Declaring the LinkedList
        LinkedList<Integer> ll = new LinkedList<Integer>();

        // Appending new elements at
        // the end of the list
        for (int i = 1; i <= 5; i++)
            ll.add(i);

        // Printing elements
        System.out.println(ll);

        // Remove element at index 3
        ll.remove(3);

        // Displaying the List
        // after deletion
        System.out.println(ll);

        // Printing elements one by one
        for (int i = 0; i < ll.size(); i++)
            System.out.print(ll.get(i) + " ");
    }
}
Output
[1, 2, 3, 4, 5]
[1, 2, 3, 5]
1 2 3 5
Vector:
- Vector provides a dynamic array in Java, similar to ArrayList, but with synchronized methods for thread safety. While slower due to synchronization overhead, it is useful in multi-threaded environments. Like ArrayList, it resizes automatically during element manipulation.
Let's understand the Vector with an example:
import java.io.*;
import java.util.*;

public class DemoVector {

    // Main Method
    public static void main(String[] args)
    {

        // Declaring the Vector
        Vector<Integer> v = new Vector<Integer>();

        // Appending new elements at the end of the list
        for (int i = 1; i <= 5; i++)
            v.add(i);

        // Printing elements
        System.out.println(v);

        // Remove element at index 3
        v.remove(3);

        // Displaying the Vector after deletion
        System.out.println(v);

        // Printing elements one by one
        for (int i = 0; i < v.size(); i++)
            System.out.print(v.get(i) + " ");
    }
}
Output
[1, 2, 3, 4, 5]
[1, 2, 3, 5]
1 2 3 5
Stack
- Stack class implements the LIFO (last-in-first-out) data structure. It supports core operations like push() and pop(), along with peek(), empty(), and search(). Stack is a subclass of Vector and inherits its properties.
Let's understand the stack with an example:
import java.util.*;
public class DemoStack {

    // Main Method
    public static void main(String args[])
    {
        Stack<String> stack = new Stack<String>();
        stack.push("Advance");
        stack.push("Core");
        stack.push("Java");
        stack.push("Easy to learn");

        // Iterator for the stack
        Iterator<String> itr = stack.iterator();

        // Printing the stack
        while (itr.hasNext()) {
            System.out.print(itr.next() + " ");
        }

        System.out.println();

        stack.pop();

        // Iterator for the stack
        itr = stack.iterator();

        // Printing the stack
        while (itr.hasNext()) {
            System.out.print(itr.next() + " ");
        }
    }
}
Output
Advance core Java Easy to learn
Advance core Java
Note: Stack is a subclass of Vector and a legacy class. It is thread-safe which might be overhead in an environment where thread safety is not needed. An alternate to Stack is to use ArrayDequeue which is not thread-safe and has faster array implementation.
4. Queue Interface
- The Queue interface follows the FIFO (First-In, First-Out) principle, where elements are processed in the order they are added—similar to a real-world queue (e.g., ticket booking). It is used when order matters. Classes like PriorityQueue and ArrayDeque implement this interface, allowing queue objects to be instantiated accordingly.
For example:
Queue <T> pq = new PriorityQueue<> ();
Queue <T> ad = new ArrayDeque<> ();
Where T is the type of the object.
The most frequently used implementation of the queue interface is the PriorityQueue.
Priority Queue
- PriorityQueue processes elements based on their priority rather than insertion order. It uses a priority heap for internal storage. Elements are ordered either by their natural ordering or by a custom Comparator provided at construction.
Let's understand the priority queue with an example:
import java.util.*;

public class DemoPriorityQueue {

    // Main Method
    public static void main(String args[])
    {
        // Creating empty priority queue
        PriorityQueue<Integer> pQueue
            = new PriorityQueue<Integer>();

        // Adding items to the pQueue using add()
        pQueue.add(10);
        pQueue.add(20);
        pQueue.add(15);

        // Printing the top element of PriorityQueue
        System.out.println(pQueue.peek());

        // Printing the top element and removing it
        // from the PriorityQueue container
        System.out.println(pQueue.poll());

        // Printing the top element again
        System.out.println(pQueue.peek());
    }
}
Output
10
10
15
5. Deque Interface
- Deque interface extends Queue and allows insertion and removal of elements from both ends. It is implemented by classes like ArrayDeque, which can be used to instantiate a Deque object.
For example:
Deque<T> ad = new ArrayDeque<> ();
Where T is the type of the object.
The class which implements the deque interface is ArrayDeque.
ArrayDeque
- ArrayDeque class implements a resizable, double-ended queue that allows insertion and removal from both ends. It has no capacity restrictions and grows automatically as needed.
Let's understand ArrayDeque with an example:
import java.util.*;
public class ArrayDequeDemo {
    public static void main(String[] args)
    {
        // Initializing an deque
        ArrayDeque<Integer> de_que
            = new ArrayDeque<Integer>(10);

        // add() method to insert
        de_que.add(10);
        de_que.add(20);
        de_que.add(30);
        de_que.add(40);
        de_que.add(50);

        System.out.println(de_que);

        // clear() method
        de_que.clear();

        // addFirst() method to insert the
        // elements at the head
        de_que.addFirst(564);
        de_que.addFirst(291);

        // addLast() method to insert the
        // elements at the tail
        de_que.addLast(24);
        de_que.addLast(14);

        System.out.println(de_que);
    }
}
Output
[10, 20, 30, 40, 50]
[291, 564, 24, 14]
6. Set Interface
- Set interface represents an unordered collection that stores only unique elements (no duplicates). It's implemented by classes like HashSet, TreeSet, and LinkedHashSet, and can be instantiated using any of these
For example:
Set<T> hs = new HashSet<> ();
Set<T> lhs = new LinkedHashSet<> ();
Set<T> ts = new TreeSet<> ();
Where T is the type of the object.
The following are the classes that implement the Set interface:
HashSet
- HashSet class implements a hash table and stores elements based on their hash codes. It does not guarantee insertion order and allows one null element.
Example:
import java.util.*;

public class HashSetDemo {

    // Main Method
    public static void main(String args[])
    {
        // Creating HashSet and
        // adding elements
        HashSet<String> hs = new HashSet<String>();

        hs.add("Advance");
        hs.add("COre");
        hs.add("Java");
        hs.add("Is");
        hs.add("Very helpful");

        // Traversing elements
        Iterator<String> itr = hs.iterator();
        while (itr.hasNext()) {
            System.out.println(itr.next());
        }
    }
}
Output
Very helpful
Java
For
Is
LinkedHashSet
- LinkedHashSet is very similar to a HashSet. The difference is that this uses a doubly linked list to store the data and retains the ordering of the elements.
Let's understand the LinkedHashSet with an example:
import java.util.*;

public class LinkedHashSetDemo {

    // Main Method
    public static void main(String args[])
    {
        // Creating LinkedHashSet and adding elements
        LinkedHashSet<String> lhs
            = new LinkedHashSet<String>();

        lhs.add("Advance");
        lhs.add("Core");
        lhs.add("Java");
        lhs.add("Is");
        lhs.add("Very helpful");

        // Traversing elements
        Iterator<String> itr = lhs.iterator();
        while (itr.hasNext()) {
            System.out.println(itr.next());
        }
    }
}
Output
Advance
Core
Is
Very helpful
7. Sorted Set Interface
- Sorted Set interface extends Set and maintains elements in sorted order. It includes additional methods for range views and ordering. It is implemented by the TreeSet class.
For example:
SortedSet<T> ts = new TreeSet<> ();
Where T is the type of the object.
The class which implements the sorted set interface is TreeSet.
TreeSet
- TreeSet uses a self-balancing tree (Red-Black Tree) to store elements in sorted order. It maintains natural ordering or uses a custom Comparator if provided during creation. Ordering must be consistent with equals to ensure proper Set behavior.
Let's understand TreeSet with an example:
import java.util.*;

public class TreeSetDemo {

    // Main Method
    public static void main(String args[])
    {
        // Creating TreeSet and
        // adding elements
        TreeSet<String> ts = new TreeSet<String>();

        ts.add("Advance");
        ts.add("Core");
        ts.add("Java");
        ts.add("Is");
        ts.add("Very helpful");

        // Traversing elements
        Iterator<String> itr = ts.iterator();
        while (itr.hasNext()) {
            System.out.println(itr.next());
        }
    }
}
Output
Core
Java
Is
Very helpful
Map Interface
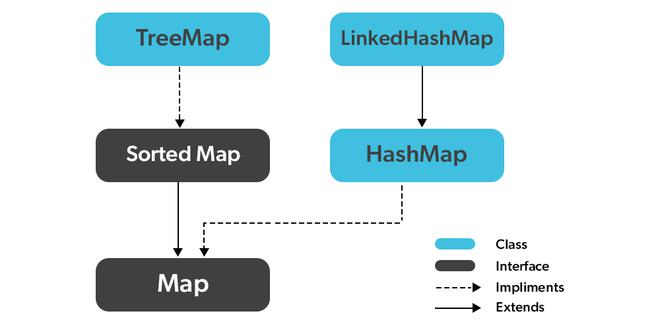
- Map is a data structure that supports the key-value pair for mapping the data. This interface doesn't support duplicate keys because the same key cannot have multiple mappings, however, it allows duplicate values in different keys. A map is useful if there is data and we wish to perform operations on the basis of the key. This map interface is implemented by various classes like HashMap, TreeMap, etc. Since all the subclasses implement the map, we can instantiate a map object with any of these classes.
For example:
*Map<T> hm = new HashMap<> ();
Map<T> tm = new TreeMap<> ();Where T is the type of the object.*
The frequently used implementation of a Map interface is a HashMap.
HashMap
- HashMap is a basic implementation of the Map interface that stores data as key-value pairs. It uses hashing for fast access, converting keys into hash codes to index values efficiently. To retrieve a value, the corresponding key is required. Internally, HashSet is also backed by a HashMap.
Let's understand the HashMap with an example:
import java.util.*;
public class HashMapDemo {

    // Main Method
    public static void main(String args[])
    {
        // Creating HashMap and
        // adding elements
        HashMap<Integer, String> hm
            = new HashMap<Integer, String>();

        hm.put(1, "Advance");
        hm.put(2, "Core");
        hm.put(3, "Java");

        // Finding the value for a key
        System.out.println("Value for 1 is " + hm.get(1));

        // Traversing through the HashMap
        for (Map.Entry<Integer, String> e : hm.entrySet())
            System.out.println(e.getKey() + " "
                               + e.getValue());
    }
}
Output
Value for 1 is Advance
1 Advance
2 Core
3 Java
Methods of the Collection Interface
- This interface contains various methods which can be directly used by all the collections which implement this interface. They are:
| Method | Description |
add(Object) | This method is used to add an object to the collection. |
addAll(Collection c) | This method adds all the elements in the given collection to this collection. |
clear() | This method removes all of the elements from this collection. |
contains(Object o) | This method returns true if the collection contains the specified element. |
containsAll(Collection c) | This method returns true if the collection contains all of the elements in the given collection. |
equals(Object o) | This method compares the specified object with this collection for equality. |
hashCode() | This method is used to return the hash code value for this collection. |
isEmpty() | This method returns true if this collection contains no elements. |
iterator() | This method returns an iterator over the elements in this collection. |
parallelStream() | This method returns a parallel Stream with this collection as its source. |
remove(Object o) | This method is used to remove the given object from the collection. If there are duplicate values, then this method removes the first occurrence of the object. |
removeAll(Collection c) | This method is used to remove all the objects mentioned in the given collection from the collection. |
removeIf(Predicate filter) | This method is used to remove all the elements of this collection that satisfy the given predicate. |
retainAll(Collection c) | This method is used to retain only the elements in this collection that are contained in the specified collection. |
size() | This method is used to return the number of elements in the collection. |
spliterator() | This method is used to create a Spliterator over the elements in this collection. |
stream() | This method is used to return a sequential Stream with this collection as its source. |
toArray() | This method is used to return an array containing all of the elements in this collection. |
Java Exception Handling
- Java's exception handling is a powerful tool for controlling runtime faults and preserving the application's normal flow. IOException, SQLException, RemoteException, ClassNotFoundException, and others are common examples of exceptions. Java allows developers to build reliable and fault-tolerant applications by managing these exceptions.
Example: Showing an arithmetic exception, or we can say a divide by zero exception.
import java.io.*;

class Main {
    public static void main(String[] args)
    {
        int n = 10;
        int m = 0;

        int ans = n / m;

        System.out.println("Answer: " + ans);
    }
}
Output:

Note: When an exception occurs and is not handled, the program terminates abruptly and the code after it, will never execute.
Example: The below Java program modifies the previous example to handle an ArithmeticException using try-catch, and finally blocks and keeps the program running.
// Java program to demonstrates handling
// the exception using try-catch block
import java.io.*;

class Main {
    public static void main(String[] args)
    {
        int n = 10;
        int m = 0;

        try {

            // Code that may throw an exception
            int ans = n / m;
            System.out.println("Answer: " + ans);
        }
        catch (ArithmeticException e) {

            // Handling the exception
            System.out.println(
                "Error: Division by zero is not allowed!");
        }
        finally {
            System.out.println(
                "Program continues after handling the exception.");
        }
    }
}
Output
Error: Division by zero is not allowed!
Program continues after handling the exception.

Java Exception Hierarchy
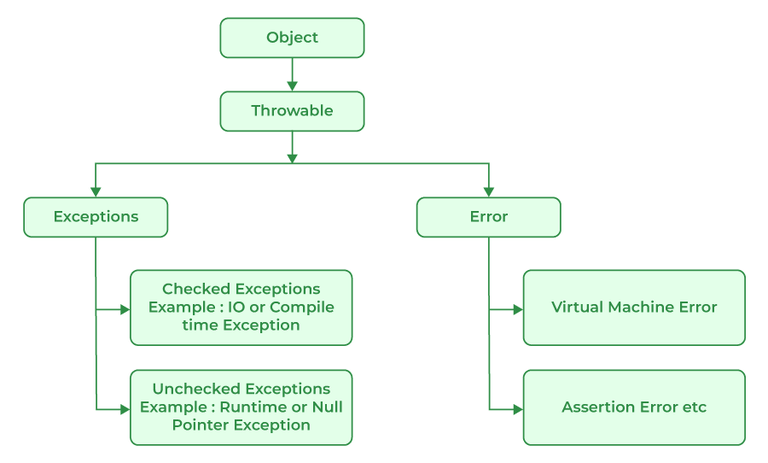
In Java, all exceptions and errors are subclasses of the Throwable class. It has two main branches
Exception.
Error
The below figure demonstrates the exception hierarchy in Java:
Major Reasons Why an Exception Occurs
Exceptions can occur due to several reasons, such as:
Invalid user input
Device failure
Loss of network connection
Physical limitations (out-of-disk memory)
Code errors
Out of bound
Null reference
Type mismatch
Opening an unavailable file
Database errors
Arithmetic errors
Errors are usually beyond the control of the programmer, and we should not try to handle errors.
Types of Java Exceptions
- Java defines several types of exceptions that relate to its various class libraries. Java also allows users to define their it's exceptions.
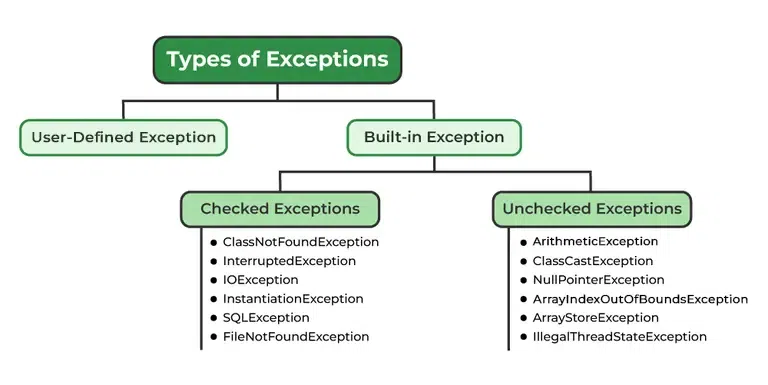
Exceptions can be categorized in two ways:
1. Built-in Exceptions
Checked Exception
Unchecked Exception
2. user-defined Exceptions
1. Built-in Exception
- Java has built-in exceptions, which are pre-defined exception classes, to handle common problems that occur during program execution. Java has two different kinds of built-in exceptions.
Checked Exceptions
The reason why checked exceptions are termed compile-time exceptions is that the compiler checks them during compilation. The following is a list of instances of checked exceptions:
ClassNotFoundException: Throws occur when a class isn't found because it is either absent from the project or is not in the correct location when the application tries to load it at runtime.
InterruptedException: thrown when another thread interrupts a stopped thread.
IOException: When an input/output operation fails, it throws.
InstantiationException: thrown when a program attempts to create an object of a class but is unsuccessful because the class has a default constructor, is abstract, or is an interface.
SQLException: Throws when there is an error with the database.
FileNotFoundException: Thrown when the program tries to open a file that does not exist.
Unchecked Exceptions
The opposite of the checked exceptions are the unchecked exceptions. These exceptions won't be checked by the compiler during compilation. To put it simply, a program would not generate a compilation error if it threw an unchecked exception, even if we had not handled or declared it. Here are some instances of unchecked exceptions:
ArithmeticException: It is thrown when there is an illegal math operation.
ClassCastException: It is thrown when we try to cast an object to a class it does not belong to.
NullPointerException: It is thrown when we try to use a null object (e.g. accessing its methods or fields).
ArrayIndexOutOfBoundsException: This occurs when we try to access an array element with an invalid index.
ArrayStoreException: This happens when we store an object of the wrong type in an array.
IllegalThreadStateException: It is thrown when a thread operation is not allowed in its current state.
2. User-Defined Exception
- Sometimes, the built-in exceptions in Java are not able to describe a certain situation. In such cases, users can also create exceptions, which are called "user-defined Exceptions".
Methods to Print the Exception Information
1. printStackTrace(): Prints the full stack trace of the exception, including the name, message, and location of the error.
2. toString(): Prints exception information in the format of the Name of the exception.
3. getMessage() : Prints the description of the exception
Try-Catch Block
- A try-catch block in Java is a mechanism to handle exception. The try block contains code that might thrown an exception and the catch block is used to handle the exceptions if it occurs.
try {
    // Code that may throw an exception
} catch (ExceptionType e) {
    // Code to handle the exception
}
finally Block
- The finally block is used to execute important code regardless of whether an exception occurs or not.
Note: finally block is always executes after the try-catch block. It is also used for resource cleanup.
try {
    // Code that may throw an exception
} catch (ExceptionType e) {
    // Code to handle the exception
}finally{
// cleanup code
}
Handling Multiple Exception
- We can handle multiple type of exceptions in Java by using multiple catch blocks, each catching a different type of exception.
try {
    // Code that may throw an exception
} catch (ArithmeticException e) {
    // Code to handle the exception
} catch(ArrayIndexOutOfBoundsException e){
    //Code to handle the anothert exception
}catch(NumberFormatException e){
     //Code to handle the anothert exception
}
How Does JVM Handle an Exception?
When an Exception occurs, the JVM creates an exception object containing the error name, description, and program state. Creating the exception object and handling it in the run-time system is called throwing an exception. There might be a list of the methods that had been called to get to the method where an exception occurred. This ordered list of methods is called call stack. Now the following procedure will happen:
The run-time system searches the call stack for an exception handler
It starts searching from the method where the exception occurred and proceeds backward through the call stack.
If a handler is found, the exception is passed to it.
If no handler is found, the default exception handler terminates the program and prints the stack trace.
Exception in thread "abc" Name of Exception : Description
// Call Stack
Look at the below diagram to understand the flow of the call stack:
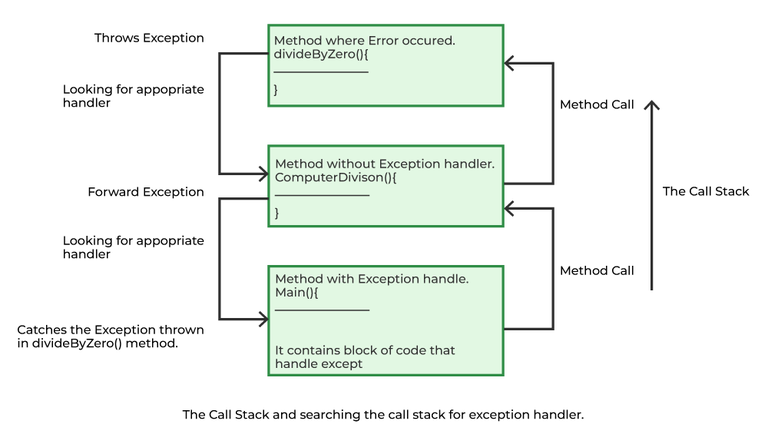
Illustration:
class Main{

    public static void main(String args[])
    {
        // Taking an empty string
        String s = null;

        // Getting length of a string
        System.out.println(s.length());
    }
}
Output:

Let us see an example that illustrates how a run-time system searches for appropriate exception handling code on the call stack.
Example:
class Main {

    // It throws the Exception(ArithmeticException)
    static int divideByZero(int a, int b)
    {

        // this statement will cause ArithmeticException (/by zero)
        int i = a / b;

        return i;
    }


    static int computeDivision(int a, int b)
    {

        int res = 0;

        // Try block to check for exceptions
        try {

            res = divideByZero(a, b);
        }

        // Catch block to handle NumberFormatException
        catch (NumberFormatException ex) {

            System.out.println(
                "NumberFormatException is occurred");
        }
        return res;
    }

    public static void main(String args[])
    {

        int a = 1;
        int b = 0;

        // Try block to check for exceptions
        try {
            int i = computeDivision(a, b);
        }

        // Catch block to handle ArithmeticException exceptions
        catch (ArithmeticException ex) {

            // getMessage() will print description of exception(here / by zero)
            System.out.println(ex.getMessage());
        }
    }
}
Output
/ by
How Programmer Handle an Exception?
Java exception handling uses five keywords such as try, catch, throw and throws, and finally.
Code that might cause an exception goes in the try block.
If an exception occurs, it is caught using catch.
We can throw exceptions manually with throw, and methods must declare exceptions they can throw using throws.
The finally block is used for code that must run after try, whether an exception occurs or not.
Tip: One must go through control flow in try catch finally block for better understanding.
Need for try-catch clause (Customized Exception Handling)
- Consider the below program in order to get a better understanding of the try-catch clause.
Example:
// Java Program to Demonstrate
// Need of try-catch Clause
class Main {

    public static void main(String[] args) {

        // Taking an array of size 4
        int[] arr = new int[4];

        // Now this statement will cause an exception
        int i = arr[4];

        // This statement will never execute
        // as above we caught with an exception
        System.out.println("Hi, I want to execute");
    }
}
Output:

Advantages of Exception Handling
Provision to complete program execution.
Easy identification of program code and error-handling code.
Propagation of errors.
Meaningful error reporting.
Identifying error types.
Difference Between Exception and Error
| Error | Exception |
| An Error indicates a serious problem that a reasonable application should not try to catch. | Exception indicates conditions that a reasonable application might try to catch |
| This is caused by issues with the JVM or hardware. | This is caused by conditions in the program such as invalid input or logic errors. |
| Examples: OutOfMemoryError, StackOverFlowError | Examples: IOException, NullPointerException |
Happy Learning
Thanks For Reading! :)
SriParthu 💝💥
Subscribe to my newsletter
Read articles from sri parthu directly inside your inbox. Subscribe to the newsletter, and don't miss out.
Written by
sri parthu
sri parthu
Hello! I'm Sri Parthu! 🌟 I'm aiming to be a DevOps & Cloud enthusiast 🚀 Currently, I'm studying for a BA at Dr. Ambedkar Open University 📚 I really love changing how IT works to make it better 💡 Let's connect and learn together! 🌈👋