Deploy an App with Docker
 Kunal Kumar Singh
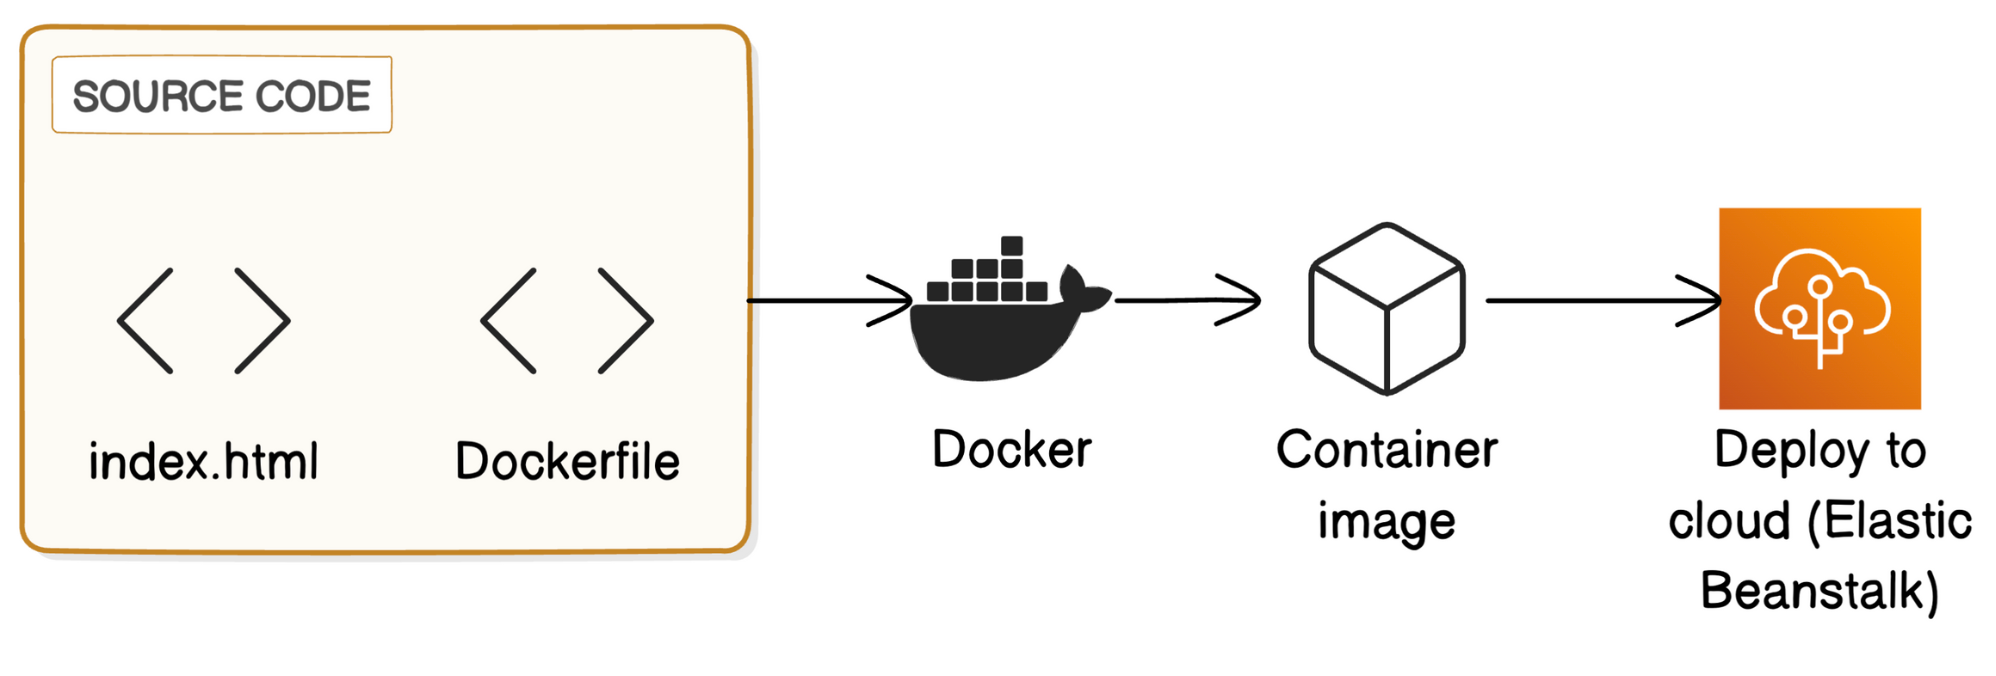
Let's learn how containers work using Docker and Elastic Beanstalk!
You'll get to create your own container (beginner friendly!) and run it using a platform called Docker 🐳
You'll also meet an awesome AWS service called AWS Elastic Beanstalk, which will help you deploy your containerized application in the cloud and make it available to the world!
💭 Why care about containers?
When developers create applications, they often use containers to package up their work and share it in a way that's easy for other people to run. Using containers has absolutely changed the game for making software fast and efficient, and it's also the reason why deploying software has become much simpler.
In this project, get ready to...
🐳 Install and use Docker.
🖼️ Build a custom container image.
🚢 Run your containerized application locally.
☁️ Deploy your containerized application to AWS Elastic Beanstalk, and access it live on the web.
Step-By-Step Project
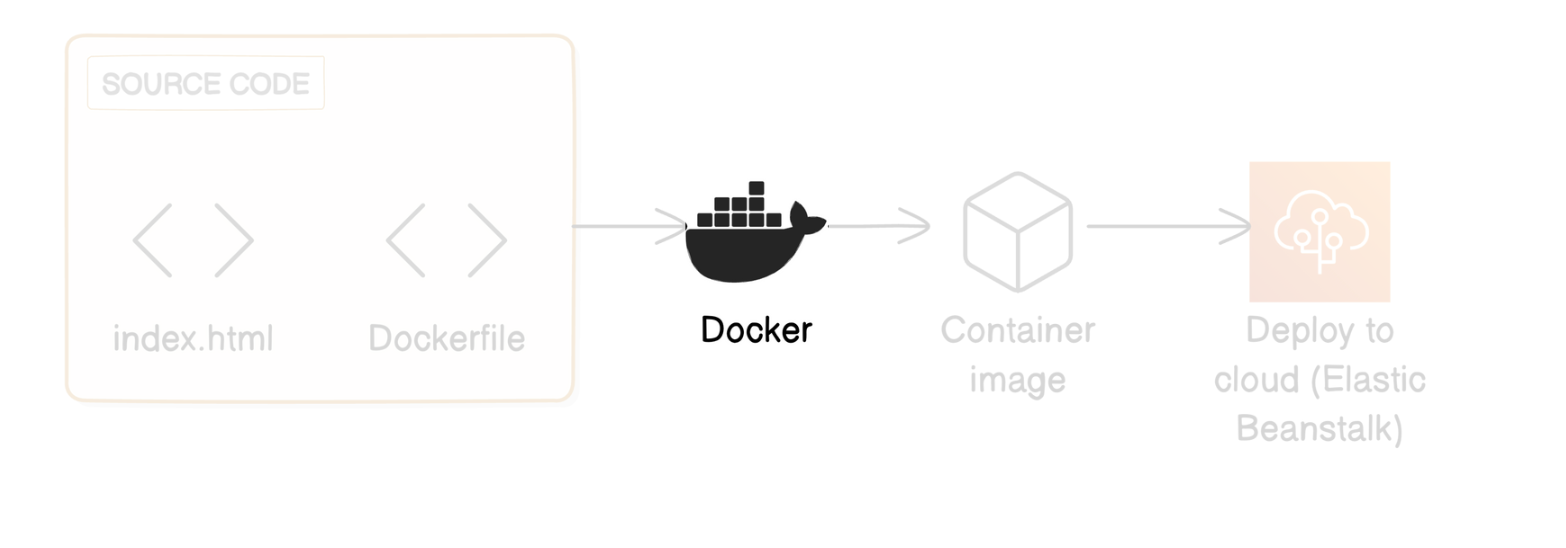
Install Docker
Welcome to Docker! Let's get to know this iconic tool by installing it and using it for the first time.
In this step, you're going to:
- Install Docker Desktop
Installing Docker Desktop
Head over to the official Docker website.
Select Download Docker Desktop, and then select the version of Docker that matches your local computer's operating system.
Downloading Docker Desktop usually takes at least a few minutes. While we wait...
Head to your computer's Downloads folder.
Install Docker Desktop:
Mac: Double-click Docker.dmg to open the installer, then drag the Docker icon to the Applications folder.
Windows: Double-click Docker Desktop Installer.exe to run the installer. By default, Docker Desktop is installed at C:\Program Files\Docker\Docker.
Linux: Install Docker Desktop using your specific Linux distribution.
Open the folder where you saved Docker Desktop e.g. Applications for Mac, or Program Files for Windows.
Open Docker Desktop.
You might run into a confirmation popup that confirms whether you want to open this file. Select Open/Okay.
Welcome to Docker Desktop!
Docker Desktop will ask you to sign in right away - we don't need to do this. Select Skip.
You're now looking at your Docker Desktop dashboard.
Let's try to verify that we've downloaded Docker successfully.
Open the terminal in your local computer. This should be called Terminal for Mac/Linux computers, and Command Prompt for Windows.
Run the following command:
docker --version
Next, we'll verify that we've installed something called a Docker daemon. Look for the Docker icon (a whale 🐳) in your system tray, which is the bar at the top (for Mac) or bottom (for Windows) of your computer screen with small icons for running applications, WIFI, battery etc.
If you see the Docker icon there, it means the Docker daemon is running on your system.
In this step, you're going to:
Spin up a container from your local terminal.
See the container load a webpage in your browser!
Back in your terminal, run the following command:
docker run -d -p 80:80 nginx
You should get this response in your terminal:

Open your web browser and navigate to http://localhost. You should see the default Nginx welcome page.

Woohoo! 🎉 You've just taken your first steps into the world of containers! Get ready to build your own custom image in the next step. 🚀
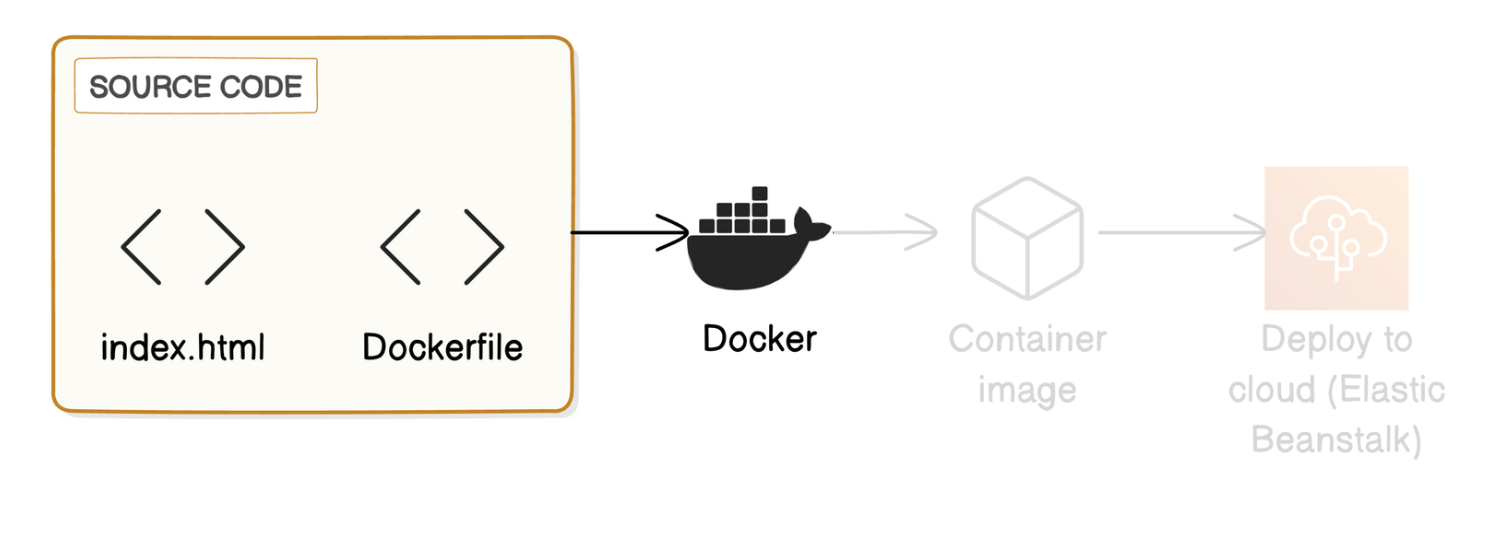
Let’s Build our custom image now
In this step, you're going to:
Write a set of instructions that tells Docker how to build your custom container image.
Get Docker to read your instructions and build the image.
Make a folder of your choice, I will go with First container Folder.
Create a new file in your Your folder called Dockerfile (note that there is no file extension after the file name). You can do this in your terminal by running the command:
- touch Dockerfile
💡 What is a Dockerfile?
A Dockerfile is a document with all the instructions for building your Docker image. Docker would read a Dockerfile to understand how to set up your application's environment and which software packages it should install.
Now let's fill in Dockerfile.
Open the Dockerfile. You can use any text editor for this e.g. TextEdit on Mac or Notepad++ on Windows.
Add the following lines to your Dockerfile:
FROM nginx:latest
COPY index.html /usr/share/nginx/html/
EXPOSE 80
Save your changes to Dockerfile by pressing Ctrl/Cmd + S on your keyboard.
Creating the web page for your container
Now that we have your Dockerfile ready, what is the web page that your Nginx container should serve? We'll put together a simple HTML file for this project.
Run these commands in your terminal to create a new file named index.html. This file should be in the same directory as your Dockerfile.
Open your index.html file and add this example HTML content:
Note: if double clicking on the file automatically opens index.html in your browser, make sure to right click on index.html instead and open it with your text editor.
Make sure you replace YOURNAME with your name.
Check that your index.html doesn't have any errors. In your DockerECR folder, right click on your index.html file and select Open With -> your browser app (e.g. Google Chrome).

Building the Image
Now, let's build the image!
Head back to your local terminal, make sure you're still in the Compute directory, and run:
docker build -t my-web-app .

💡 What does building an image mean?
Building an image means you're creating a Docker image using the instructions in a Dockerfile. Docker will then use the built image as the blueprint to create containers that run your application anywhere.
💡 Wow! What does the response from the terminal mean?
The terminal response shows the steps Docker took to build your image from the Dockerfile:Loading build definition: Docker is loading the instructions in your Dockerfile to understand how to build the image.
[1/2] FROM docker.io...: Docker is processing the first line in your Dockerfile.
[2/2] COPY index.html...: Docker is processing the second line in your Dockerfile, which tells it to copy your index.html file into the container's file system.
Exporting to image: Docker is combining all the instructions applied to the image together, making it ready to run containers.
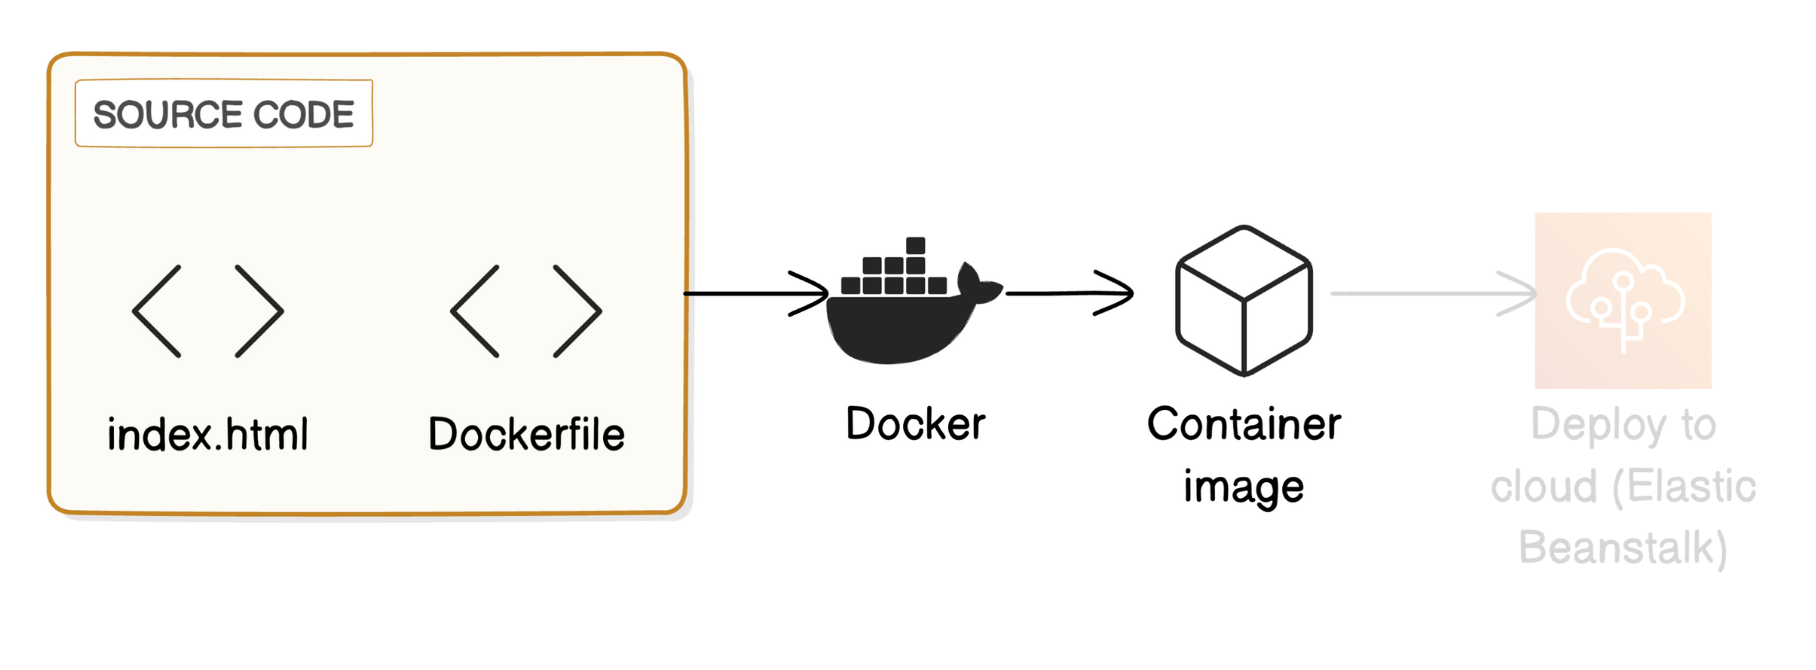
Run a container with your custom image
Image building done
Next up is to run the container with the image we've built.
In this step, you're going to:
Run your custom container image, so you can see your webpage in action.
To run an image, use this command:
docker run -d -p 80:80 my-web-app
Did you run into an error?

Let's figure out who's taking up port 80 right now 🔎
You can find the container that's running in port 80 by visiting Docker Desktop again. The container's icon should be green if it's running.
This is the Nginx container you created when you first ran docker run -d -p 80:80 nginx. Culprit found! 🧙♂️
You can then stop the container by selecting the square stop icon. The container icon should turn grey.
Another way to find the container is by running docker ps --filter "publish=80" in your local terminal. Your terminal should show you the id under CONTAINER ID.

You can then stop the container by running
docker stop {container_id}
- Replace {container_id} with the actual ID of the other container.
- Let's try to run the image again:
docker run -d -p 80:80 my-web-app
yaaayyy!!!! No more errors this time.
Open your web browser and navigate to http://localhost again. If we've done everything correctly, then we should see the content of our index.html file.
- Hooray!
Deploy your custom image to Elastic Beanstalk
In this step, we'll deploy your custom Docker image to AWS Elastic Beanstalk, a service that makes it easy for developers to deploy applications in the cloud.
This is the grand finale for the project - complete the application development process by making your app public on the internet!
In this step, you're going to:
Set up your application in Elastic Beanstalk.
Deploy your application and make it available to the world!
Creating an Elastic Beanstalk Application
Head to the AWS Management Console and log in as your IAM user.
Search for Elastic Beanstalk and click on the service.
💡 What is Elastic Beanstalk?
AWS Elastic Beanstalk is a service that makes it easy to deploy cloud applications without worrying about the underlying infrastructure. You simply upload your code and Elastic Beanstalk handles everything needed to get it running, like setting up servers and managing scaling. This lets you focus on your application code without having to spend too much time on managing cloud infrastructure.In more technical terms, Elastic Beanstalk handles things like:
Capacity provisioning
Load balancing
Auto-scaling
Application health monitoring
Click on Create Application in the Elastic Beanstalk homepage.
In the Configure Environment page:
We'll leave the Environment tier as default.

Enter Web App as the application name.
We'll leave the Environment information section with the default values.
Under the Platform section, select Docker as your Platform.
The platform branch and version will be automatically selected for you too.

In the Application code section, select Upload your code.
Before we upload any code, head back to the Compute folder in your desktop and open up index.html with your text editor.
Find the line that says <h1>Hello from Kunal's custom Docker image!</h1>
Update index.html by adding a new line underneath the line you've found. For example:

Elastic Beanstalk needs your source code to be in a ZIP file. Create a ZIP file containing Dockerfile and index.html.
Your files should be at the root level of the ZIP file, not inside a subfolder.
To create your ZIP file, in your folder, multi-select both your Dockerfile and index.html, then compress them together.
Back to your Elastic Beanstalk setup page, enter Version One as the Version label.
Select Local file.
Under Upload application, select Choose file.
Upload the ZIP file you created earlier. This uploads your application code to Elastic Beanstalk.
In the Presets section, choose Single instance (Free tier eligible).
Select Next.
In the Configure service access page:
Select Create and use new service role. This creates a new IAM role that Elastic Beanstalk can use.
Use the default service role name, which should look like aws-elasticbeanstalk-service-role.
Ignore the EC2 key pair dropdown, since we don't need to access the EC2 instance directly for this project.
Under EC2 instance profile, choose ecsInstanceRole.
In the Set up networking, database, and tags page:
Ignore the Virtual Private Cloud section - the default VPC looks good for this project!
Under Instance settings, check Activated for the Public IP address option.
Skip the rest of the page, we don't need to set up a database for our webpage.
Select Next.
For the Configure instance traffic and scaling page:
Under the Instances section, for your Root volume type select General Purpose 3 (SSD).
For the Size select 10 GB.
Under Instance metadata service (IMDS), make sure IMDSv1 is Deactivated i.e. keep the Deactivated checkbox checked.
Since our app won't need access to other AWS services, we won't need IMDS.
We don't need to configure anything else. Skip the security groups and Capacity sections.
Select Next.
In the Configure updates, monitoring, and logging page:
Under the Monitoring section, select Basic for your System.
Make sure to select Basic for your System to keep your project free.
Scroll the Managed platform updates section.
Make sure to uncheck the Activated checkbox for Managed updates option.
We don't need managed updates since we aren't keeping this application for long
Now in the Rolling updates and deployments section, accept the default All at once deployment policy.
Leave all other options, including the Platform software section as default.
Select Next.
For the final step, we'll just need to review our Elastic Beanstalk setup. This rounds up your selections across the last five pages.
Let's run a quick checklist and scavenger hunt. Is...
Application name Web App?
Application code a zip file?
EC2 instance profile set to ecsInstanceRole?
Public IP address set to true?
Root volume type set to gp3?
Environment type set to Single instance?
System set to basic?
Managed updates deactivated?
Deployment policy AllAtOnce?
Click Submit. This starts the environment creation and application deployment process. This process can take several minutes...
Environment launch success!
Shall we see our environment in action? Click on the Domain link on the environment dashboard.

Wow! The Domain link is showing you your updated HTML file, which tells us that Elastic Beanstalk has successfully deployed your ZIP file's contents as a container image.
If You are using AWS free Tier account make sure to Delete Your Resources
The Elastic Beanstalk environment
In the Elastic Beanstalk console, navigate to your NextWorkApp-env environment.
Select the Actions dropdown, and select Terminate environment.
Enter the name of your environment i.e. WebApp-env.
Select Terminate.
This will delete all resources associated with your environment, including the EC2 instance.
Select Applications from your left hand sidebar.
Select Web App
Select the Actions dropdown, and select Delete application.
Enter Web App and select Delete.
In your AWS Management Console, head to the S3 console.
Select Buckets from the left hand sidebar.
Select the bucket that AWS automatically created for you. Its name should start with elasticbeanstalk
Select Empty, and type in permanently delete
Select Exit.
Select the bucket again, and this time select Delete.
Enter the name of the bucket and select Delete bucket.
🙋♀️ I ran into an error deleting this bucket!
No stress! Let's work through a permissions error like this one together.
Select Cancel.
Click into your elasticbeanstalk bucket's name.
Select the Permissions tab.
At the Bucket policy section, select Delete at the right hand corner.
Type delete and select Delete.
Select Buckets from the left hand sidebar, and try deleting your bucket again.
Containers and container images
It doesn't cost any money to store containers in Docker, but it's best practice to remove resources that you won't need anymore.
Head back to the terminal in your local computer.
Run docker ps -a to list all containers (running and stopped).
Can you tell why there are two containers listed? Hint: you've deployed two containers in this project!
Identify the running container i.e. the container running the my-web-app image. You can tell it's still running as its status still says Up x hours, which means it's been running for that amount of time (and counting).
Use docker stop <container_id> to stop your running container. Replace <container_id> with the id of that container.
Remove the containers using docker rm <container_id>. Run the command twice and replace <container_id> with the id of the container you're removing.
Next, we'll remove the container images too.
Run docker images to list your local images.
Remove the images using docker rmi <image_id>. Replace <image_id> with the id of the image you're removing.
And Done you have completed a Project.
Subscribe to my newsletter
Read articles from Kunal Kumar Singh directly inside your inbox. Subscribe to the newsletter, and don't miss out.
Written by
Kunal Kumar Singh
Kunal Kumar Singh
I am a DevOps Engineer working in MNC. Where I automate Infrastructure using various DevOps tools and AWS Cloud.