Step-by-Step Guide on how to setup AWS Elastic Disaster Recovery Service
 Mmesoma Okaro
Overview
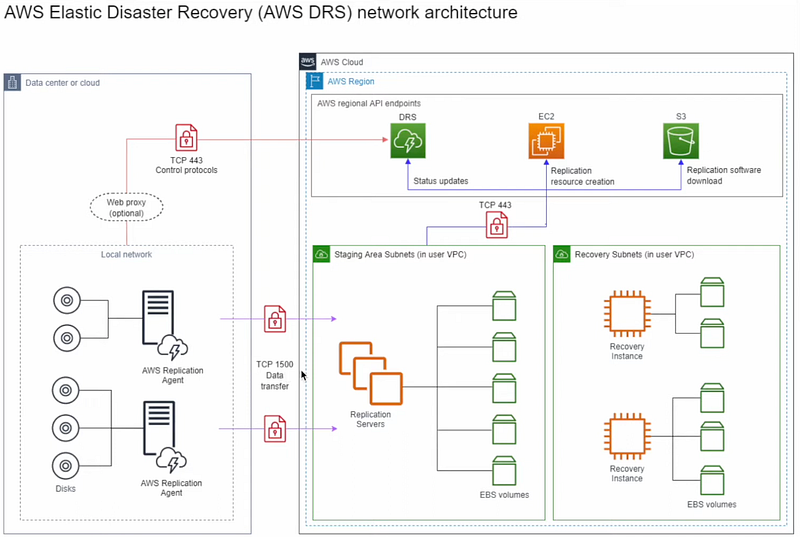
Disaster Recovery (DR) is a critical component of any business continuity strategy. AWS Elastic Disaster Recovery (DRS) (formerly CloudEndure Disaster Recovery) enables organizations to quickly recover IT infrastructure and data in case of disasters whether due to on-premises failures, cloud outages, or cybersecurity incidents.
In this comprehensive guide, I’ll walk you through how I set up AWS Elastic DRS from scratch. I’ll share the key terminologies used, the prerequisites, my step-by-step replication setup process, how I handled my first failover scenario, the failback procedures I’ve refined, and the cleanup strategies that have saved me both time and money.
KEY TERMINOLOGIES USED IN THIS ARTICLE:
Before we dive into the setup, I want to help you understand the essential DR terms that I had to master when I first started:
Source Server: This is the server you want to make disaster-ready. I install the AWS replication agent on this server to enable seamless replication.
Replication Server: AWS EDR automatically launches this server to replicate your data to another subnet called the staging subnet. You don’t need to manage this AWS handles it for you.
Conversion Server: During the launch process, AWS automatically spins up this server to handle driver changes, network configurations, and OS licensing for your instance. It helps with the conversion process and terminates automatically once done.
Recovery Server: This is a server that contains all the data and configuration from your source server, set up according to the template we configure. In the event of a disaster, this becomes your primary server.
Failover: When something happens to your source server, all user traffic gets redirected to the recovery server. I’ve tested this process multiple times to ensure it works smoothly.
Failback: Once your source server is back up and running, we redirect traffic back to it from the recovery server. This is how you return to normal operations.
Replication: The continuous process of copying data from your source servers (whether on-premises or in AWS) to AWS for DR readiness.
Recovery Point Objective (RPO): This is the maximum data loss you can accept (e.g., 15 minutes, 1 hour). When I implemented AWS Elastic DRS, I was impressed by how it achieves low RPO through continuous replication.
Recovery Time Objective (RTO): The maximum downtime you can tolerate before restoration (e.g., 2 hours). I’ve found that AWS Elastic DRS minimizes RTO with its automated failover capabilities.
AWS Regions & Availability Zones (AZs): I recommend replicating your data to a different AWS Region for geographic redundancy. But for the purpose of this of this setup I used cross availability zones.
PREREQUISTIES
Prerequisite 1:
IAM User and Key
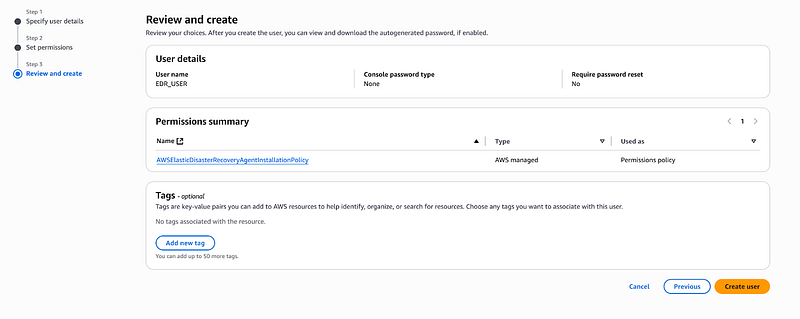
Before we begin, I need to walk you through creating a user that will install the AWS replication agent on your source server. you need to assign the AWS Elastic Disaster Recovery Agent Policy to this user. You also need the access key and secret key of the user you created for CLI initialization
**Steps to create an IAM User and Key:
**Navigate to IAM Service
Once you’re in IAM, I click on “Users” in the left sidebar, then hit “Create Users.

Click on Next and Setup the permissions for it, Click on attach policies directly
Attach this policy to your user

Click on Next
After creating the user, click on the user and navigate to security credentials

Click on create access key and create a new access key for the newly created user. Make sure you download the access key.
Prerequisite 2
S3 Bucket
The next thing I always do is create an S3 bucket for storing my primary server configurations from the primary subnet. Make sure to store all the critical configuration files from source server. This includes network settings, application configurations, and any custom setup files that you will need for restoration.
Steps to create an S3 bucket:
Navigate to S3 service, click on create S3 bucket

Give your bucket a unique name. For the purpose of this setup, leave every other configuration as default and click on create.
Prerequisite 3:
AWS EDR Security Group
Here’s what I do when creating the security group for EDR:
I created a new security group with the following inbound rules that I’ve found essential for proper replication:
Port 443 (HTTPS): This allows secure communication between the replication agent and AWS services
Port 1500: This is crucial for the replication agent communication — without this, your replication simply won’t work
Port 22 (SSH) or Port 3389 (RDP): Depending on whether you’re using Linux or Windows servers for management access
For outbound rules, I typically allow all traffic since the replication agent needs to communicate with various AWS services.
Prerequisite 4:
Source Server
You must have a source server running, this could be a Windows server or an Ubuntu server that’s actively running. In my experience, I’ve worked with both, and the setup process is quite similar regardless of which operating system you choose. The key is that your source server needs to be operational and accessible because we’ll be installing the AWS replication agent directly on it.
Steps to Setup an EC2 Server
Navigate to the EC2 Service on your AWS Console
Click on Launch Instance

Follow the configuration to set up your windows EC2 instance.

WALKTHROUGH PROPER
Before we can start using AWS Elastic Disaster Recovery, I need to show you how to initialize the service for your chosen AWS Region. For the purposes of this walkthrough I used eu-west-1 (ireland) region on AWS
AWS Elastic Disaster Recovery Service
Navigate to the AWS Elastic Disaster Recovery service on your console
Look for the “Configure and initialize” button

Click on configure and initialize, it will lead you to this page that has 6 steps setup for configuring your EDR.
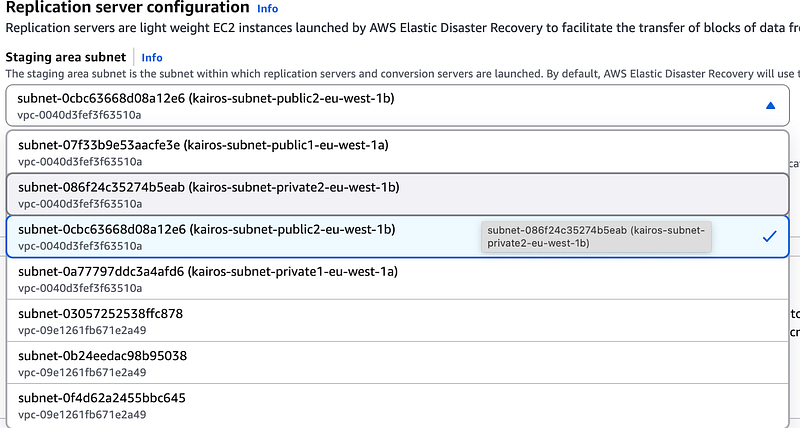
Set up replication servers.
Replication Servers are lightweight Amazon EC2 instances that are used to replicate data between source servers and AWS. When I set this up, I had to choose: Instance type, Subnets for the staging server, Availability zone for the staging subnet. I used the t3.small for it.
Under the staging subnet region. We are trying to achieve a subnet to subnet replication hence select the eu-west-1b subnet. Remember that our Source Server is on eu-west-1a.
Under the replication server instance type, select your desired instance type or leave it to the recommended settings.

Specify Volumes and Security Groups
This step was crucial for me to understand. For each disk on an added source server there is an identically-sized EBS volume attached to a replication server, and each replication server can handle replication of disks from multiple source servers up to 14 source servers.
Here’s what I configured: EBS Volume Types: I usually choose gp3 for cost-effectiveness and performance. Volume Size: AWS automatically matches the source server disk sizes. Security Groups: I create specific security groups that allow: Port 443 (HTTPS) for secure replication. Port 1500 for the replication agent communication. Any application-specific ports my servers need.
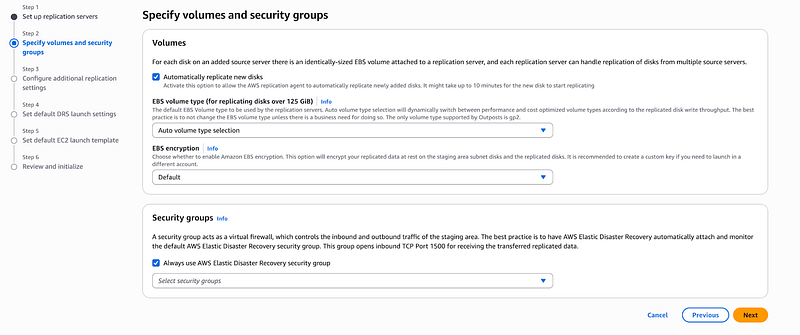
If you want to fulfil compliance, choose this:
Use private IP for data replication (VPN, DirectConnect, VPC peering) so replication can happen over the private network.
Click on Next
Configure Additional Replication Settings
This session covers the bandwidth throttling, Point-in-time snapshots, data routing, resource tagging. I configured how often recovery points are created as well as set up my retention policy. I put 7 days there.
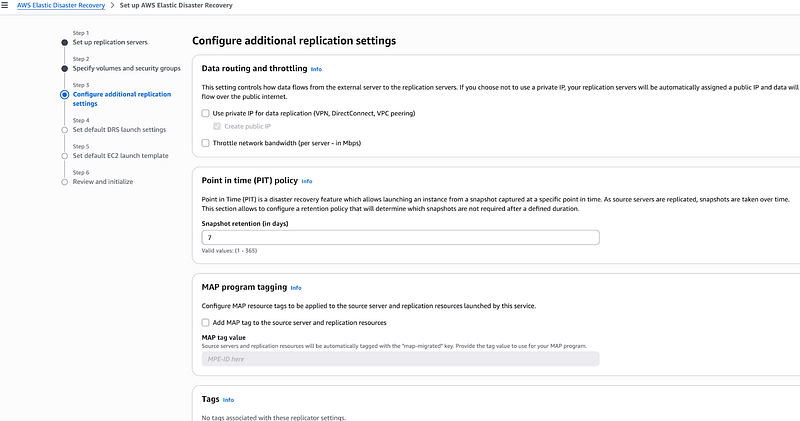
Click on Next
Set Default DRS Launch Settings
This is where I define how my recovery instances will behave during an actual disaster: Instance Types (I can choose different instance sizes for recovery sometimes smaller to save costs), Target Subnet (Where recovered instances will launch), Security Groups (What security groups the recovered instances will use), IAM Roles (What permissions the recovered instances need ie EC2-SSM role). Licensing (if your server is a windows server that requires certain licenses).

Click on Next.
Set Default EC2 Launch Template
I create launch templates that define: AMI Settings (Which operating system images to use). User Data Scripts (Any startup scripts needed for recovery instances). Network Interfaces: How the network should be configured). Storage Configuration (EBS volume settings for recovered instances). For the purpose of this demo , I will leave everything as default. Not to worry, you can still modify the template after setup.
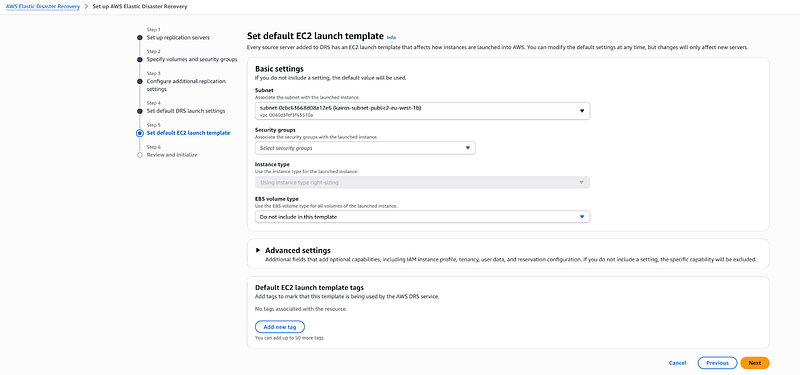
Click on next
Review and Initialize
The final step involves reviewing all my configurations. Always double-check

Once I click “Initialize,” AWS sets up the entire disaster recovery infrastructure in my chosen region. Default launch settings and Default replication settings are initially configured while Initializing the AWS Elastic Disaster Recovery Service.
Confirm it has been created successfully

EC2 Agent Installation
Navigate to your EC2 console
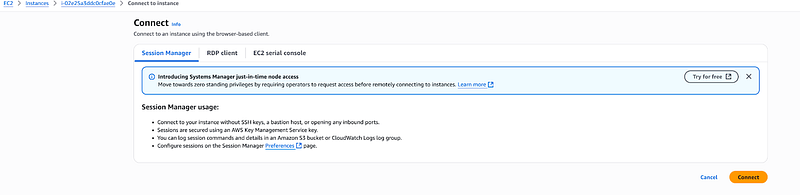
Connect to Your Source Server Next, so I use AWS Systems Manager Session Manager to connect to the server — this is my preferred method because it’s secure and doesn’t require opening RDP ports.
When I click on my Windows server instance, I select “Connect” and then choose “Session Manager” from the connection options. This gives me a secure shell session directly to my server without needing to worry about VPNs or bastion hosts.
Navigate to the Downloads directory inside the server
Run these commands
Invoke-WebRequest -Uri "https://aws-elastic-disaster-recovery-eu-west-1.s3.eu-west-1.amazonaws.com/latest/windows/AwsReplicationWindowsInstaller.exe" -OutFile "AwsReplicationWindowsInstaller.exe"
.\AwsReplicationWindowsInstaller.exe
It will prompt you to enter the region secret key and access key that you once created.

Wait till when you see this on your CLI
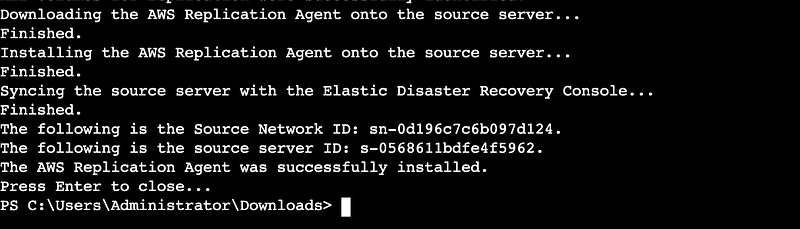
Navigate back to the AWS EDR Service console and refresh, you will see your source server in the initializing state

Wait for it to be done before continuing.
Still on AWS EDR, Click on source server and monitor your data replication progress
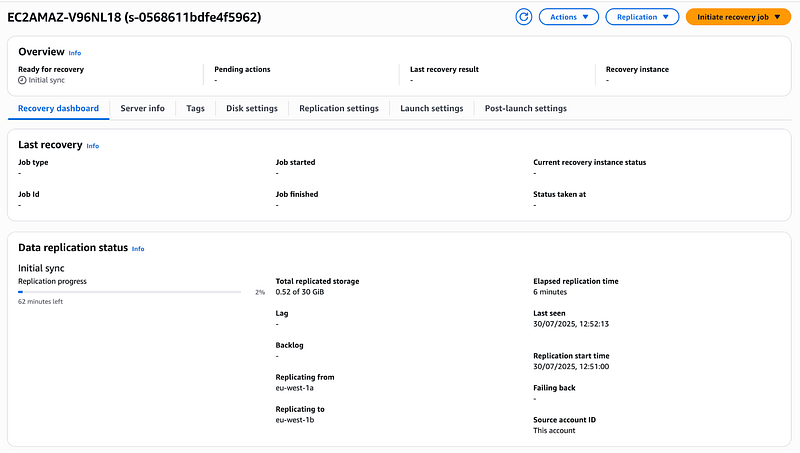
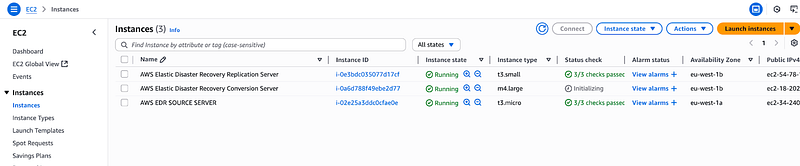
When it’s done, navigate to the EC2 Console to confirm that AWS EDR service has created a replication server for you.

Compare the two subnets of the source and replication server

Notice they are in eu-west-1a and eu-west-1b respectively as we specified in our launch settings

Navigate to the AWS EDR
Confirm your replication is completed.

Monitoring Your Recovery Instance Status
At this point, you’ll notice something important that I want to highlight — when I check the recovery instance session, there’s nothing there yet. Don’t worry, this is completely normal! This happens because I haven’t initiated a recovery job at this stage.
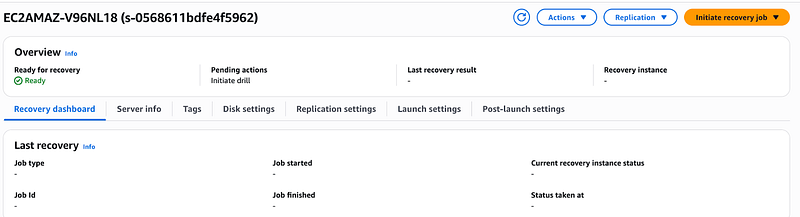
Once you see that green ready indicator, you’ll know that your disaster recovery setup is ready and your data is being continuously replicated to AWS. That’s when the real magic happens!
Recovery/ Failover
Click on the source server instance on the AWS EDR Console and click on initiate recovery job and select initiate recovery.

It will lead you to the next page where you will select the point in time snapshot you want to use.

Select the one you want to use for replication and click on initiate recovery.
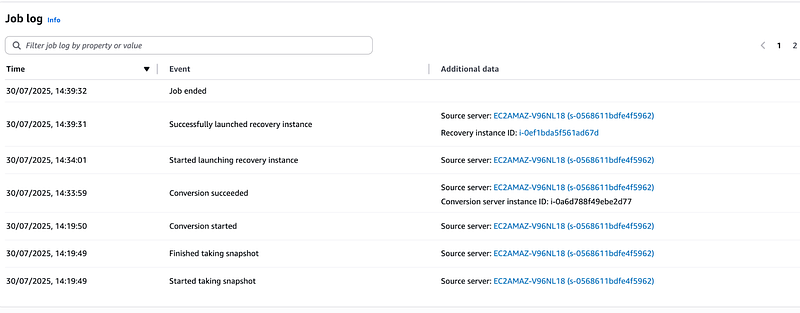
Go to your recovery job history and confirm that job has started

Go to EC2 Console and notice that AWS EDR has created a conversion server for you.
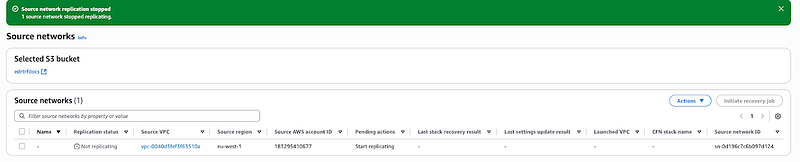
Go to source networks and if you notice this, that means you didn’t create the s3 from the prerequisite step
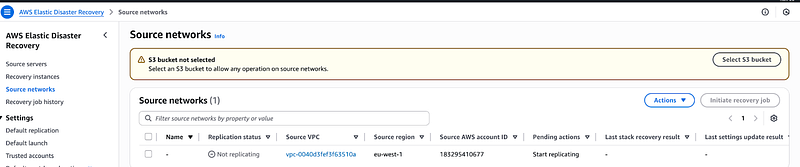
Kindly create an S3 bucket.
After that go back to the source networks, select the network and click on start replication.

Monitor the progress of your recovery job on the recovery job history.

Navigate to the EC2 and noticed that AWS EDR created an instance with similar specs as the source server using the launch template and settings you provided.
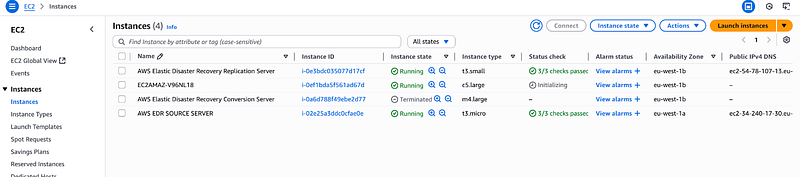
Check the Recovery Instance used for Failback on AWS EDR console and you will see the instance already created.

.
Failback Process (Optional)
Now, if you want to perform a failback — meaning you want to redirect your user traffic back from the recovery site to your original source site after the disaster is resolved — here’s what I would typically do:
I would install the
AwsReplicationWindowsInstaller.exe
on my recovery server to set up the replication agents for the reverse direction. Then I’d perform the handshake process to establish the connection and continue with the failback procedure.
This essentially reverses the replication flow, allowing me to sync any changes that happened during the disaster back to my original source server, and then switch traffic back to the primary site.
However, for the purpose of this demonstration, I won’t be walking through the complete failback procedure.
CleanUp
Now that we’ve completed our disaster recovery setup and testing, I always make sure to clean up the resources to avoid unnecessary charges.
Stop All Replications*:* First and most importantly, I stop all active replications. This is crucial because replication processes continue running in the background and will keep generating costs. I go to the AWS EDR console and stop replication for each source server I had configured.
Disconnect and Delete Source Servers*:* First, I go to both my Source Servers and Recovery Instances in the AWS EDR console. I click on each server and select “Disconnect from AWS” then I click “Delete” this will remove all the created disaster recovery resources associated with these servers.

Clean Up EC2 Resources*:* Next, I head over to the EC2 Console to make sure I’ve removed all related resources. I delete any remaining EC2 instances that were created during the process.

That wraps up our AWS Elastic Disaster Recovery guide!!!!
Checkout my post on medium
Subscribe to my newsletter
Read articles from Mmesoma Okaro directly inside your inbox. Subscribe to the newsletter, and don't miss out.
Written by