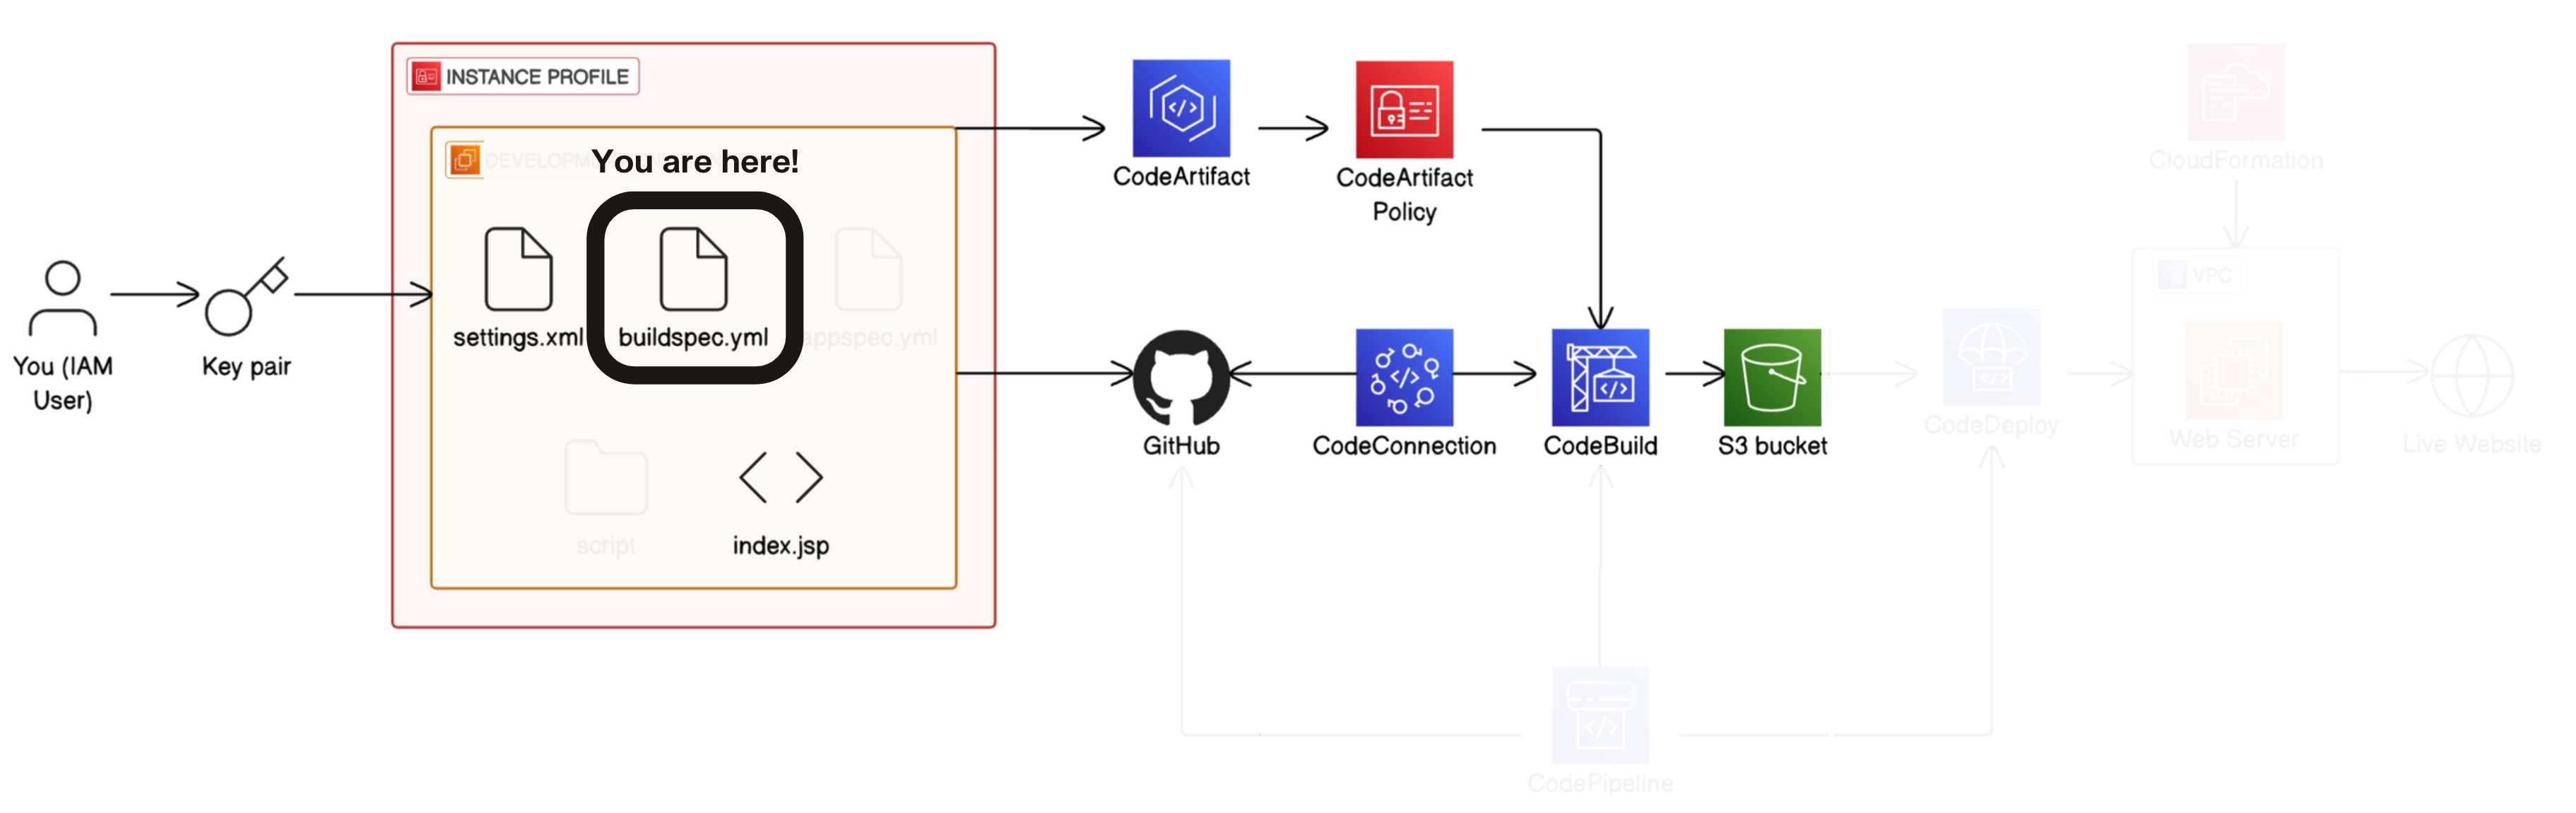
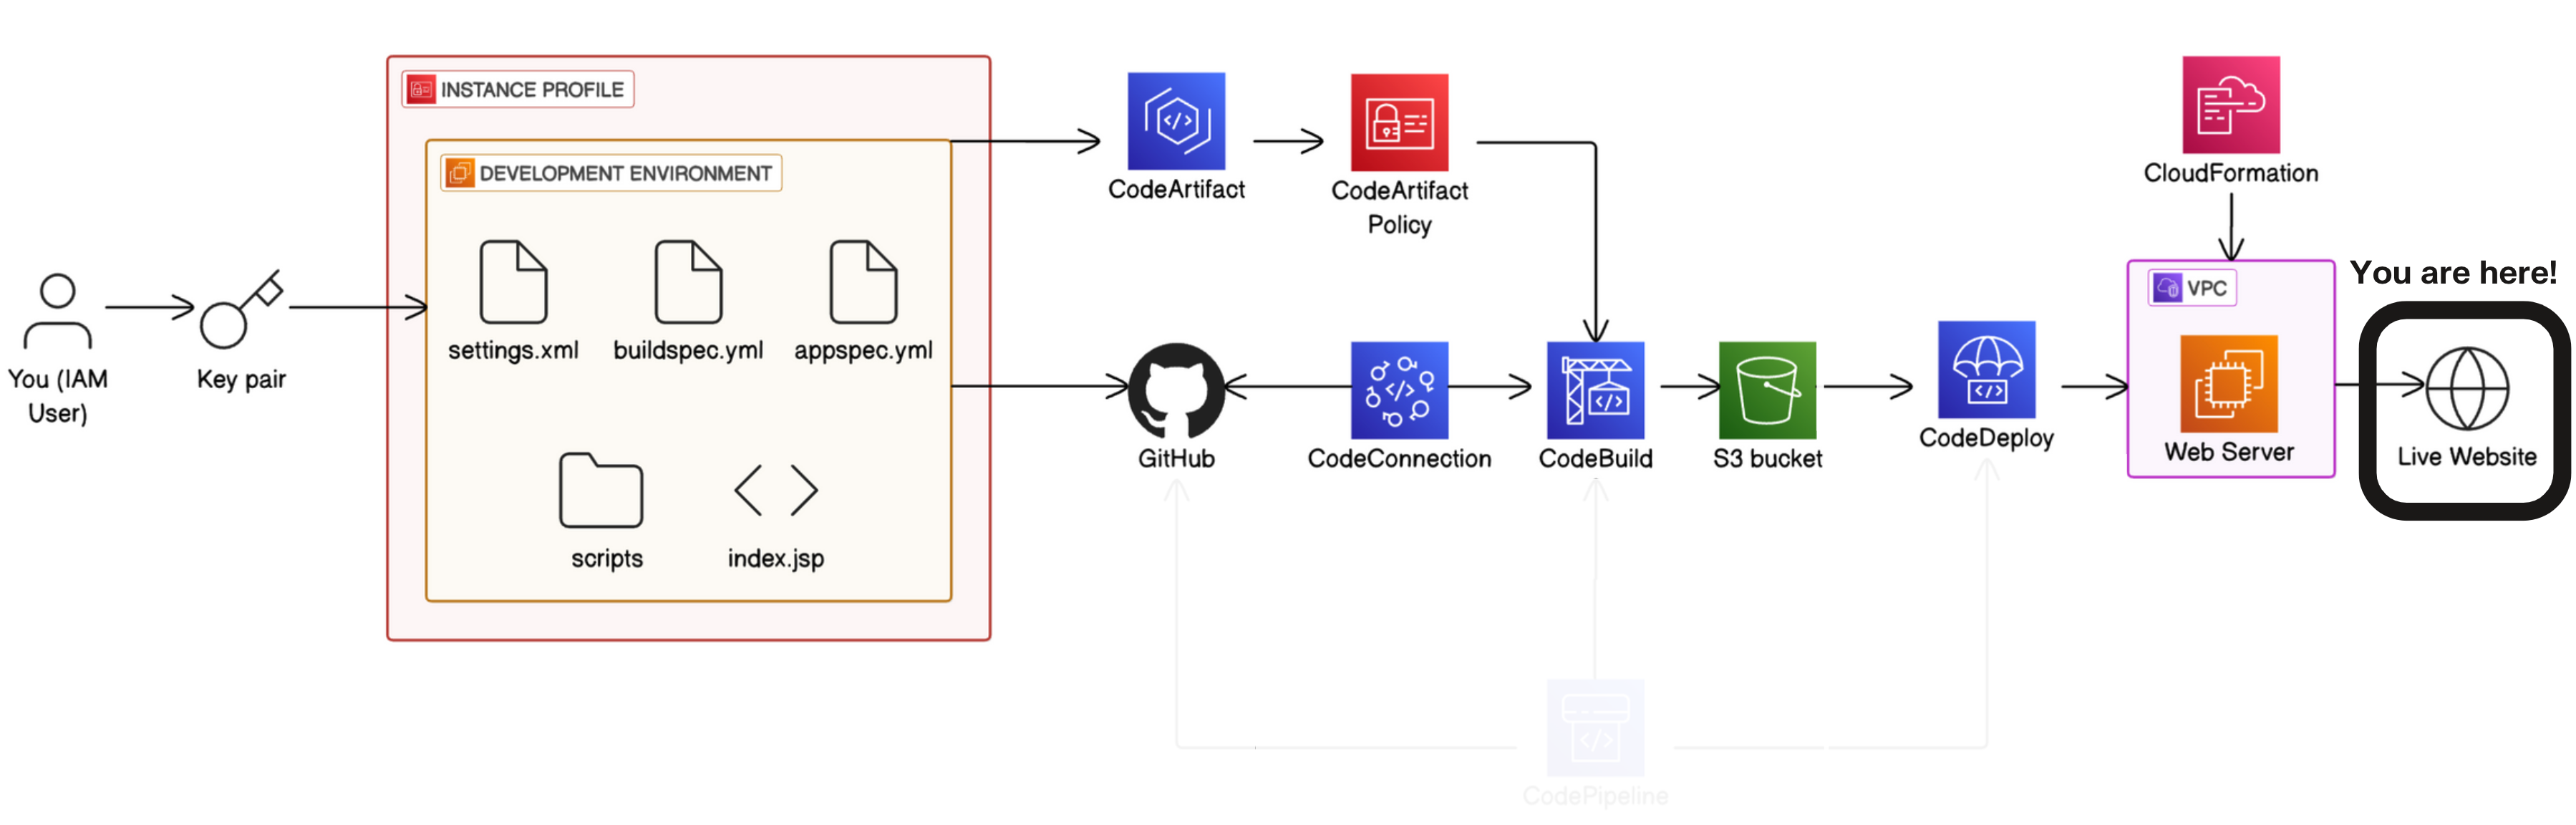
Complete CI/CD pipeline using AWS tools
 Neha Sawant
Step 1: Set Up a Web App in the Cloud
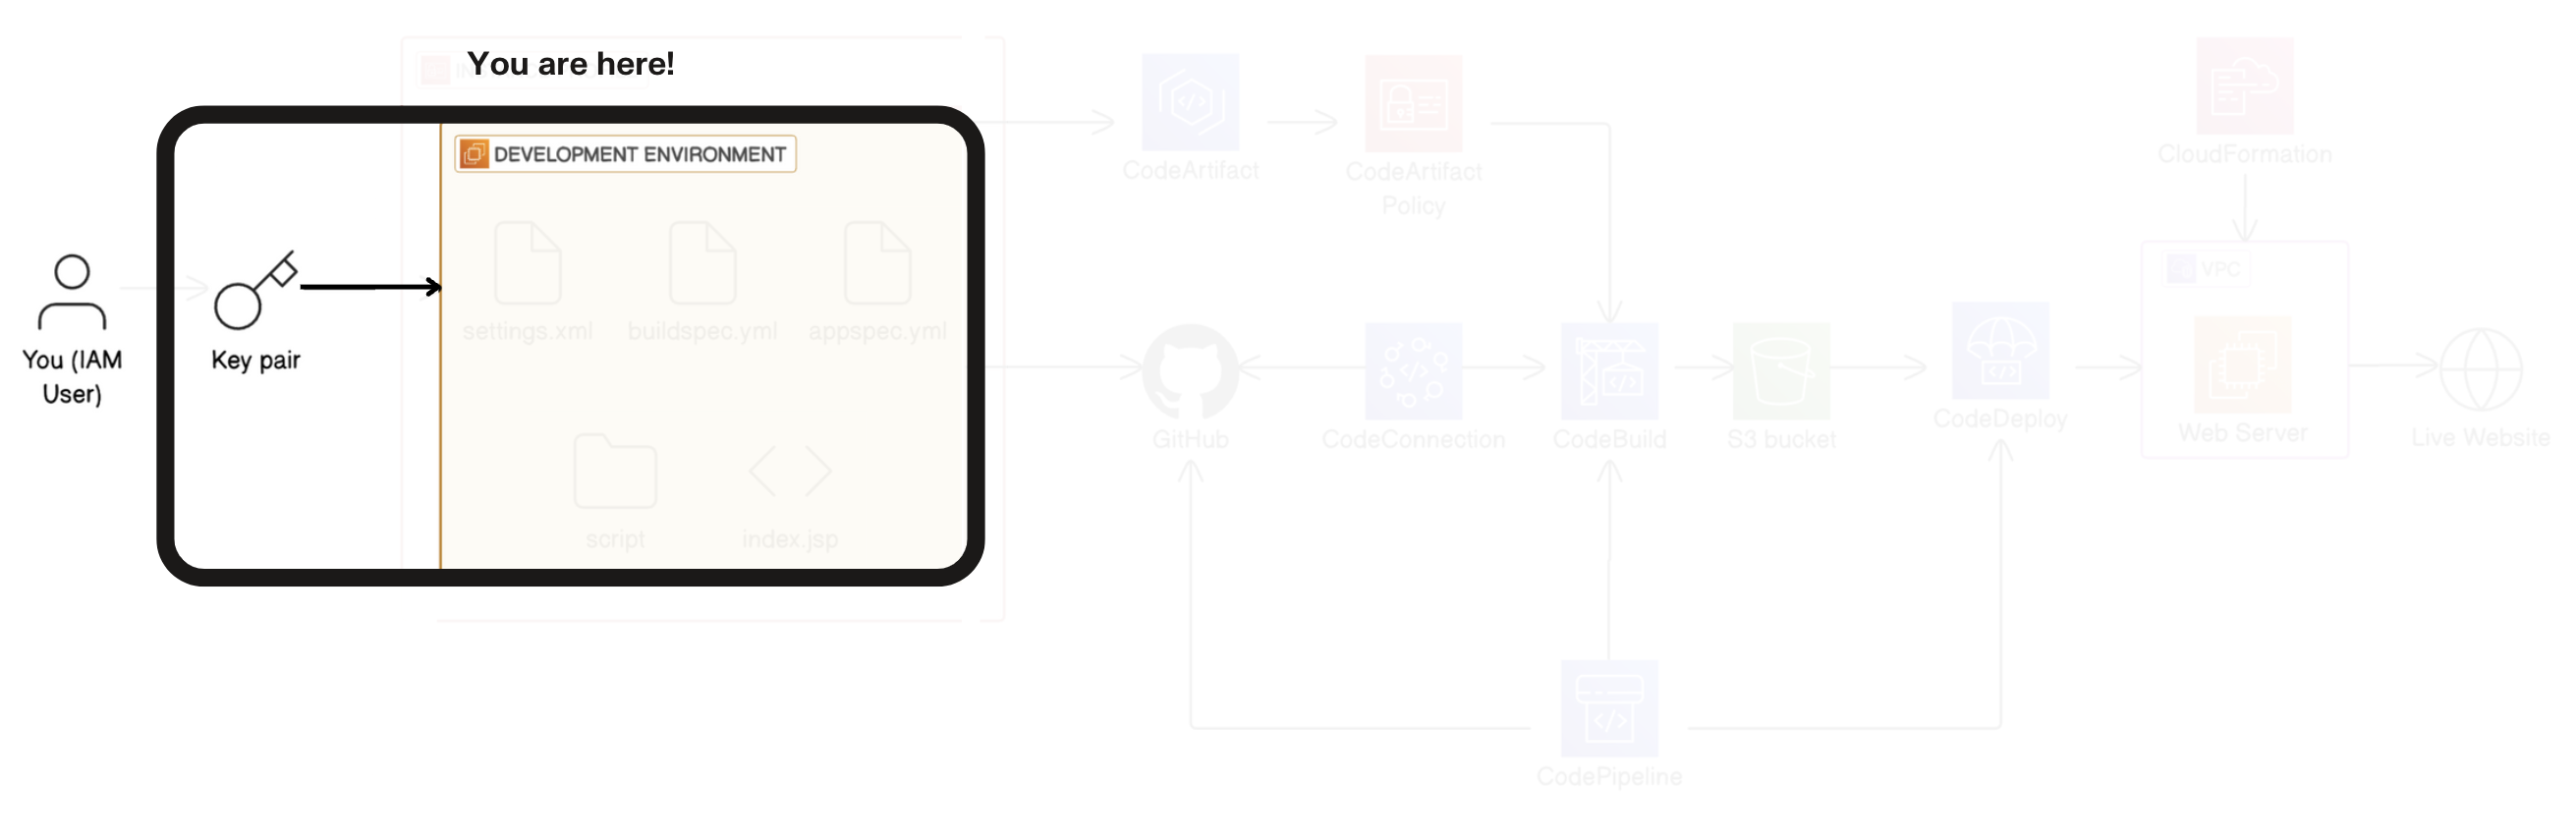
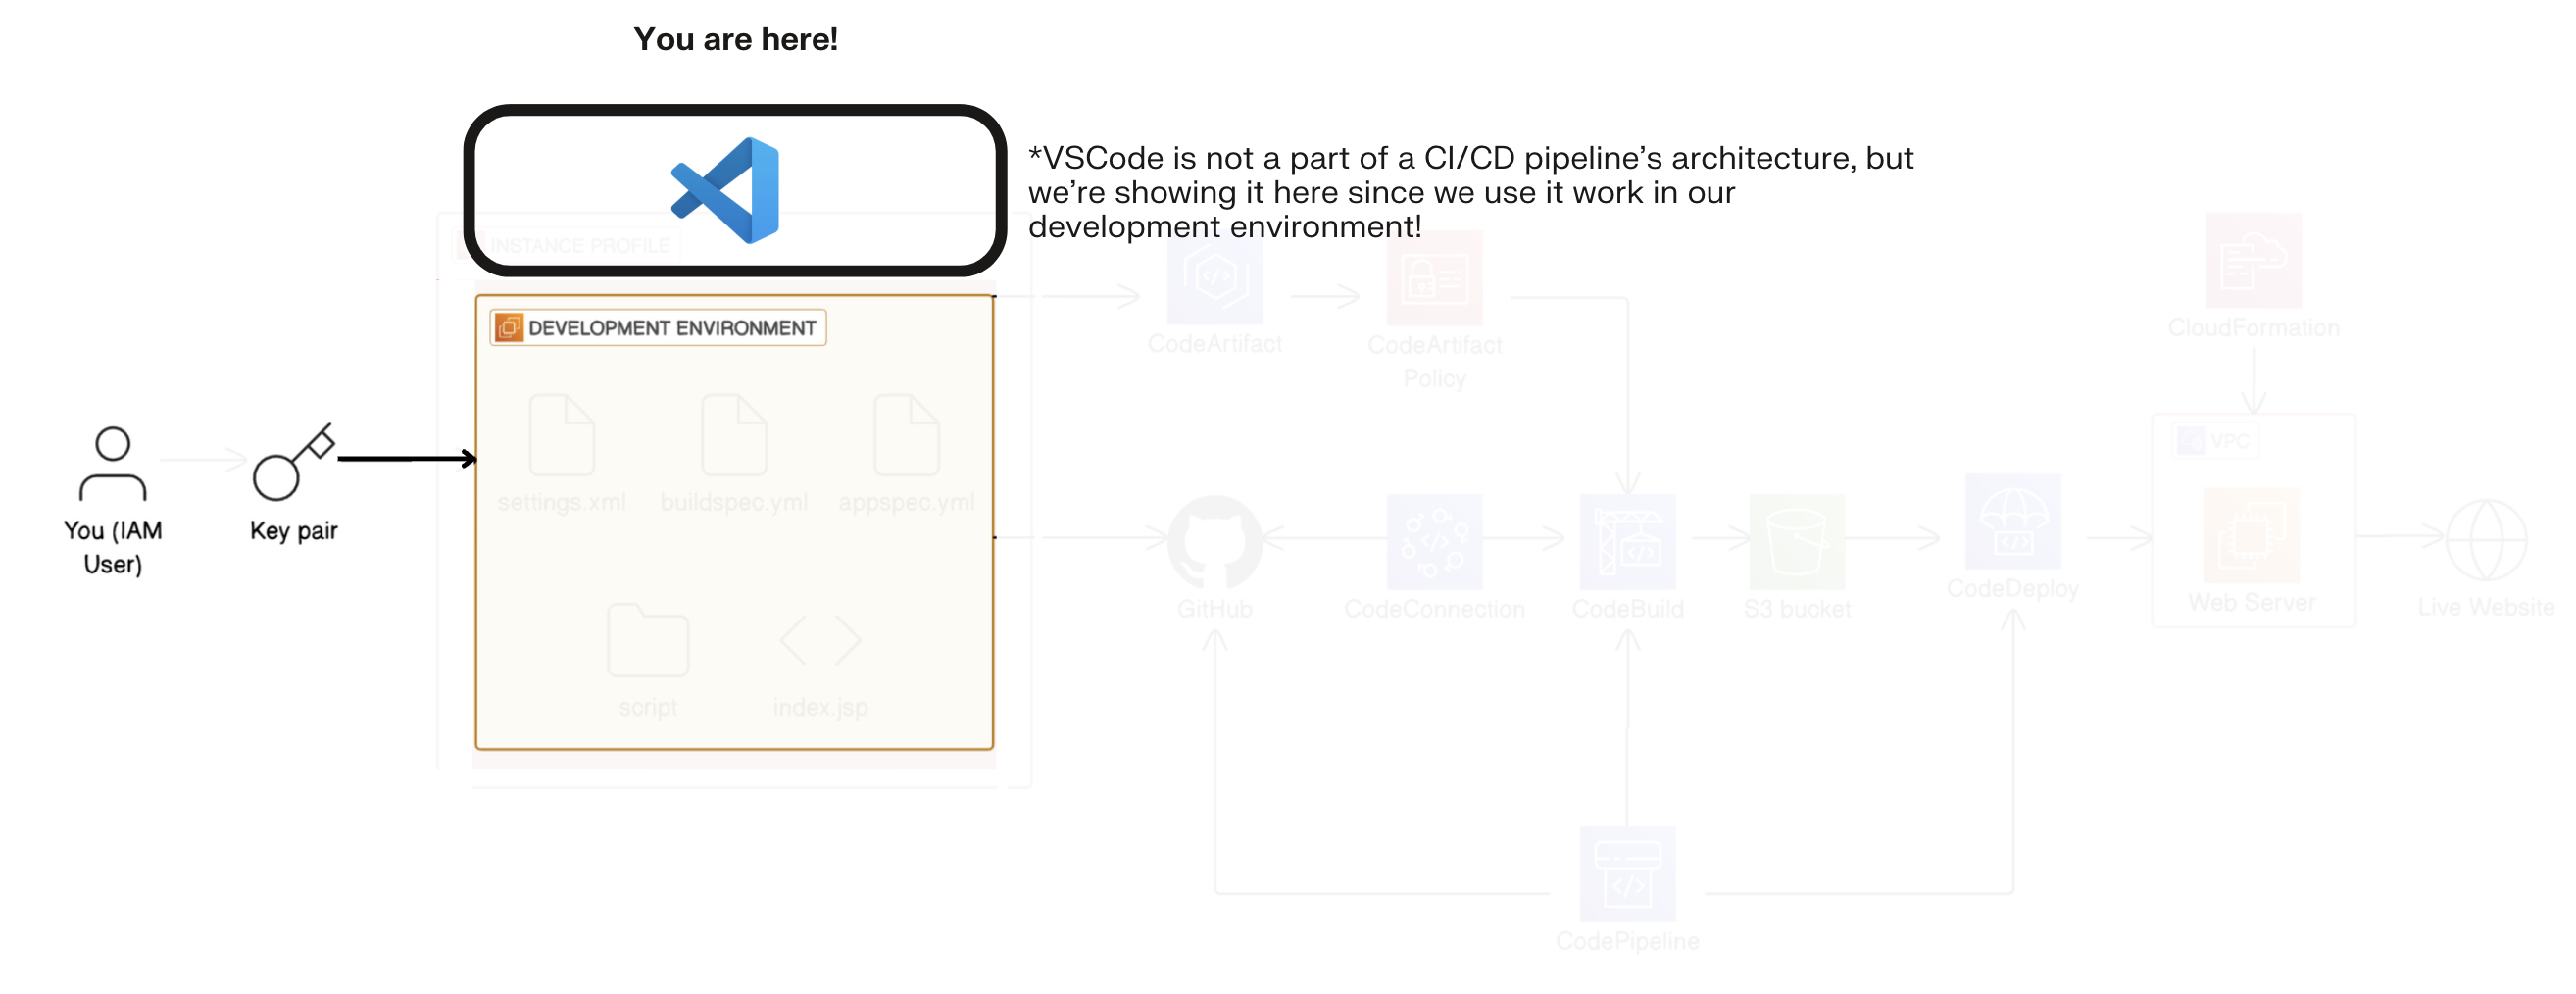
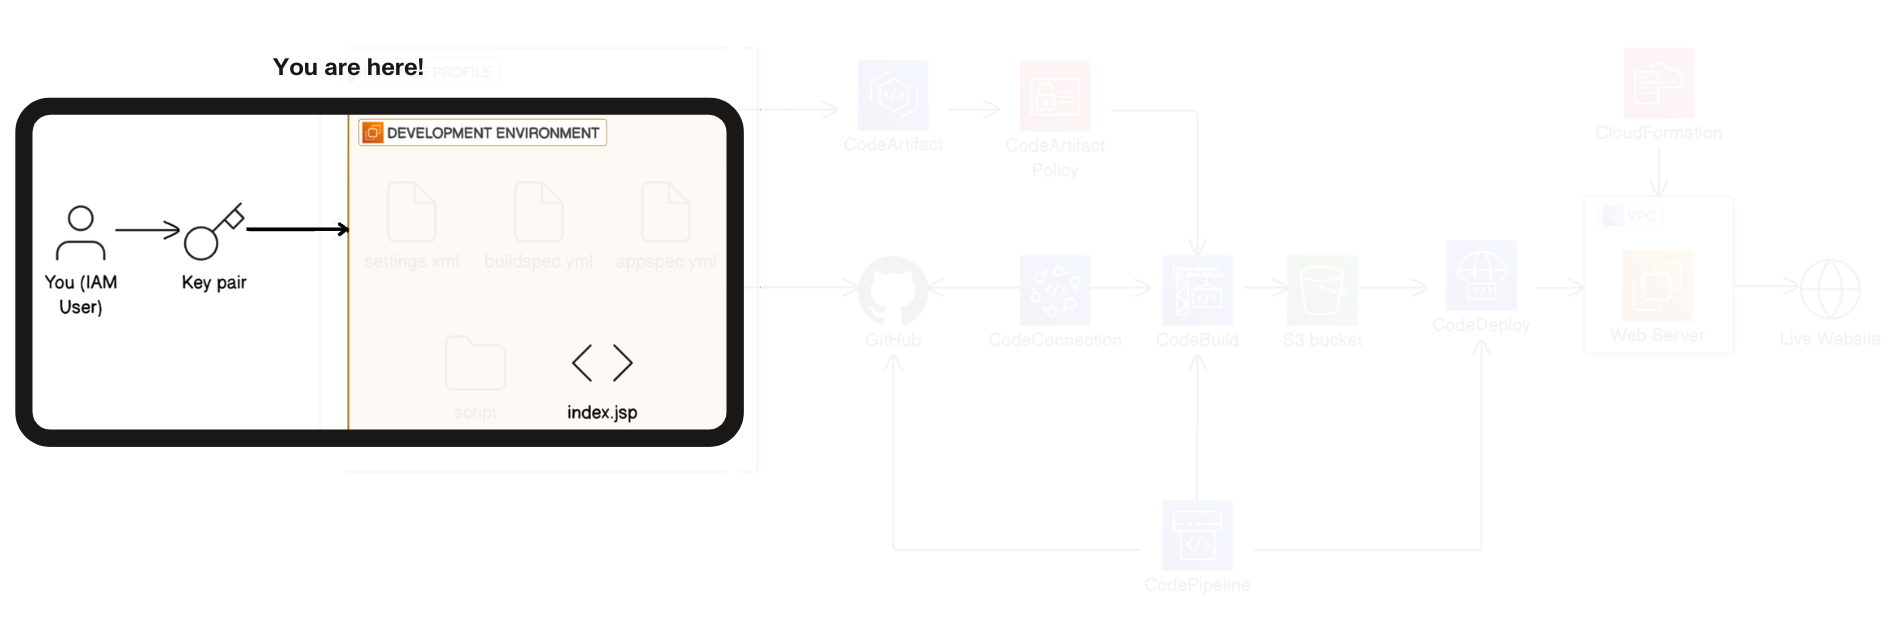
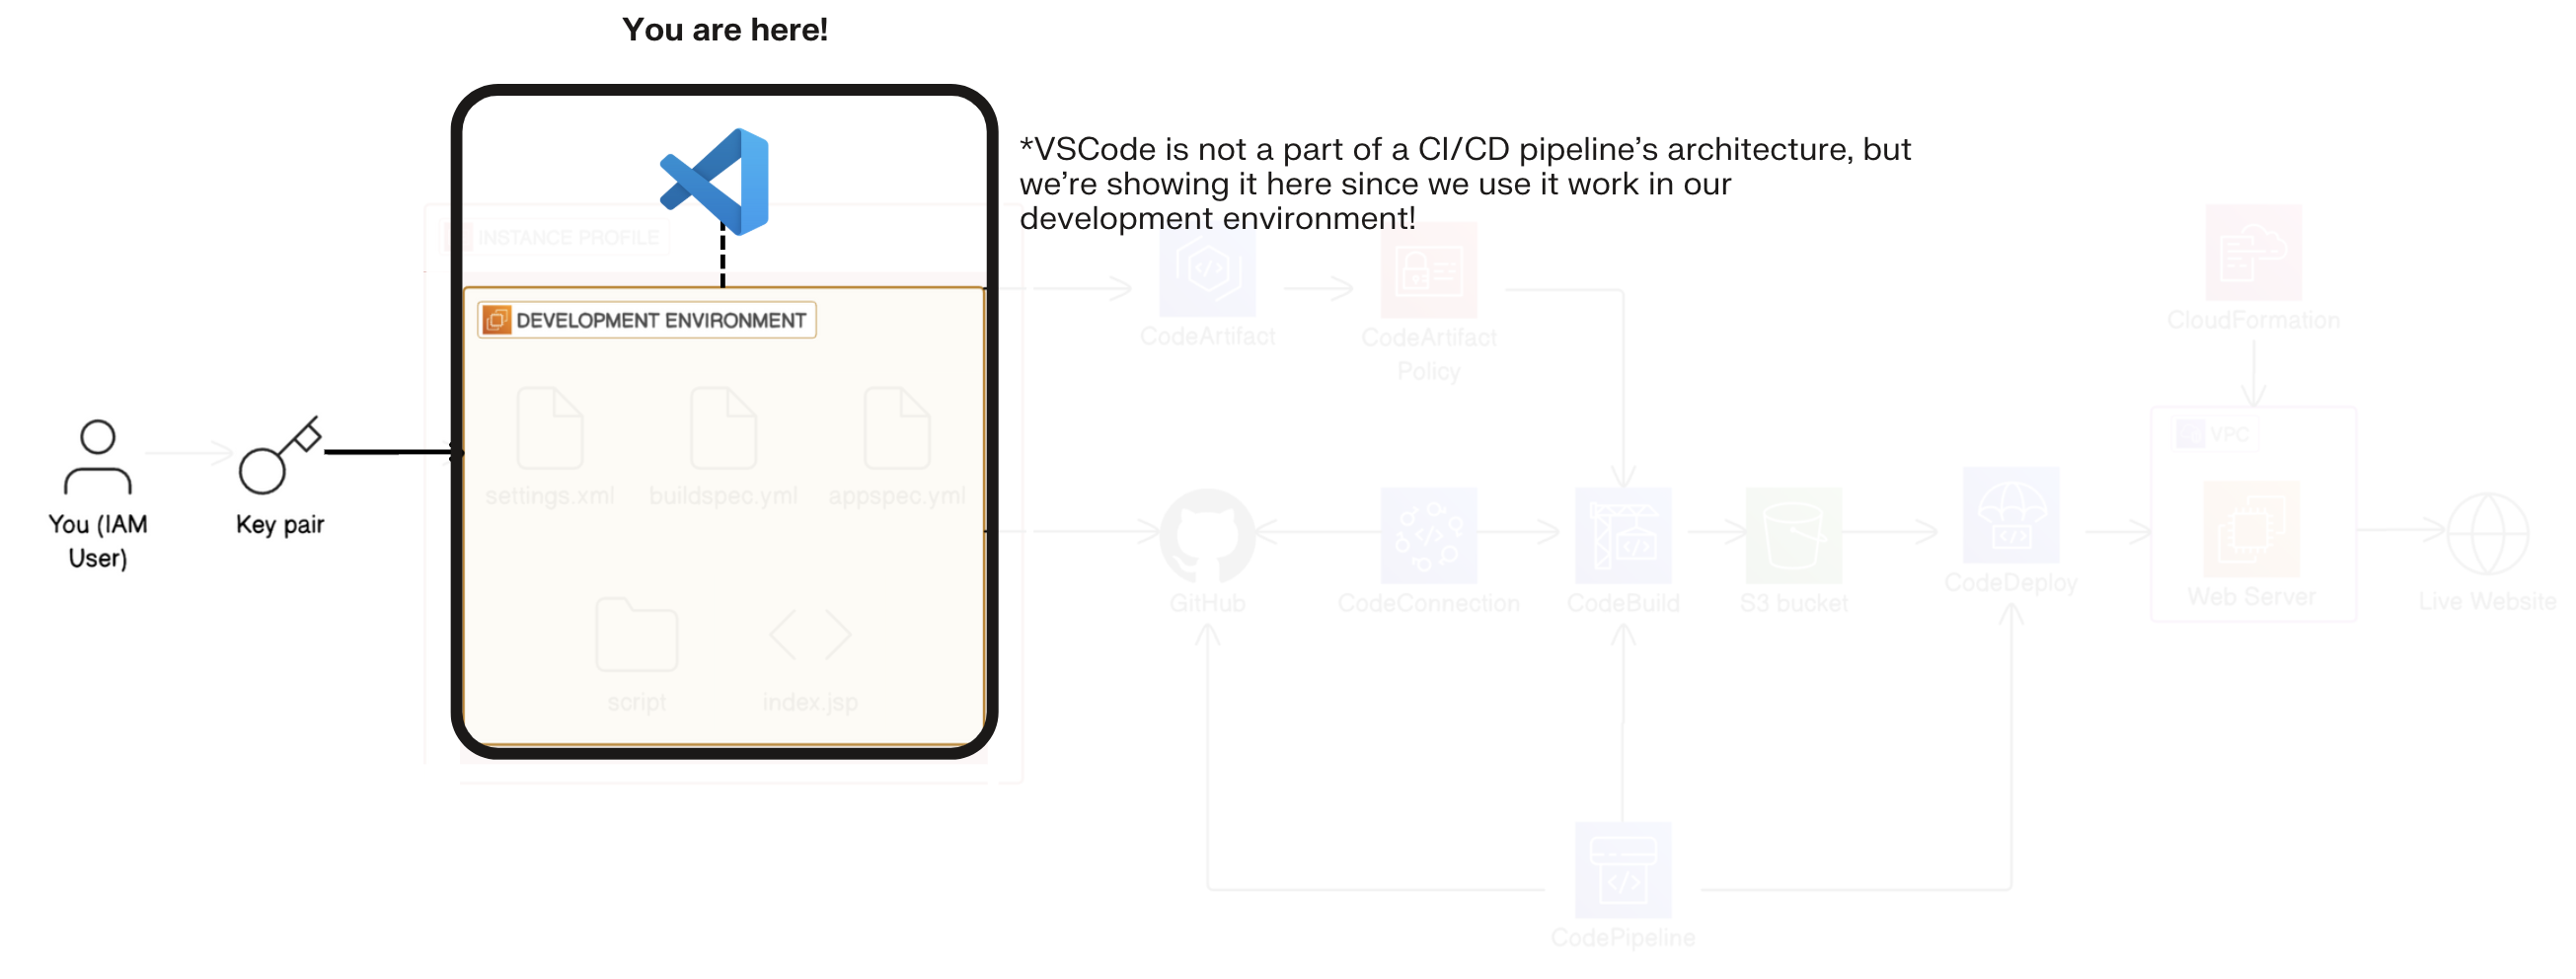
Designed and implemented the foundational components of a CI/CD pipeline by developing a web application from scratch. Provisioned and configured an Amazon EC2 instance, established a secure remote connection using Visual Studio Code, and deployed the web application within the instance.
In this step, we are launching on EC2 instance is our AWS account. We are also going to set up its network setting and our key pair which helps us to make we have the permission to access the ec2 instance.
Switch your Region to the one closest to you
Launch a new EC2 instance.
Name: devops_project
AMI: Amazon linux
Instance type: t2.micro
Key-pair: create a new key pair (devopsp2.pem)
Key pair type: RSA
Private key file format: .pem
Network settings: Allow SSH traffic from, select the dropdown and choose My IP.
Create a new folder in your desktop called DevOps.
Move your .pem file from your Downloads folder into your DevOps folder
This makes sure only you can access your EC2 instance. If your IP address is different from what's under My IP, select Custom from the dropdown instead. Enter your IP and make sure to add a /32 to the end e.g. 012.345.678.9/32
- Launch instance.
Install VS code:
- Set up a terminal in VS Code, so you can communicate with your EC2 instance.
Navigate to your folder:
- Navigate your terminal to the DevOps folder. You'll do this by entering this command in the terminal:

Change the permissions of your .pem file:
In the terminal, run the following command to allow access to your .pem file.

- to check username: #whoami

Connect to your EC2 Instance
AWS Management Console → Instance → details → public IPV4 DNS → copy this.
Now we'll connect to our instance via SSH.
ssh -i “path_to_pem_file“ ec2-user@public_IPV4_DNS

- Look out for a change in your terminal's name to something that looks like

- Install Apache Maven on your EC2 instance.
wget https://archive.apache.org/dist/maven/maven-3/3.5.2/binaries/apache-maven-3.5.2-bin.tar.gz
sudo tar -xzf apache-maven-3.5.2-bin.tar.gz -C /opt
echo "export PATH=/opt/apache-maven-3.5.2/bin:$PATH" >> ~/.bashrc
source ~/.bashrc
- Install Amazon Corretto 8, a version of Java.
sudo dnf install -y java-1.8.0-amazon-corretto-devel
export JAVA_HOME=/usr/lib/jvm/java-1.8.0-amazon-corretto.x86_64
export PATH=/usr/lib/jvm/java-1.8.0-amazon-corretto.x86_64/jre/bin/:$PATH
Verify the installations.


Run Maven commands in your term
Generate a Java web app.
mvn archetype:generate \
   -DgroupId=com.nextwork.app \
   -DartifactId=nextwork-web-project \
   -DarchetypeArtifactId=maven-archetype-webapp \
   -DinteractiveMode=false
- Watch out for a BUILD SUCCESS message in your terminal once your application is all set up.

Install an extension in VS Code.
Use the extension to set up a connection between VS Code and your EC2 instance
Click on the Extensions icon at the side of your VS Code window.

- In the search bar, type Remote - SSH and click Install for the extension.

Connect to SSH Host.
- Click on the double arrow icon at the bottom left corner of your VS Code window. This button is a shortcut to use Remote - SSH.
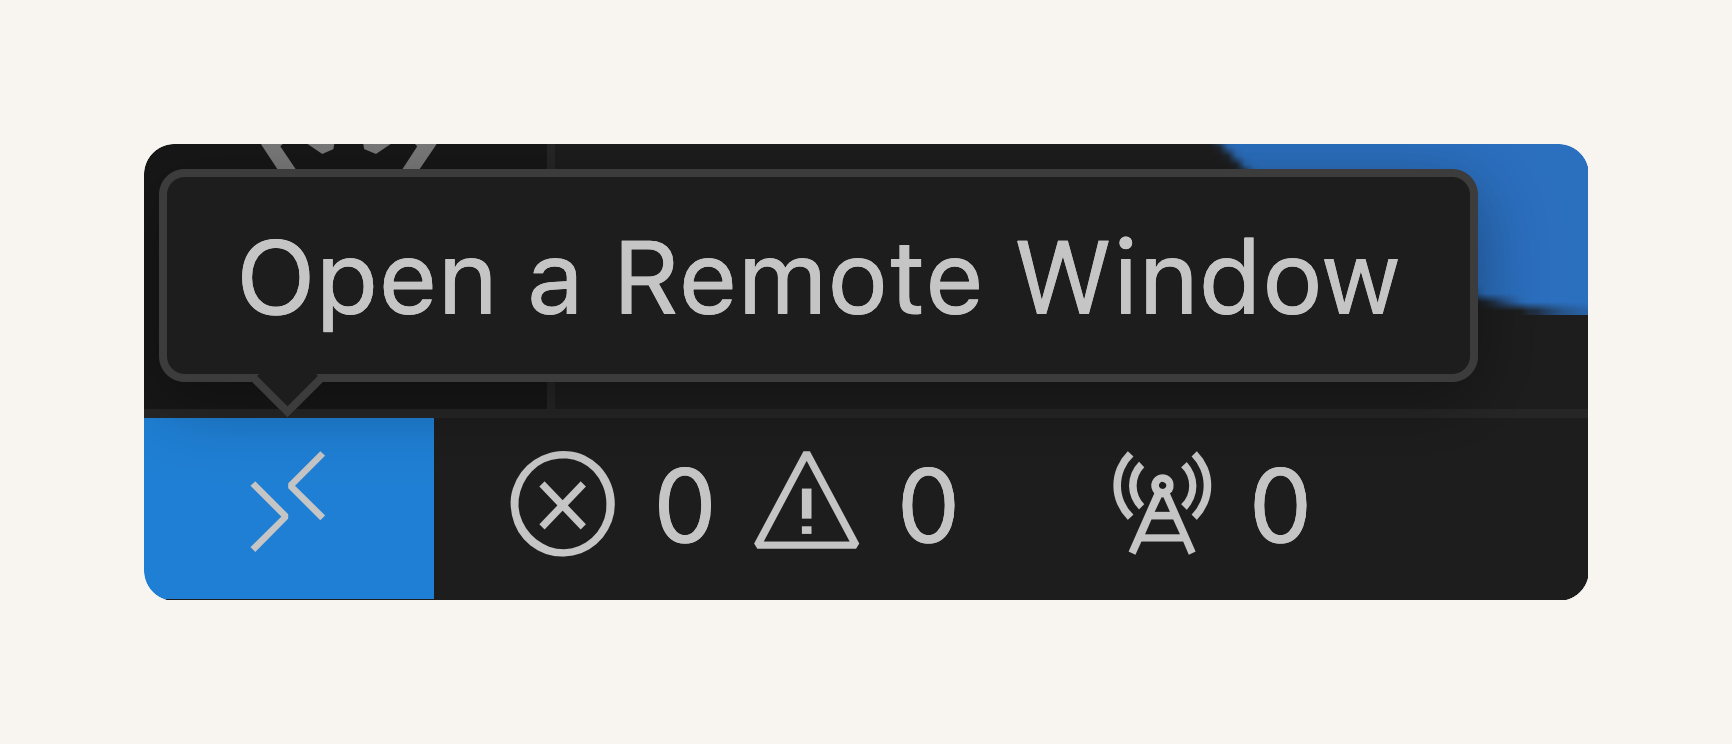
Select Connect to Host.
Select + Add New SSH Host
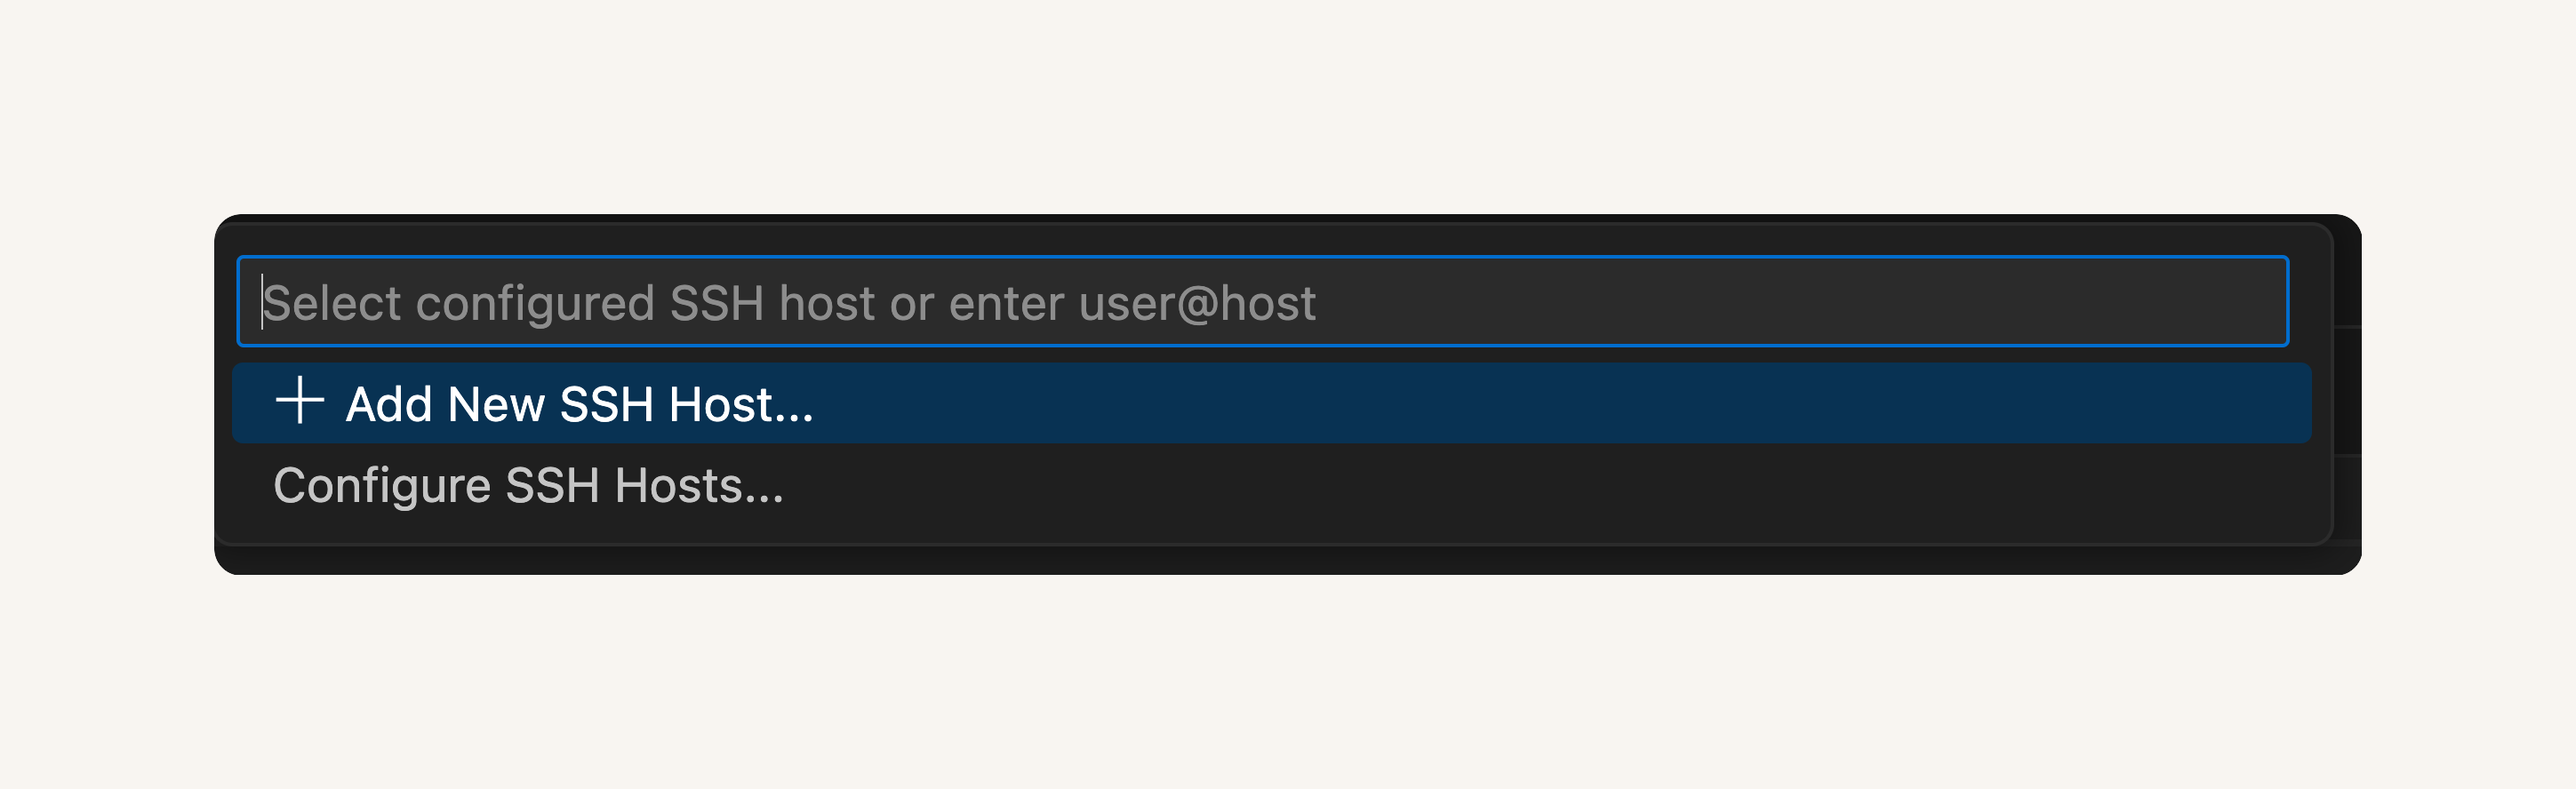
- Enter the SSH command you used to connect to your EC2 instance:
ssh -i C:\Users\ghada\OneDrive\Desktop\DevOps\devopsp2.pem ec2-user@ec2-3-138-107-59.us-east-2.compute.amazonaws.com
Check and verify Configuration file.
- Select the configuration file at the top of your window. It should look similar to /Users/natashaong/.ssh/config

- A Host added! popup will confirm that you've set up your SSH Host.

- Select the blue Open Config button on that popup.
Note: Confirm that all the details in your configuration file look correct:
Host should match up with your EC2 instance's IPv4 DNS.
IdentityFile should match up to nextwork-keypair.pem's location in your local computer.
User should say ec2-user

Click on the double arrow button on the bottom left corner and select Connect to Host again.
You should now see your EC2 instance listed at the top. Something like this.
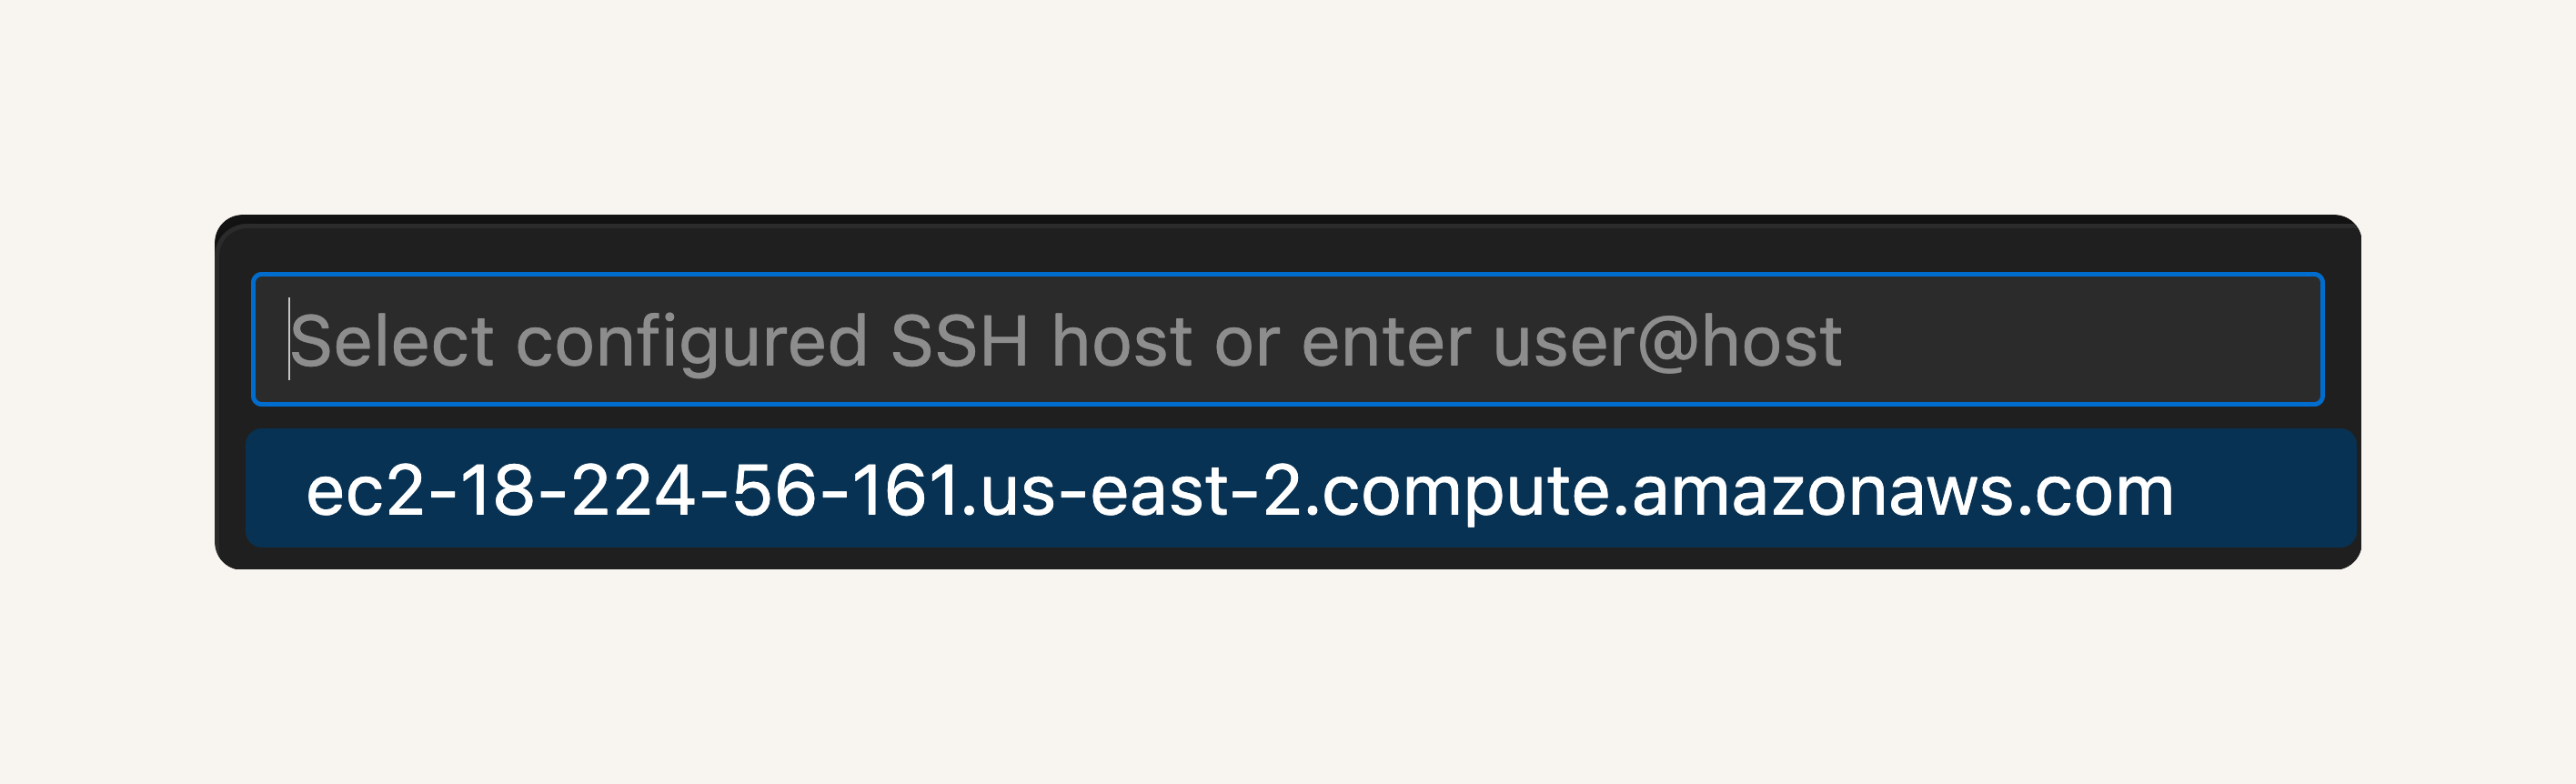
Select the EC2 instance and off we go to a new VS Code window
Check the bottom right hand corner of your new VS Code window - it should show your EC2 instance's IPV4 DNS.

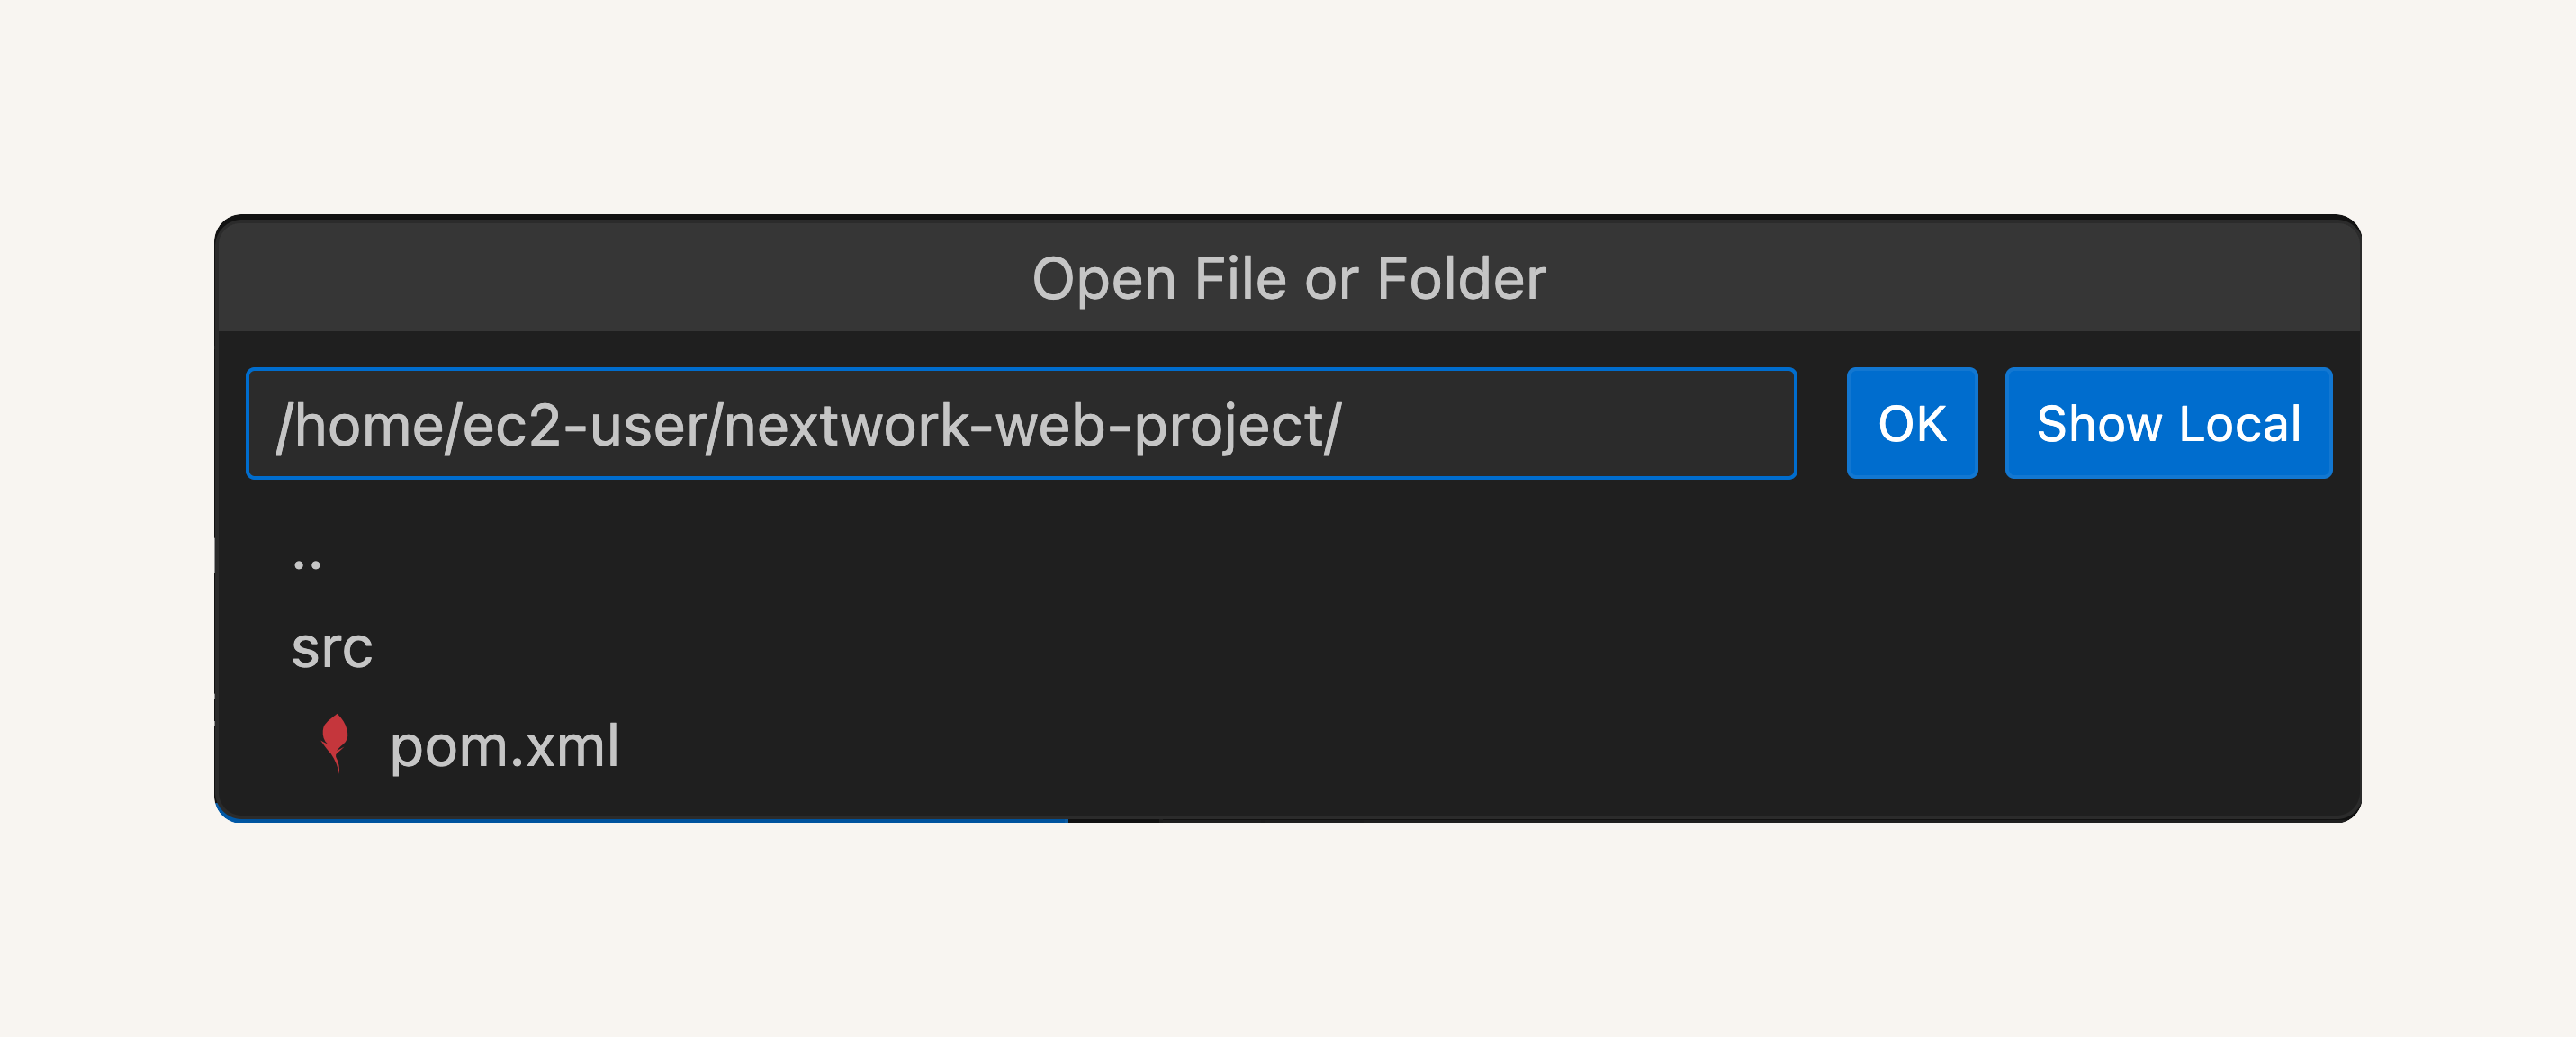
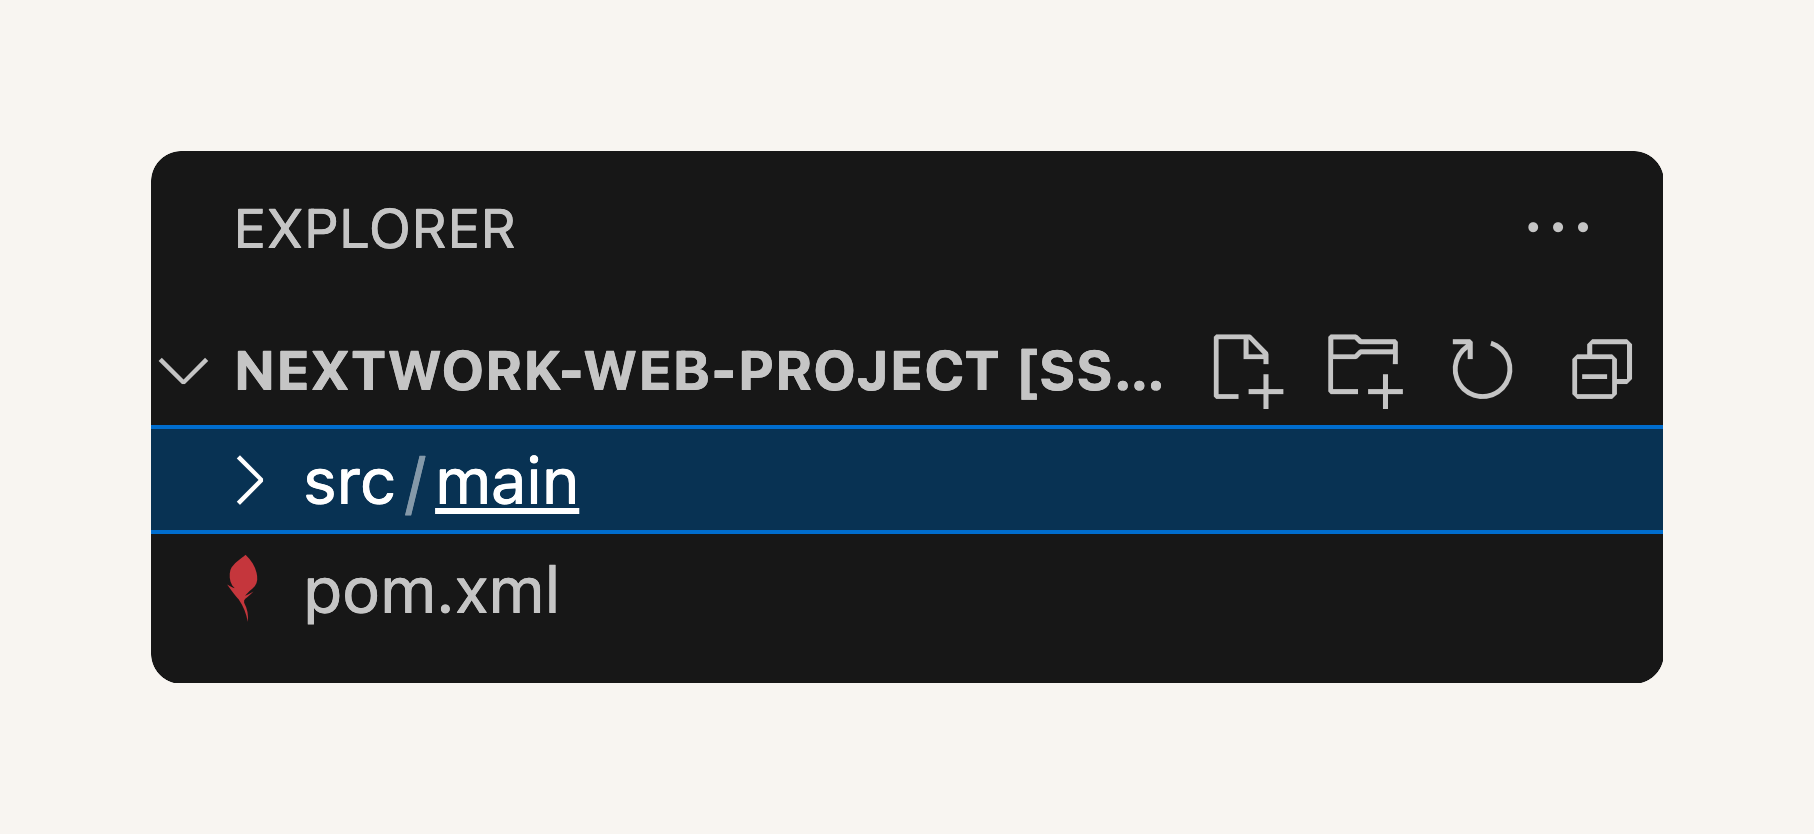
- Open Project.
From VS Code's left hand navigation bar, select the Explorer icon.
Select Open folder.
At the top of your VS Code window, you should see a drop down of different file and folder names. This is VS Code asking you which specific file/folder you'd like to open!
Enter /home/ec2-user/nextwork-web-project
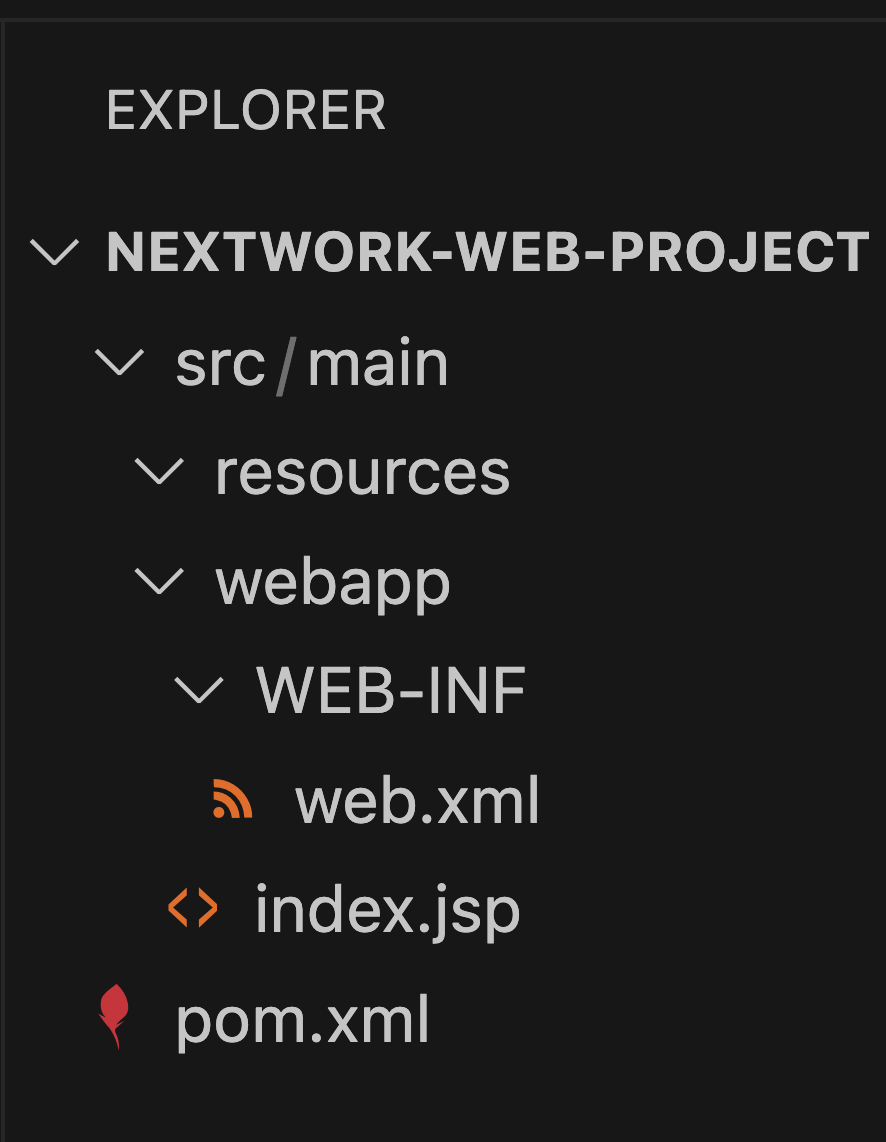
click into index.jsp. You can edit code or page.


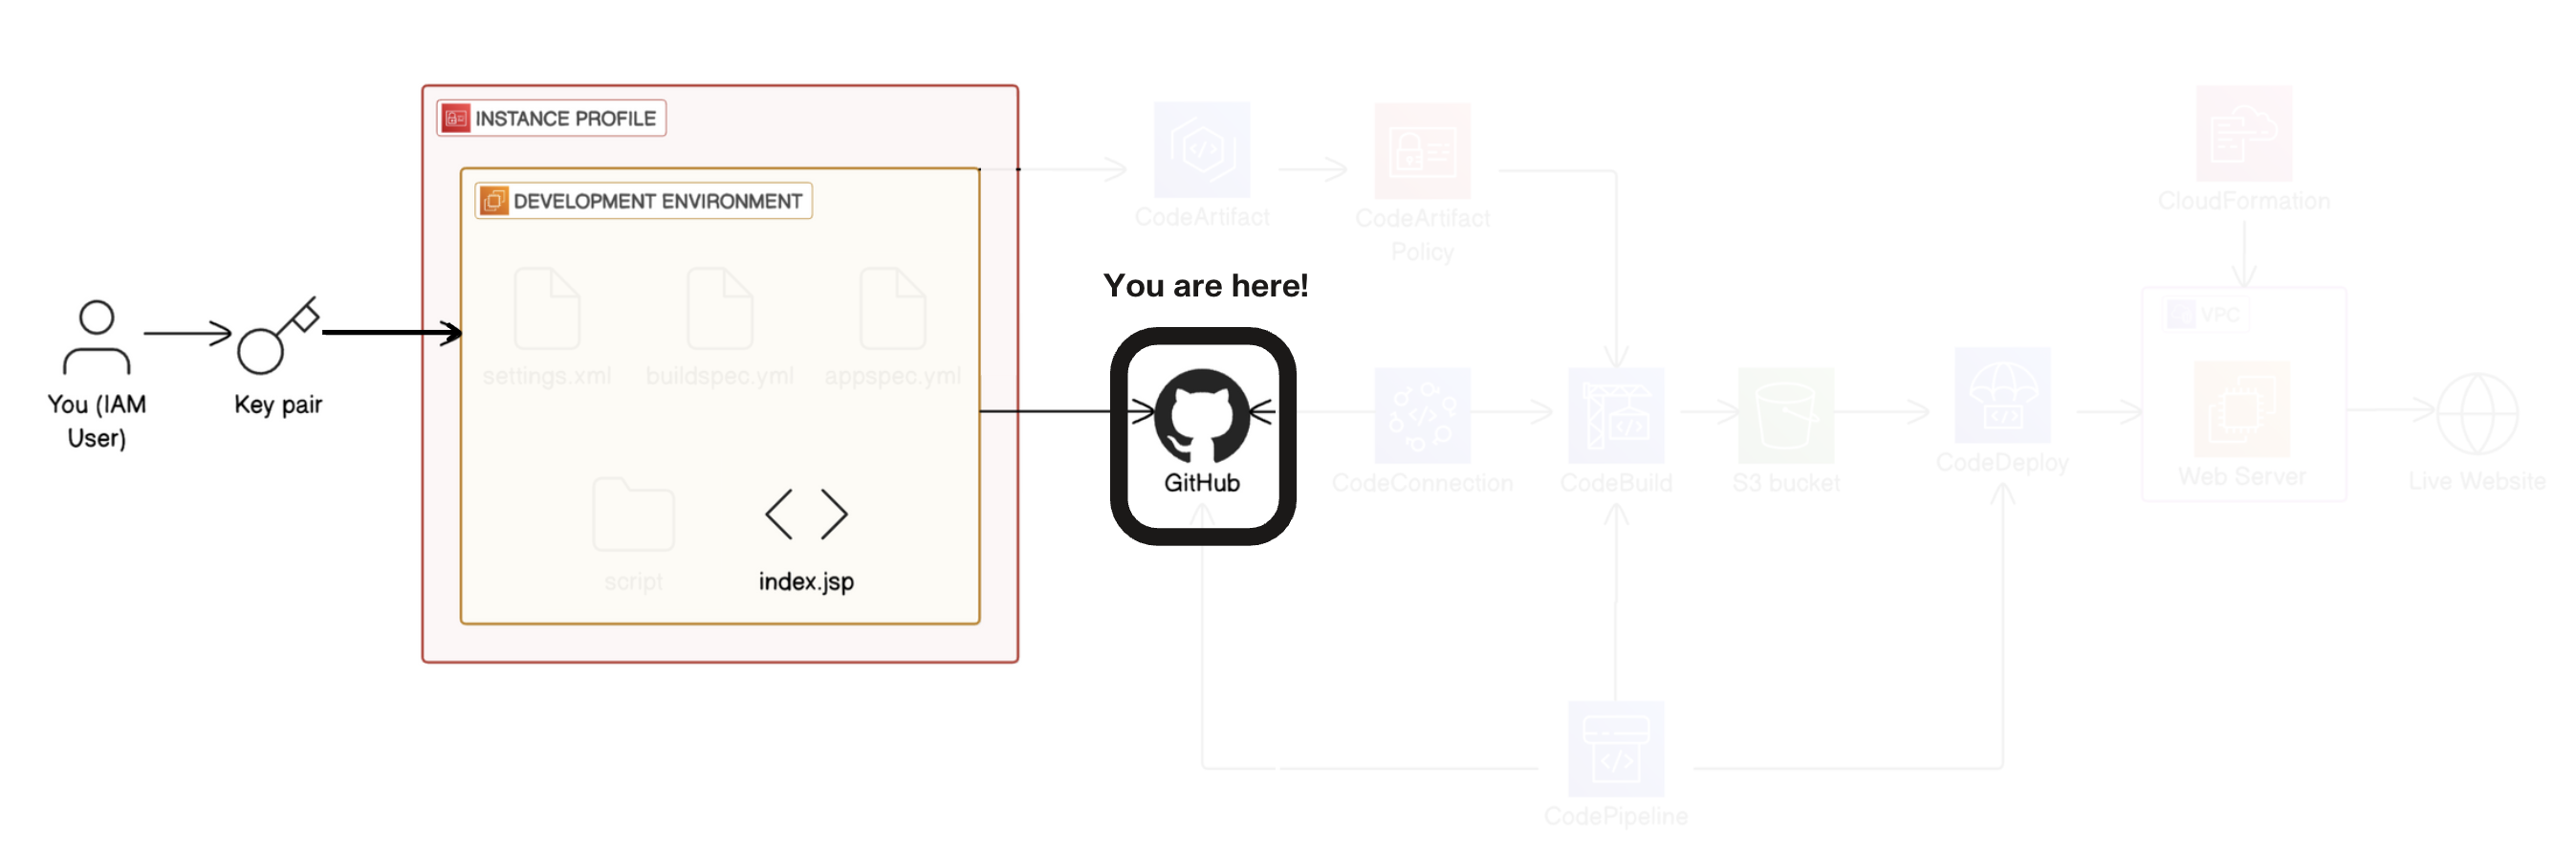
Step 2. Connect a GitHub Repo with AWS
Install git on your EC2 instance
Open your EC2 instance's terminal
In the terminal, run these commands to install Git:
    sudo dnf update -y
    sudo dnf install git -y

- Verify the installation:
git --version
Sign in GitHub and create repository
- After signing in to GitHub, click on the + icon next to your GitHub profile icon at the top right hand corner.
Select New repository → Create repository →Repository name: nextwork-web-project → Description: Java web app set up on an EC2 instance.→ Choose your visibility: Public.
In VS Code navigate to your project using cd command.
Connect web app project to GitHub repo.
- Initialise the git repo.
    git init
    git remote add origin https://github.com/nehasawan/nextwork-web-project.git
    git add .
    git commit -m "Updated index.jsp with new content"
    git push -u origin master
Github username, and press Enter on your keyboard.
Next, enter your password. You'll notice that as you type this out, nothing shows on your terminal.
Passwords won't work for authentication, We have to use github personal access token.
Set up a token on GitHub.
GitHub → setting → developer setting → Personal access token → token classic → generate new token → generate new token classic → description → checkbox next to repo → generate token → copy that token and keep safe for later use.
- Head to your VS code terminal again try git push -u origin master. → enter username and enter newly generate token as password → enter

Head to your GitHub repository in your web browser.
Refresh the page, and you’ll see your web app files in the repository, along with the commit message you wrote.

- Run git log to see your history of commits, which also mentions the commit author's name.

When you add, commit and push your changes, you might notice the terminal automatically sets two other things - your name and email address - before it asks for your GitHub username.
EC2 Default User isn't really your name, and the EC2 instance's IPv4 DNS is not your email. Let's configure your local Git identity so Git isn't using these default values.
Don't forget to replace "Your name" with your name (keep the quote marks), and you@nextwork.org with your email address.
    git config --global user.name "Neha"
    git config --global user.email nehasawant719@gmail.com
- We will do second commit. In index.jsp make below changes in web app. save it. commit and push those changes.
    <p>If you see this line in Github, that means your latest changes are getting pushed to your cloud repo :o</p>

    //add, commit, push
    git add .
    git diff --staged

git commit -m "Add new line to index.jsp"
git push
Head back to your github refresh and check index.jsp.
Step 3: Secure Packages with CodeArtifact
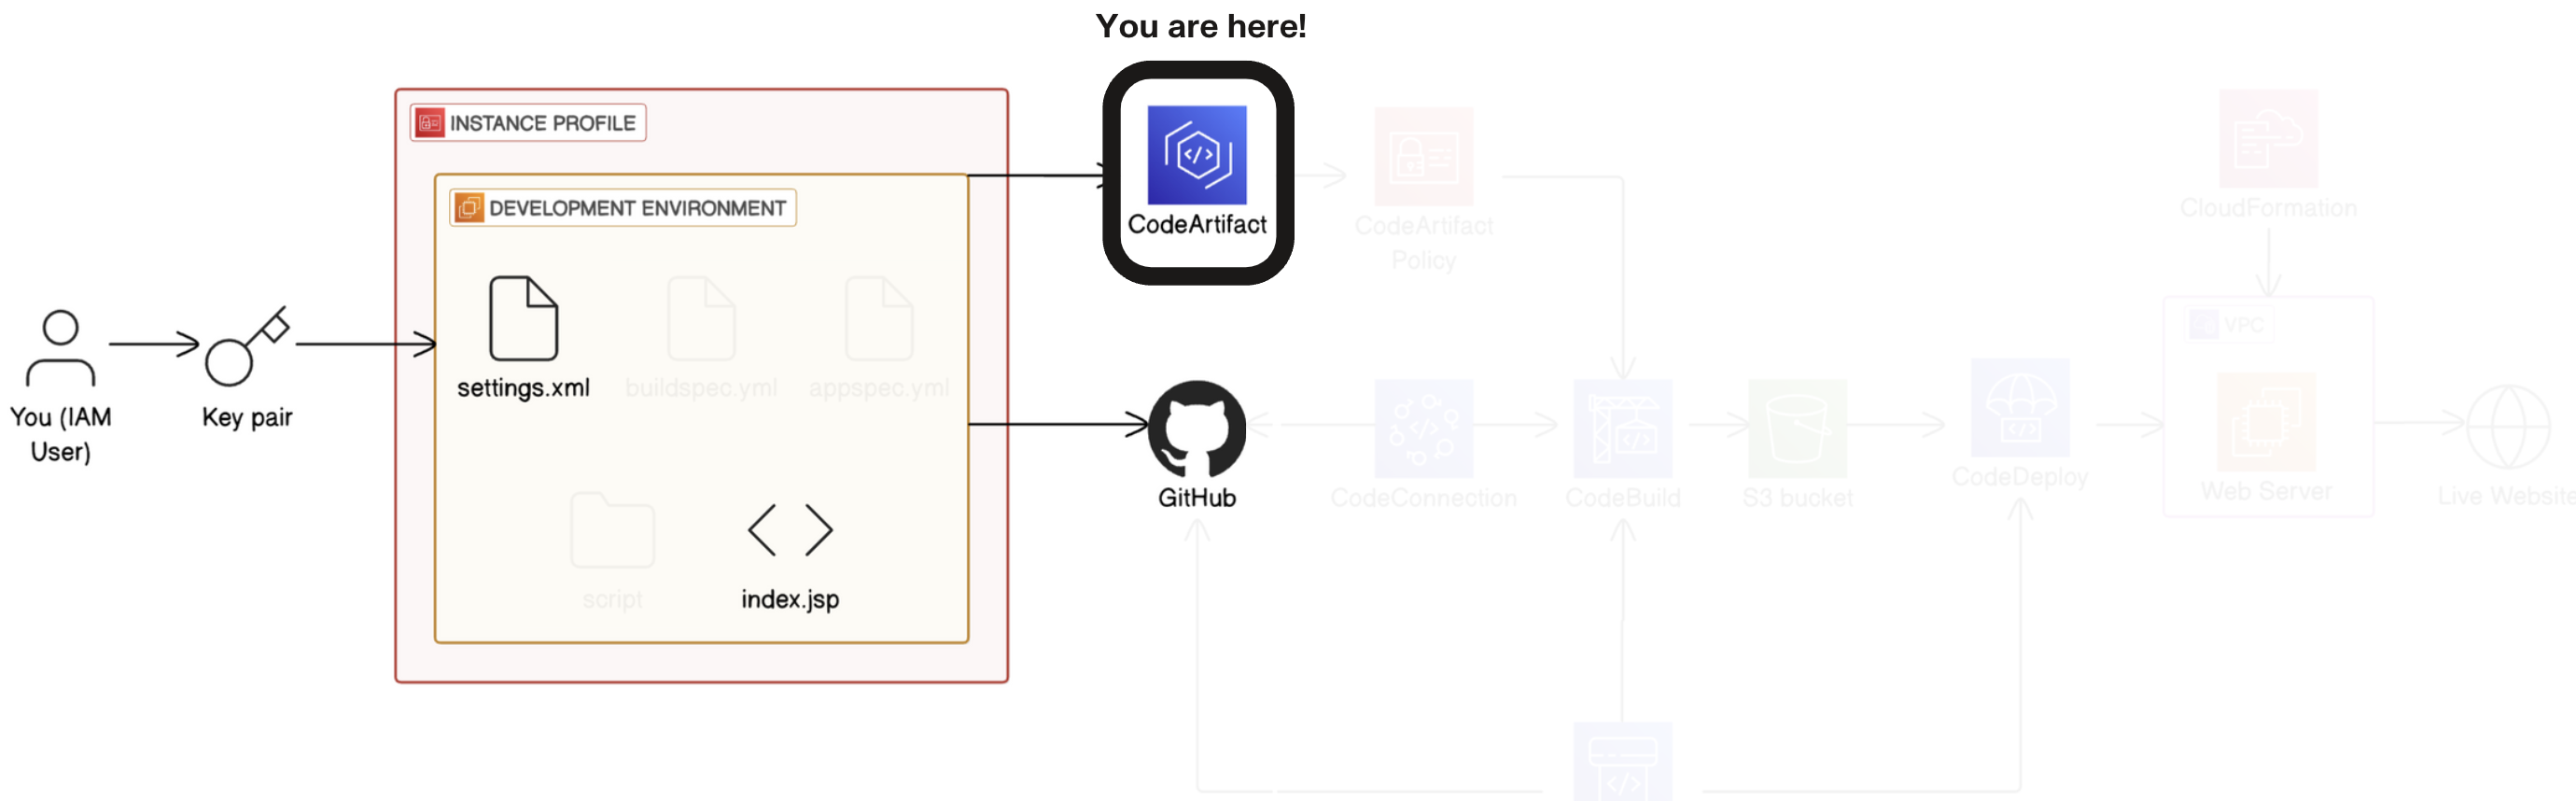
Set up and use AWS CodeArtifact to manage and secure Java dependencies for your applications.
Set up CodeArtifact
AWS Management Console → Repositories. →
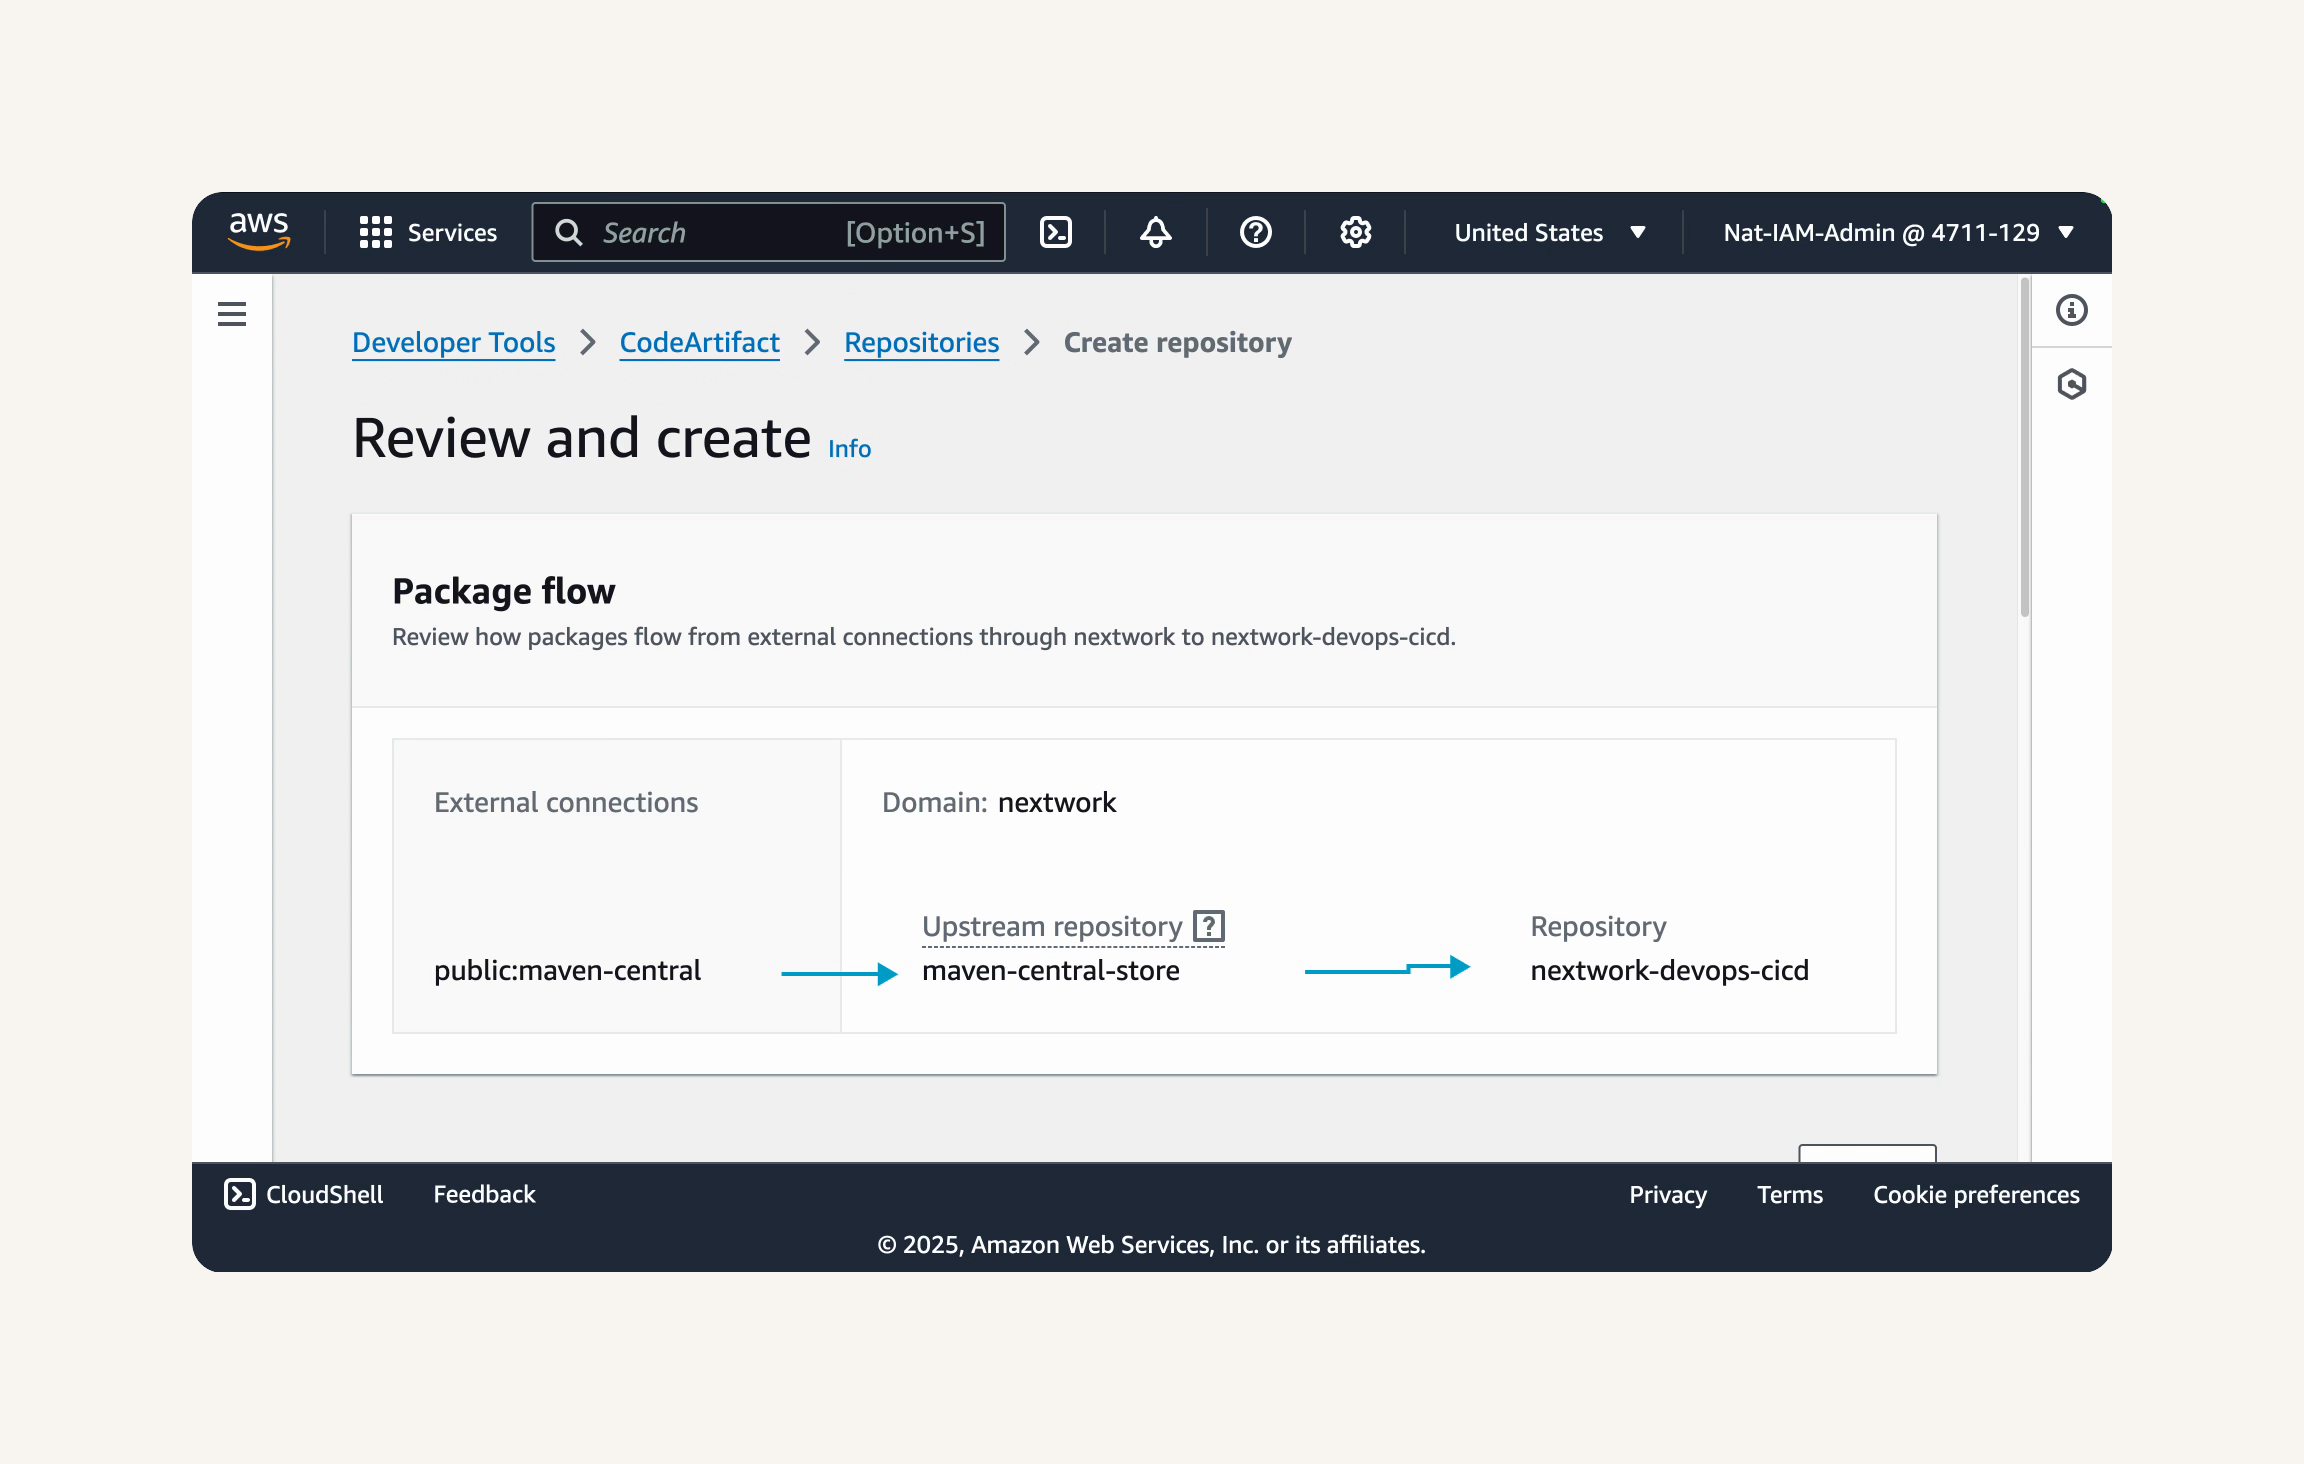
Create repository → Repository configuration → Repository name: nextwork-devops-cicd → Public upstream repositories: maven-central-store → Next
Domain: this aws account → Domain name: nextwork → Next → review and create → create repository
Create an IAM Policy for CodeArtifact Access
For Maven to start working with CodeArtifact, we need to create an IAM role that grants our EC2 instance the permission it needs to access CodeArtifact.
AWS Console → CodeArtifact → Repositories → repo name: nextwork-devops-cicd → view connection instruction
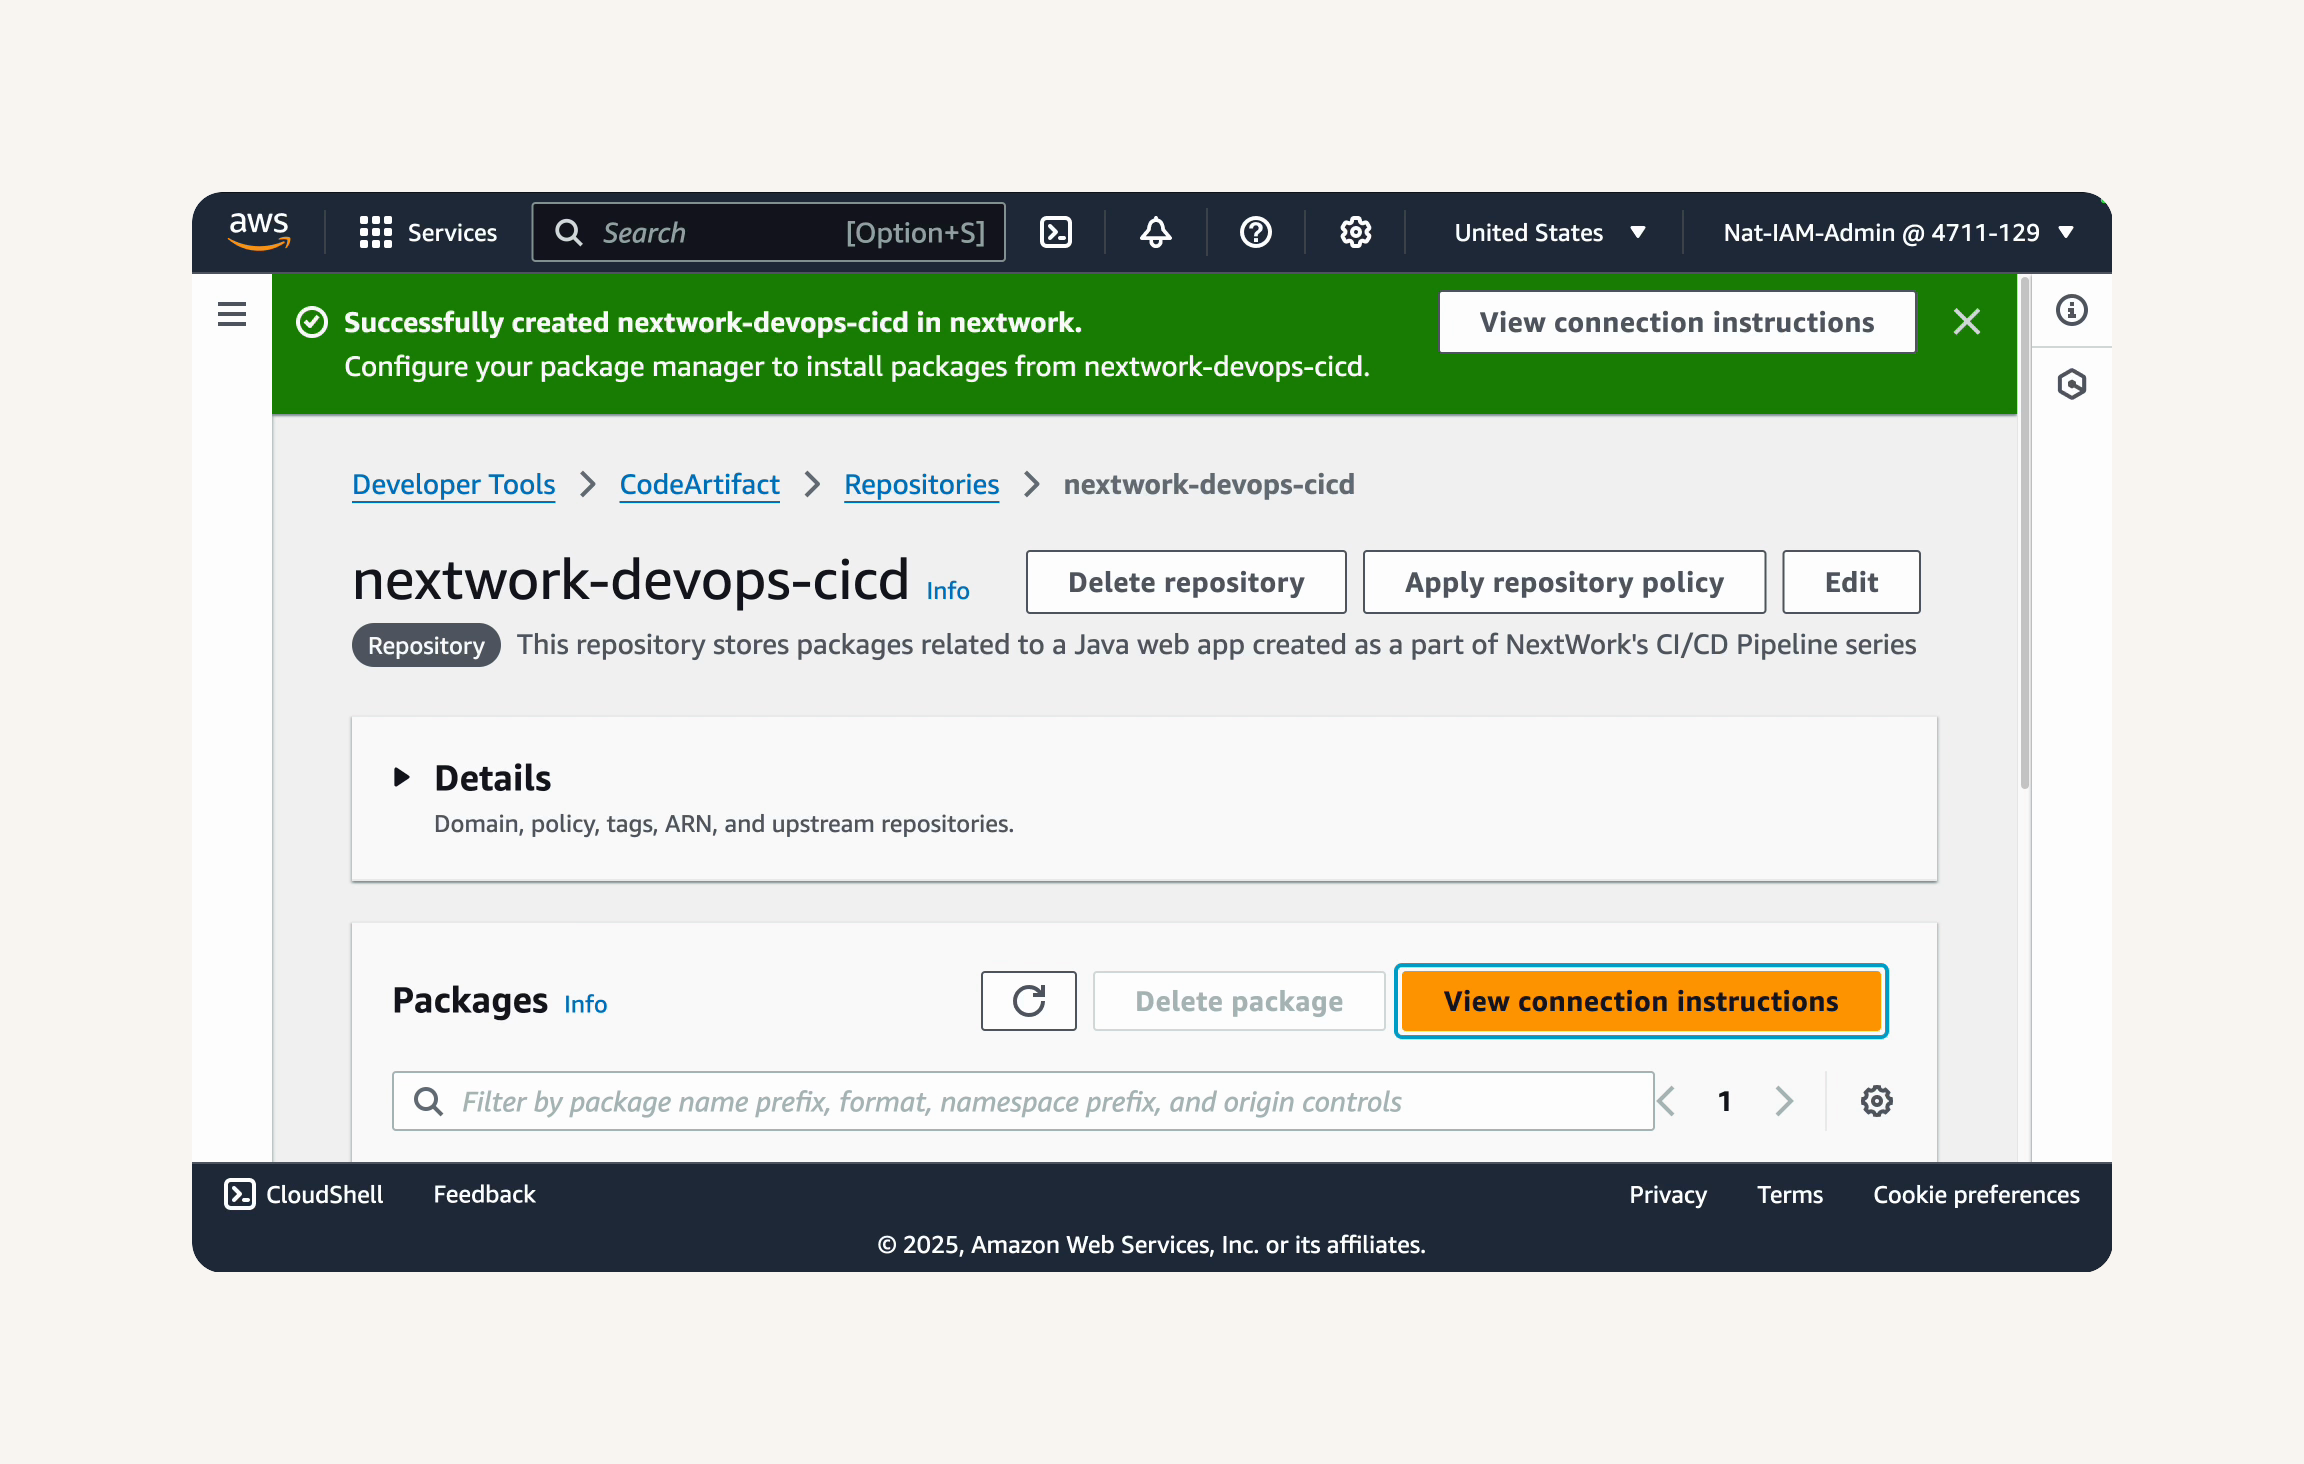
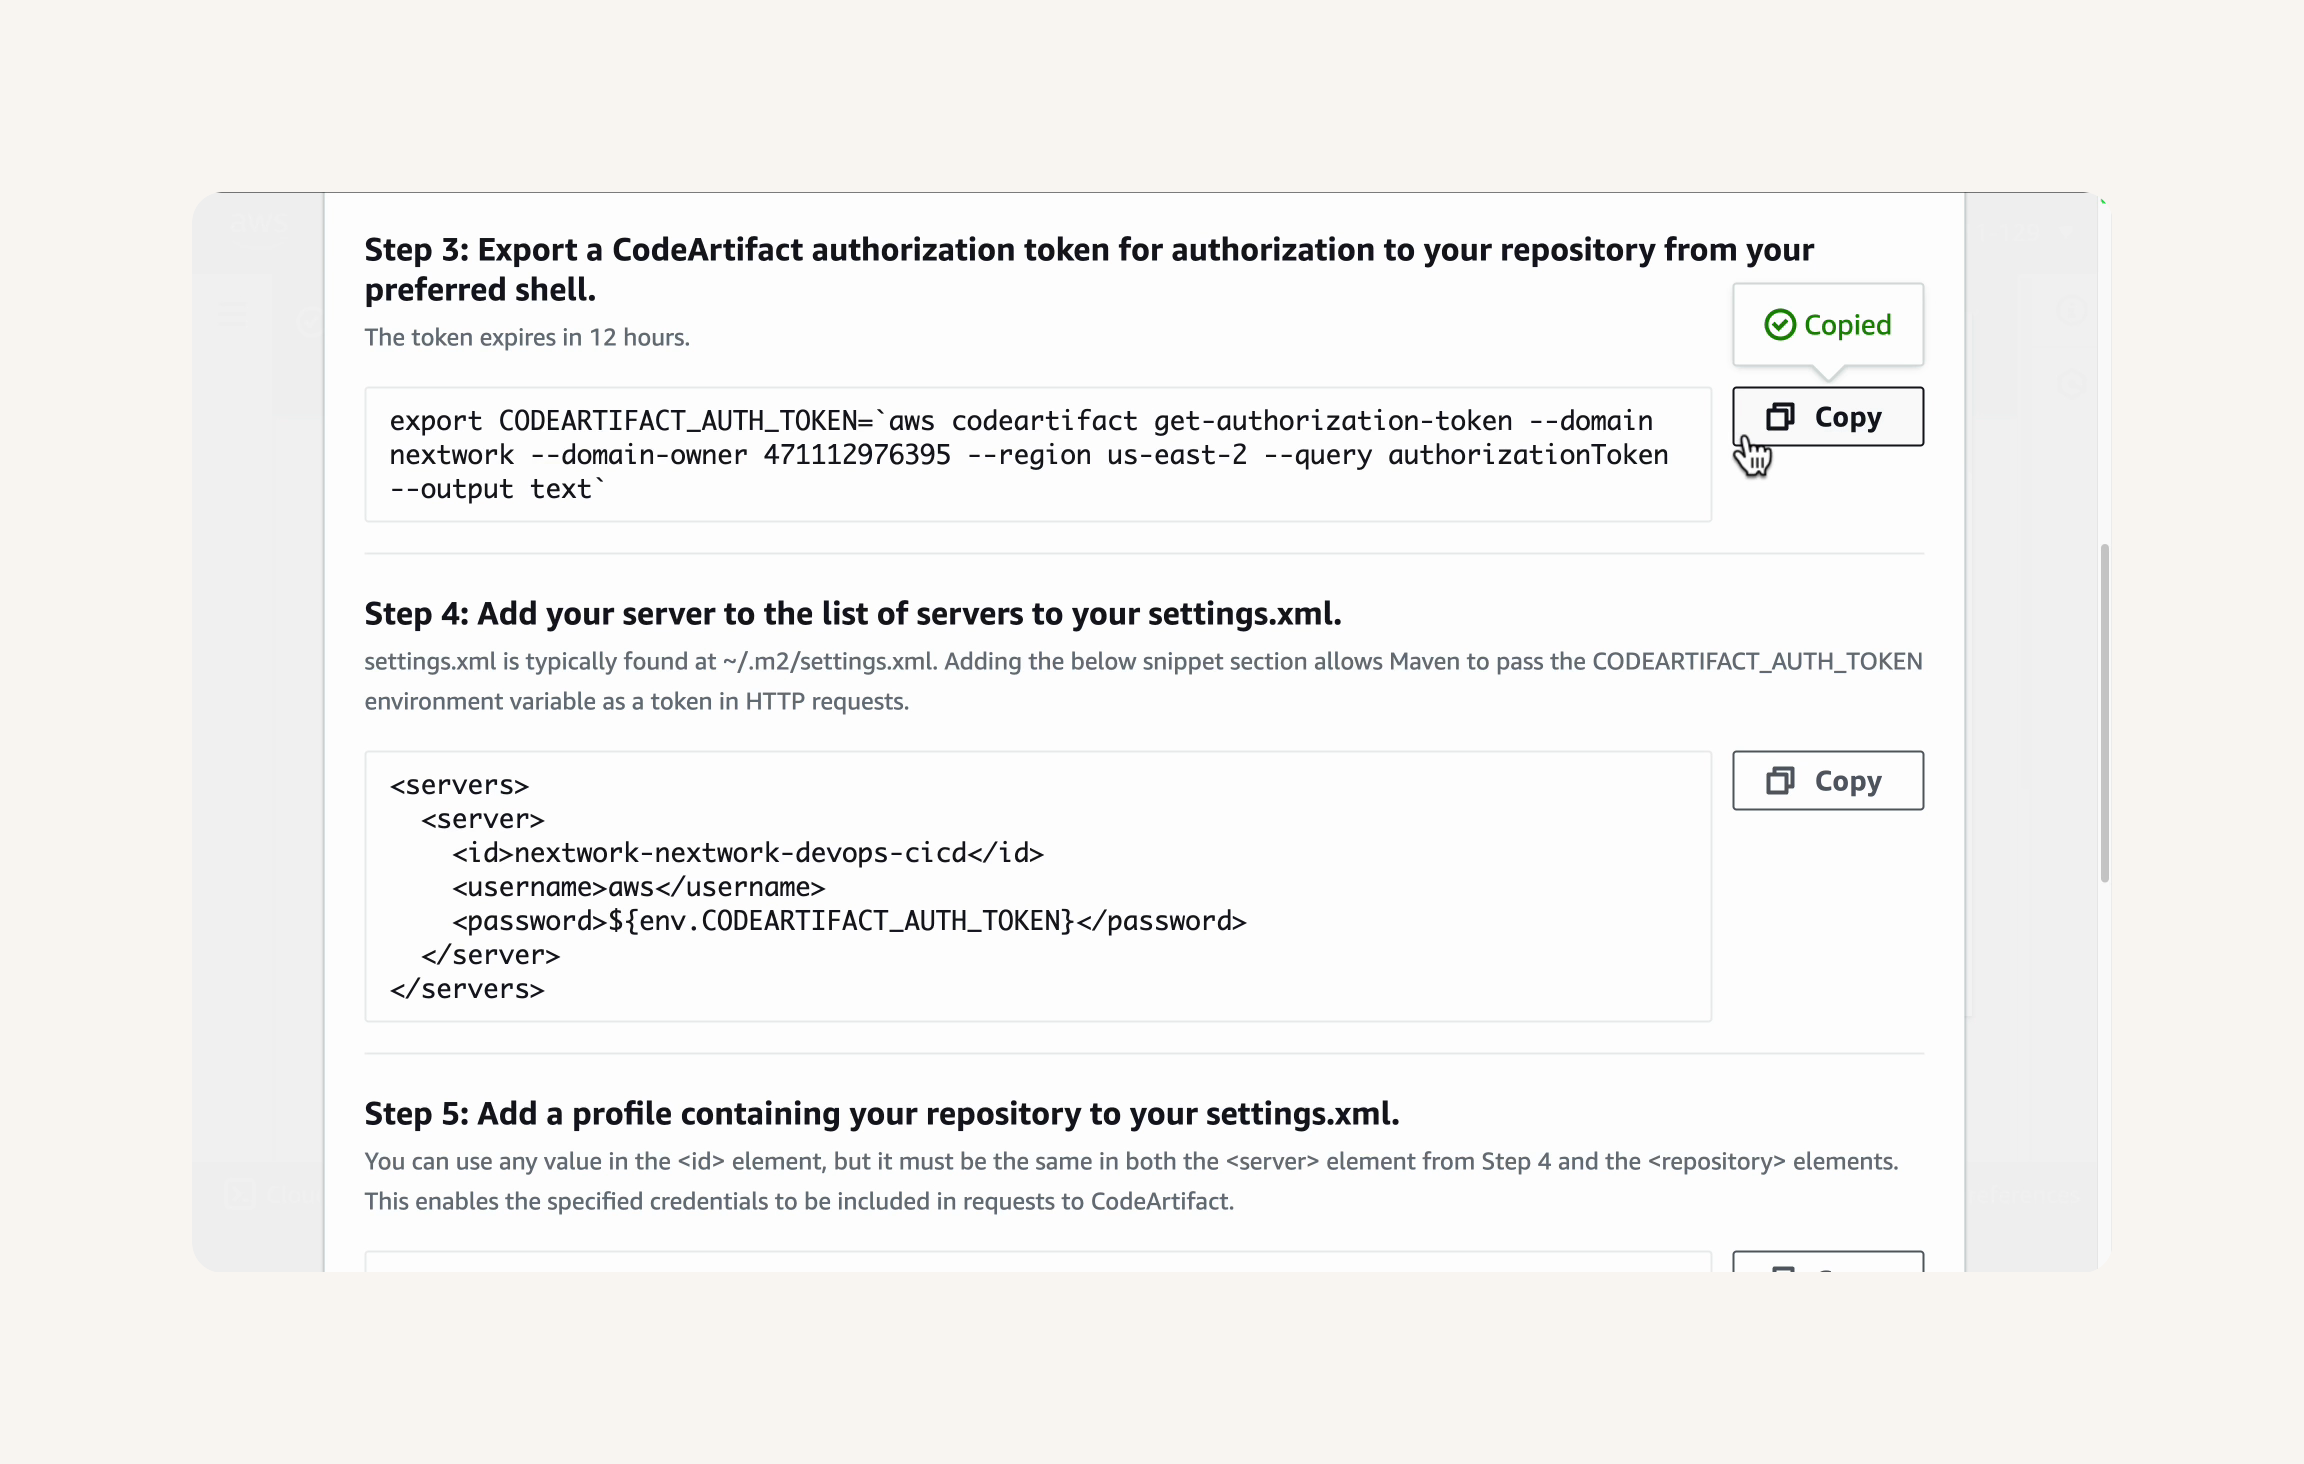
Operating system: Mac and Linux. → Package Manager Client: mvn → Configuration method: Pull from your repository→ Find Step 3: Export a CodeArtifact authorization token→ copy that
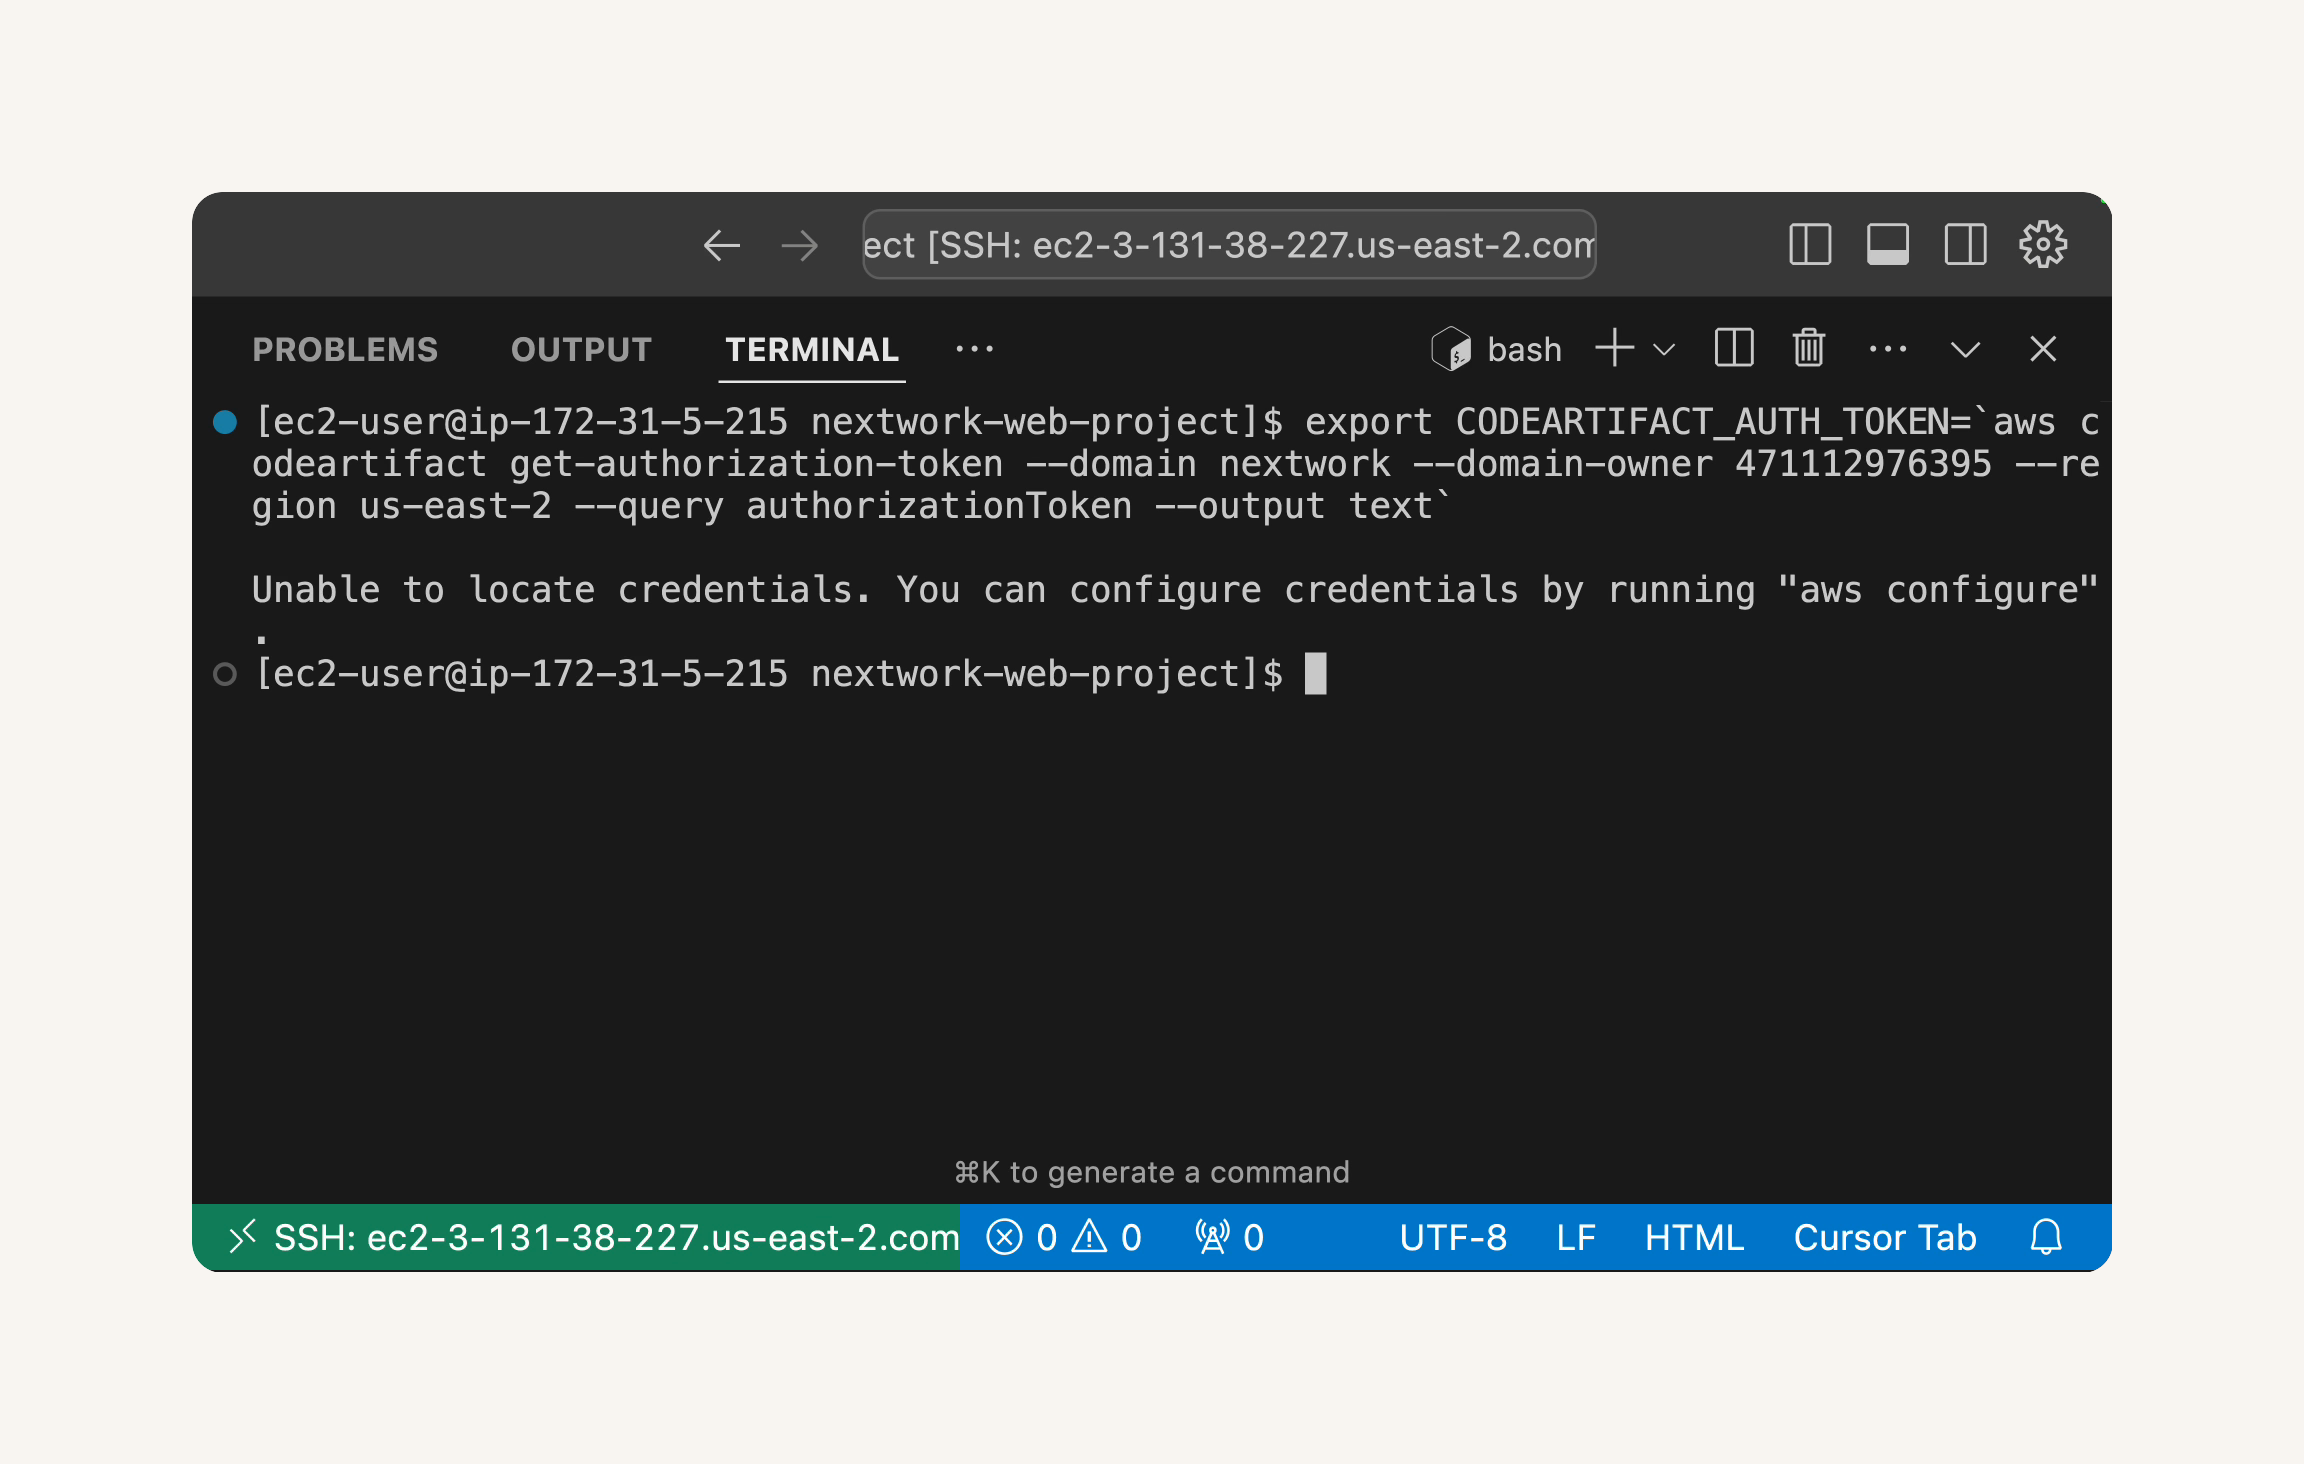
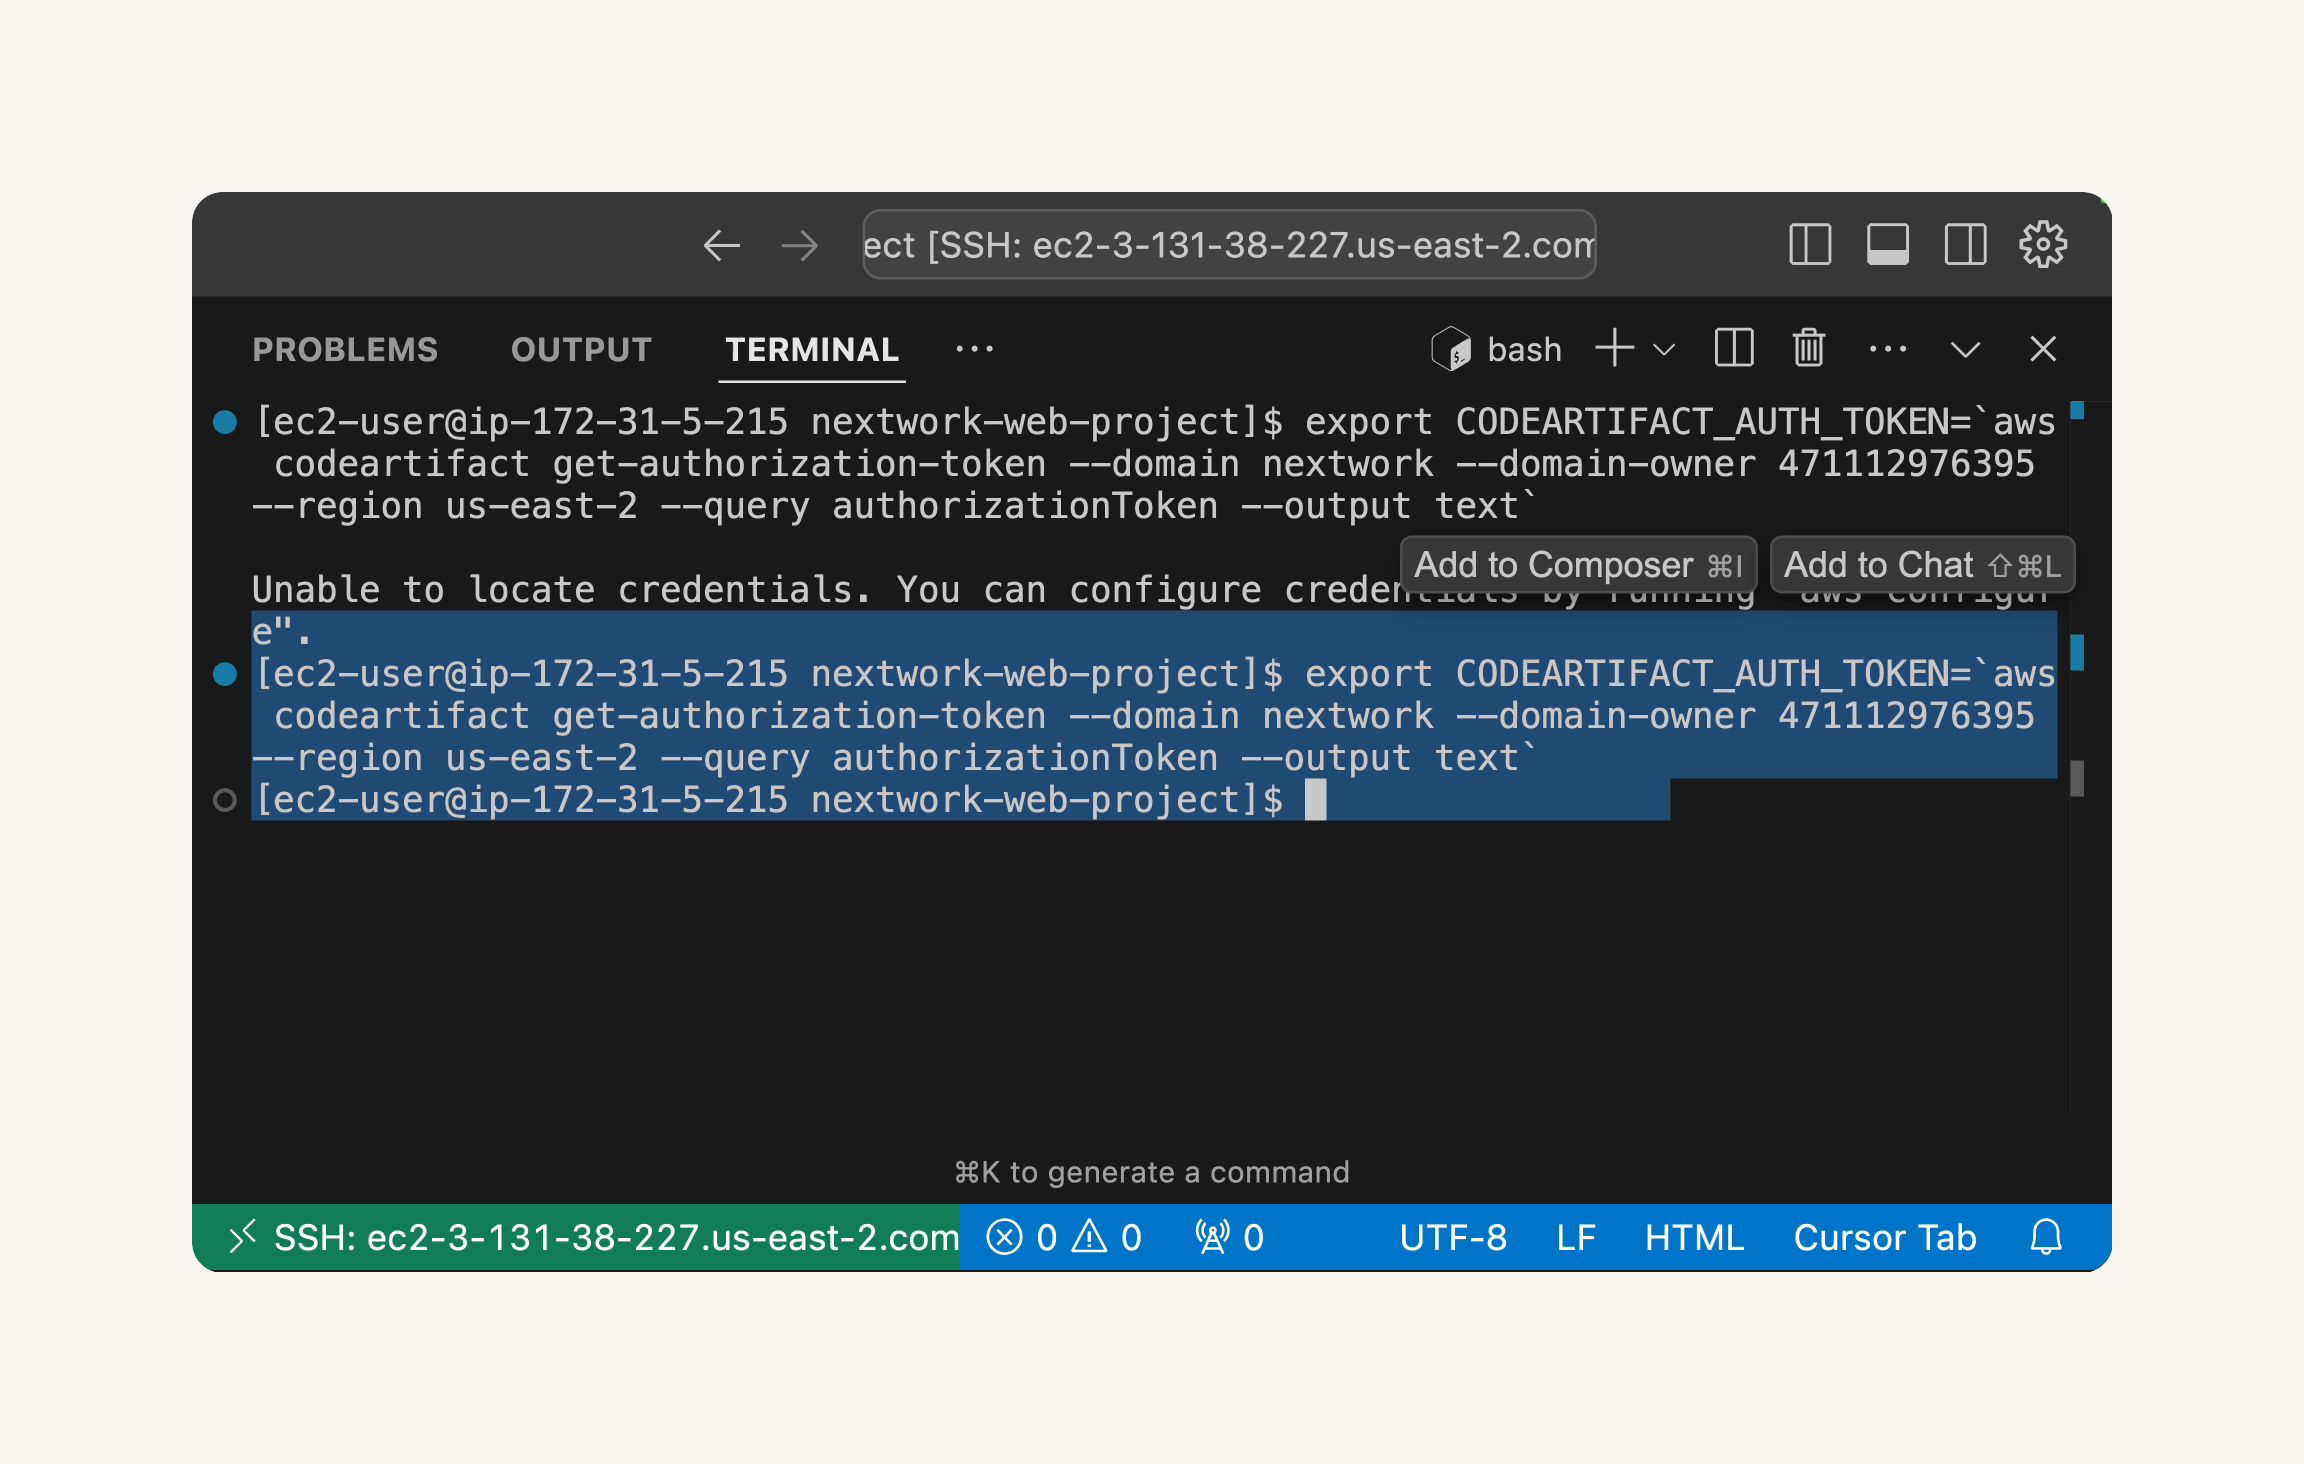
Go back to your VS Code terminal → paste in the terminal → you will get an error.

Create a new IAM policy:
AWS Management Console → IAM → policies → create policy → Select JSON tab Replace the default content in the text editor with the following JSON policy document. → Next
 {
     "Version": "2012-10-17",
     "Statement": [
         {
             "Effect": "Allow",
             "Action": [
                 "codeartifact:GetAuthorizationToken",
                 "codeartifact:GetRepositoryEndpoint",
                 "codeartifact:ReadFromRepository"
             ],
             "Resource": "*"
         },
         {
             "Effect": "Allow",
             "Action": "sts:GetServiceBearerToken",
             "Resource": "*",
             "Condition": {
                 "StringEquals": {
                     "sts:AWSServiceName": "codeartifact.amazonaws.com"
                 }
             }
         }
     ]
 }
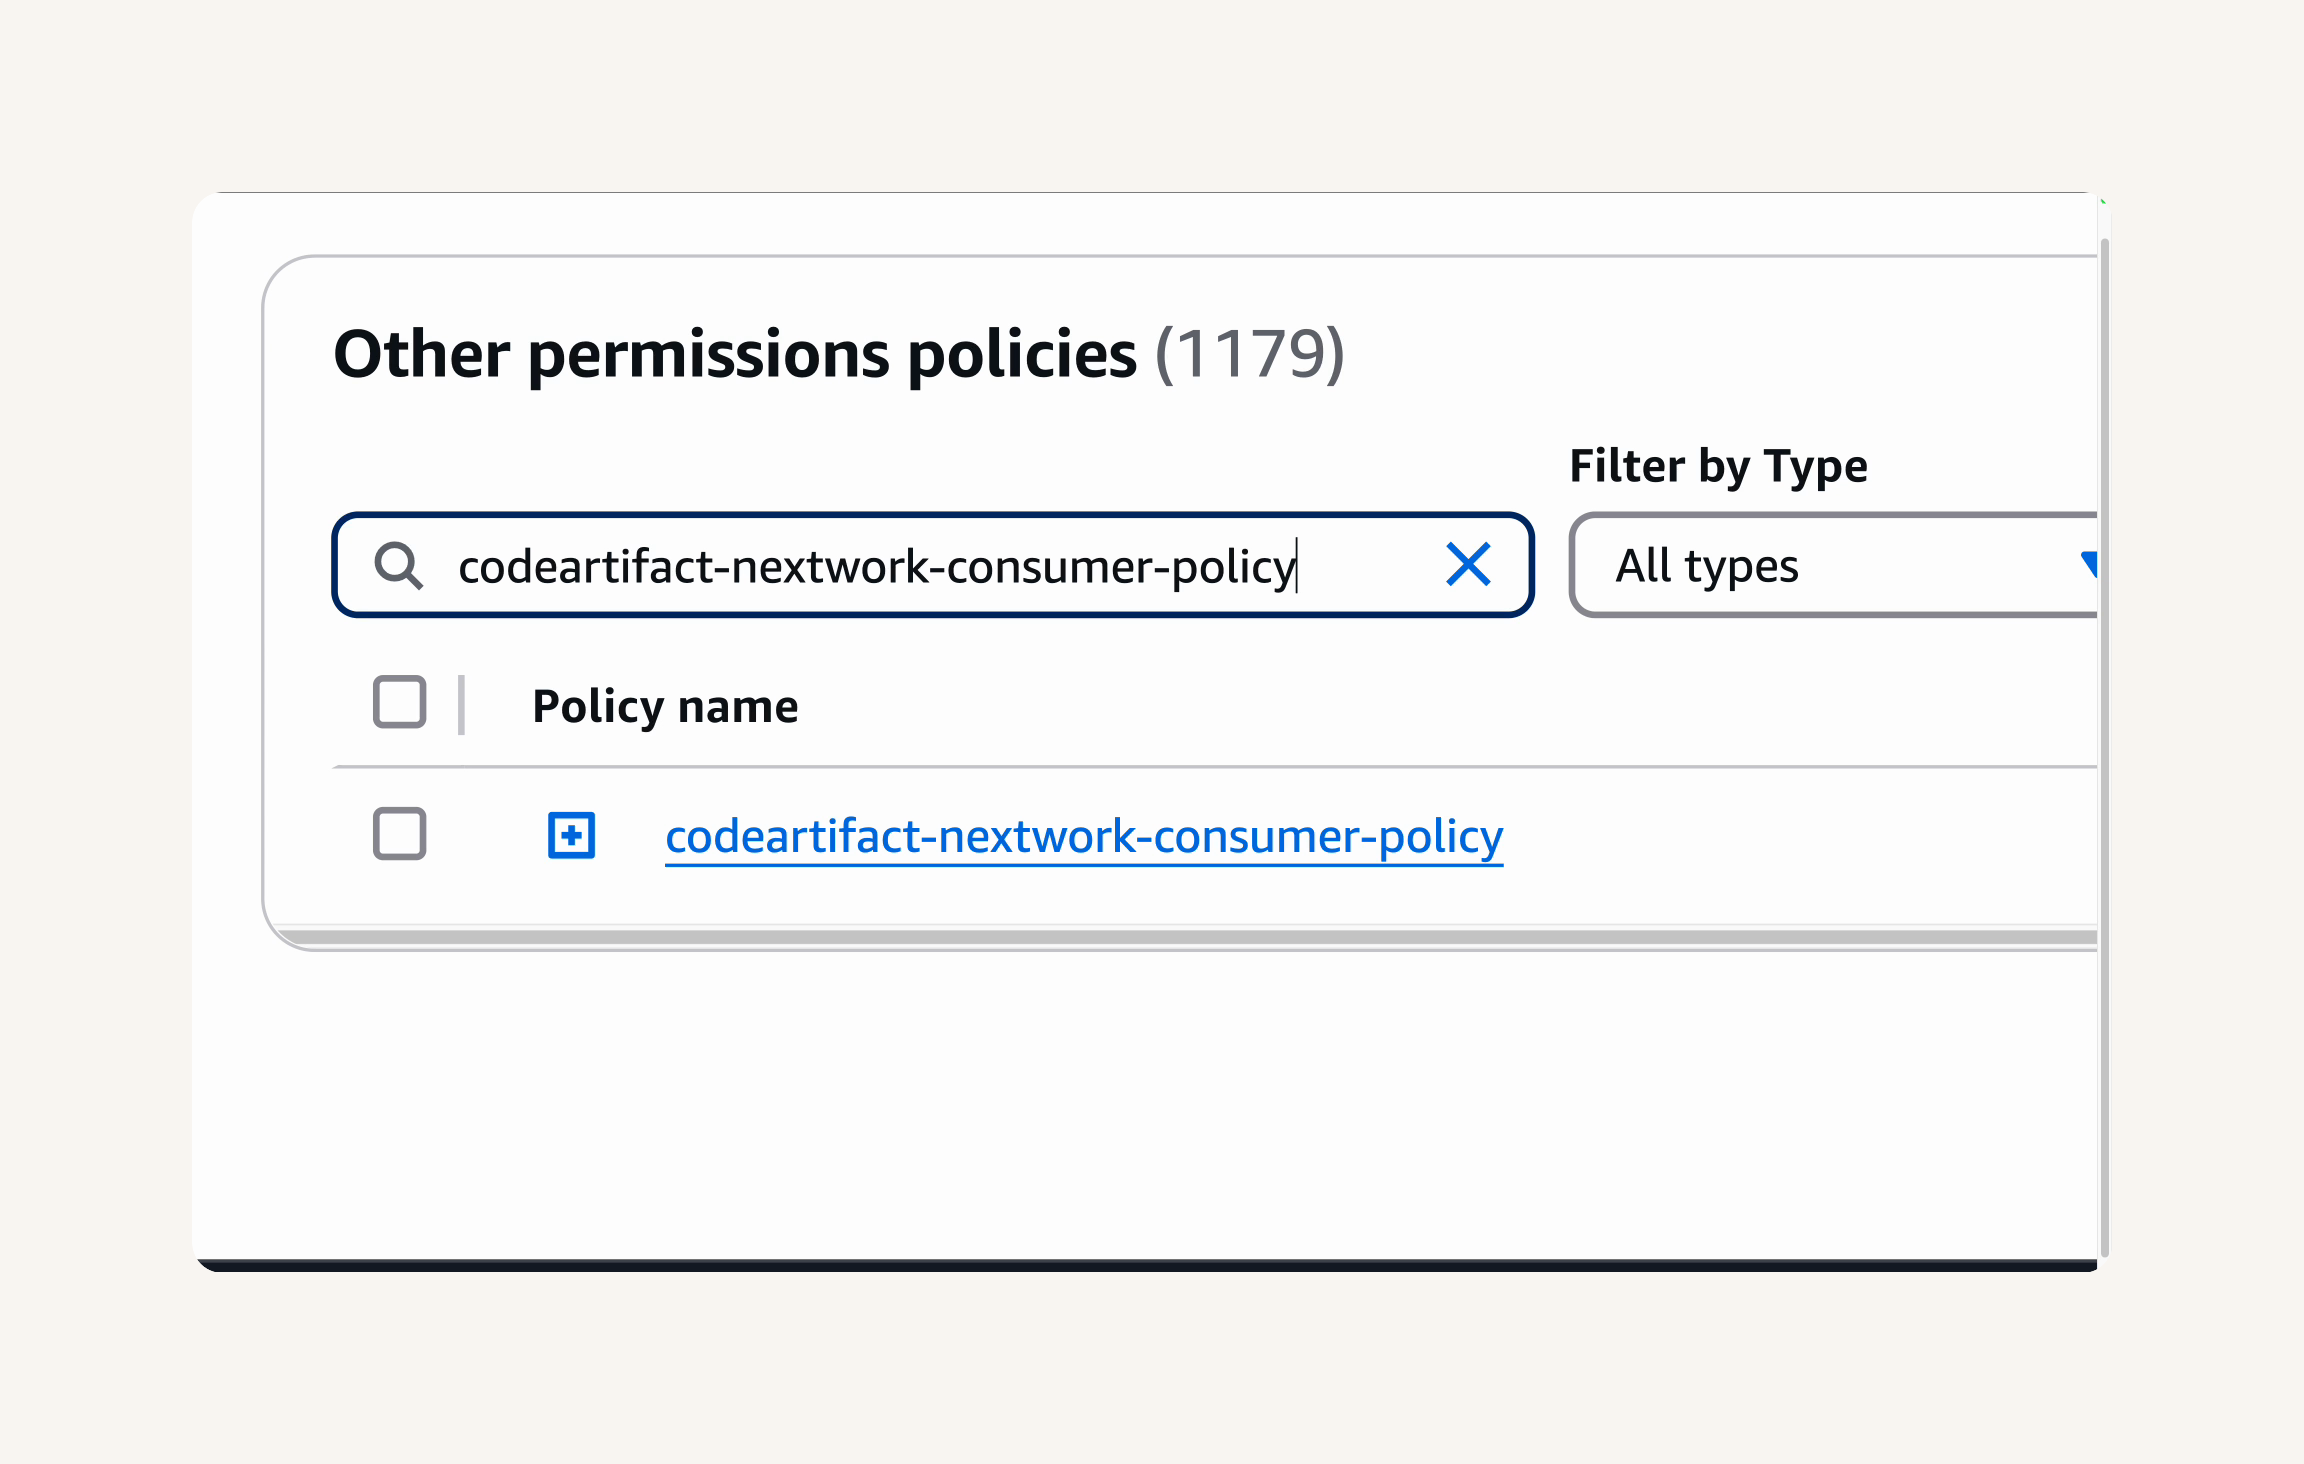
Review policy → policy name: codeartifact-nextwork-consumer-policy → Review the Summary of your policy to ensure the permissions and details are correct. - Create policy.
Create a new IAM role:
IAM console → roles → create role → select entity type: AWS service → choose use case: EC2 → Next → add permission → search box → Select the checkbox next to the codeartifact-nextwork-consumer-policy → Next → Name, review, create → Role Name: EC2-instance-nextwork-cicd → create role
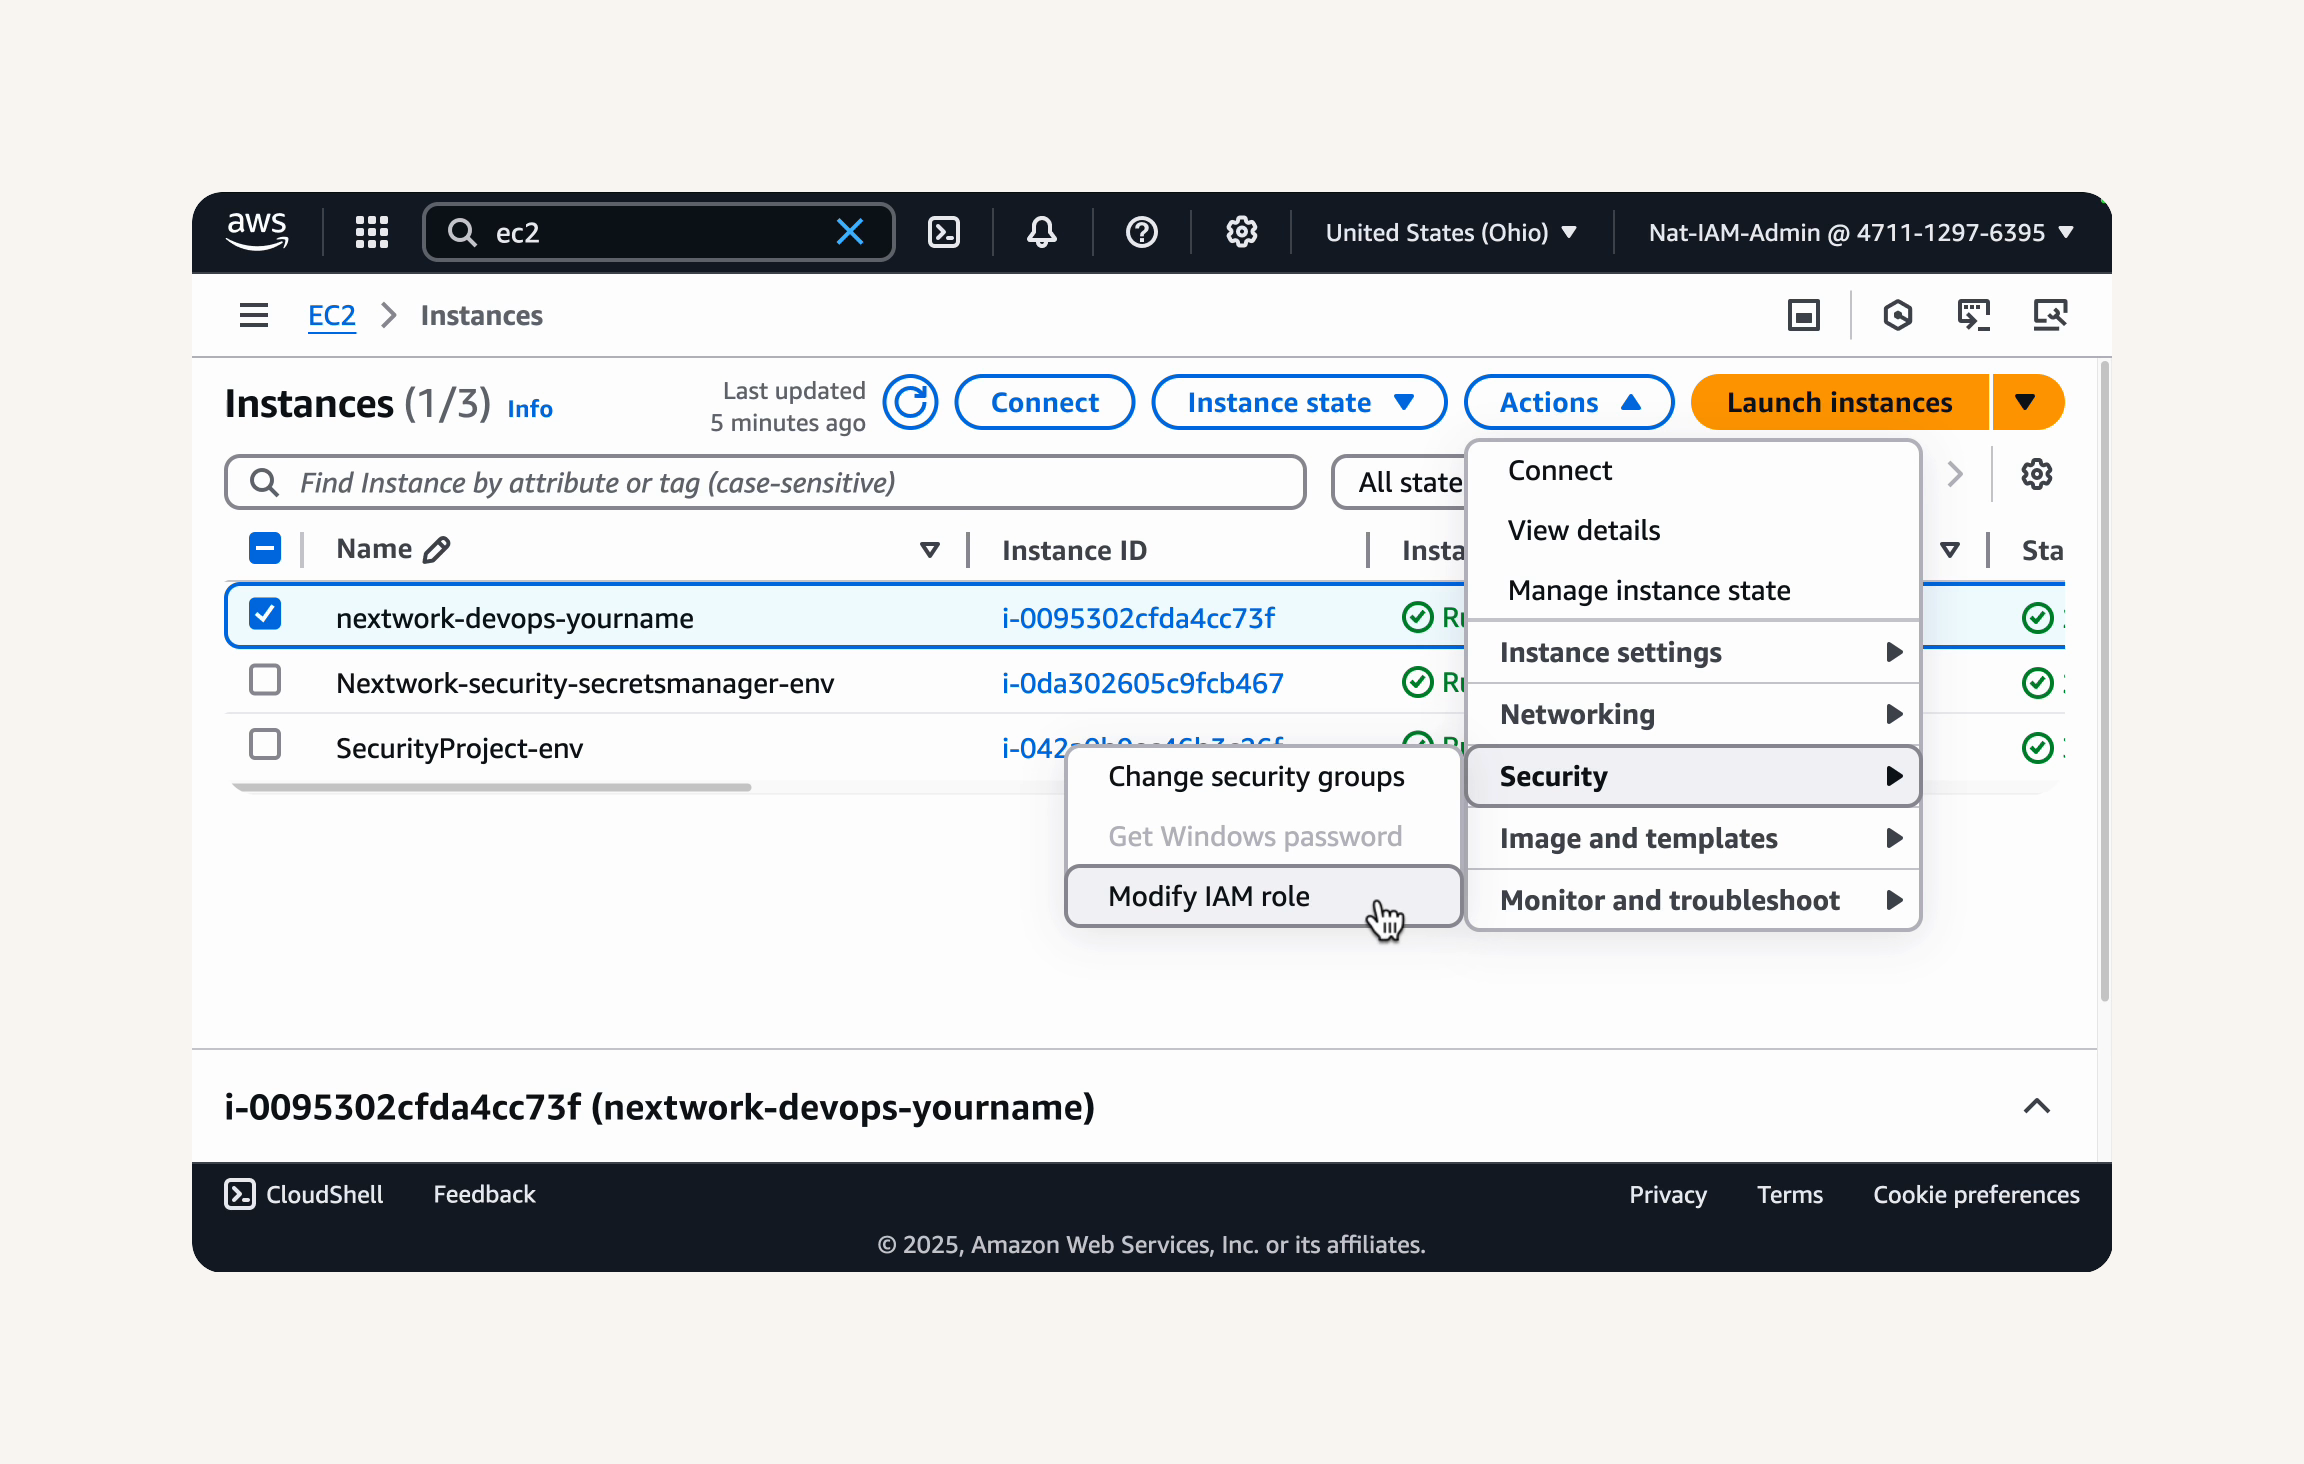
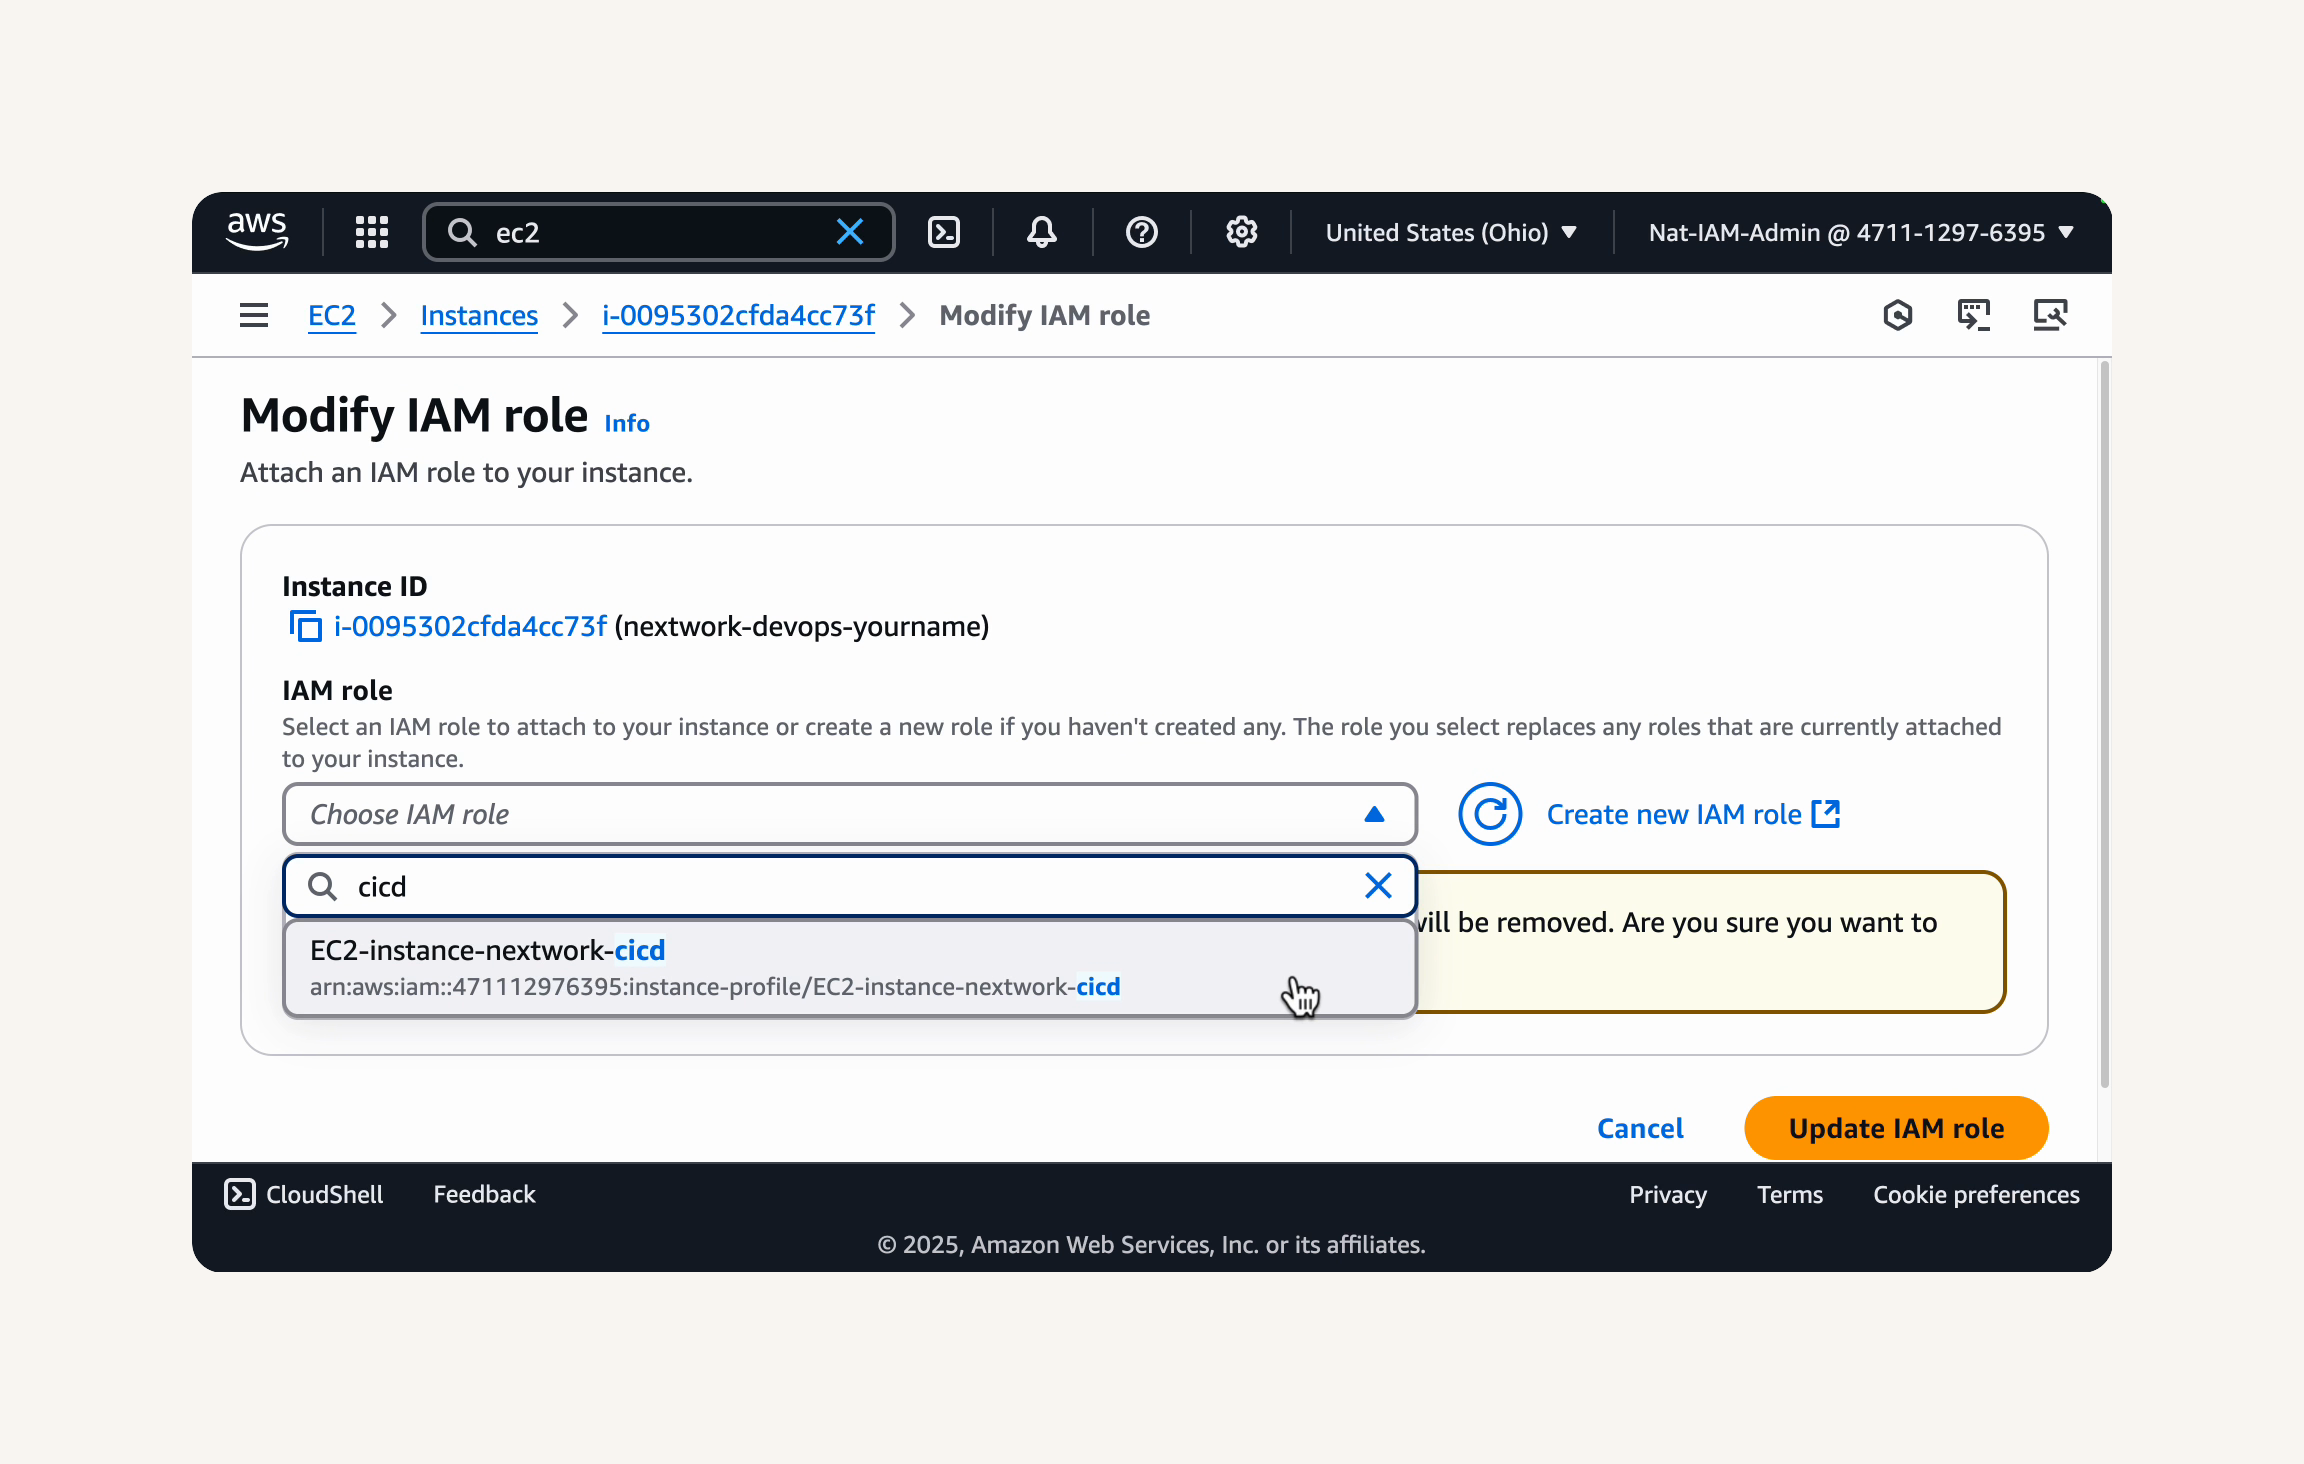
Attach IAM role to EC2:
EC2 → instance → select running instance: nextwork-devops-natasha - Actions → security → Modify IAM role → Choose IAM role: EC2-instance-nextwork-cicd → Update IAM role
Re-run export token command:
This command will retrieve a temporary authorization token for CodeArtifact and store it in an environment variable named CODEARTIFACT_AUTH_TOKEN
Setting up connection between maven to CodeArtifact
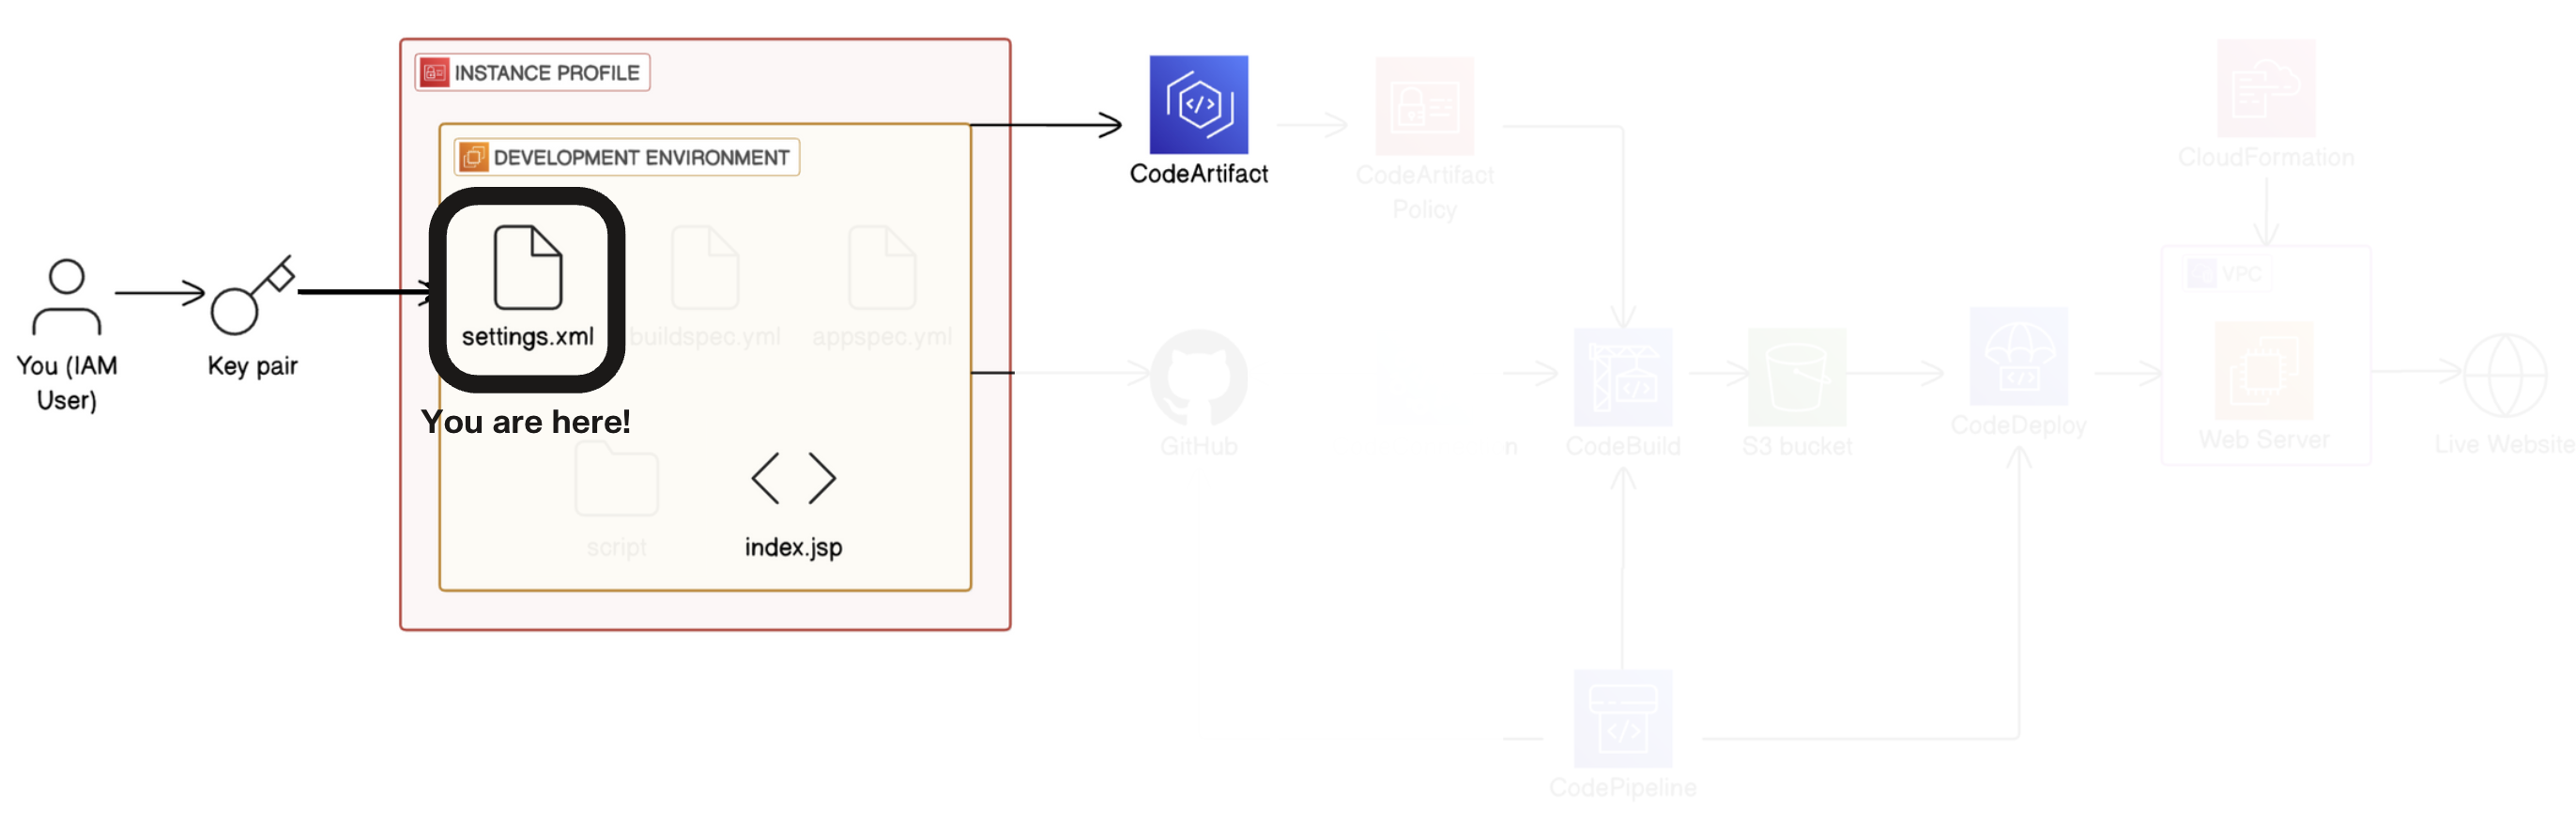
we'll have to set up a special file called settings.xml first.
VS Code → file explorer → select nextwork-web-project → Create a new file at the root of your project → Name the new file settings.xml
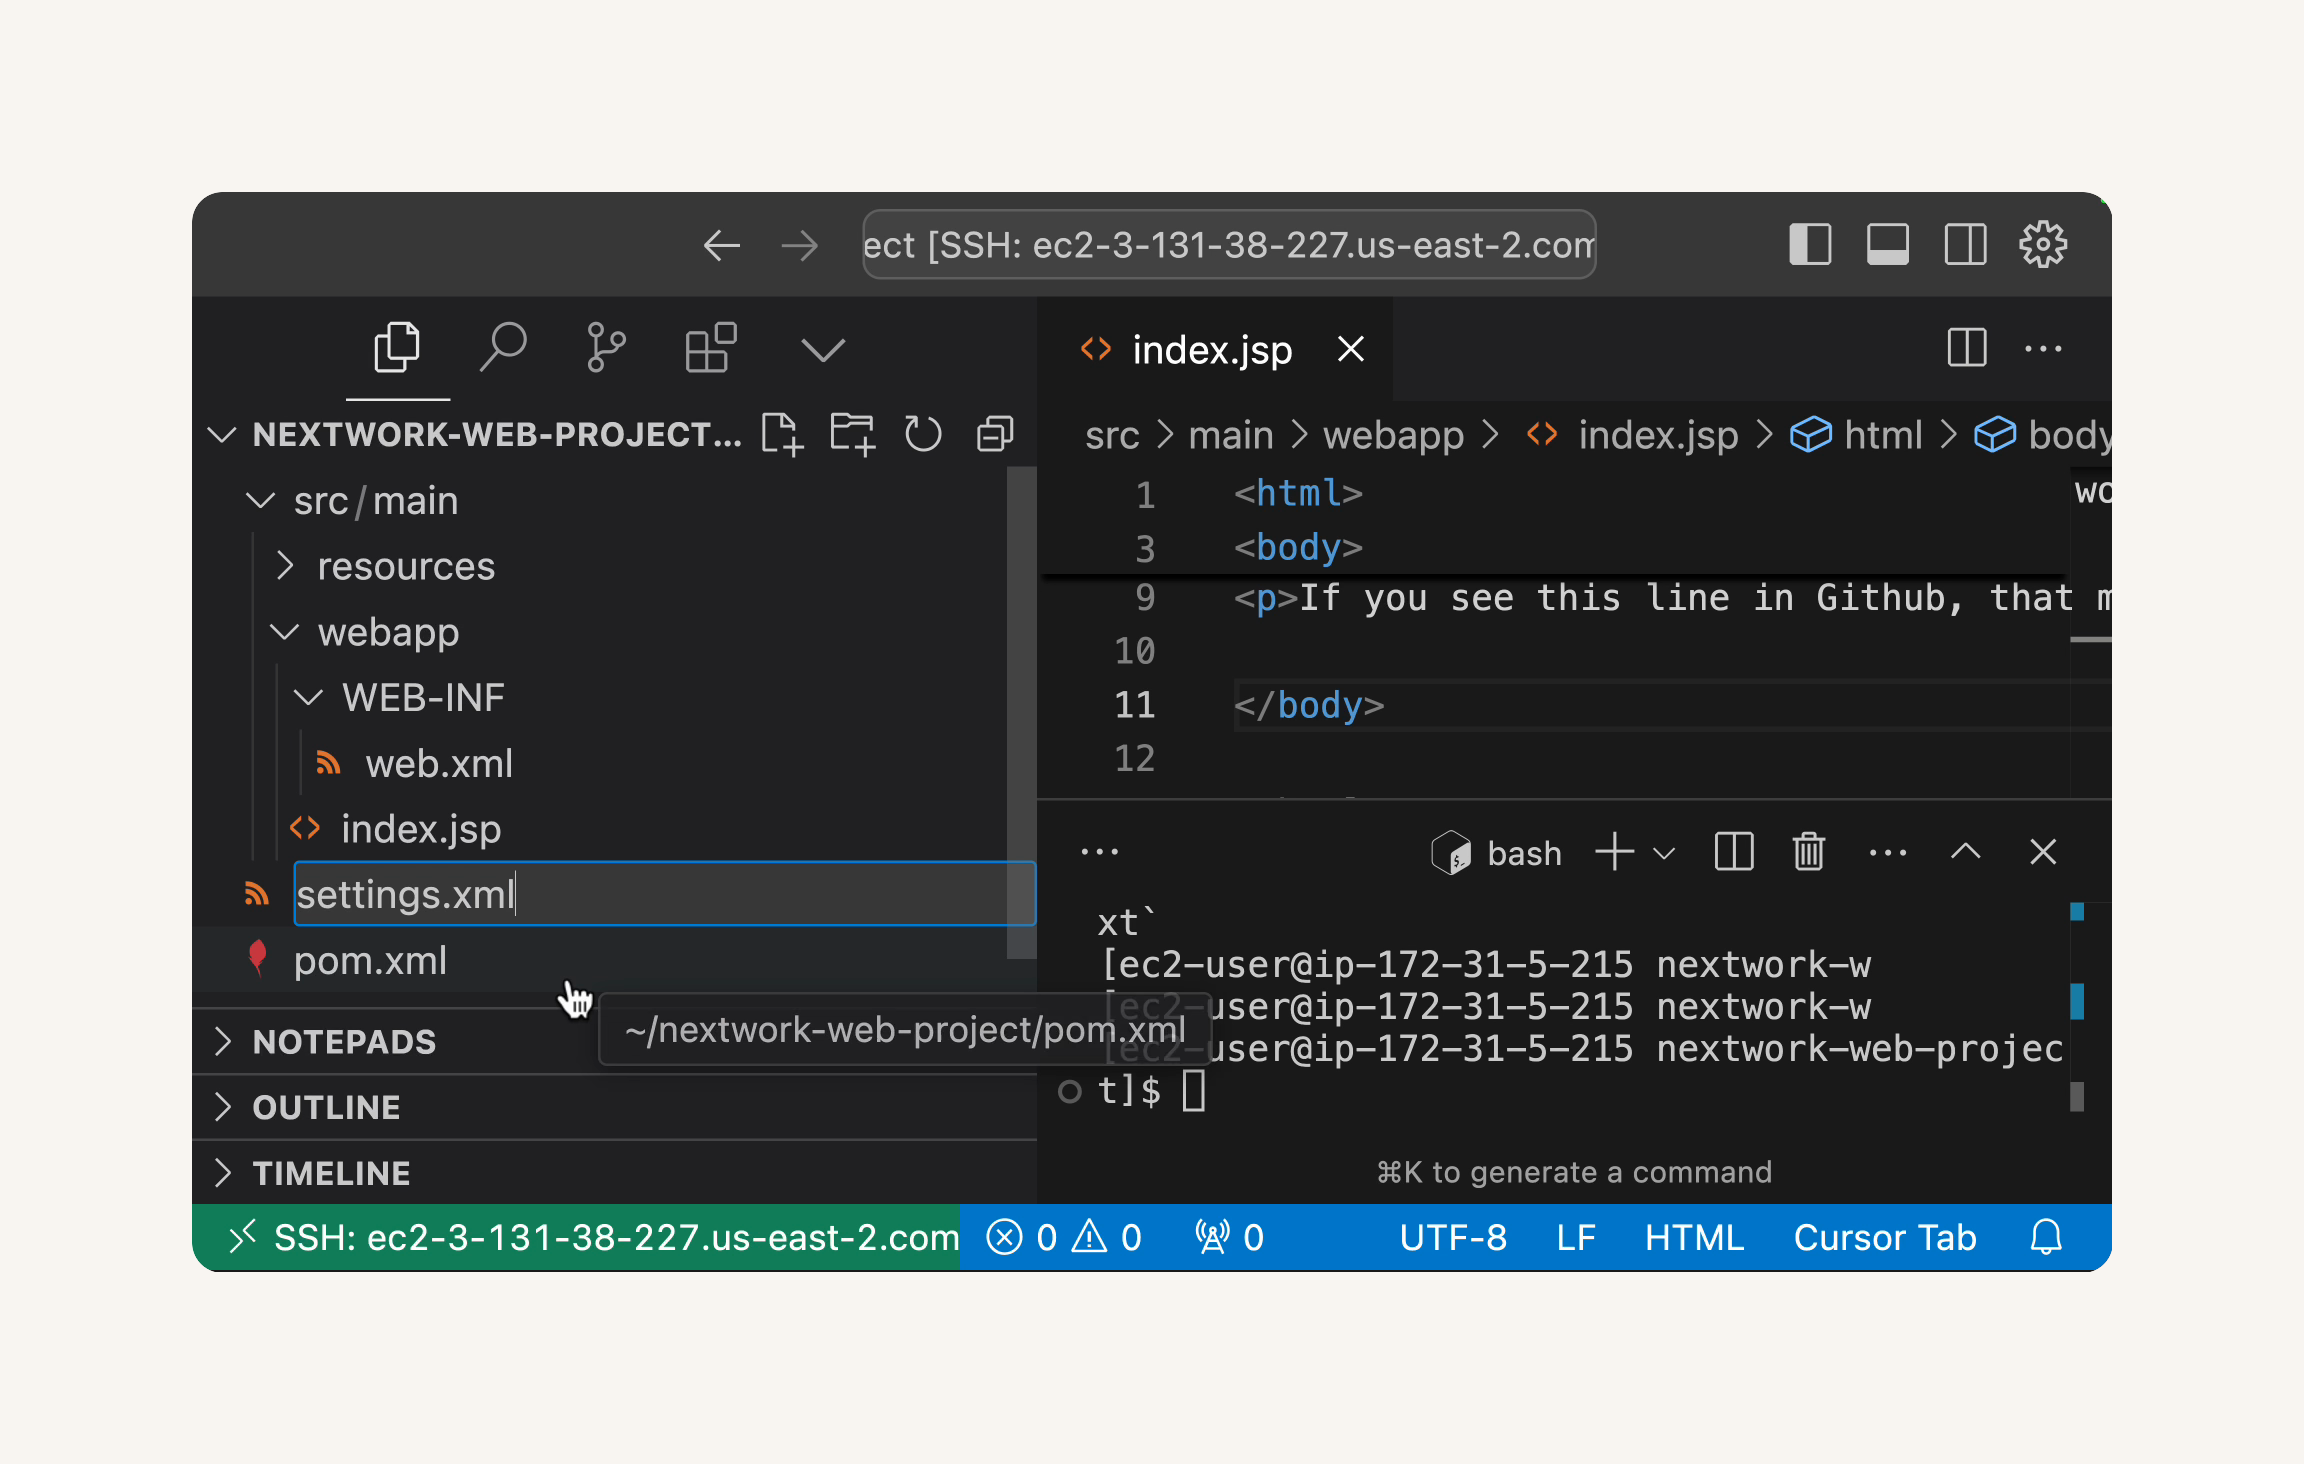
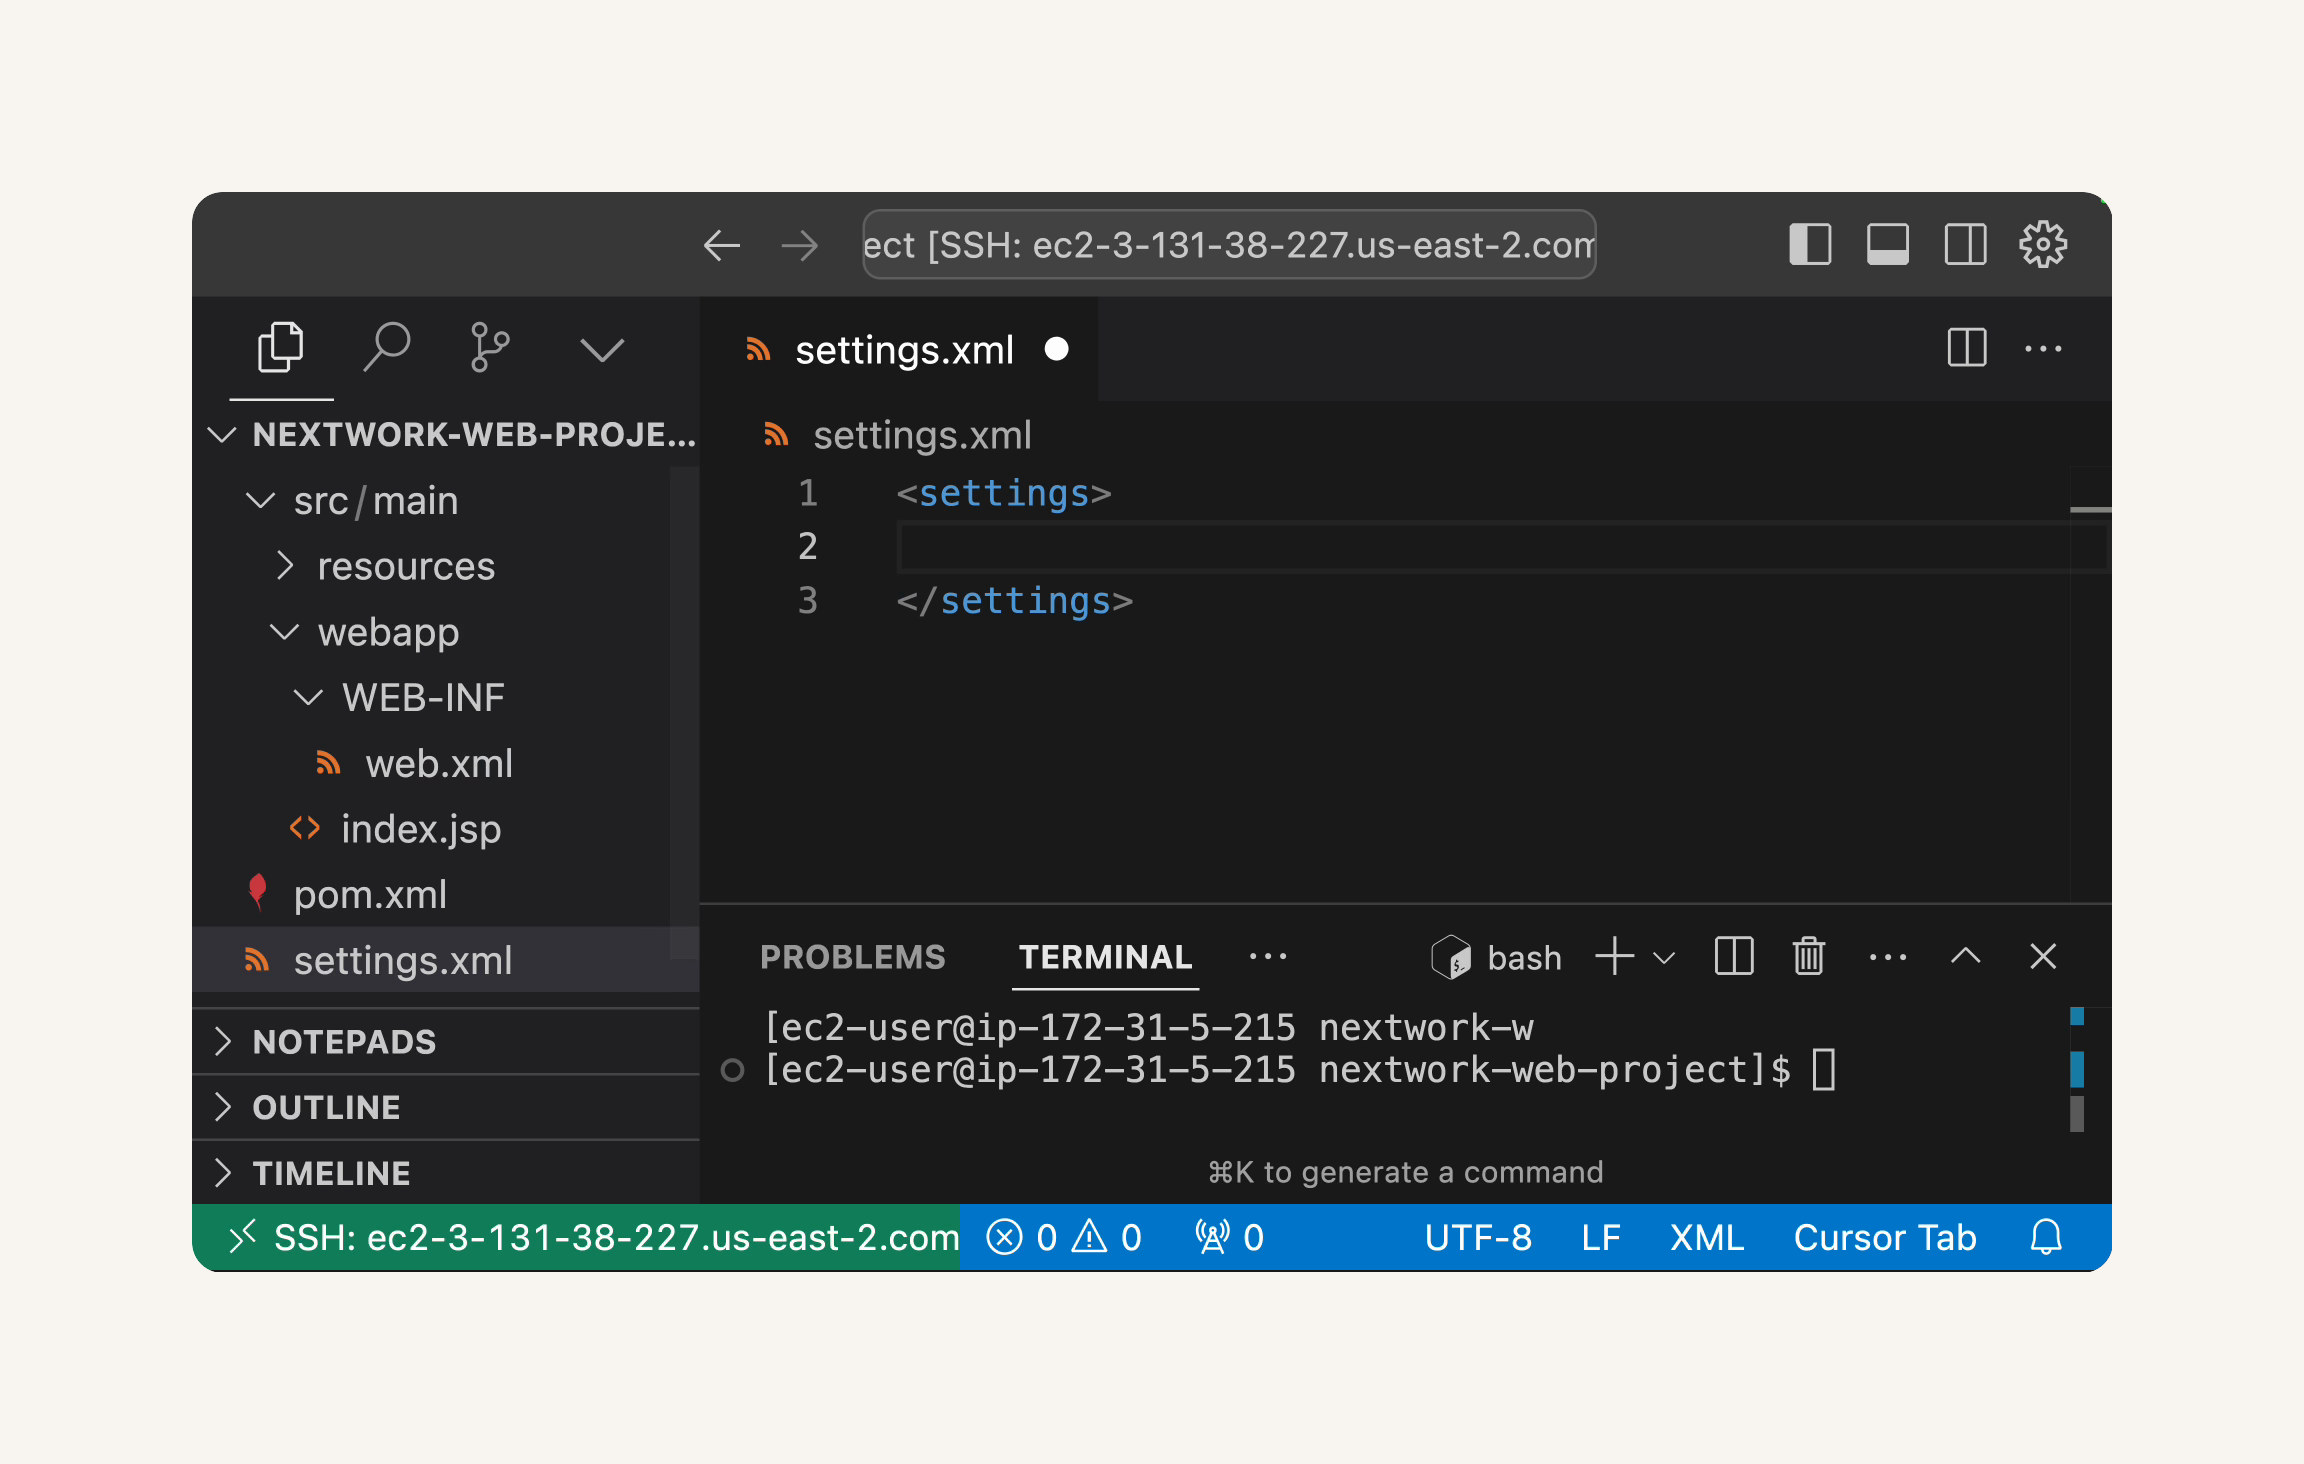
Open the settings.xml file. add the <settings> root tag if it's not already there.
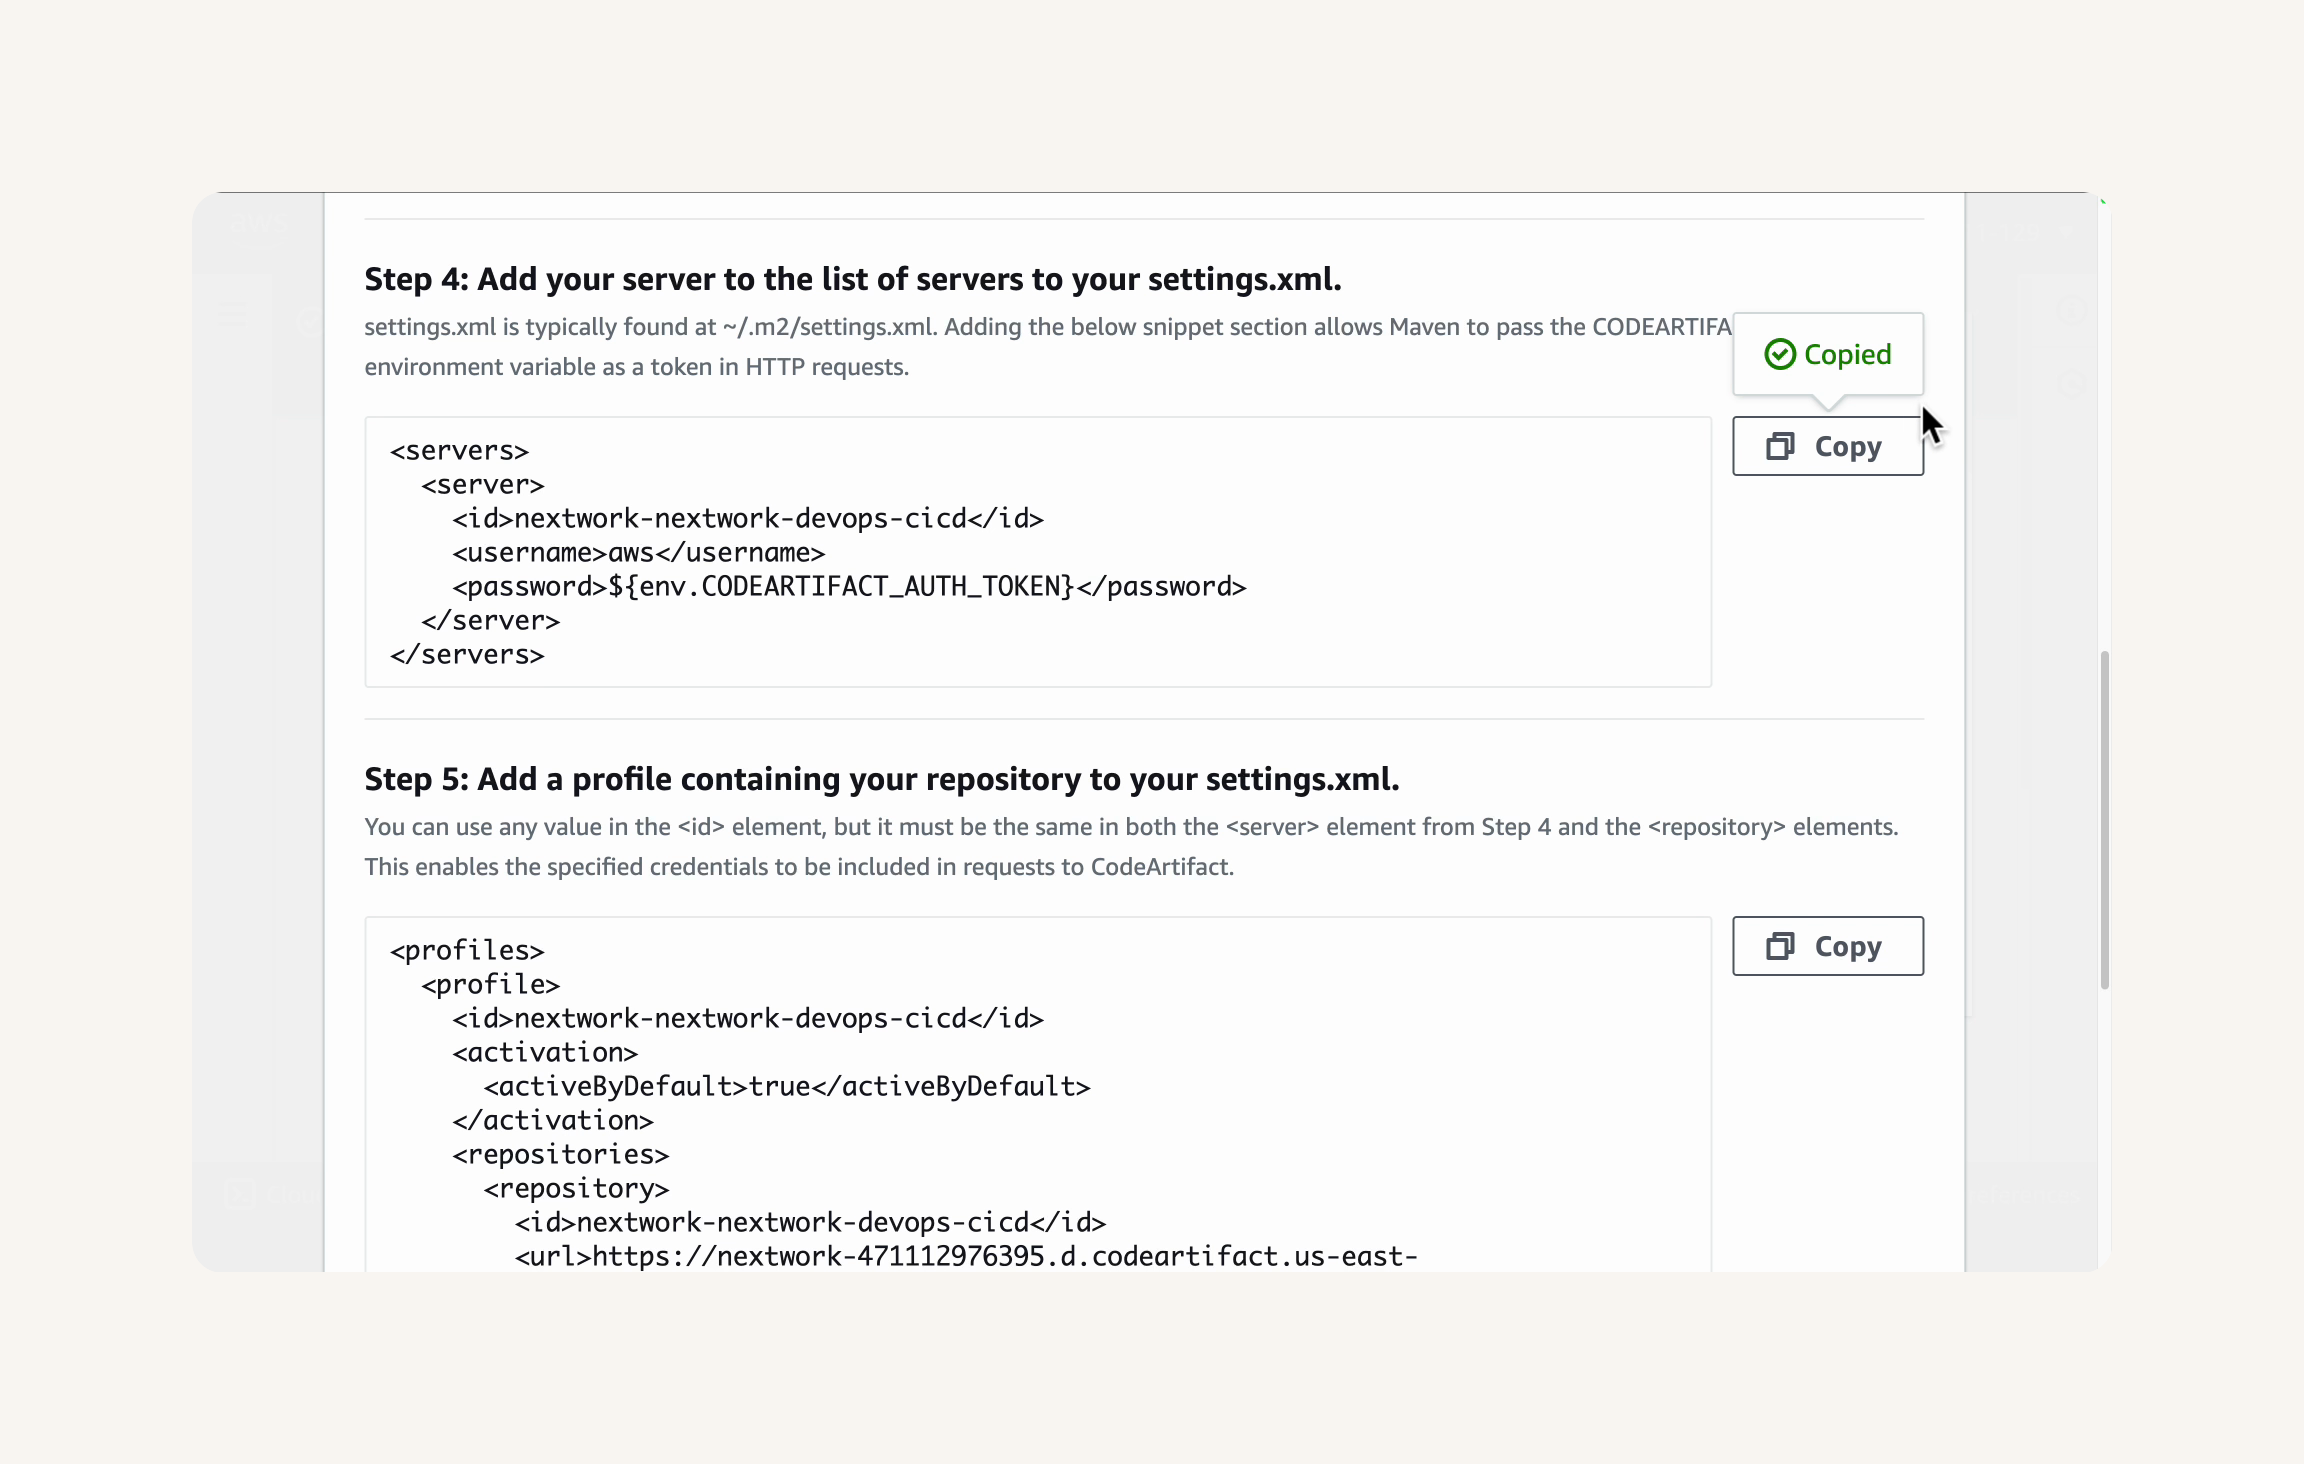
AWS console → codeartifact → CodeArtifact connection settings panel → Connection instructions → copy the XML code snippet from Step 4: Add your server to the list of servers in your settings.xml. → Step 5: Add a profile containing your repository to your settings.xml → Step 6: (Optional) Set a mirror in your settings.xml→ Paste the code in the settings.xml file, in between the <settings> tags. → save the settings.xml file
Compile your project and verify the CodeArtifact integration:
cd nextwork-web-project
mvn -s settings.xml compile

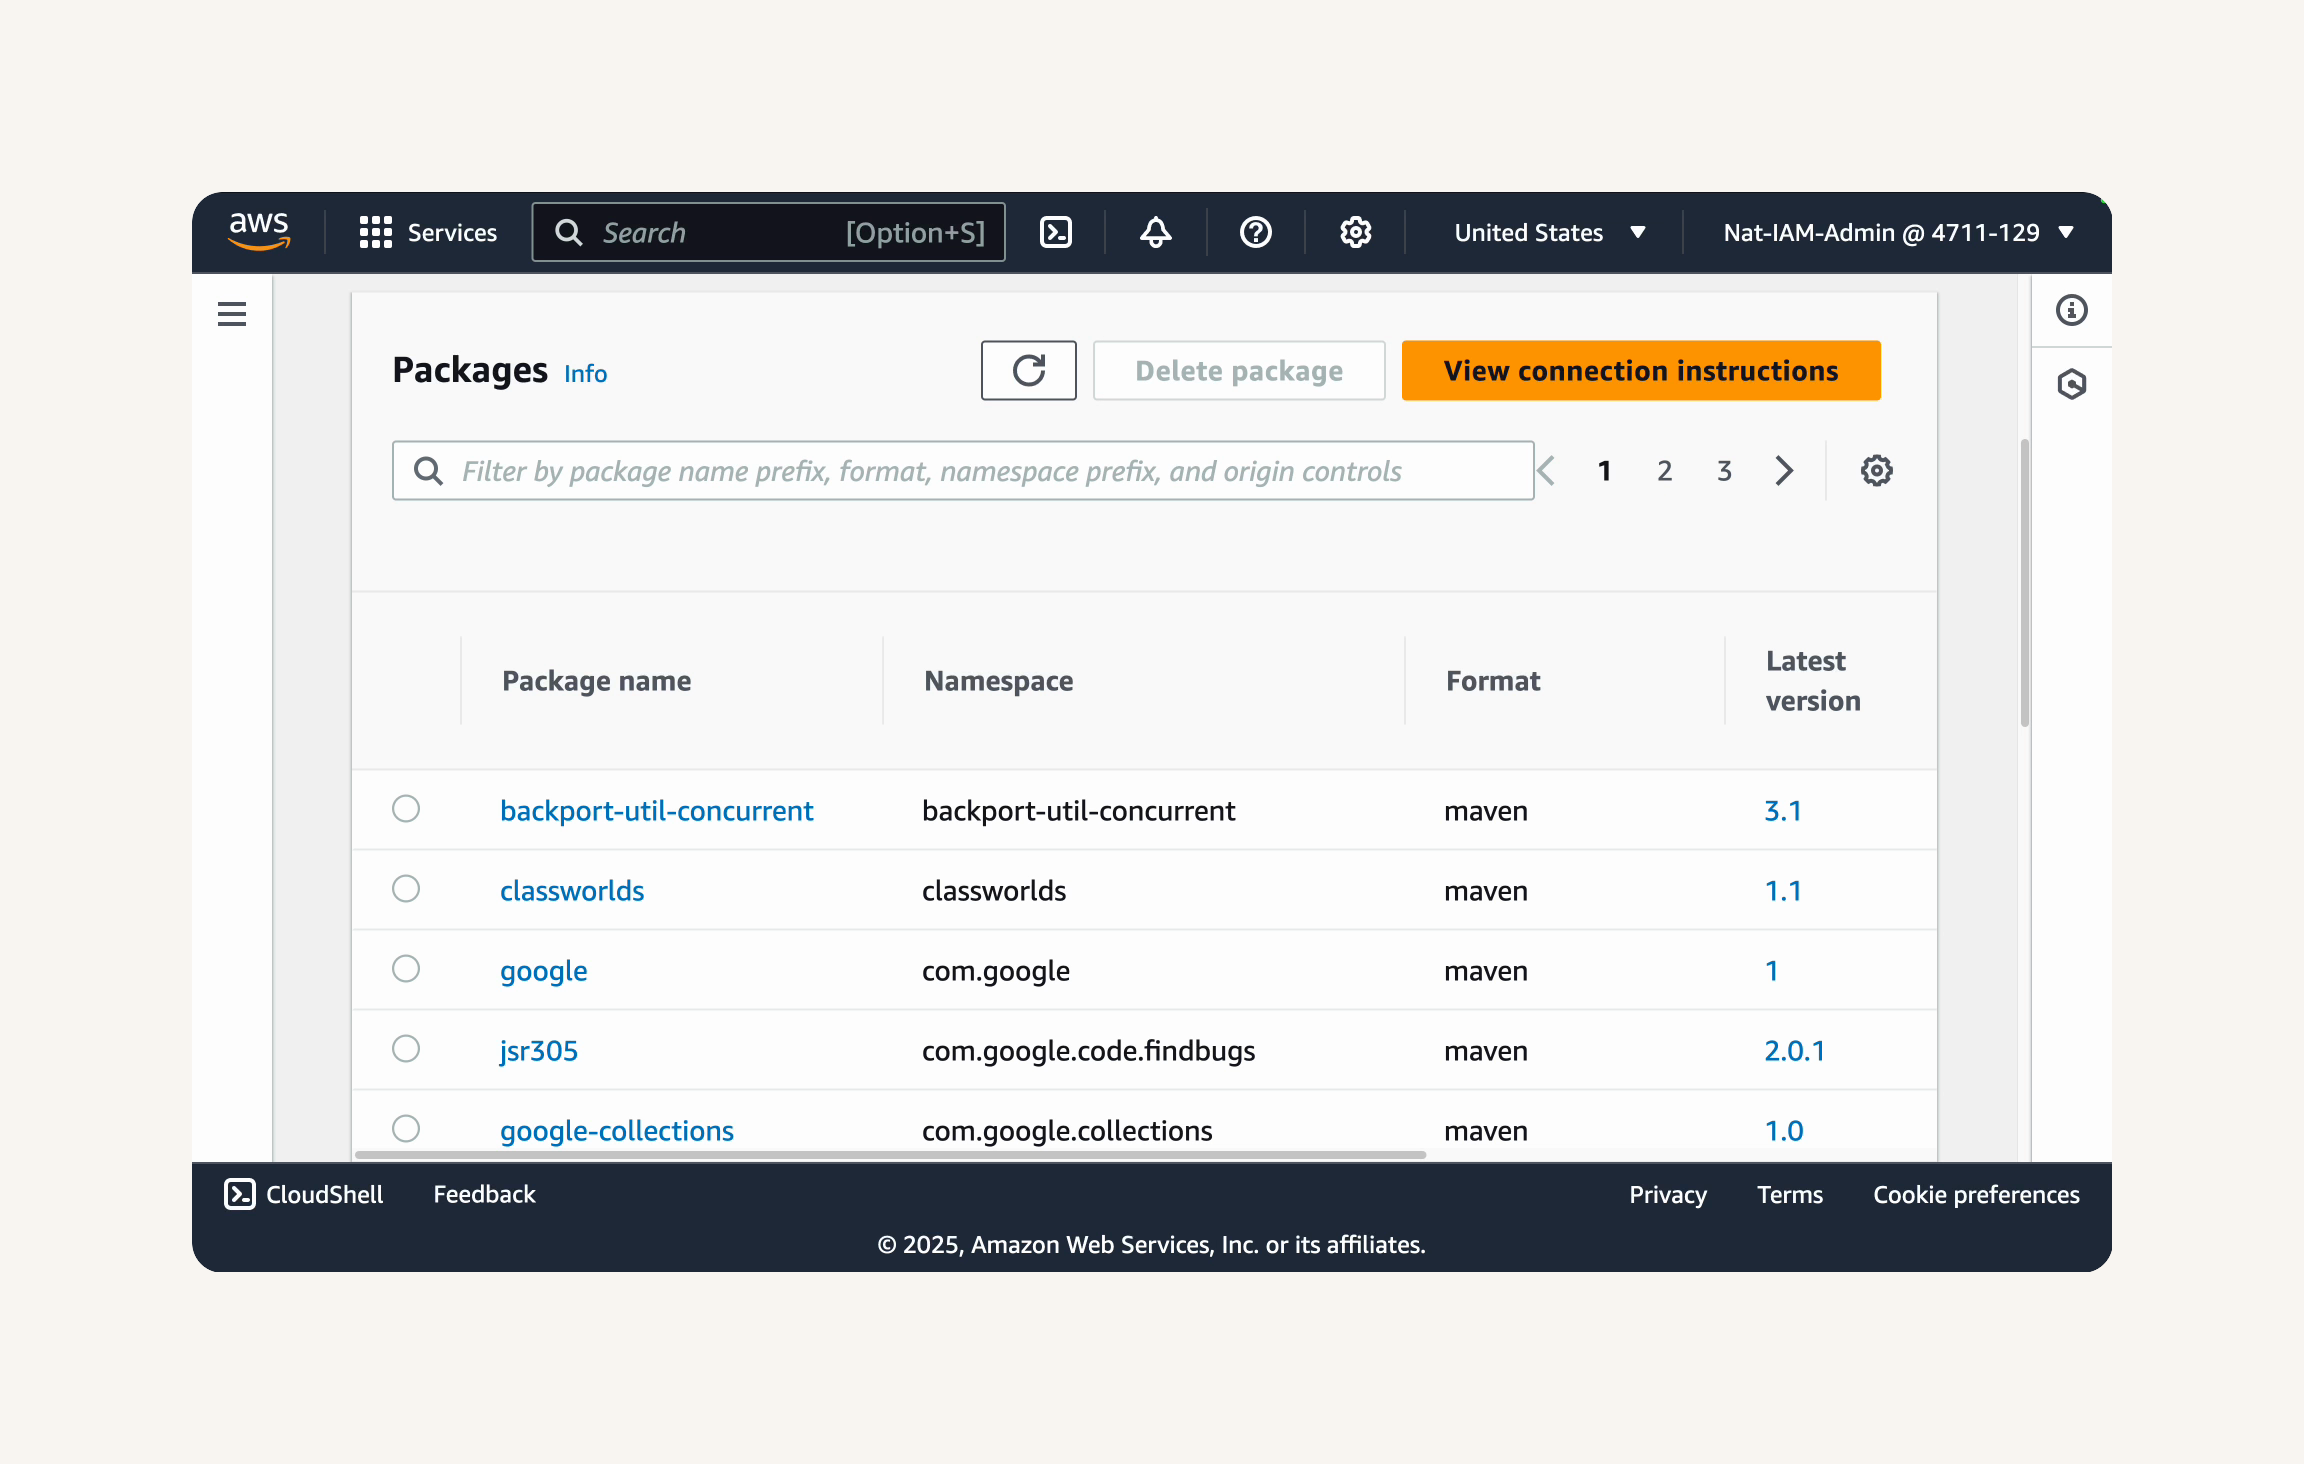
Let's head back to the CodeArtifact console in your browser. → Close the connection instructions window. → click the refresh button in the top right corner of the Packages pane.

After refreshing, you should now see a list of Maven packages in your CodeArtifact repository.
Step 4: Continuous Integration with CodeBuild

Create and configure a CodeBuild project from scratch.
AWS Management Console → CodeBuild → Build projects → Create build project → Project Configuration → Project name: nextwork-devops-cicd → Project Type: Default project → source → Source provider: Github
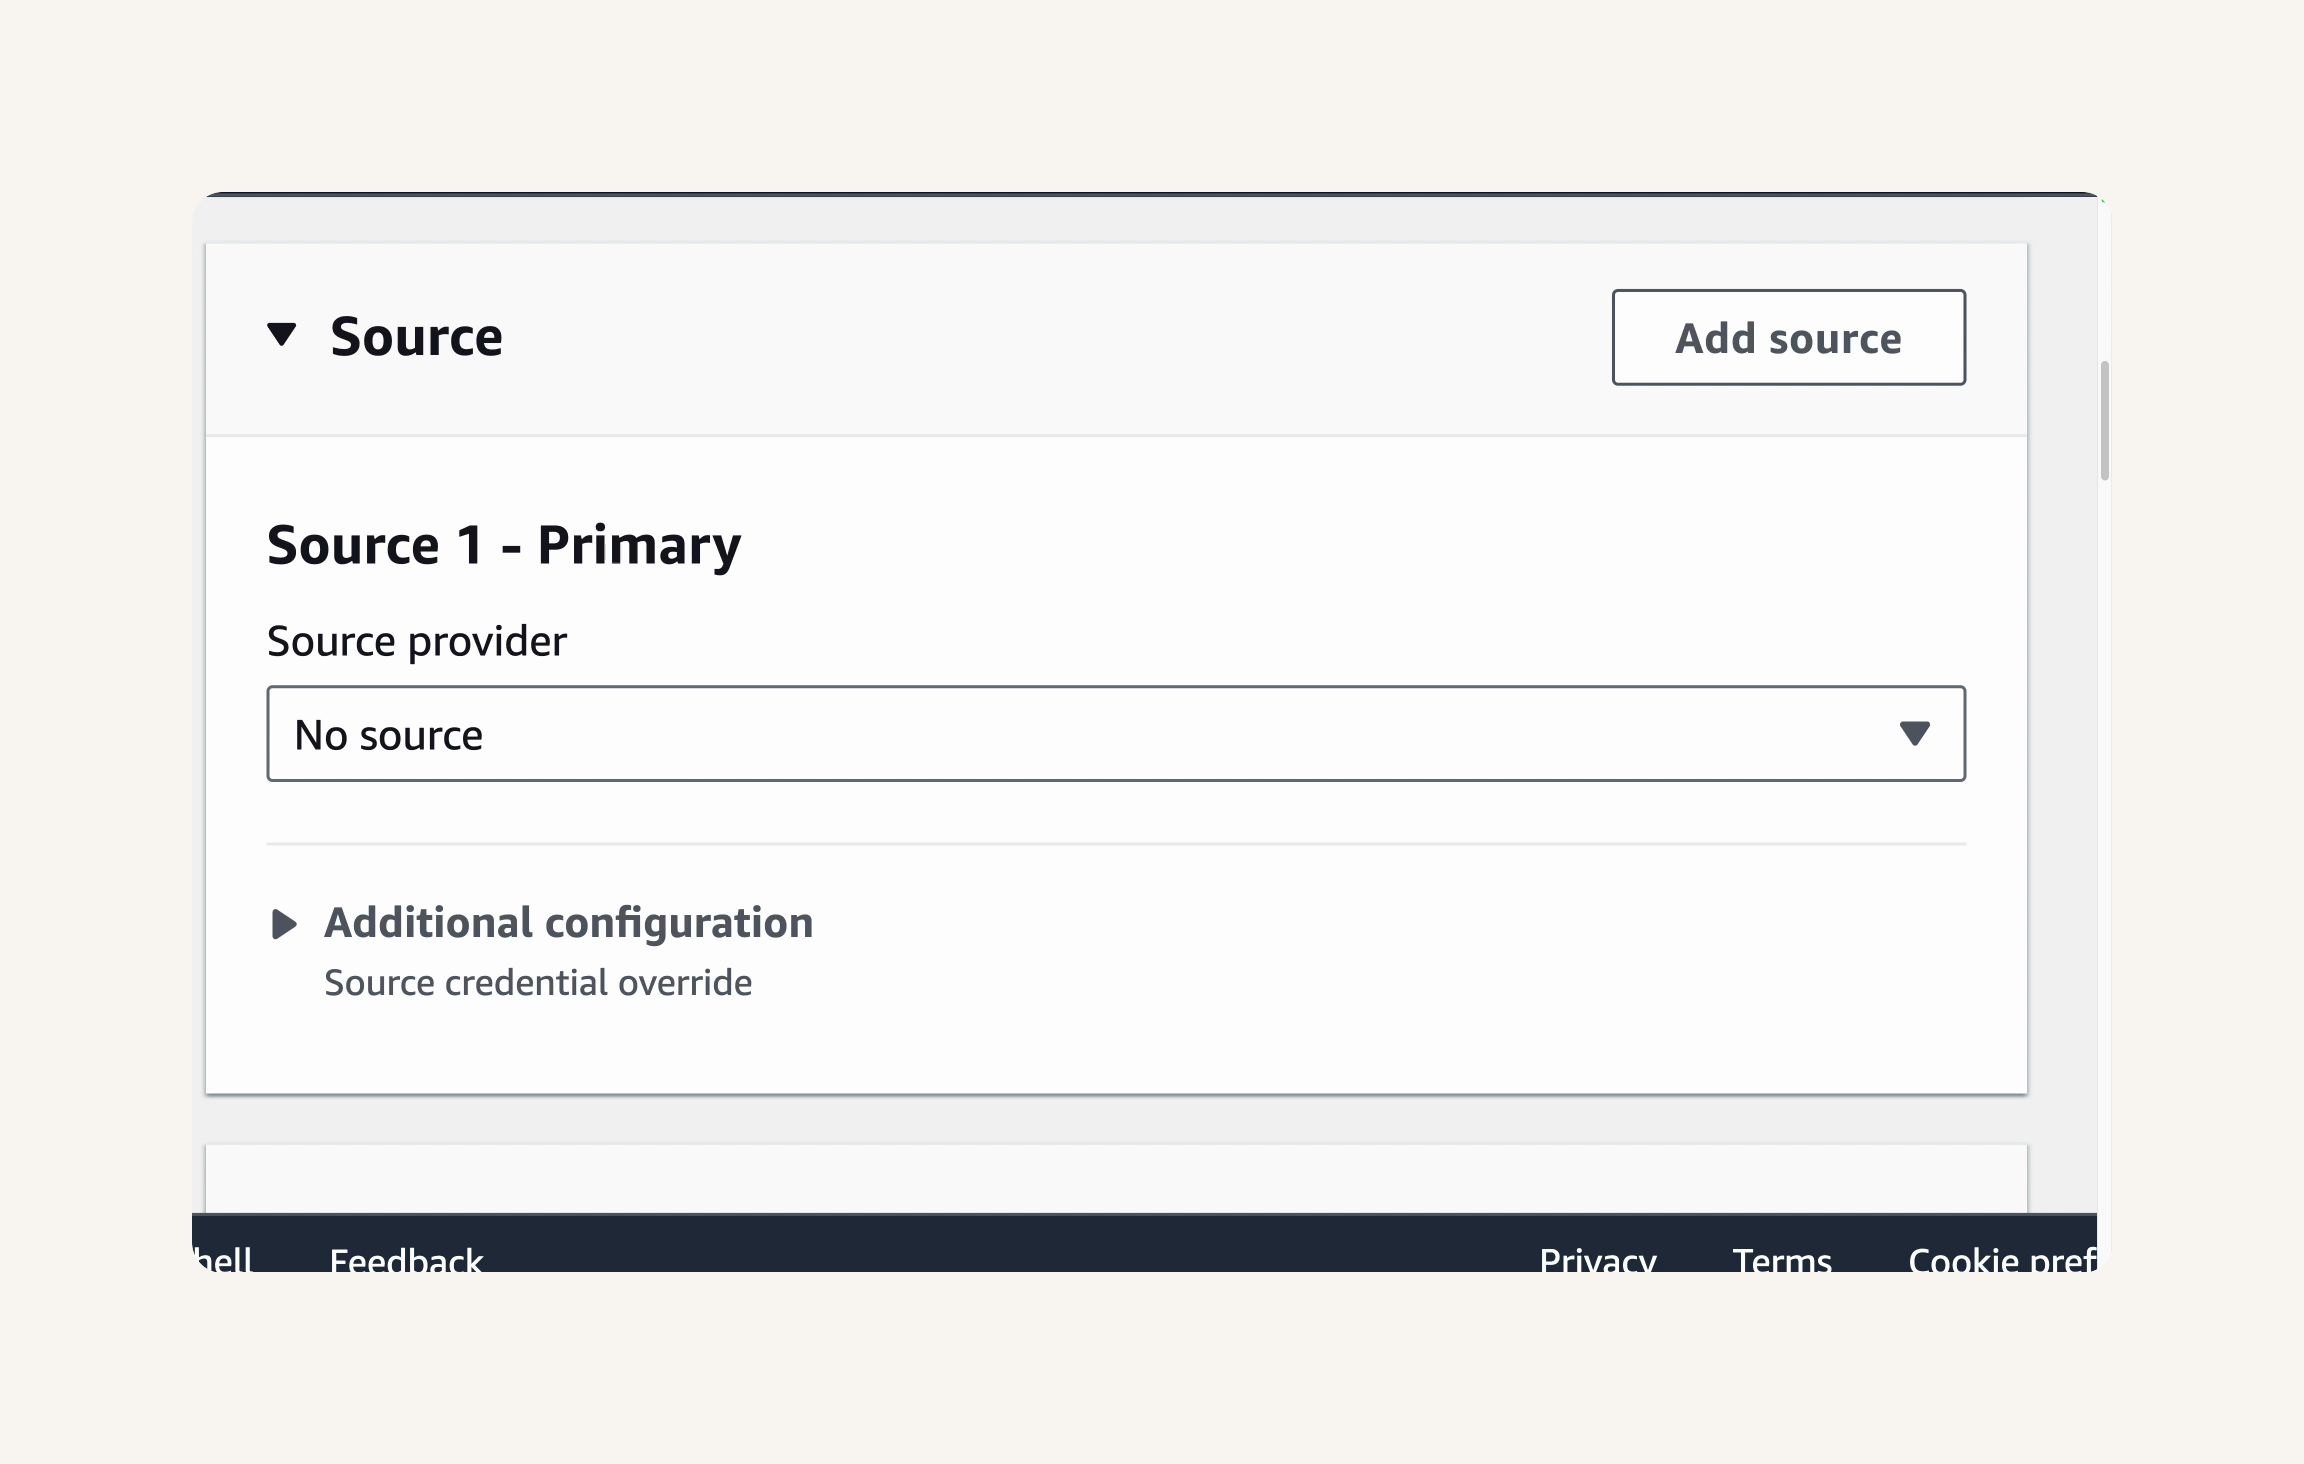
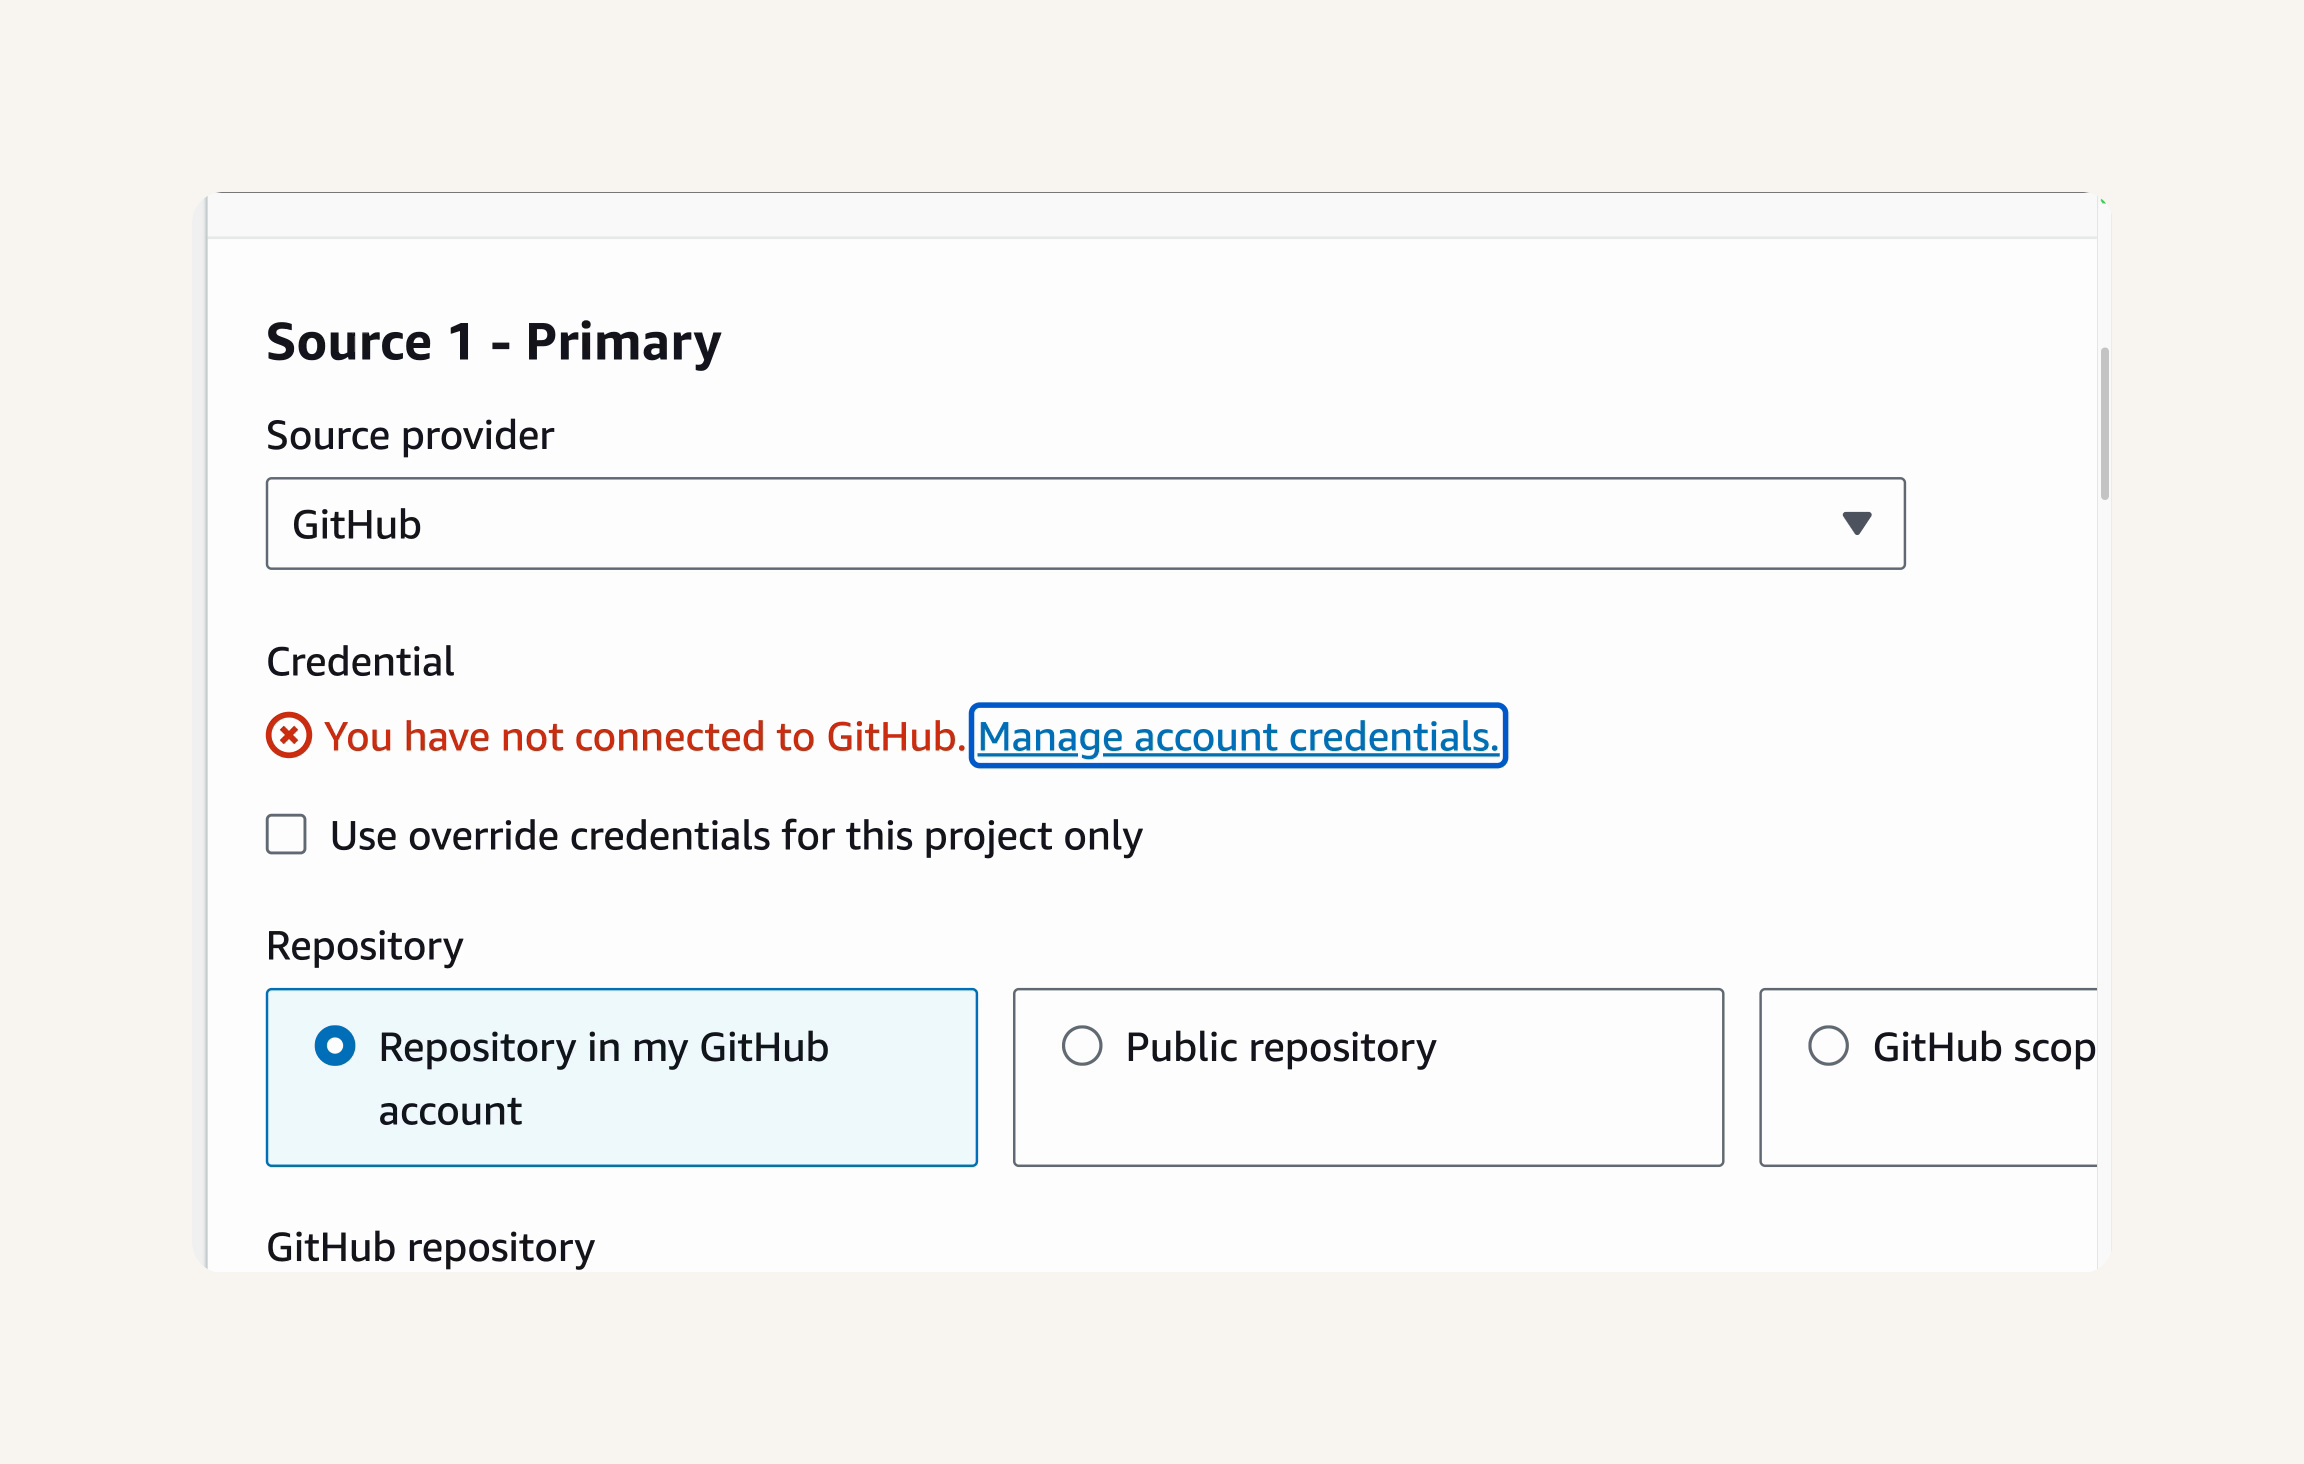
Connect your CodeBuild project to your GitHub repository.
In the Source section → Credential → You have not connected to GitHub. Manage account credentials. → Manage account credentials.
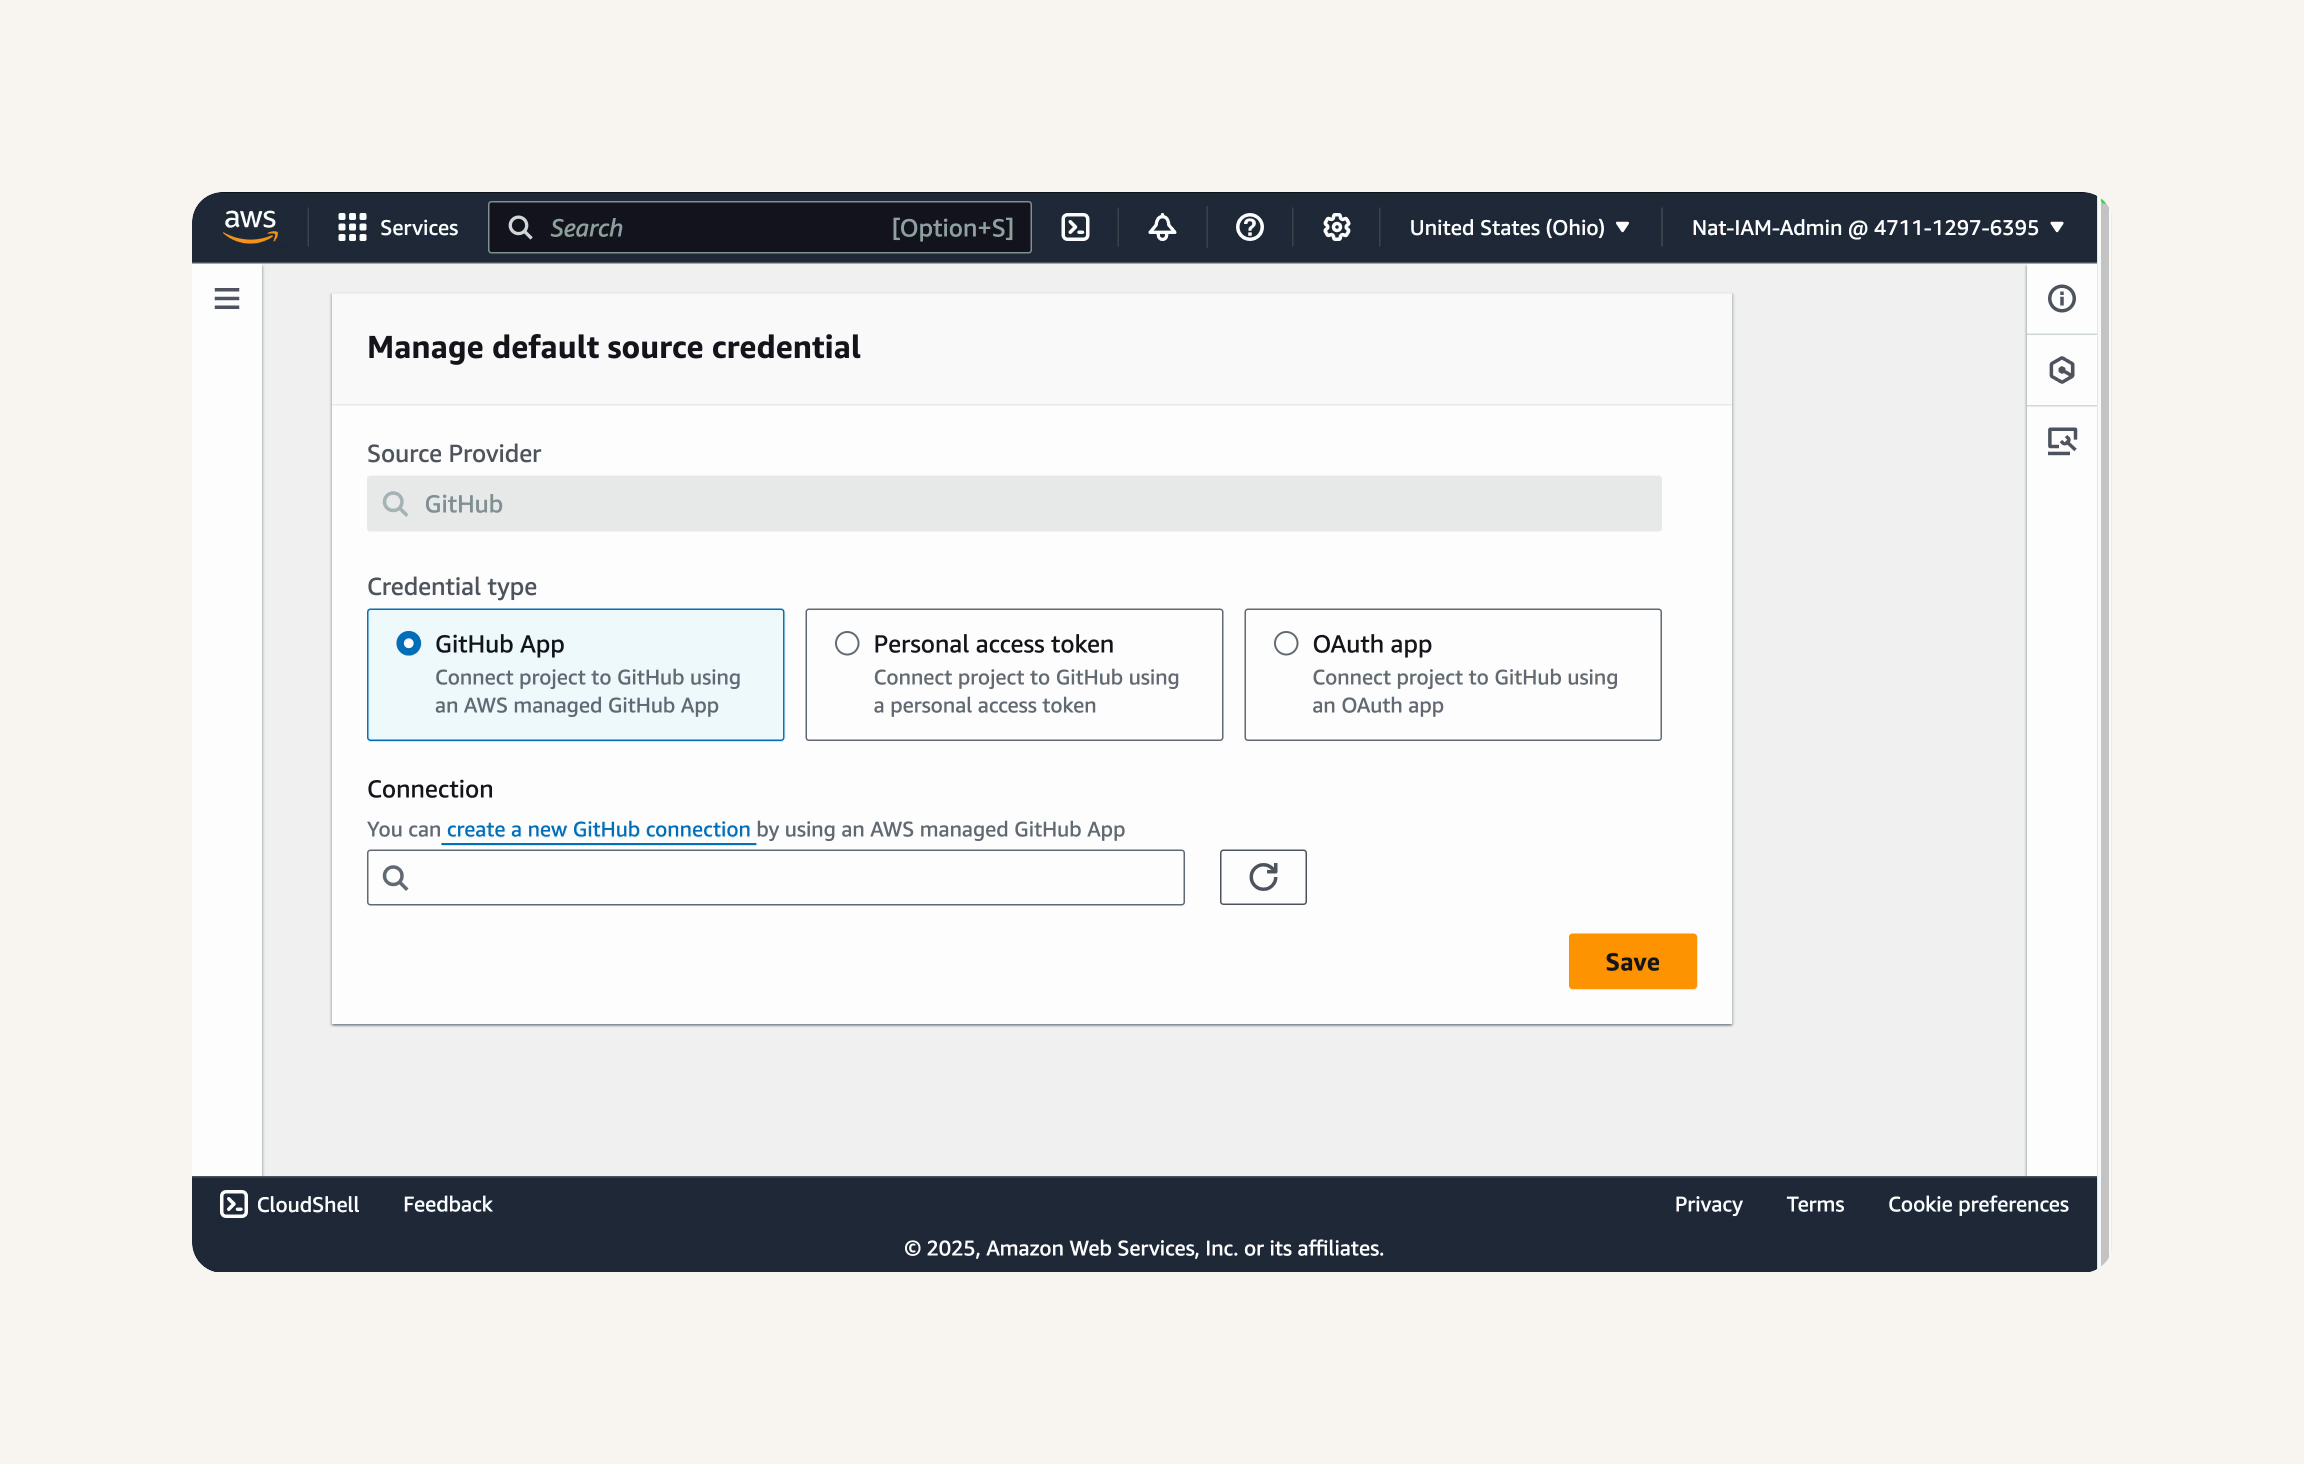
- You will be taken to the Manage default source credential page.
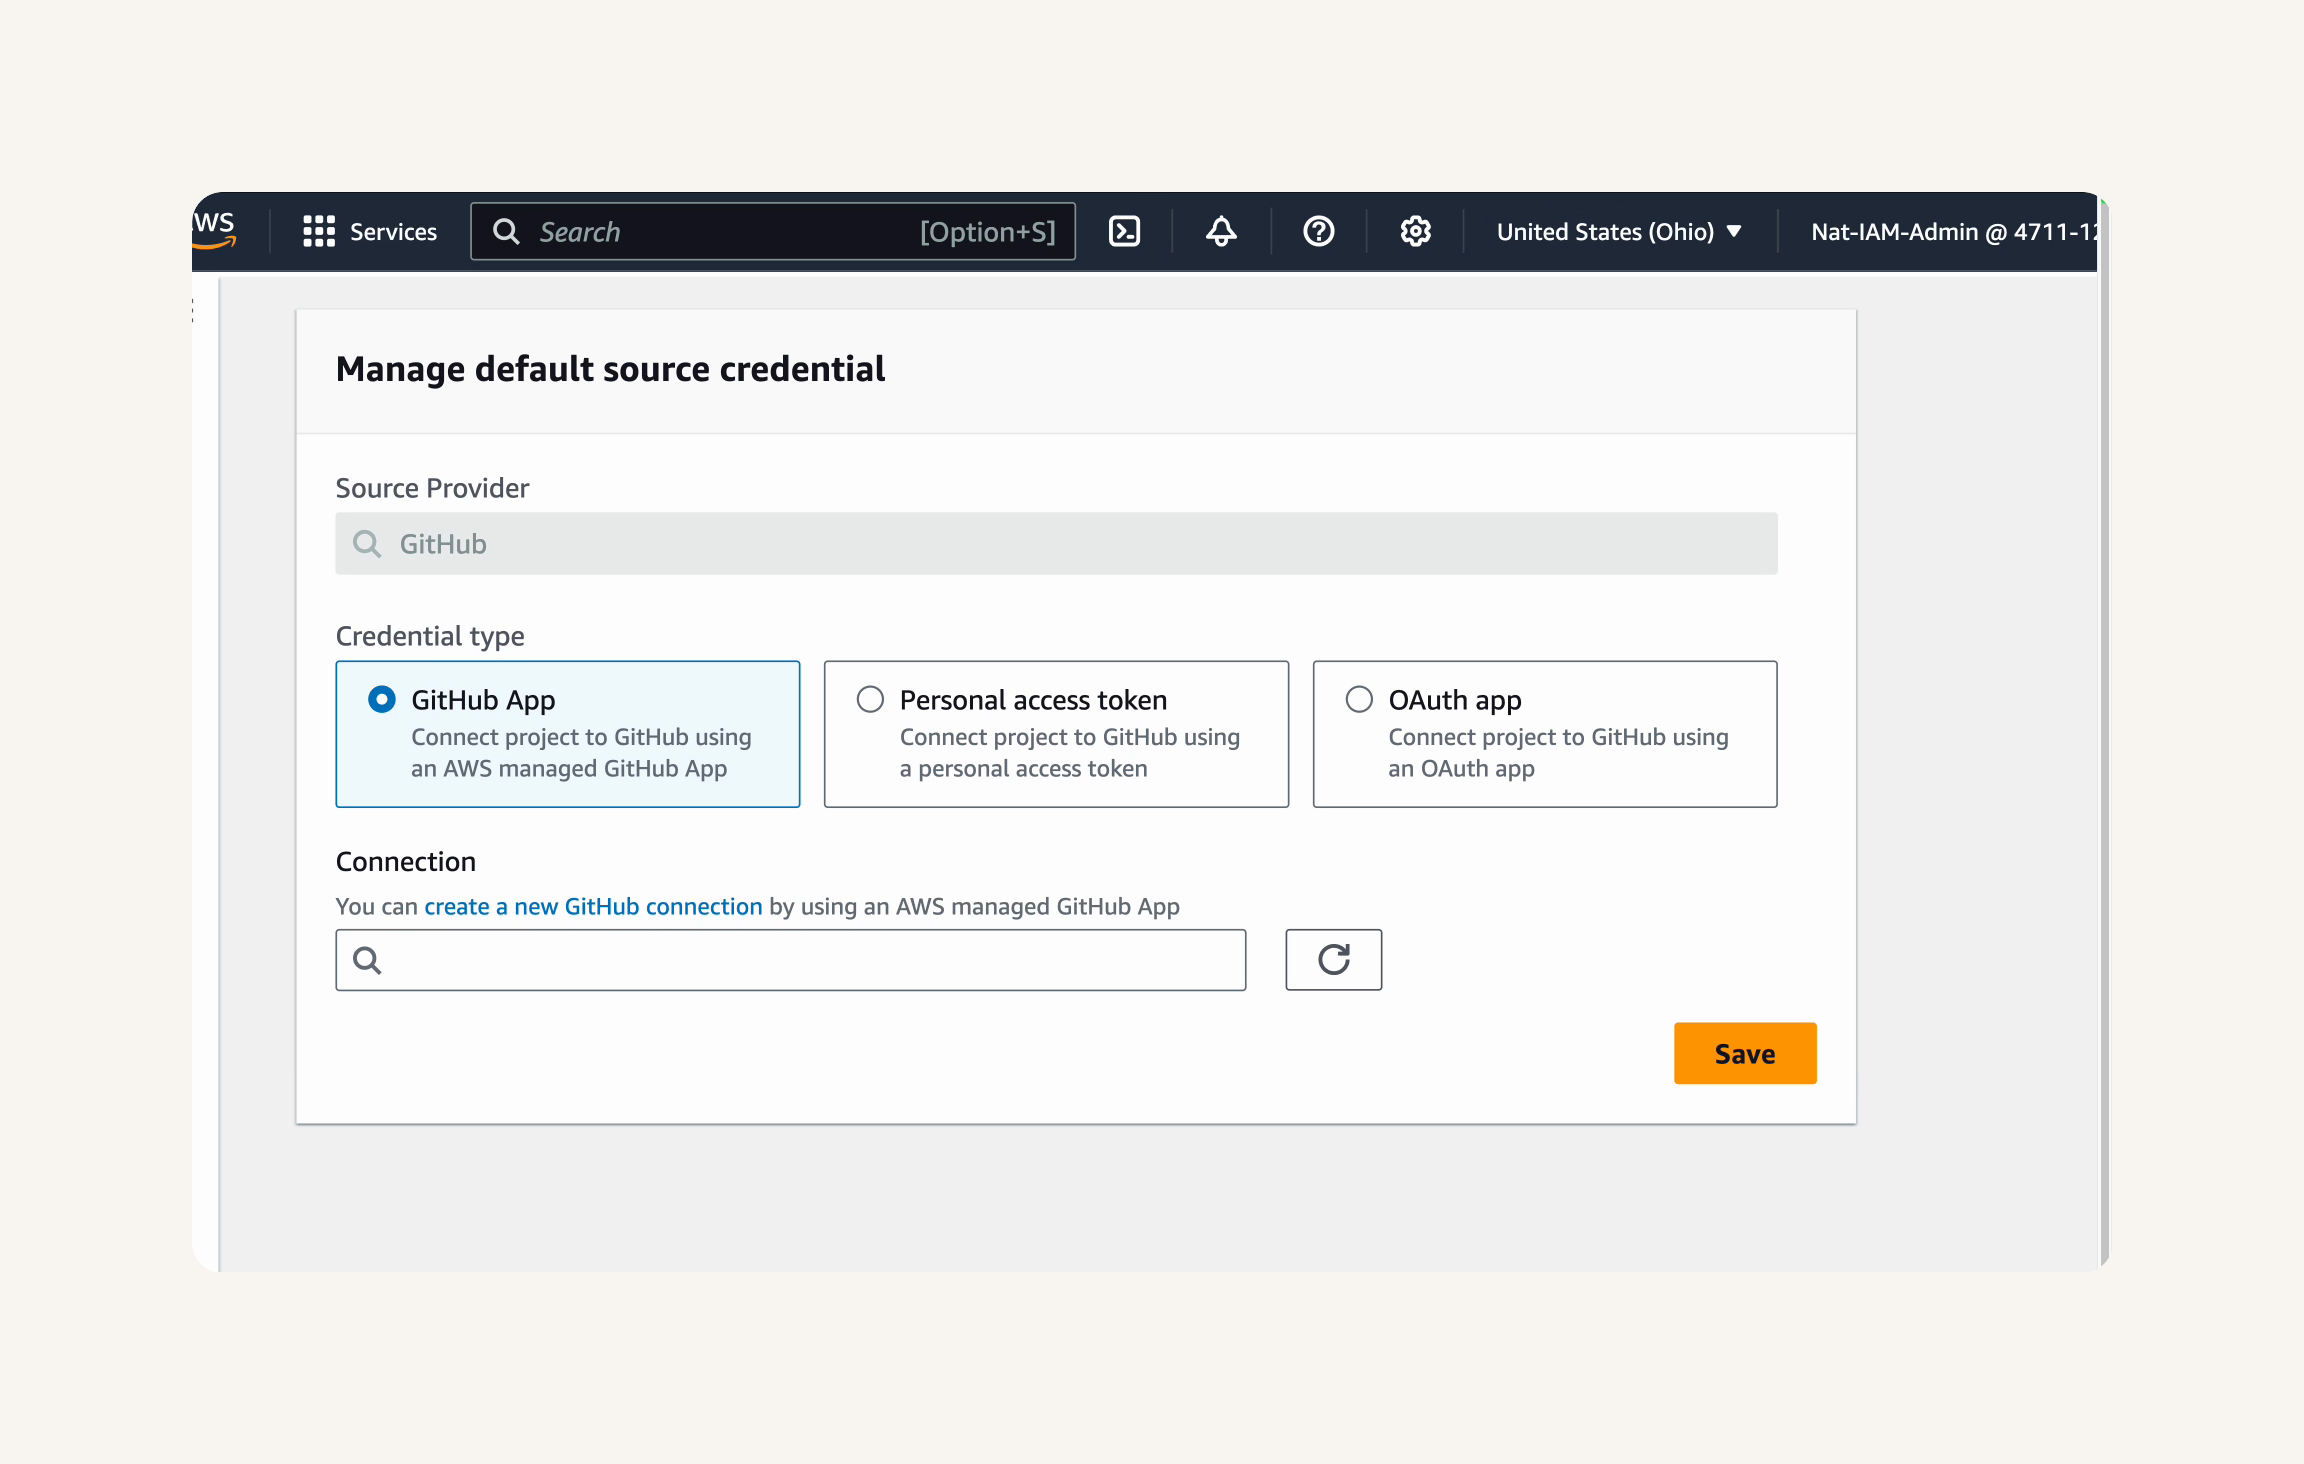
Credential type: GitHub App → create a new GitHub connection → Create connection page → Connection name: nextwork-devops-cicd → Connect to GitHub. →
- You will be taken to GitHub to authorize the AWS Connector for GitHub application, Select your GitHub user account where your repository is located. After authorization on GitHub, you'll get taken back to the AWS console.
GitHub Apps → Github username is there. → connect
You should get redirected back to CodeBuild's Manage default source credential page after successful connection. → save
Back in the Create build project page → Source → you will see "Your account is successfully connected by using an AWS managed GitHub App." message.
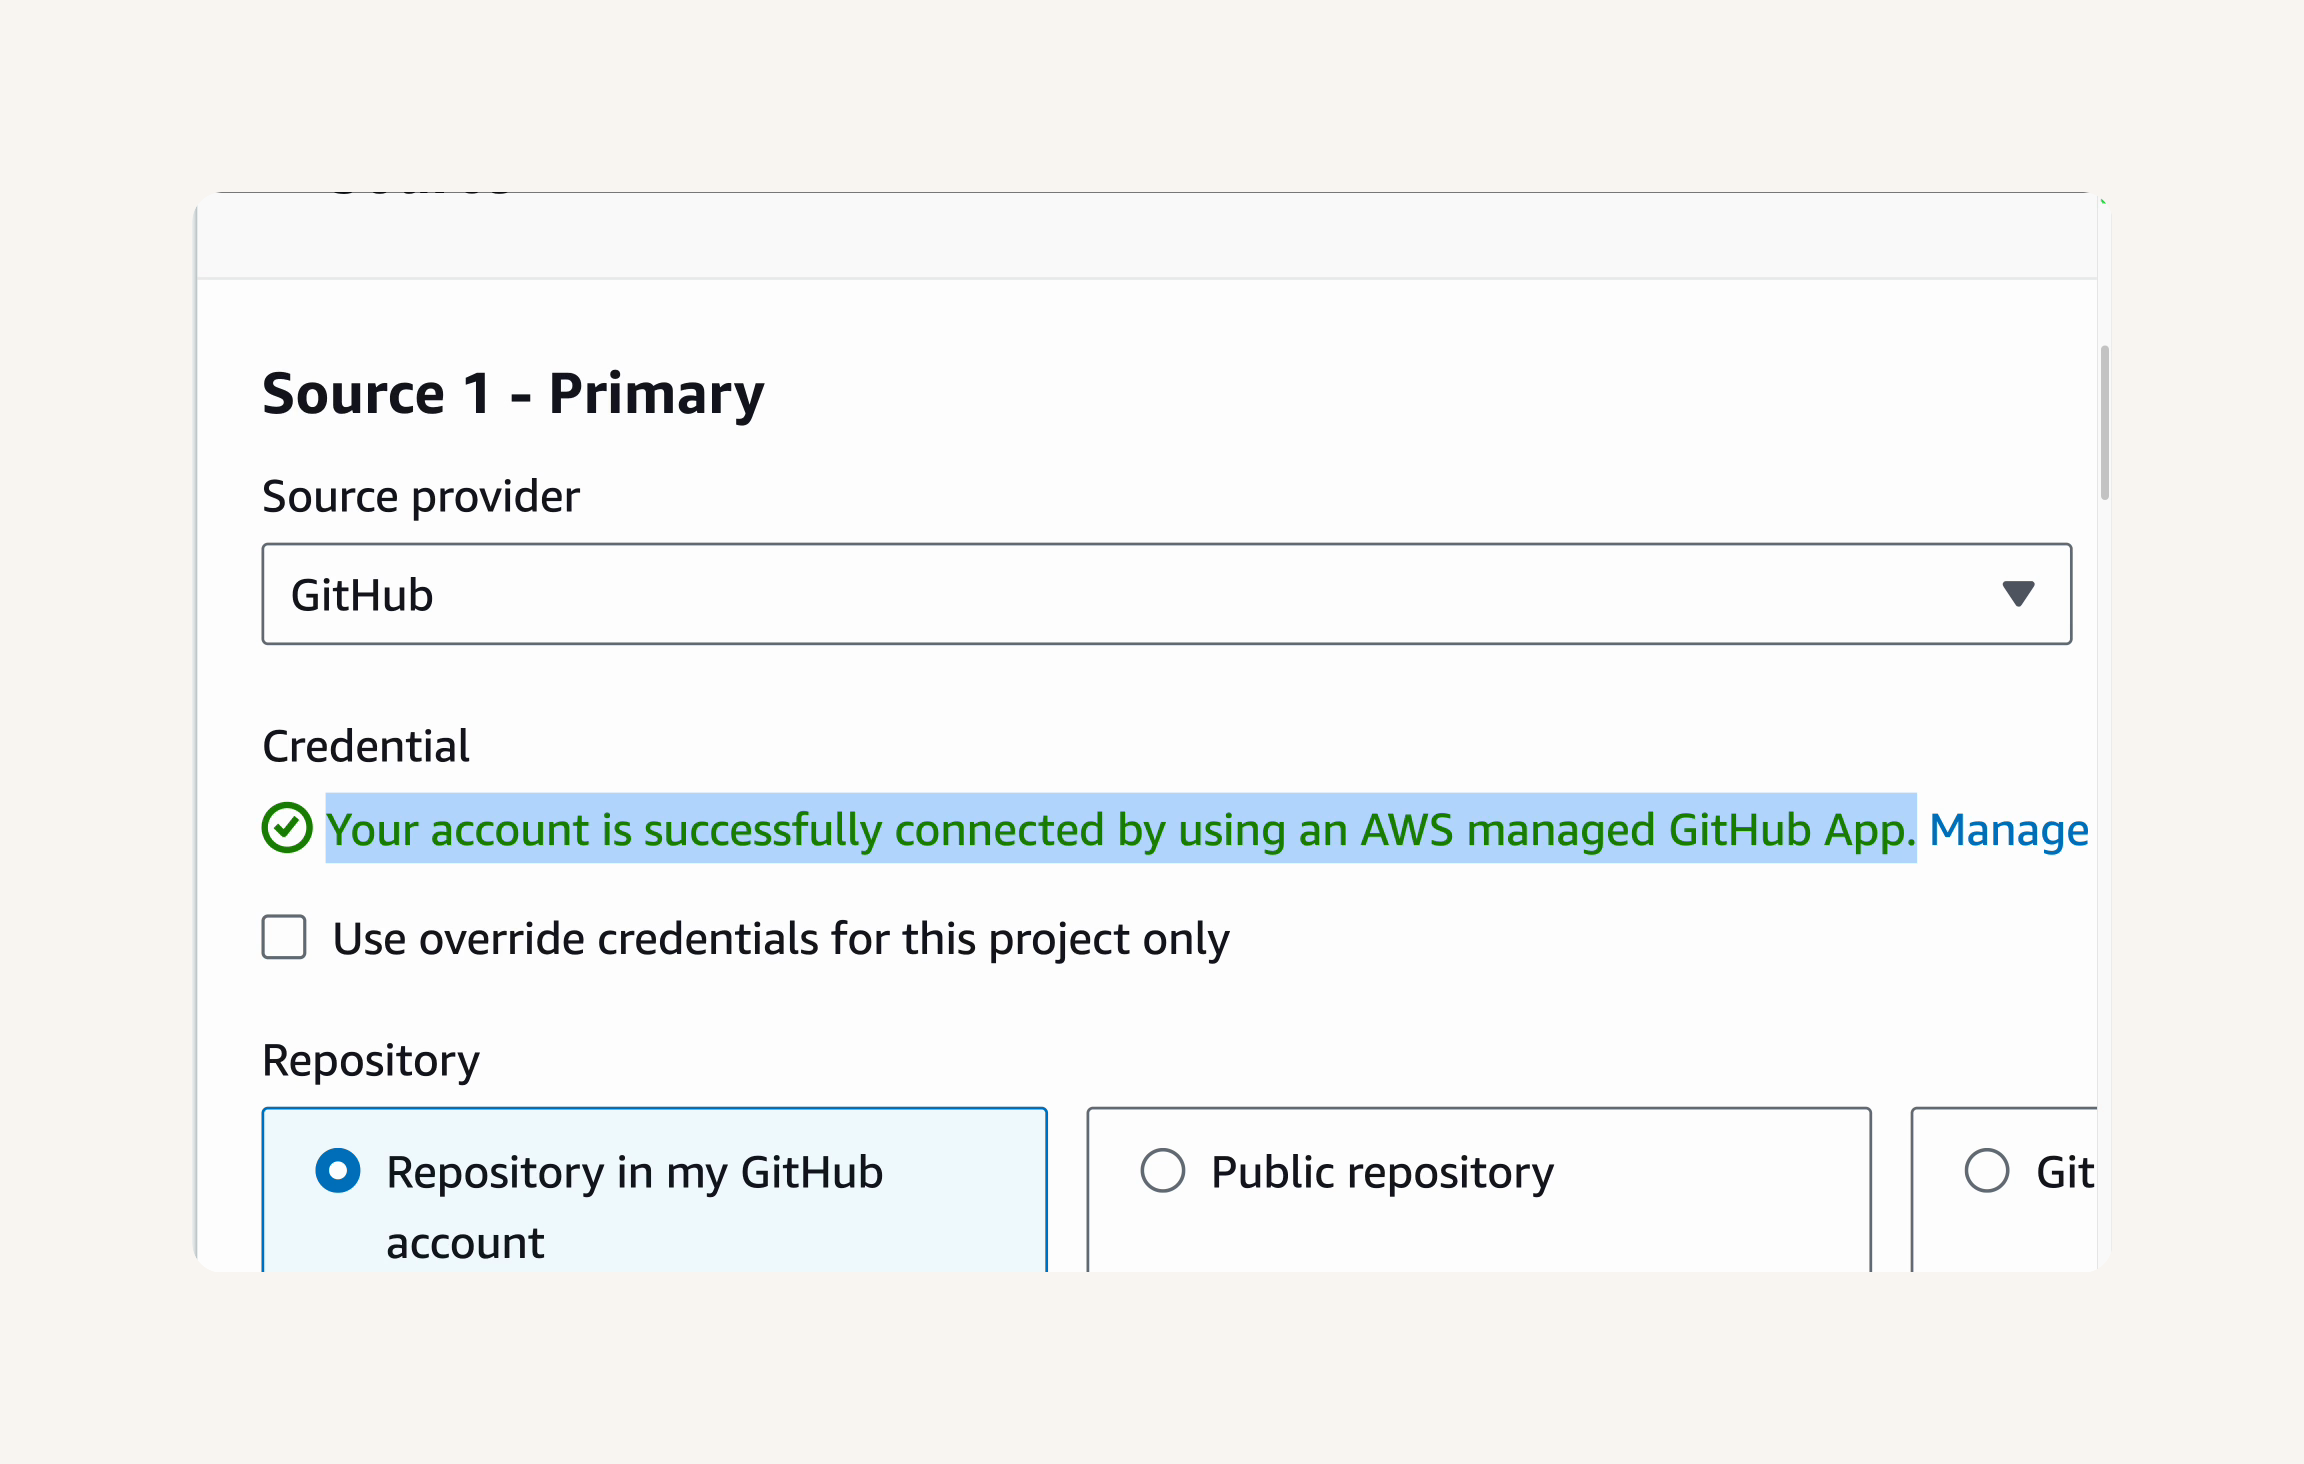
You can now select your GitHub repository nextwork-web-project as the source.
- Configure CodeBuild's environment settings.
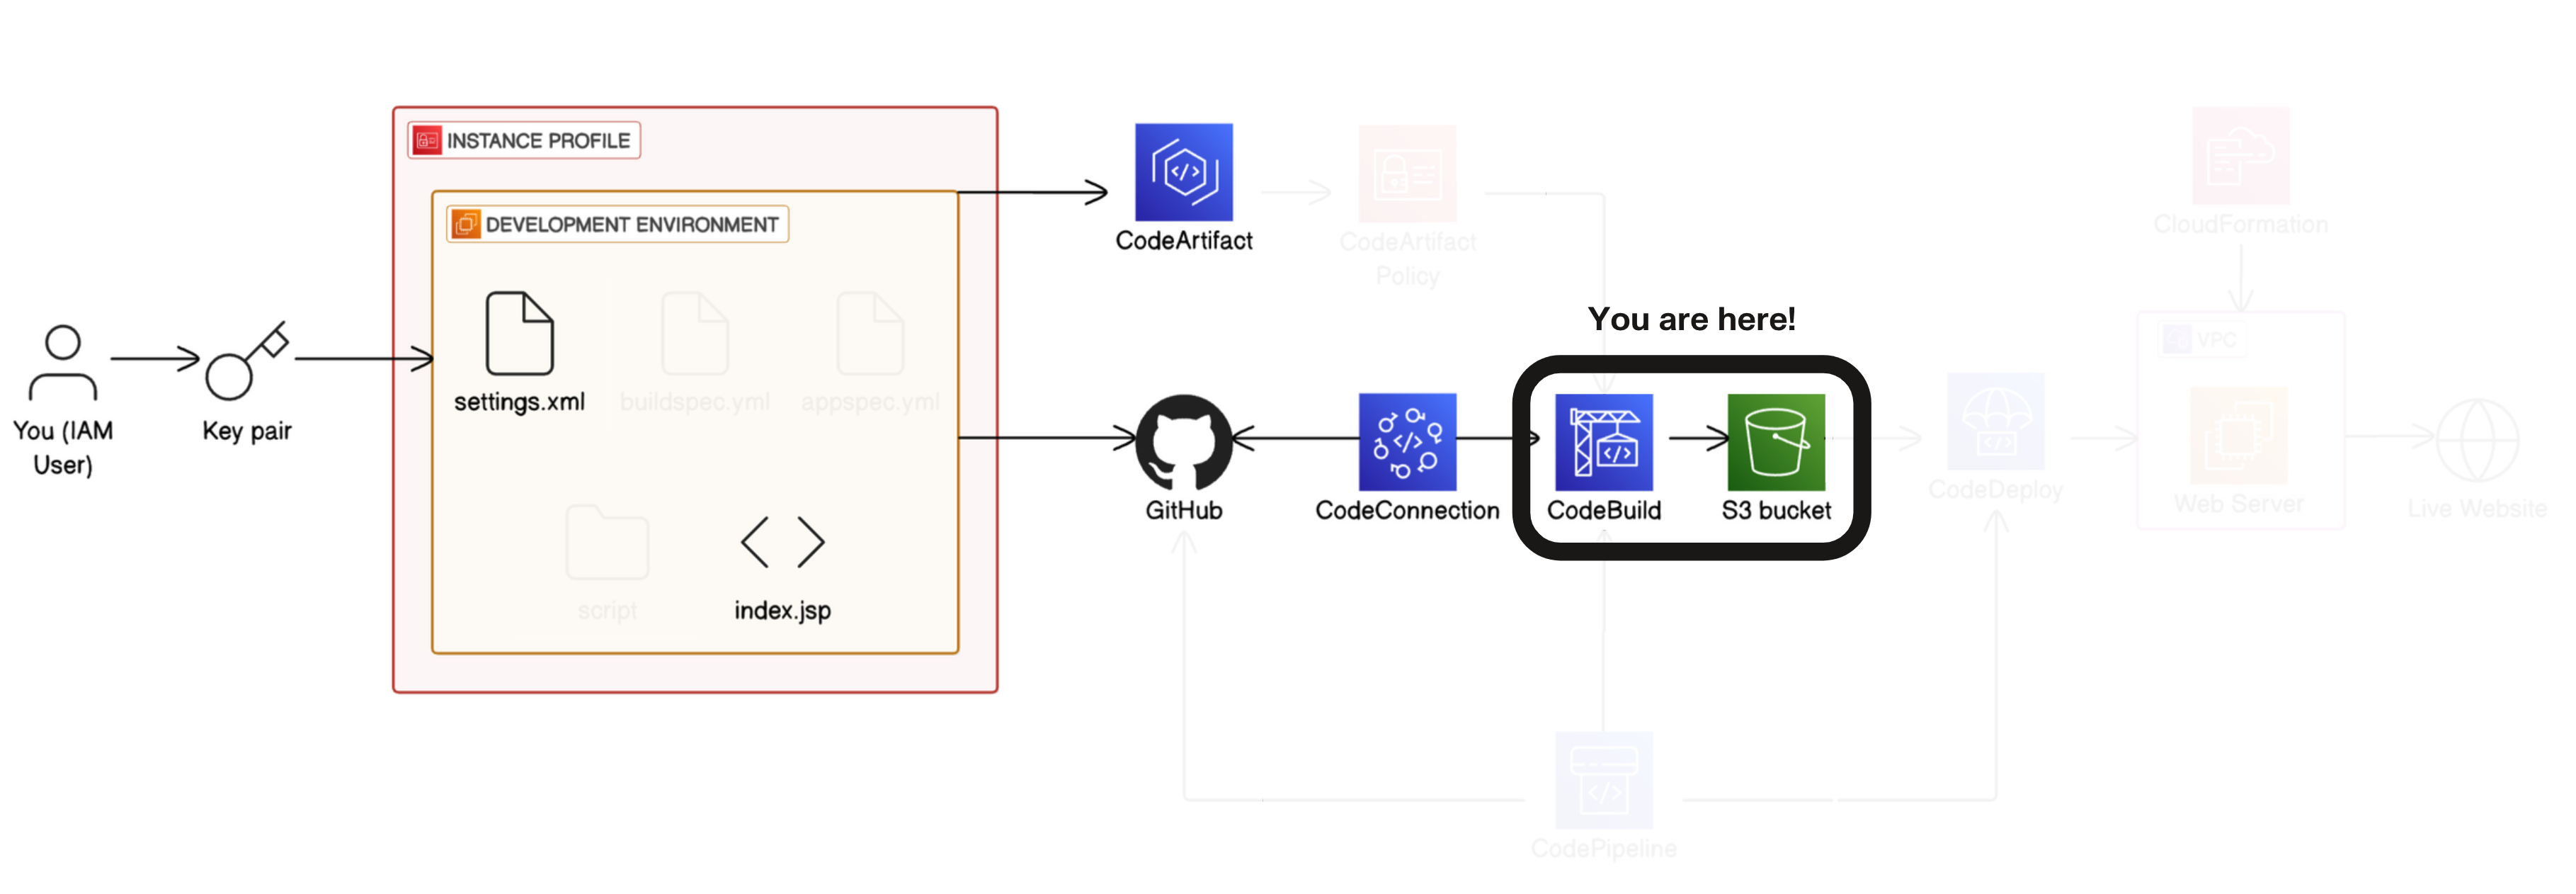
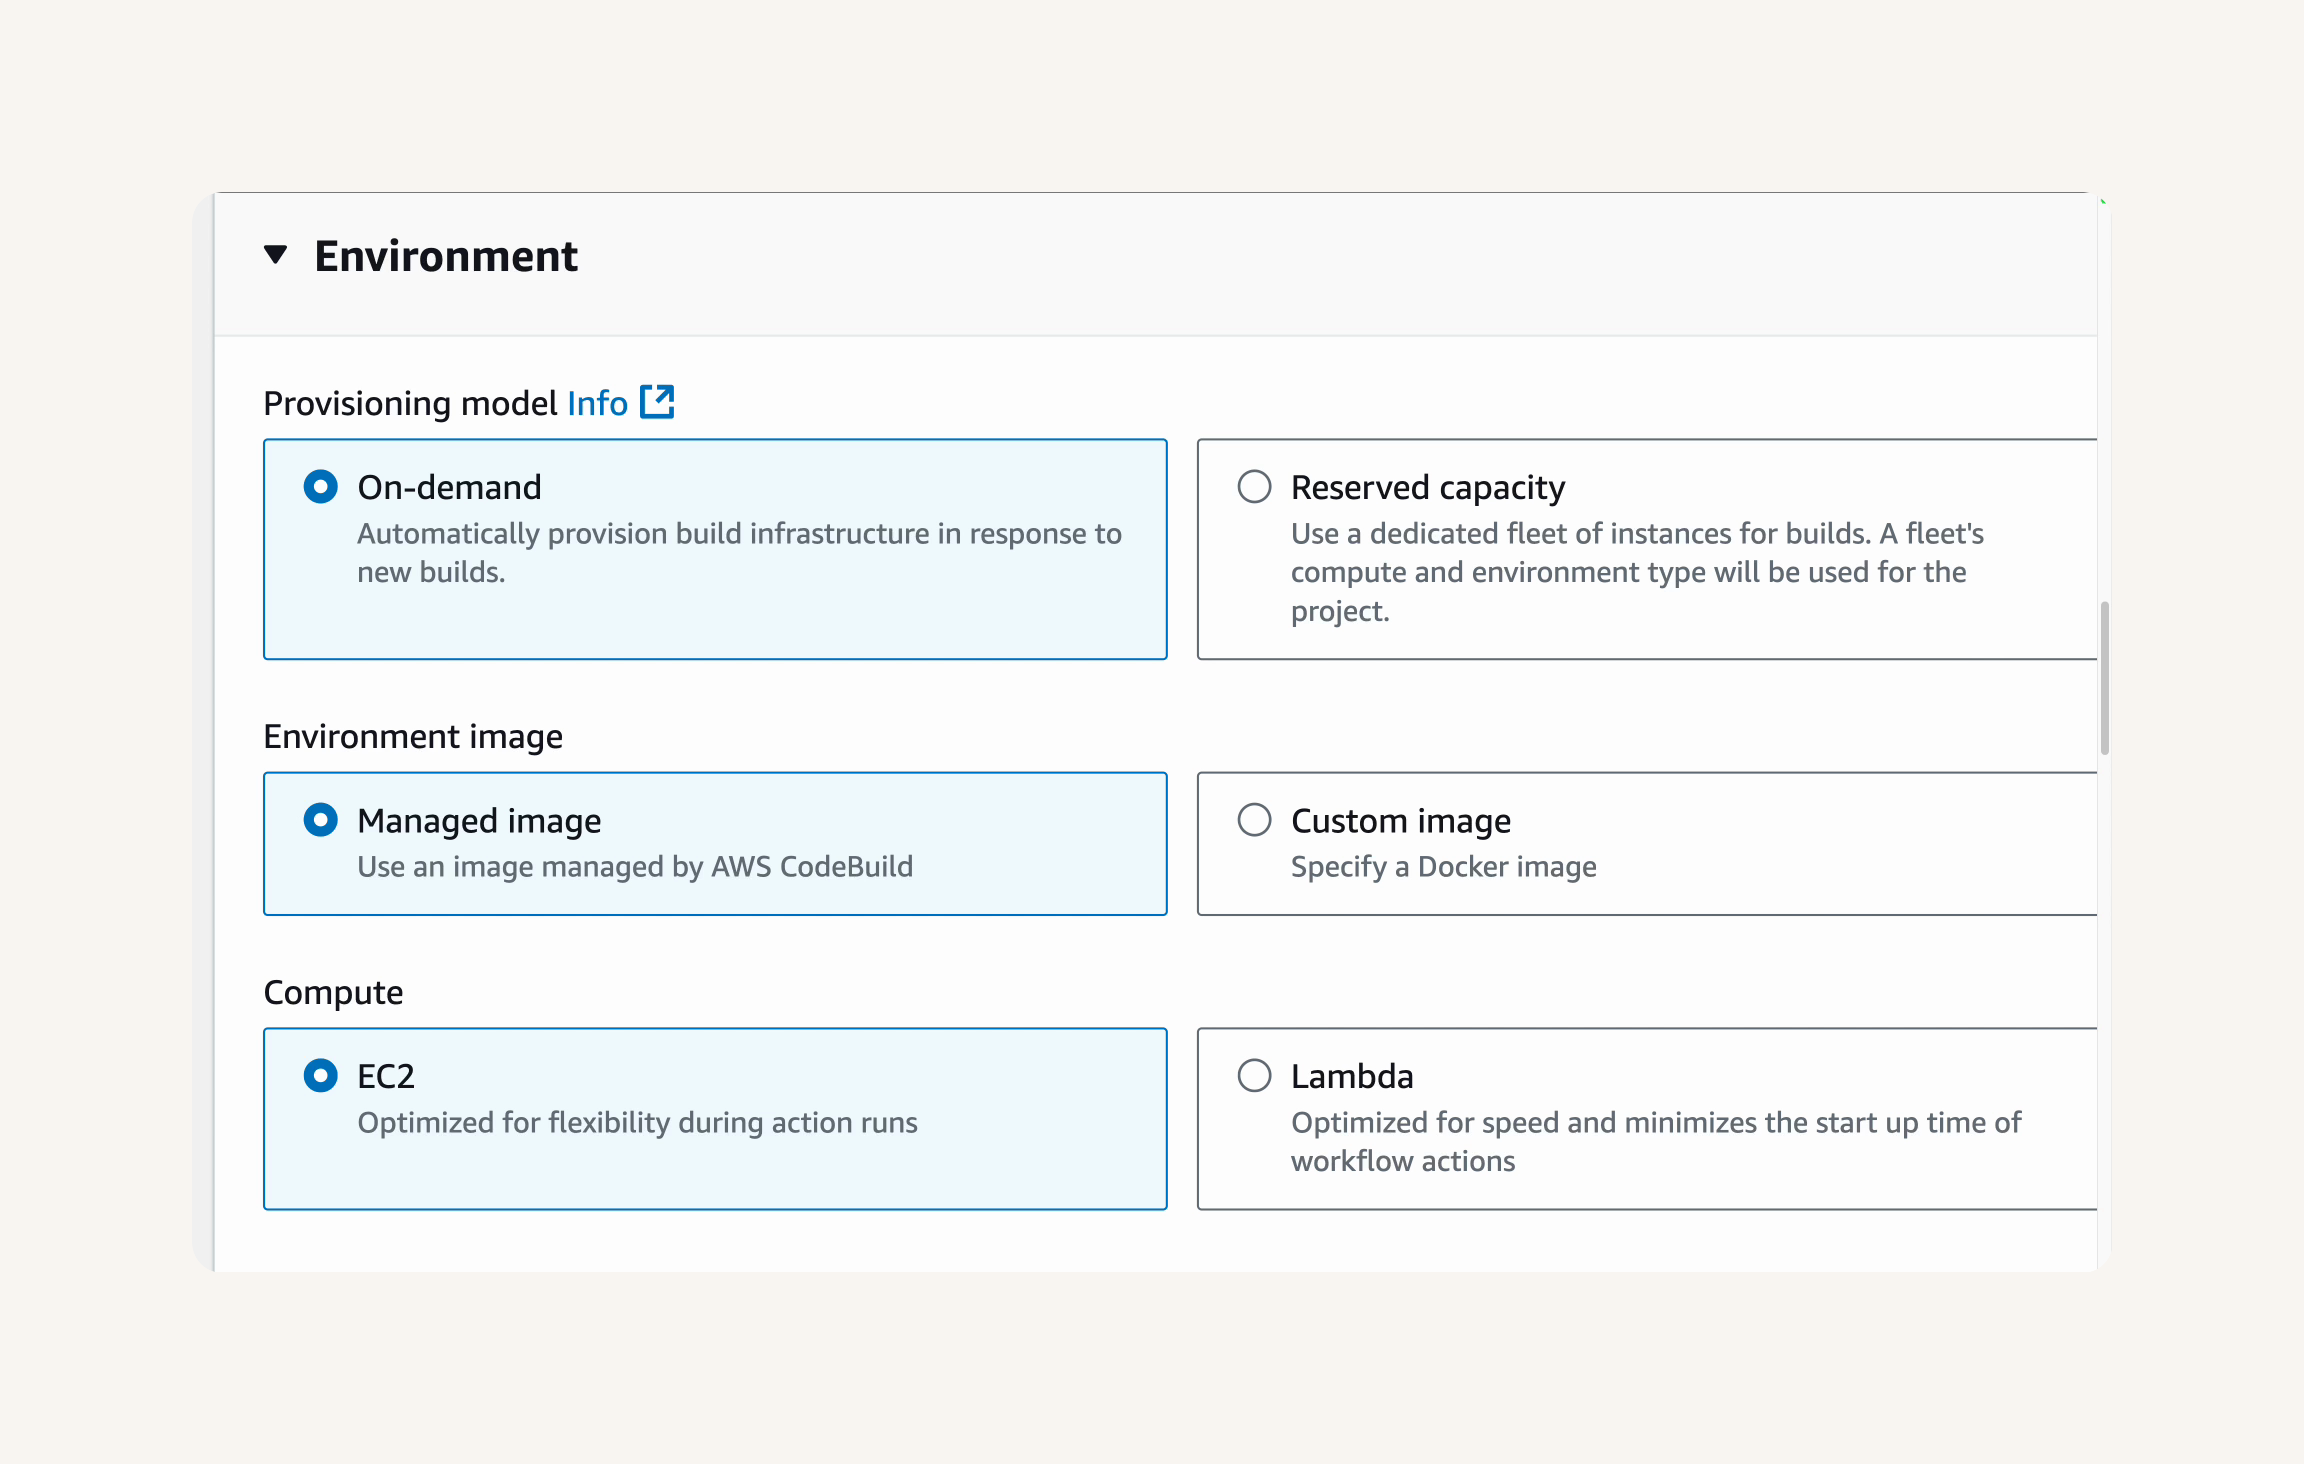
Primary source webhook events → Untick the Webhook checkbox that says "Rebuild every time a code change is pushed to this repository."* Scroll down to the Environment section. → Compute → Provisioning model: On-demand → Environment image: Managed image → compute type: EC2
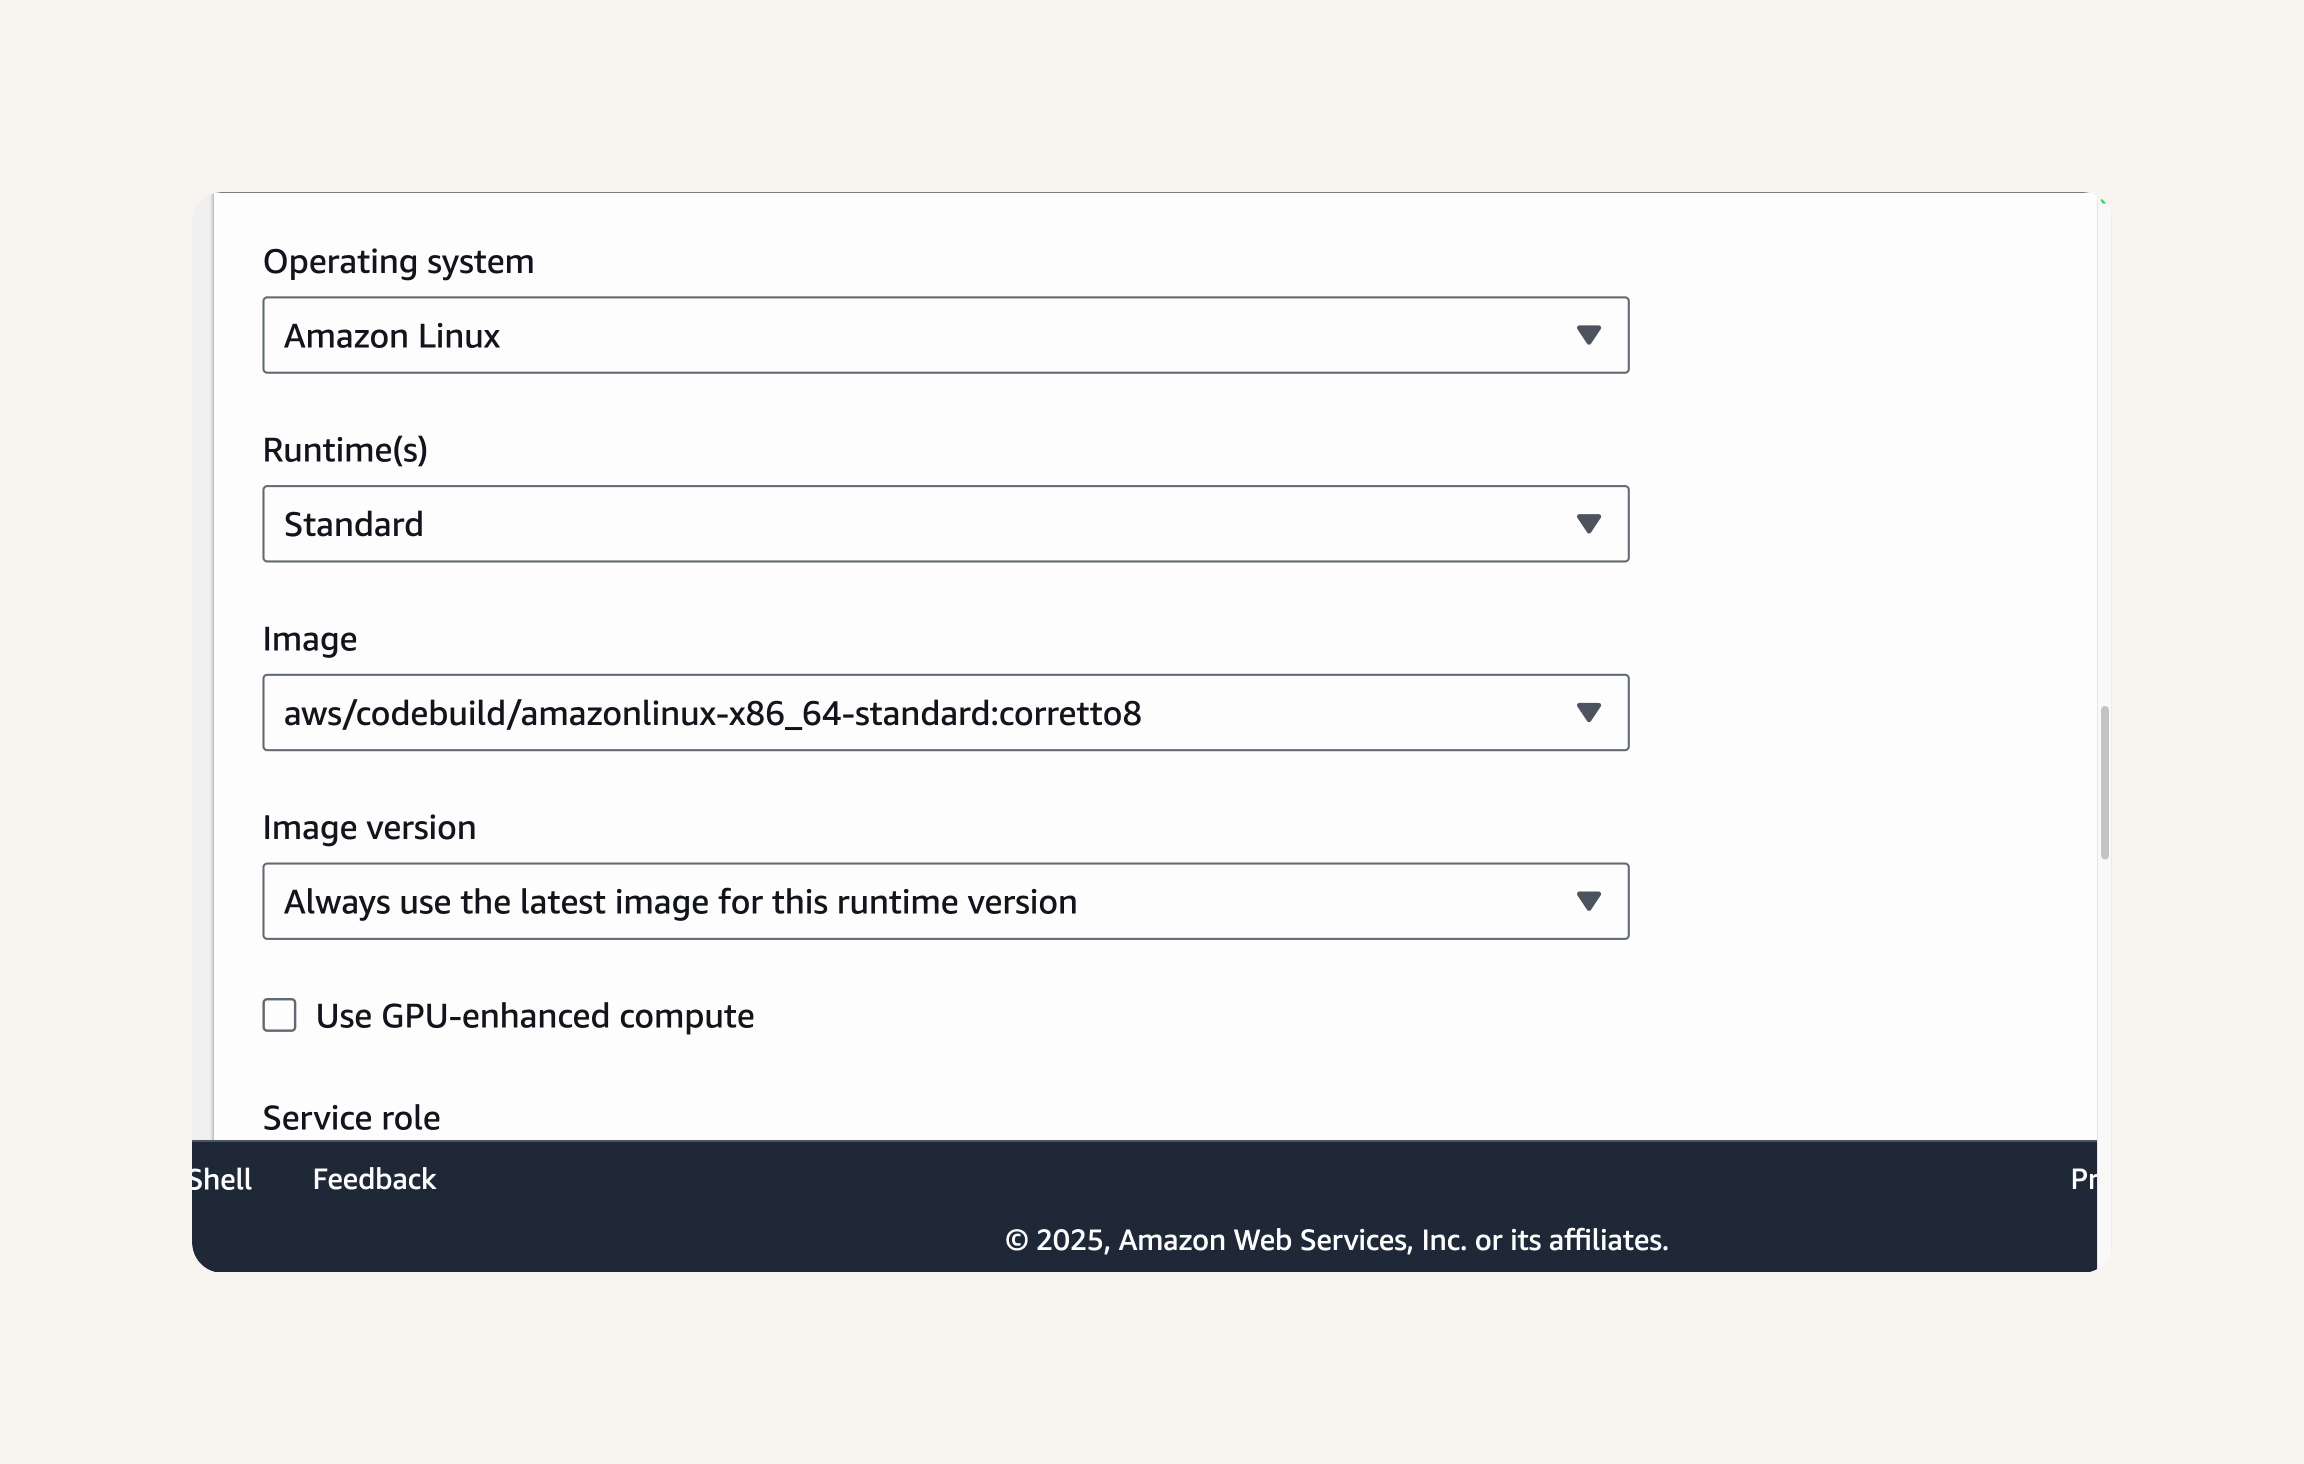
Environment→ Operating system: Amazon Linux → Runtime: standard → Image: aws/codebuild/amazonlinux-x86_64-standard:corretto8 → Image version: Always use the latest image for this runtime version. → Service role:New service role.
4. Define your build process using a buildspec.yml file.
Buildspec section. → Buildspec format: Use a buildspec file. → Buildspec name: buildspec.yml → Configure Build Artifact → Artifact section1 → Type: Amazon S3
- Let's head to the S3 console. In the AWS Management Console search bar, type S3 and select S3 from the dropdown menu under Services.
Note: Make sure you're still in the same region where you set up the CodeBuild build project.
Create a s3 bucket.
Buckets→ Create bucket. → General configuration → Bucket name: nextwork-devops-cicd→ Create bucket
Refresh the build project page in your browser → In your CodeBuild project, head back to the Artifacts section. → For Type: Amazon S3. → Bucket name: choose your newly created bucket nextwork-devops-cicd from the dropdown. → Name: nextwork-devops-cicd-artifact → Artifacts packaging: zip

Configure CloudWatch Logs:
Logs section → Make sure CloudWatch logs is checked → Group name: /aws/codebuild/nextwork-devops-cicd → Create build project
Navigate to your newly created CodeBuild project nextwork-devops-cicd.
Click the Start build button.
You will be redirected to the build execution page.
You should see the build status change to In progress.
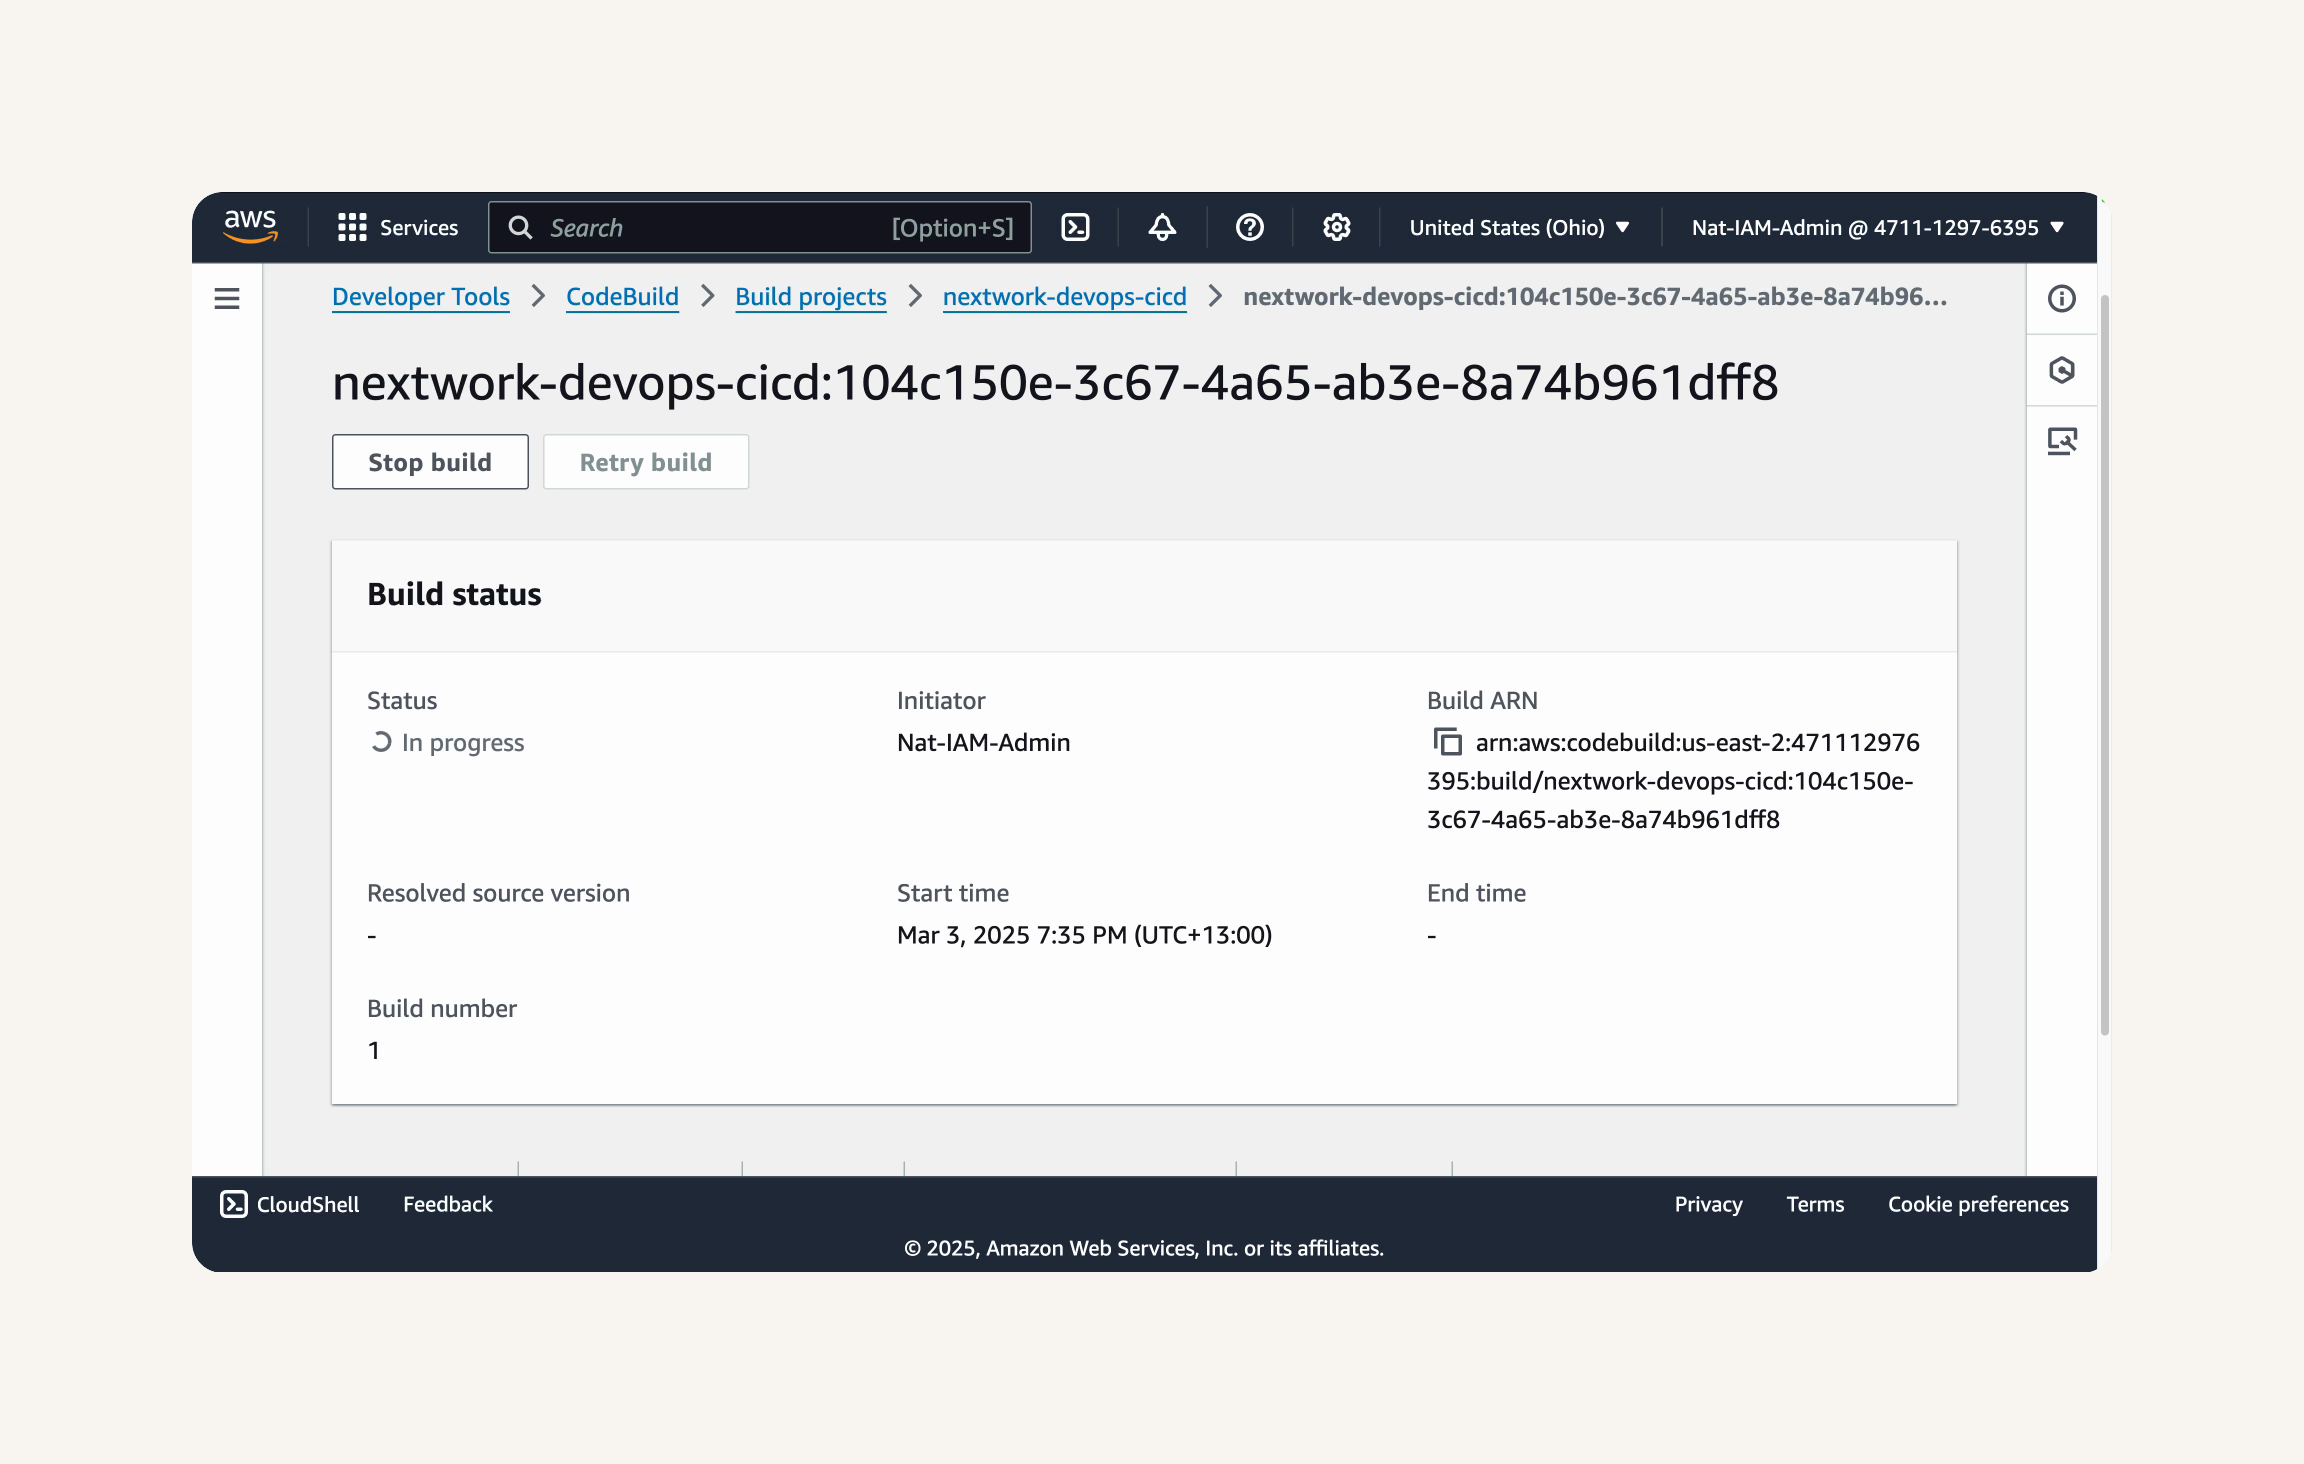
Wait for the build to complete.
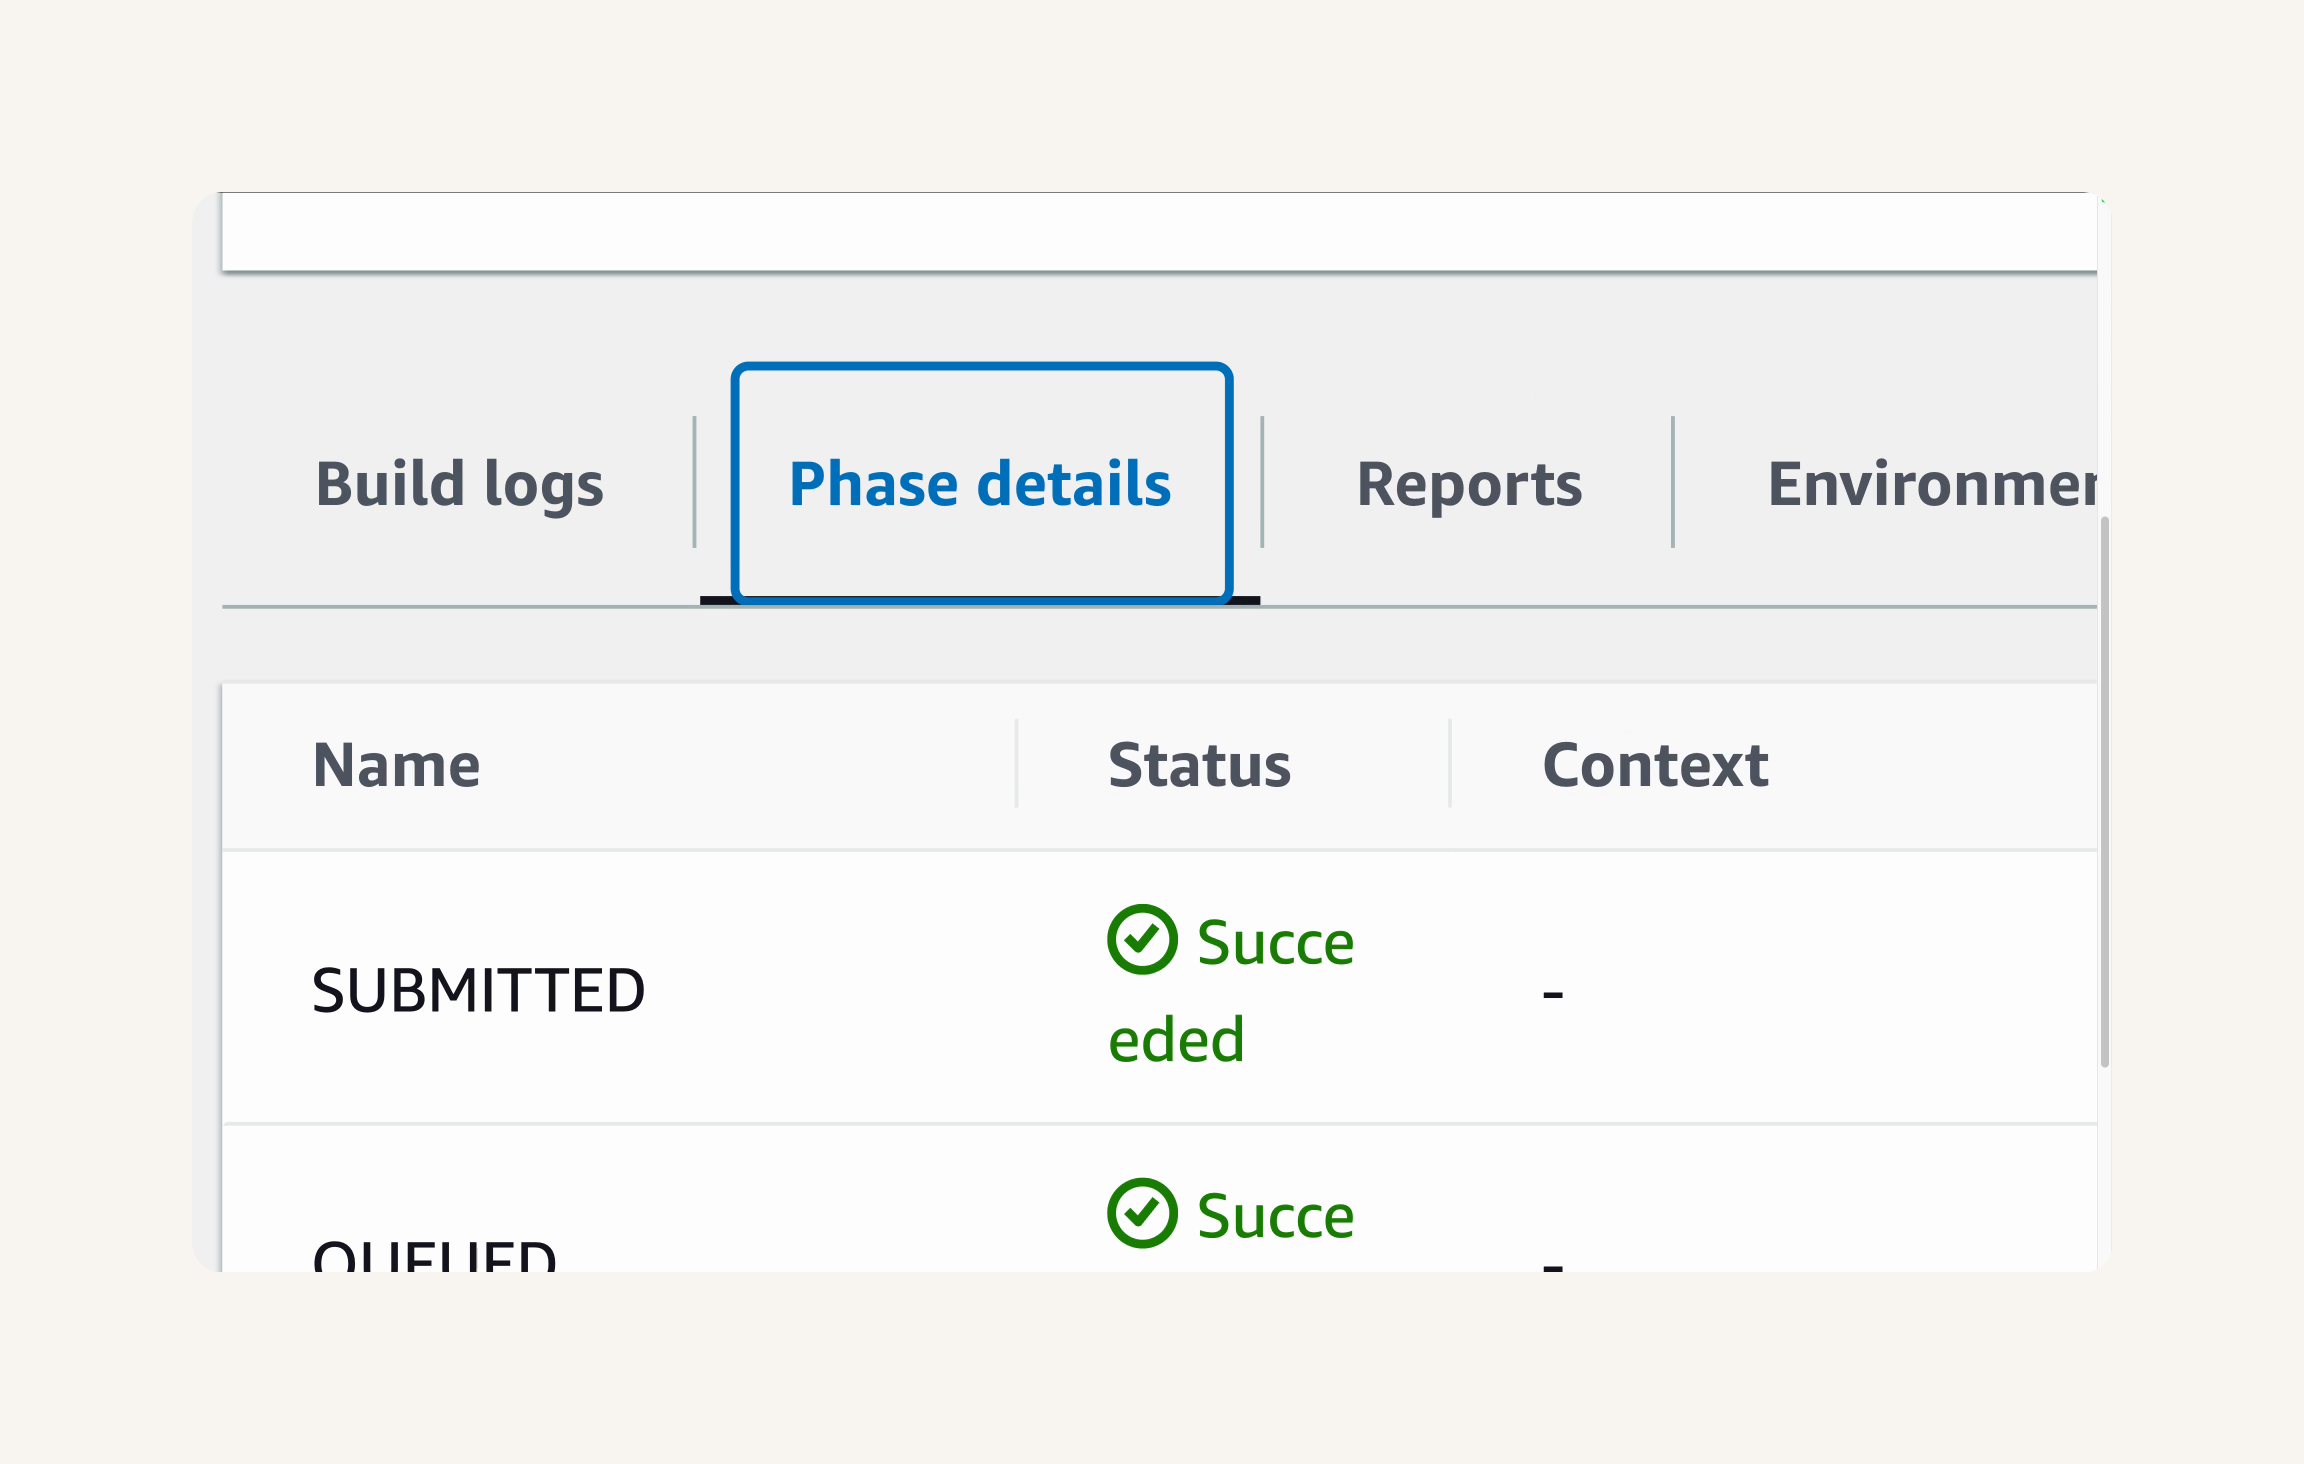
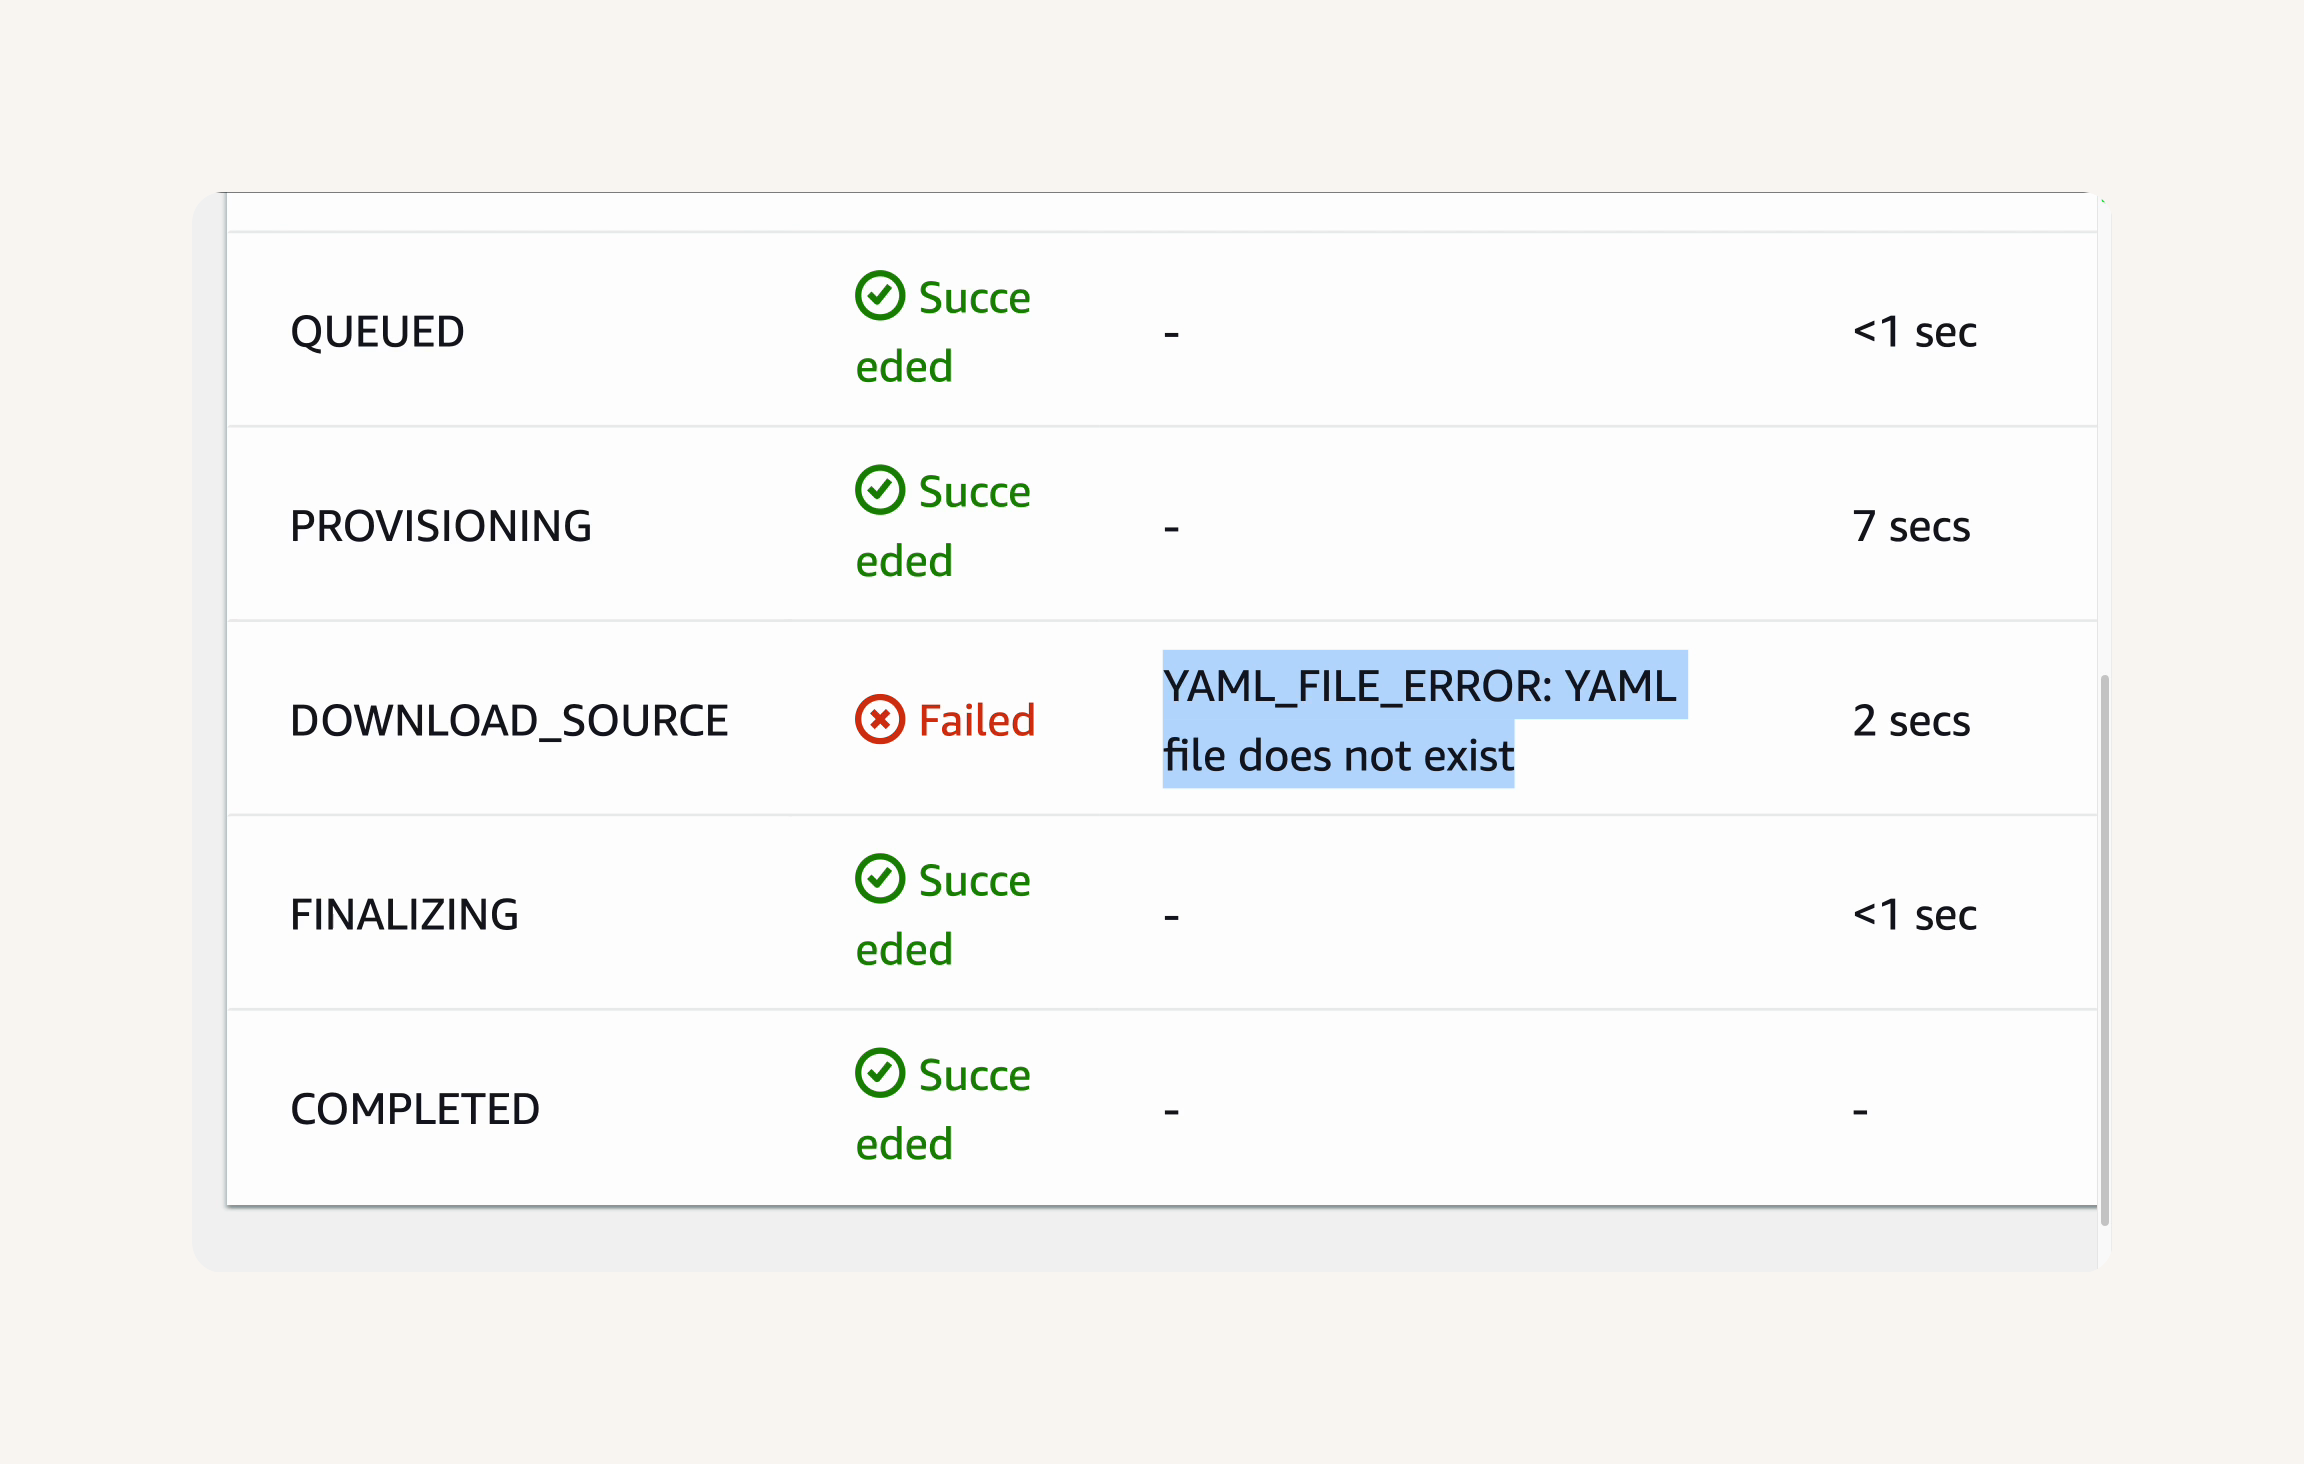
Select the Phase details tab to understand the failure.
Failure 1: YAML_FILE_ERROR:
DOWNLOAD_SOURCE phase has failed with the error message YAML_FILE_ERROR: YAML file does not exist
Click on the Build details tab.
Scroll down to the Buildspec section.
Let's make sure that it says Using the buildspec.yml in the source code root directory
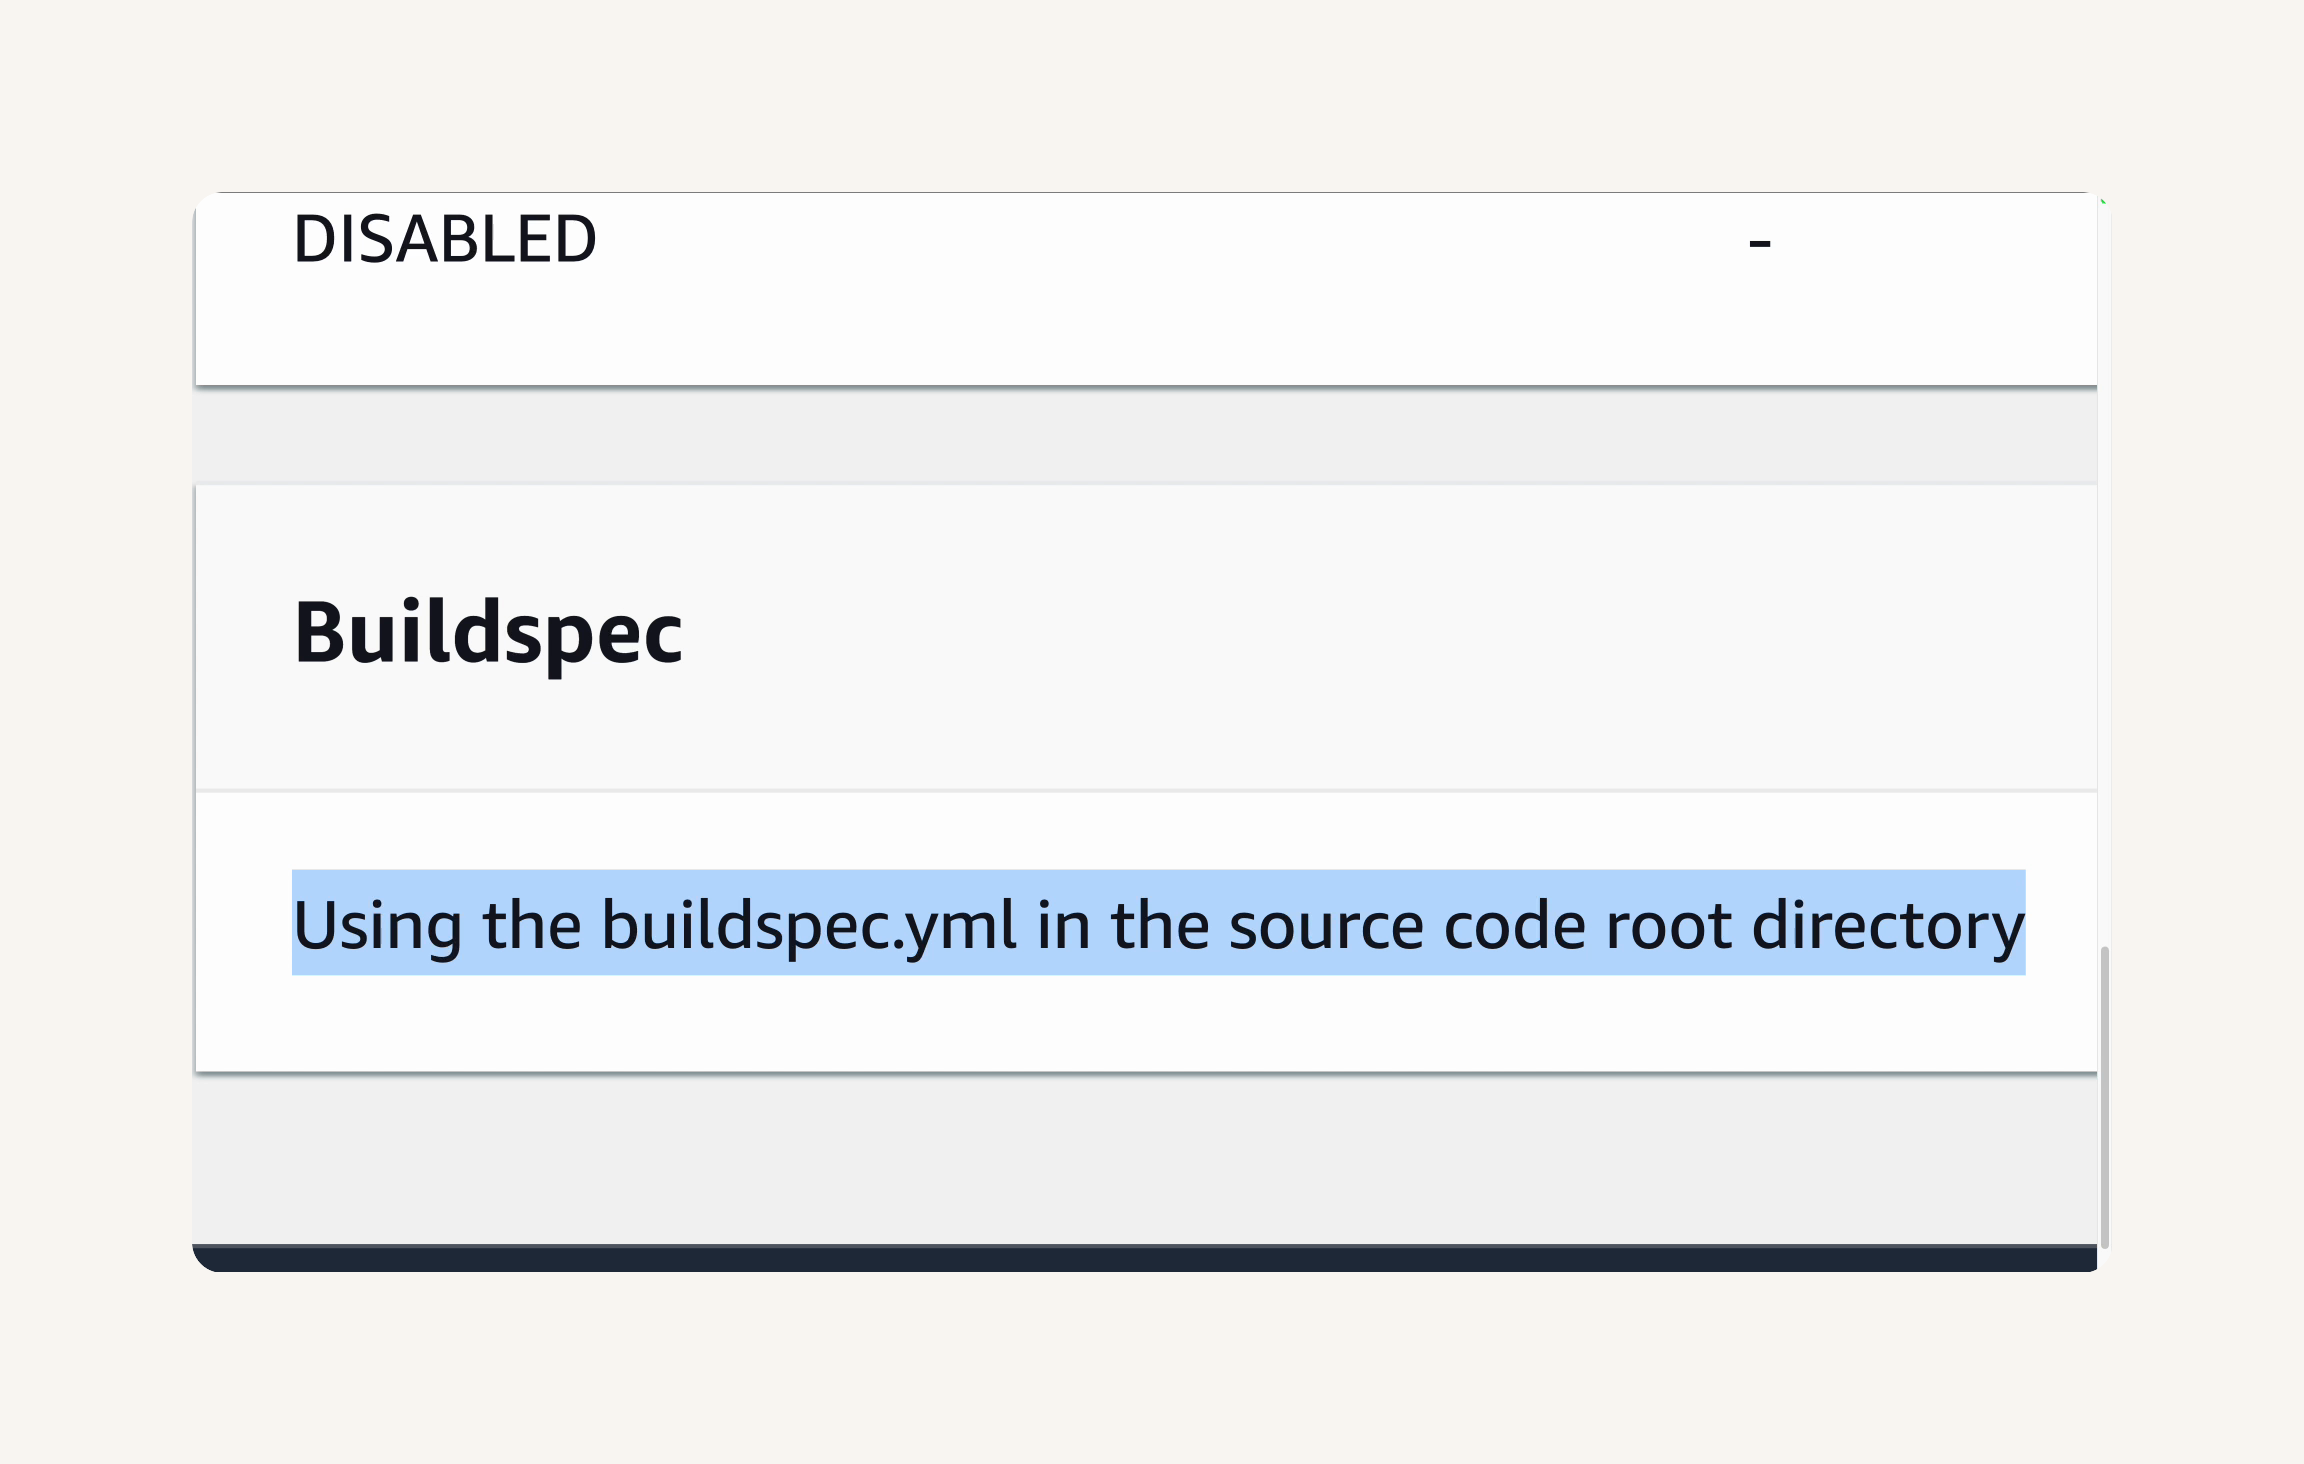
This confirms that CodeBuild is looking for buildspec.yml in the root directory of our web app's nextwork-web-project code repository... we haven't created that file yet.
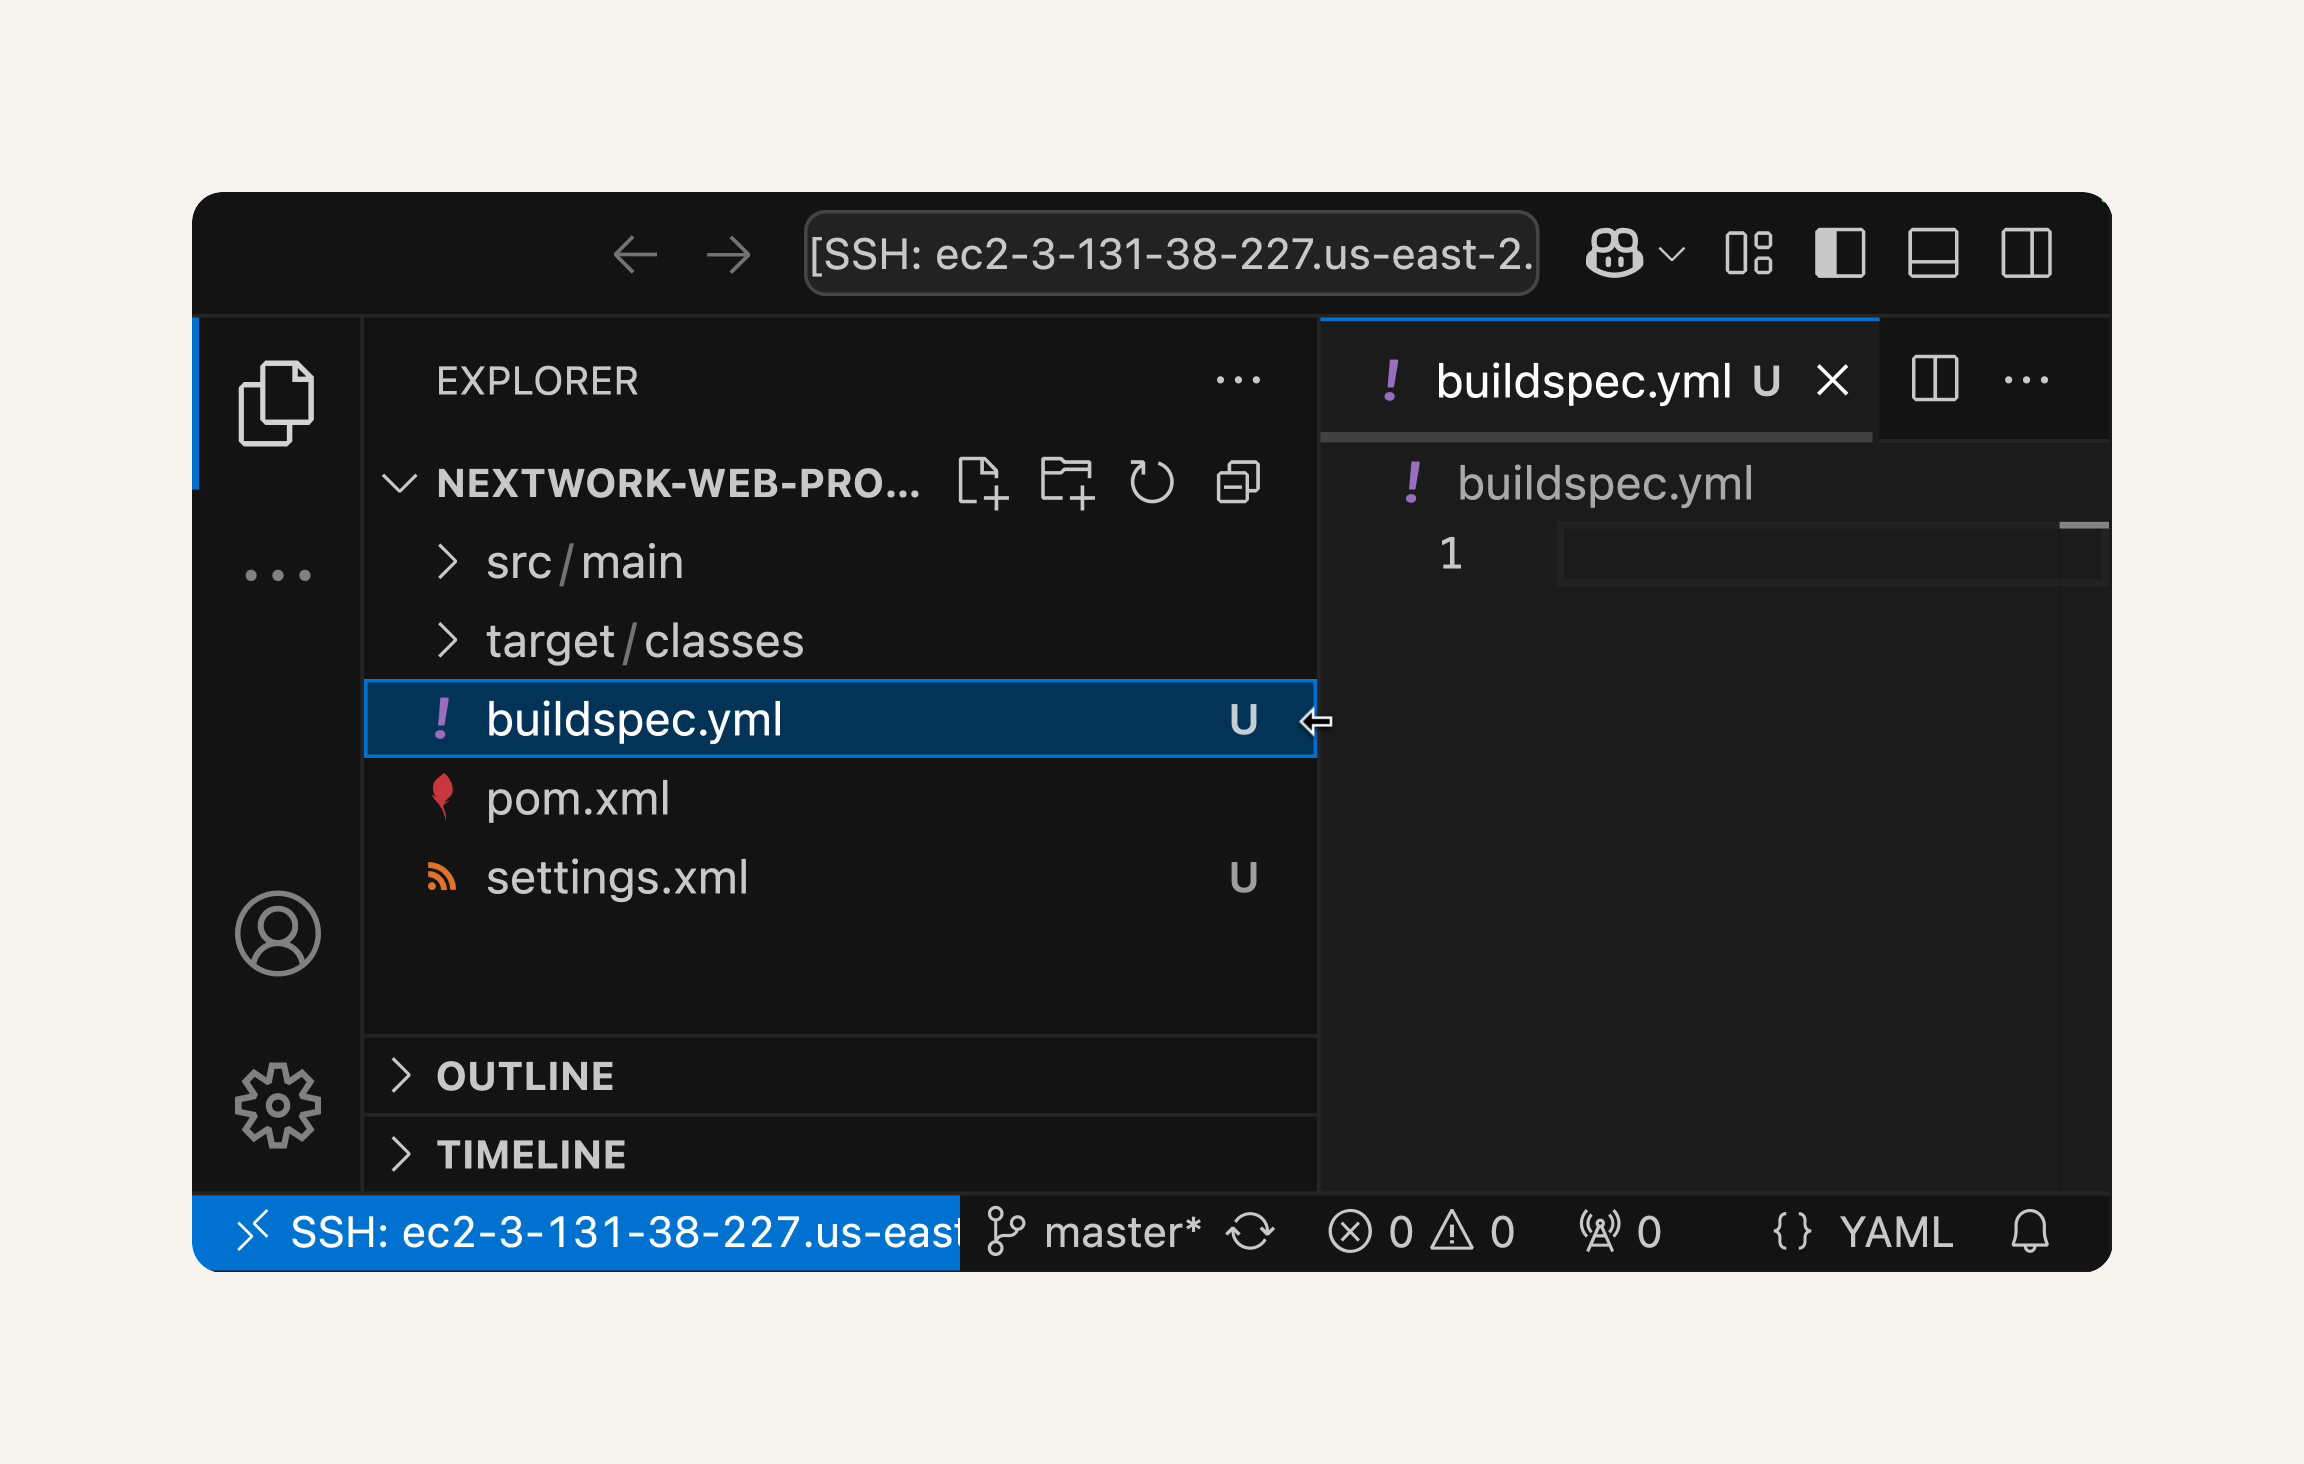
let's check our GitHub repository. Select the Repository link in your CodeBuild project. there's no buildspec.yml file. It should be in the root of your web app repository.
Open VS code → Open your nextwork-web-project folder → create a new file on the project root (nextwork-web-project). - Create and Enter buildspec.yml as the file name.
version: 0.2

phases:
  install:
    runtime-versions:
      java: corretto8
  pre_build:
    commands:
      - echo Initializing environment
      - export CODEARTIFACT_AUTH_TOKEN=`aws codeartifact get-authorization-token --domain nextwork --domain-owner 123456789012 --region us-east-2 --query authorizationToken --output text`

  build:
    commands:
      - echo Build started on `date`
      - mvn -s settings.xml compile
  post_build:
    commands:
      - echo Build completed on `date`
      - mvn -s settings.xml package
artifacts:
  files:
    - target/nextwork-web-project.war
  discard-paths: no
In the buildspec.yml file:
Replace the placeholder AWS Account ID with your actual AWS Account ID.
Check that the region code is correct! Update the region section from --region us-east-2 to the AWS region you're using.→ Save the buildspec.yml file
we need to commit and push the buildspec.yml file to your GitHub repository so CodeBuild can access it.
Open the terminal in VS Code (Ctrl+or Cmd+).
Run the following Git commands:
  git add .
  git commit -m "Adding buildspec.yml file"
  git push
Seeing errors when pushing your code?
Try resetting your Git credentials, and starting over again! Run these commands in your terminal:
git config --global --unset credential.helper
git config --local --unset credential.helper
git remote set-url origin https://<YOUR_GITHUB_USERNAME>@github.com/<YOUR_GITHUB_USERNAME>/<YOUR_REPOSITORY_NAME>.gitMake sure to replace <YOUR_GITHUB_USERNAME> with your GitHub username and <YOUR_REPOSITORY_NAME> with your repository name.
Make sure to replace <YOUR_GITHUB_USERNAME> with your GitHub username and <YOUR_REPOSITORY_NAME> with your repository name.
Then try git push again and enter your GitHub PAT when prompted for the password.
Go to your GitHub repository nextwork-web-project in your browser and refresh the page to verify that buildspec.yml is now present in the repository.
Retry your build
Return to the CodeBuild console in your browser.
Retry the build by clicking the Retry build button.
Failure 2: CLIENT ERROR:
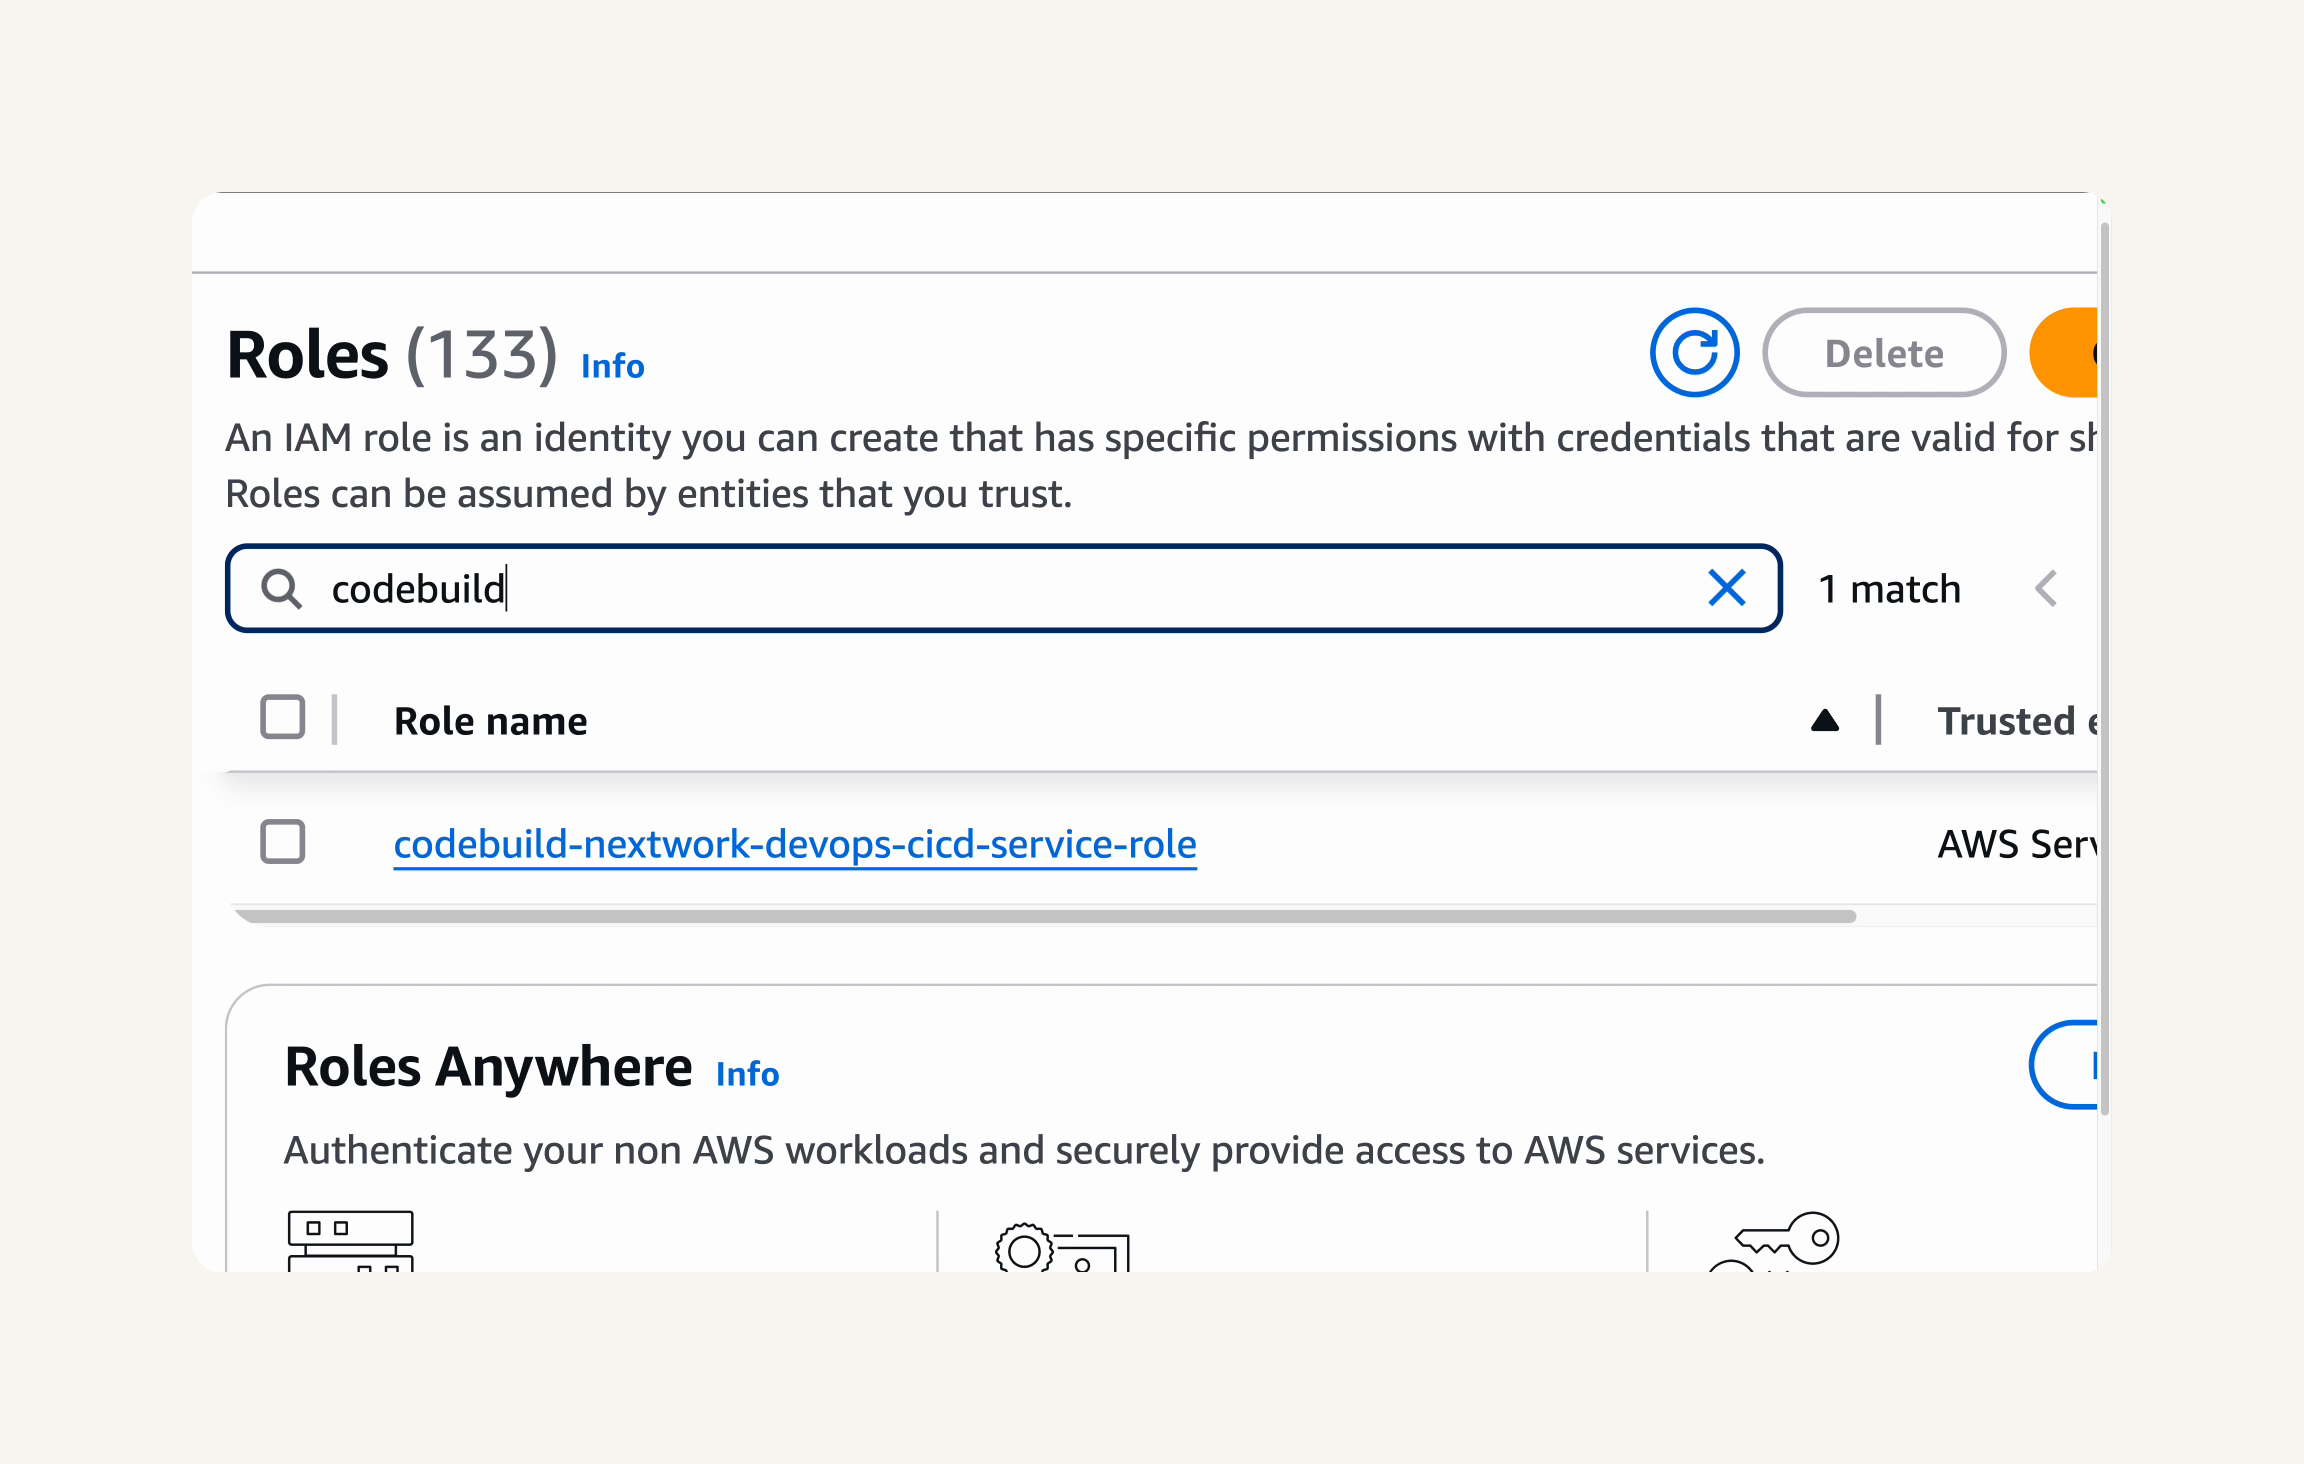
Phase details → To fix this, we need to grant CodeBuild's IAM role the permission to access CodeArtifact.

IAM Console → roles → In the roles search bar, type codebuild to filter the roles.→ Select the role that starts with codebuild-nextwork-devops-cicd-service-role -
Select your CodeBuild service role. → Click on the Add permissions button. → Choose Attach policies.
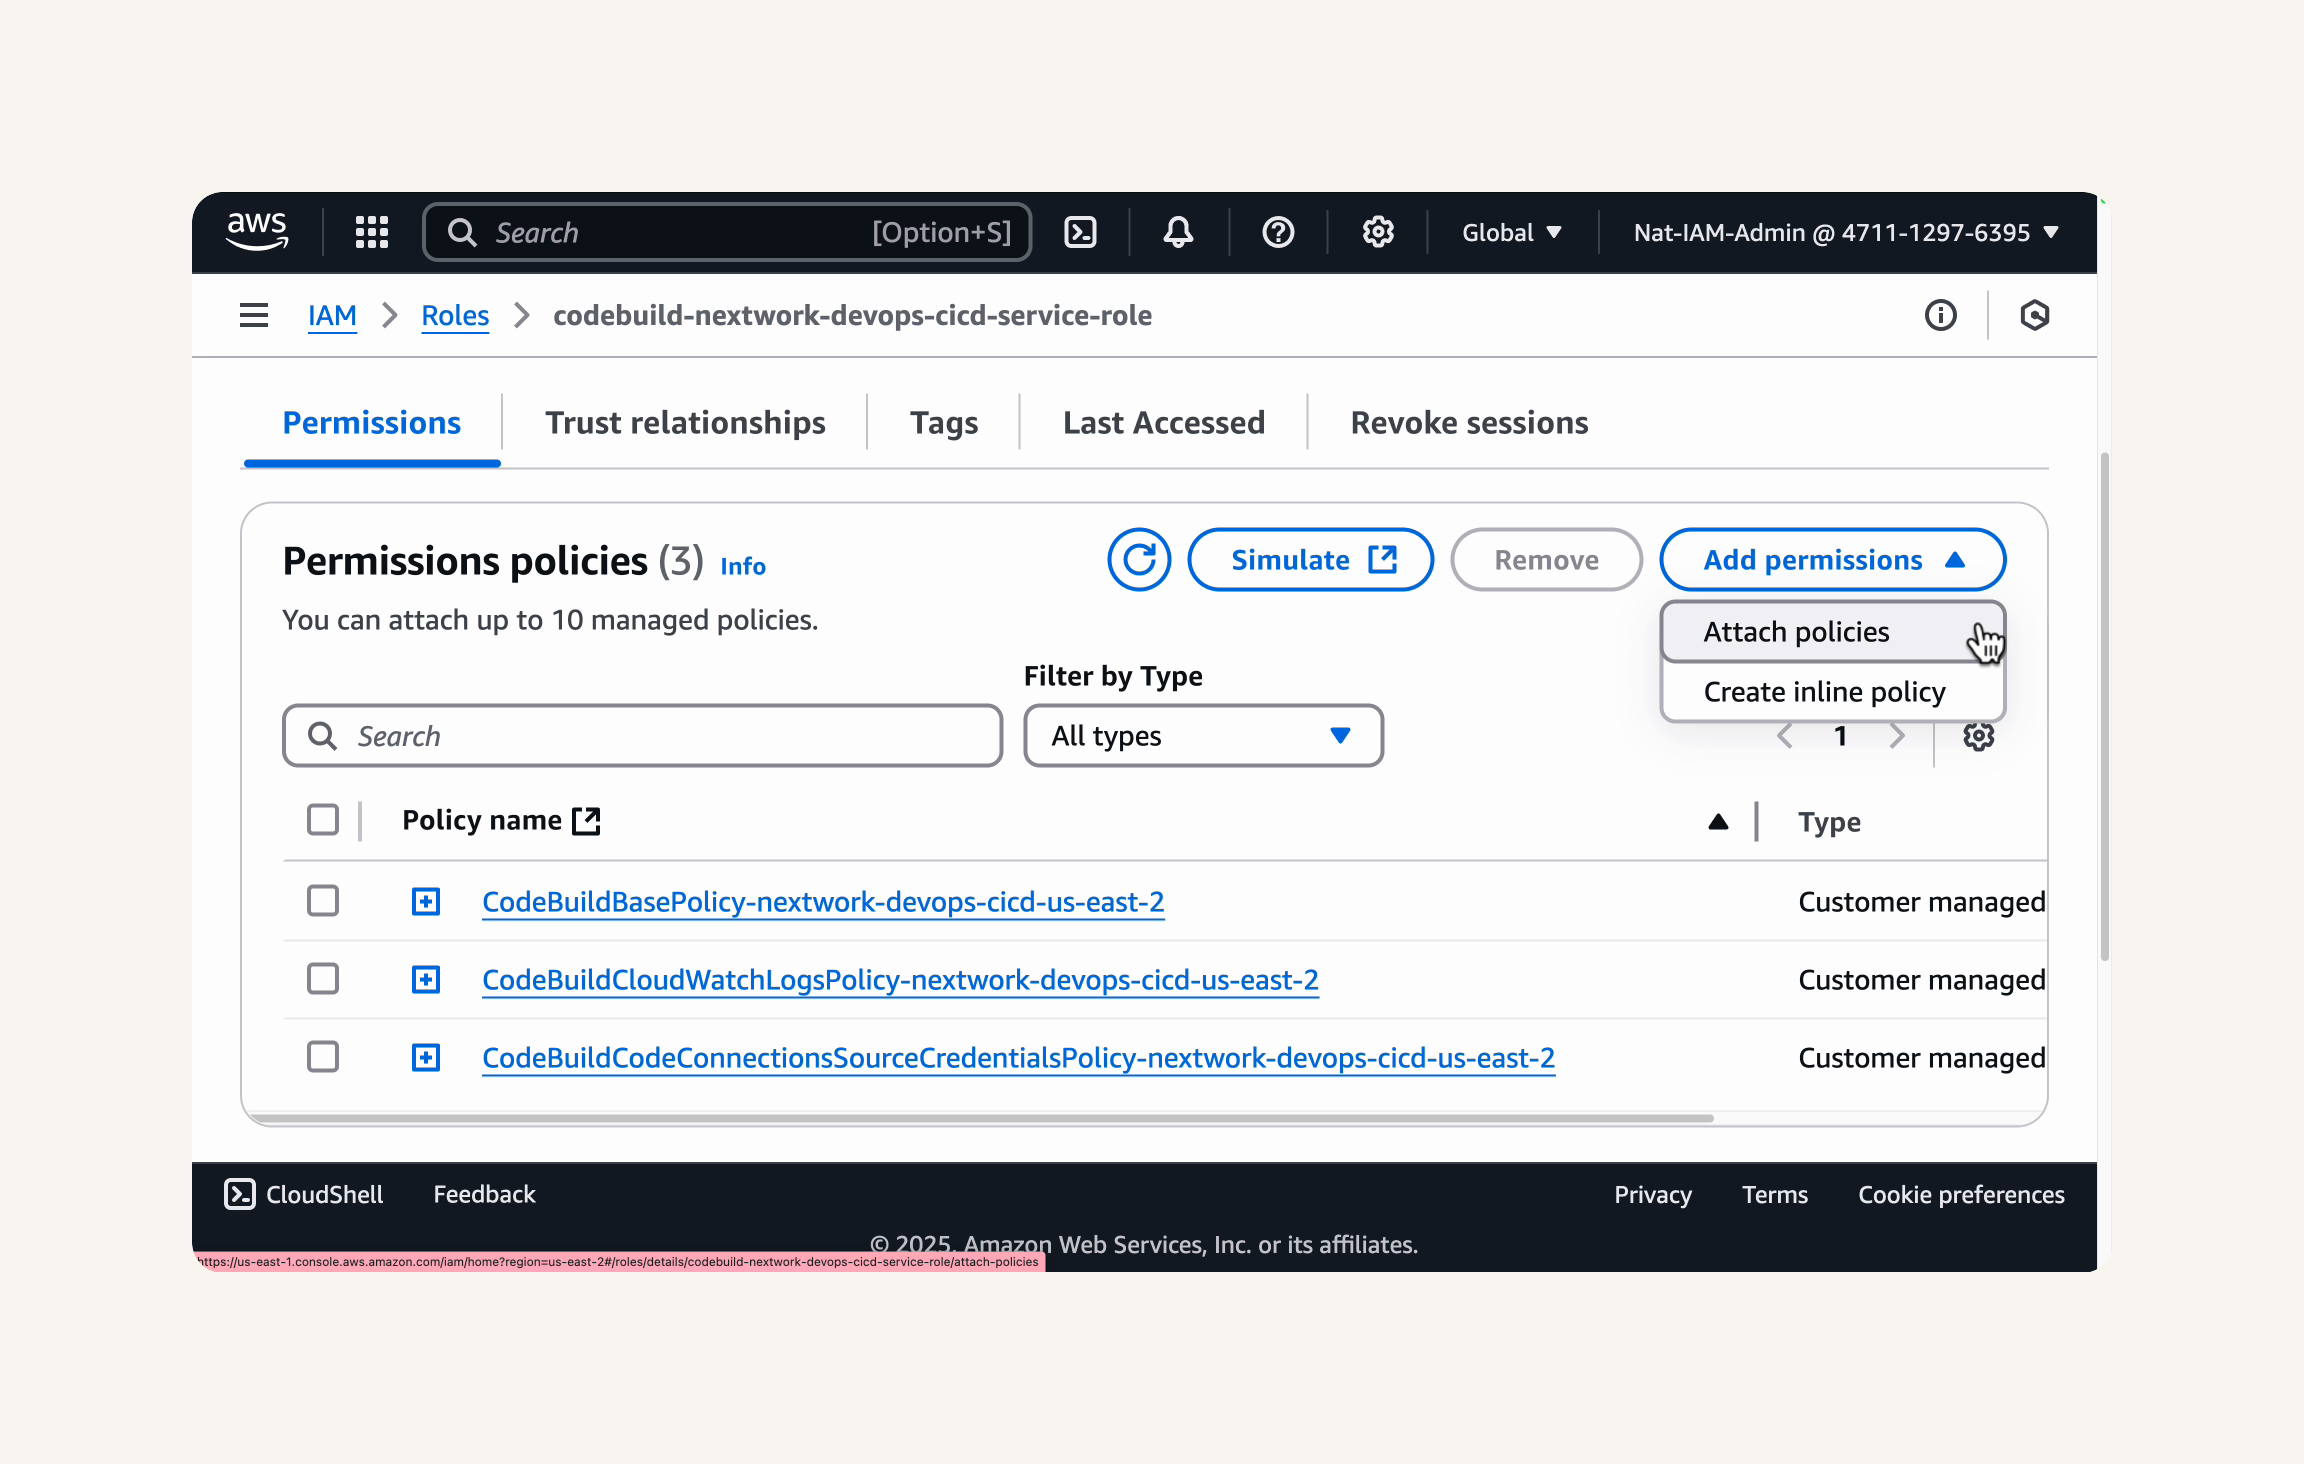
In the Filter policies search bar: enter codeartifact-nextwork-consumer-policy.
→ select it → add permission
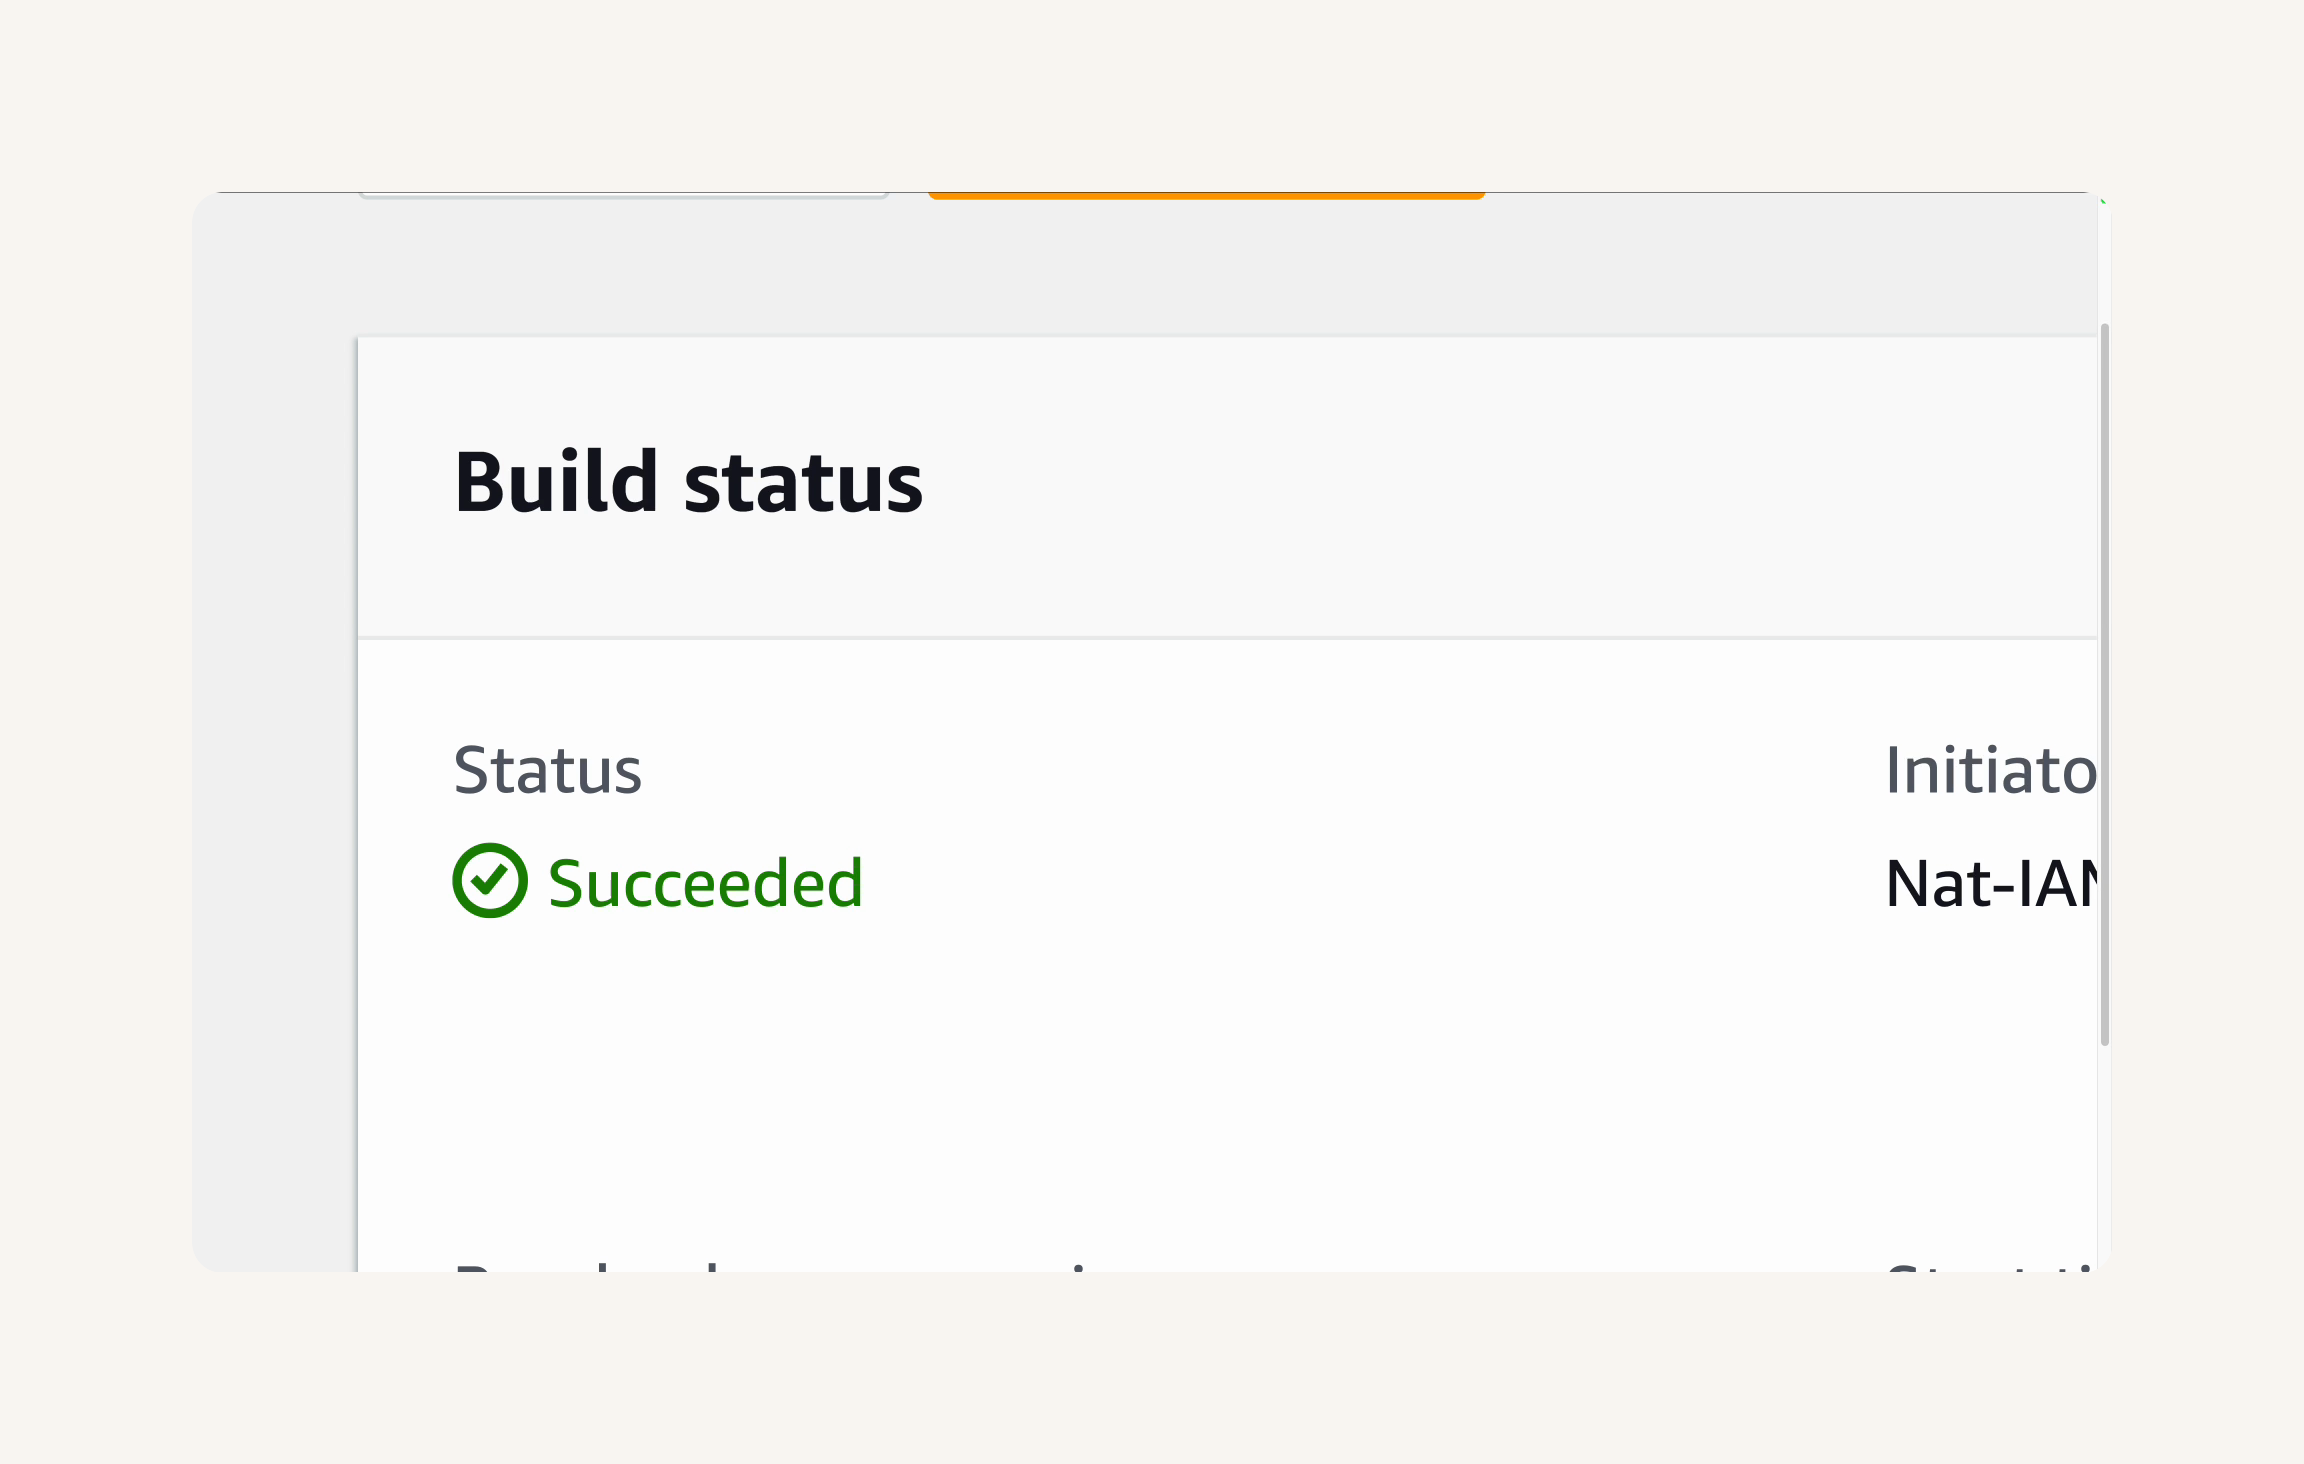
Return to the CodeBuild console, navigate to your nextwork-devops-cicd project→ Retry build→ build status should now be Succeeded with a green checkmark, indicating a successful CI pipeline run
To verify the successful build, let's check if the build artifact was correctly uploaded to our S3 bucket.
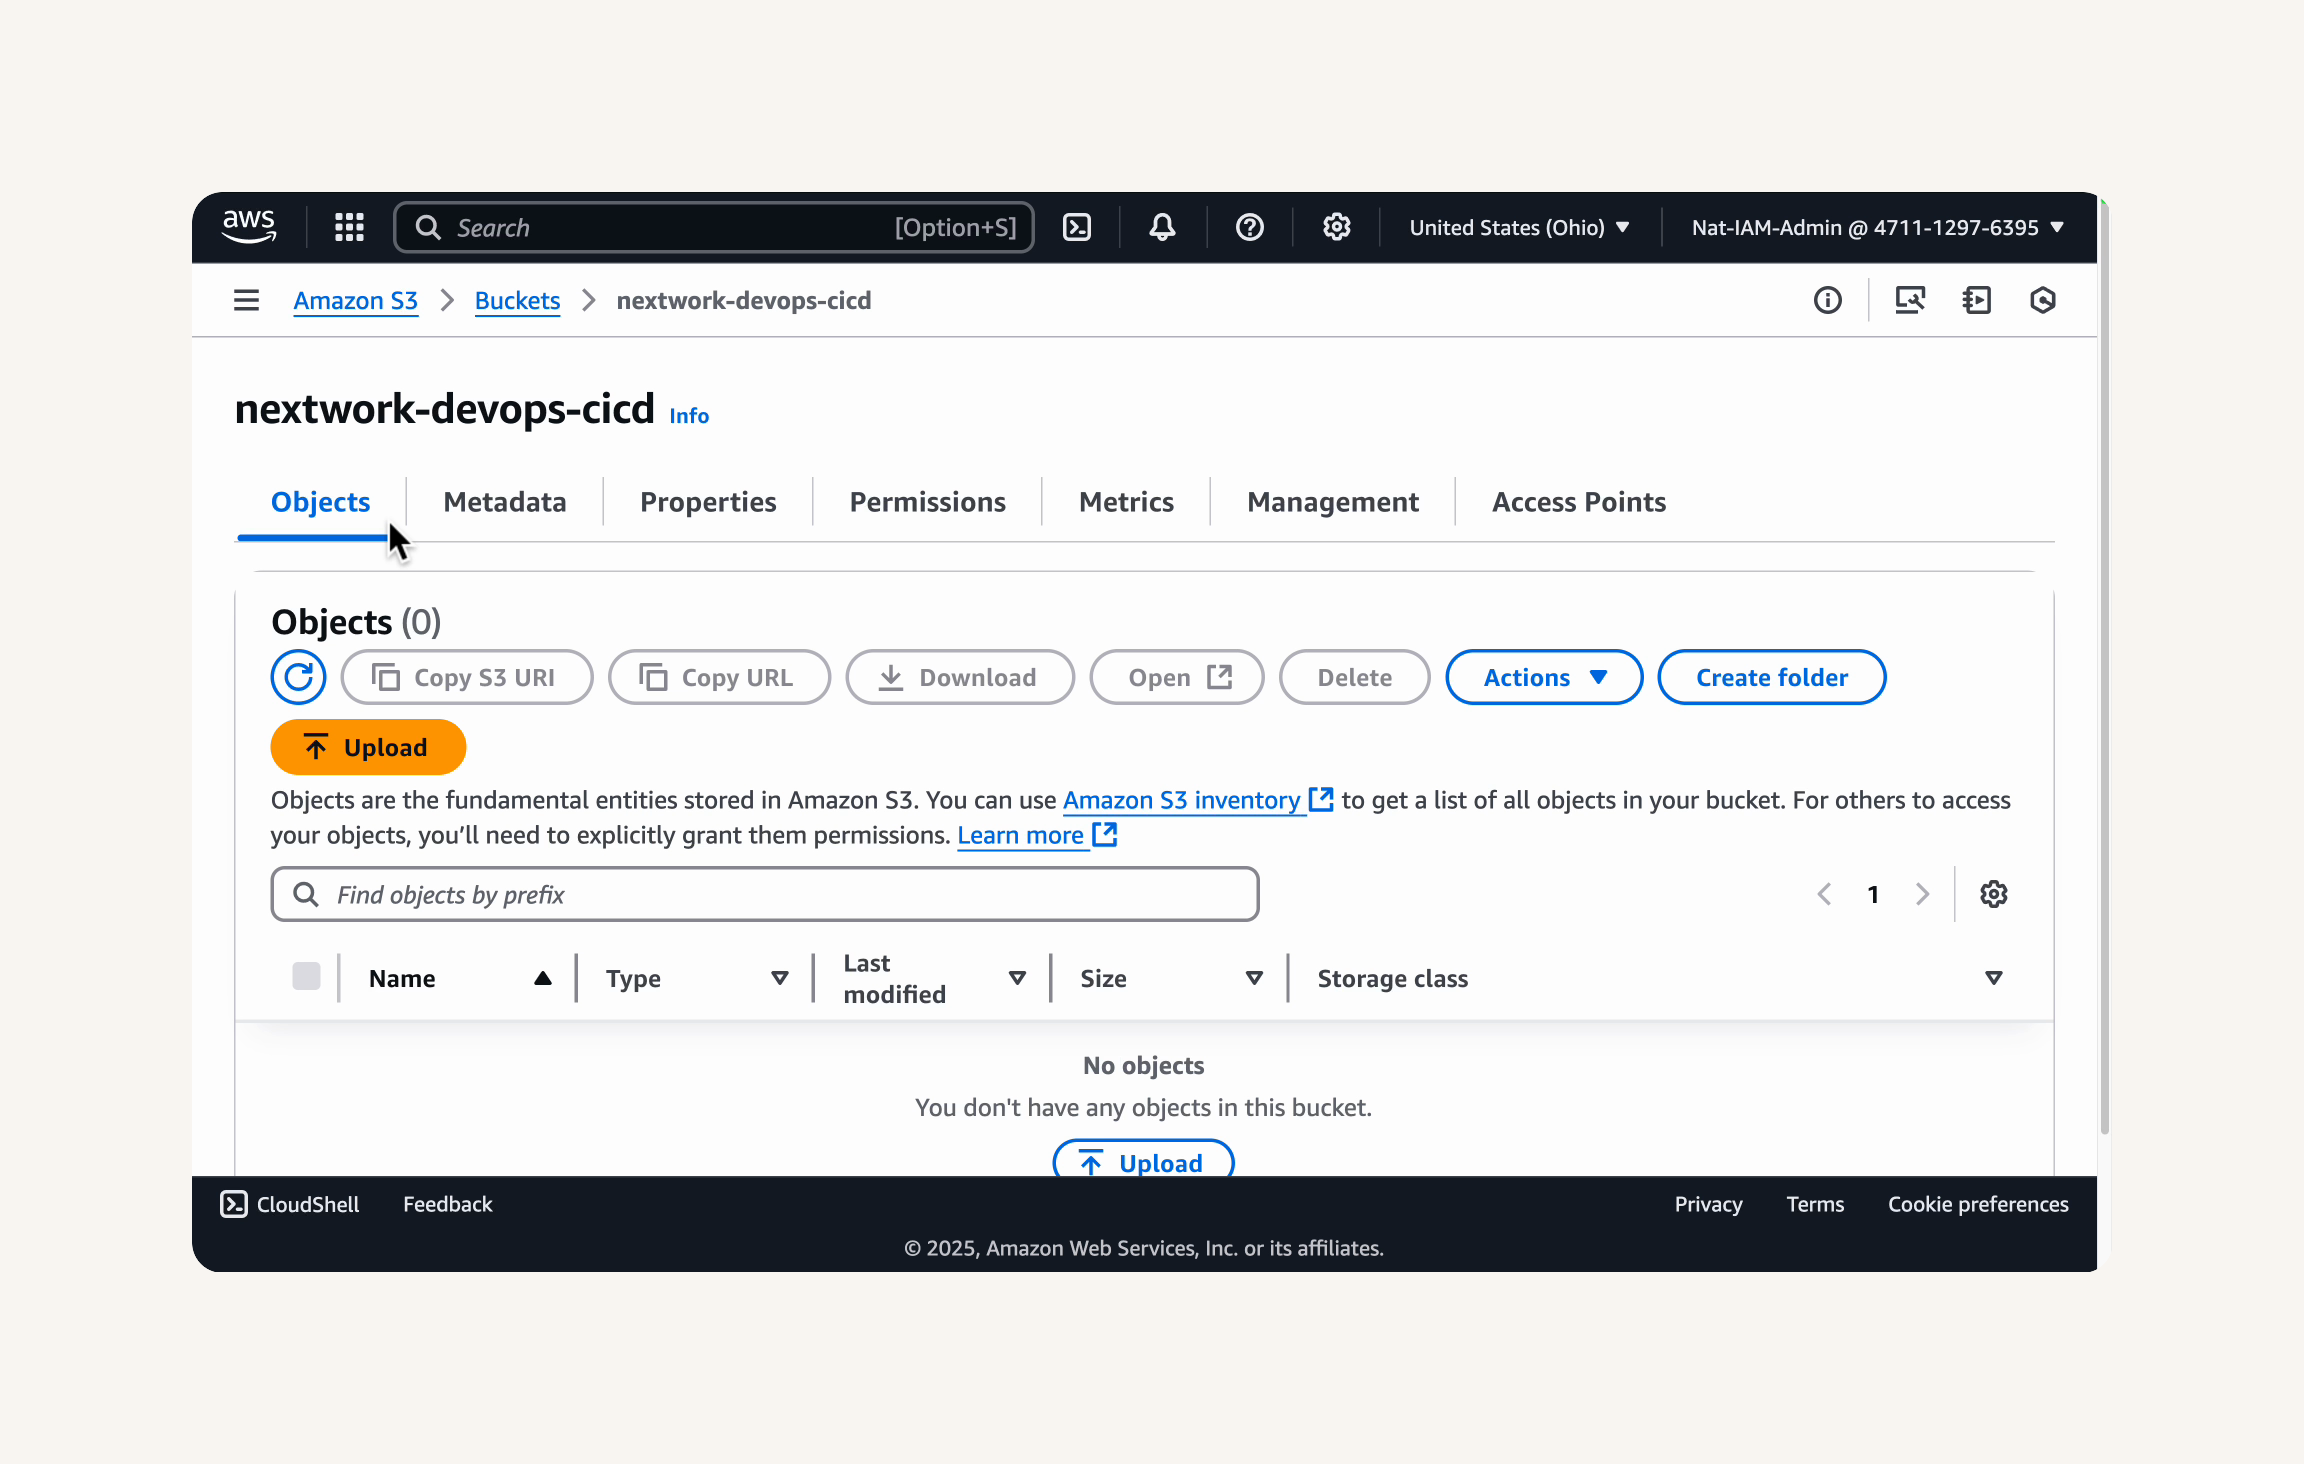
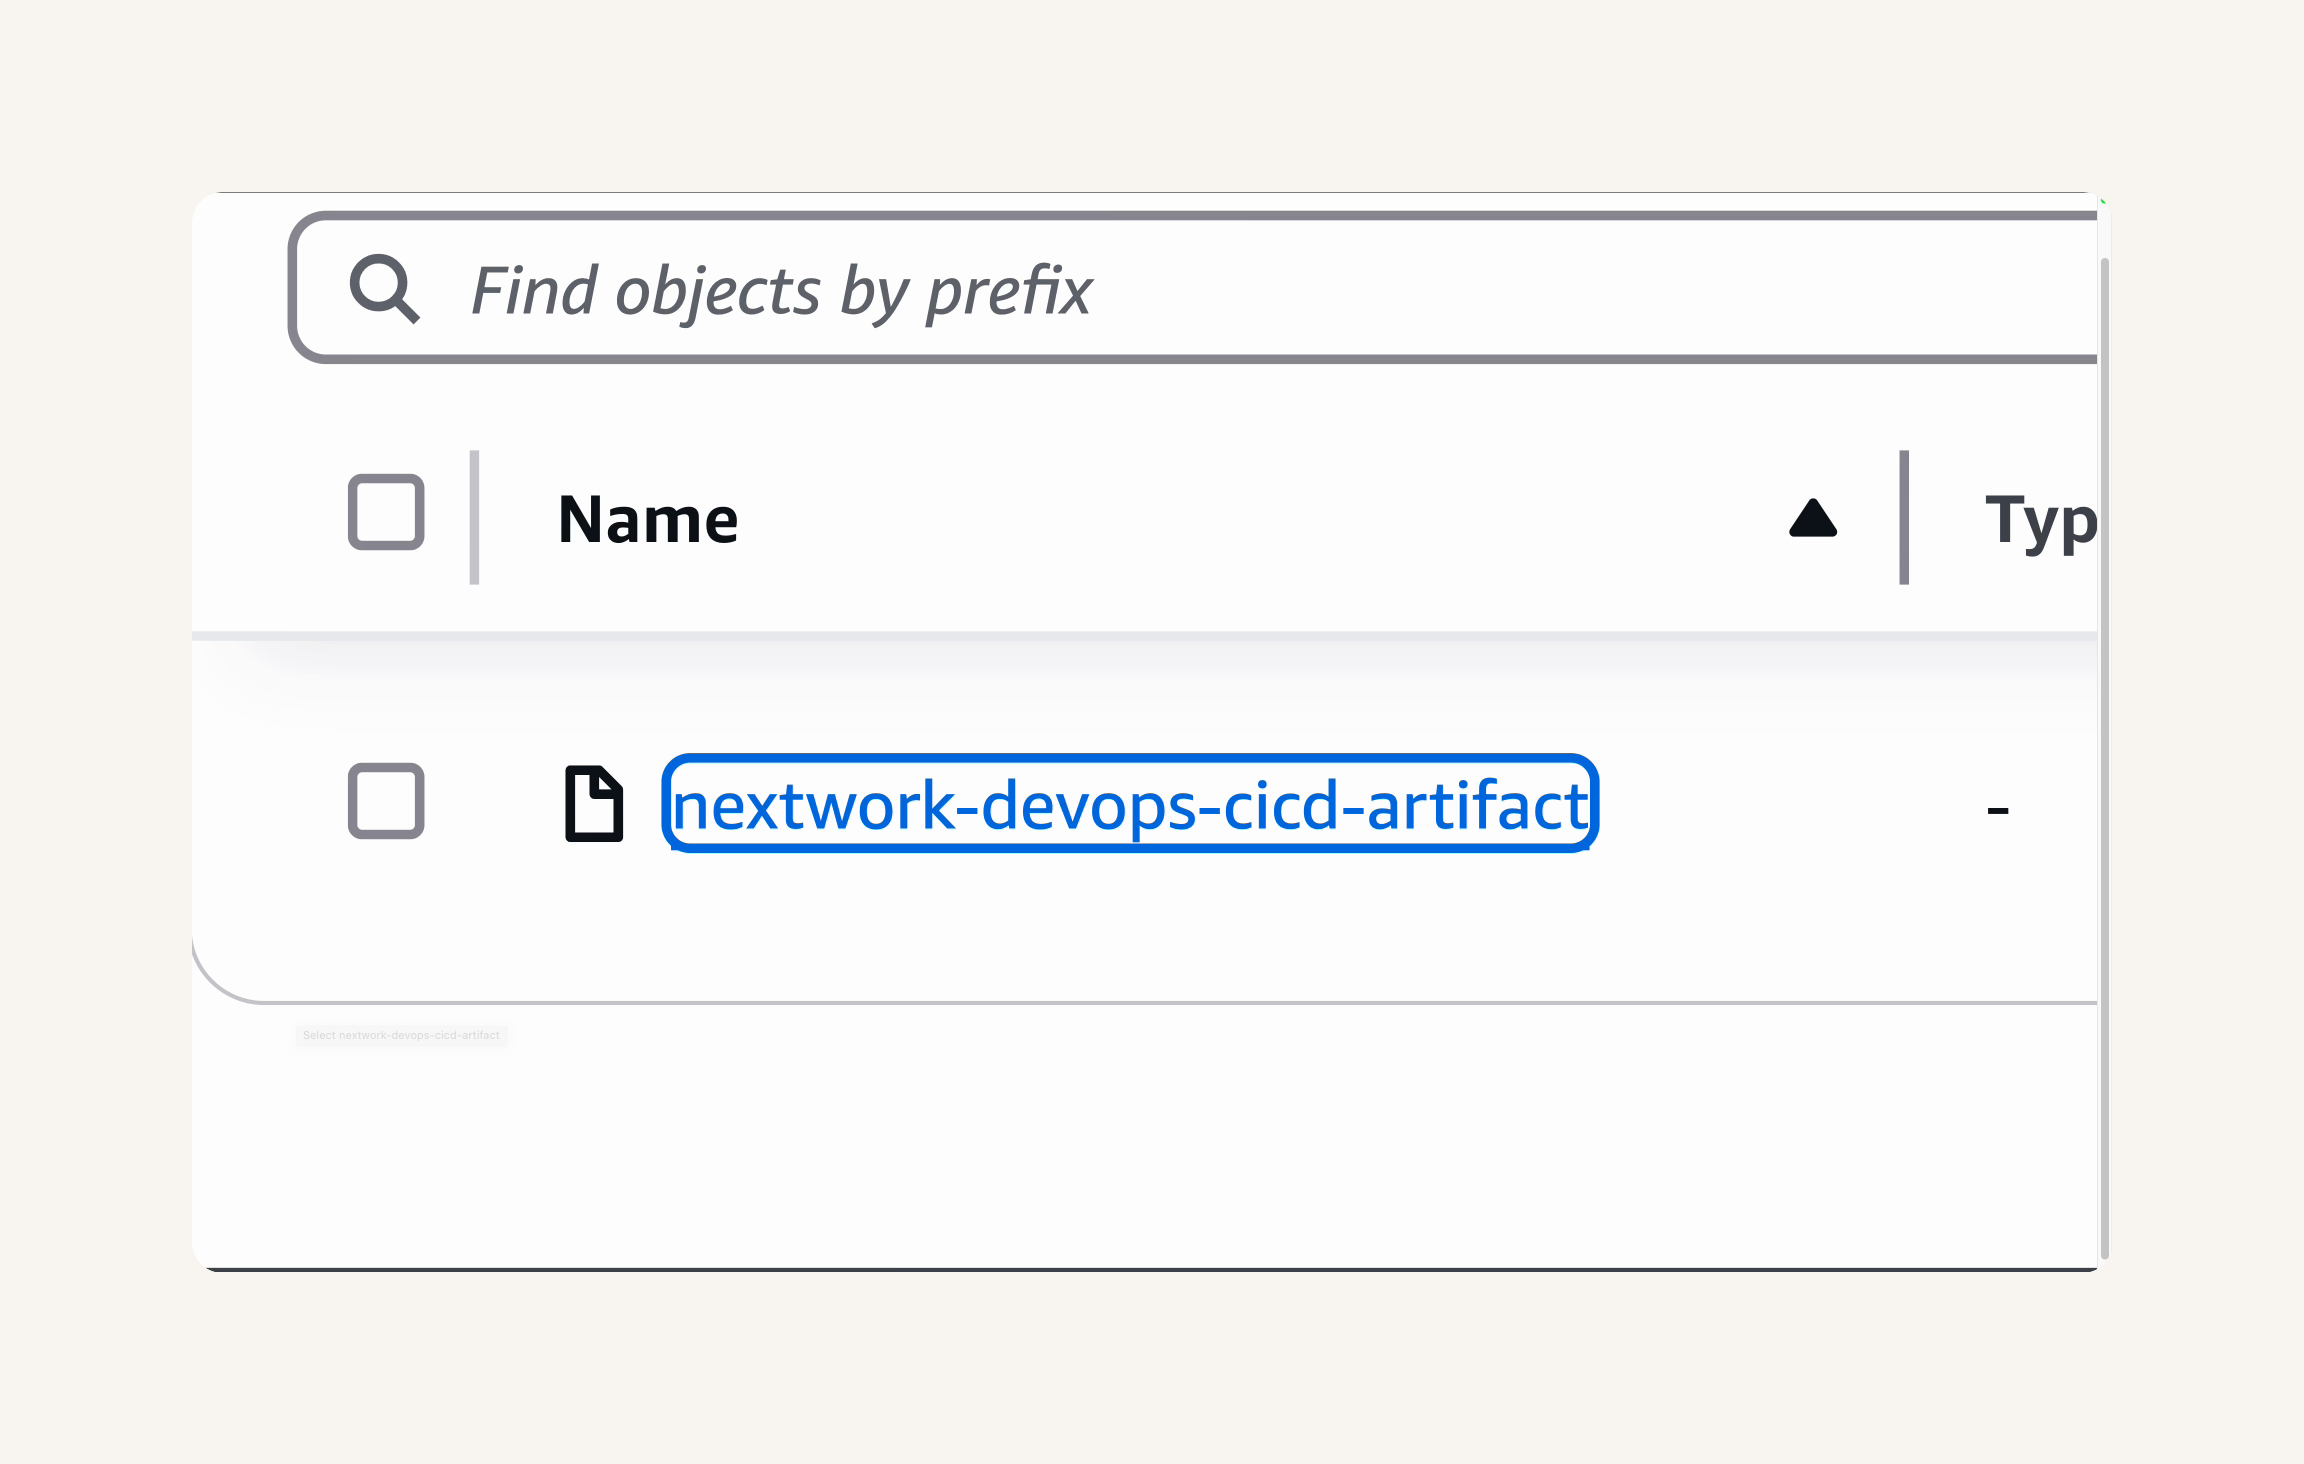
Head to the S3 console.→ Select Buckets from the left navigation menu. → Select the nextwork-devops-cicd bucket you created earlier. → Click Refresh to update the bucket content.
Step 5: Deploy a Web App with CodeDeploy

Launch an EC2 instance using CloudFormation.
CloudFormation→ Create stack. → With new resources (standard)→ Upload a template file. → choose file
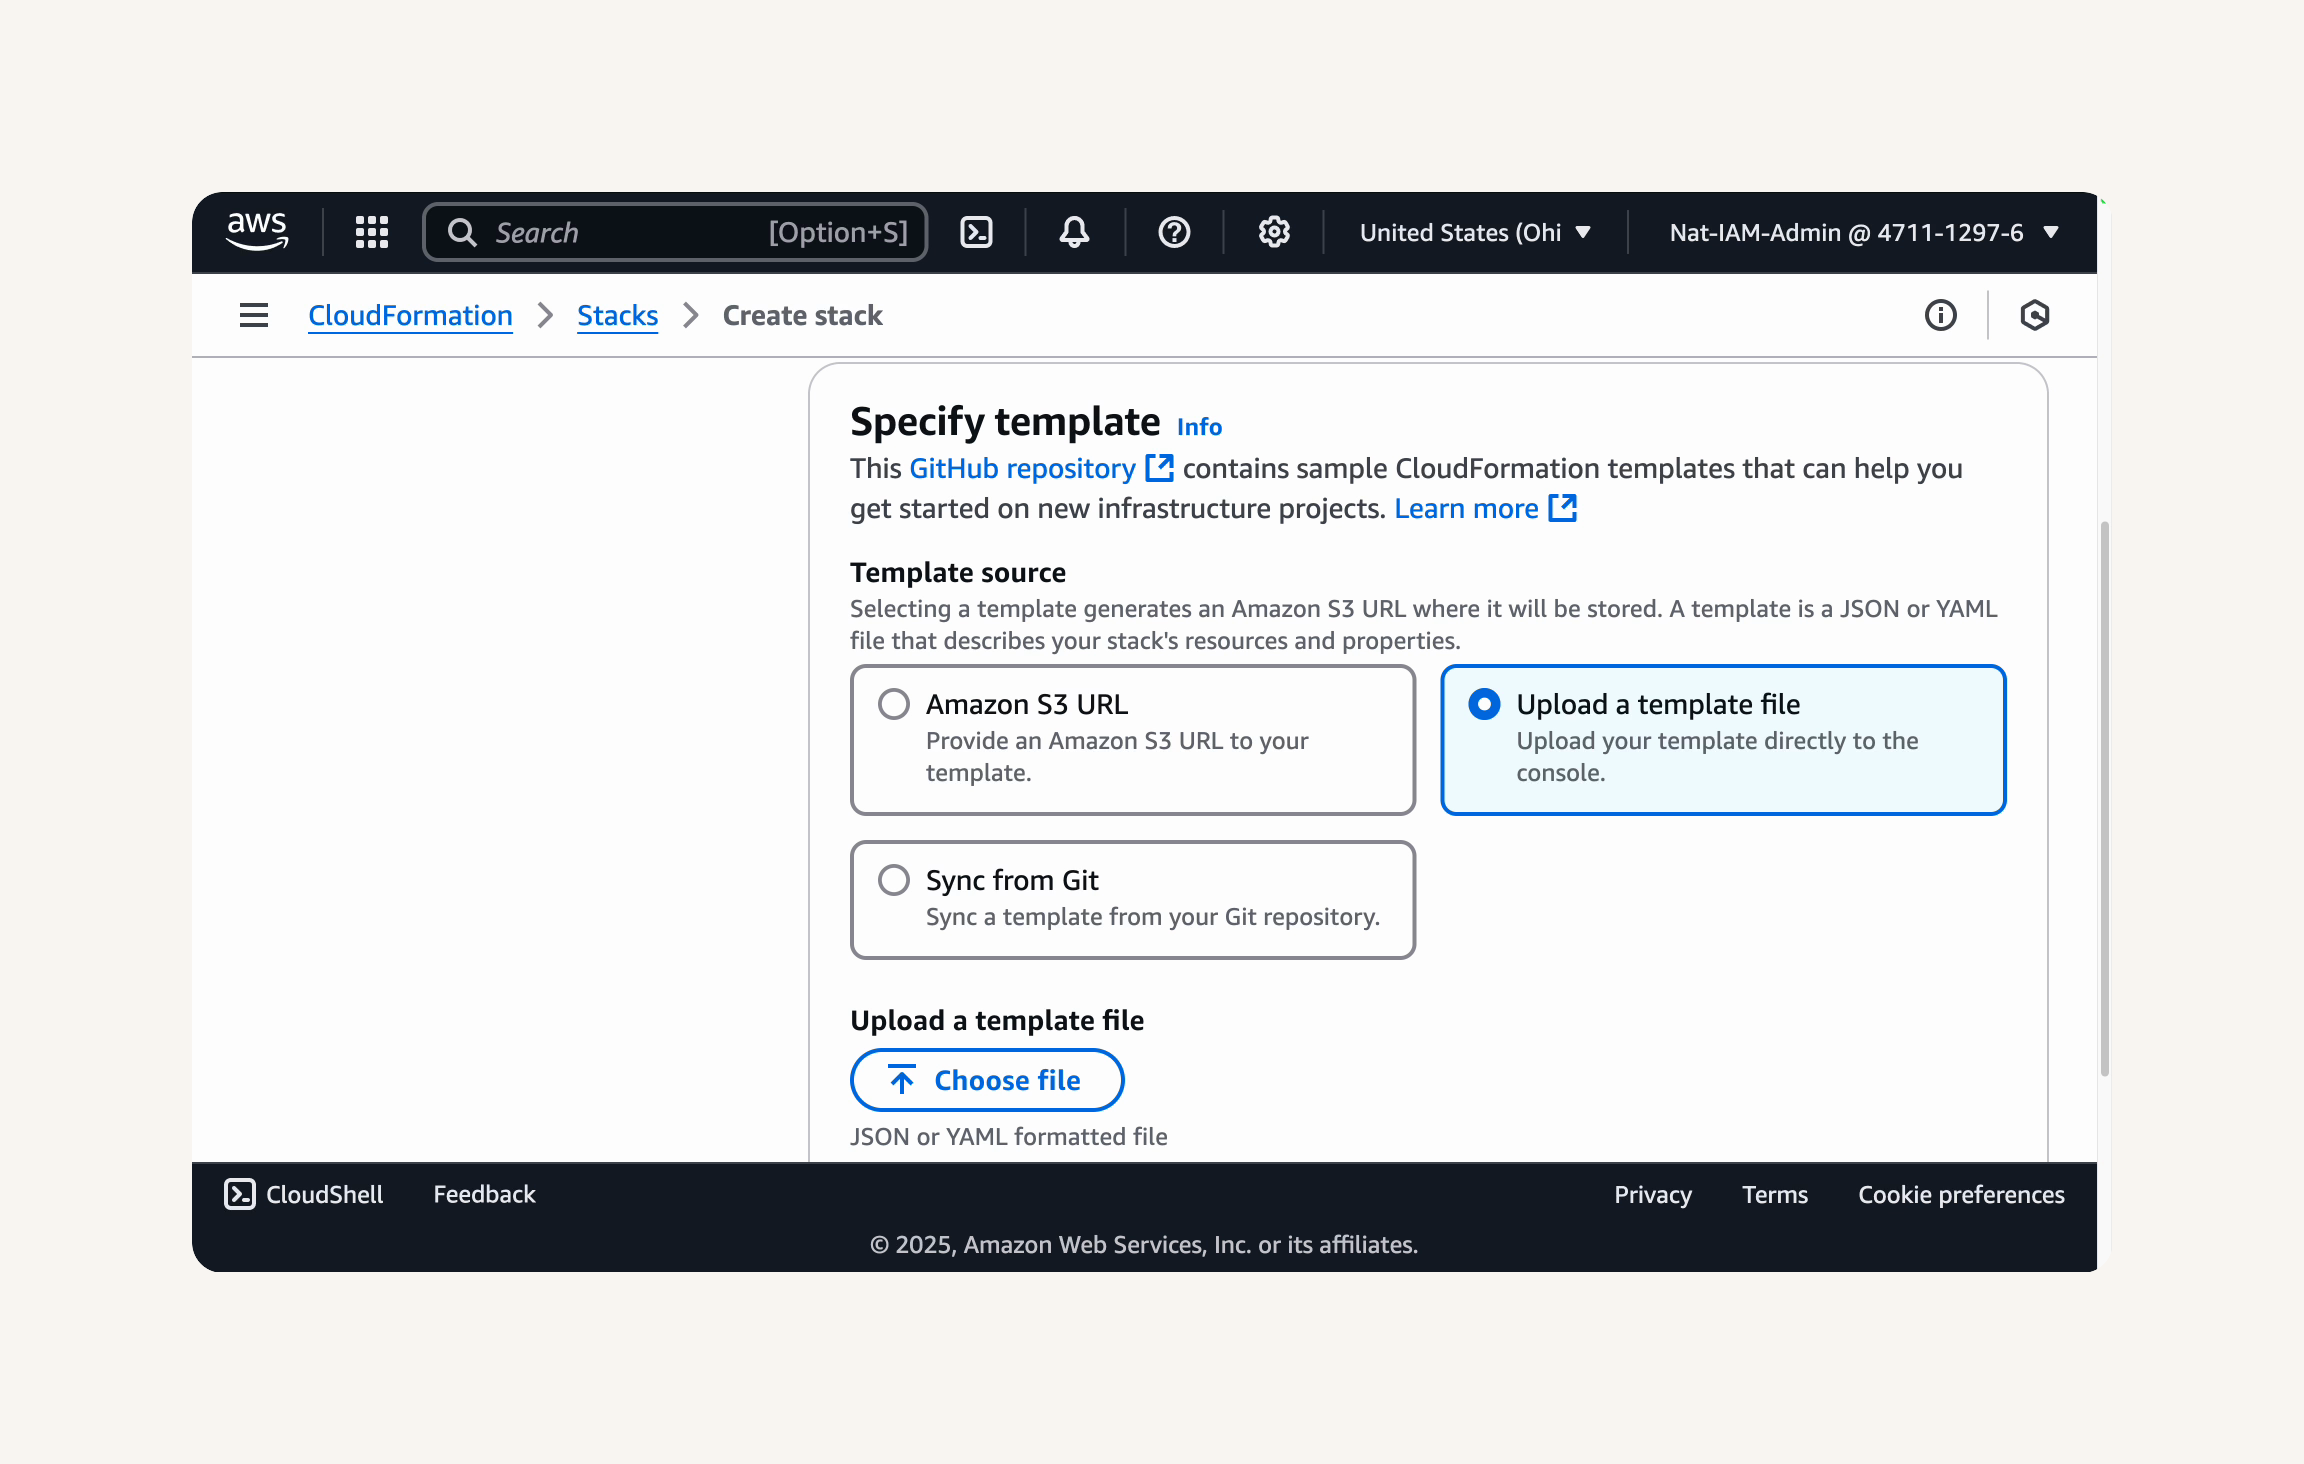
Upload the following CloudFormation template: nextworkwebapp.yaml
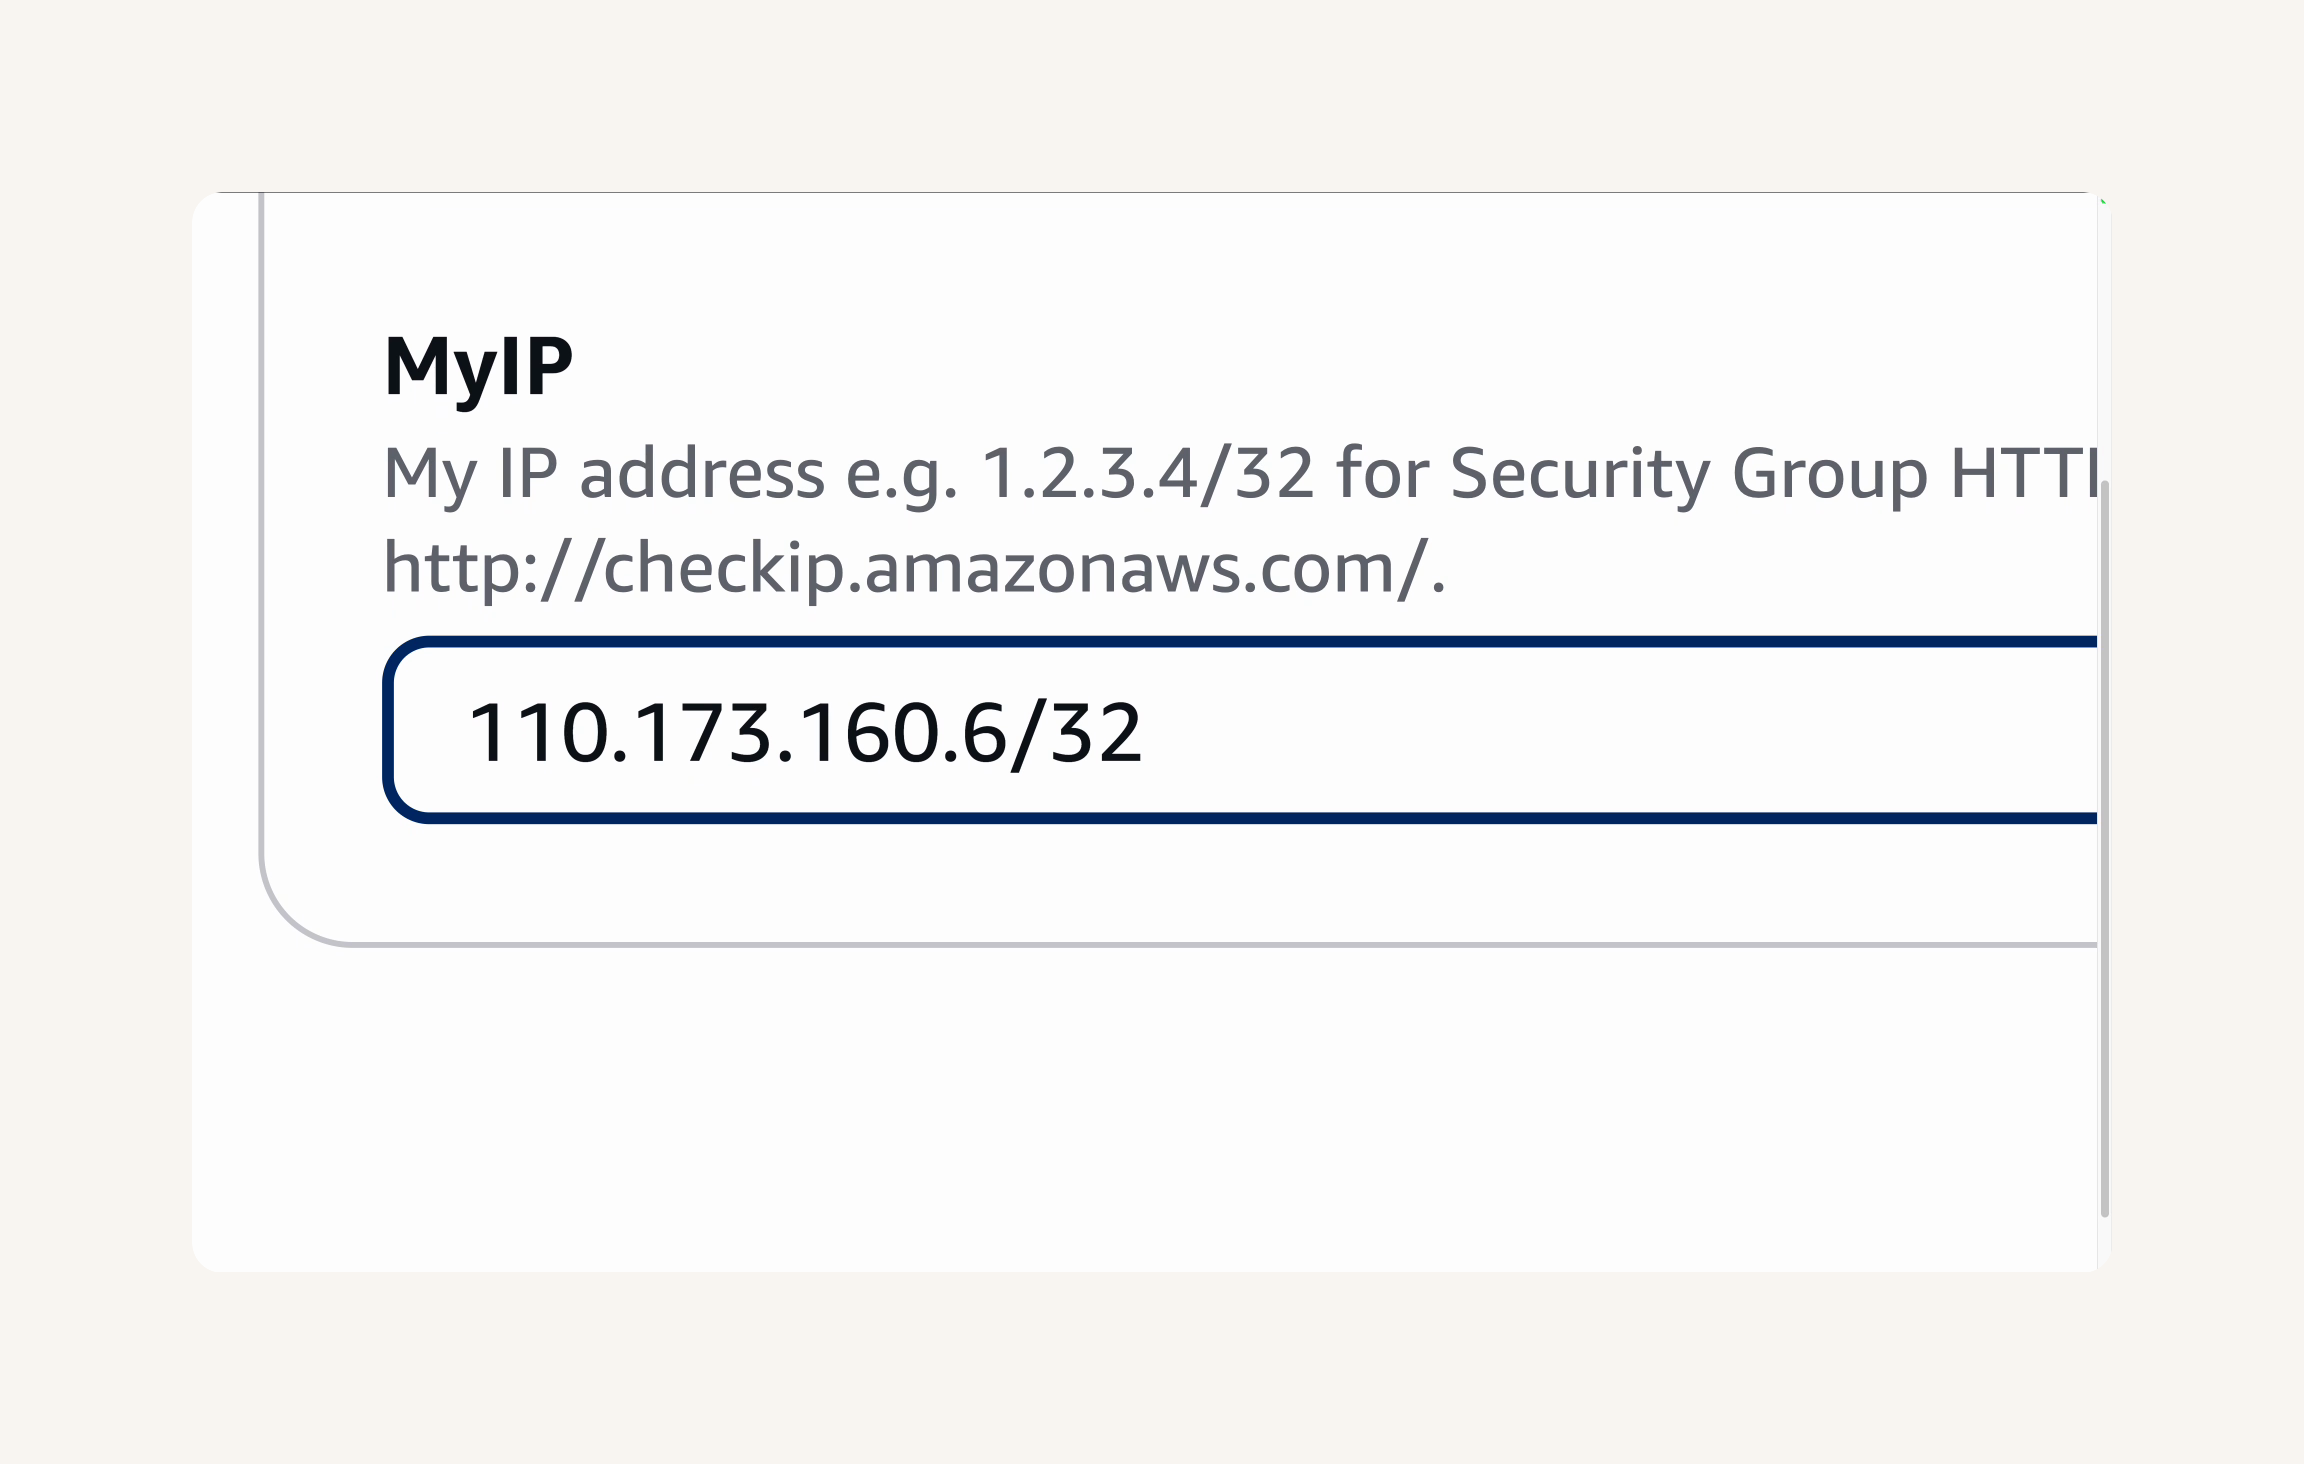
→ Verify the file nextworkwebapp.yaml → **Configure Stack Details →Stack name:**NextWorkCodeDeployEC2Stack → we'll need to add our IP address to the template. → https://checkip.amazonaws.com/ → copy your IP address. → Paste your IP address into the MyIP parameter field and add /32 at the end. → next
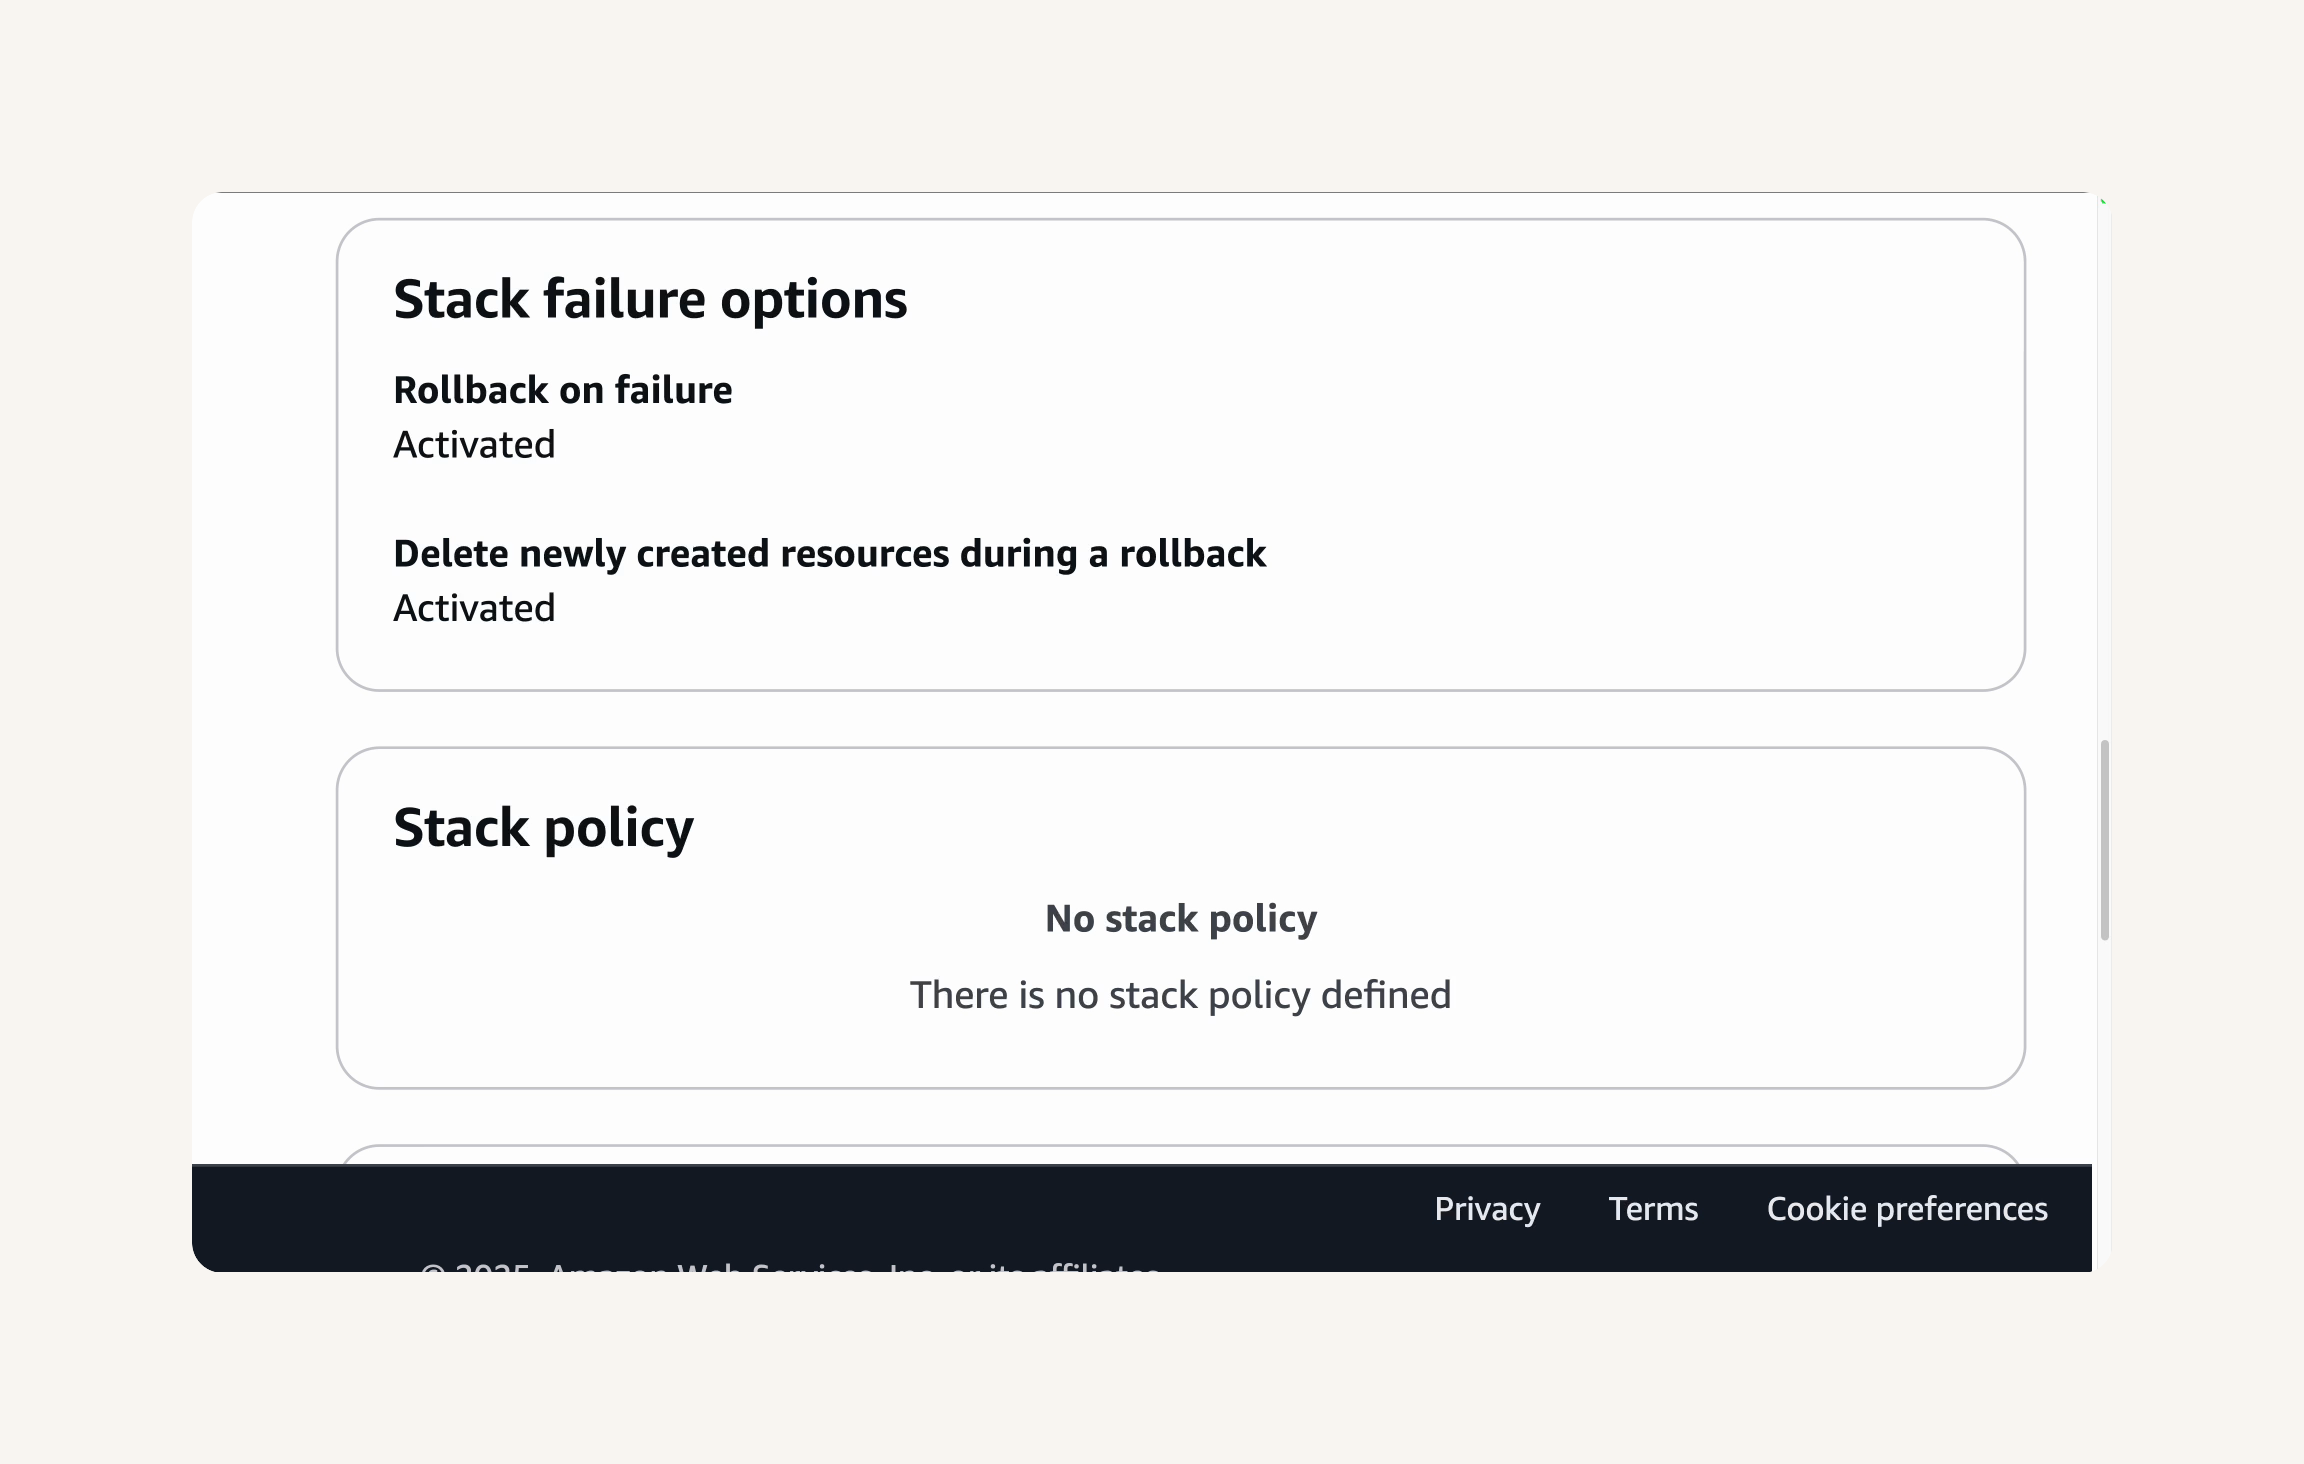
Configure Stack Options → Stack failure options → Roll back all stack resources → select Delete all newly created resources. → Capabilities → check the box I acknowledge that AWS CloudFormation might create IAM resources. → Review and Submit → check Rollback on failure: Activated, Delete all newly created resources during rollback: Activated → submit
check out the Resources tab.
You can see a list of the resources being created

You can watch your CloudFormation stack's events in real-time in the Events tab - just keep refreshing it!
- Wait for the stack's status to become CREATE_COMPLETE
Prepare Deployment Scripts and AppSpec
Create deployment scripts for installing dependencies, starting, and stopping the server.
Create an appspec.yml file to tell CodeDeploy how to handle the deployment process.
Update buildspec.yml to package deployment files in your build artifact.
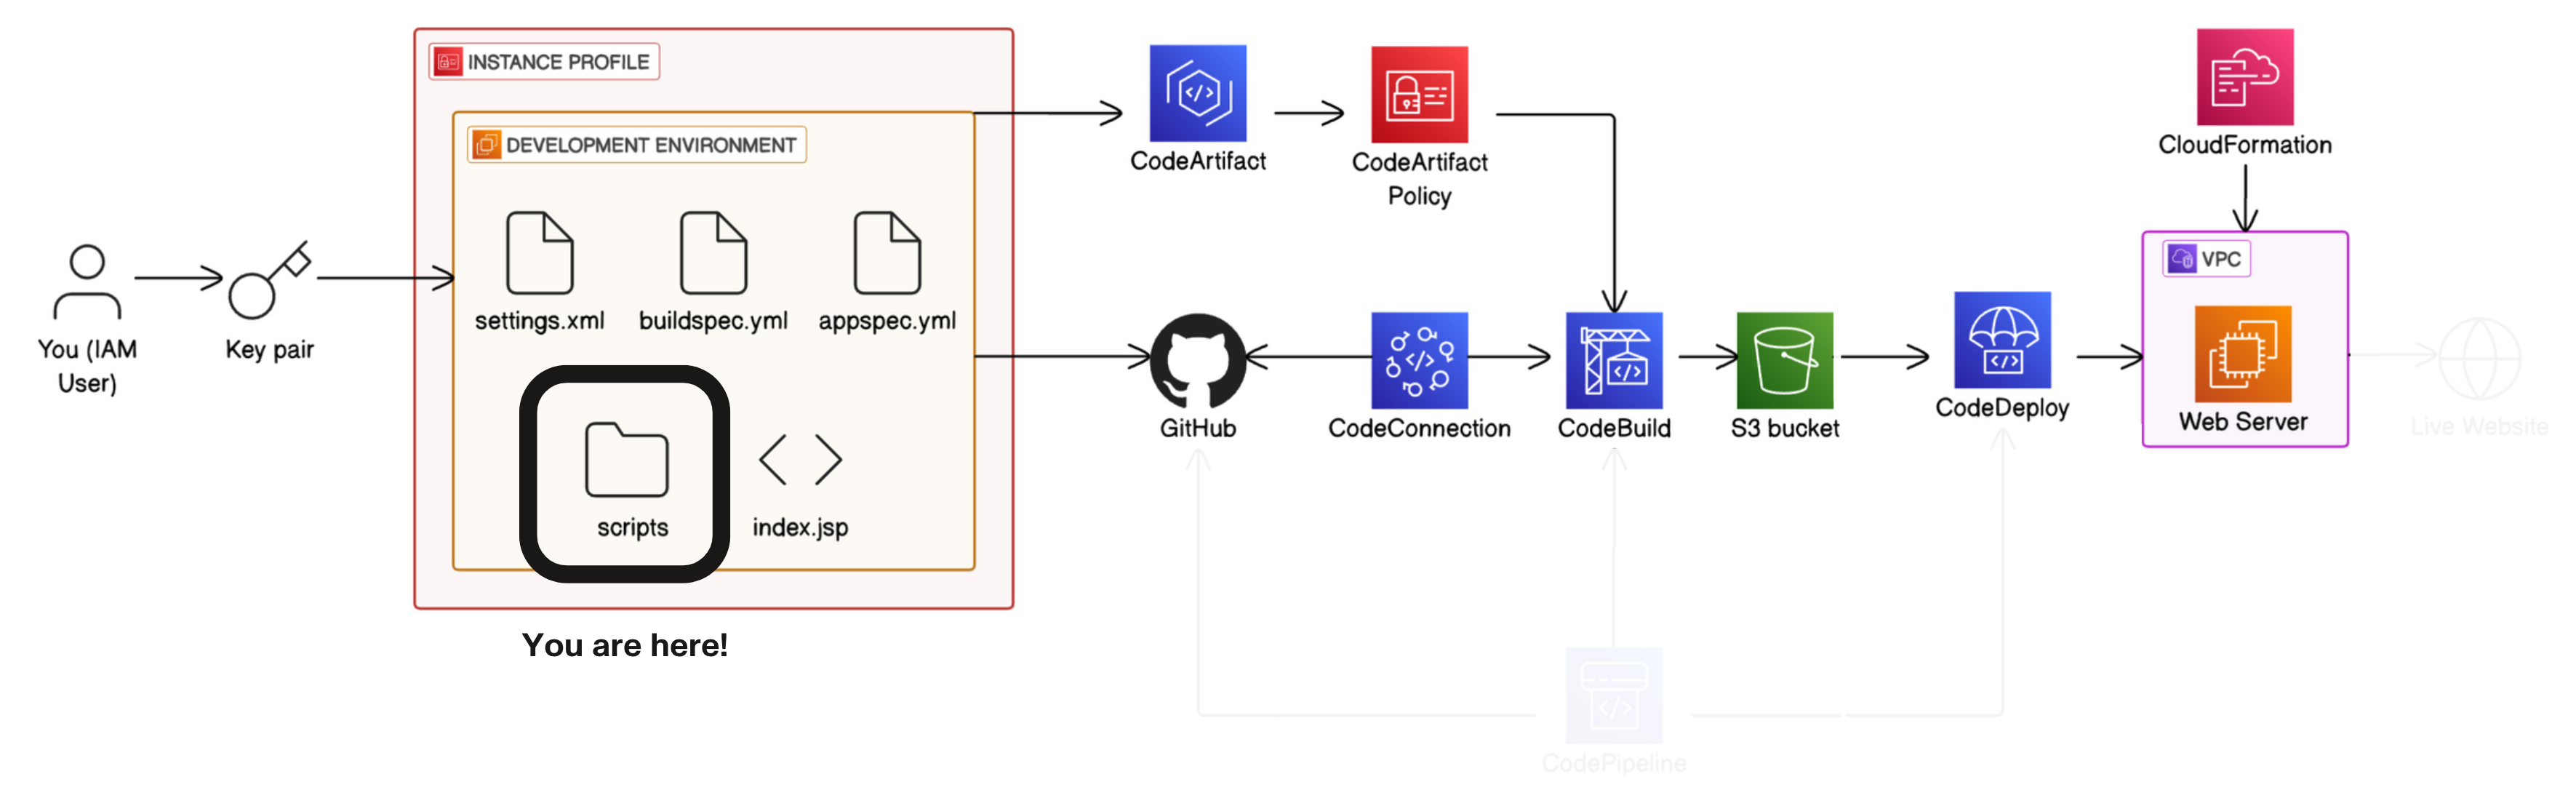
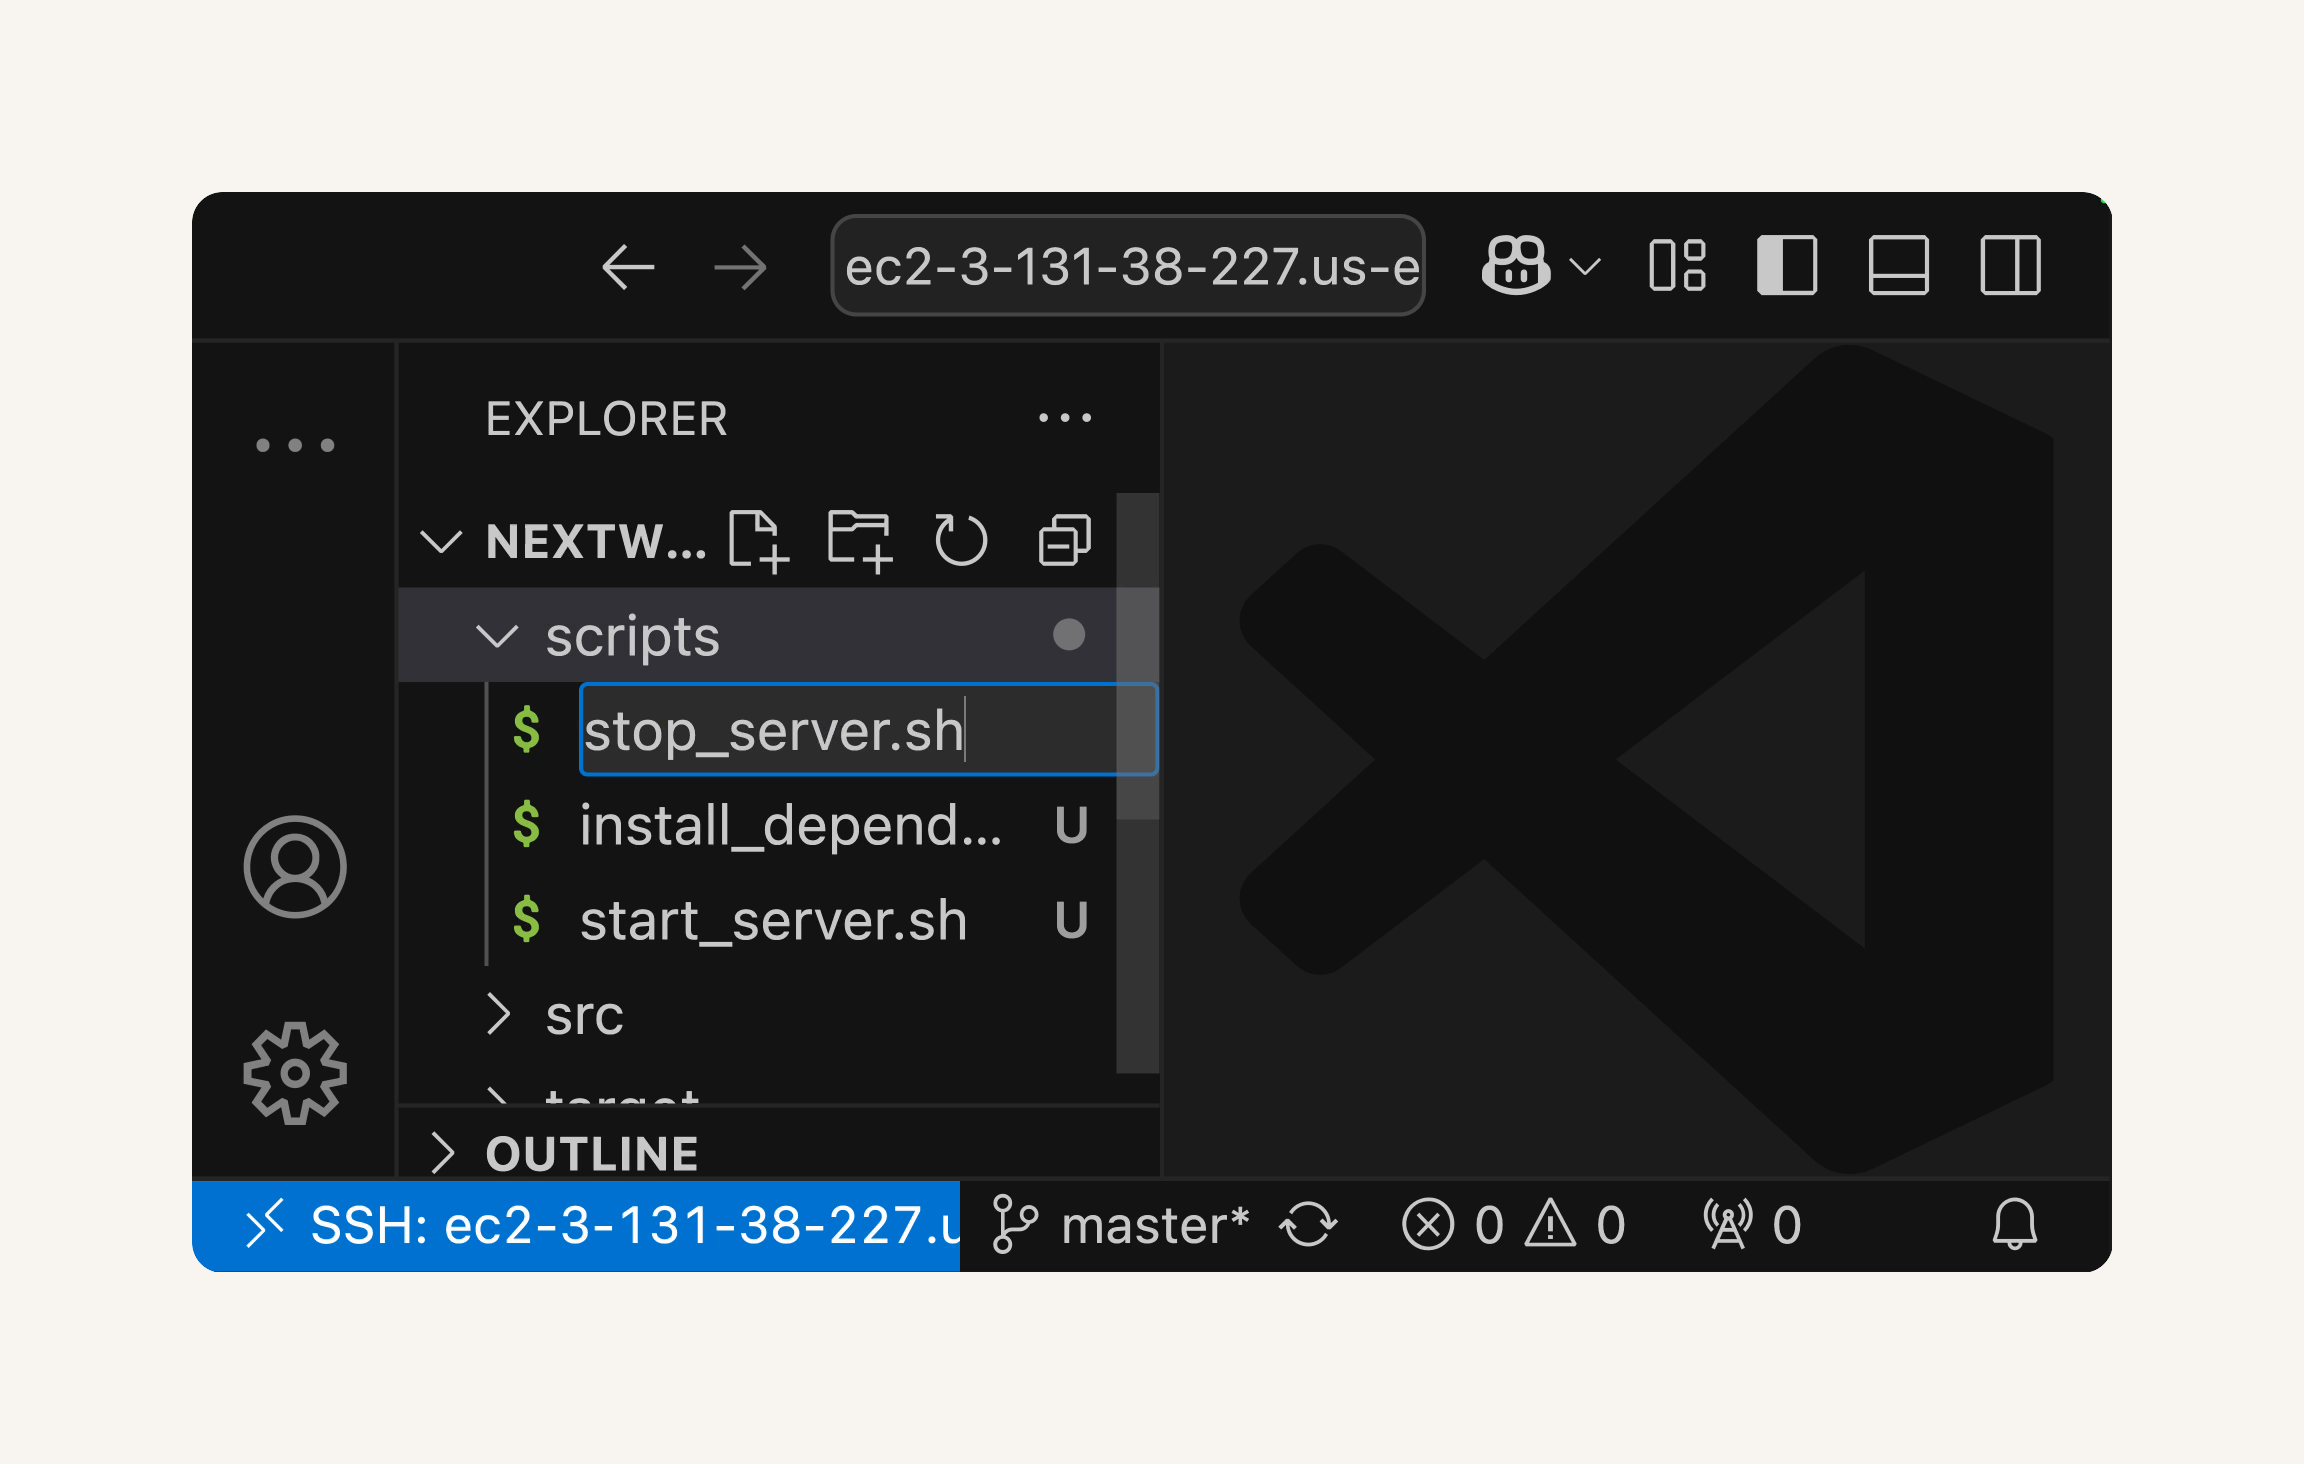
VS code → Create Scripts Folder at the root of your project directory → Create install_dependencies.sh, start_server.sh, stop_server.sh inside scripts folder →
Create install_dependencies.sh:
    Add the following content to install_dependencies.sh:

    #!/bin/bash
    sudo yum install tomcat -y
    sudo yum -y install httpd
    sudo cat << EOF > /etc/httpd/conf.d/tomcat_manager.conf
    <VirtualHost *:80>
      ServerAdmin root@localhost
      ServerName app.nextwork.com
      DefaultType text/html
      ProxyRequests off
      ProxyPreserveHost On
      ProxyPass / http://localhost:8080/nextwork-web-project/
      ProxyPassReverse / http://localhost:8080/nextwork-web-project/
    </VirtualHost>
    EOF

    save it.
Create start_server.sh
    Add the following content to start_server.sh:

    #!/bin/bash
    sudo systemctl start tomcat.service
    sudo systemctl enable tomcat.service
    sudo systemctl start httpd.service
    sudo systemctl enable httpd.service

    save it.
Create stop_server.sh
    Add the following content to stop_server.sh:

    #!/bin/bash
    isExistApp="$(pgrep httpd)"
    if [[ -n $isExistApp ]]; then
    sudo systemctl stop httpd.service
    fi
    isExistApp="$(pgrep tomcat)"
    if [[ -n $isExistApp ]]; then
    sudo systemctl stop tomcat.service
    fi
Create appspec.yml new file, but this time at the root of your project.
Make sure this file is NOT inside the scripts folder!
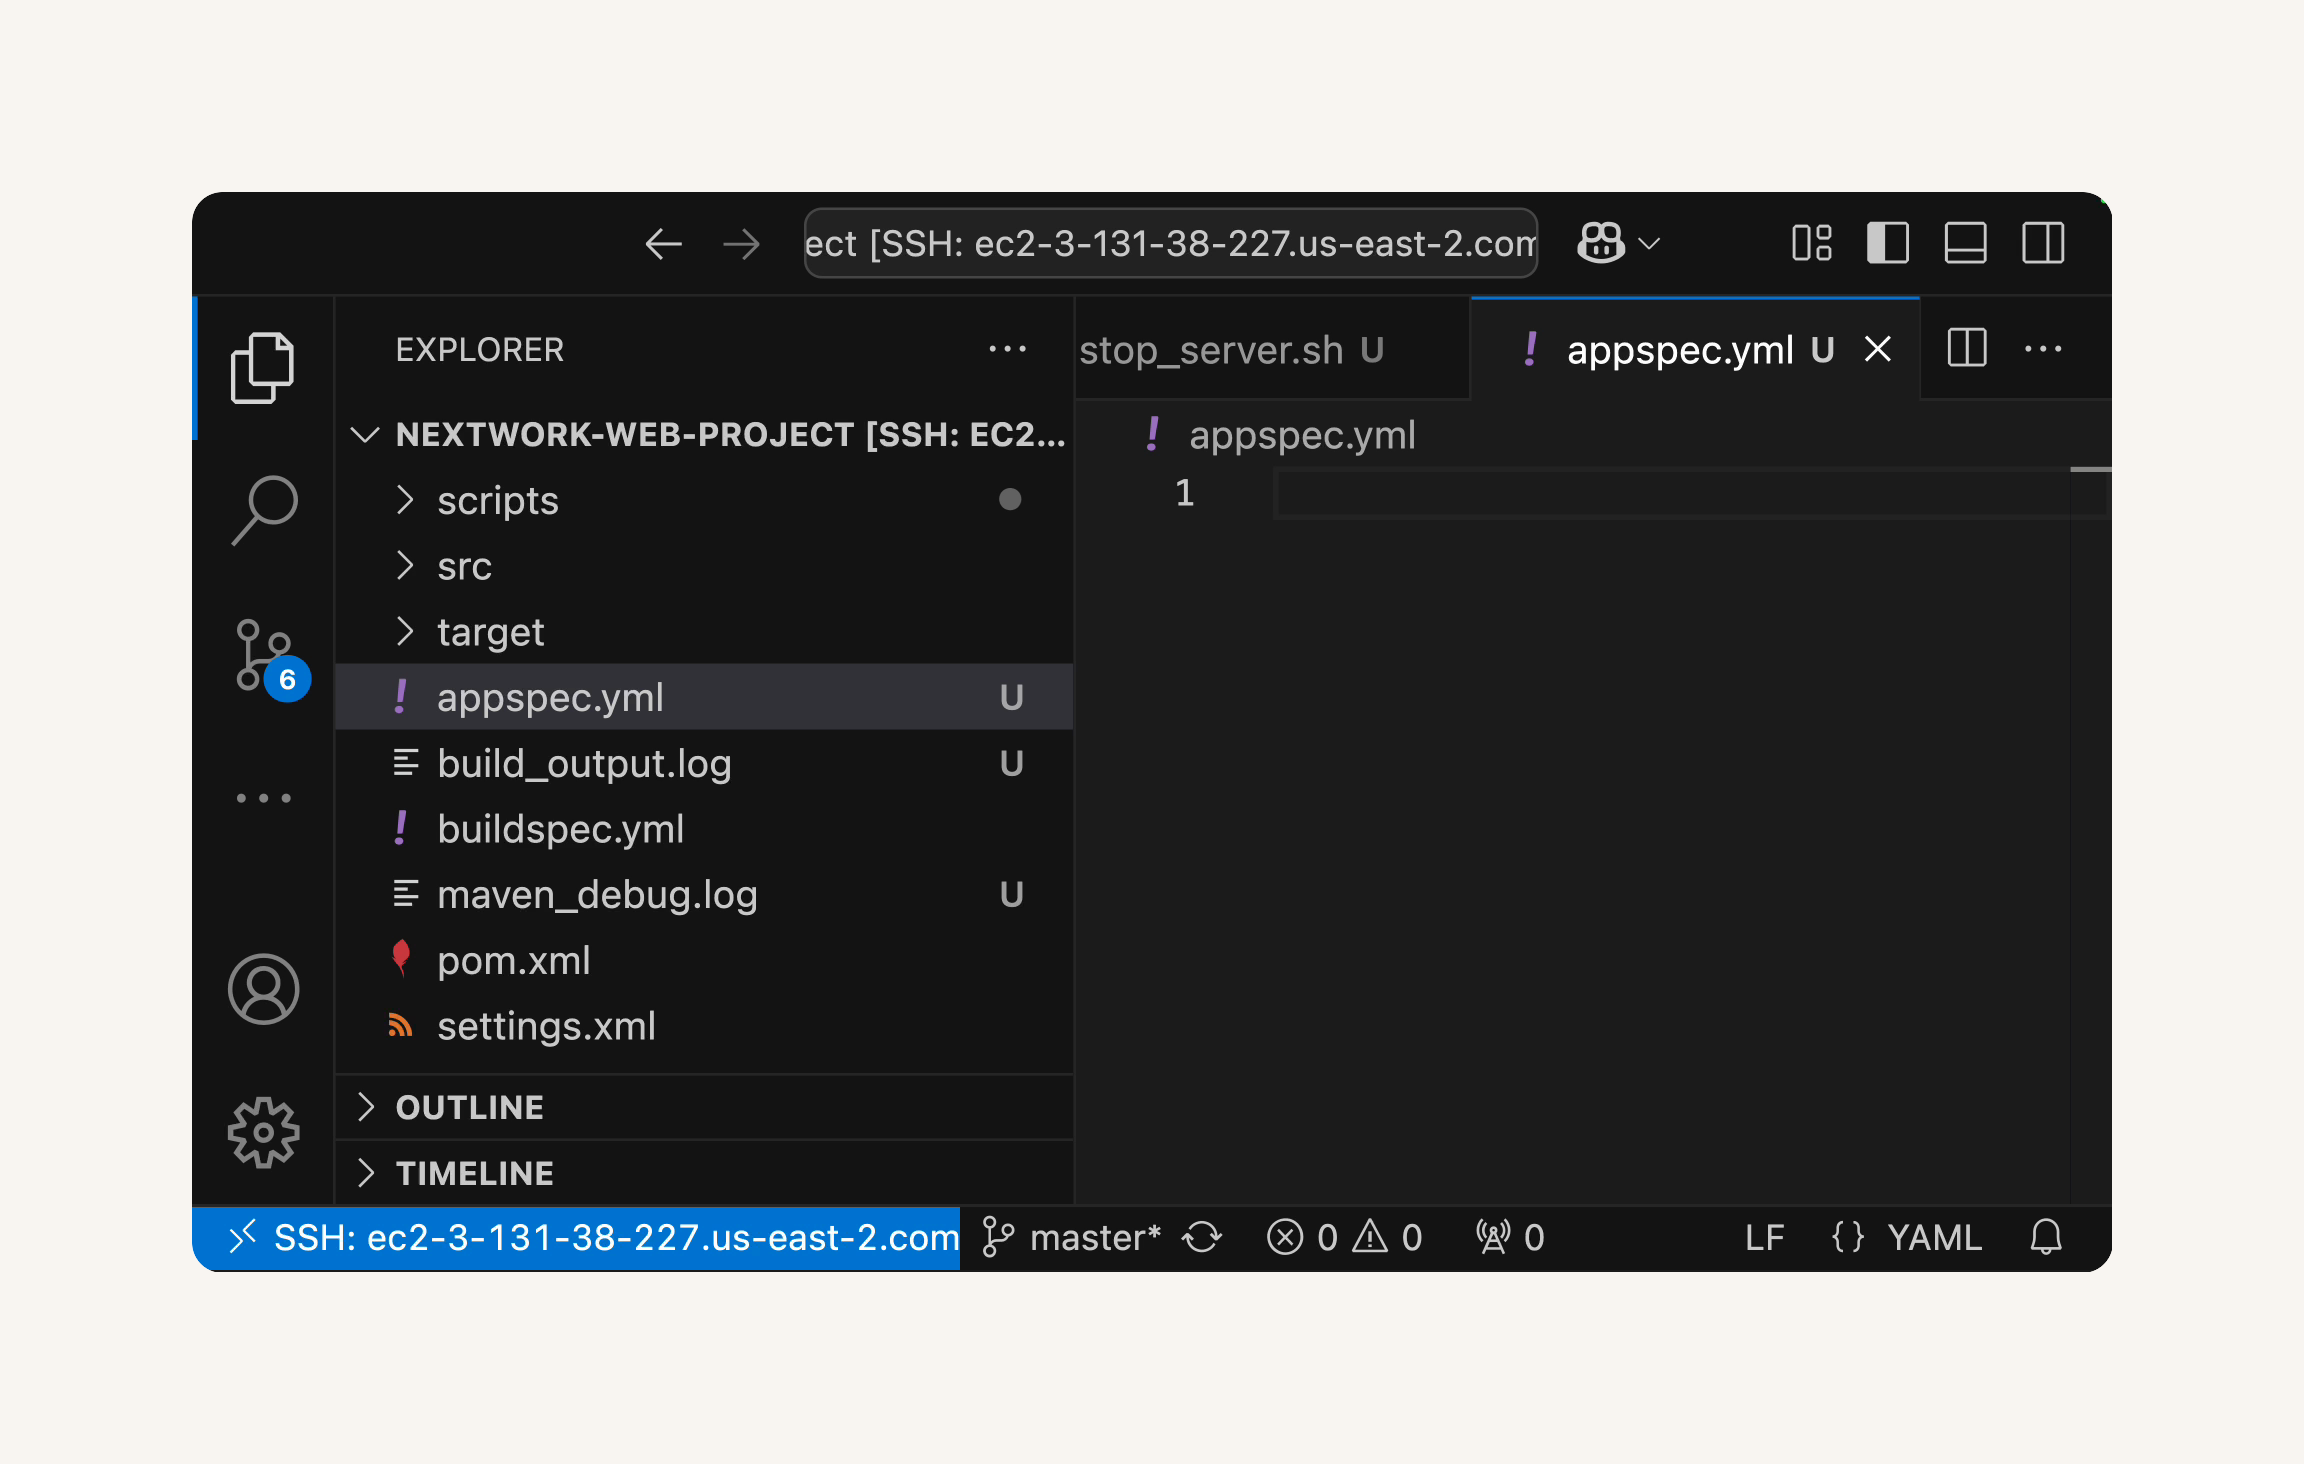
Create appspec.yml
Add the following content to appspec.yml

version: 0.0
os: linux
files:
  - source: /target/nextwork-web-project.war
    destination: /usr/share/tomcat/webapps/
hooks:
  BeforeInstall:
    - location: scripts/install_dependencies.sh
      timeout: 300
      runas: root
  ApplicationStart:
    - location: scripts/start_server.sh
      timeout: 300
      runas: root
  ApplicationStop:
    - location: scripts/stop_server.sh
      timeout: 300
      runas: root
Update buildspec.yml File
Open buildspec.yml and modify the artifacts section to include appspec.yml and the scripts folder:
  Add the following content to  buildspec.yml:

  artifacts:
    files:
      - target/nextwork-web-project.war
      - appspec.yml
      - scripts/**/*
    discard-paths: no
Commit and Push Changes to GitHub, Push changes to your GitHub repository using git push
- Set Up CodeDeploy
Create a CodeDeploy application, which is an application that you want to deploy.
Create a CodeDeploy deployment group, which is like a folder of deployment settings for the same application.
Give CodeDeploy the permission to access CodeArtifact.
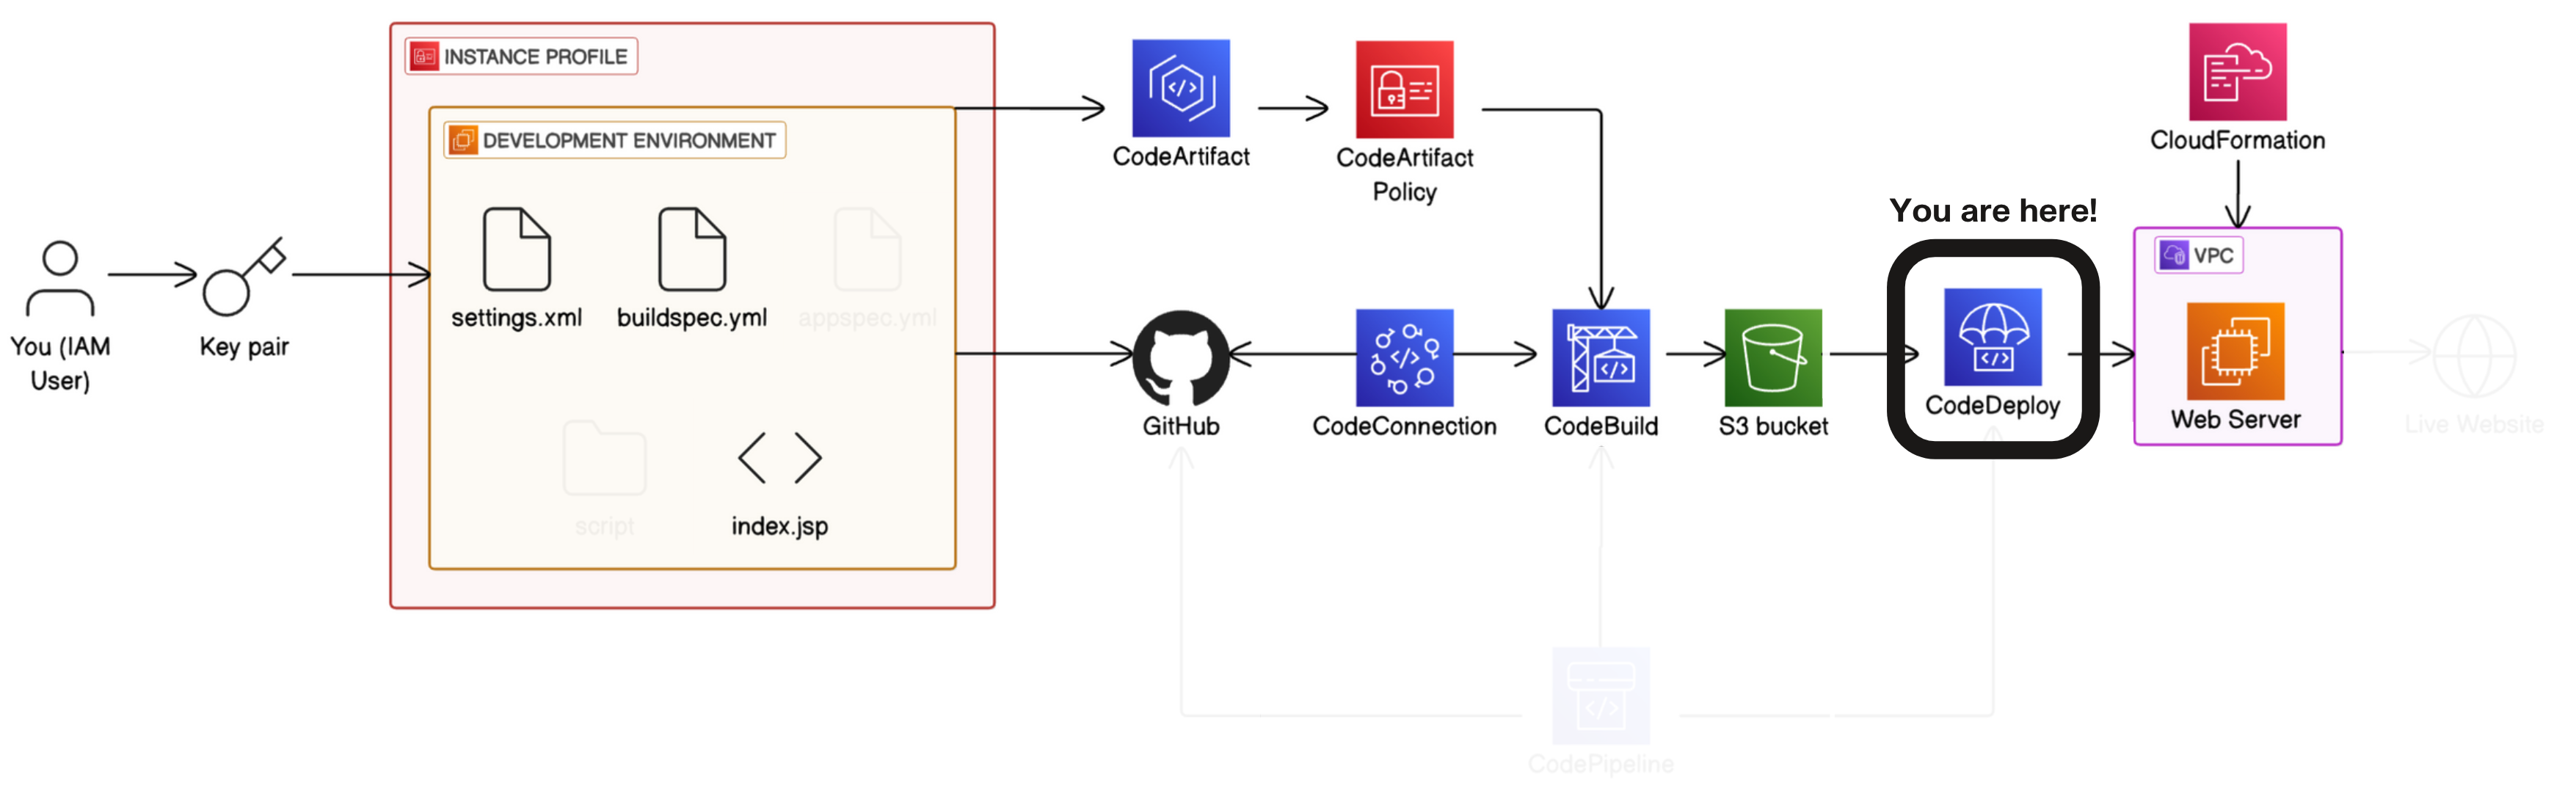
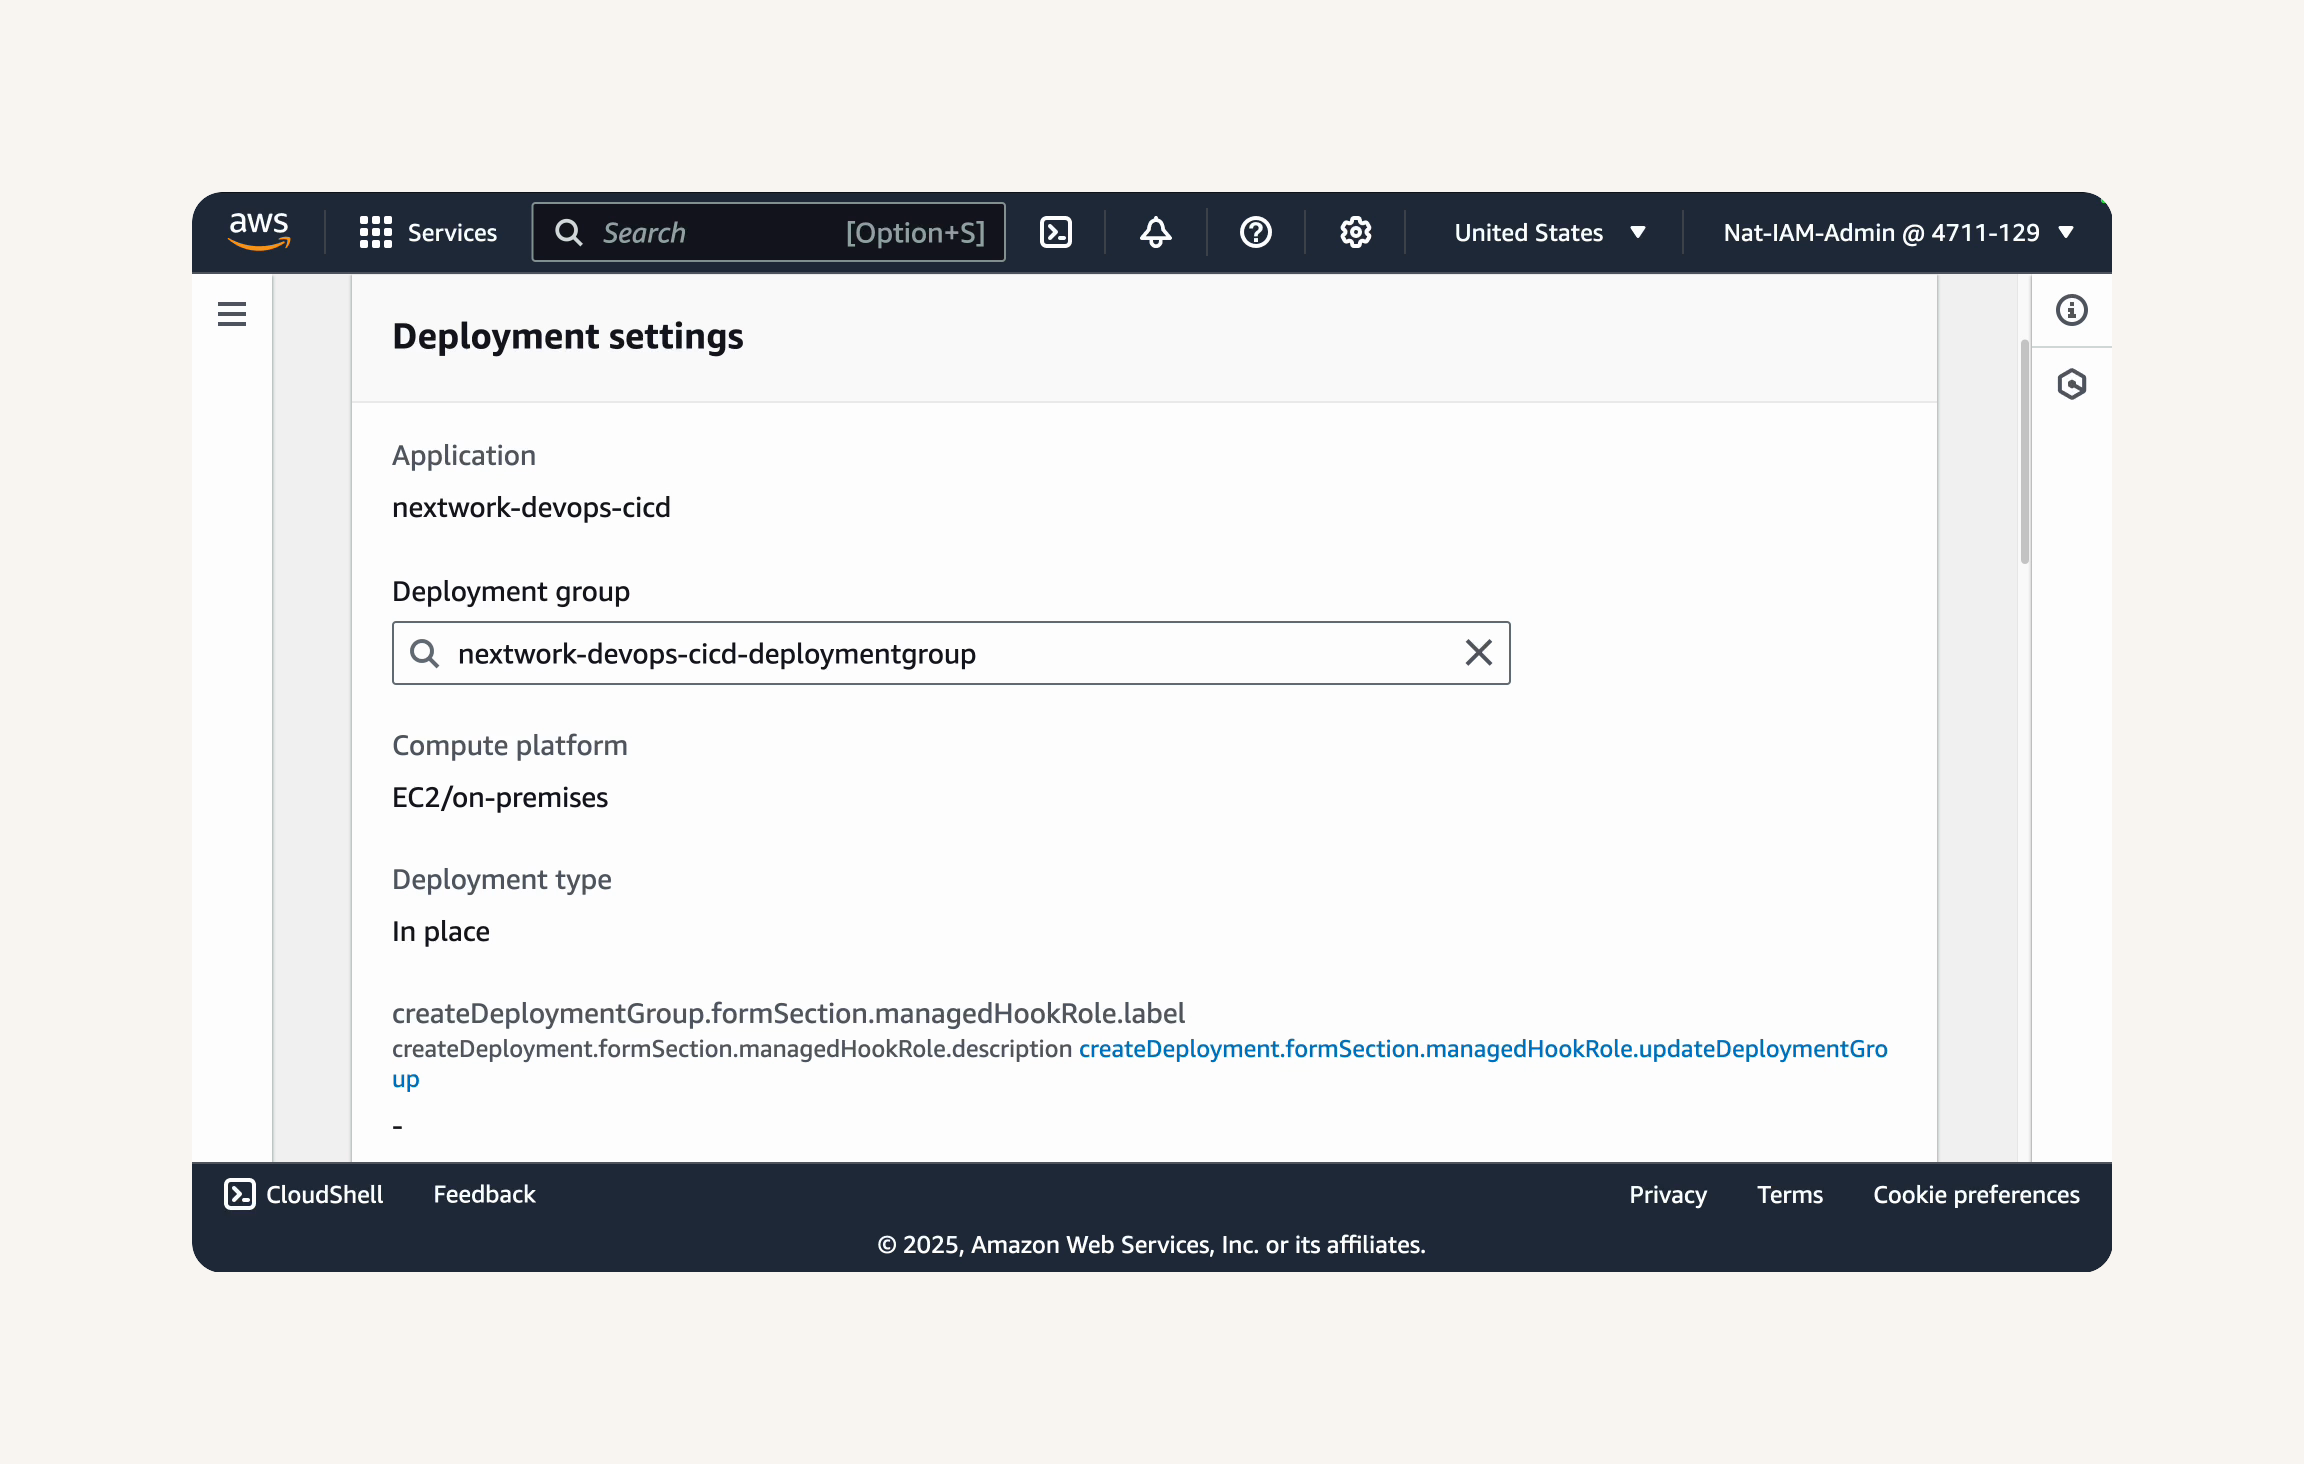
CodeDeploy → select Applications in the left hand navigation menu → Create application. → Application name: nextwork-devops-cicd → Compute platform: EC2/On-premises → Create application.
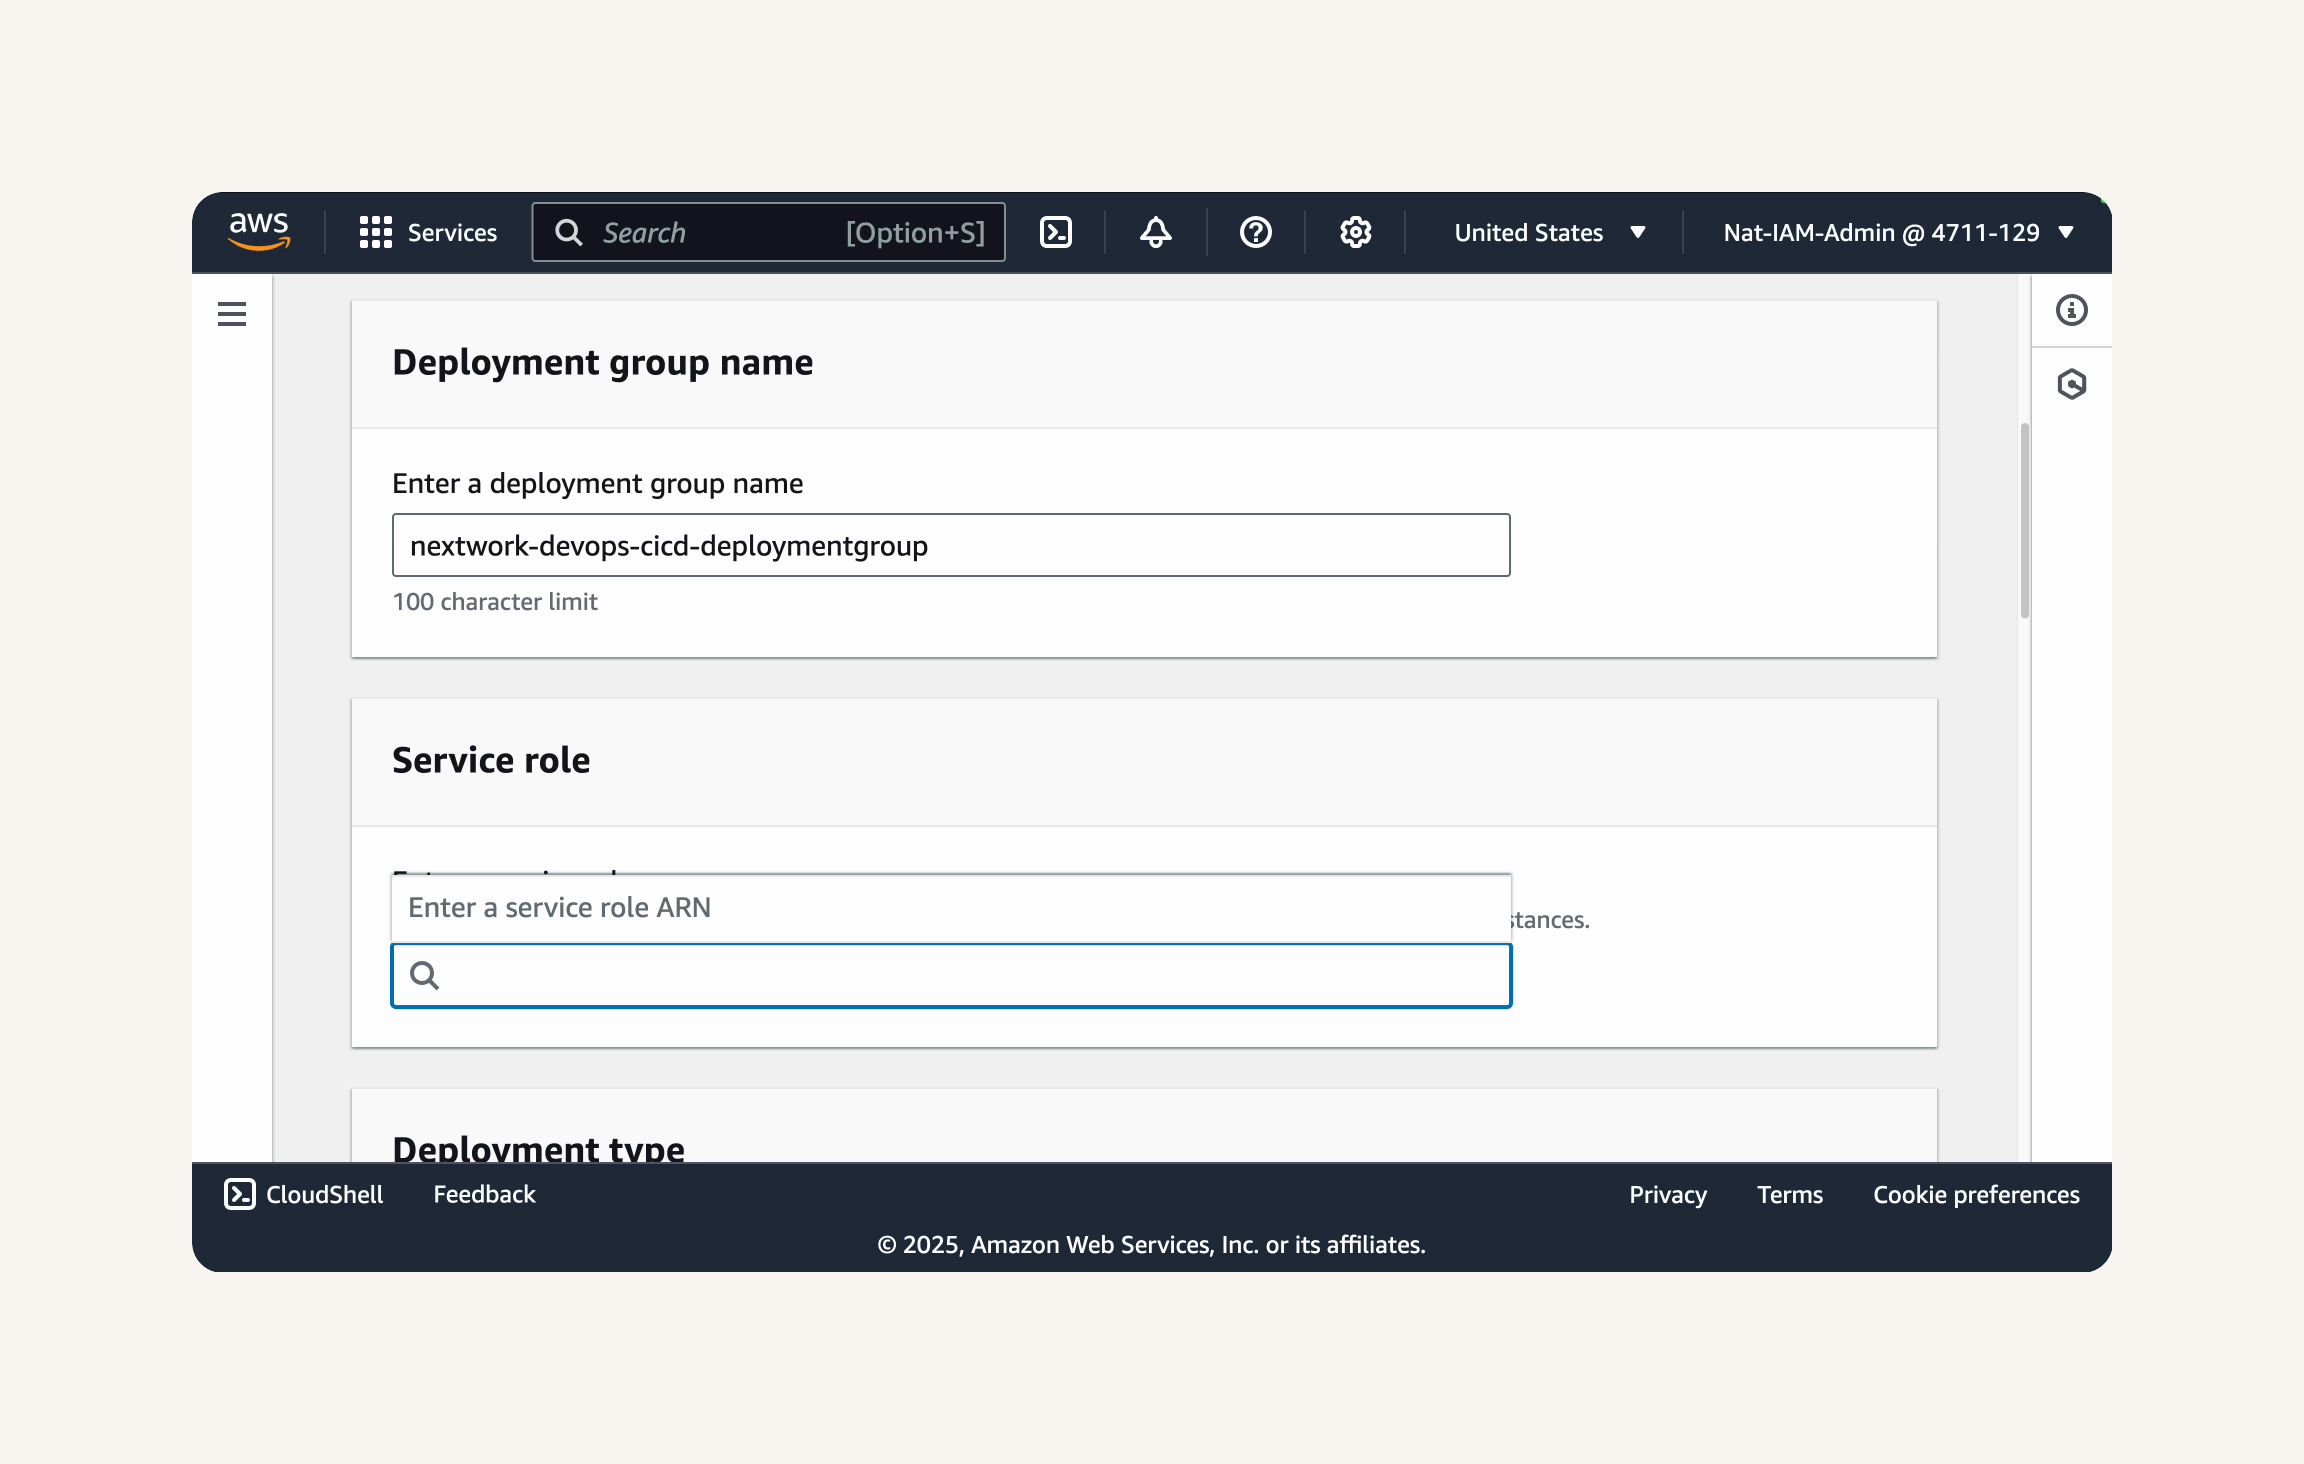
Create Deployment Group→ Deployment group name: nextwork-devops-cicd-deploymentgroup → service role: We'll have to create a new service role.
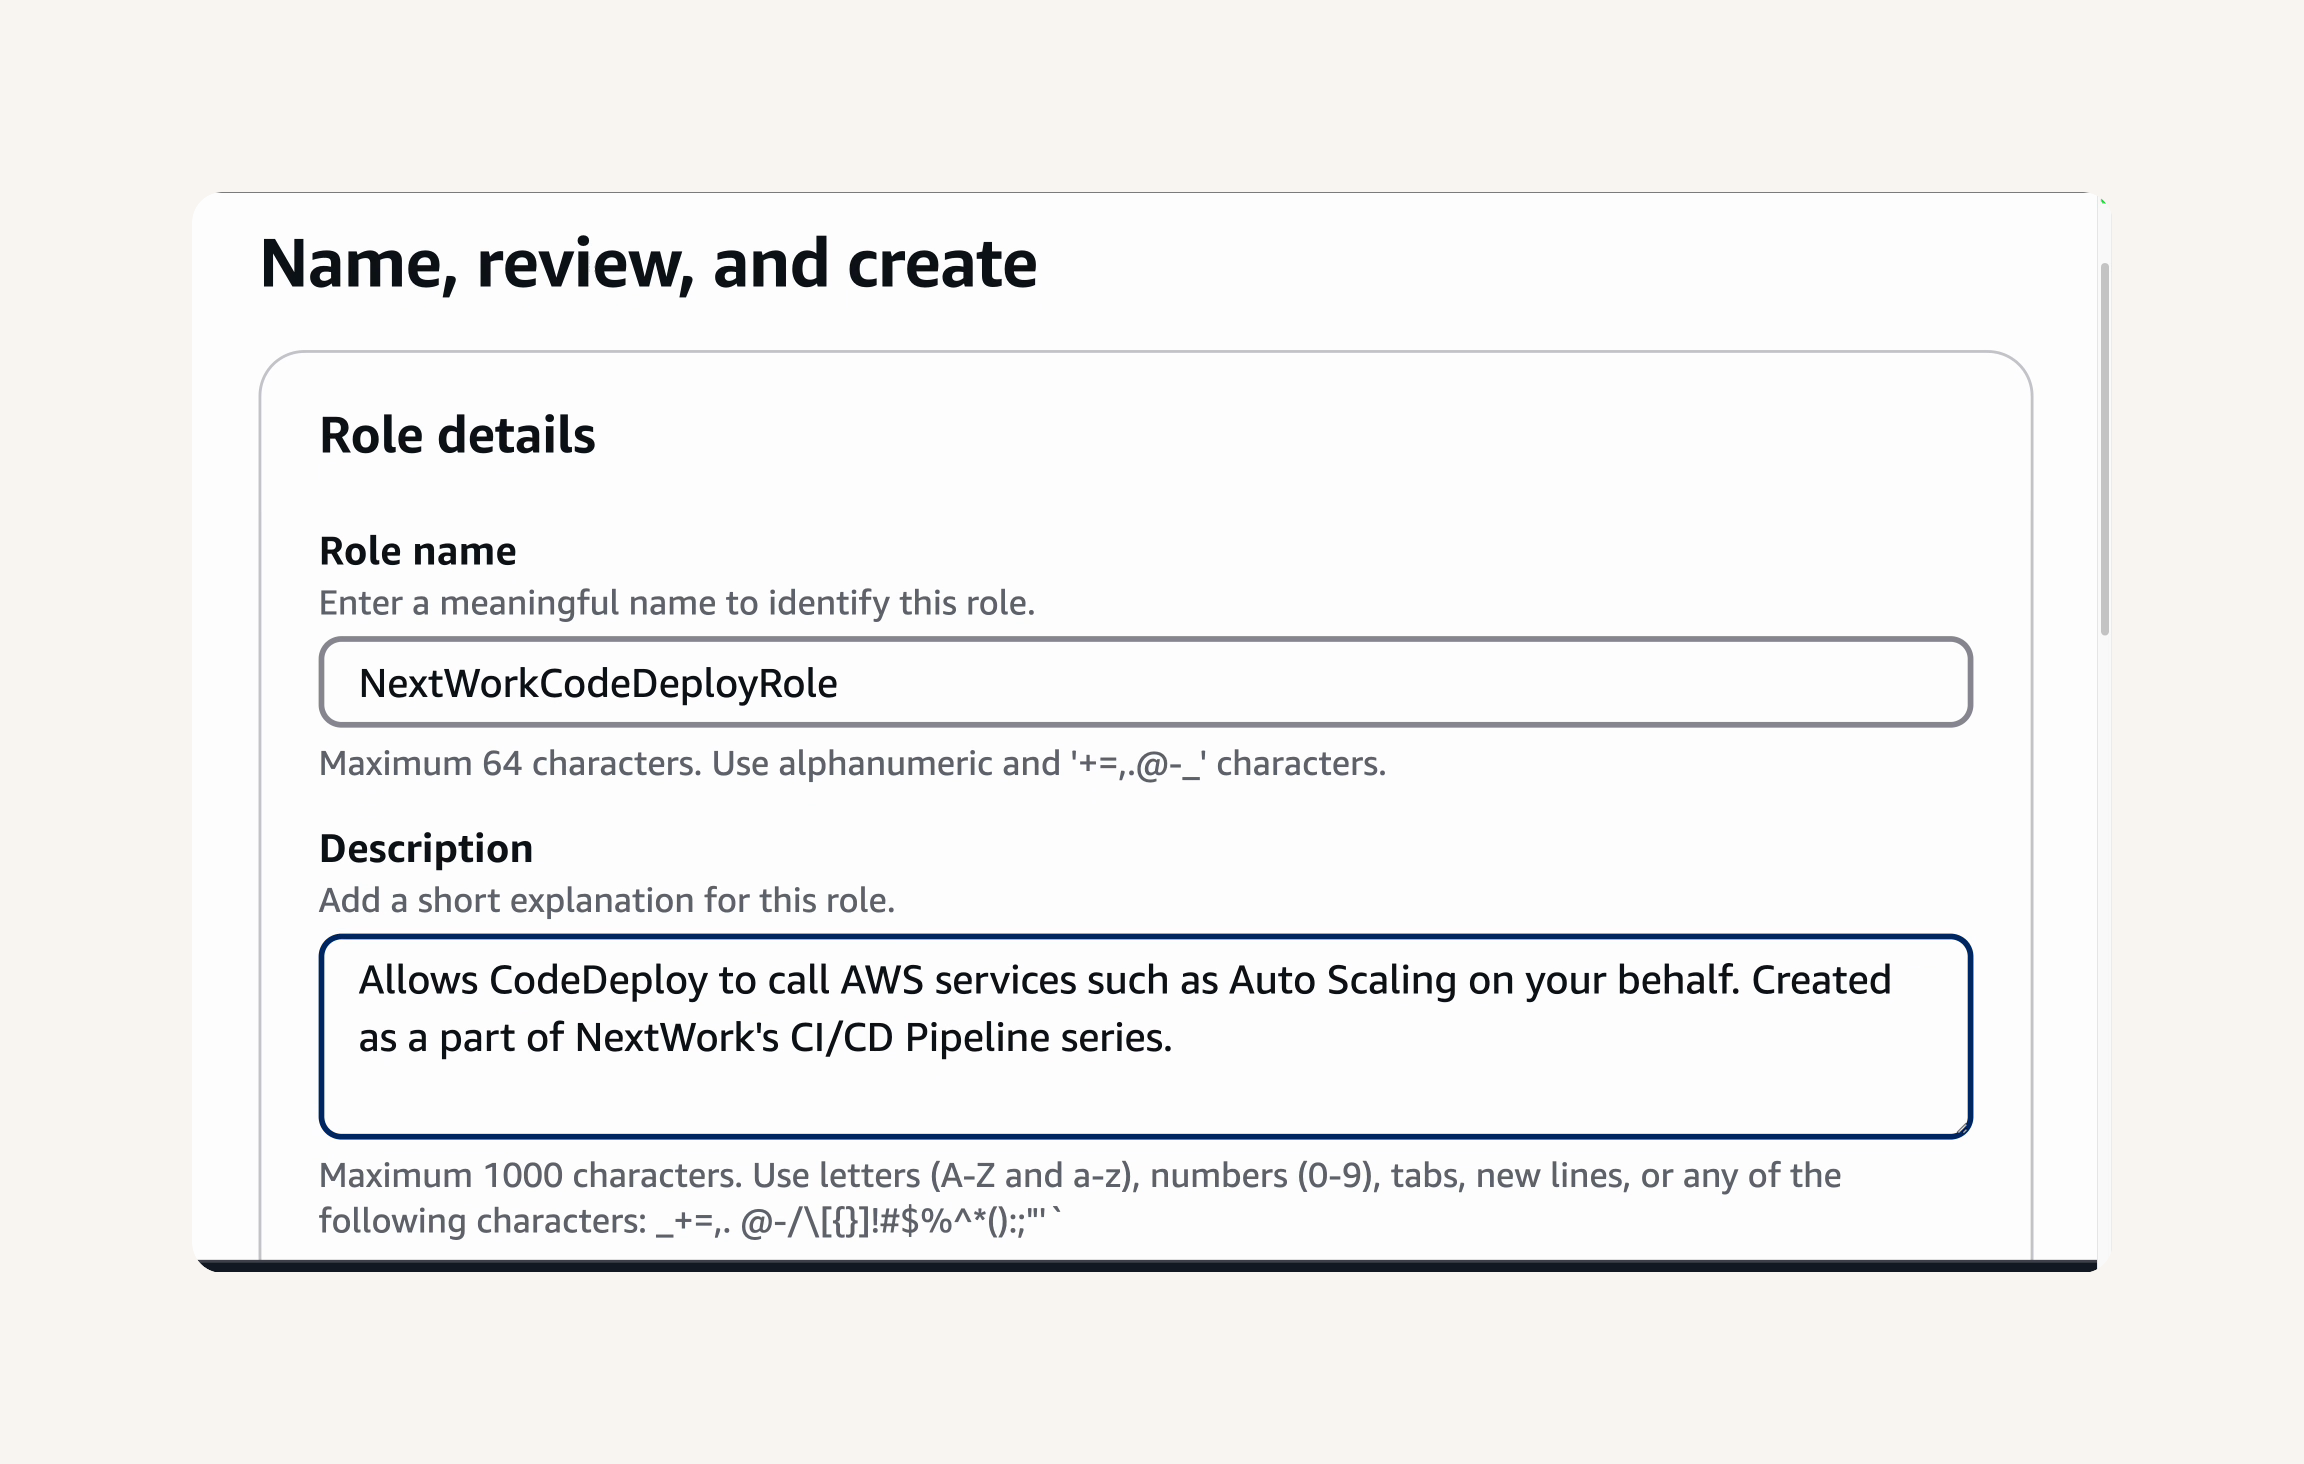
Create an IAM Role for CodeDeploy:
IAM console - roles → create role →trusted entity type: AWS service → use case: codeDeploy → Next → Role name: NextWorkCodeDeployRole → Review the Permissions policies and make sure AWSCodeDeployRole is attached → create role
CodeDeploy console → Select Service Role → NextWorkCodeDeployRole → Deployment type: In-place → Environment configuration: Amazon EC2 instances → Tag group 1 → Key: role, value: webserver
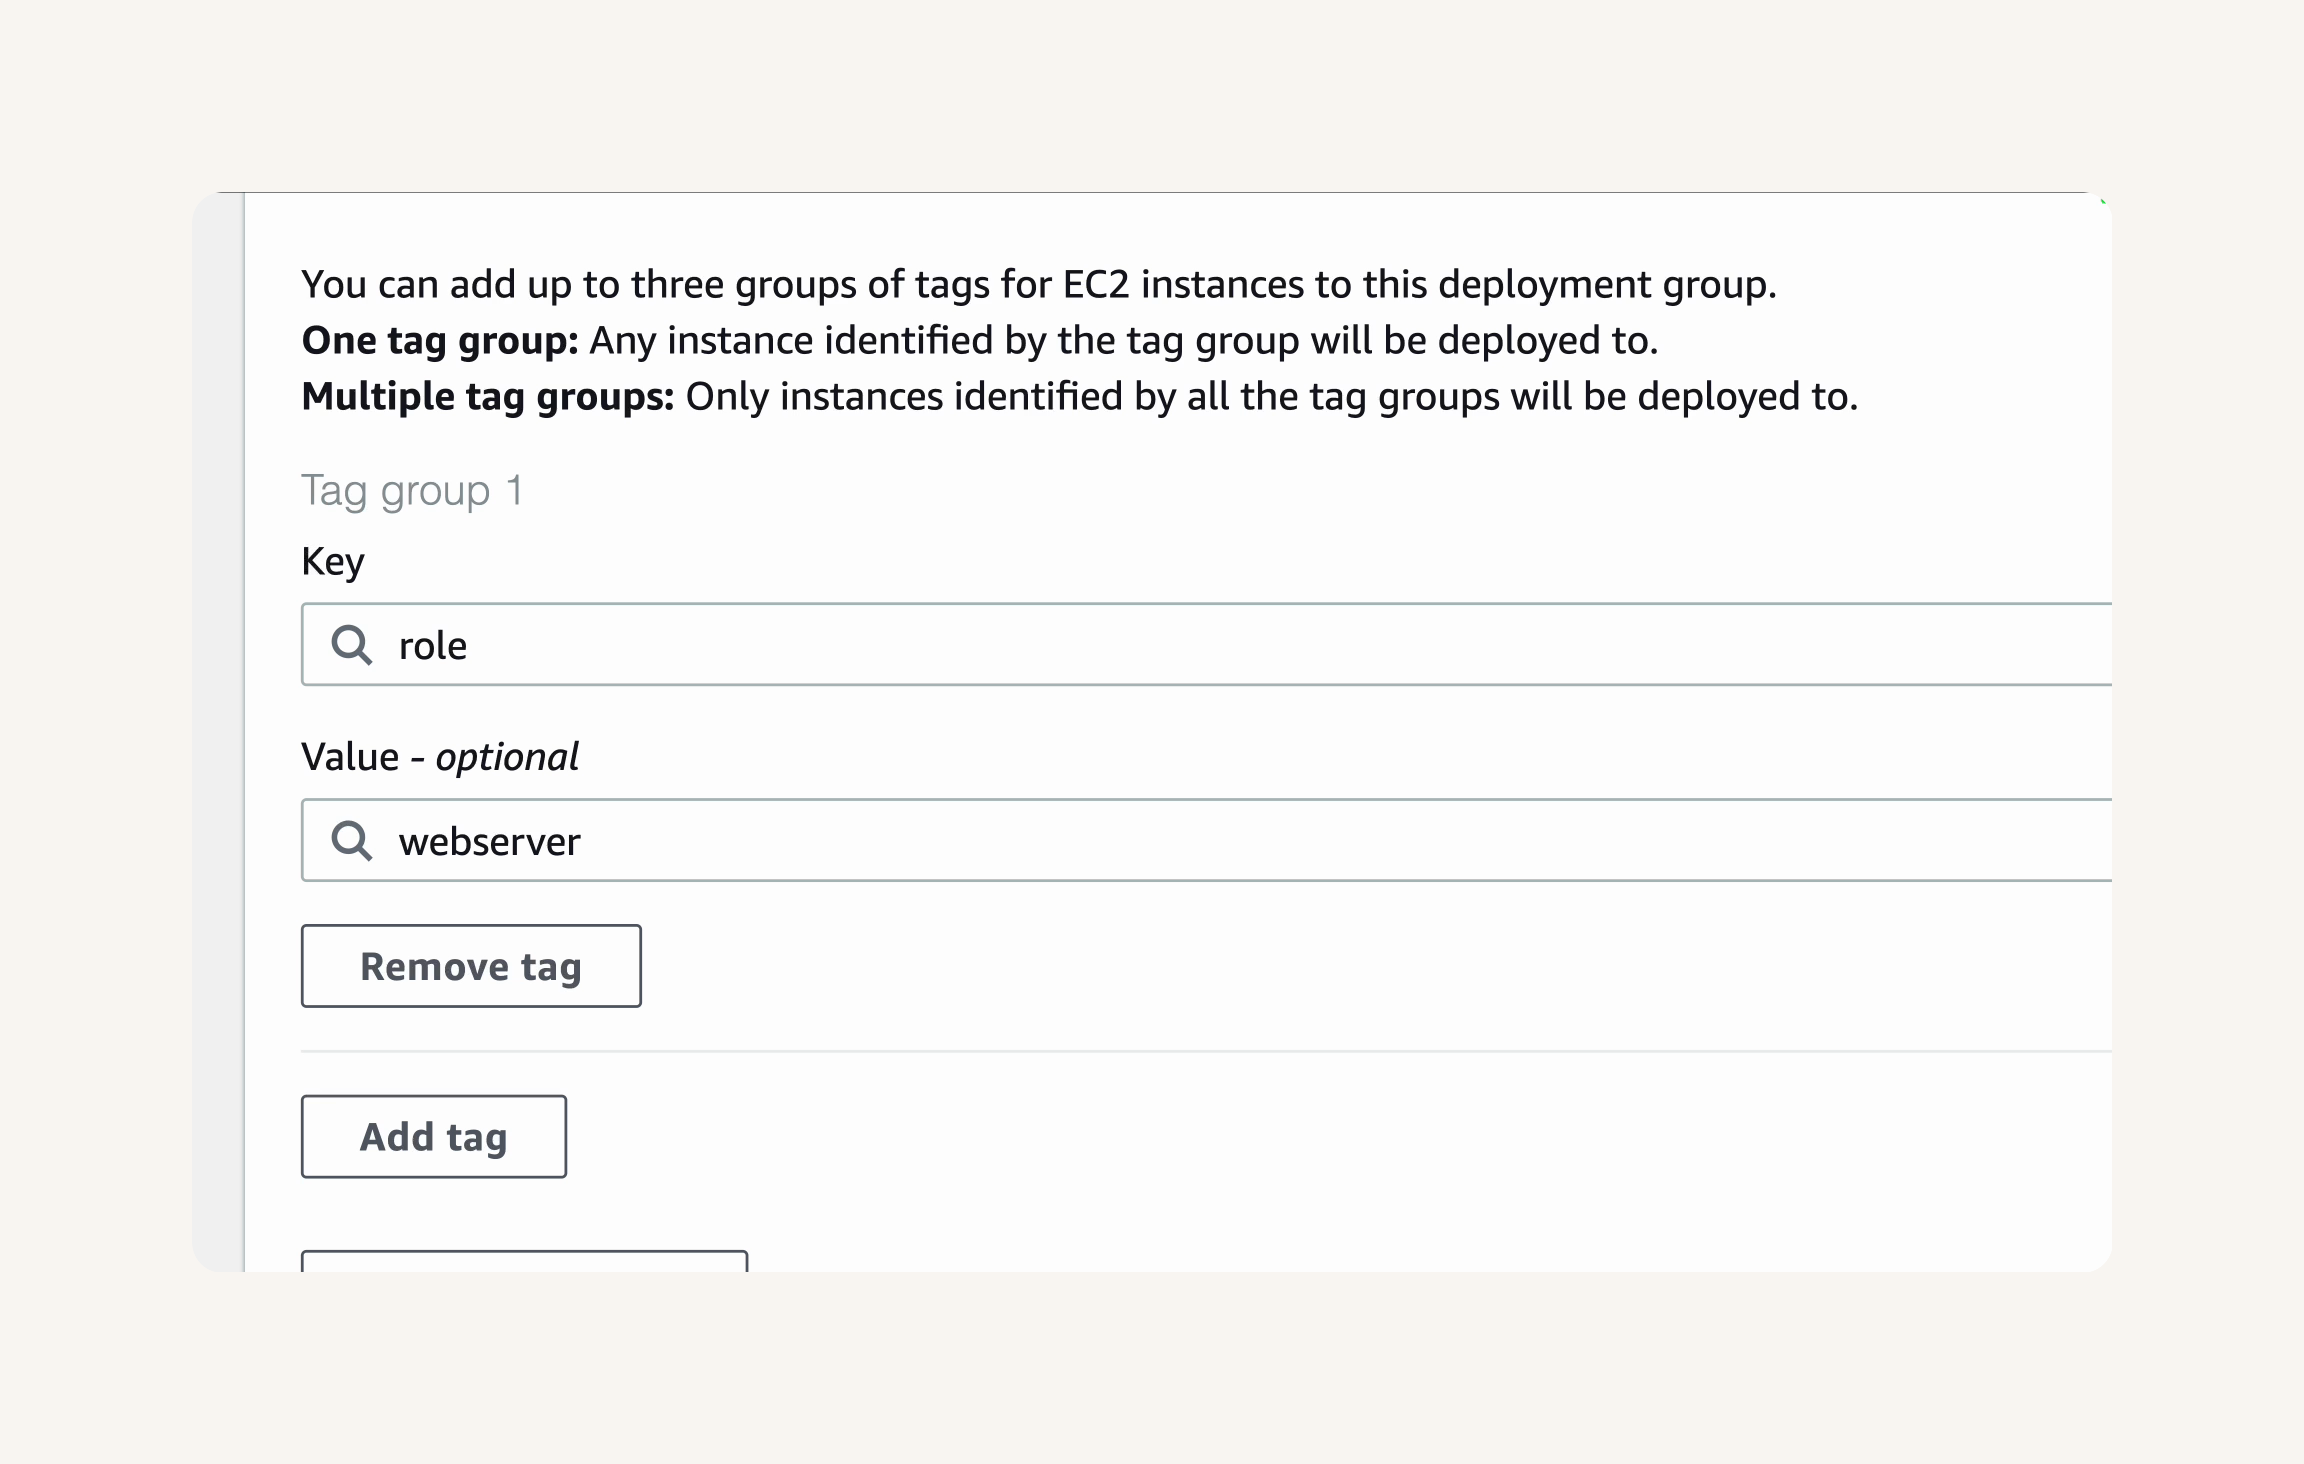
- Check the line below your tag settings - you might notice that 1 unique matched instance is found.
Click Click here for details to view the matched instance.
You'll see an EC2 instance called NextWorkCodeDeployEC2Stack::WebServer - that's the EC2 instance we launched from our CloudFormation template. This confirms to us that the web app will be deployed onto that instance instance.

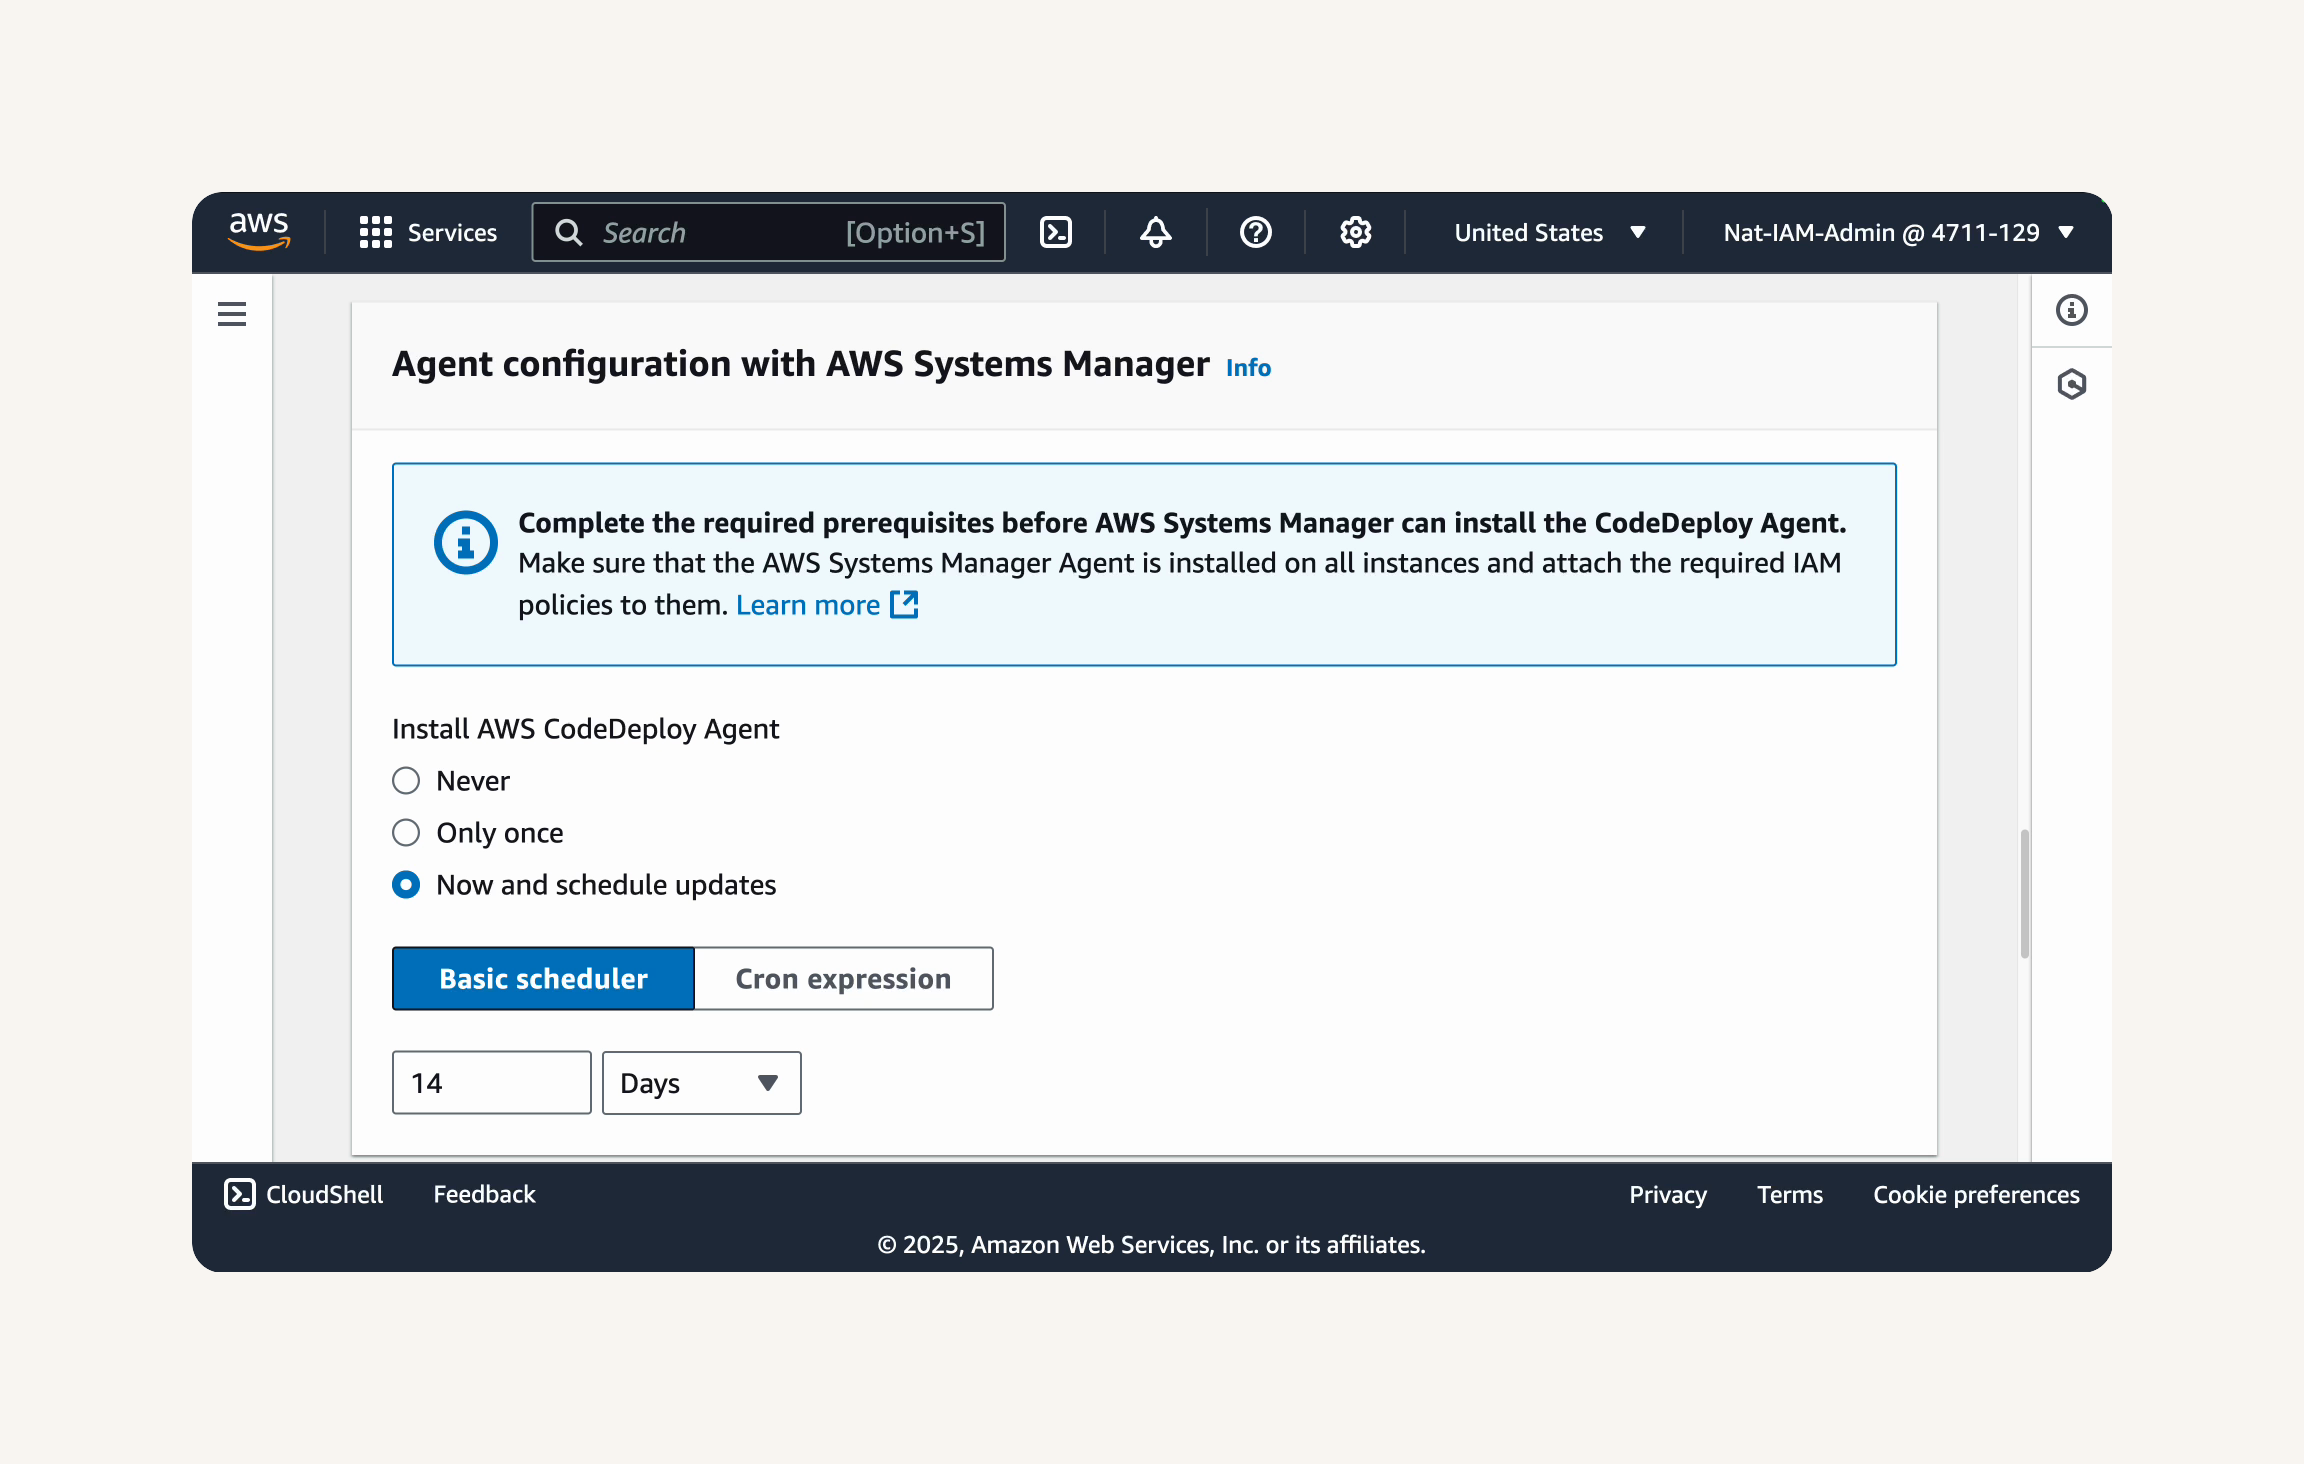
Configure Agent and Deployment Settings:
head back to your CodeDeploy Deployment group → Agent configuration with AWS Systems Manager: Now and schedule updates → Basic scheduler →
14 Days. → Deployment settings: CodeDeployDefault.AllAtOnce → Deselect Enable load balancing: Create deployment group
Create and Verify Deployment
Create deployment. → Some of this deployment configuration is already pre-filled for us.
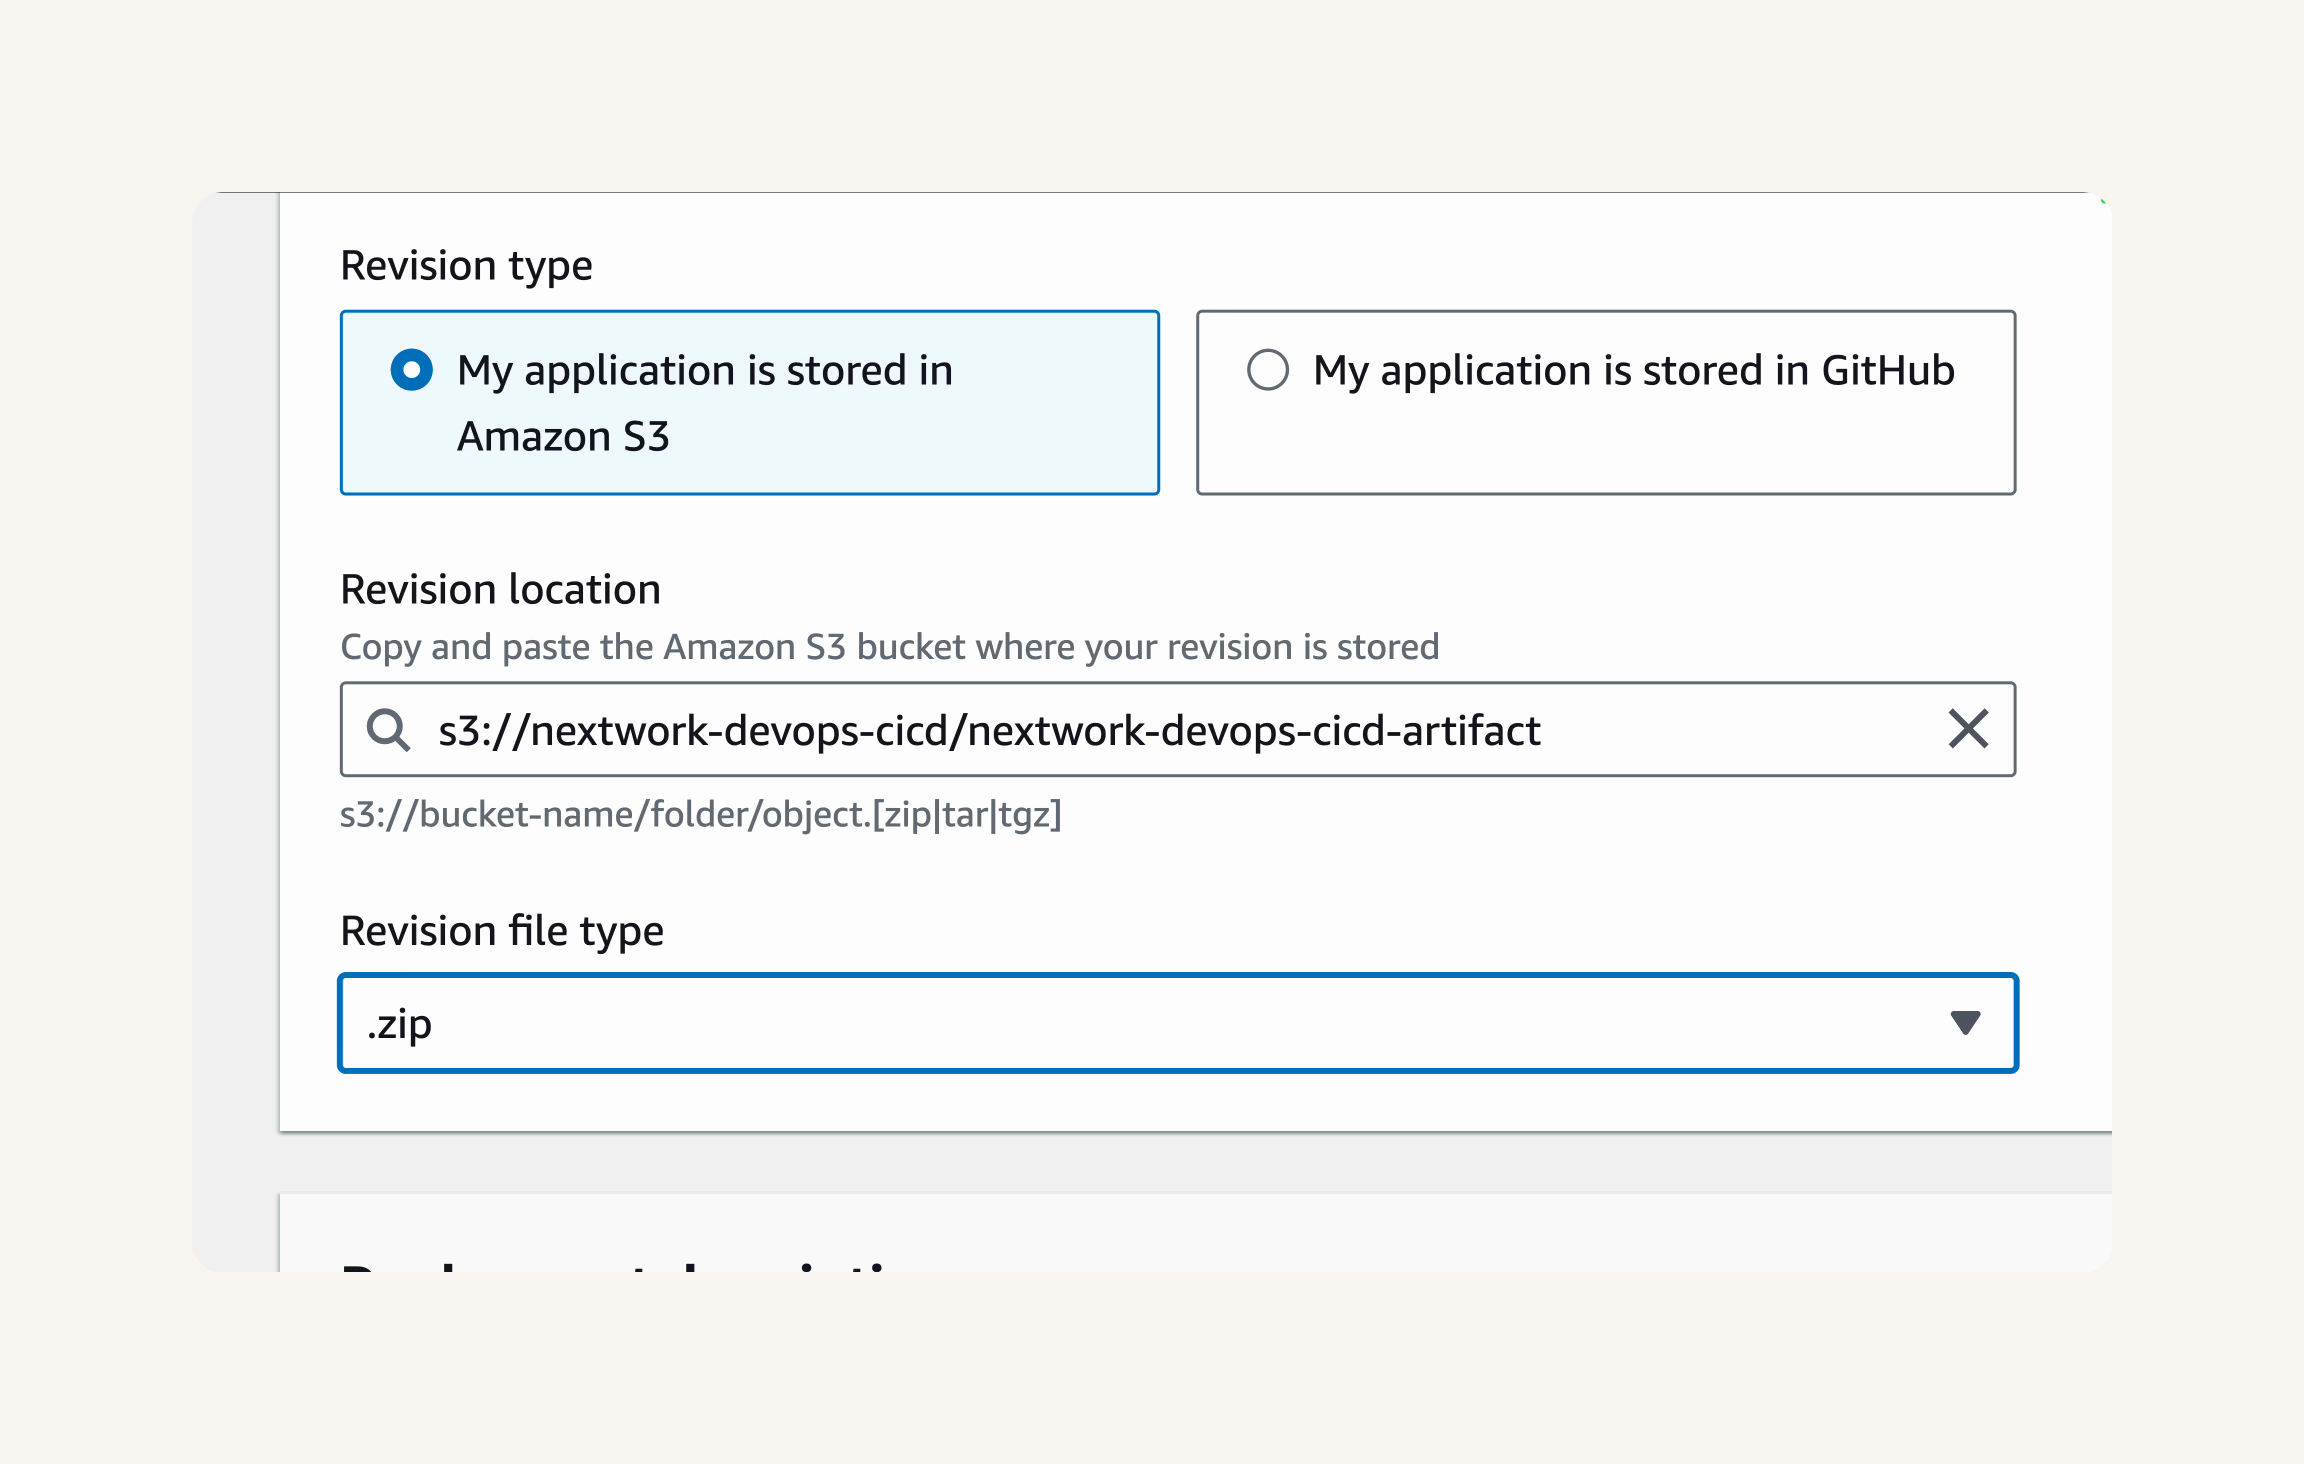
Revision type: My application is stored in Amazon S3

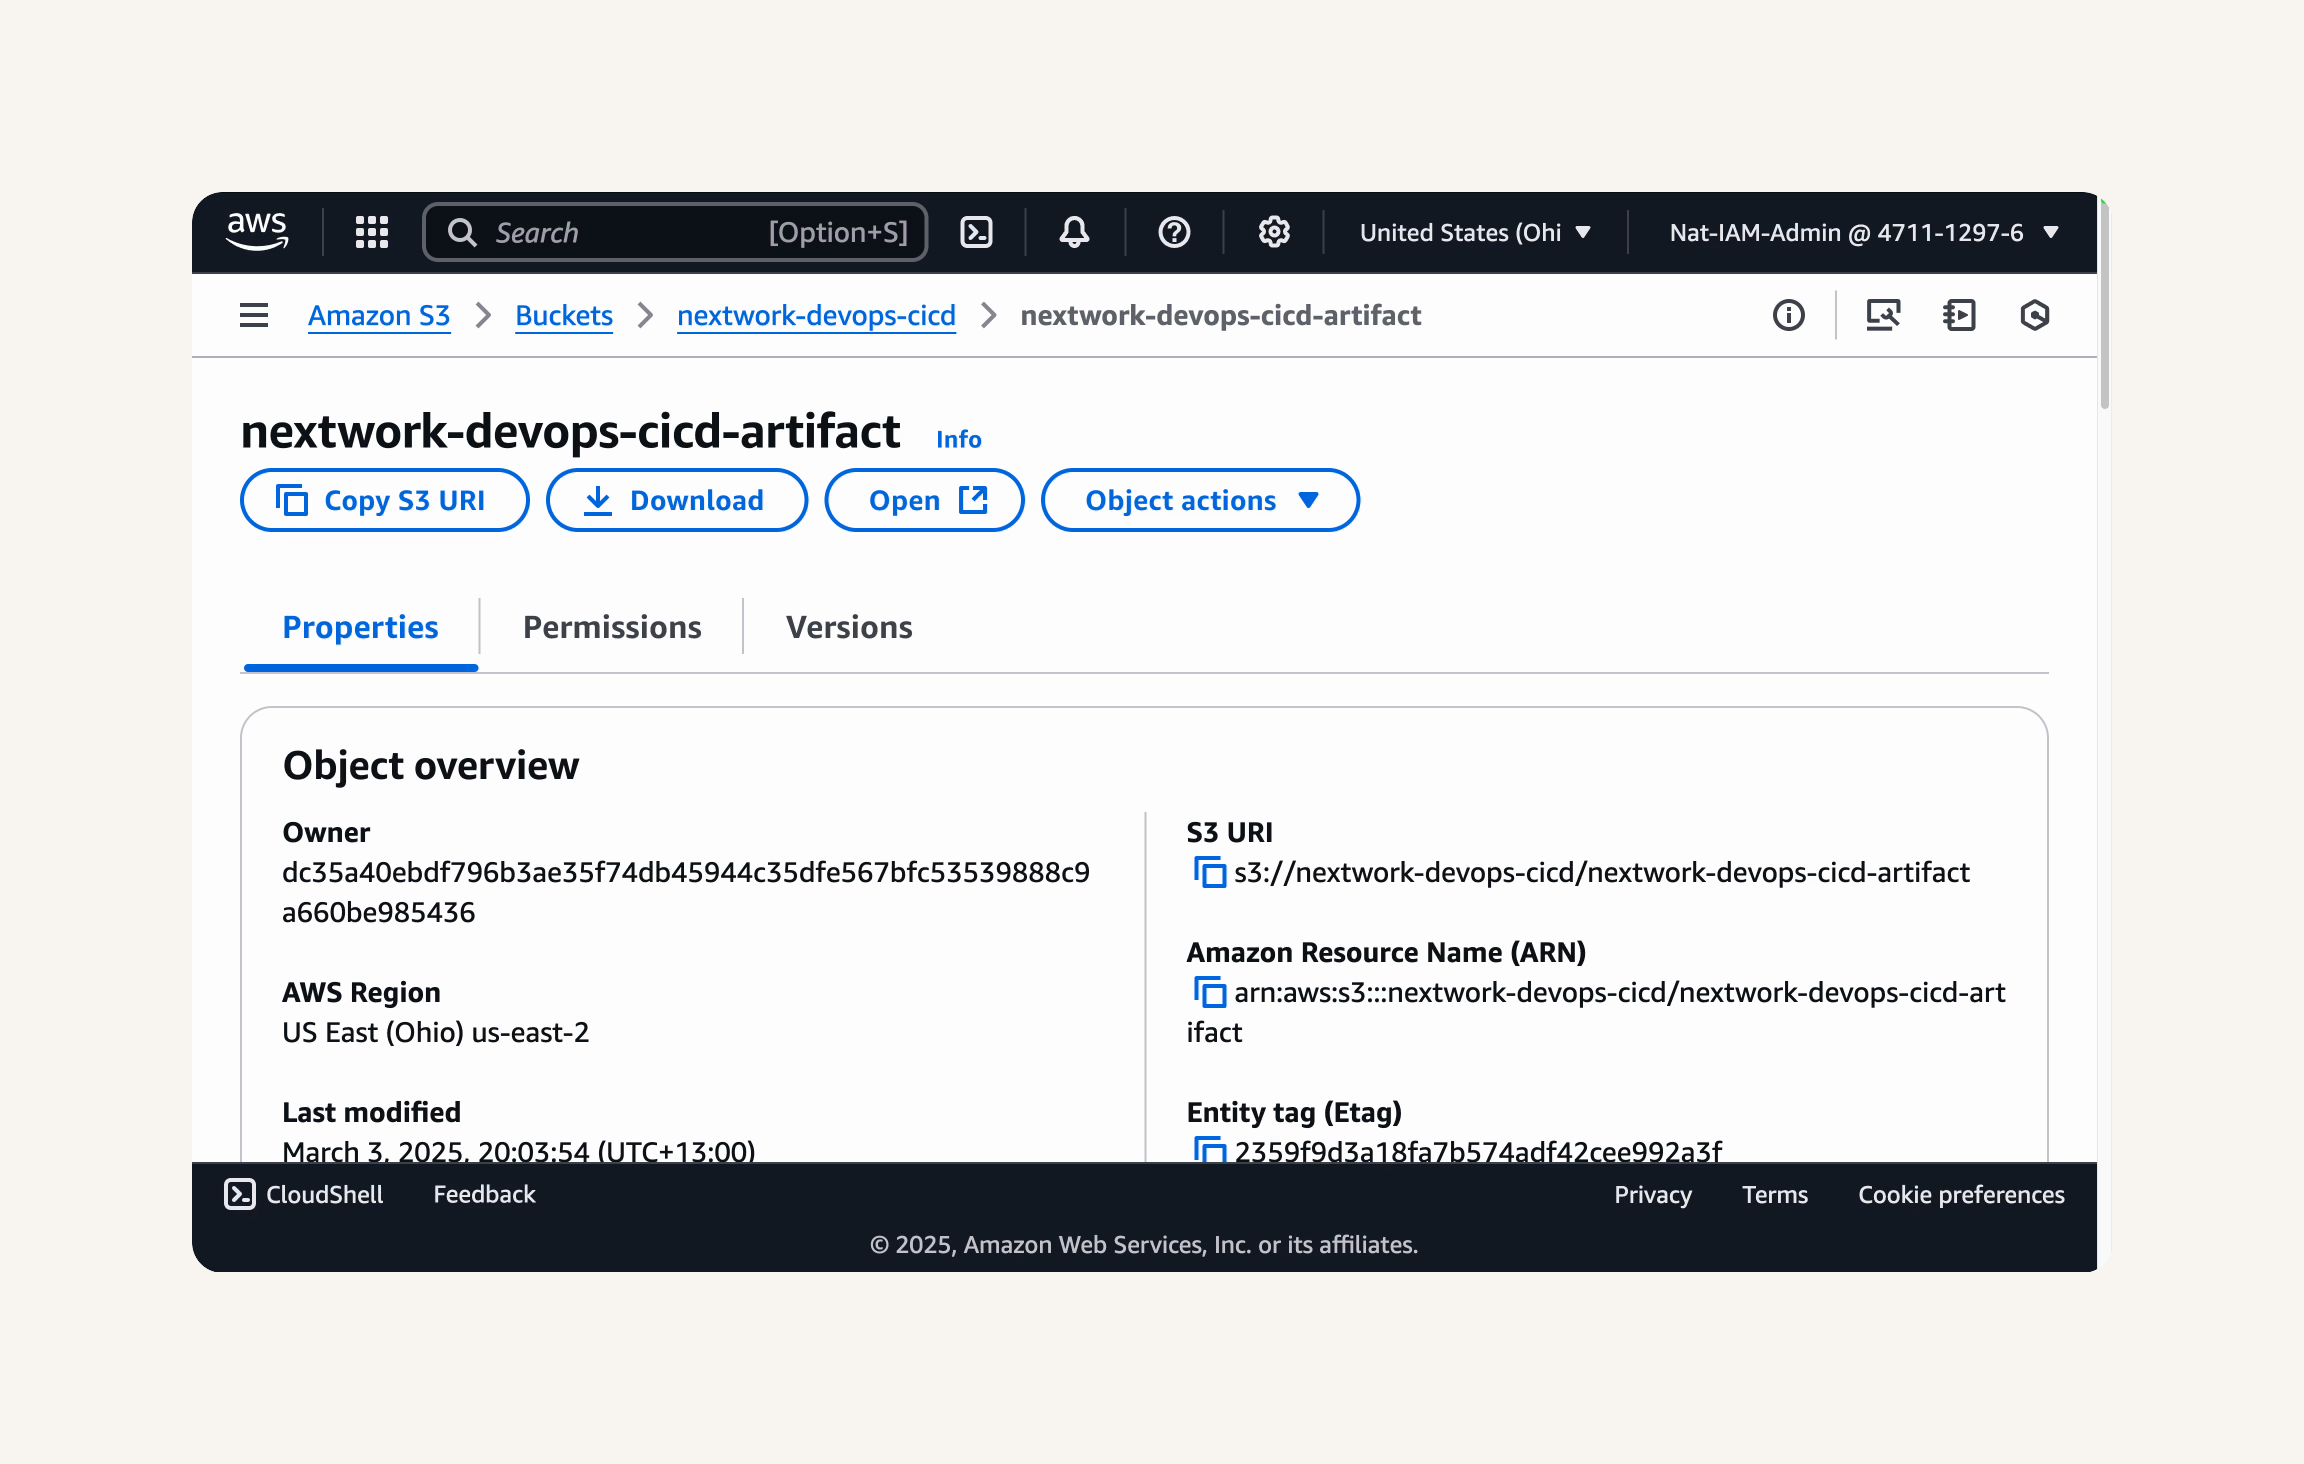
- Head back to your S3 bucket called nextwork-devops-cicd. → Click into the nextwork-devops-cicd-artifact build artifact. → Copy the file's S3 URI. → Paste the S3 URI into the Revision location field → Revision file type: zip → Create deployment.
- CodeDeploy kicks off a deployment of your web app.

Deployment lifecycle events → monitor the events by clicking View events.
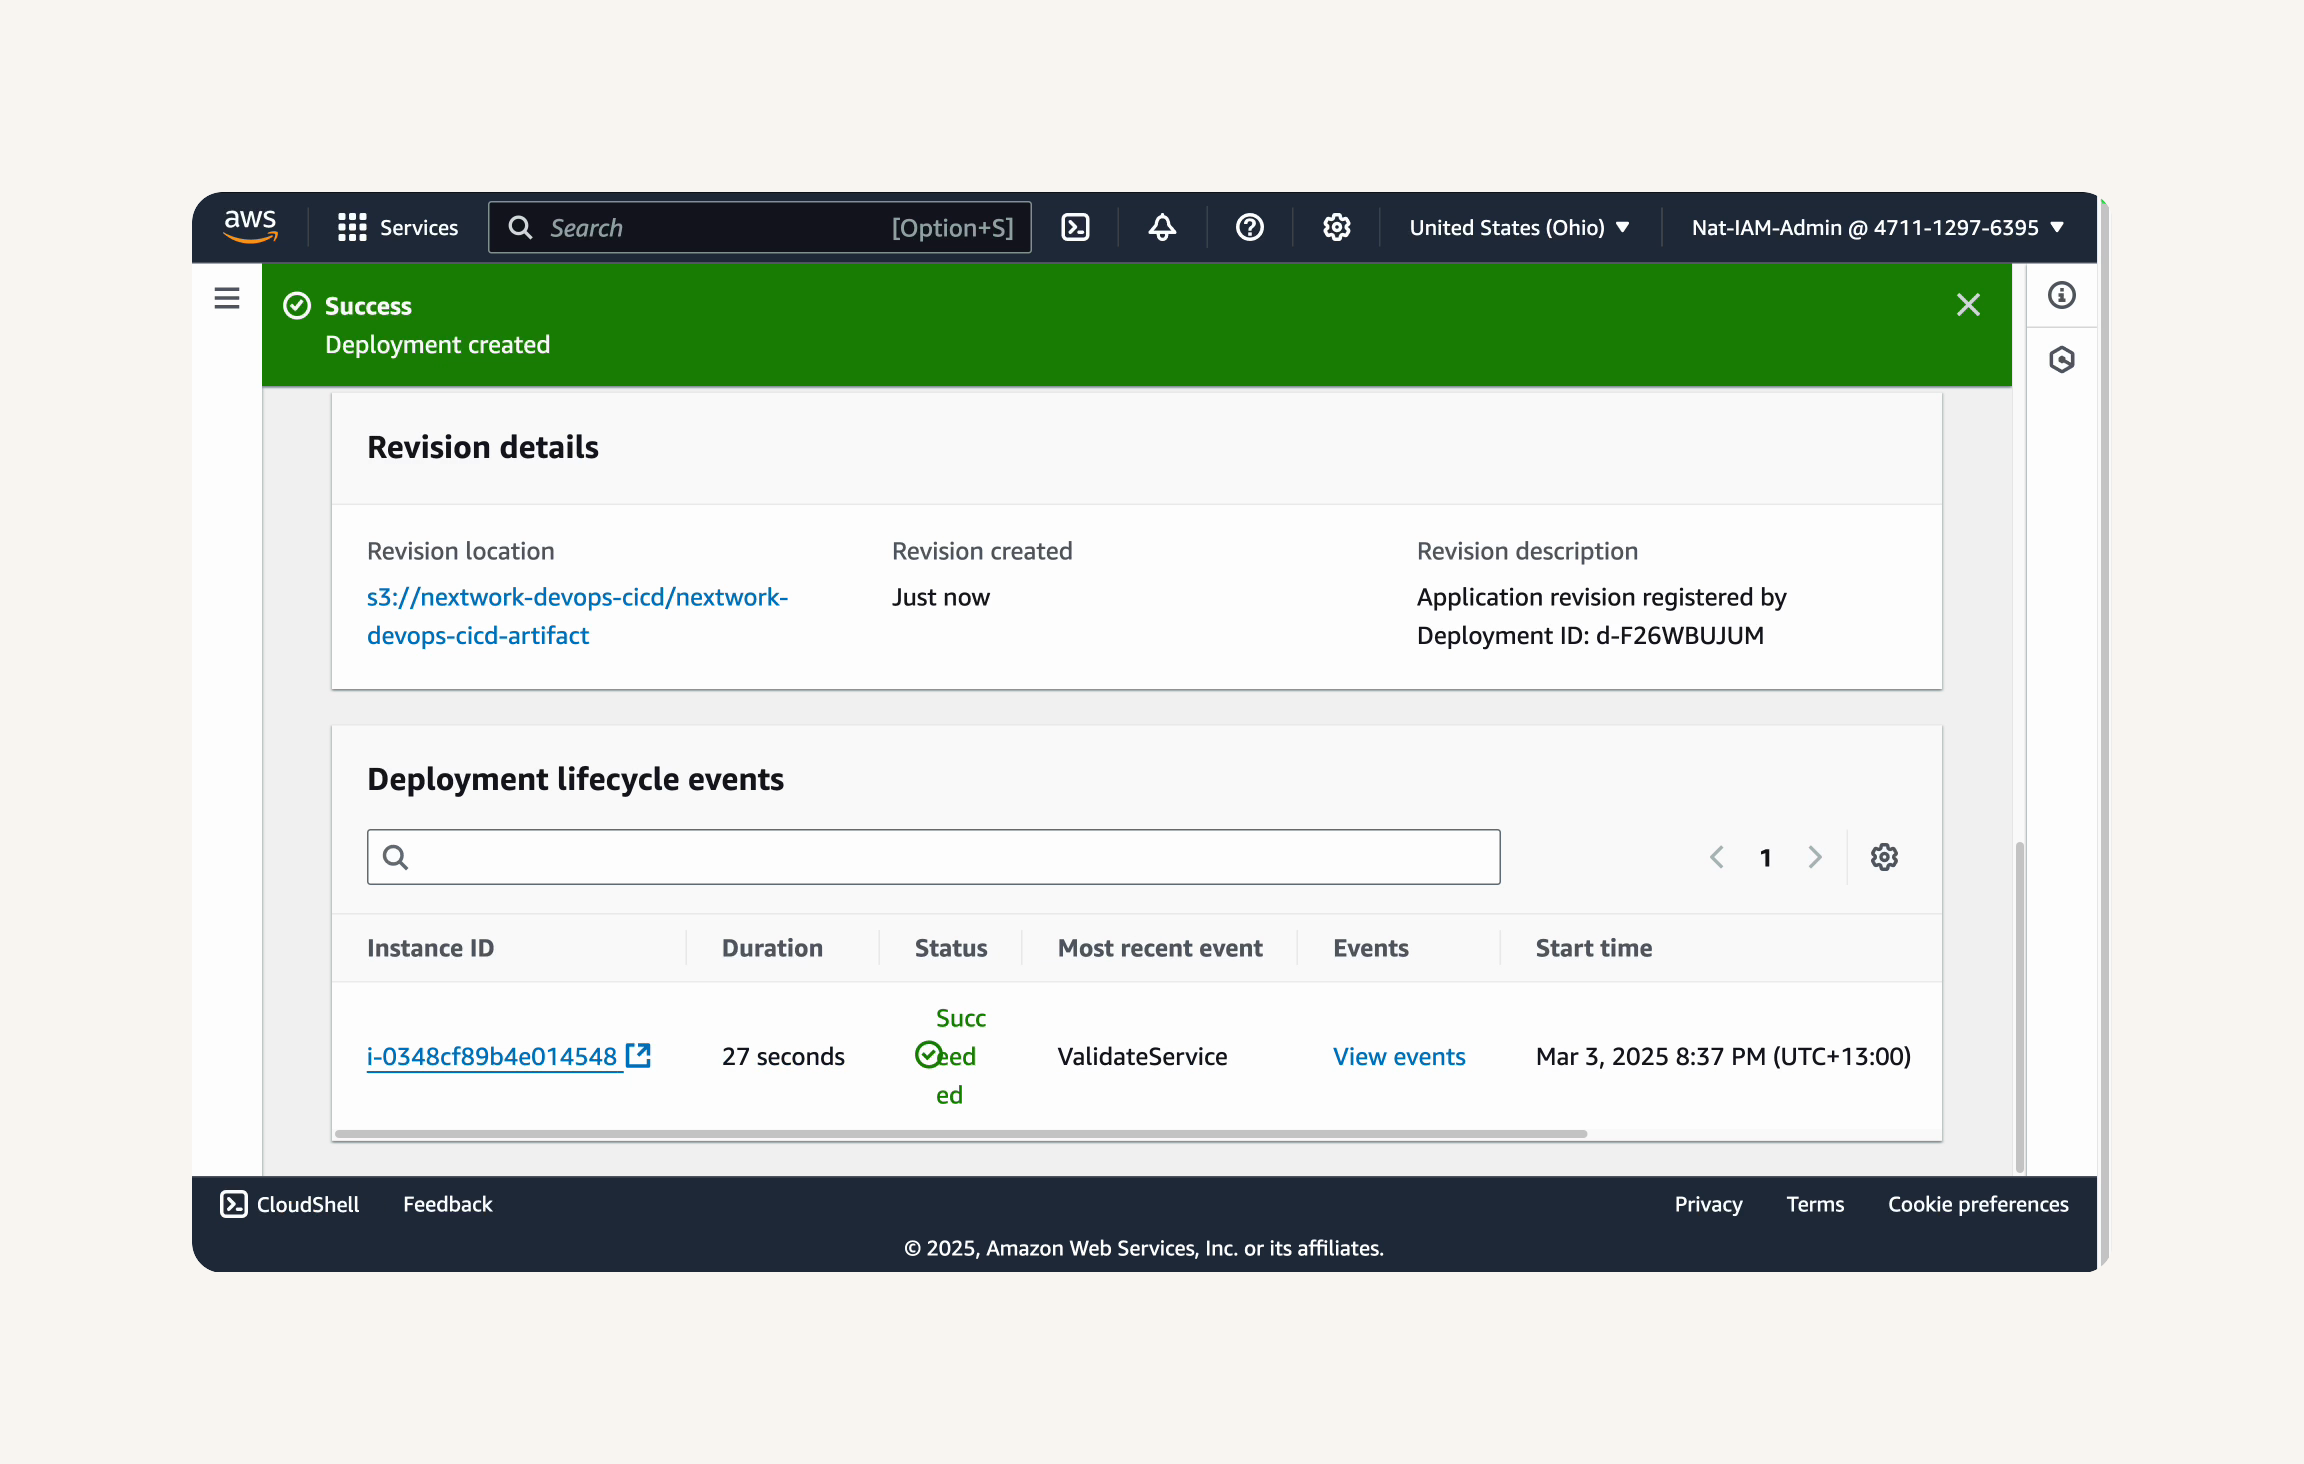
Check Your Deployed App:
Select the Instance ID in the Deployment lifecycle events panel. This takes you to the deployment EC2 instance you launched with CloudFormation.

Get the Public IPv4 DNS of your EC2 instance from the EC2 console. Open the Public IPv4 DNS in a web browser.
Step 6: complete CI/CD pipeline with AWS CodePipeline.
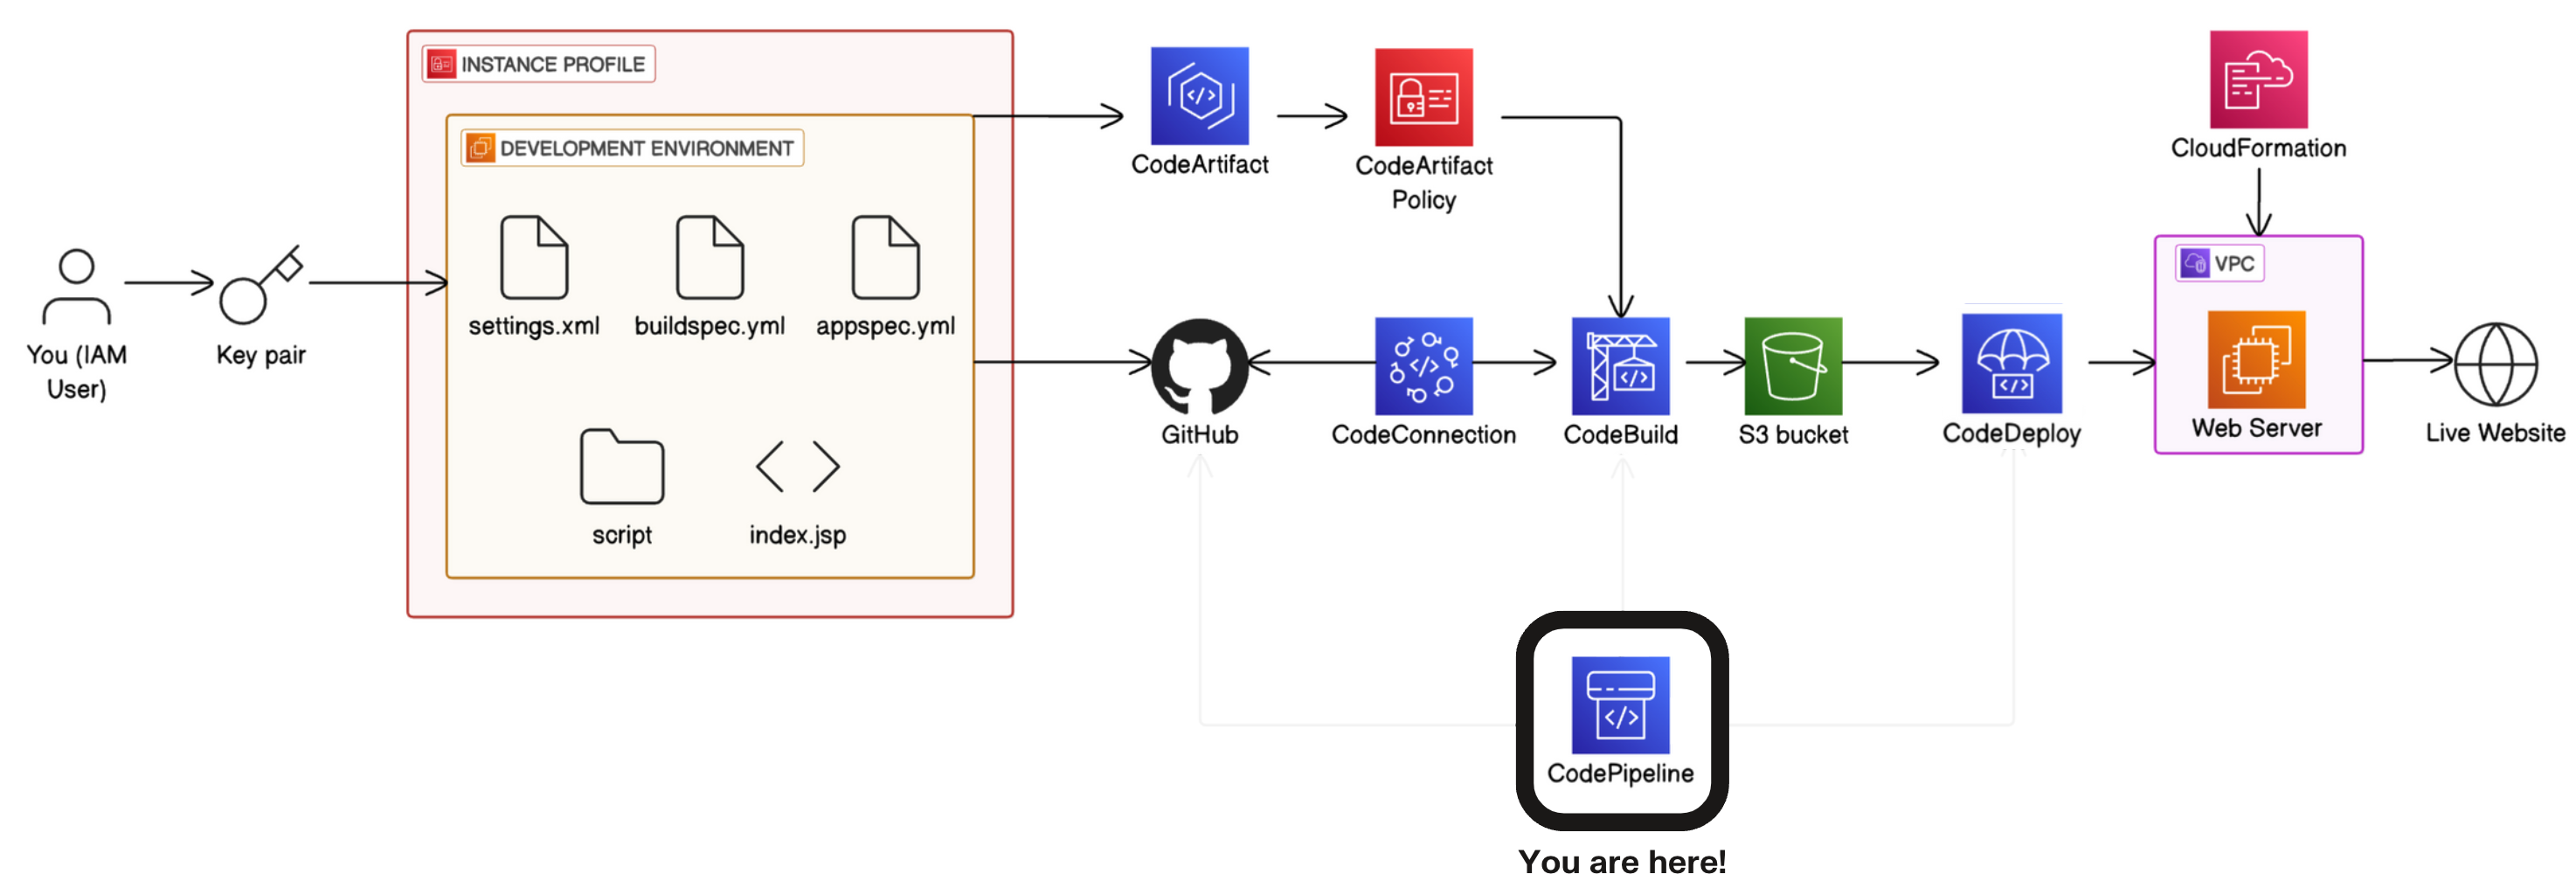
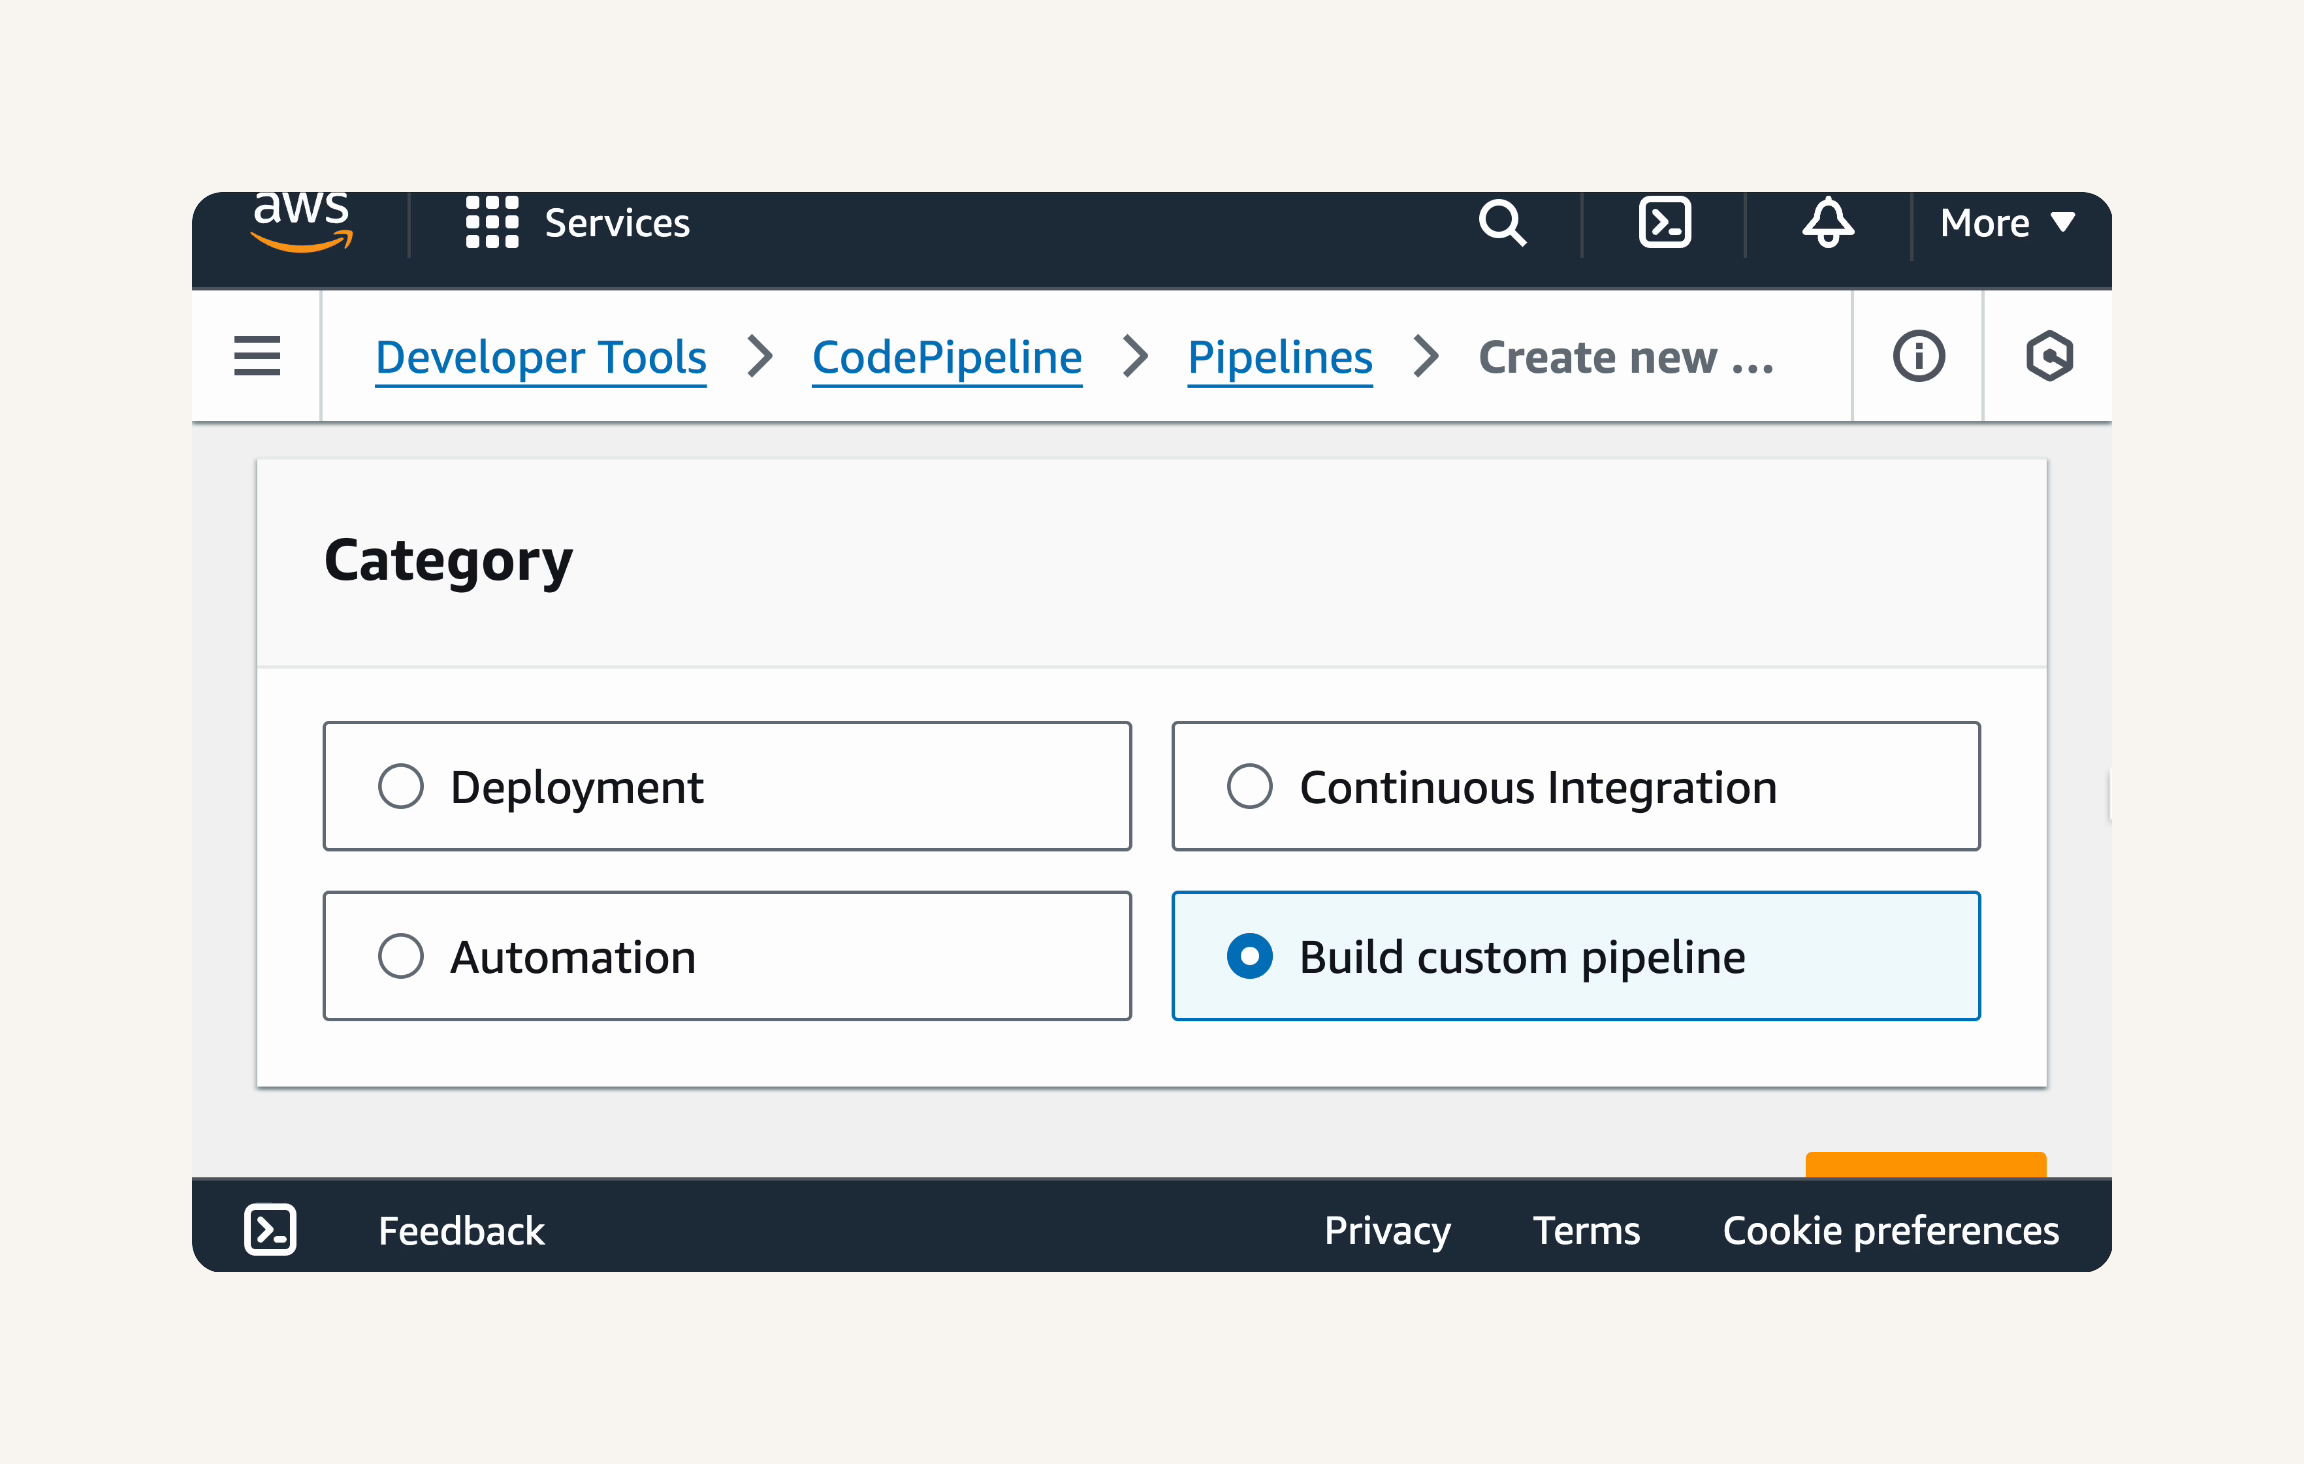
- Start a new pipeline:
CodePipeline → Create pipeline→ Build custom pipeline. → next
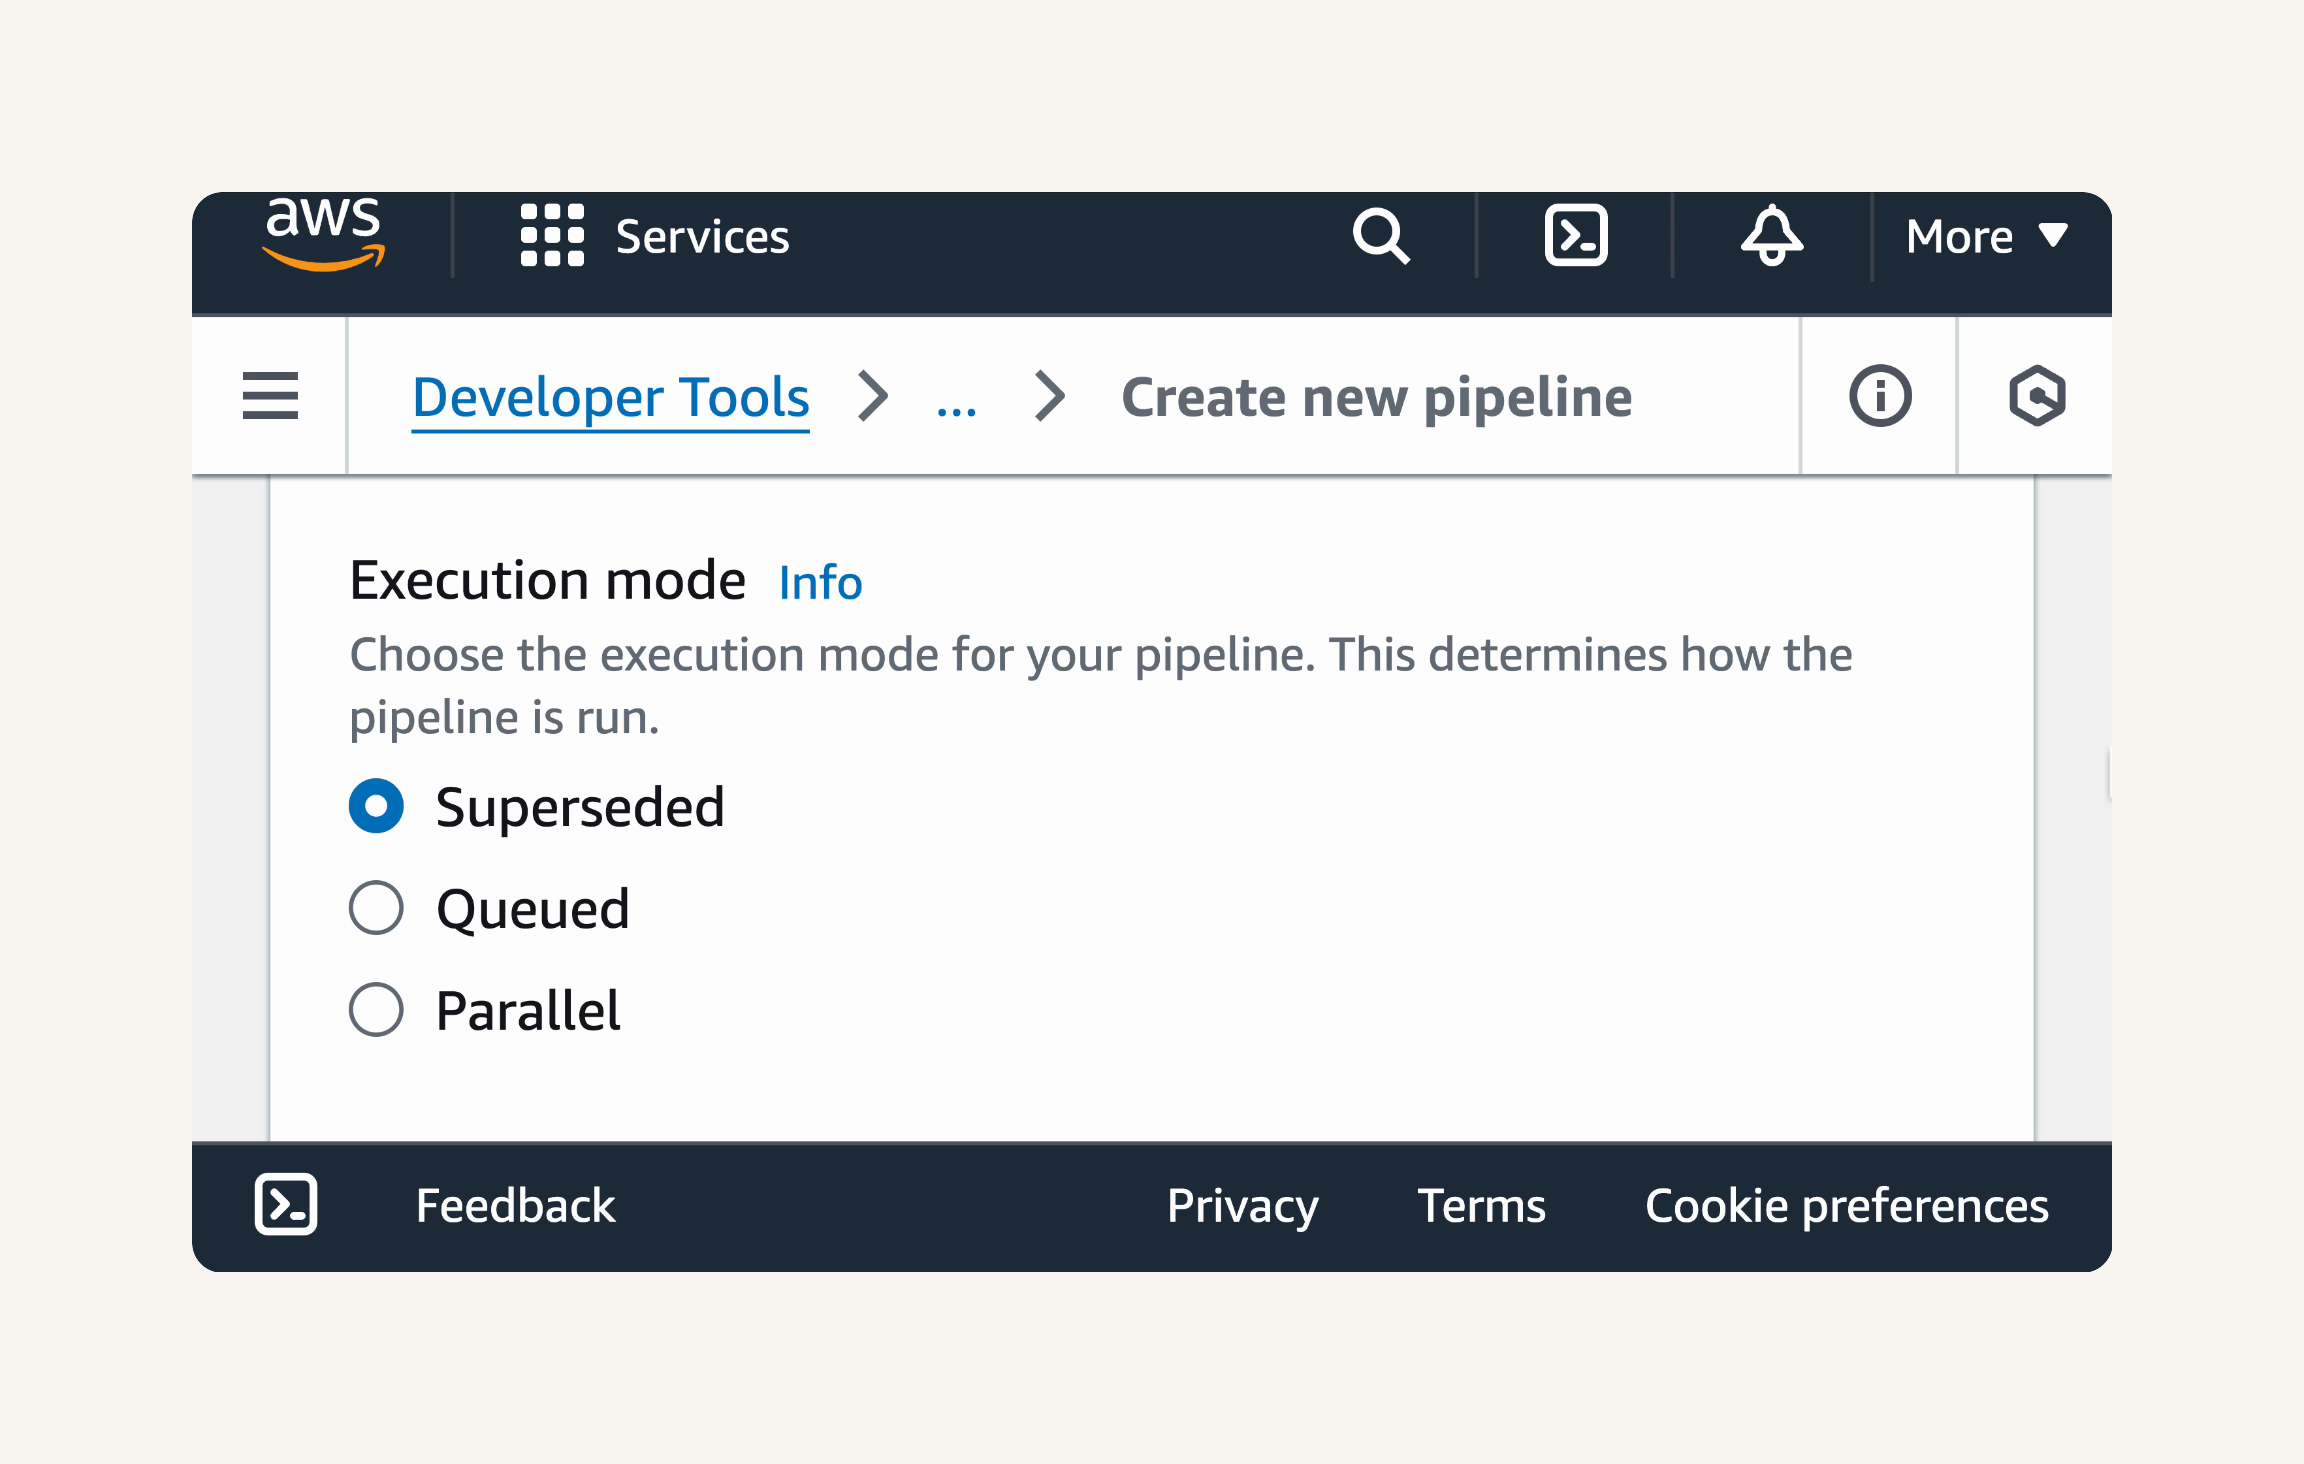
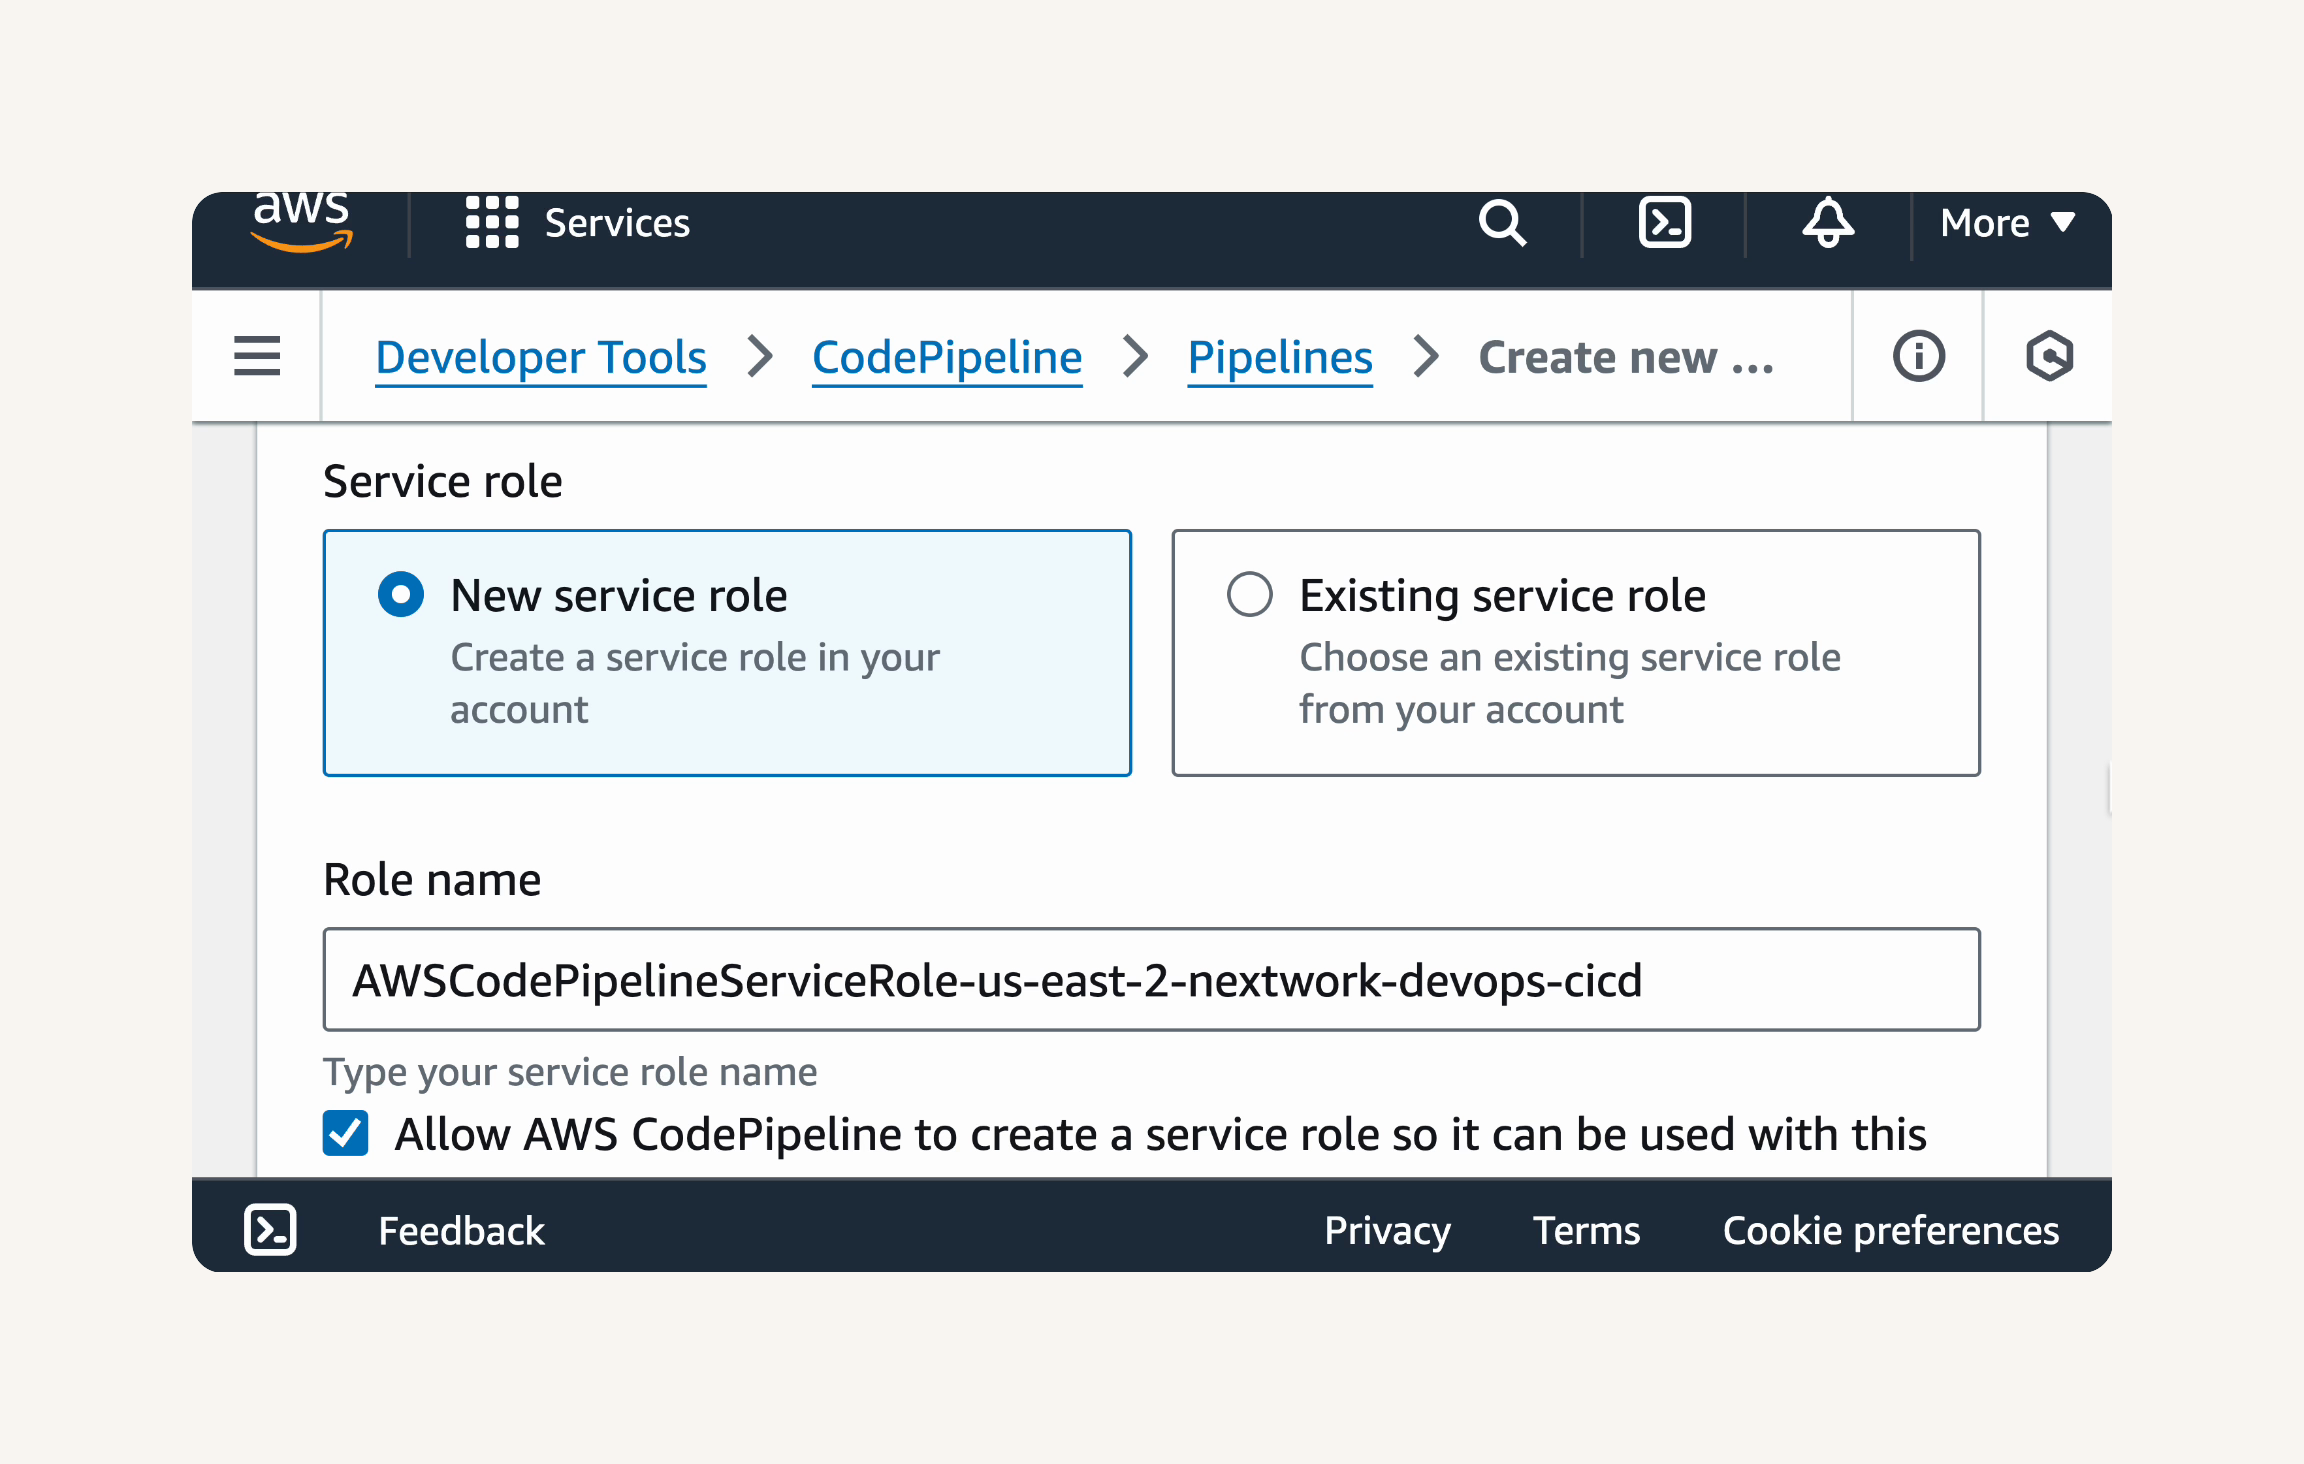
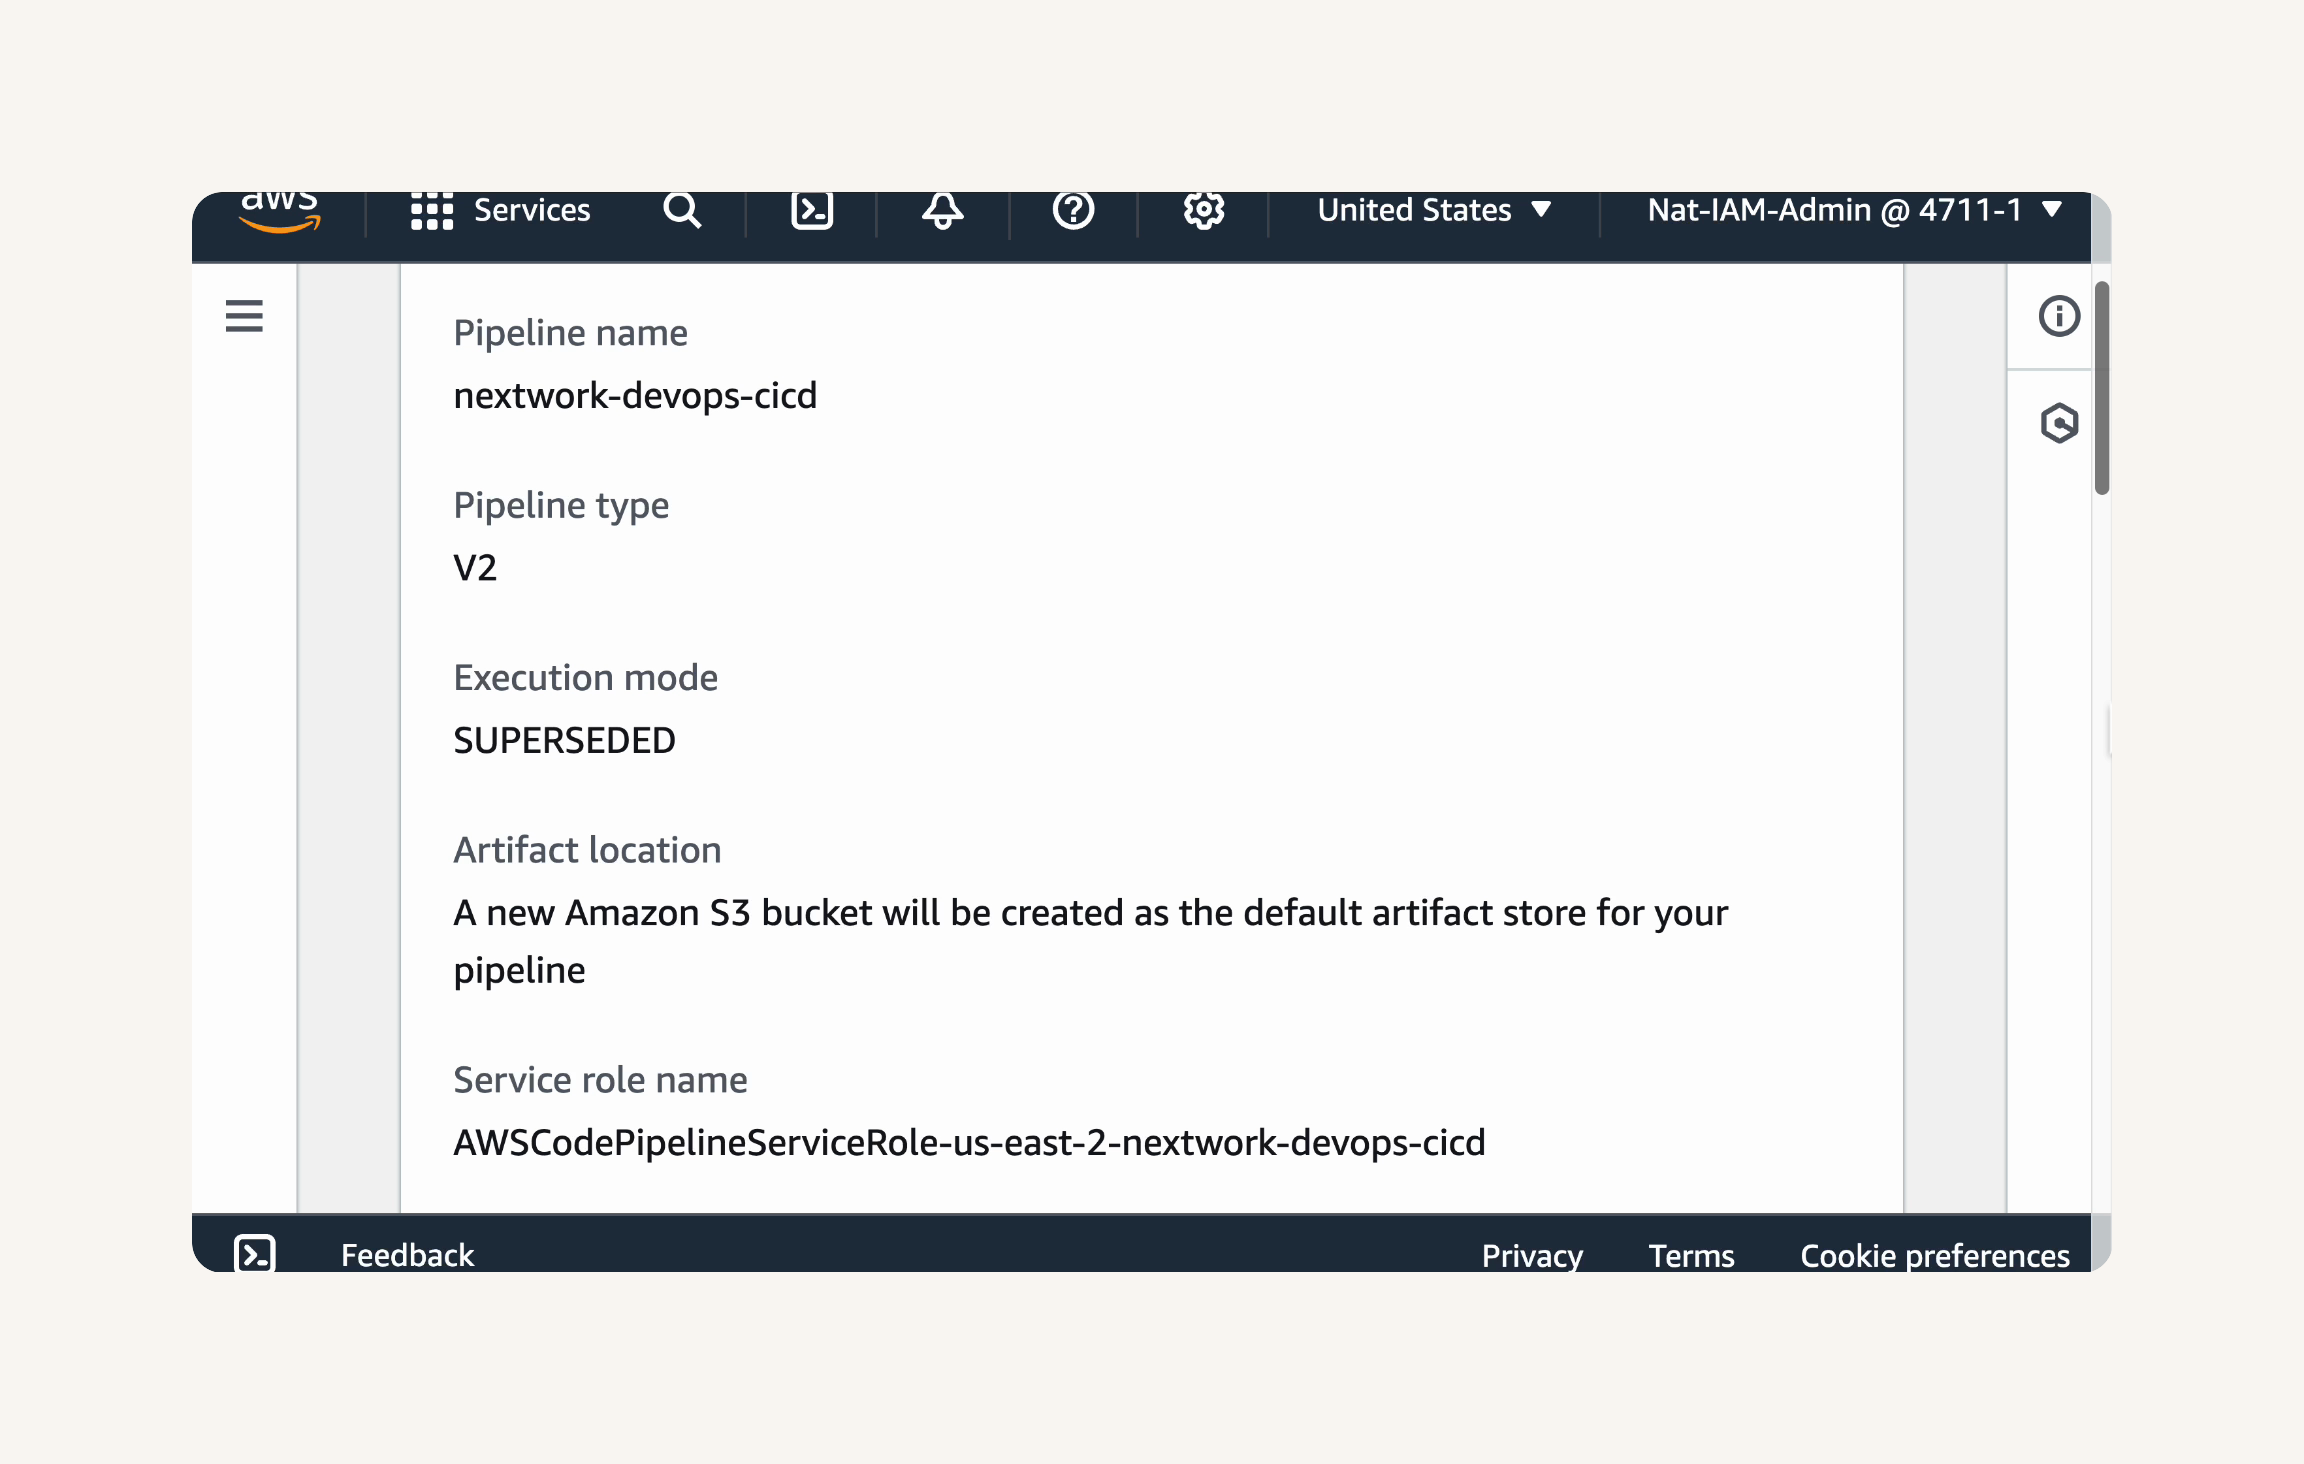
→ Configure Pipeline Settings → pipeline name : nextwork-devops-cicd → Execution mode: Superseded. → service role: New service role
Advanced settings.→ Leave the default settings for Artifact store, Encryption key, and Variables. → next
Configuring the Source, Build and Deploy Stages
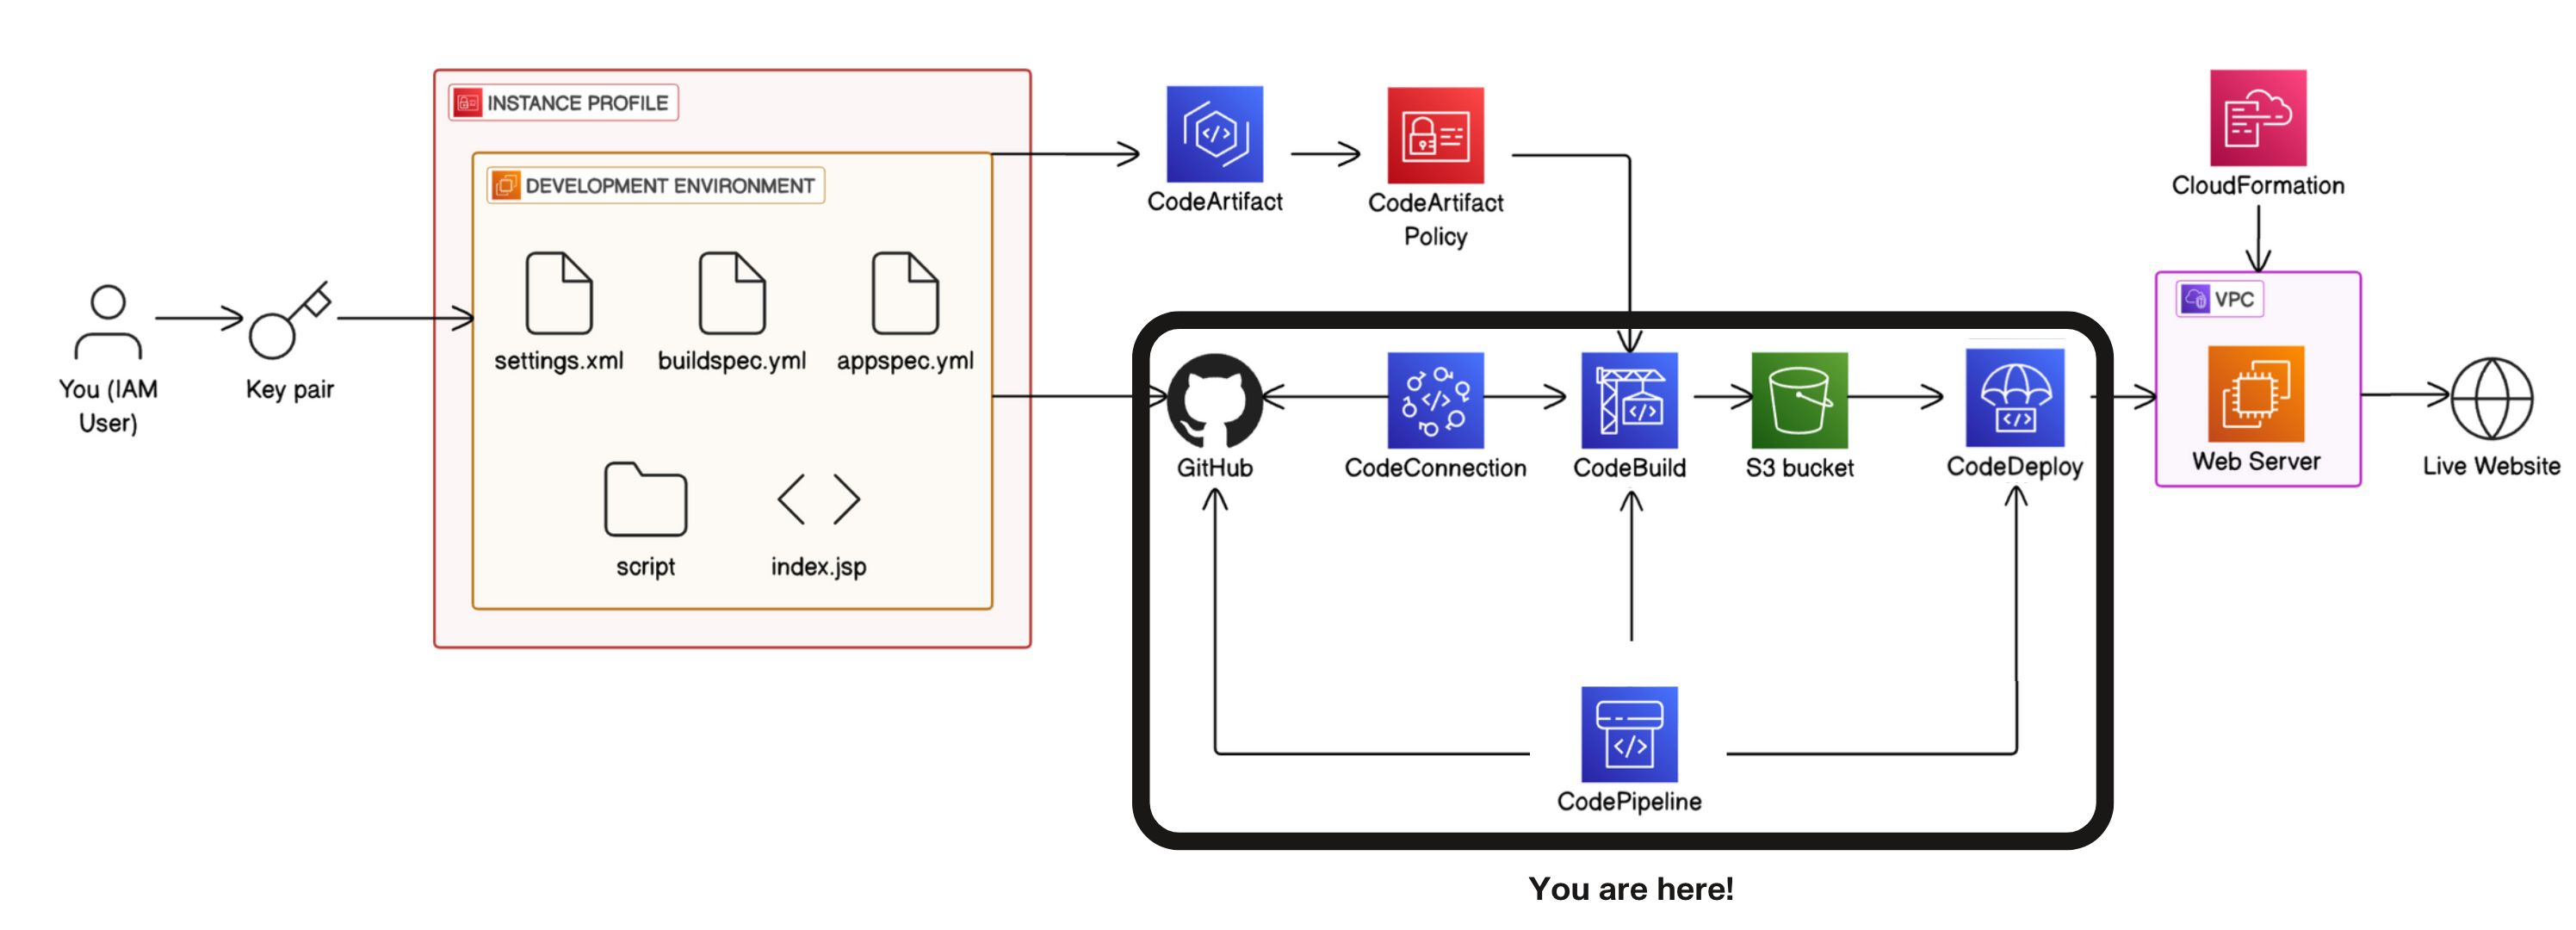
Connect CodePipeline to your GitHub repository and branch:
Source Stage → Source provider: GitHub (via GitHub App). → Connection, select your existing GitHub connection → Repository name: nextwork-web-project →
Default branch: master.
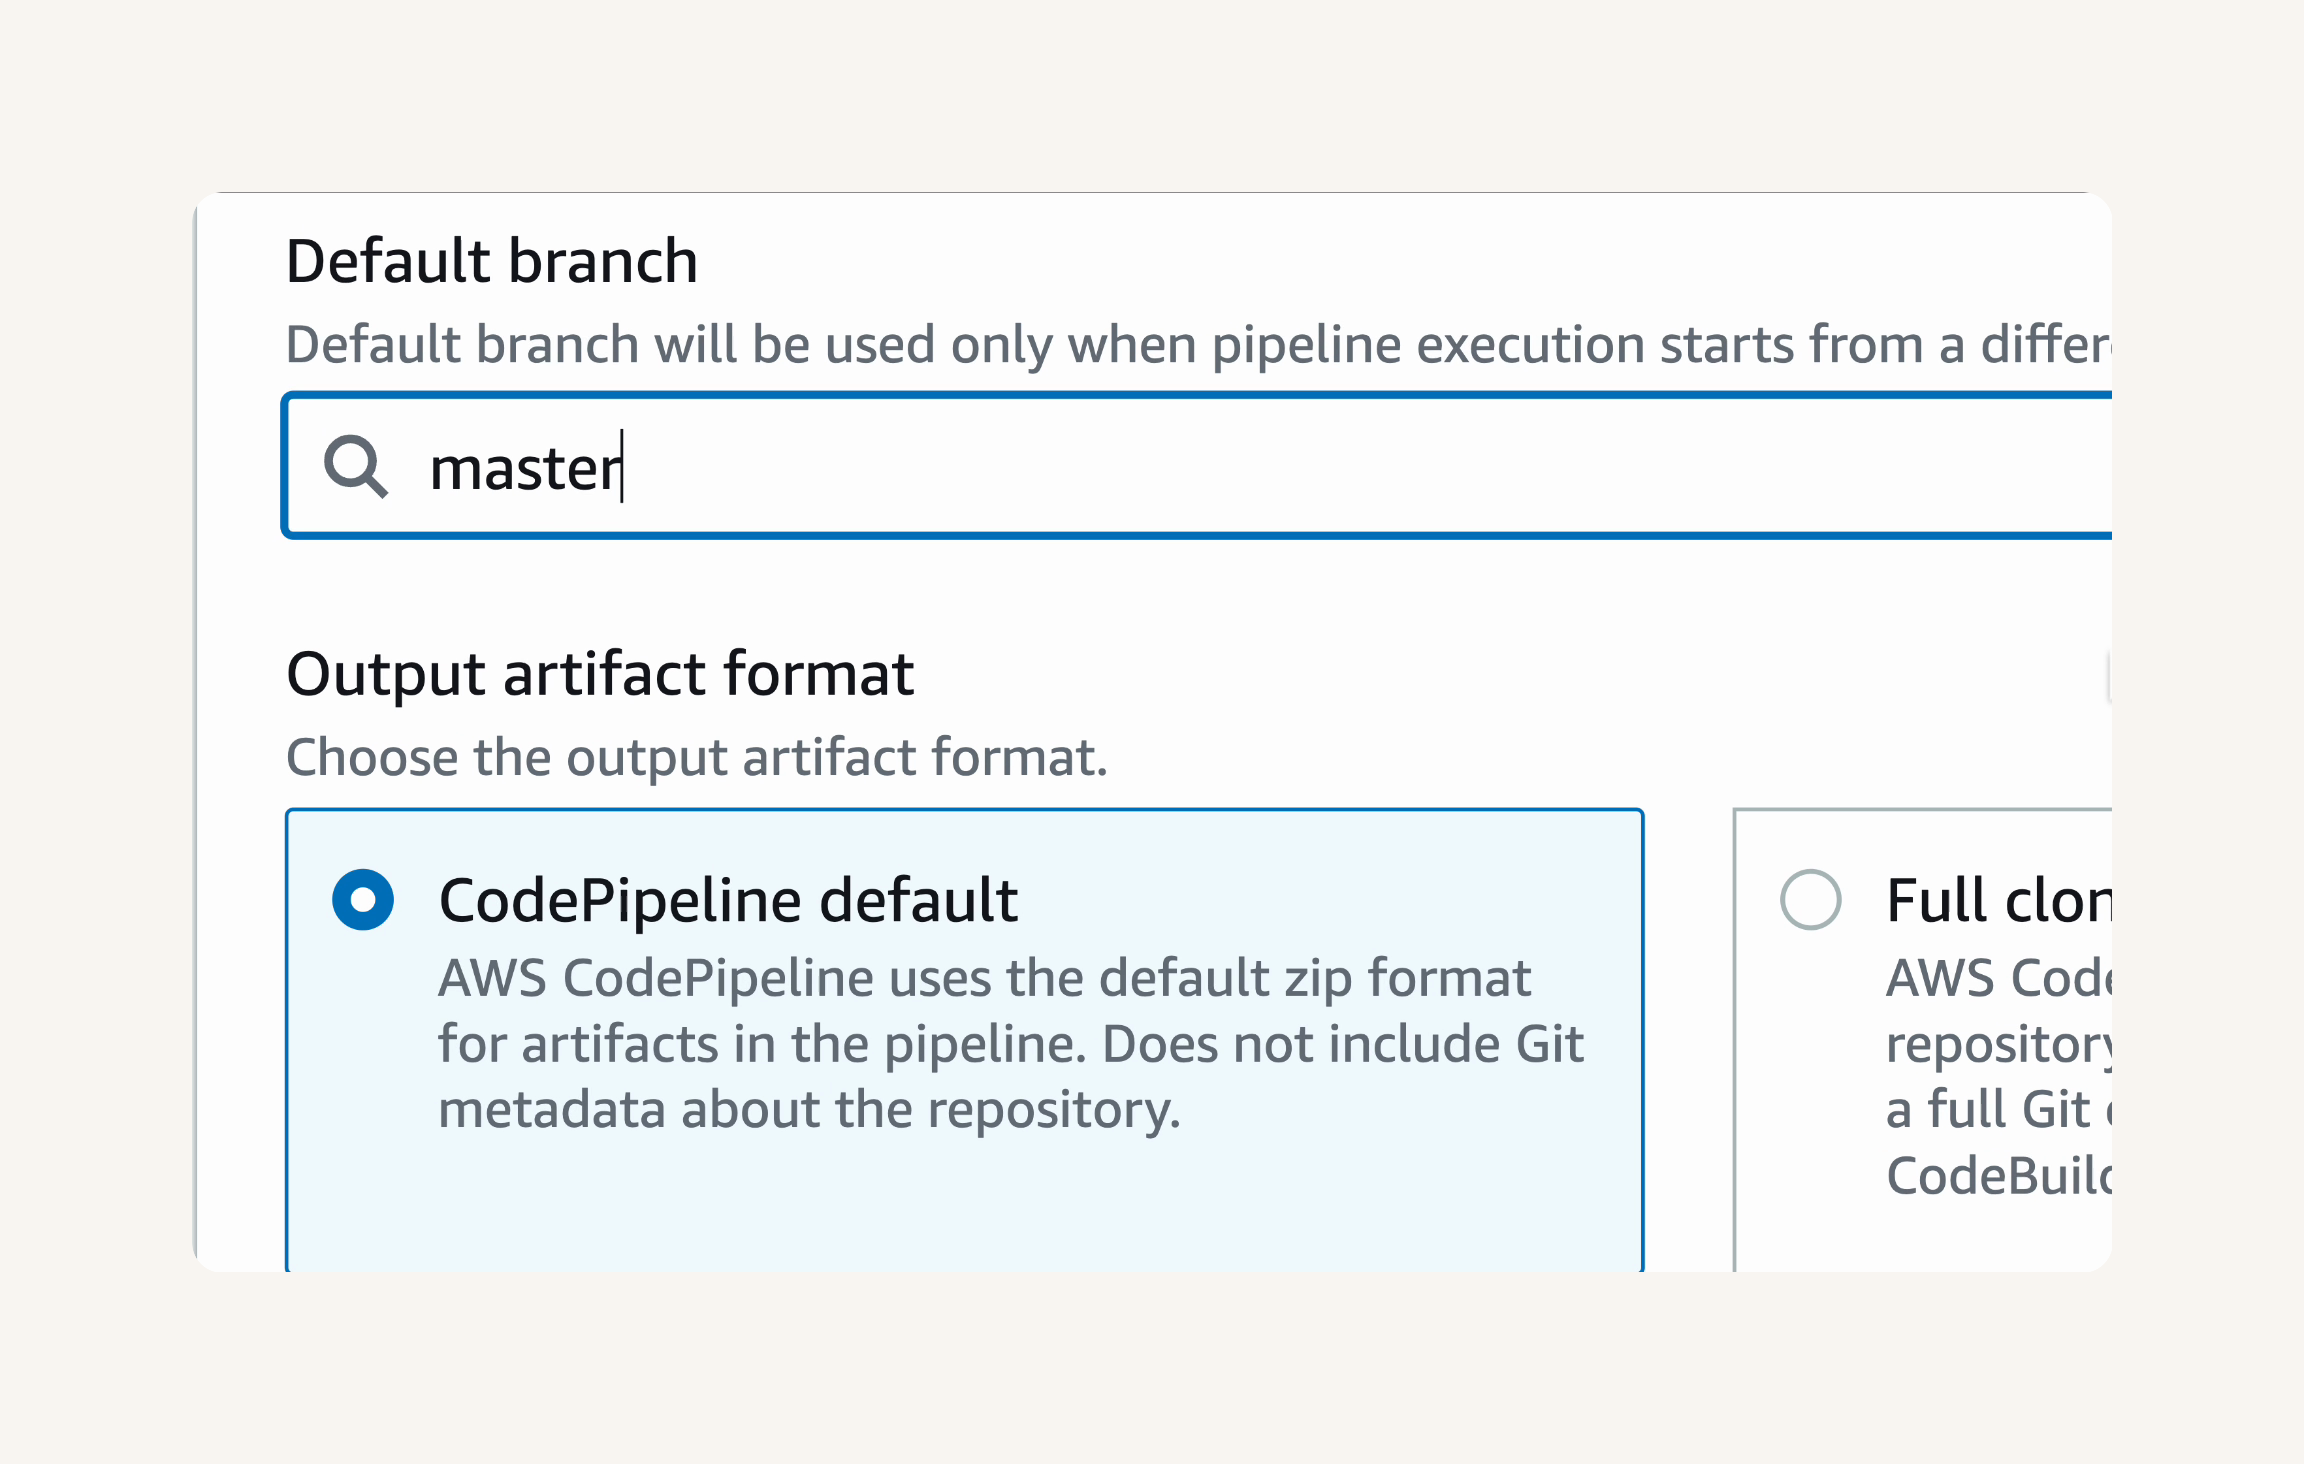
Output artifact format, leave it as CodePipeline default → Webhook events is checked under Detect change events. → next
Build stage:
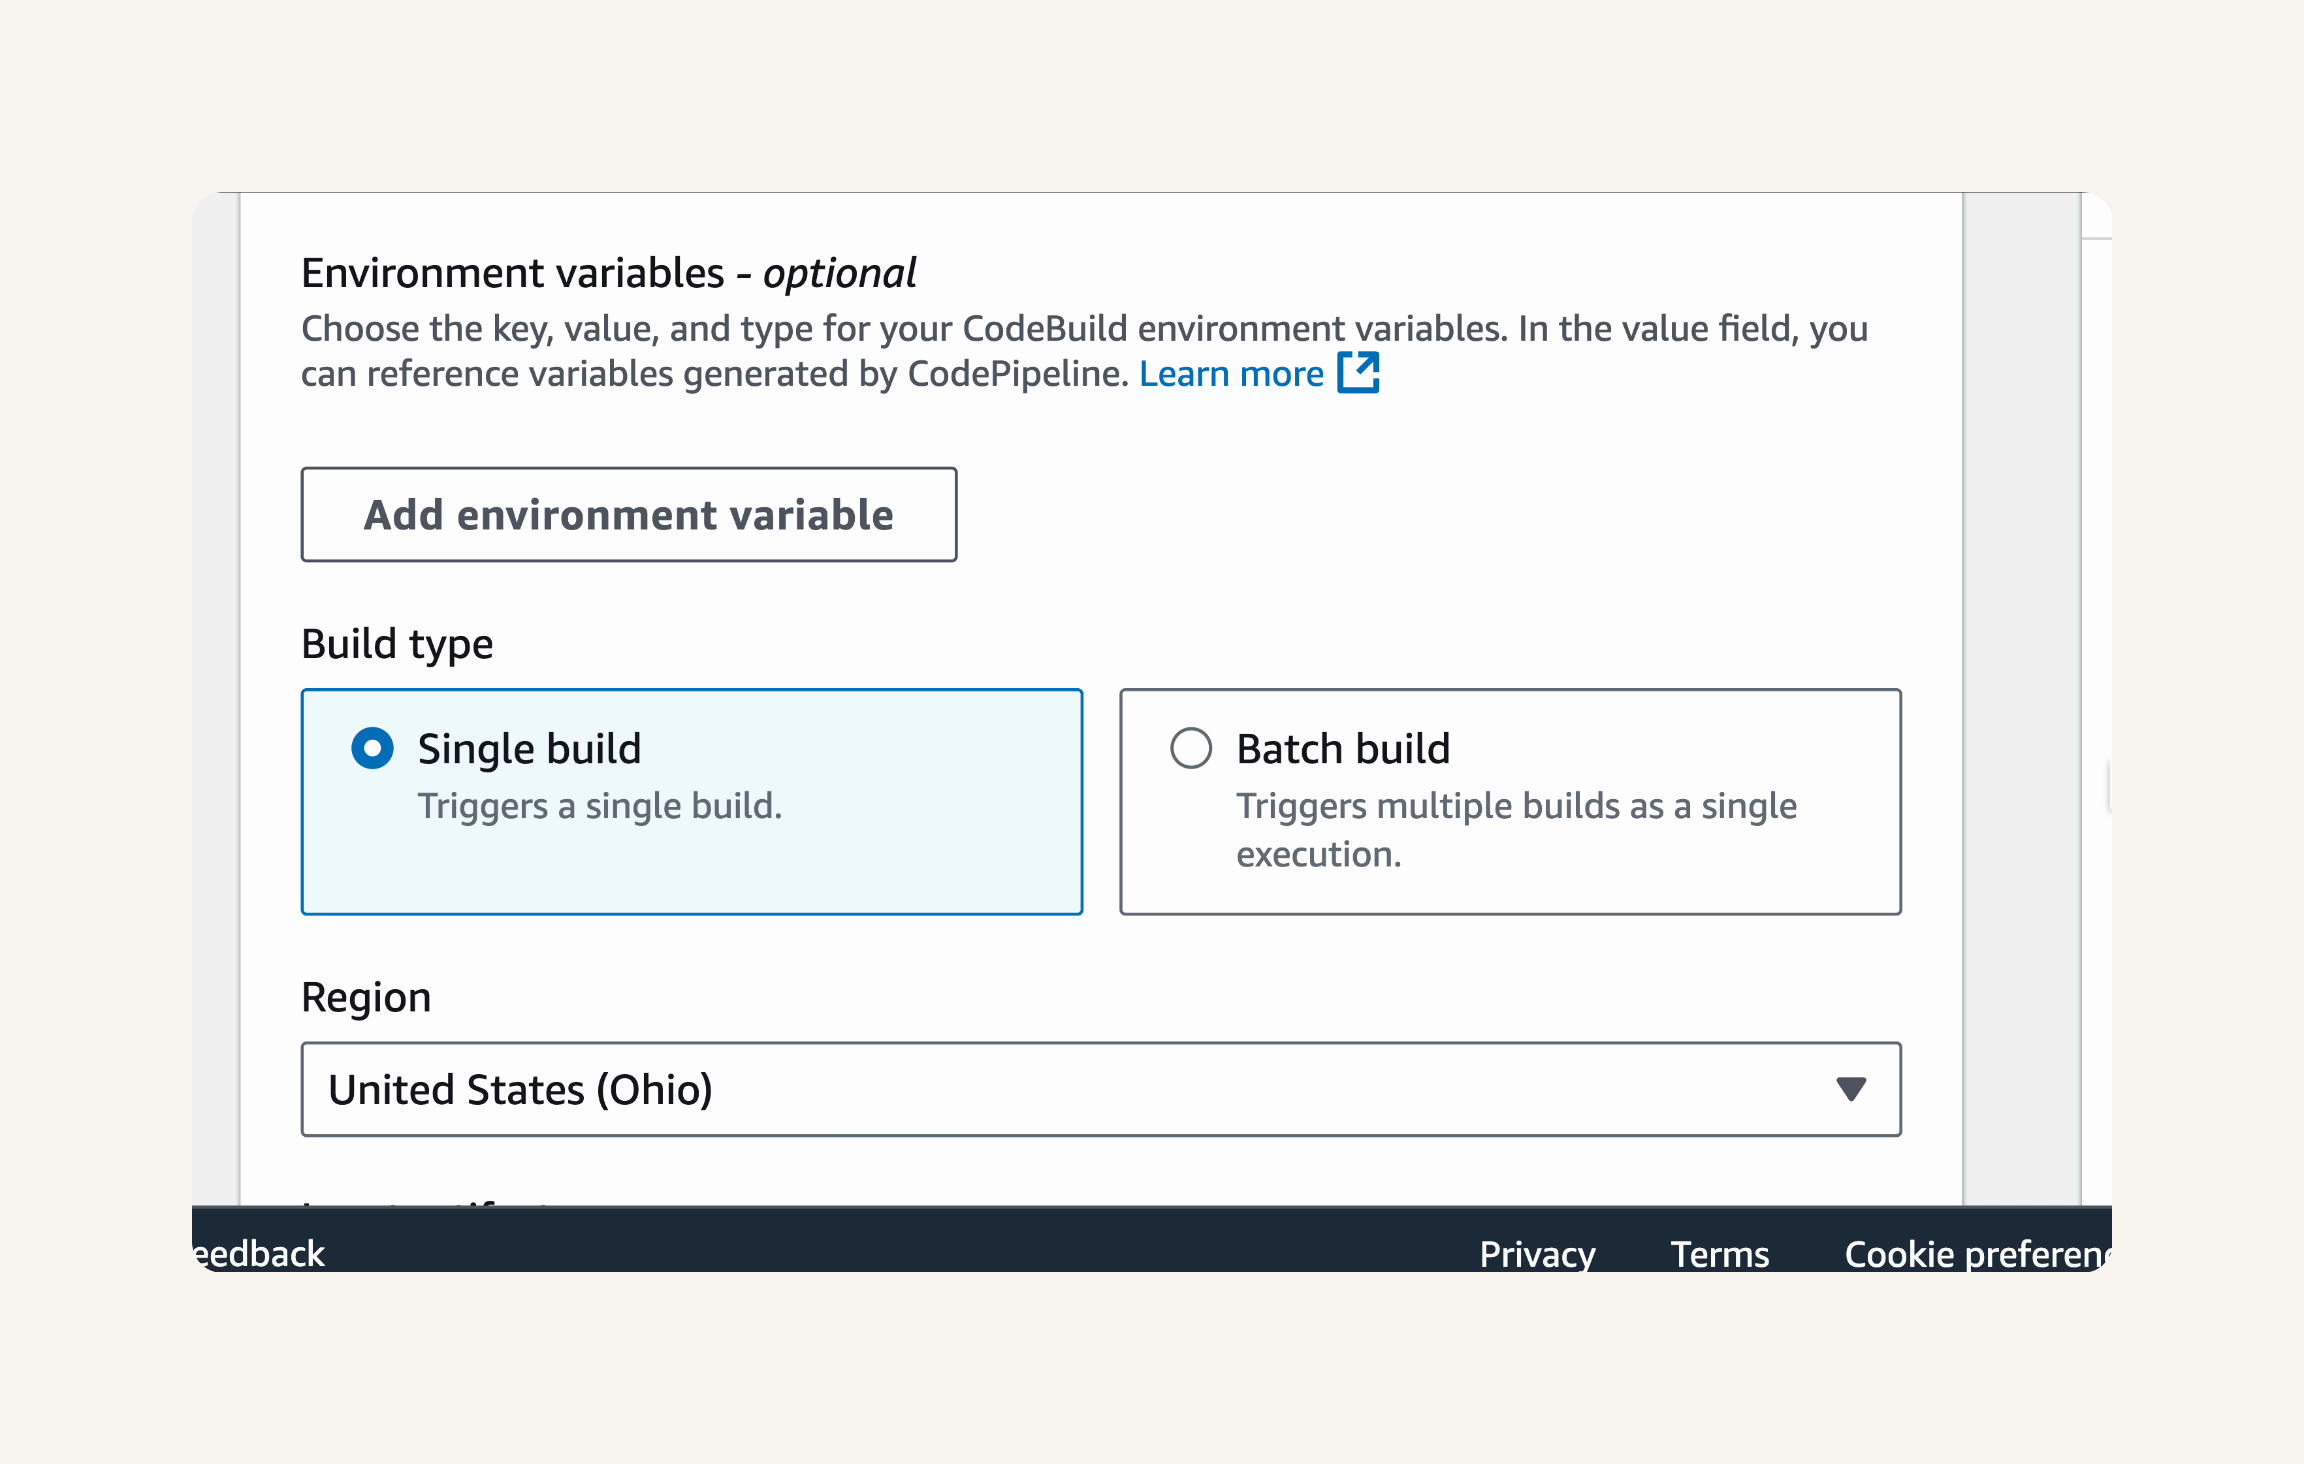
Build provider: Other build providers. → Project name: nextwork-devops-cicd → Leave the default settings for Environment variables, Build type, and Region. → Input artifacts:SourceArtifact → next → skip test stage
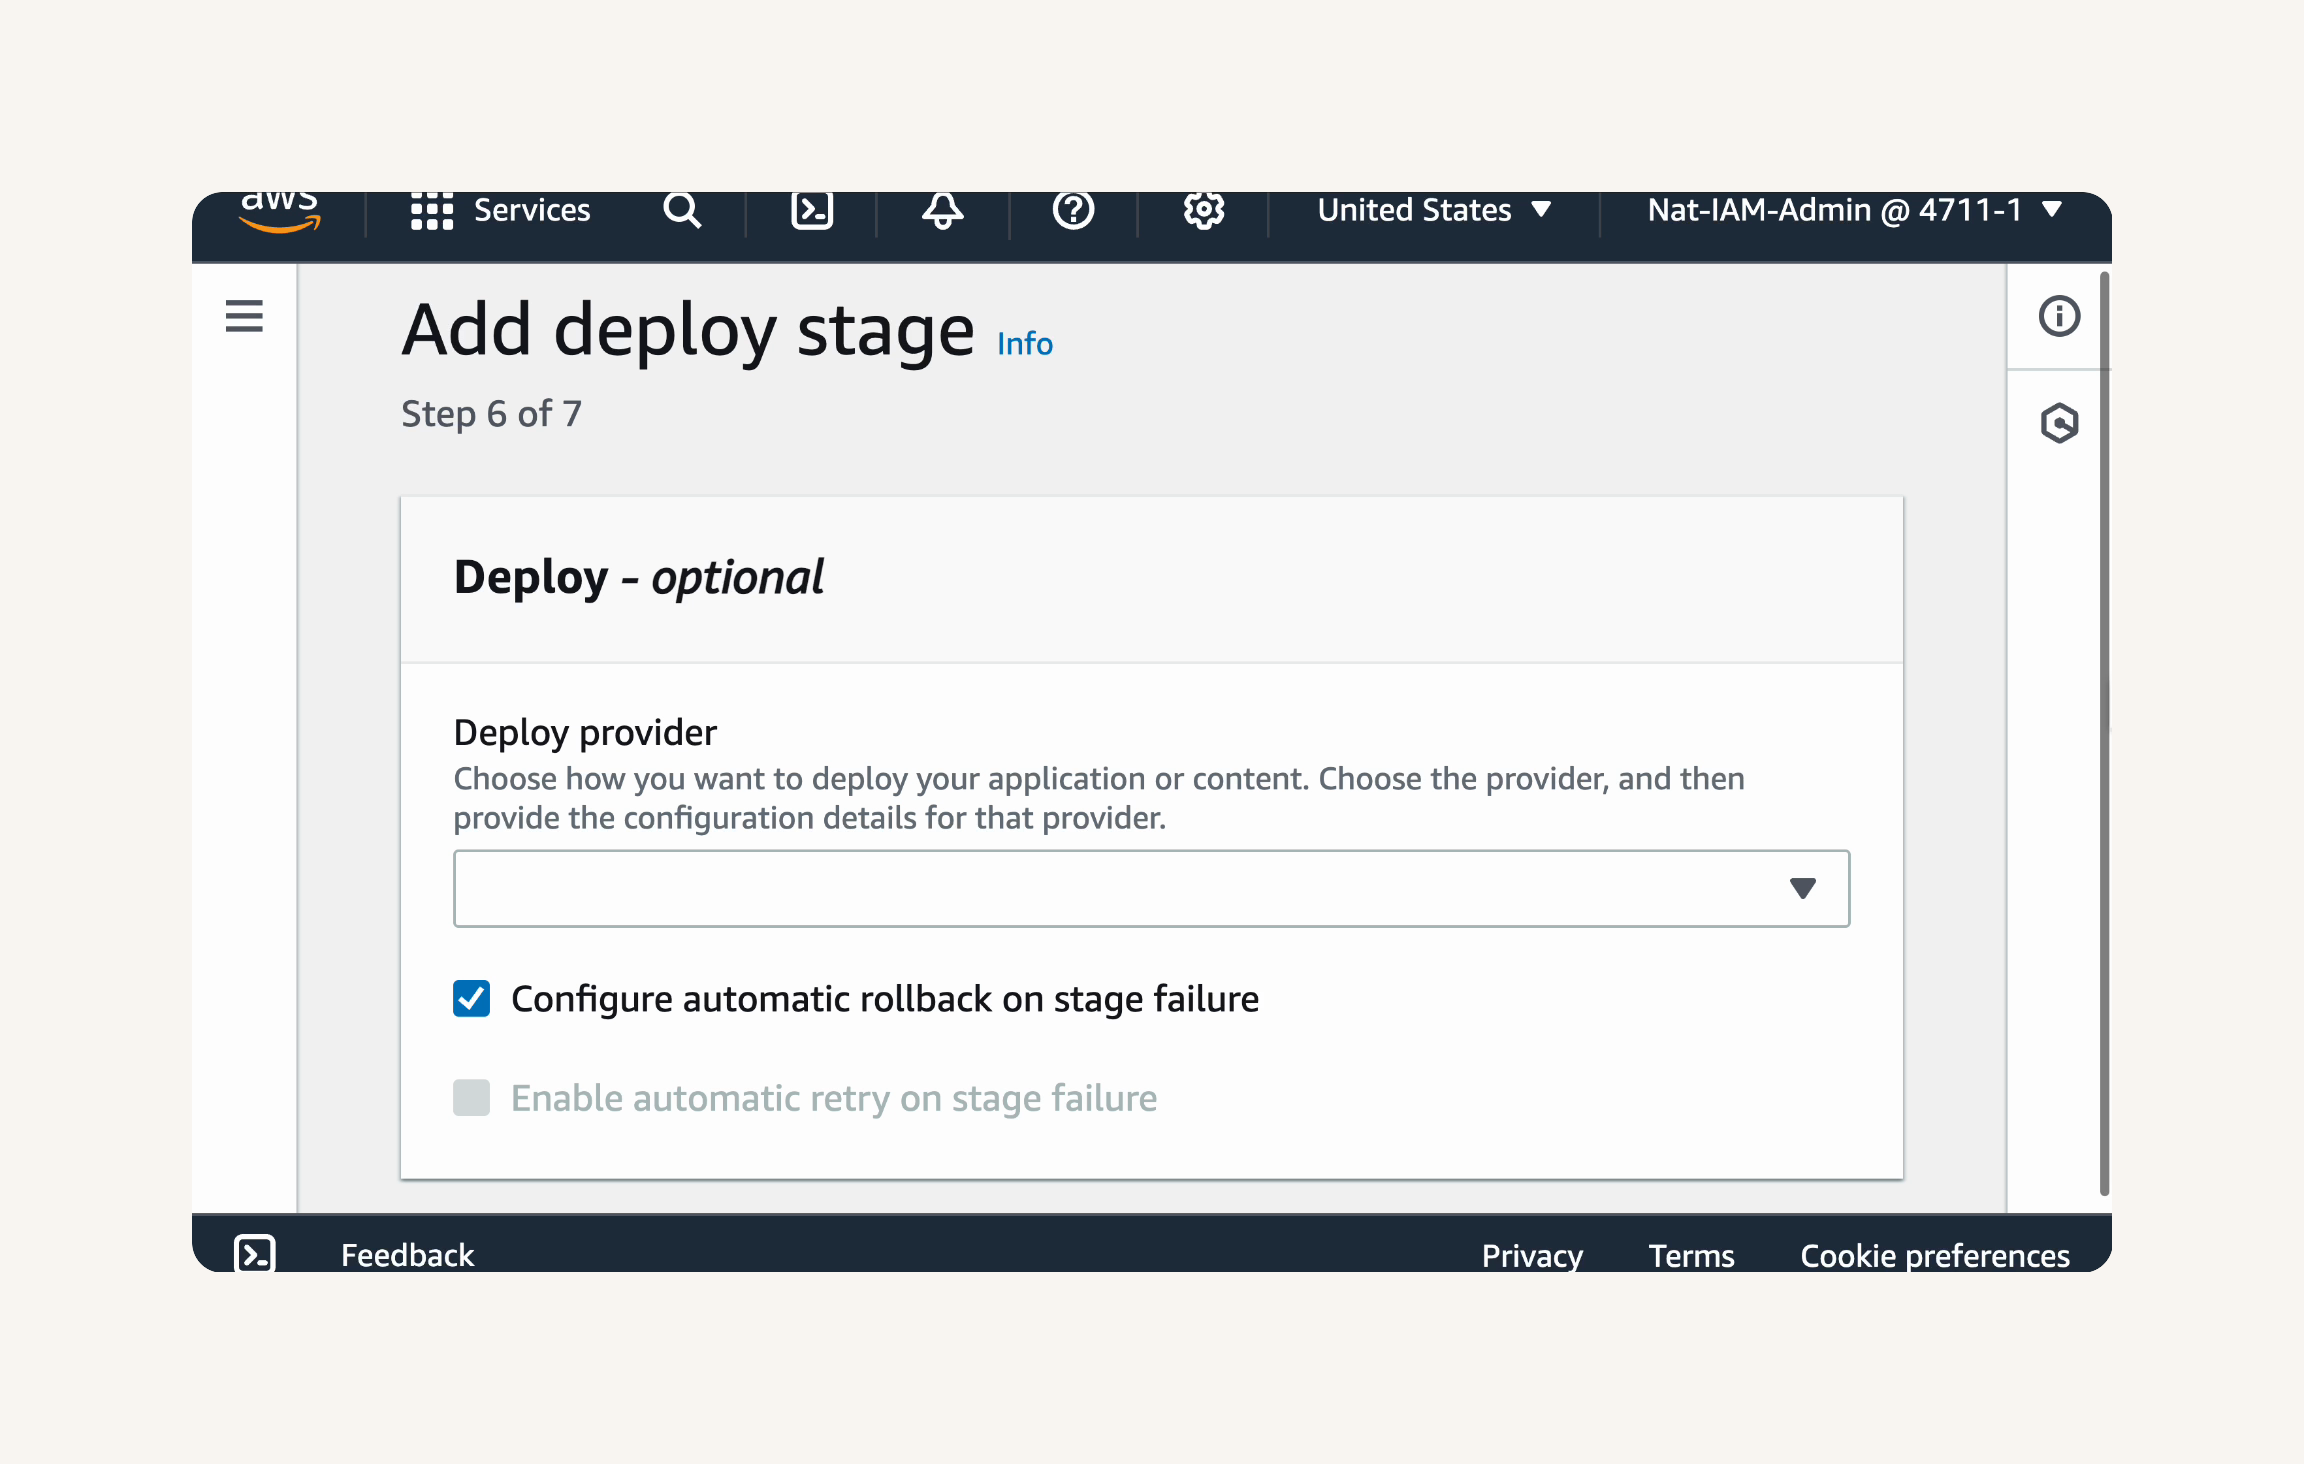
Deploy Stage:
Deploy provider: AWS CodeDeploy → Input artifacts: BuildArtifact → Application name, select your existing CodeDeploy application
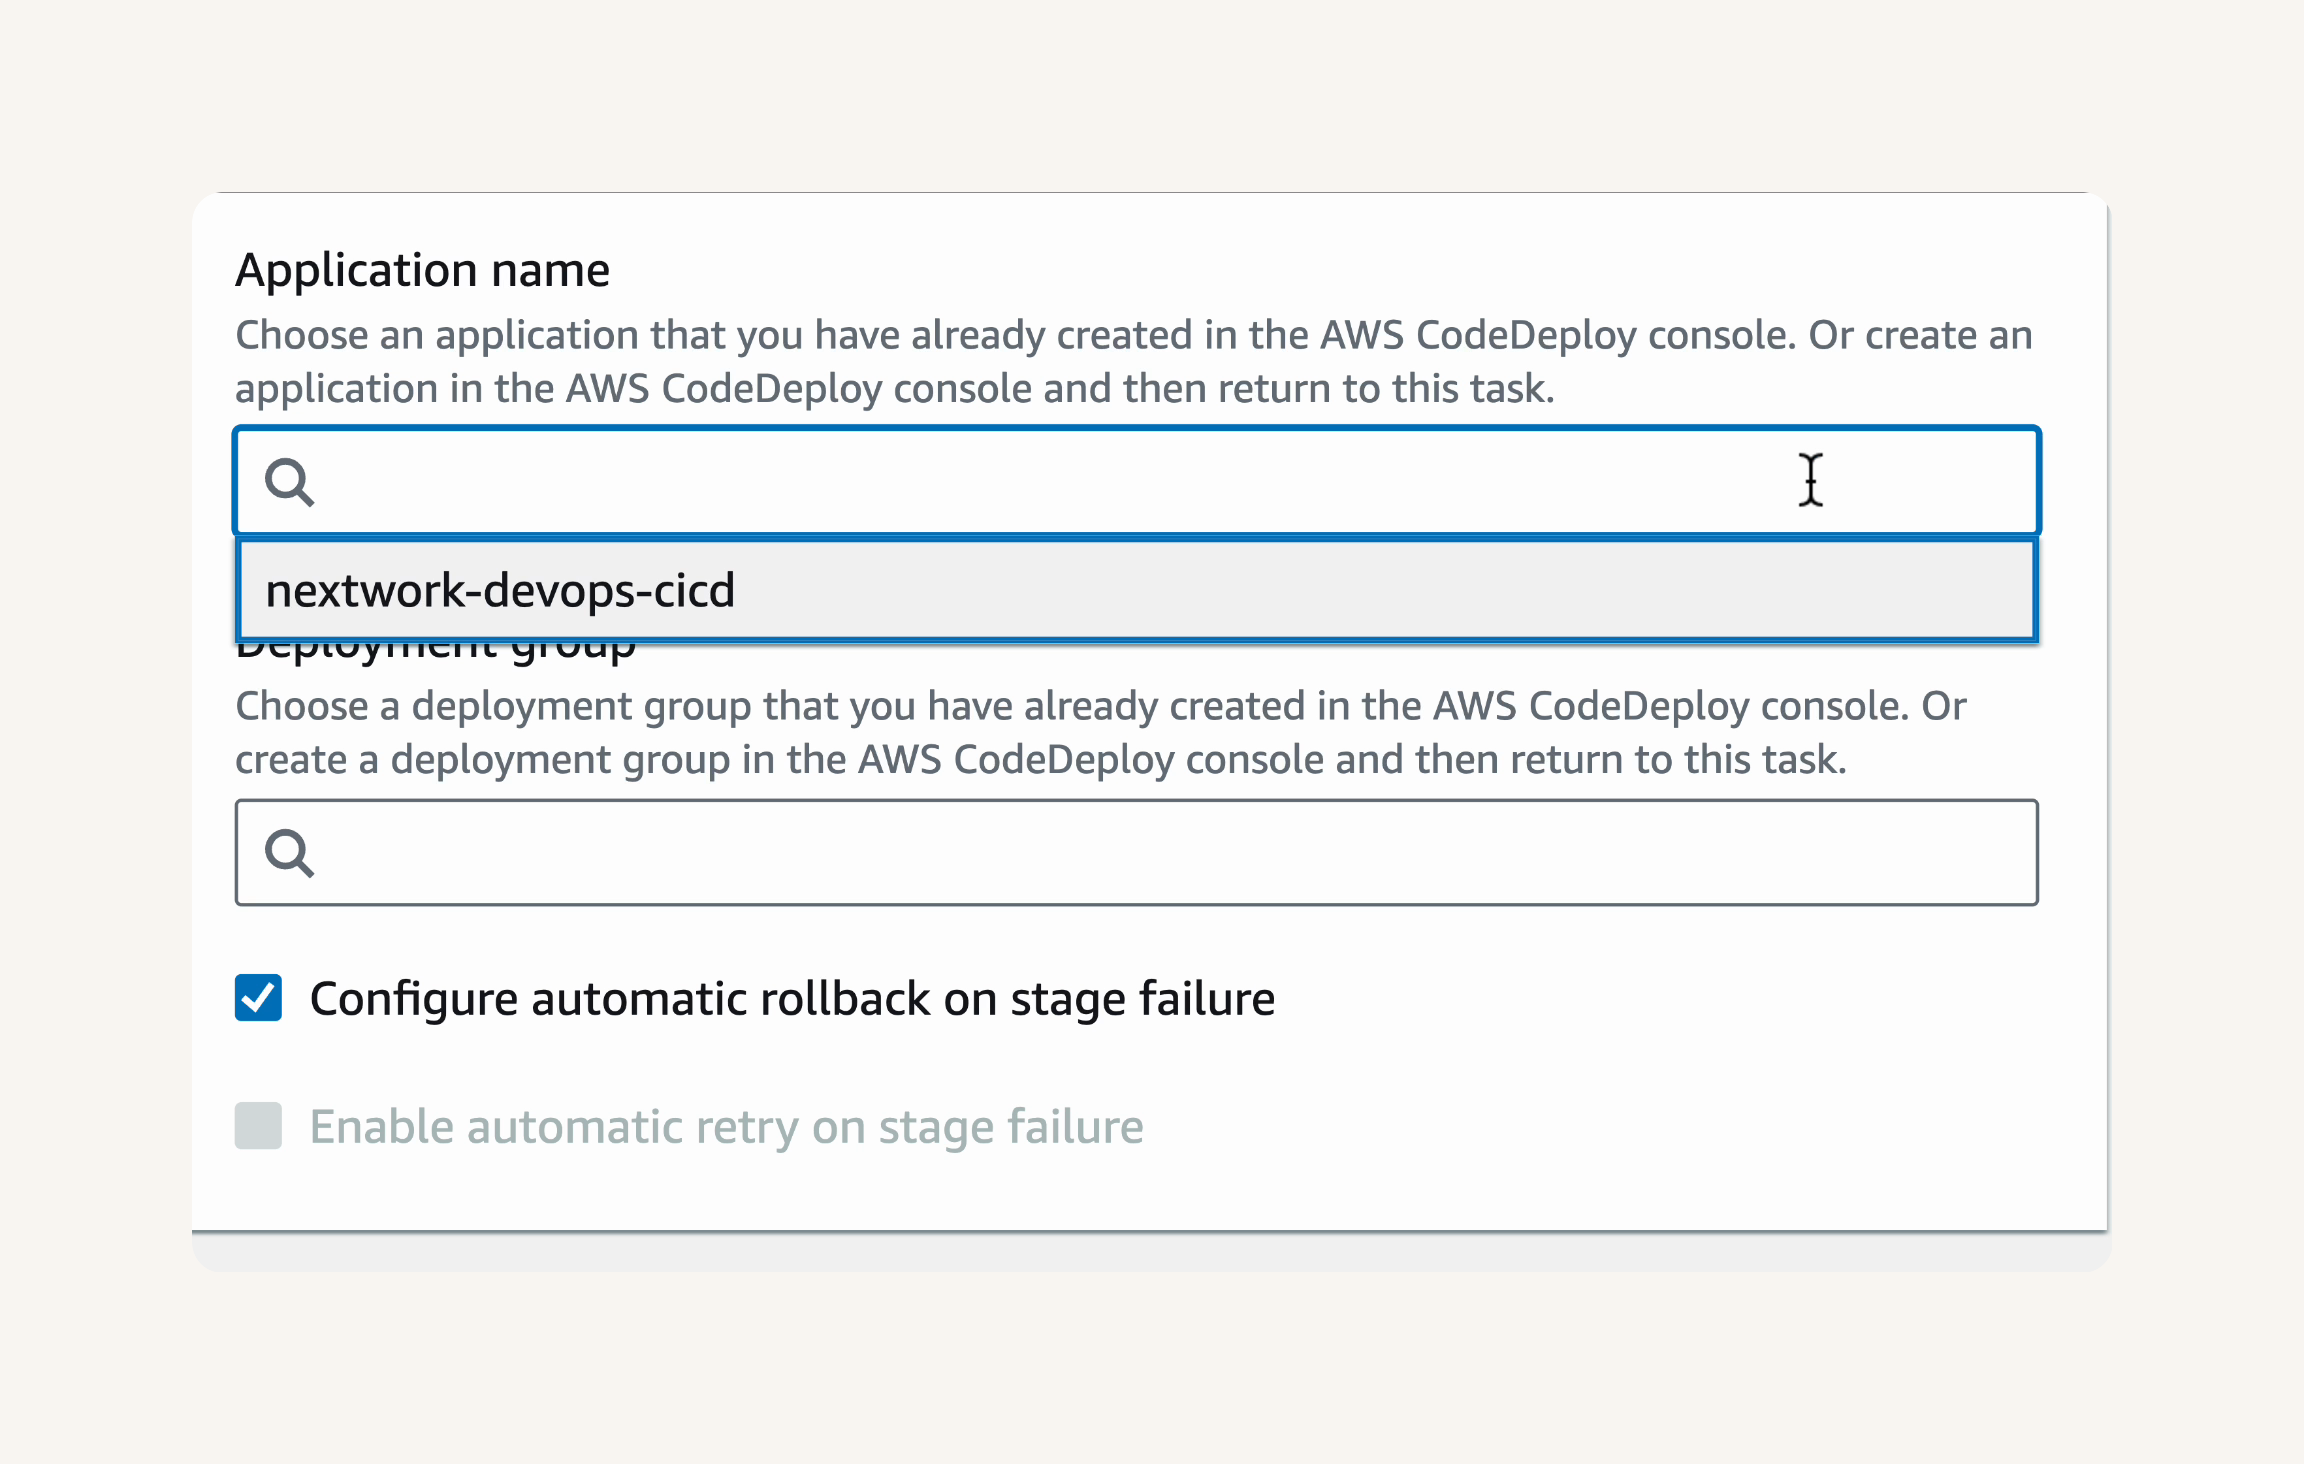
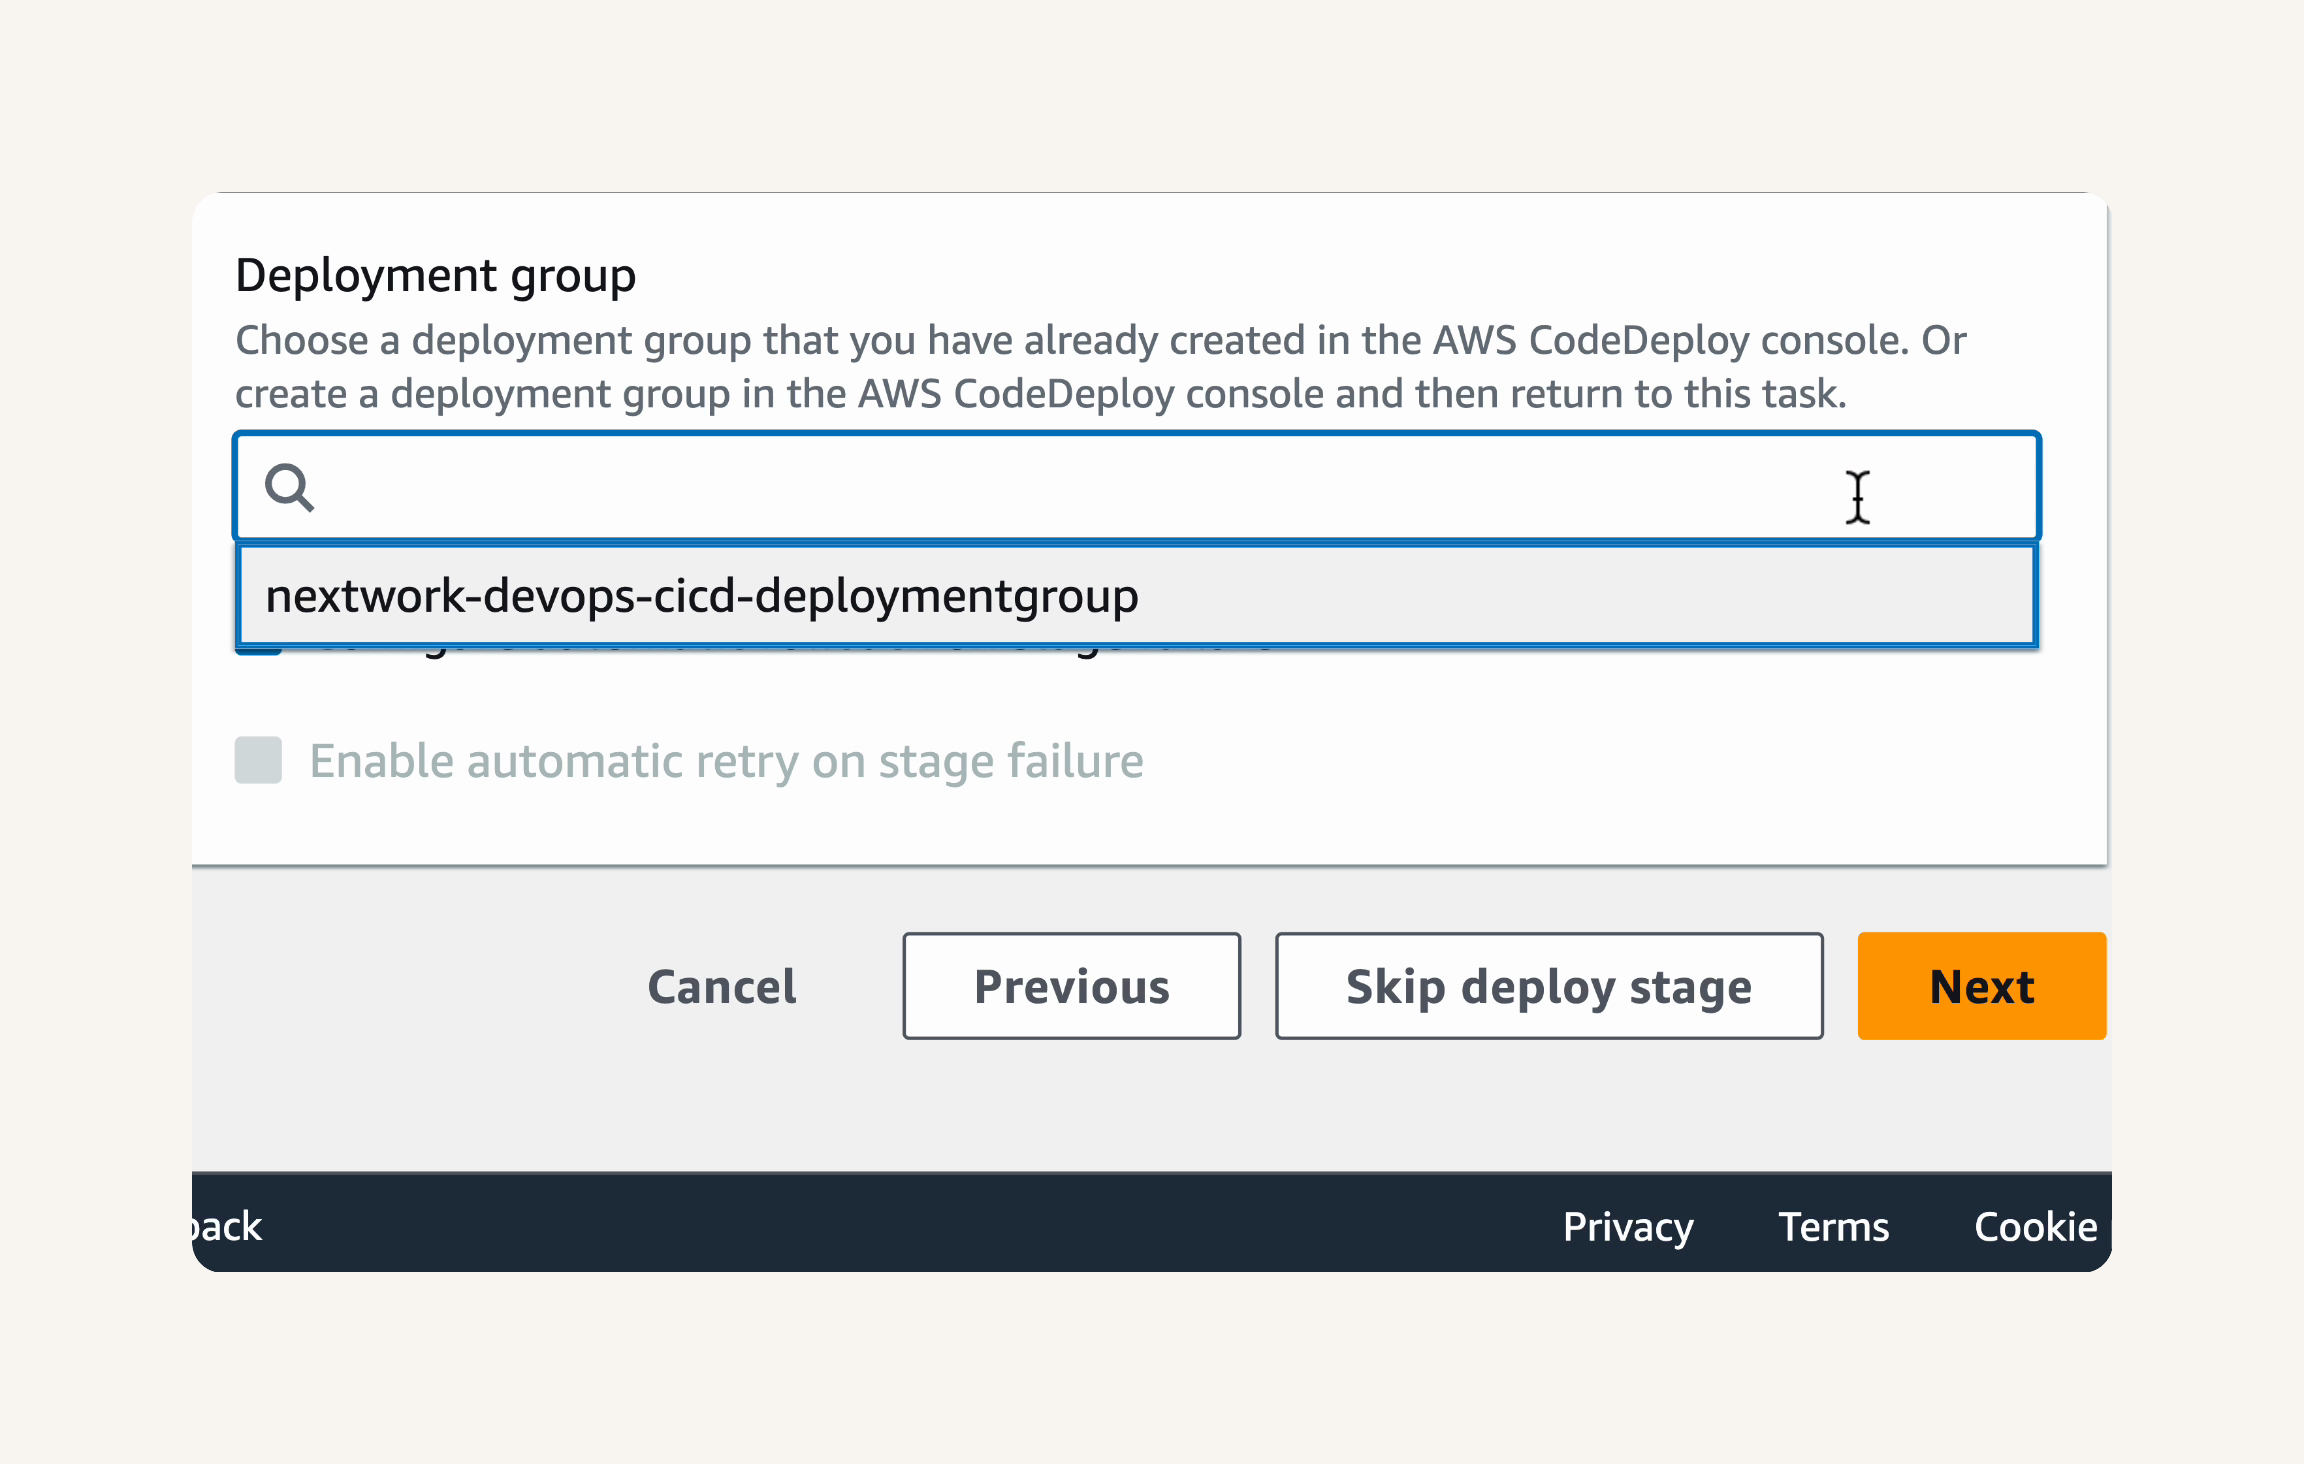
Deployment group, select your existing CodeDeploy deployment group → Check the box for Configure automatic rollback on stage failure. → next
Run Your Pipeline:
Review Your Pipeline:
Confirm that the Pipeline settings are:
Pipeline name: nextwork-devops-cicdPipeline
type: V2
Execution mode: SUPERSEDED
Artifact store location: Default location
Service role: New service role
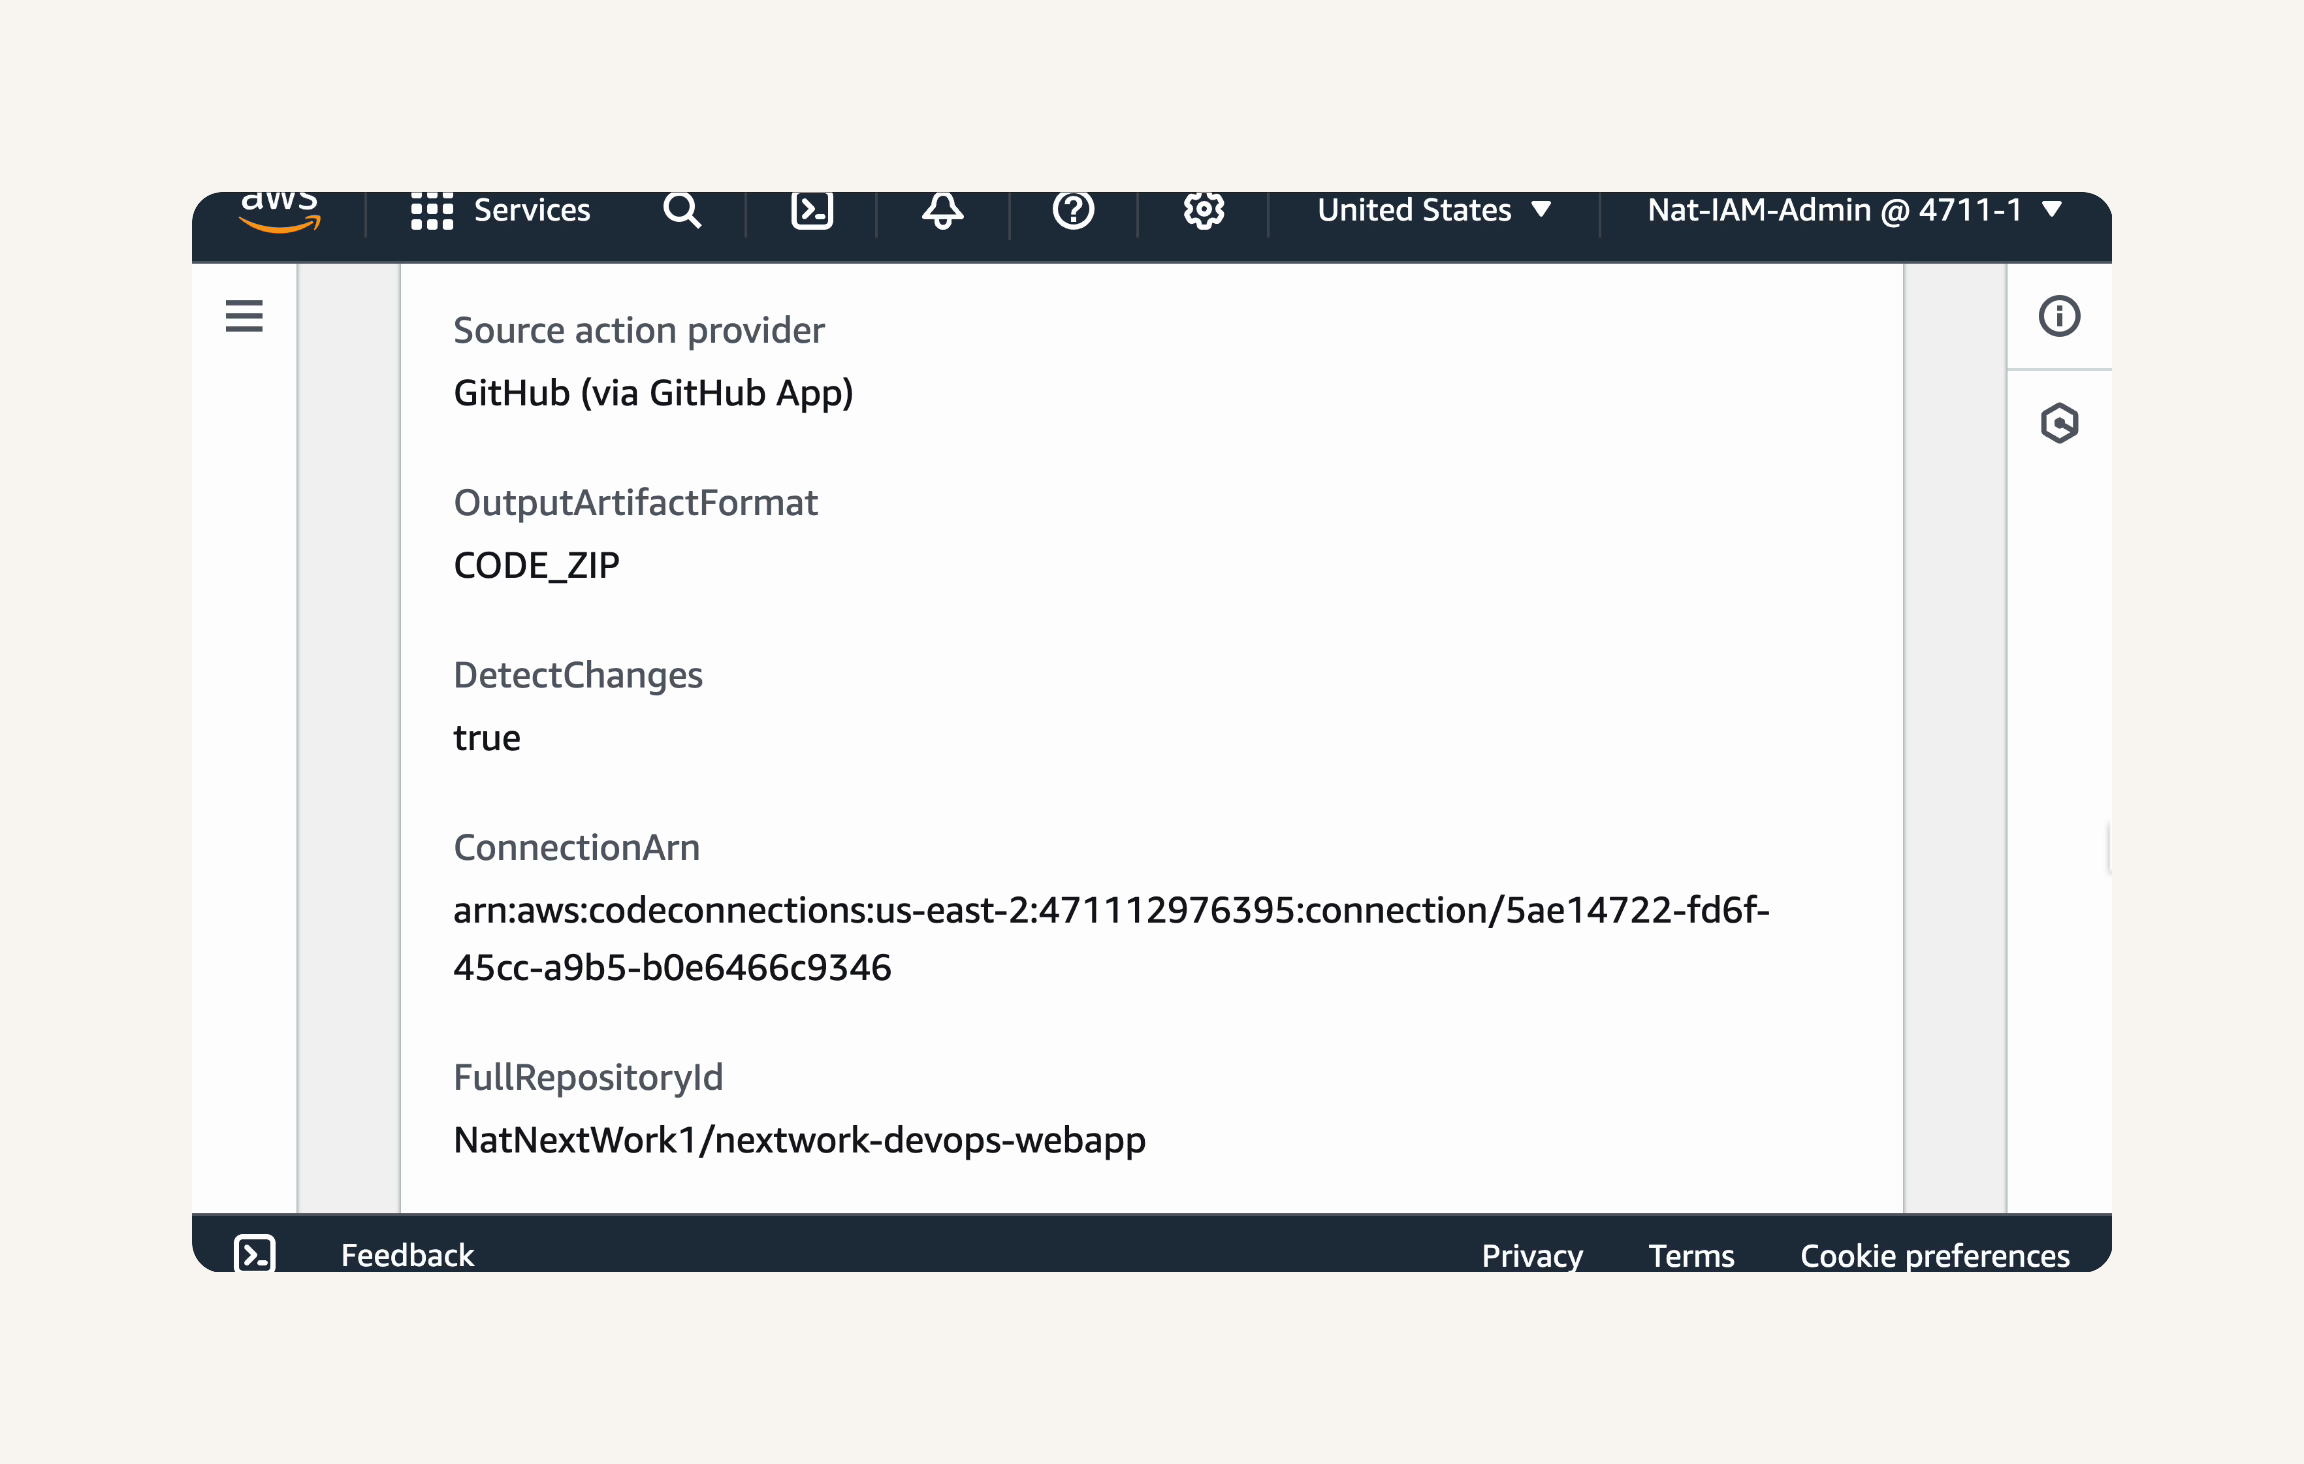
Confirm that the Source stage settings are:
Source provider: GitHub (via GitHub App)
Output artifact format: CODE_ZIP
Detect changes: true
Connection ARN: Your Code
Connection ARN
Full repository ID: Your GitHub account/nextwork-web-project
Default branch: master
Enable automatic retry on stage failure: Enabled
Confirm Build stage settings:
Action provider: AWS CodeBuild
Project name: nextwork-devops-cicd
Enable automatic retry on stage failure: Enabled
Confirm that the Deploy stage settings are:
Action provider: AWS CodeDeploy
Application name: nextwork-devops-cicd
Deployment group name: nextwork-devops-cicd-deploymentgroup
Configure automatic rollback on stage failure: Enabled
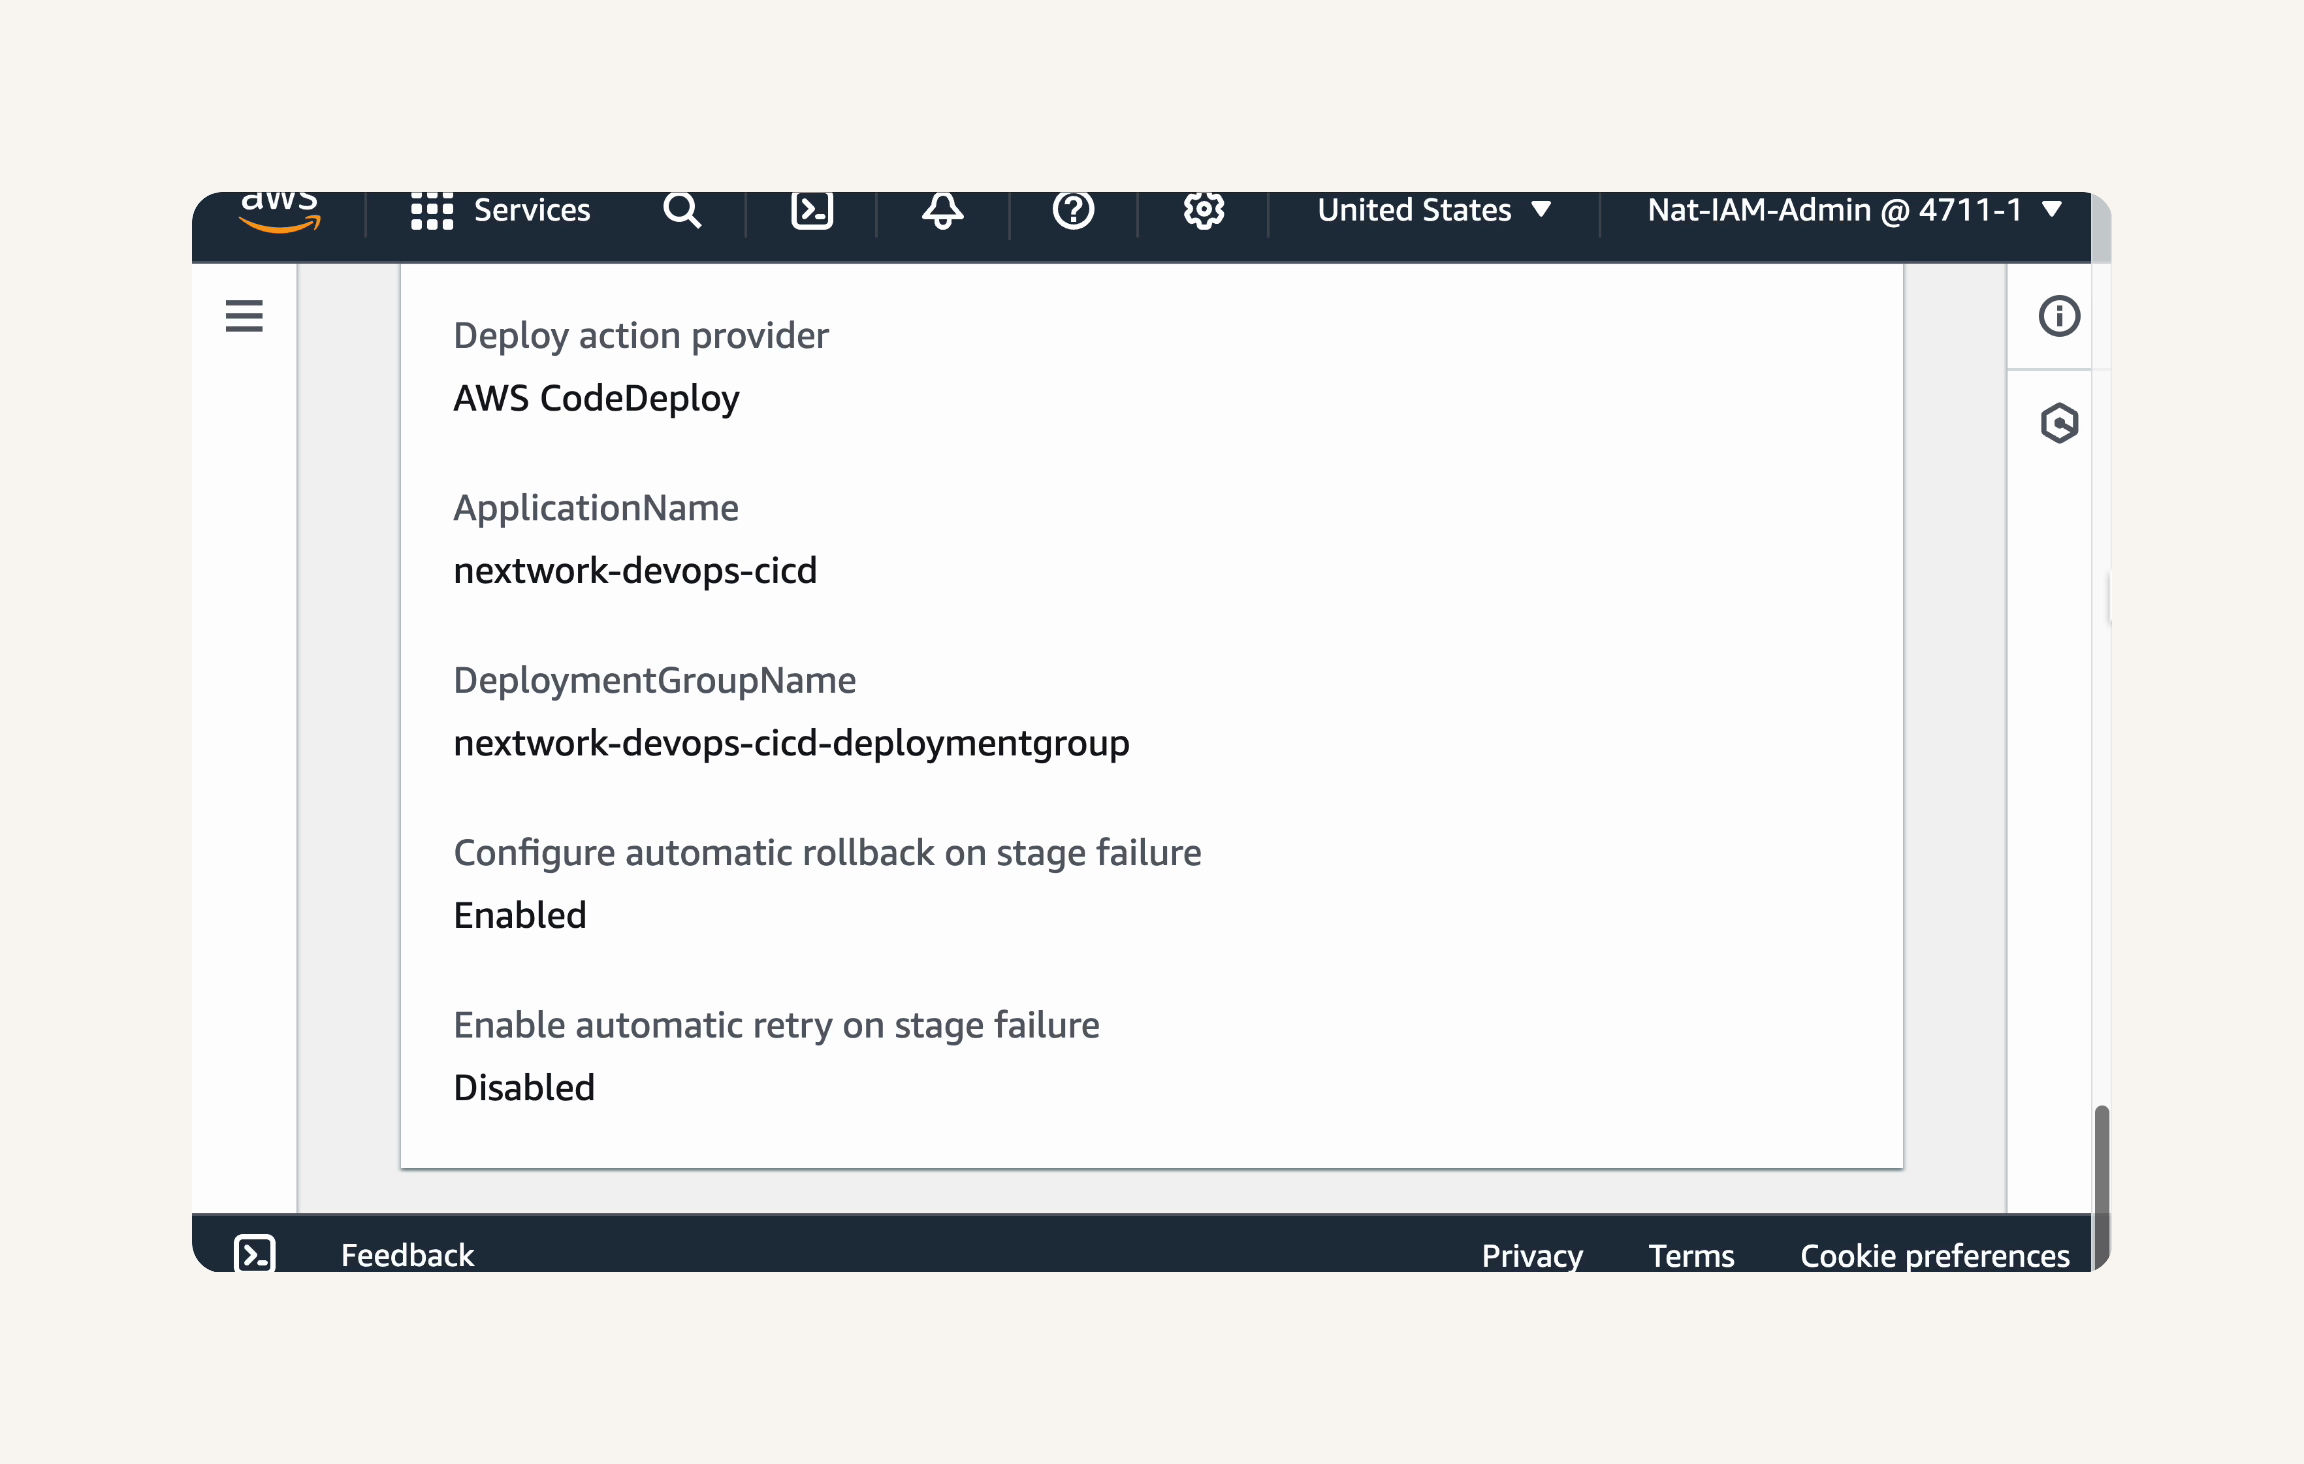
Create pipeline.
Run Your Pipeline:
After clicking Create pipeline, you will be taken to the pipeline details page.
Note the pipeline diagram at the top of the page.
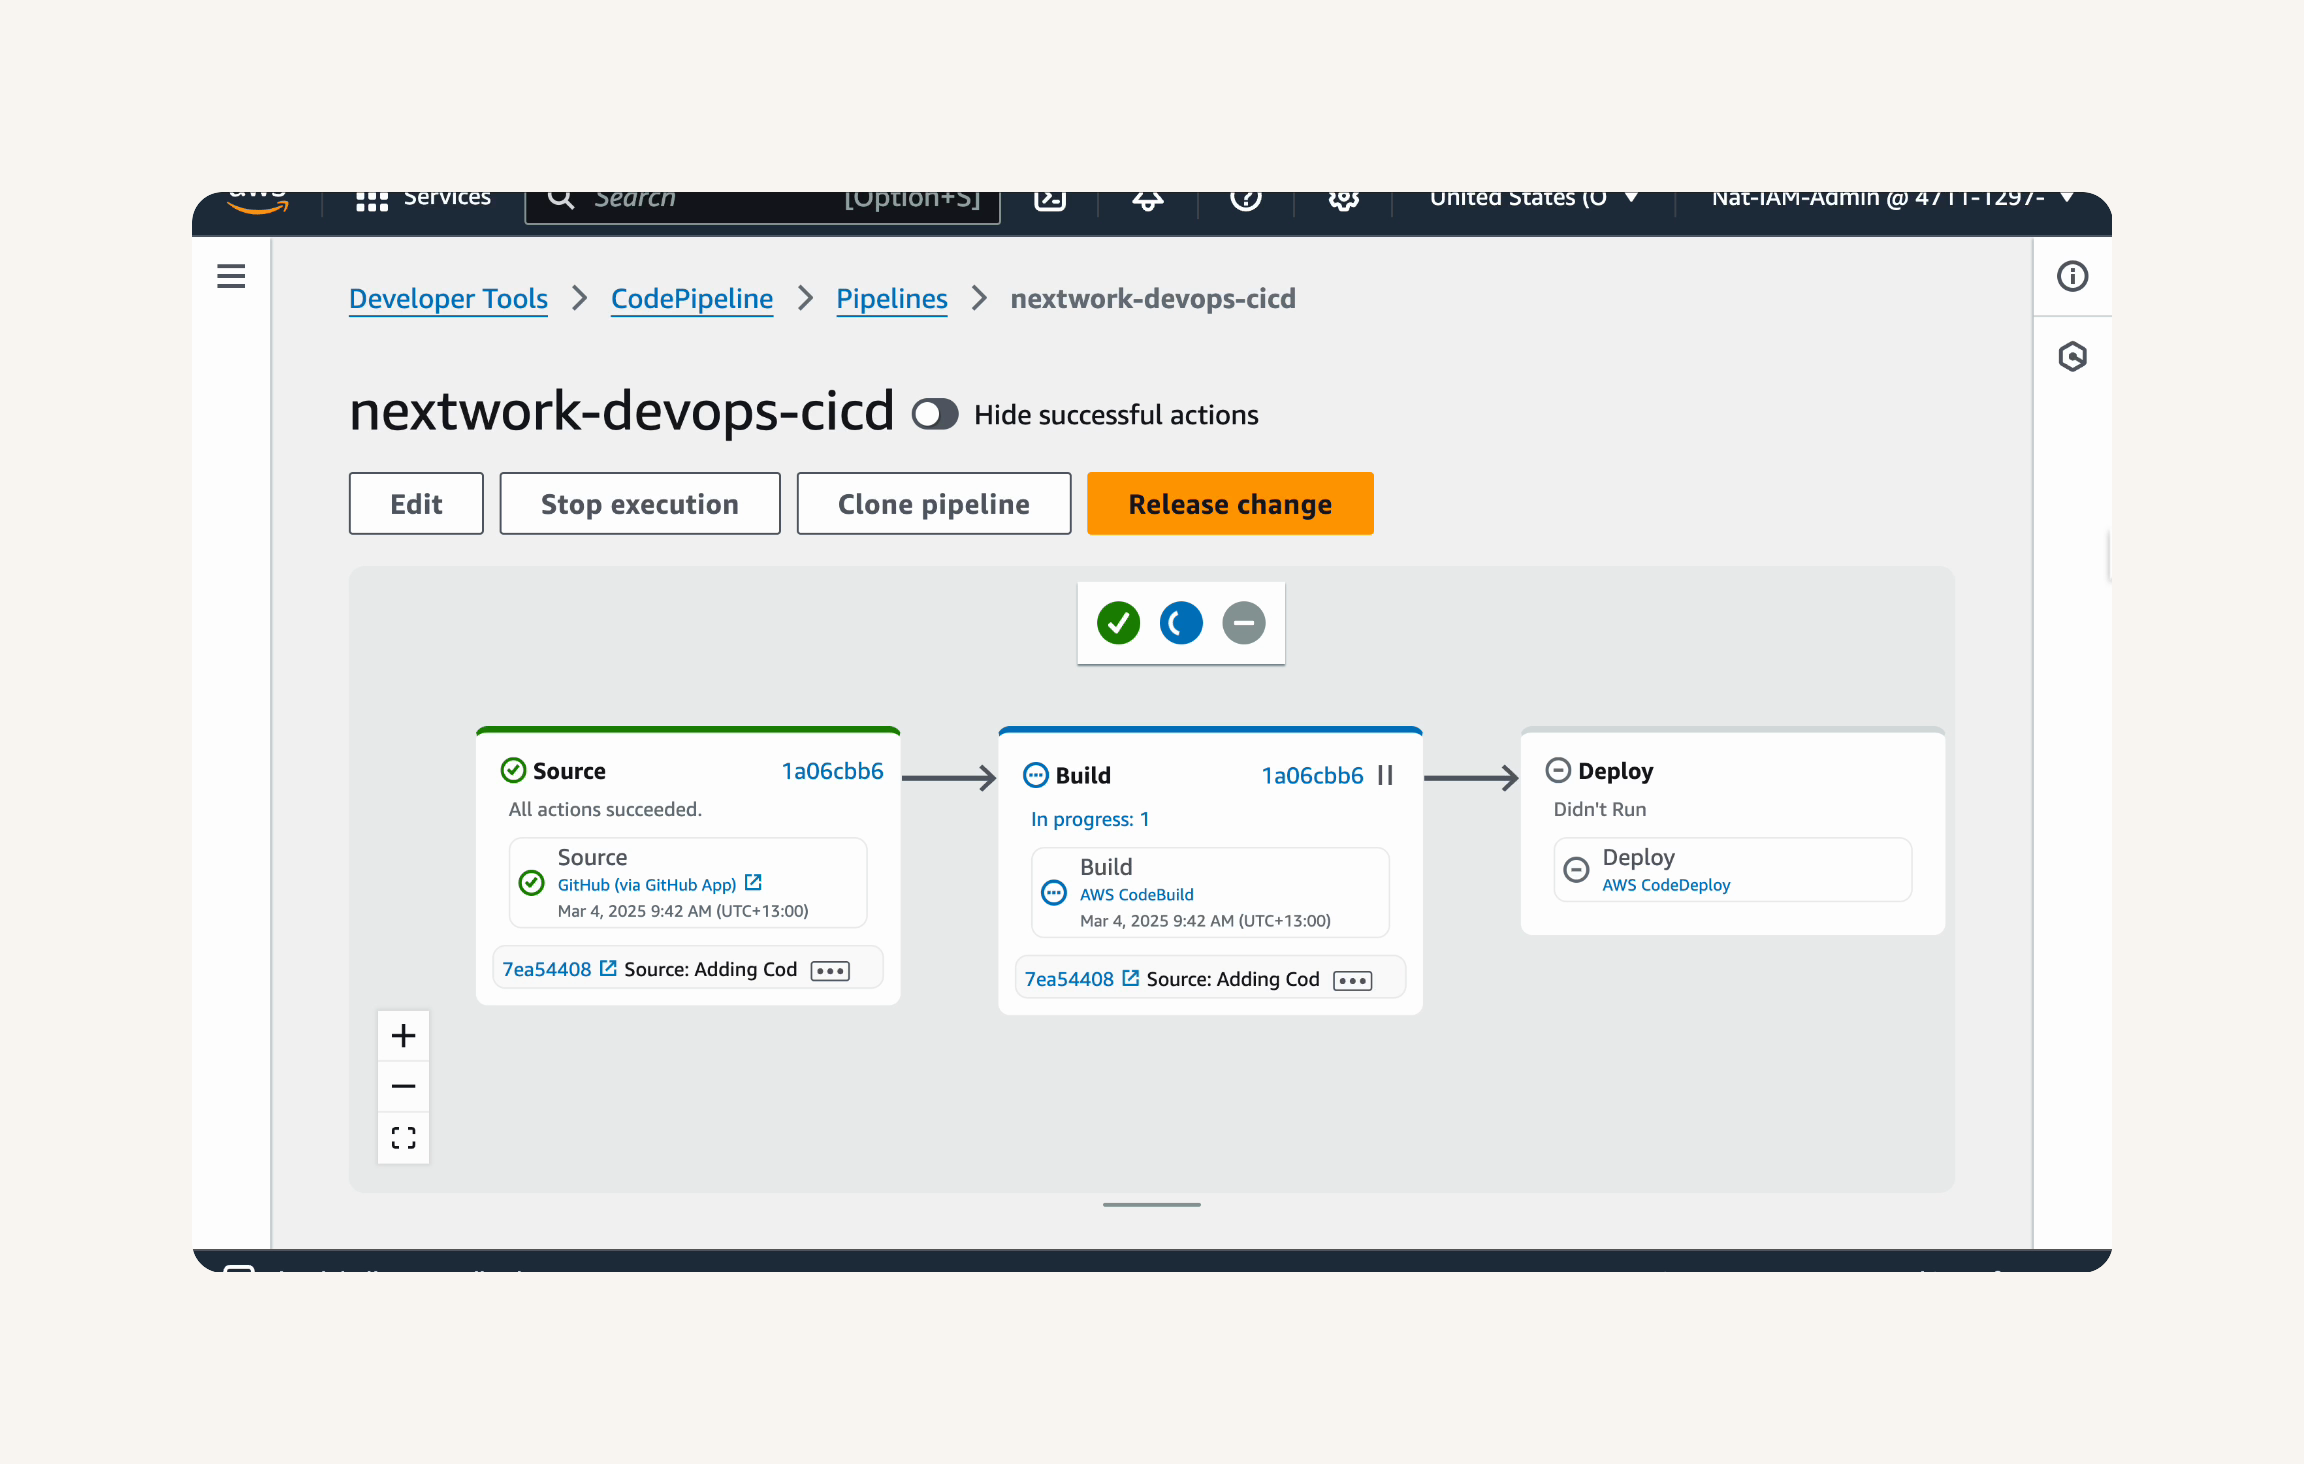
To see more details about each execution, click on the Executions tab above the pipeline diagram.
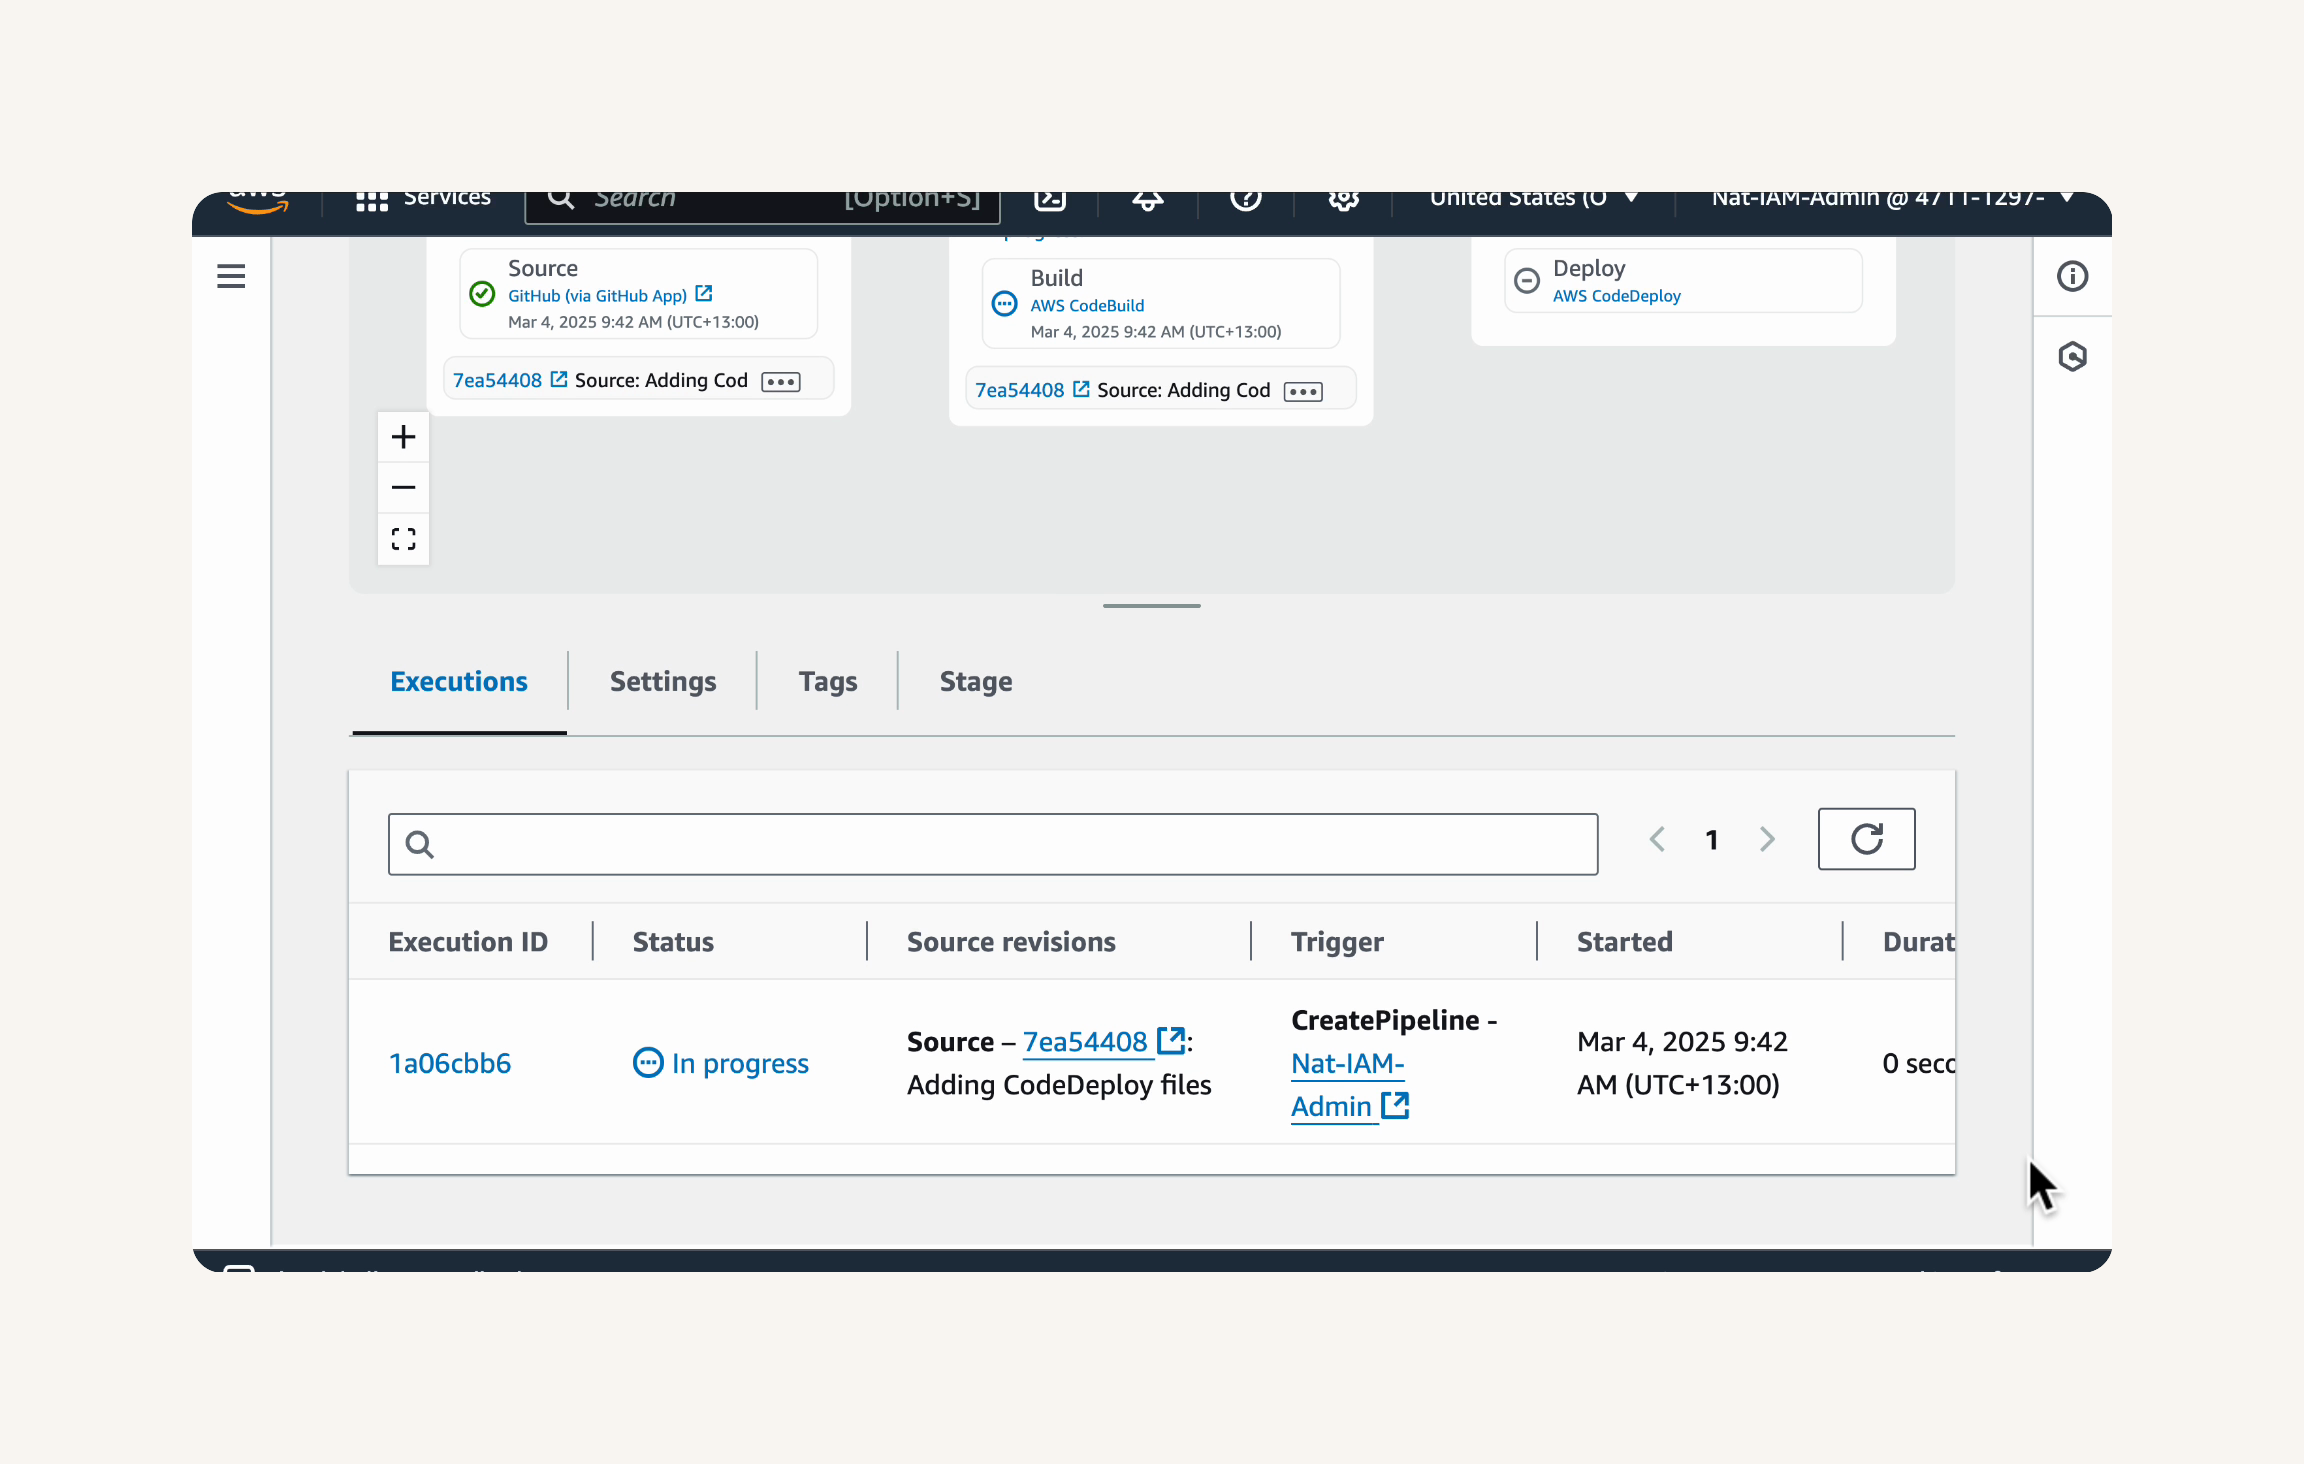
To view details of a specific stage execution, click on the Stage ID link in the Executions tab. For example, click on the Source stage ID to see details about the source code retrieval.
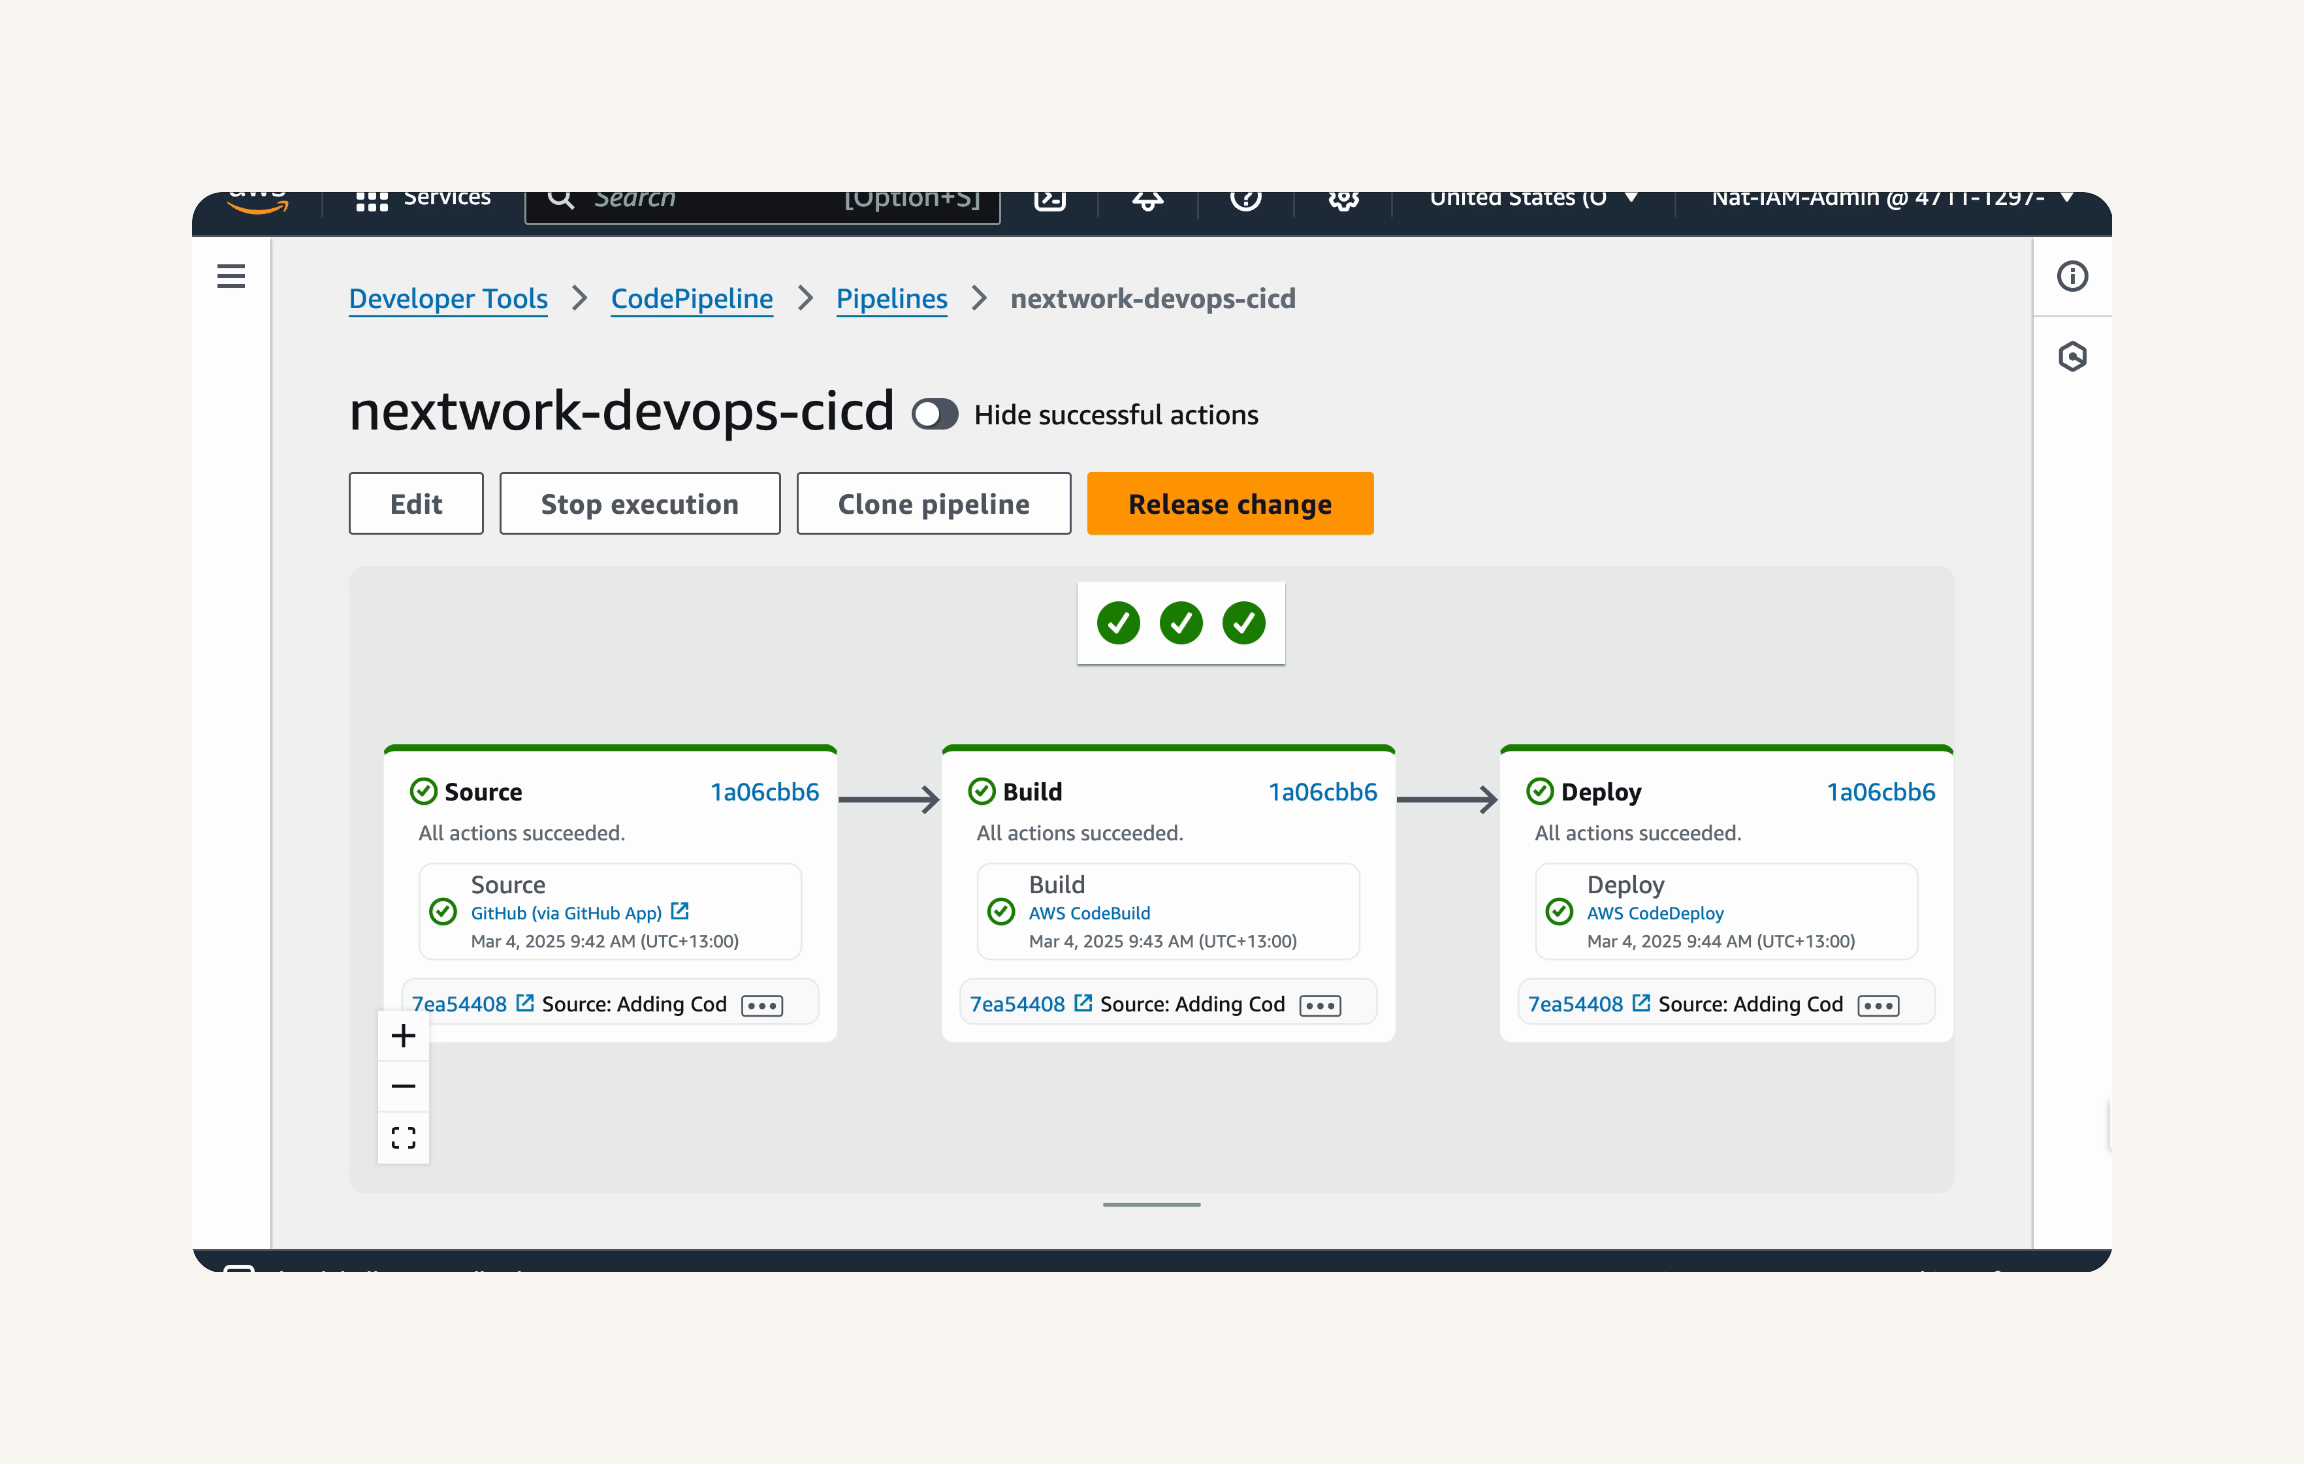
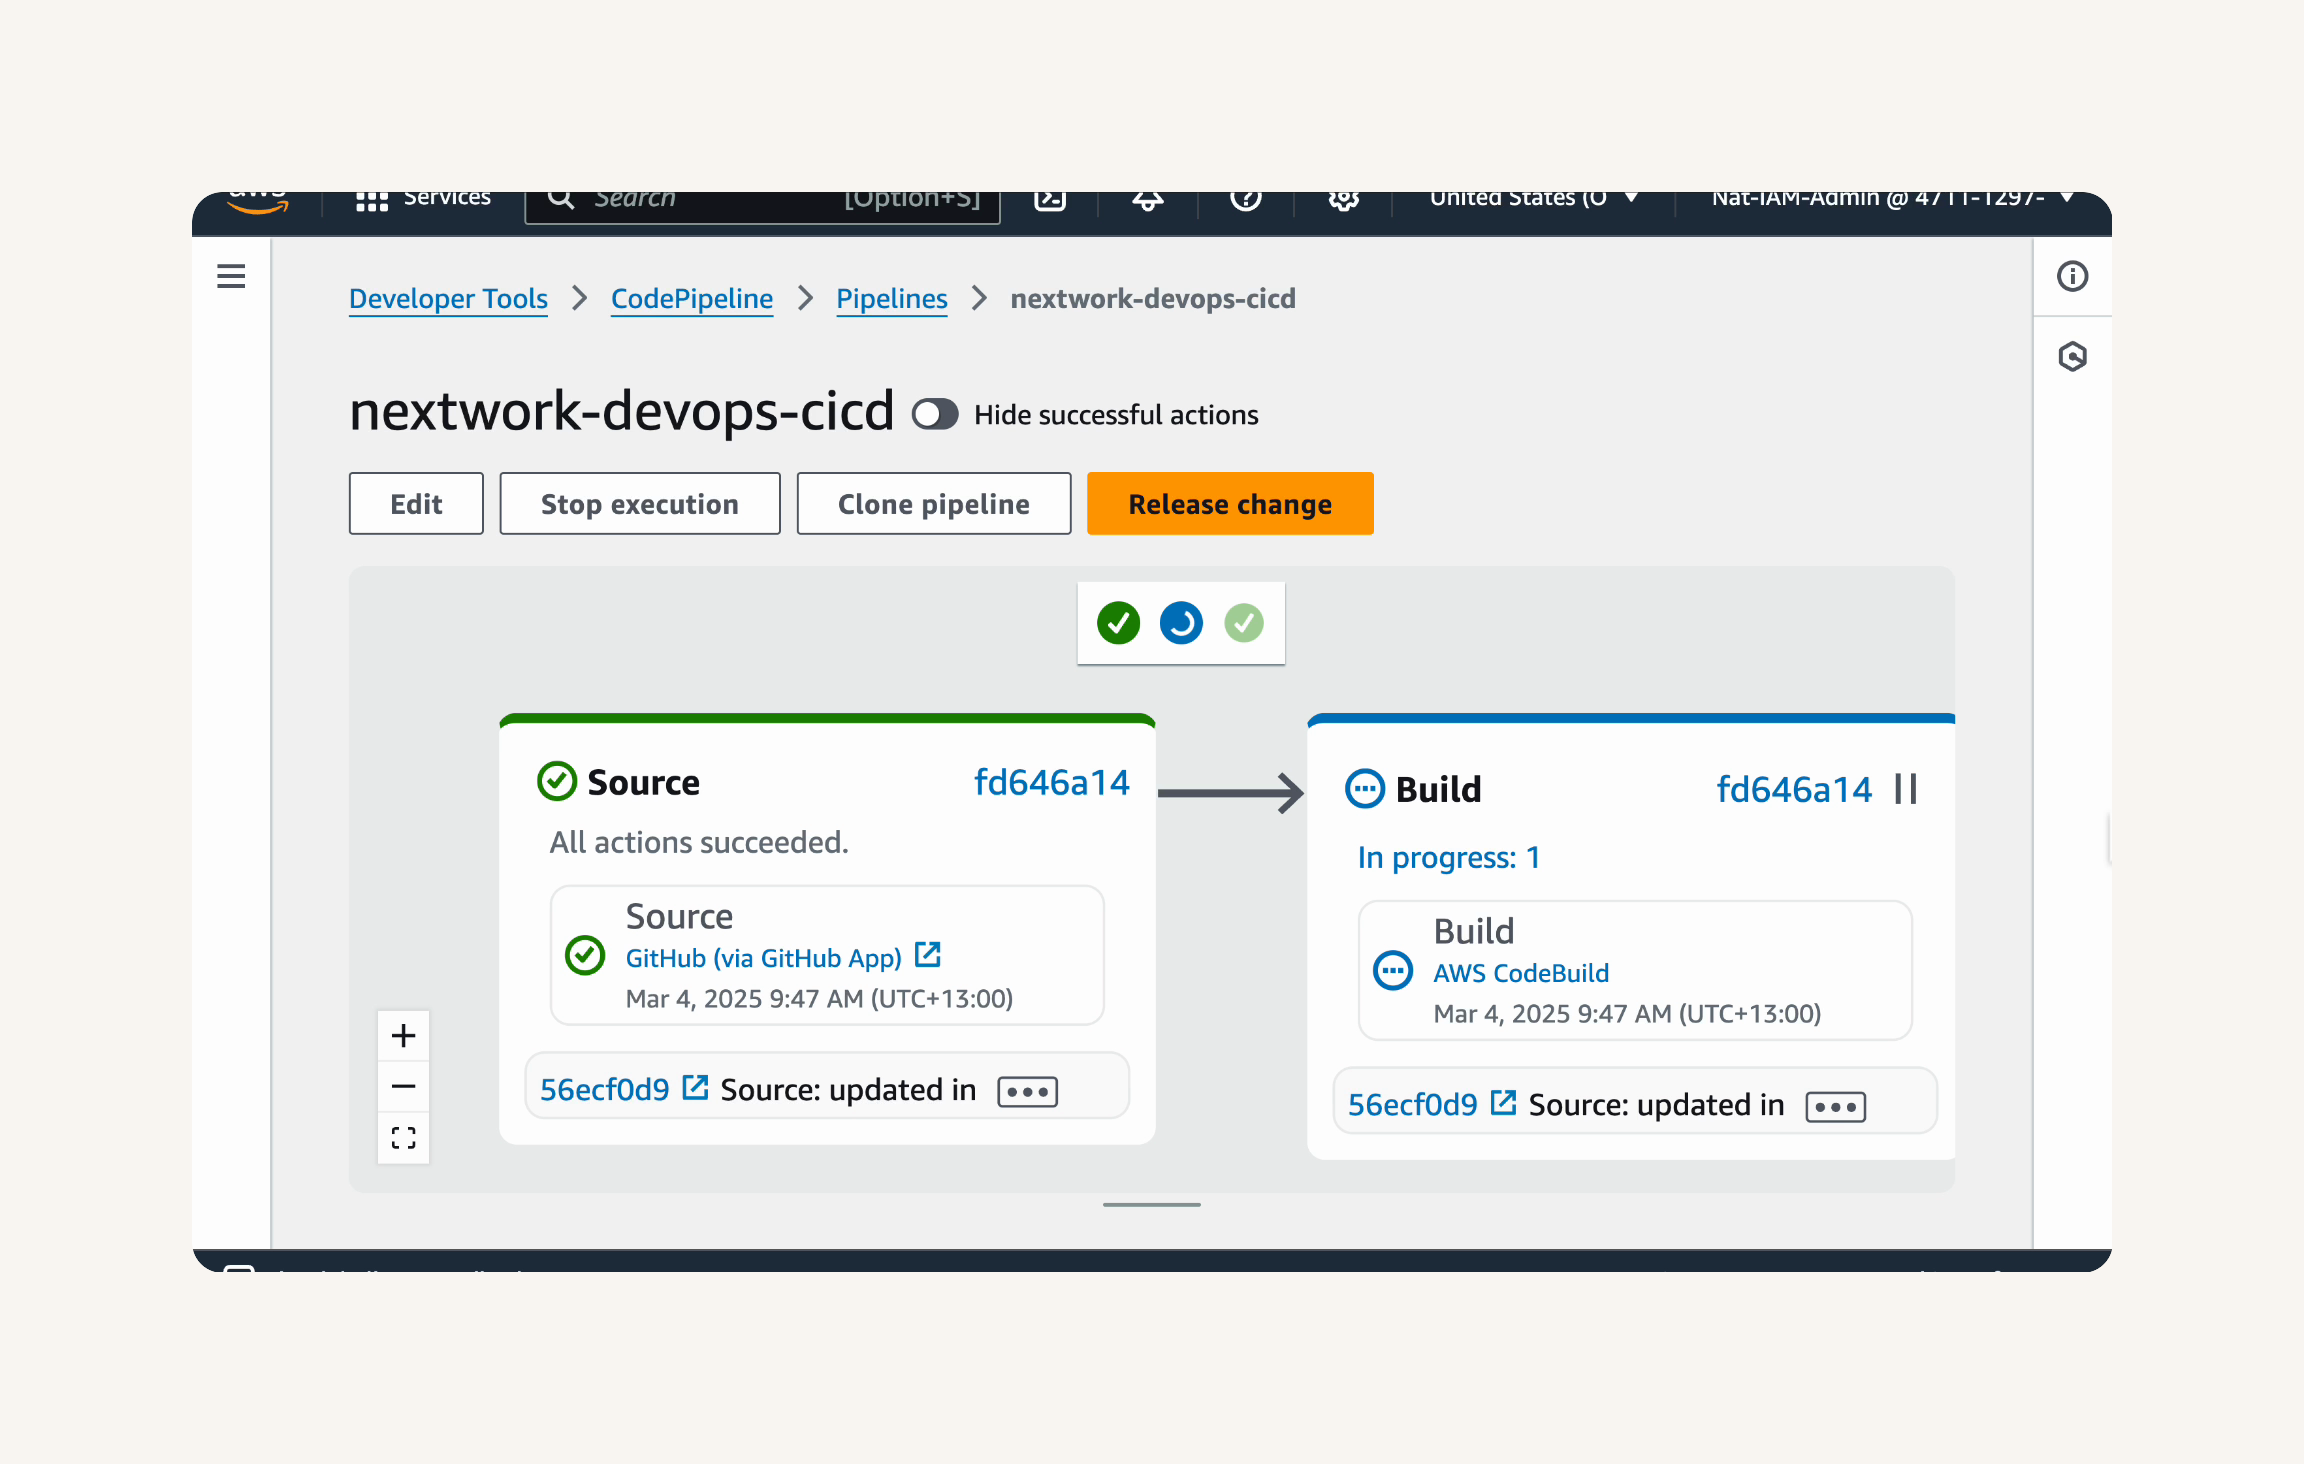
Wait for all stages in the pipeline diagram to turn green, which means your pipeline is all set up using the latest code change.
Test Your Pipeline:
Test the pipeline by making a code change and pushing it to GitHub.
Open your web app code in your local IDE (e.g., VS Code).
Open the index.jsp file located in src/main/webapp/.
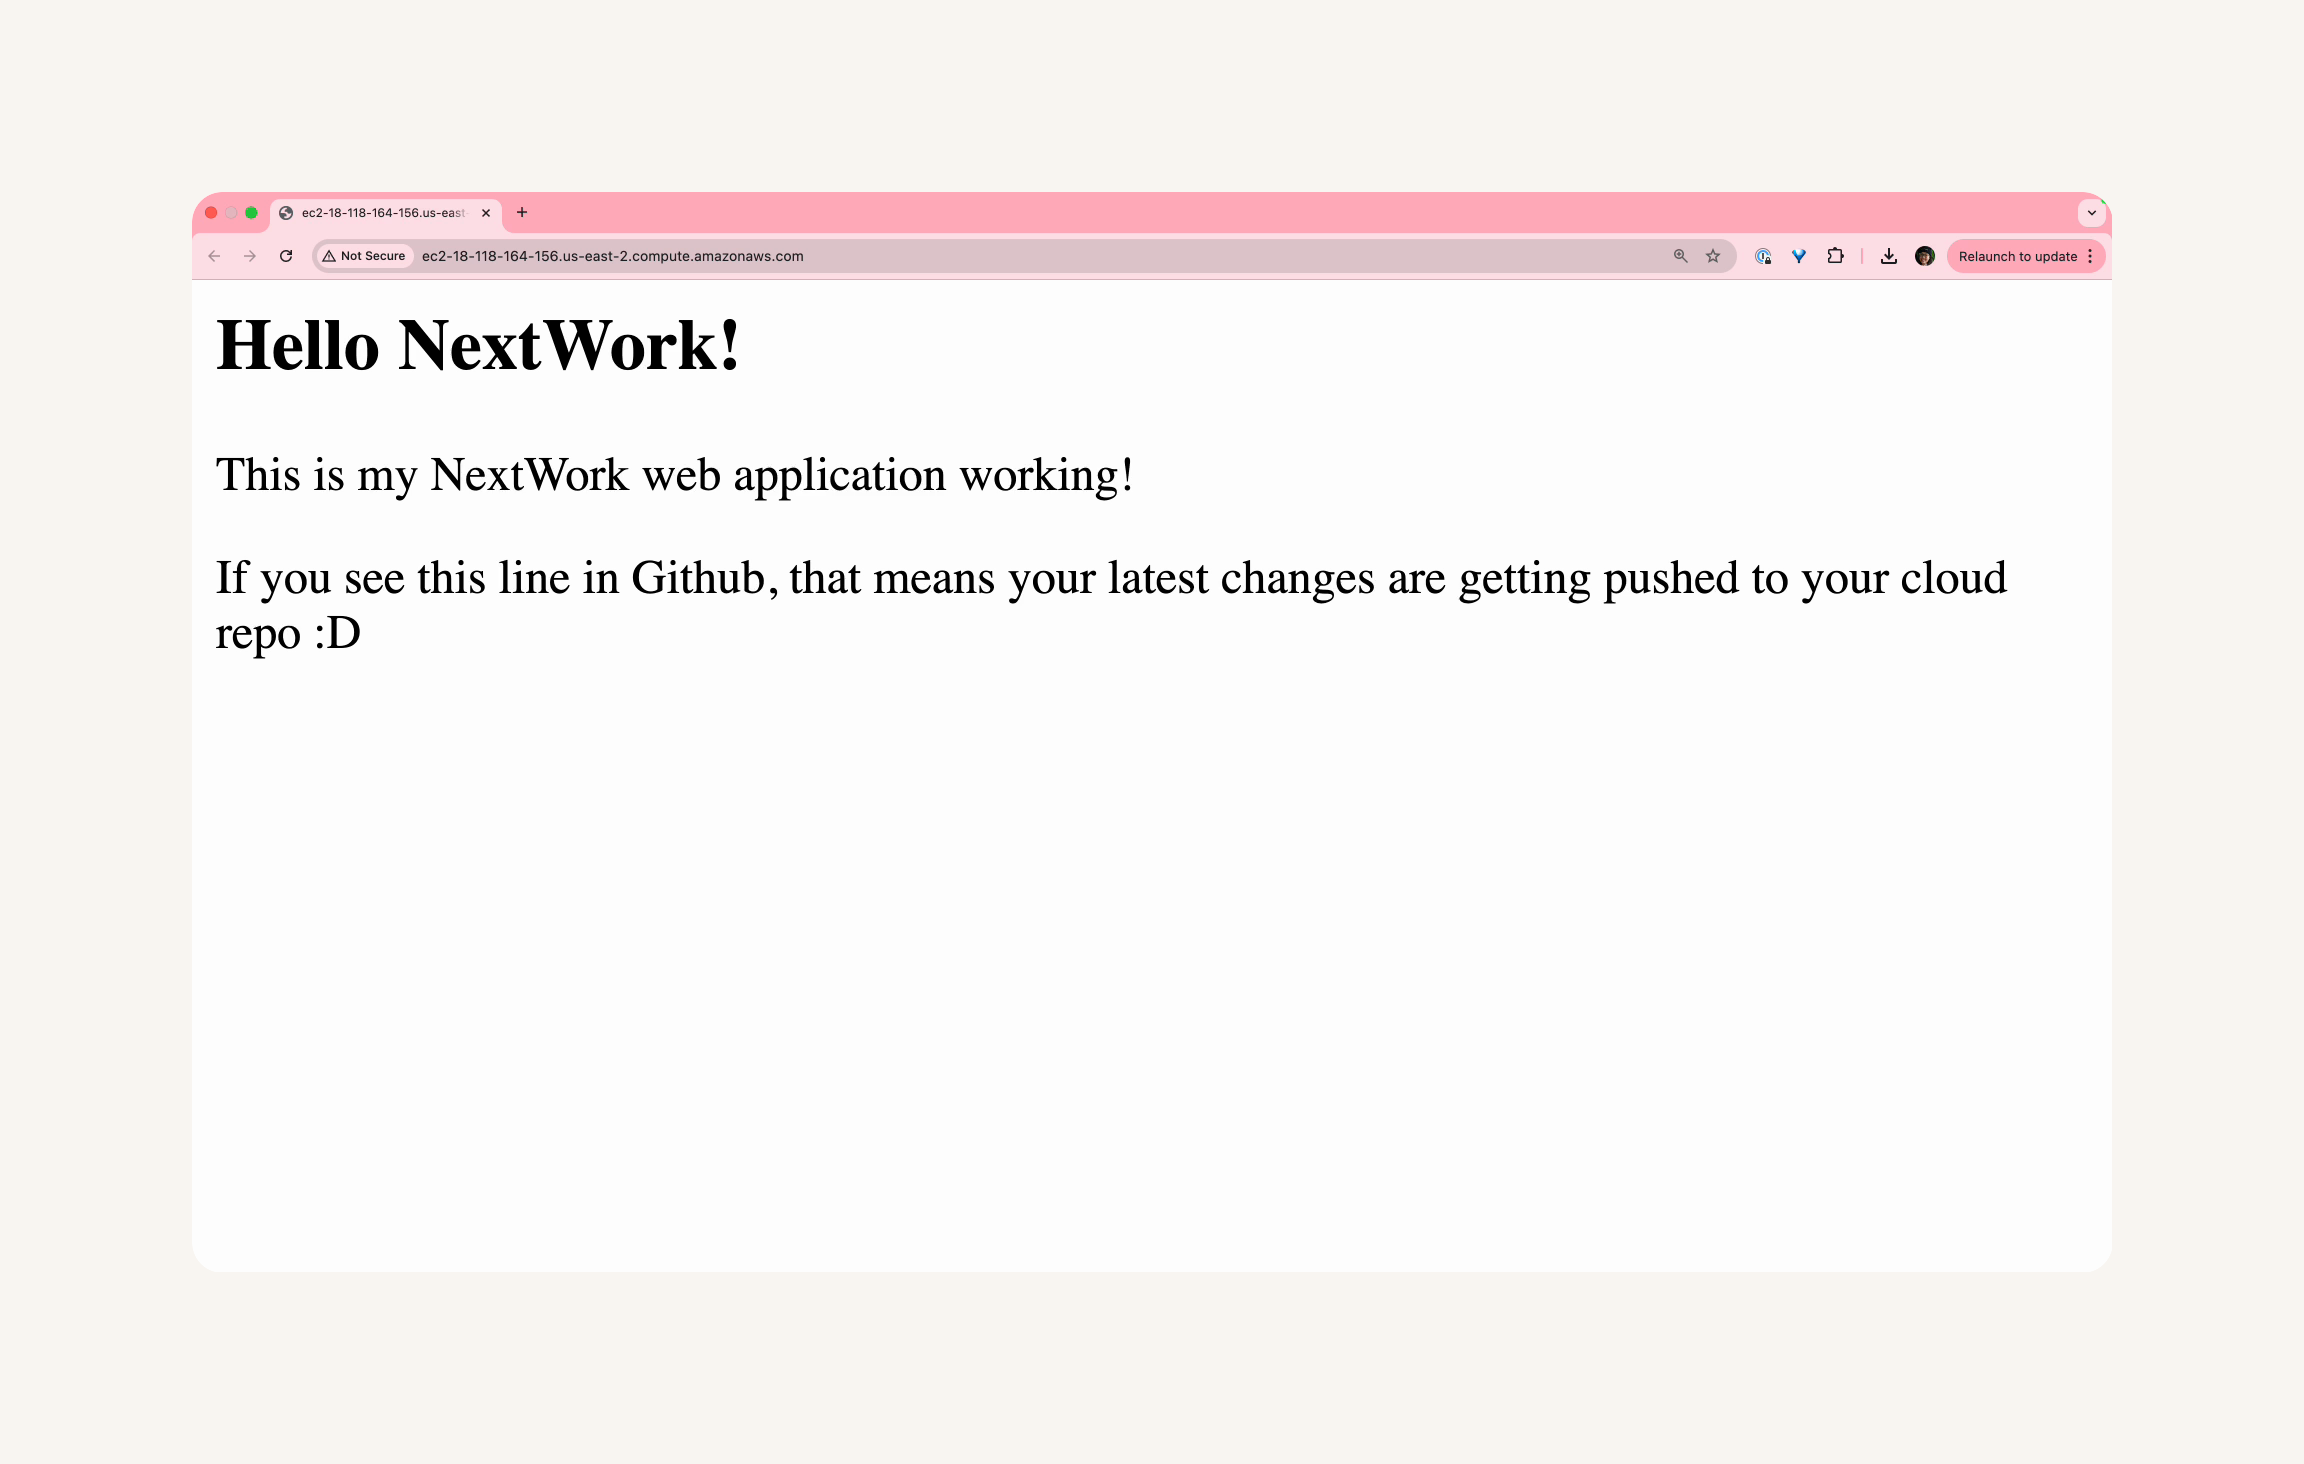
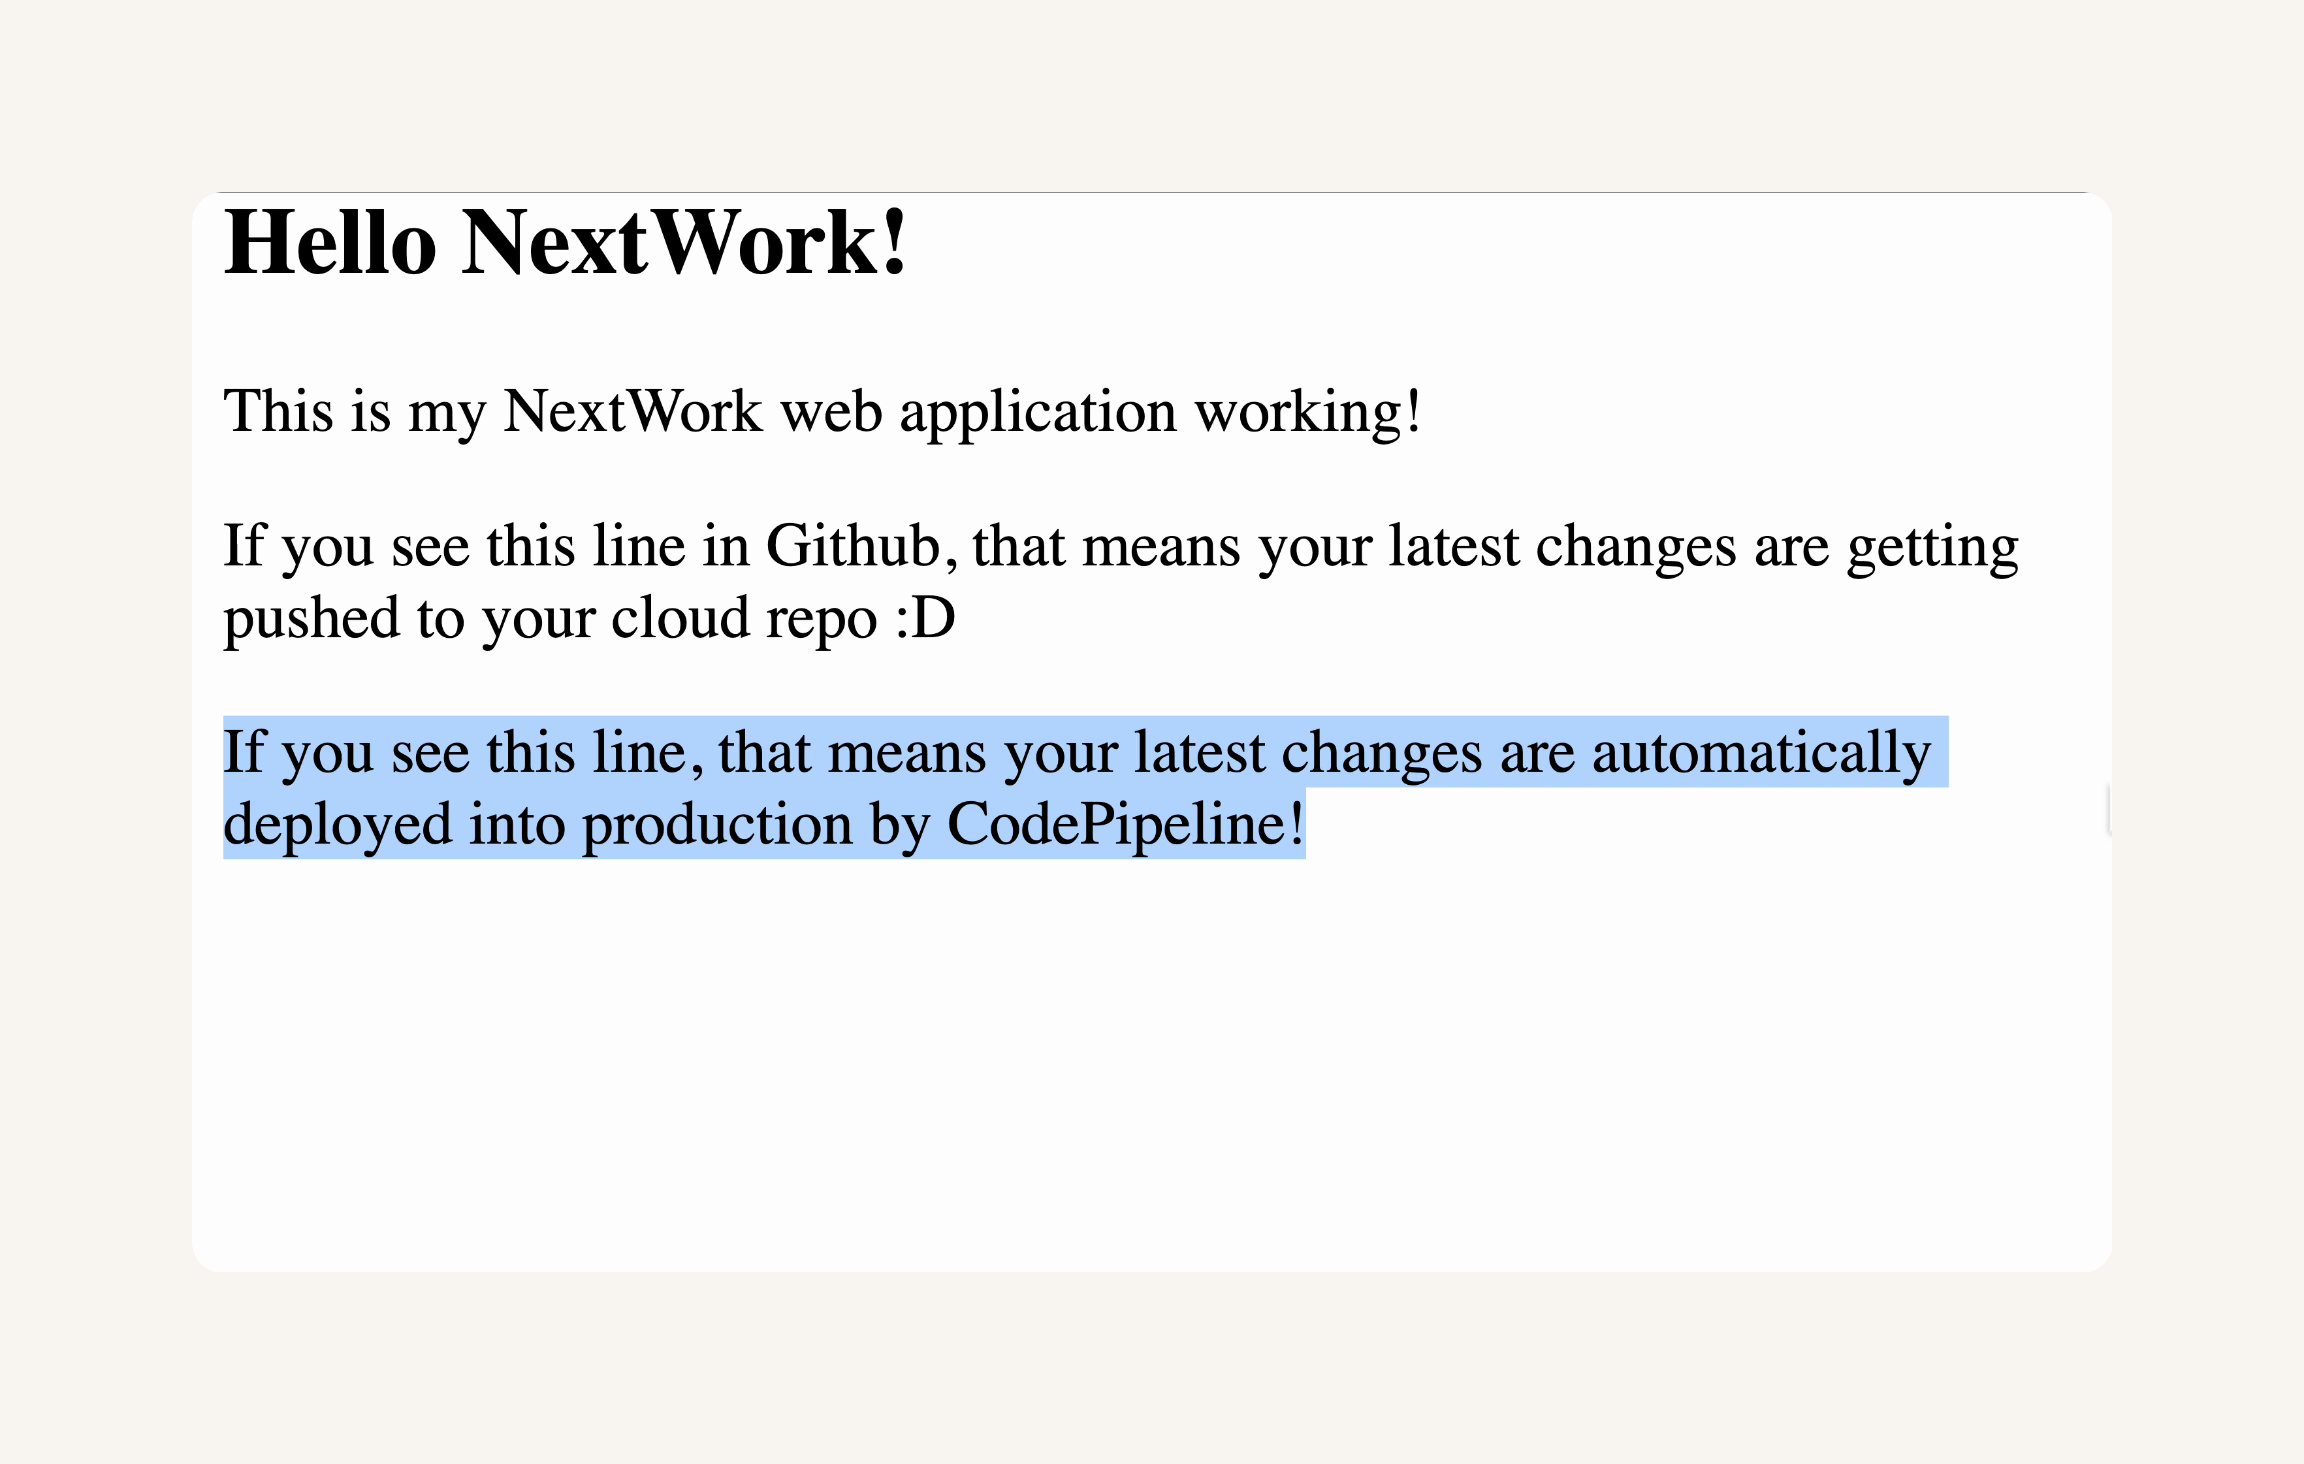
Add a new line in the <body> section of index.jsp:
<p>If you see this line, that means your latest changes are automatically deployed into production by CodePipeline!</p>Save the index.jsp file.
Open your terminal and navigate to your local git repository for the web app.
Commit and push the changes to your GitHub repository using the following commands:
  git add .
  git commit -m "Update index.jsp with a new line to test CodePipeline"
  git push origin master
You should see a new execution starting automatically after you push the changes to GitHub.
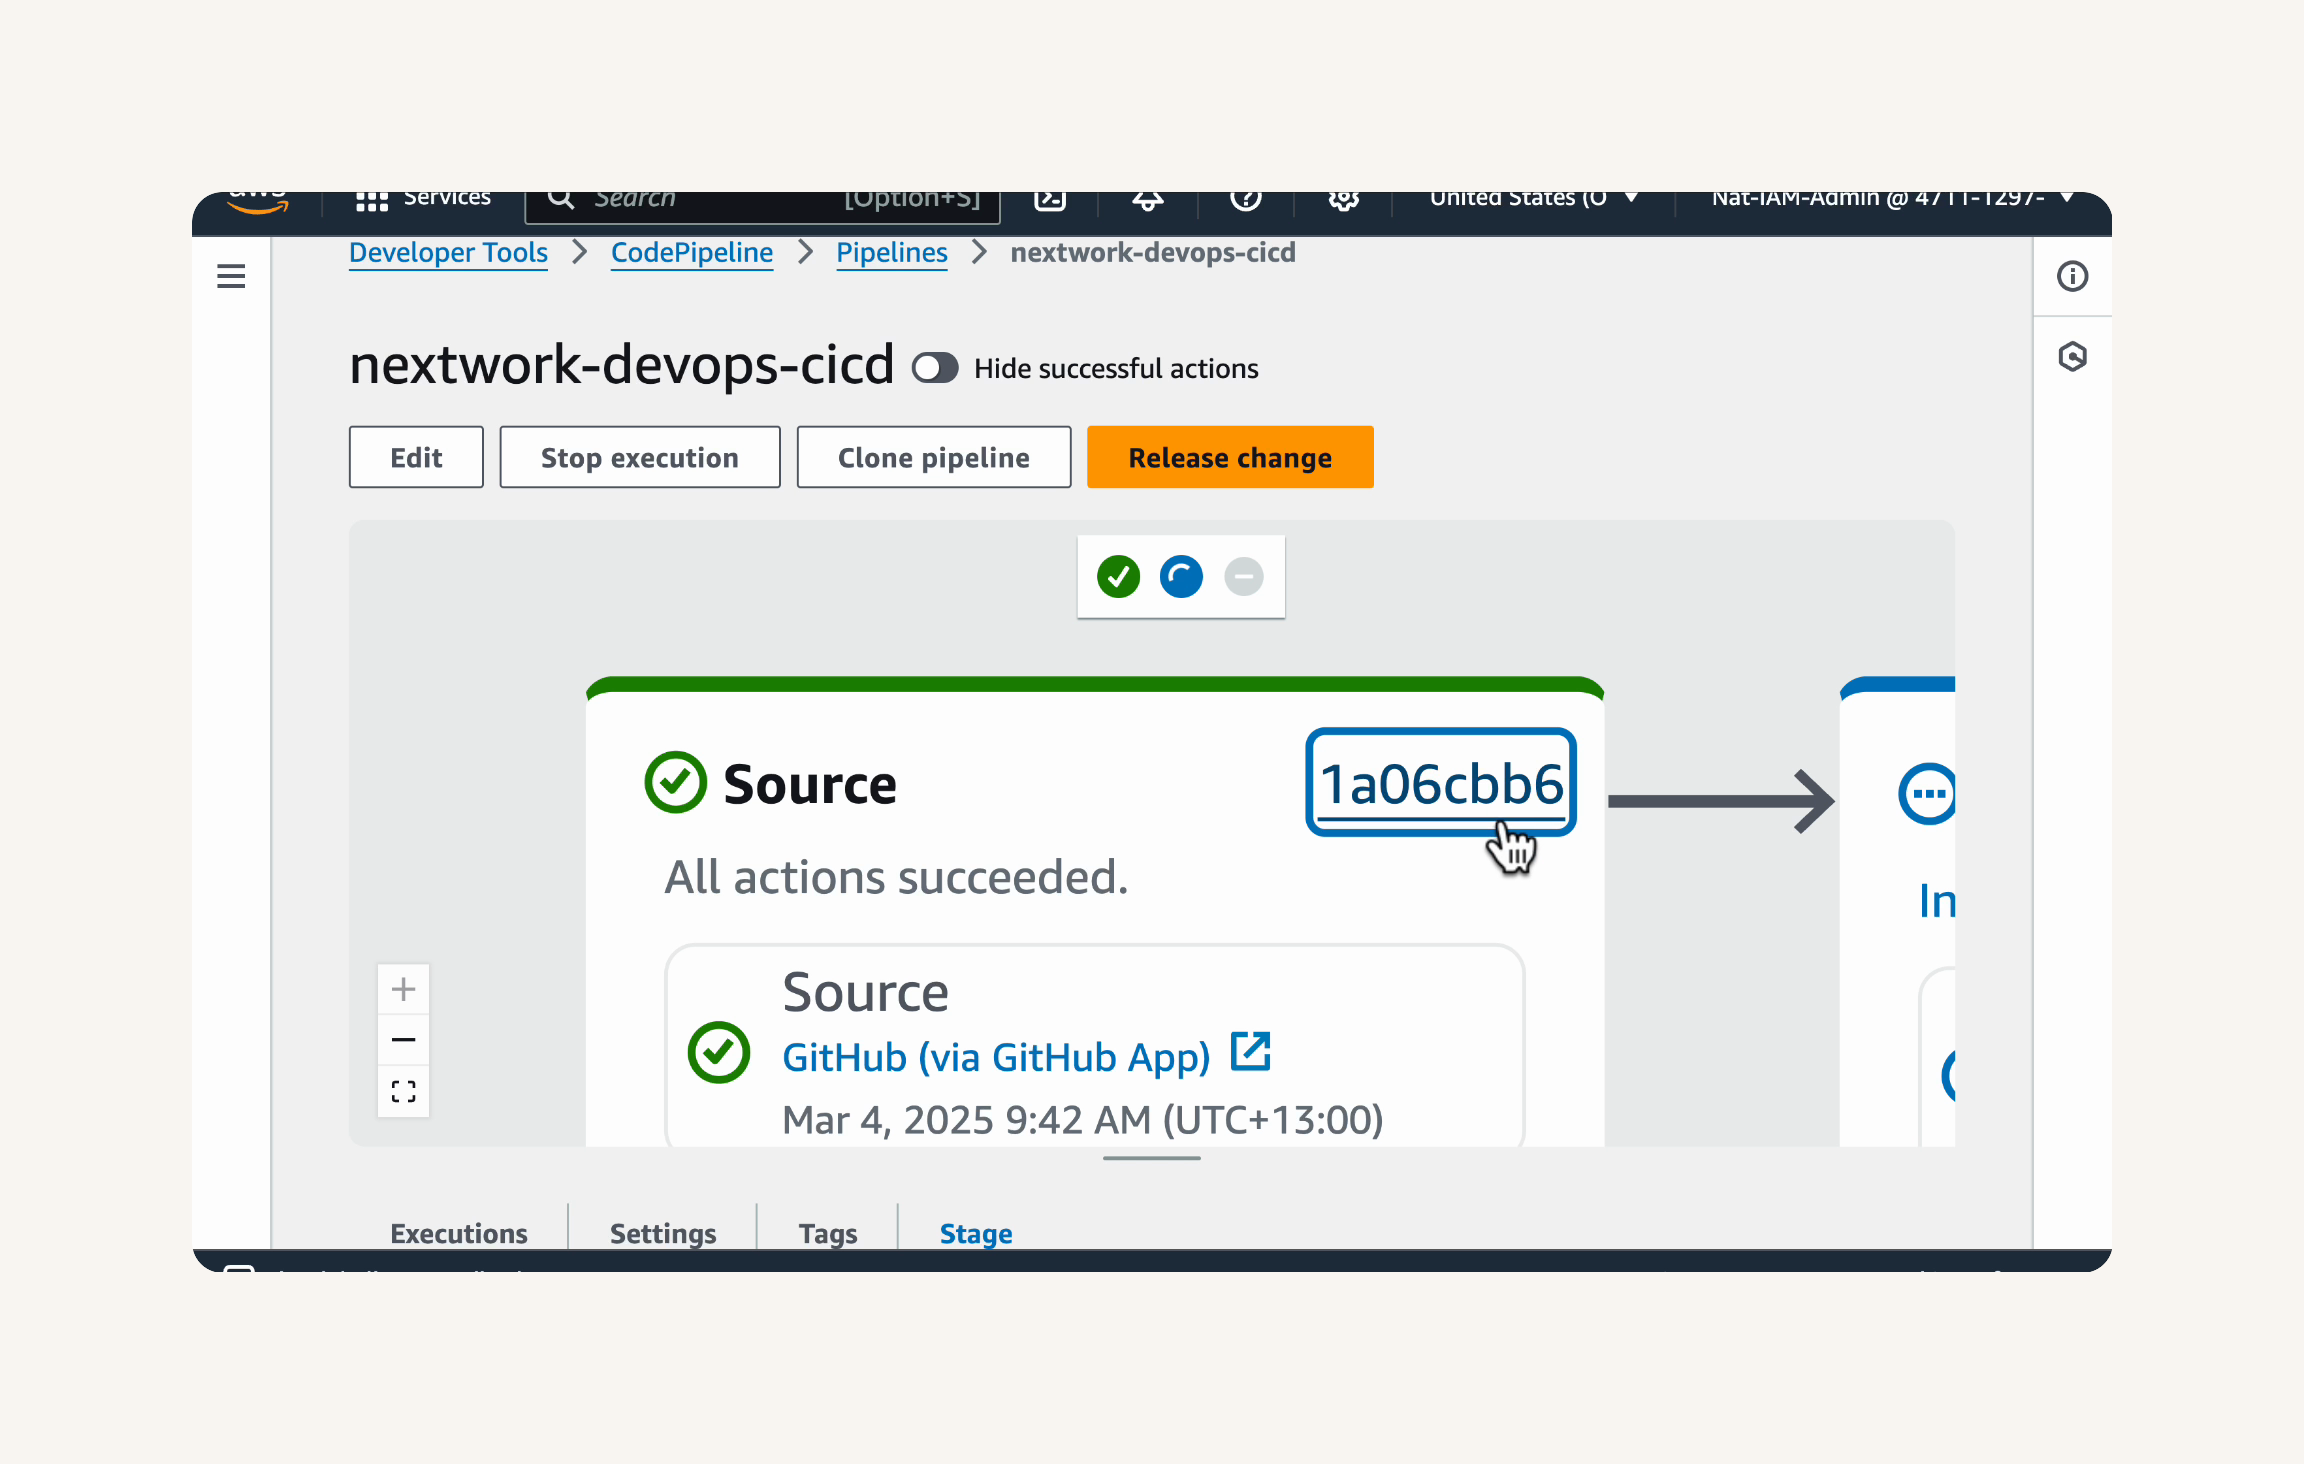
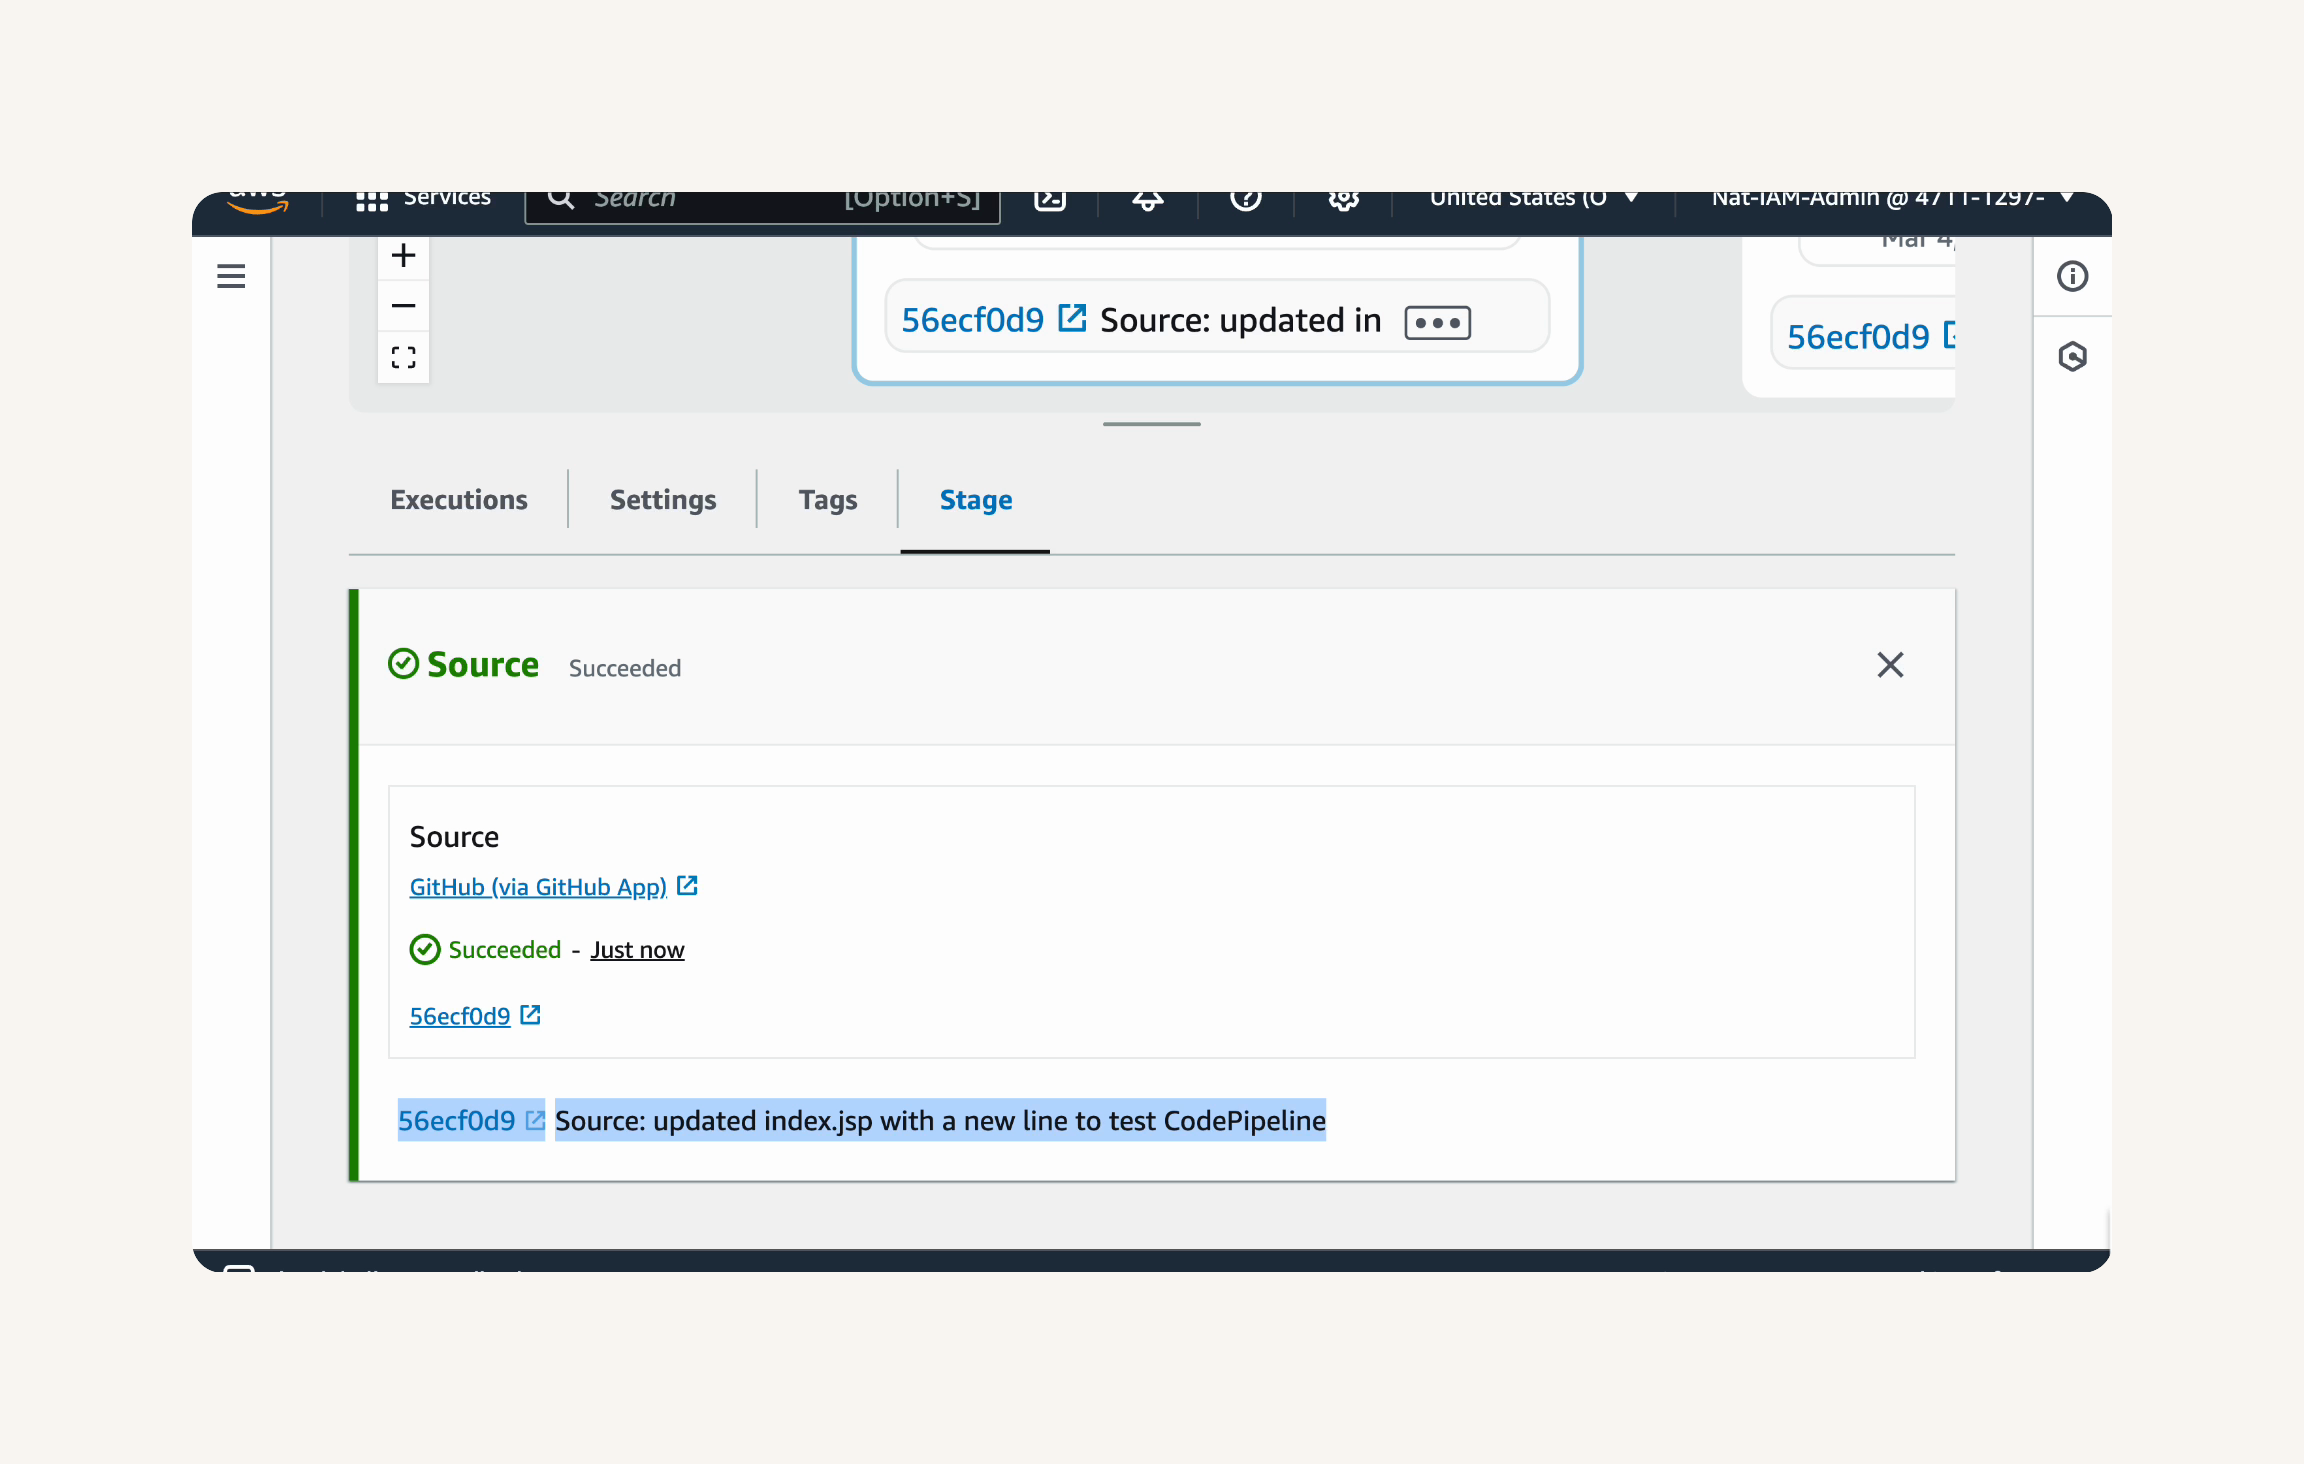
Click on the Source stage box in the pipeline diagram.
Scroll down in the stage details panel to see the commit message.
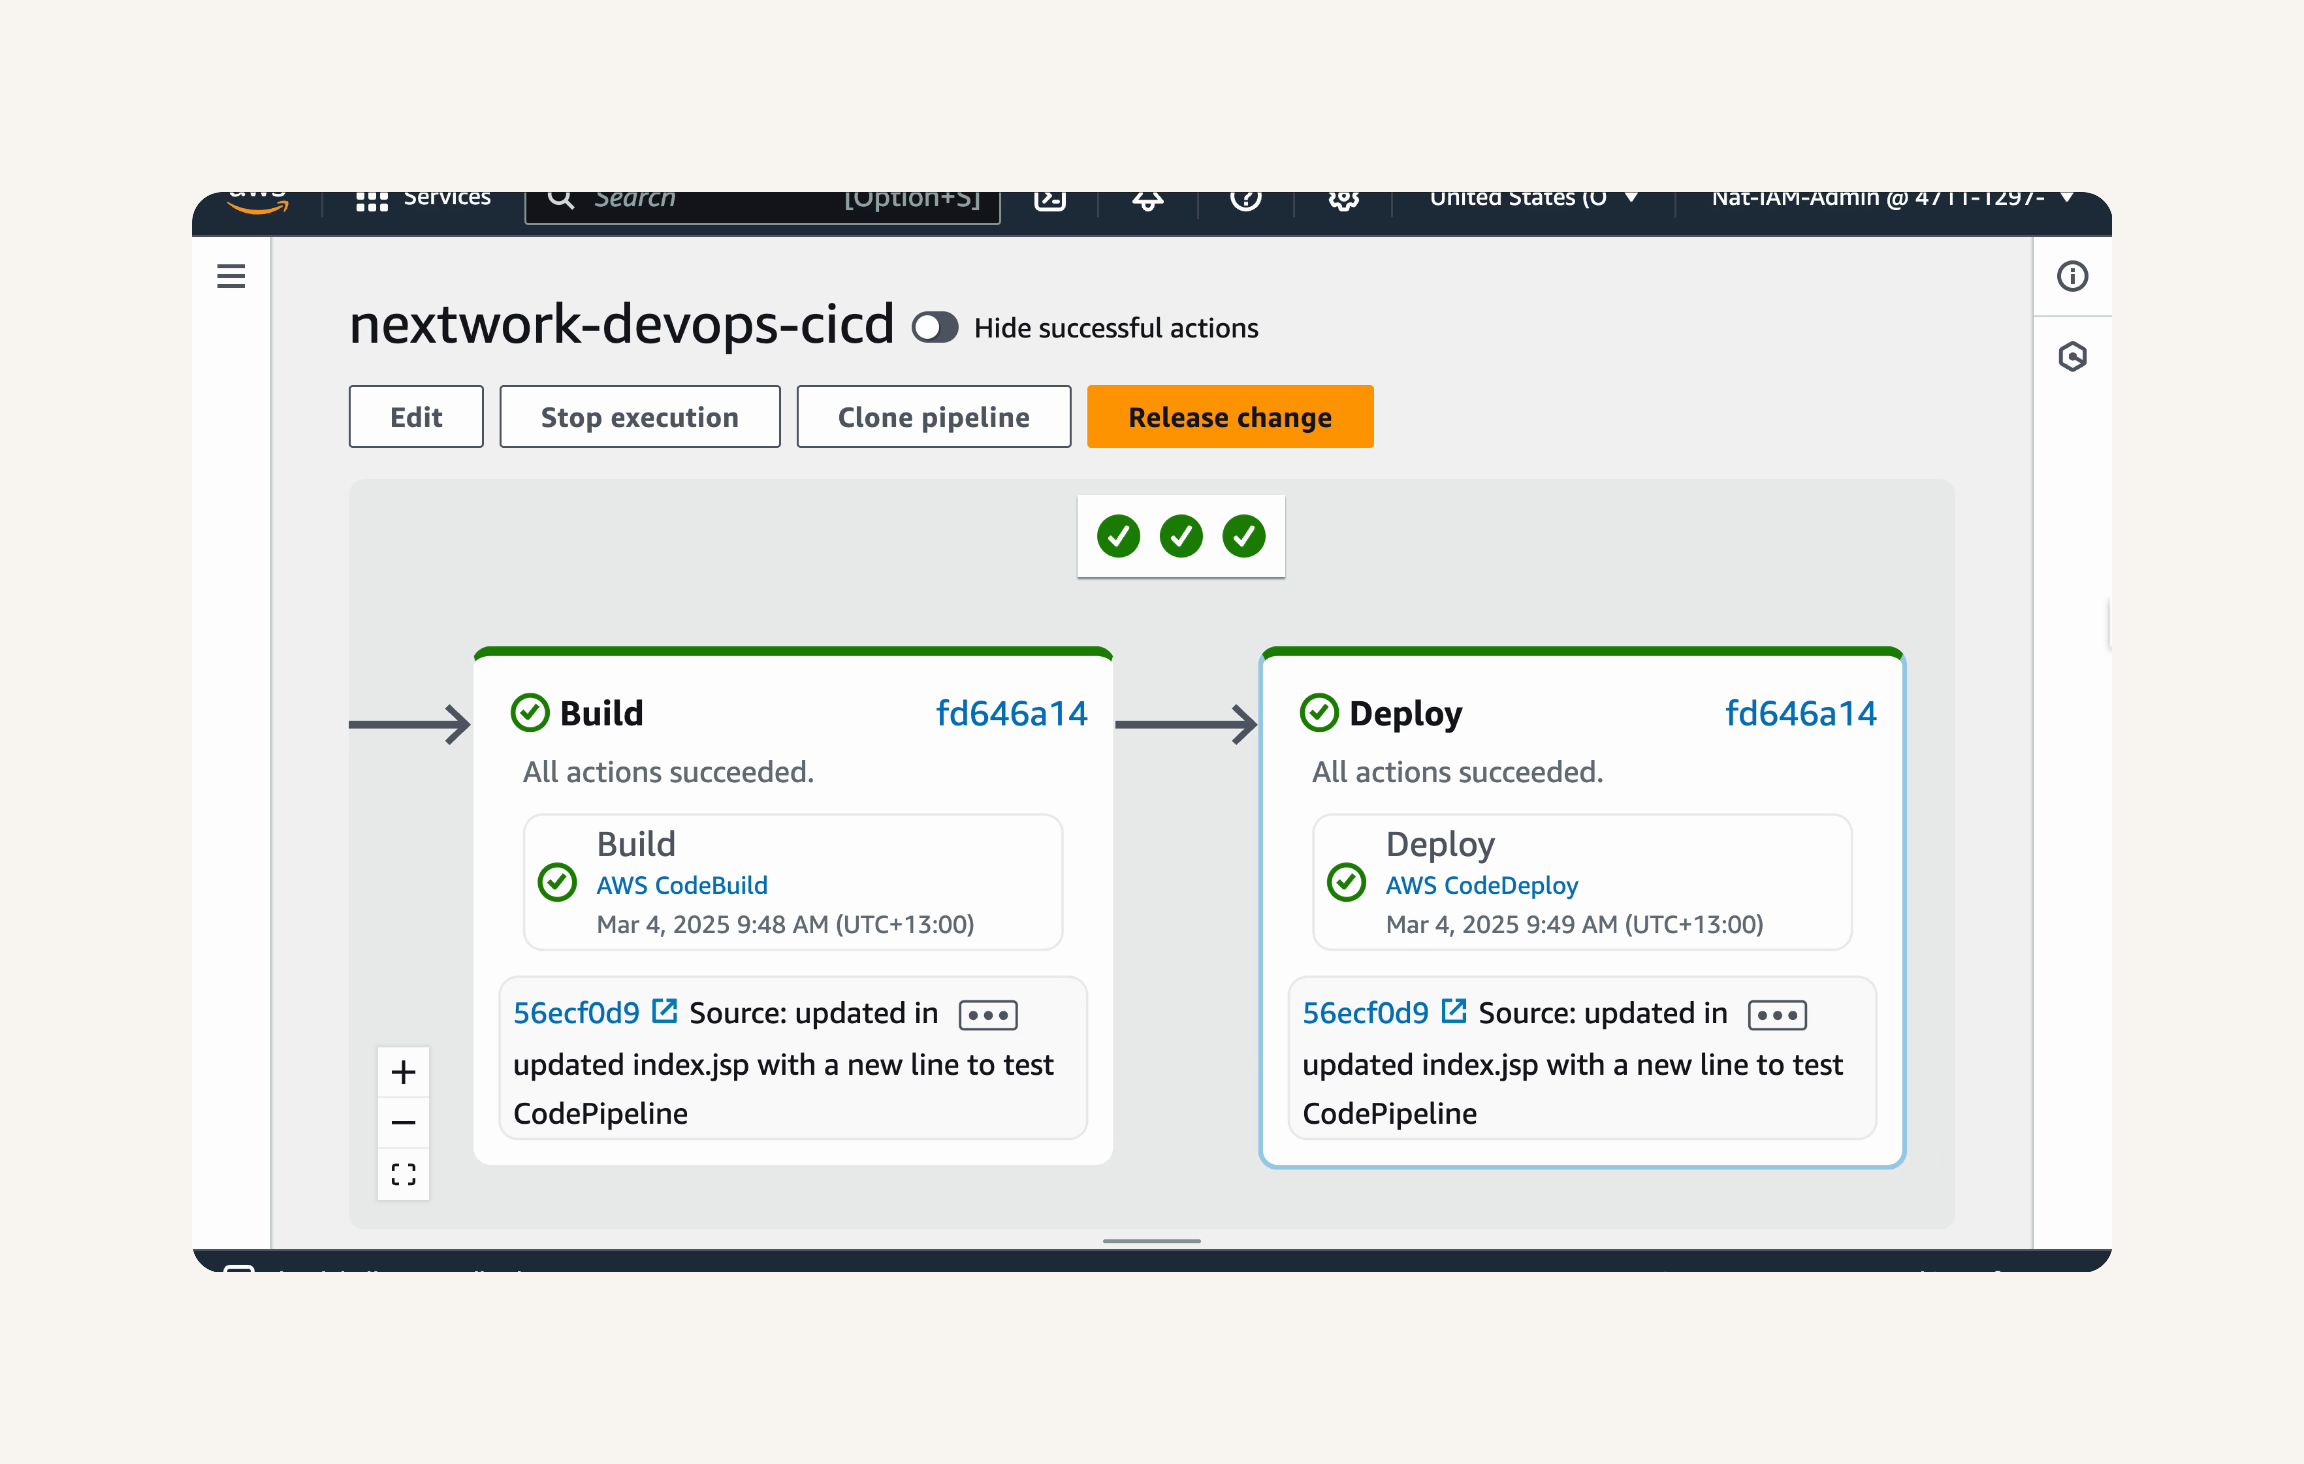
Wait for the Build and Deploy stages to complete successfully (turn green) in the CodePipeline console
Verify Automated Deployment:
To find the Public IPv4 DNS, in the CodePipeline console, click on the Deploy stage, then click on the CodeDeploy link in the details panel.
In the CodeDeploy console, scroll down to Deployment lifecycle events and click on the Instance ID.
On the EC2 instance summary page, copy the Public IPv4 DNS.
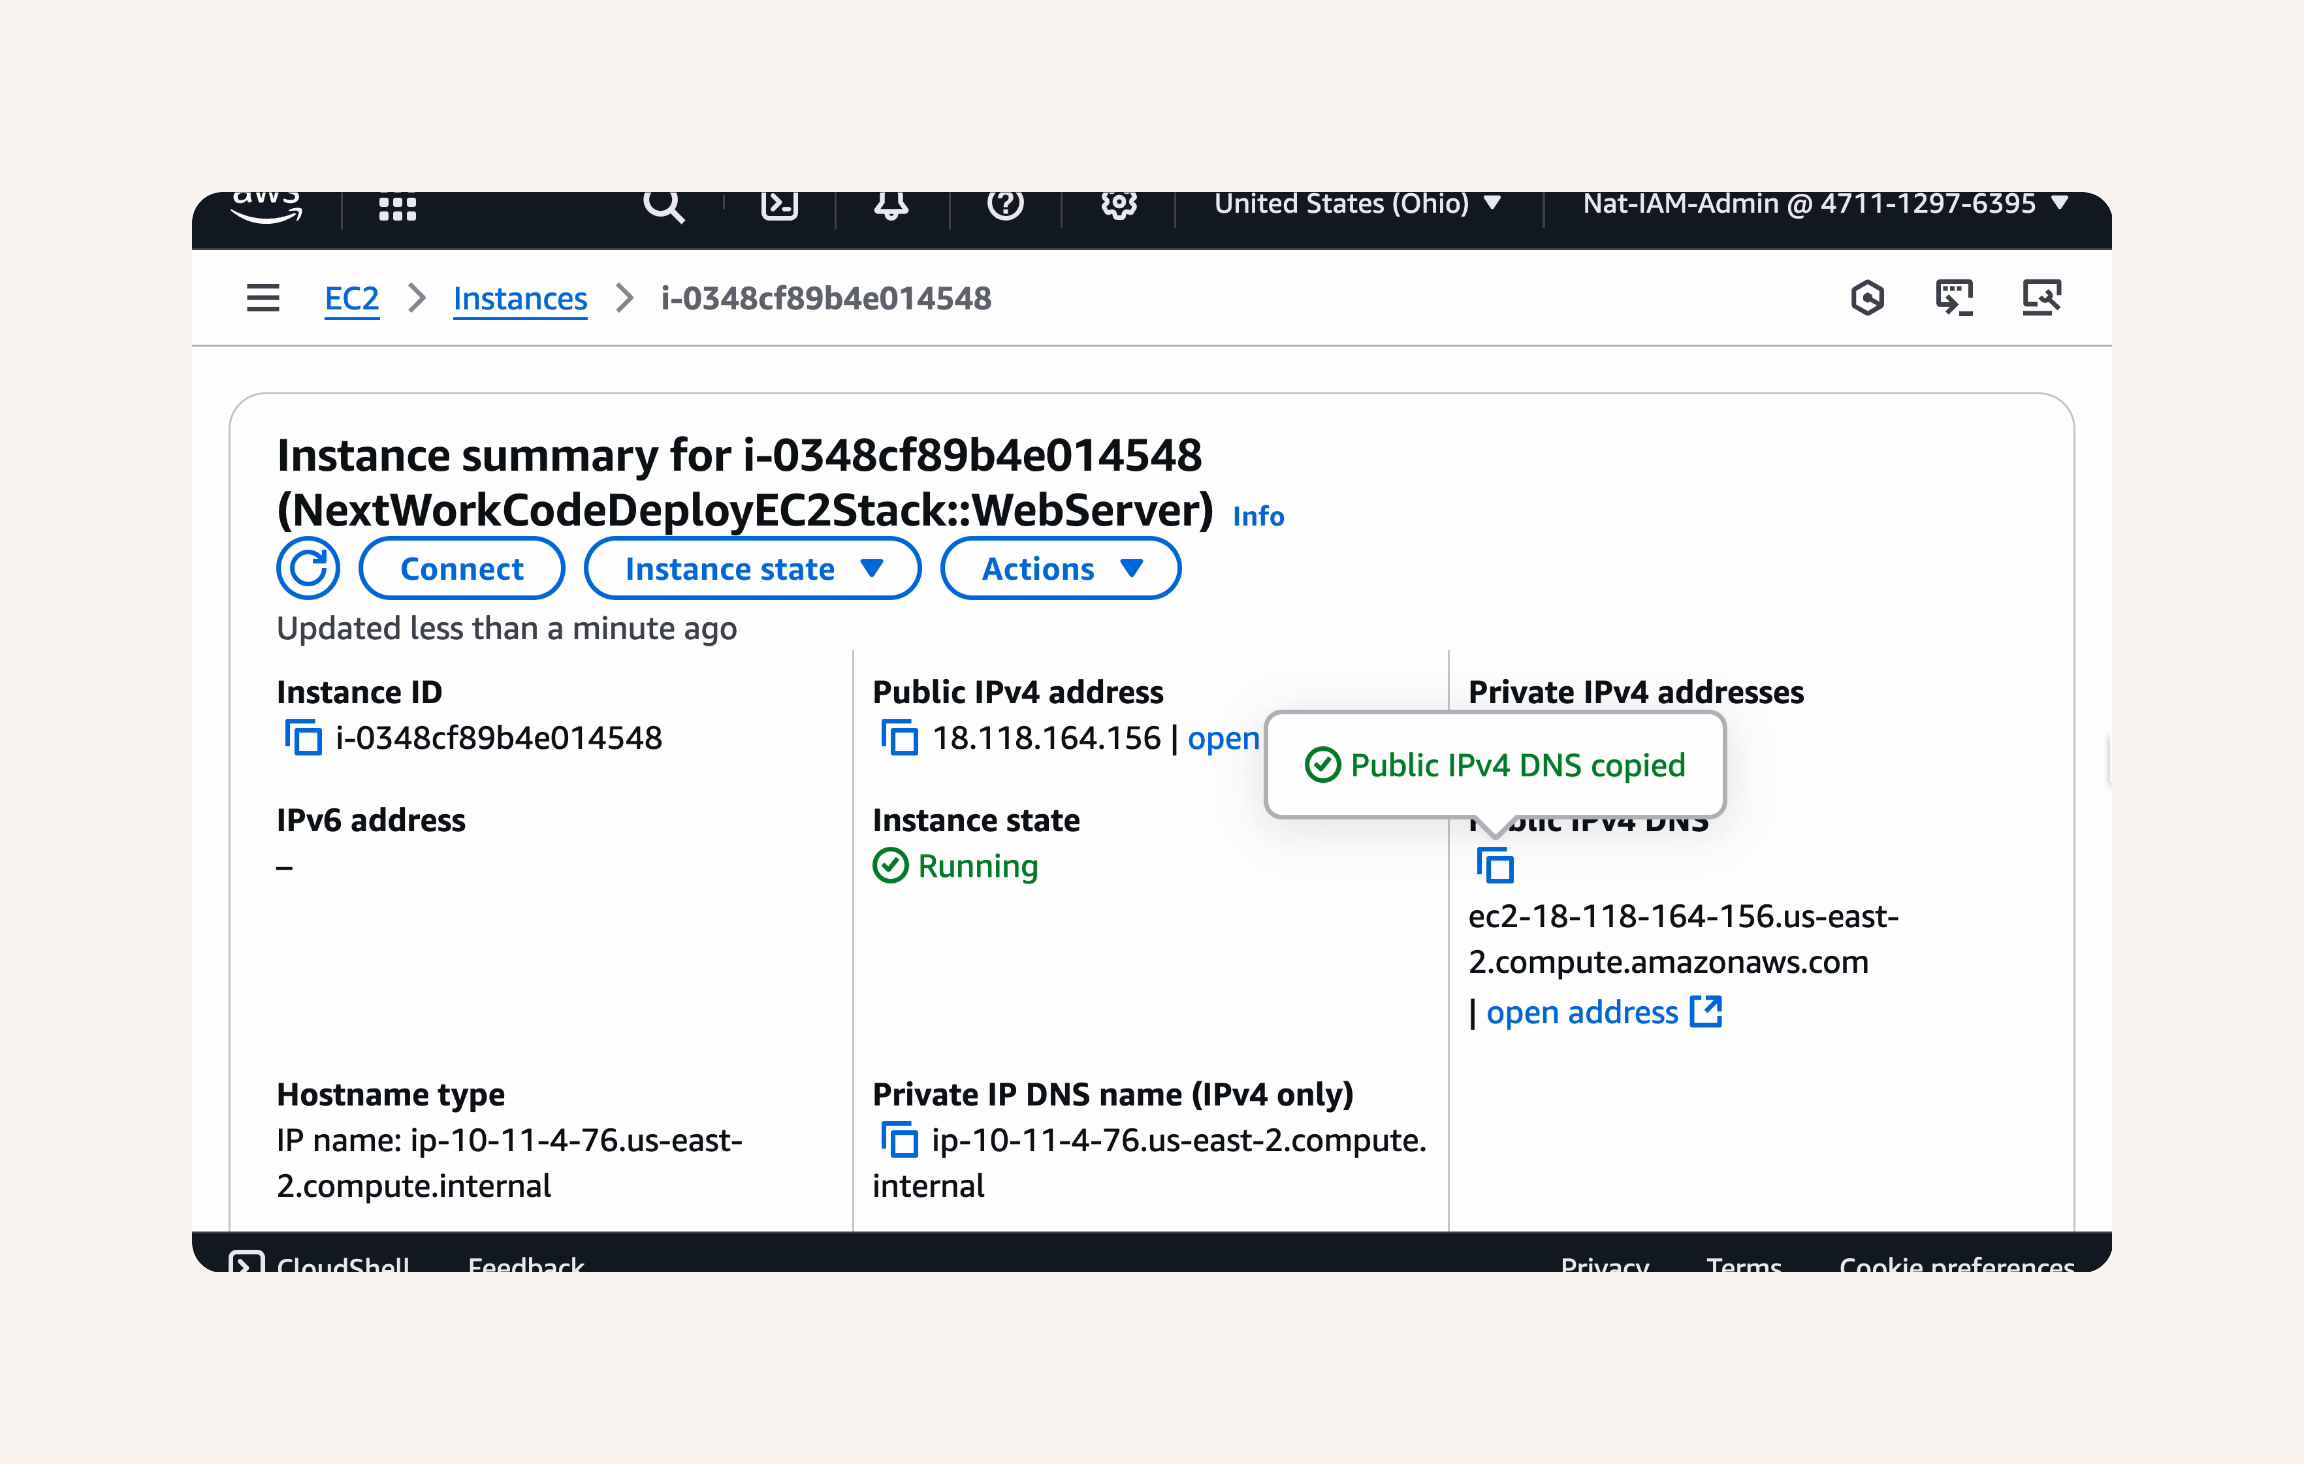
Paste the copied Public IPv4 DNS in a new browser tab and press Enter.
You should see your web application with the new line you added:
Subscribe to my newsletter
Read articles from Neha Sawant directly inside your inbox. Subscribe to the newsletter, and don't miss out.
Written by