All The New Features In Next.js
 Tuan Tran Van
Table of contents
- Next.js 15
- create-react-app upgrades: cleaner UI, 700x faster build
- Typescript configs - next.config.ts
- React Compiler, React 19 Support, and User-Friendly Errors
- New Caching Behavior
- Partial Prerendering (PPR)
- after
- Stable App Router with Layouts and Nested Routing
- Smarter <Image /> Component
- Edge Middleware: Fast, Personalized Routing
- useLinkStatus
- Next 14
- Next.js 13
- Next.js 12
- References

Next.js 15
Next.js 15 Release Candidate (RC) introduces a range of new features & improvements aimed at enhancing the development experience and performance of web applications. This release builds on the strengths of the previous version while at the same time introducing innovative capabilities that promise to streamline workflows and optimize application performance. Below is a detailed overview of the key updates in Next.js 15 RC.
create-react-app upgrades: cleaner UI, 700x faster build
Reformed design
❌From this:

✅To this:

Webpack → Turbopack
Turbopack: The fastest module builder in the world.
700x faster than Webpack
10x faster than Vite
And now with v15, adding it to your Next.js project is easier than ever before:

Typescript configs - next.config.ts
With Next.js 15, you can finally create the config file in TypeScript directly.

The NextConfig type enables editor IntelliSense for every possible option.
React Compiler, React 19 Support, and User-Friendly Errors
React Compiler
React Compiler is a React Compiler (who would have thought)
A modern compiler that understands your React code at a deep level
Bringing optimizations like automatic memoization, destroying the need for useCallback and useMemo in the vast majority of cases.
Saving time, preventing errors, and speeding things up.
And it’s really easy to set up: You just install babel-plugin-react-compiler:

And add this to next.config.js

React Server Actions (Stable with React 19)
Say goodbye to complex API routes.
Next.js 15 supports React Server Actions, allowing you to handle server logic directly inside your component files.
You declare them using a special "use server" directive.
"use server";

export async function submitContactForm(data) {
  await db.contact.insert(data);
}
Then call them from a <form>:
<form action={submitContactForm}>
  <input name="email" />
  <textarea name="message" />
  <button type="submit">Send</button>
</form>
✅ Benefits:
Eliminates boilerplate API files
Fully type-safe and colocated
Keeps data handling strictly server-side
No need for fetch(), Axios, or client mutation libraries
💡 Server Actions unlock a more intuitive, secure, and maintainable full-stack pattern.
React Server Components (RSC): Less JavaScript, More Speed
React Server Components allow you to fetch data and render UI on the server without sending any unnecessary JavaScript code to the client. They are server-only by default, which improves performance dramatically:
// Server Component (default in `app/`)
export default async function ProductList() {
  const products = await fetchProducts();
  return <ul>{products.map(p => <li key={p.id}>{p.name}</li>)}</ul>;
}
✅ Benefits:
30–50% smaller JS bundles
No hydration costs
Co-locates data fetching with UI
Boosts Core Web Vitals (LCP, FID, etc.)
RSCs make your apps faster, more secure, and easier to scale.
Better hydration errors
Dev quality of life means a lot, and error messages’ usefulness plays a big part in that.
Next.js sets the bar higher: now making intelligent suggestions on possible ways to fix the error:
Before v15:

Now:

You know I have had a tough time in the past from these hydration errors, so this will certainly be an invaluable one for me.
New Caching Behavior
No more automatic caching
For all:
fetch()requestsRoute handlers:
GET,POST, etc.<Link>client-side navigation.
This change ensures that the data served is always fresh, reducing the chances of displaying outdated information to users. Next.js development company now has more control over caching behaviors, allowing for more precise optimization of application performance.
But if you still want to cache fetch():

Then you can cache the others with some next.config.js options.
Partial Prerendering (PPR)
PPR combines static and dynamic rendering on the same page
With PPR, you can wrap dynamic UI components in a Suspend boundary and opt in specific Layouts and Pages for partial prerendering. When a request comes in, Next.js will immediately serve a static HTML shell and then render and stream the dynamic parts in the same HTTP request.
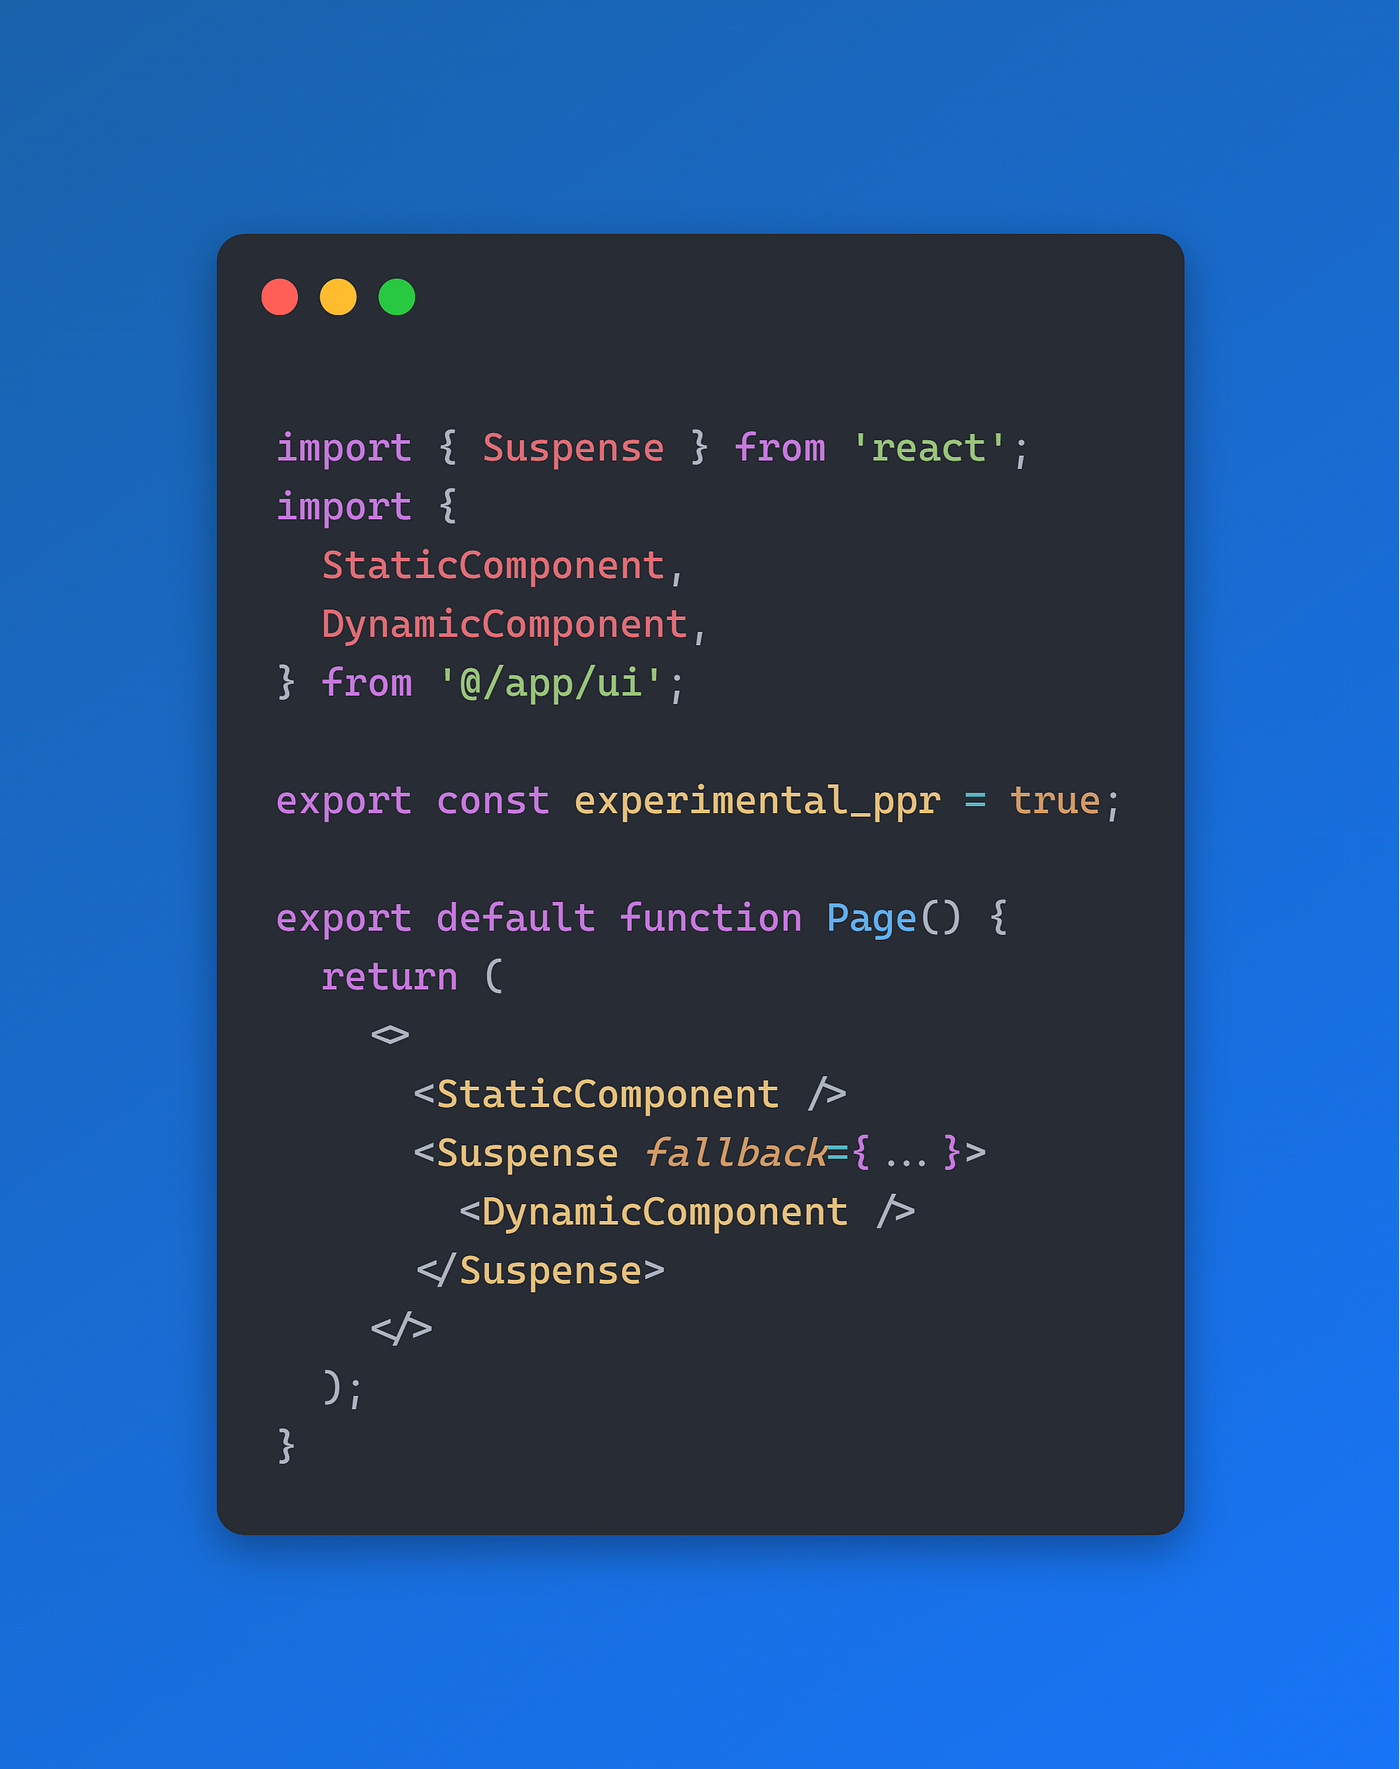
All you need is this in next.config.js:

after
Next.js 15 gives you a clean way to separate essential from non-essential tasks from every server request:
Essential: Auth checks, DB updates, etc.
Non-essential: Logging, analytics, etc.

Start using it now with experimental.after:

Stable App Router with Layouts and Nested Routing
Introduced in v13 and now fully stable, the /app directory in Next.js 15 gives you modular routing with nested layouts, co-located data fetching, and component-based architecture.
📁 Folder structure:
app/
  layout.tsx
  page.tsx
  dashboard/
    layout.tsx
    page.tsx
🎯 Why it matters:
Improved scalability for large apps
Built-in support for error boundaries and loading states
Cleaner structure that mirrors component trees
Ideal for: scalable dashboard, admin panels, and modular websites.
Smarter <Image /> Component
The <Image /> component in Next.js 15 is now:
Faster
Lighter
Easier to use
Enhancements:
Native
loading="lazy"Blur/SVG placeholders
Better AVIF/WebP support
<Image
  src="/banner.jpg"
  alt="Banner"
  width={800}
  height={400}
  placeholder="blur"
/>
✅ Benefits:
Improves LCP and CLS
No need for 3rd-party CDNs
Works out of the box
Edge Middleware: Fast, Personalized Routing
Edge Middleware runs before a page is rendered and allows you to:
Redirect by location or cookies
Block bots
Inject A/B testing logic
// middleware.ts
import { NextResponse } from 'next/server';

export function middleware(req) {
  const country = req.geo?.country;
  if (country === 'FR') {
    return NextResponse.redirect(new URL('/fr', req.url));
  }
  return NextResponse.next();
}
✅ Benefits:
Personalization without latency
Logic at the CDN edge
Great for internationalization and auth flows
useLinkStatus
The useLinkStatus hook was introduced in Next.js v15.3.0. It tracks the pending state in the Next.js Link component.
You can use it to provide inline visual feedback to the user, such as displaying spinners or text effects, while navigating to the new route.

Key Features:
You can only use the useLinkStatus hook inside the Next.js Link Component.
Make sure to set the
prefetch={false}in the Next.js Link component to use the useLinkStatus hook in your project.useLinkStatushook is used to show the loading state during the navigation transitions.The useLinkStatus must be used within a descendant of a Link component.
The useLinkStatus hook returns a pending boolean value
The useLinkStatus helps improve the user experience on slow networks
We use the useLinkStatus hook for:
The useLinkStatus hook is useful when prefetching (prefetch=false) is disabled in the Next.js Link component.
With the useLinkStatus hook, you want to show inline visual feedback during navigation
How does the useLinkStatus hook work?
First, we create a loading indicator when we click on the link (navigation element) component. You can see the loading indicator in the link component.
// components/loading-indicator.tsx

"use client";

import { Loader2Icon } from "lucide-react";
import { useLinkStatus } from "next/link";

export default function LoadingIndicator() {
  const { pending } = useLinkStatus();
  return pending ? <Loader2Icon className="animate-spin" /> : null;
}
Use the LoadingIndicator component inside the Link component. When the user clicks on the navigation, you will see the loading indicator.
<Link
  href="/"
  className="hover:underline hover:underline-offset-2"
  prefetch={false}
>
  <Button className="rounded" size="lg">
    <HomeIcon className="mr-2 h-4 w-4" /> {/* show icon */}
    <LoadingIndicator /> {/* Show the indicator */}
    Home
  </Button>
</Link>
After combining the LoadingIndicator and Link components, your header component code looks like this.
// components/Header.tsx

"use client";

import Link from "next/link";
import LoadingIndicator from "./loading-indicator";
import { CircleUserRound, HomeIcon, NotebookPen } from "lucide-react";
import { Button } from "@/components/ui/button";

export function Header() {
  return (
    <header className="container flex justify-center items-center p-4">
      <div className="max-w-2xl flex gap-5 mx-auto">
        <Link
          href="/"
          className="hover:underline hover:underline-offset-2"
          prefetch={false}
        >
          <Button className="rounded" size="lg">
            <HomeIcon className="mr-2 h-4 w-4" />
            <LoadingIndicator />
            Home
          </Button>
        </Link>
        <Link
          href="/posts"
          className="hover:underline hover:underline-offset-2"
          prefetch={false}
        >
          <Button className="rounded" size="lg">
            <NotebookPen className="mr-2 h-4 w-4" />
            <LoadingIndicator />
            Posts
          </Button>
        </Link>
        <Link
          href="/about"
          className="hover:underline hover:underline-offset-2"
          prefetch={false}
        >
          <Button className="rounded" size="lg">
            <CircleUserRound className="mr-2 h-4 w-4" />
            <LoadingIndicator />
            About
          </Button>
        </Link>
      </div>
    </header>
  );
}
Finally, use the header component in the layout.tsx file.
// app/layout.tsx

import "./globals.css";
import { Header } from "@/components/Header";

export default function RootLayout({
  children,
}: Readonly<{
  children: React.ReactNode;
}>) {
  return (
    <html suppressHydrationWarning={true} lang="en">
      <body>
        <Header />
        {children}
      </body>
    </html>
  );
}
Next 14
Next 14 was released on October 26, 2023, and during the Next.js Conf, Guillermo Rauch, the CEO, talked about the new features. One of the new features, termed “Partial Prerendering“, was introduced in the preview with the goal of providing both quick initial and dynamic visuals without sacrificing the developer experience.
Next.js 14 brings notable improvements to its TuporPack, the engine responsible for efficient compilation, now it is now faster. Furthermore, the stabilization of Server Actions and partial prerendering results in a better experience and better websites.
Partial Pre-rendering
Partial prerendering is a technique that enhances the performance and user experience of dynamic web pages by extracting the static elements, such as logos, icons, page navigation, and fallbacks of dynamic slots. These elements are used to create a static shell, which can be delivered to users without delay. Meanwhile, the server continues to load the dynamic content in the background and displays it progressively when ready. With the ongoing debate between SSR and SSG, Next.js has decided to bring you the benefits of both worlds.
Here is the app/CatFacts.tsx file, which includes a component that interacts with a public API and showcases captivating cat facts from its response:
async function getData() {
  await new Promise(resolve => setTimeout(resolve, 1000));

  // call public API to retrieve cat facts and ensure cache is disabled
  const res = await fetch('https://cat-fact.herokuapp.com/facts/', { cache: 'no-store' });

  if (!res.ok) {
    throw new Error('Failed to fetch data');
  }

  return res.json();
}

export default async function CatFacts() {
  // call API inside the React component
  const data = await getData();

  return (
    <ul className="list-disc">
      {data.map(({ text, _id }: { text: string; _id: string }) => (
        <li key={_id}>{text}</li>
      ))}
    </ul>
  );
}
Here is the fallback display of the CatFacts component before the page is rendered, available in the app/CatFactsSkeleton.tsx file.
export default function CatFactsSkeleton() {
  return <p>Loading Cat Facts...</p>
}
Here is the modified app/page.tsx file, which displays the CatFacts component, along with its fallback UI.
import { Suspense } from 'react';
import CatFacts from './CatFacts';
import CatFactsSkeleton from './CatFactsSkeleton';

export default async function Home() {
  return (
    <main className="flex items-center p-24">
      <Suspense fallback={<CatFactsSkeleton />}>
        <CatFacts />
      </Suspense>
    </main>
  );
}
Build the production version of the app:
% yarn build
yarn run v1.22.10
warning ../package.json: No license field
$ next build
   ▲ Next.js 14.1.1-canary.17

   Creating an optimized production build ...
 ✓ Compiled successfully
 ✓ Linting and checking validity of types
 ✓ Collecting page data
 ✓ Generating static pages (5/5)
 ✓ Collecting build traces
 ✓ Finalizing page optimization

Route (app)                              Size     First Load JS
┌ λ /                                    136 B          85.1 kB
└ ○ /_not-found                          885 B          85.9 kB
+ First Load JS shared by all            85 kB
  ├ chunks/54-42de27d3a1832522.js        29.8 kB
  ├ chunks/fd9d1056-9e0d44545602dadc.js  53.4 kB
  └ other shared chunks (total)          1.86 kB


○  (Static)   prerendered as static content
λ  (Dynamic)  server-rendered on demand using Node.js

✨  Done in 13.16s.
jenniferfu@jenniferfu my-next-app % yarn start
yarn run v1.22.10
warning ../package.json: No license field
$ next start
   ▲ Next.js 14.1.1-canary.17
   - Local:        http://localhost:3000

 ✓ Ready in 394ms
Execute the command yarn start to start the production server. Instantly, the fallback UI appears, followed by the CatFacts component once it is rendered.

Generate a Lighthouse report to analyze and audit the web page,and it shows a flawless performance score:

Turbo Mode
Turbopack is an innovative bundler specifically designed for JavaScript and TypeScript, developed in Rust by the creators of Webpack and Next.js. It serves as a compelling alternative to Webpack, offering substantial improvements in cold start and Hot Module Replacement (HMR) performance.
The exceptional performance of Turbopack can be attributed to two primary factors. First, it leverages highly optimized machine code to ensure efficient execution. Second, it incorporates a sophisticated low-level incremental computation engine that enables caching at the granularity of individual functions. As a result, once Turbopack completes a task, it never needs to repeat it. With Turbopack, we can significantly enhance the speed of an application’s startup and seamlessly handle module updates during development.
The following execution demonstrates that a cold start of the out-of-box application typically takes 1886 milliseconds without Turbopack:
% yarn dev
yarn run v1.22.10
warning ../package.json: No license field
$ next dev
   ▲ Next.js 14.1.0
   - Local:        http://localhost:3000

 ✓ Ready in 1886ms
The following execution shows that the cold start can be reduced to 915ms with Turbopack:
% yarn dev --turbo
yarn run v1.22.10
warning ../package.json: No license field
$ next dev --turbo
   ▲ Next.js 14.1.0 (turbo)
   - Local:        http://localhost:3000

 ✓ Ready in 915ms
The performance enhancement reaches a significant 51.5%, nearly matching the official benchmark achieved with Turbopack:
Up to 53.3% faster local server startup
Up to 94.7% faster code updates with Fast Refresh
Turpoback has successfully completed over 5000 integration tests for App and Pages Router, accounting for 92.6% of the total tests. Once it achieves 100% pass rates, Turpopack will be considered stable and will be released in an upcoming minor release.
Stable Server Actions
Server Actions, also known as Server Side Rendering (SSR) functions, were introduced in Next.js 13 but they had some bugs and stability issues. In Next.js 14, Server Actions have reached production stability.
Developers can now define reusable server-side logic directly in their React components. This provides a seamless way to handle data fetching, API requests, and other server-side tasks without having to create separate API route files. It’s a game-changer for the developer experience. The stability improvements in Next.js 14 make it ready for production use cases. Error handling is also improved with consistent error messages.
// app/page.tsx

export default function Page() {
  async function create(formData: FormData) {
    'use server';
    await db.form.insertOne({ formData });
  }
  return (
    <form action={create}>
      <input type="text" name="name" />
      <button type="submit">Submit</button>
    </form>
  );
}
App Router, Data Fetching & Streaming
Next.js, powered by React Server Components, revolutionizes web development by providing unparalleled features such as shared layouts, nested routing, loading states, error handling, and a plethora of other capabilities. To bring this visionary concept to life, Next.js relies on three essential parts:
The App Router
Data Fetching System
Streaming Architecture
The App Router
The App Router is a built-in router system that defines and handles routes in a Next.js application. It is responsible for mapping URLs to specific pages or components in the application. The App Router enhances the overall user experience. Its introduction in Next.js 13.4 firmly established its credibility, earning it recommendations ever since.
The App Router, located in the app directory, utilizes a folder structure that mirrors the segments of a URL path for seamless routing. It accommodates nested routes by organizing folders within one another. Furthermore, apart from designated files, we can conveniently place our own files (such as components, styles, tests, etc.) within the app directory’s folders.
https://medium.com/render-beyond/mastering-next-js-c7cba322a103
Streaming Architecture
Streaming architecture allows for incremental rendering and delivering components to the client as soon as they are ready. It provides faster page loading times by breaking down the rendering process into smaller chunks and streaming them to the client progressively. With streaming architecture, Next.js takes advantage of the streaming capabilities of Node.js and the HTTP/2 protocol to send the rendered content to the client in chunks, allowing the user to see and interact with the page while it is fetching data.
Data Fetching System
Next.js 14 introduces an improved data fetching system, aimed at enhancing the developer experience when working with data mutations. This system eliminates the need for manually creating an API route. Rather than creating an additional file, developers can simply define a server-side function in the component file and call it directly from a React component. This update effectively simplifies the data fetching workflow and allows for more efficient development.
Below is the modified app/page.tsx file that defines the server-side function getData, which fetches cat facts from a public API https://cat-fact.herokuapp.com/facts/. The Home component calls getData directly without writing an extra API route.
async function getData() {
  // call the public API to fetch cat facts
  const res = await fetch('https://cat-fact.herokuapp.com/facts/');

  if (!res.ok) {
    throw new Error('Failed to fetch data');
  }

  return res.json();
}

export default async function Home() {
  // call API inside the React component
  const data = await getData();

  return (
    <main className="flex items-center p-24">
      <ul className="list-disc">
        {data.map(({ text, _id }: { text: string; _id: string }) => (
          <li key={_id}>{text}</li>
        ))}
      </ul>
    </main>
  );
}
Execute the command yarn dev --turbo, and we see cat facts at http://localhost:3000.

What if there is an error in retrieving data?
Change the fetch URL to https://cat-fact.herokuapp_error.com/facts/, and we see the following error in the browser:
Unhandled Runtime Error
Error: Failed to fetch data

Call Stack
getData
/Users/jenniferfu/my-next-app/.next/server/chunks/[root of the server]__9d686c._.js (87:15)
process.processTicksAndRejections
node:internal/process/task_queues (95:5)
async Home
/Users/jenniferfu/my-next-app/.next/server/chunks/[root of the server]__9d686c._.js (92:18)
The data fetching system not only retrieves data but also incorporates caching and invalidation capabilities. Let’s provide examples illustrating the functioning of data caching.
- Caches by default
Next.js includes a convenient built-in data cache that stores the results of data fetched from incoming server requests and deployments. By default, a fetch result is stored in the data cache on the server to improve performance and prevent unnecessary re-fetching of data.
// 'force-cache' is the default, and can be omitted
fetch('https://...', { cache: 'force-cache' })
In the following app/page.tsx file, we have used the public API http://www.randomnumberapi.com/api/v1.0/random to generate a unique random number each time it is called. In addition, we have implemented a component to combine the results of two API calls.
async function getData() {
  // call the public API to fetch a random number
  const res = await fetch('http://www.randomnumberapi.com/api/v1.0/random');

  if (!res.ok) {
    throw new Error('Failed to fetch data');
  }

  return res.json();
}

export default async function Home() {
  // call API twice inside the React component
  const data = await getData();
  const data2 = await getData();

  return (
    <main className="flex items-center p-24">
      <ul className="list-disc">
        {[...data, ...data2].map(((value: number, id: number) => (
          <li key={id}>{value}</li>
        )))}
      </ul>
    </main>
  );
}
When executing the command yarn dev --turbo, it appears that the random number generated remains the same with each call. Additionally, the data persists even when the browser is refreshed, which may not be the desired behavior.

- Disabling caching
We have the option of 'no-store' to disable caching.
// Opt out of caching for an individual fetch request
fetch('https://...', { cache: 'no-store' })
Here is the modified app/page.tsx file:
async function getData() {
  // call the public API to retrieve a random number and ensure cache is disabled
  const res = await fetch('http://www.randomnumberapi.com/api/v1.0/random', { cache: 'no-store' });

  if (!res.ok) {
    throw new Error('Failed to fetch data');
  }

  return res.json();
}

export default async function Home() {
  // call API twice inside the React component
  const data = await getData();
  const data2 = await getData();

  return (
    <main className="flex items-center p-24">
      <ul className="list-disc">
        {[...data, ...data2].map(((value: number, id: number) => (
          <li key={id}>{value}</li>
        )))}
      </ul>
    </main>
  );
}
When executing the command yarn dev --turbo, we observe that the random number changes with each call.

Alternatively, we can opt out of caching for a specific route segment, using the route segment config options.
export const dynamic = 'force-dynamic'; // disable caching

async function getData() {
  // call public API to fetch a random number
  const res = await fetch('http://www.randomnumberapi.com/api/v1.0/random');

  if (!res.ok) {
    throw new Error('Failed to fetch data');
  }

  return res.json();
}
- Time-based revalidation
We can also implement time-based revalidation to automatically fetch data after a specified interval. This approach proves beneficial for data that undergoes infrequent changes, where maintaining absolute real-time freshness is not as crucial.
Here is the modified app/page.tsx file:
async function getData() {
  // call the public API to fetch a random number, and ensure its revalidation after one second
  const res = await fetch('http://www.randomnumberapi.com/api/v1.0/random', { next: { revalidate: 1 } });

  if (!res.ok) {
    throw new Error('Failed to fetch data');
  }

  return res.json();
}

export default async function Home() {
  // call API twice inside the React component
  const data = await getData();
  const data2 = await getData();

  return (
    <main className="flex items-center p-24">
      <ul className="list-disc">
        {[...data, ...data2].map(((value: number, id: number) => (
          <li key={id}>{value}</li>
        )))}
      </ul>
    </main>
  );
}
To confirm, run the command yarn dev --turbo and observe that the random number remains constant for sequential calls made within a 1-second timeframe.

However, the random numbers will change after a second by simply refreshing the browser.

- Revalidating tags
The revalidateTag API provides a convenient way to instantly invalidate cached data for a specific cache tag. Its tag parameter is expected to be a string that consists of 256 characters or less.
revalidateTag(tag: string): void;
Tags is an array of strings defined in the fetch request:
// define a list of tags
fetch(url, { next: { tags: ['tag1', 'tag2', ...] } });
Below is the modified app/page.tsx file, where the fetch request is tagged as 'number', and the cache is cleared after each fetch.
import { revalidateTag } from 'next/cache';

async function getData() {
  // call the public API to fetch a random number, and label the response with the tag 'number'
  const res = await fetch('http://www.randomnumberapi.com/api/v1.0/random', { next: { tags: ['number'] } });

  if (!res.ok) {
    throw new Error('Failed to fetch data');
  }

  return res.json();
}

export default async function Home() {
  // call API inside the React component
  const data = await getData();
  revalidateTag('number'); // revalidate the data cache
  const data2 = await getData();
  revalidateTag('number'); // revalidate the data cache

  return (
    <main className="flex items-center p-24">
      <ul className="list-disc">
        {[...data, ...data2].map(((value: number, id: number) => (
          <li key={id}>{value}</li>
        )))}
      </ul>
    </main>
  );
}
When executing the command yarn dev --turbo, we observe that the random number changes with every call.

- Revalidating path
Alternatively, the revalidatePath function can also be utilized to manually refresh cached data for a specific path.
revalidatePath(path: string, type?: 'page' | 'layout'): void;
path: It is either a string representing the filesystem path associated with the data to revalidate (for example,/product/[slug]/page), or the literal route segment (for example,/product/123). It must be less than 1024 characters.type(optional): It is a string of'page'or'layout'to specify the type of path to revalidate. Ifpathcontains a dynamic segment (for example,/product/[slug]/page), this parameter is required.
Below is the modified app/page.tsx file, where the cache of the data path / is cleared after each fetch.
import { revalidatePath } from 'next/cache';

async function getData() {
  // call the public API to fetch a random number
  const res = await fetch('http://www.randomnumberapi.com/api/v1.0/random');

  if (!res.ok) {
    throw new Error('Failed to fetch data');
  }

  return res.json();
}

export default async function Home() {
  const data = await getData();
  revalidatePath('/'); // revalidate the data path /
  const data2 = await getData();
  revalidatePath('/'); // revalidate the data path /

  return (
    <main className="flex items-center p-24">
      <ul className="list-disc">
        {[...data, ...data2].map(((value: number, id: number) => (
          <li key={id}>{value}</li>
        )))}
      </ul>
    </main>
  );
}
When executing the command yarn dev --turbo, we observe that the random number changes with every call.

- Stable APIs
Server actions are deeply integrated into the entire App Router model. Here is the summary of the server API calls:
Revalidate cached data with
revalidatePath()orrevalidateTag()Redirect to different routes through
redirect()Set and read cookies through
cookies()Handle optimistic UI updates with
useOptimistic()Catch and display errors from the server with
useFormState()Display loading states on the client with
useFormStatus()
Metadata Improvements
Before your page content can be streamed from the server, there is important metadata about the viewport, color scheme, and theme that needs to be sent to the browser first.
Ensuring these meta tags are sent with the initial page content helps a smooth experience, preventing the page from flickering by changing the theme color or shifting layout due to viewport changes.
In Next.js 14, decoupled blocking and non-blocking metadata. Only a small subset of metadata options are blocking, and Next.js wants to make sure non-blocking metadata will not prevent a partially pre-rendered page from serving the static shell.
The following metadata options are now deprecated and will be removed from metadata in a future major version:
viewport: Sets the initial zoom and other properties of the viewportcolorScheme: Sets the support modes (light/dark) for the viewportthemeColor: Sets the color the chrome around the viewport should render with
Image Optimization and Image Component
Next.js 14 introduces an enhanced and flexible image optimization feature, streamlining the process of optimizing images automatically. Here’s a brief overview of how Next.js facilitates image optimization:
- Prioritizing Image Loading
Next.js intelligently prioritizes image loading. Images within the viewport are loaded first, providing a faster initial page load, and images below are loaded asynchronously as the user scrolls down.
- Dynamic Sizing and Format Selection
The Image component in Next.js dynamically selects the right size and format based on the user’s bandwidth and device resources. This ensures that users receive appropriately sized and optimized images.
- Responsive Image Resizing
Next.js simplifies responsive image handling by automatically resizing images as needed. This responsive design approach ensures that images adapt to various screen sizes, further enhancing the overall user experience.
- Support for Next-Gen Formats (WebP):
The image optimization in Next.js extends to supporting next-generation image formats like WebP. This format, known for its superior compression and quality, is automatically utilized by the Image component when applicable.
- Preventing Cumulative Layout Shifts:
To enhance visual stability and prevent layout shifts, Next.js incorporates placeholders for images. These placeholders serve as temporary elements until the actual images are fully loaded, avoiding disruptions in the layout.
Additionally, Next.js 14 enhances performance by efficiently handling font downloads. The framework optimizes the download process for fonts from sources such as Next/font/google.
Automatic code splitting
Automatic code splitting in Next.js 14 is a powerful technique that significantly contributes to optimizing web performance. As discussed in the Calibre blog post, dynamic imports, also known as code-splitting, play a key role in this process.
Code-splitting results in breaking JS bundles into smaller, more manageable chunks. Users only download what’s necessary, leading to a more efficient use of bandwidth. With less JS, the performance on slower devices sees a notable improvement.
Another insightful article on Builder.io expands on the two methods of code-splitting in Next.js:
Route-based splitting: By default, Next.js splits JavaScript into manageable chunks for each route. As users interact with different UI elements, the associated code chunks are sent, reducing the amount of code to be parsed and compiled at once.
Component-based splitting: Developers can optimize even further on a component level. Large components can be split into separate chunks, allowing non-critical components or those rendering only on specific UI interactions to be lazily loaded as needed.
These approaches collectively contribute to a more efficient, faster, and user-friendly web application experience, aligning with the continuous efforts to enhance performance in Next.js 14.
https://medium.com/render-beyond/mastering-next-js-c7cba322a103
https://medium.com/@sassenthusiast/my-epiphany-with-next-js-14s-server-components-08f69a2c1414
Next.js 13
The Vercel team posted a major announcement on their blog about the release of Next.js 13.4. To provide more context about why this is such an important release, we need to understand how the Vercel team handles releases to the public. Next.js 13 introduced so many new features, but most of them have remained in the alpha & beta versions, even though they were included in the major release.
So despite the fact that Next.js dropped some major new upgrades in Version 13 last October, the features have not quite been ready for prime time. Those changes in Next.js 13.4! The new 13.4 release finally provides a stable release of one of the most important new features: the App Router.
In this section, we will dive into some of the new features and improvements that come with this release. From the first stable release of the new app directory and app router to the latest advancements in Turpoback, there is a lot to be excited about. Let’s get started.
The New App Router
As mentioned, Next.js 13.4 is the first release that takes the new app directory and app router features out of beta!
As someone who has been playing with these features in sample projects, I can tell you that I have been getting antsy waiting to use them in production because they make the development experience in Next that much better.
Also, perhaps symbolic of the importance of this release, the Next.js document site has a major update to make the App Router the default! You can now toggle the docs between the new app Router and the previous Page Router.

Below, we will do a quick recap of the app router by diving into some of the main features.
Routing in the app directory

Routing in the new app directory is as simple as adding the page.tsx file that exports a React function component. The routing of the application is defined by the hierarchy of your folders within the app directory. For example, creating a page at the / route is as easy as adding a file page.tsx file at the root of the app directory.
.
└── app/
    └── page.tsx
// app/page.tsx
export default function Page() {
  return <SomeJsx />
}
Next, let’s show how we can create more complex application routes using the new app router:
.
└── app/
    ├── page.tsx
    ├── about/
    │   ├── page.tsx
    │   └── layout.tsx
    └── articles/
        └── article/
            └── [id]/
                ├── page.tsx
                ├── layout.tsx
                └── components/
                    ├── BlogArticle.tsx
                    └── Author.tsx
As you can see above, we are able to create a simple route such as /about, as well as create more complex routes like /articles/article/12345 using Next.js’ dynamic routes.
With the new App Router, our pages can make use of React Server Components, which allows us to simplify data fetching using the familiar async/await syntax.
// app/page.tsx
export default async function Page() {
  const res = await fetch('https://api.example.com/...');
  const data = res.json();
  return '...';
}
In Next.js 13, files are server components by default. You can opt into client components by including the 'use client' directive at the top of your module.
'use client'
export default function ClientComponent({ id }: ArticleProps) {
  useEffect(() => { //... }, [])
  return //...
}
Also, notice in our sample file tree above, we added components to our blog article folder. This was difficult in previous versions of Next.js because all files within the page directory were considered pages. Next.js 13 makes this a nicer experience by enforcing special file names for layout, page, template, etc.
Route segment configuration
Our pages can also export route segments that allow us to control how the pages render. One common practice in Next.js is to statically generate pages. We run into an issue when we use dynamic params, though. How would Next.js know what pages to statically generate? We can make use of generateStaticParams to solve this.
In the example below, we export an async function called generateStaticParams that loads all of our blog articles and returns an array of objects with a property that matches the name of our dynamic route segment, in this case id. Next.js will use this to statically generate pages for each of our blog articles.
// app/articles/article/[id]/page.tsx
type ArticleProps = Pick<Article, 'id'>

export default async function Page({ id }: ArticleProps) {
  const article = await(await fetchArticleById(id)).json();
  return <BlogArticle article={article} />
}

export async function generateStaticParams(): ArticleProps[] {
  const articles = await(await fetchArticles()).json();
  return articles.map(article => ({ id: article.id }))
}
Next.js 13 gives us several route segment configuration options to control how Next.js renders the page. Aside from generateStaticParams, the most commonly used route segment configuration that I’ve been using is revalidate. When combined with Static Site Generation (SSG), revalidate allows you to control how of the page will get regenerated.
Building on our previous example, we can set revalidate to 60 seconds to rebuild the page every 60 seconds. Note that it’s a bit more nuanced than that, so make sure to read up on ISR on the Next.js documentation site.
// app/articles/article/page.tsx
type ArticleProps = Pick<Article, 'id'>

export default async function Page({ id }: ArticleProps) {
  const article = await(await fetchArticleById(id)).json();
  return <BlogArticle article={article} />
}

export async function generateStaticParams(): ArticleProps[] {
  const articles = await(await fetchArticles()).json();
  return articles.map(article => ({ id: article.id }))
}

export const revalidate = 60
We can tell Next.js not to render pages for IDs that are not returned in generateStaticParams by making use of the dynamicParams route segment configuration.
export dynamicParams = false
Finally, we can force the page to generate statically or dynamically, depending on our use case. For example, if we have a page that is making use of query params, we may want it to be dynamically server rendered when the page is requested using the dynamic route segment.
export dynamic = 'force-dynamic'
// or: 'auto' | 'force-dynamic' | 'error' | 'force-static'
Layouts and Templates
Along with pages, Next.js 13 also introduced special files for layouts and templates. In the example above, you may have noticed that we include several layout.tsx files at the various levels of the folder hierarchy. We created a root-level layout.tsx, which is a typical practice in Next.js 13.
Within the root layout, we can create the HTML document, add scripts and other content to the head, provide semantic structure, and wrap the app in providers. We no longer have to make use of the special <Head /> and <Script /> components from previous versions of Next. We can also add metadata here, but Next.js 13.2 introduced a new dynamic Metadata API for this that we will cover in another article.
Note that layouts and pages should typically be server components, so you should avoid forcing them to be client components by adding hooks or other client-only functionality.
// app/layout.tsx
export default function RootLayout({ children }) {
  return (
    <html lang="en">
      <head>
        <script>//...</script>
      </head>
      <body>
        <main>
           <AppProvider>{children}</AppProvider>
        </main>
      </body>
    </html>
  );
}

// app/page.tsx
export default function Page() {
  return //...;
}
Layout files can be added at each level of the app directory’s hierarchy to apply more specific layouts to different parts of the application. For example, let’s say that we want to add a specific AppWrapper surrounding our blog articles. We can add a new layout.tsx file to the /app/articles/article/[id] directory next to the page.tsx file.
// app/articles/article/[id]/layout.tsx
export default function RootLayout({ children }) {
  return (
    <AppWrapper>{children}</AppWrapper>
  );
}
Similar to layouts, templates allow you to create a shared structure. We will not go into them deeply here, so I suggest you read up on them on the Next.js documentation website.
Automatic Code Splitting
Next.js 13.4 also makes it easier than ever to code split and dynamically load content. In previous versions of Next.js, you had to make sense of next/dynamic. With Next.js 13, the entire application can opt into code splitting and dynamic loading by making use of Suspense. In fact, you can code split with a simple conditional within a client component. Check out the example below from the Next.js blog, which returns completely different bundles depending on whether the user is logged in or not.
// app/layout.tsx
import { getUser } from './auth';
import { Dashboard, Landing } from './components';

export default async function Layout() {
  const isLoggedIn = await getUser();
  return isLoggedIn ? <Dashboard /> : <Landing />;
}
Route Groups
Route Groups are a nifty feature introduced in Next.js 13, especially when your app requires multiple root layouts. Next.js 13.3 removed the deprecated head.js special file and replaced it with the generateMetadata API. One downside of this approach is that it made it difficult to add scripts and other things to the <head /> when you had pages that had different content.
For example, let’s say part of your app has navigation that is loaded from an API. The API returns its content for its script dependencies. Route Groups give a solution to this problem by allowing you to split parts of your apps into different folders that have their own root layouts.
.
├── (navigation)/
│   ├── dashboard/
│   │   └── page.tsx
│   └── layout.tsx
└── (navless)/
    ├── auth/
    │   └── page.tsx
    └── layout.tsx
In the example above, the dashboard page has its own root layout that can include the additional head content loaded from your API:
import { PropsWithChildren } from 'react'

export default async function Layout({ children }: PropsWithChildren) {
  const { head, header, footer } = await fetchNavigationMarkup()

  return (
    <html>
      <head>
        {head}
      </head>
      <body>
        {header}
        {children}
        {footer}
      </body>
    </html>
  )
}
React Server Components (RSC)
The new Next.js 13 App Router was built in close partnership with React 18. One of the major new features of React 18 is React Server Components (RSC). In order to start working in Next.js 13, you need to wrap your head around this new paradigm.
In the past, React was primarily a client-side UI rendering library. With the addition of RSCs, the intention is to render as much of your application as possible on the server at build time (we will go into the different rendering modes more below)
When a route is loaded with Next.js, the initial HTML is rendered on the server. This HTML is the progressively enhanced in the browser, allowing the client to take over the application and add interactivity, by asynchronously loading the Next.js and React client-side runtime.
From the React Essentials Section on the Next.js documentation site.
In React 18, two new directives, “use client“ and “use server“ were added in order to control where components are rendered at the file level. These new directives are used in Next.js 13 to control whether the bundle code is included in the client-side bundle or not.
With the “use server“ directive, we can indicate that a component does not need to be included in the bundle that the client loads. The component will be rendered on the server at build or run time.
As you can see in the code above, we can also make use of async await in Server Components, which makes them great for loading data.
// ServerComponent.ts
"use server"

export default async function ServerComponent() {
  const data = await fetchData()

  return //...
}
If a component needs to make use of React Hooks, such as useEffect, or it needs to access browser APIs, we can use the “use client“ directive in order to indicate that the component should be included in the client bundle.
// ClientComponent.tsx
// use client is needed here since we are using React hooks and accessing
// the localStorage browser API
"use client"
export default function ClientComponent() {
  const [todos, setTodos] = useState([])
  useEffect(() => {
    const cachedTodos = localStorage.get('todos')
    setTodos(todos)
  })

  return (
    <>
      {todos.map(todo => <Todo {...todo} />)}
    </>
  )
}
See the original React RFC where these directives were proposed for more information: https://github.com/reactjs/rfcs/pull/227
Server Components are the default in Next.js
In the world of Next.js 13, server components are now the default, which means that most of your components should not need a “use server“ or “use client“ directive.
The only time you need to use these directives is when you are creating a boundary component.
// page.tsx
// React Server Component, will not be included in the client
export default function Page() {

  return (
    <Provider>
      <TodoList />
    </Provider>
  )
}

// TodoList.tsx
// use client is needed here since we are using React hooks
"use client"
export default function TodoList() {
  useEffect(() => {})

  return (
    <>
      {todos.map(todo => <Todo {...todo} />)}
    </>
  )
}

// TodoList.tsx
// No "use client" needed here, even though we are using hooks
// because this component is only ever rendered within another client component
export default function Todo() {
  useEffect(() => {})

  return (
    <>
      {todos.map(todo => <Todo {...todo} />)}
    </>
  )
}
Client Components are rendered on the server, too
When you use a “use client“ directive to make a client component, it doesn’t means that it only renders on the client side. In fact, most client components are rendered on the server when doing server-side rendering (SSR) or static site generation (SSG).
The only time a client component will not be rendered on the server is when you specifically instruct it not to. One way to do this is by making use of next/dynamic with the ssr: false option (note: Vercel recommends using React.lazy and Suspense directly instead of next/dynamic:)
import dynamic from 'next/dynamic';

const DynamicHeader = dynamic(() => import('../components/header'), {
  ssr: false,
});
This enables Next.js to be a truly hybrid framework and it promotes the goal of Next, which is to statically render as much content as possible and only include what’s needed by the client.
What this means is that you need to think about how a client component will be rendered on the server. A way to test this is to disable JavaScript in your browser and see how the page renders. What you should see is that the page renders in its entirety, but interactive elements are disabled.
You will want to make sure that no layout shift is introduced when the element becomes interactive, so make sure the component renders well before JavaScript is enabled, either by rendering the content by default or by making use of skeletons.
Choosing Rendering at Component Level
What is cool about this new approach is that you can you can interleave Server and Client Components in your application, and behind the scenes, React will seamlessly merge the work of both environments.
React can render on the client and the server, and you can choose the rendering environment at the component level!
In Next.js 13, all the components within the /app folder are server components by default. You will use the "use client" directive if you want to render Client Components.
In the example below, Counter is a Client Component, because it preserves local state and has event handlers for a button click. This component will have a "use client" directive placed on top of the component file, above the imports, to indicate that it is a Client Component.
Once
"use client"is defined in a file, all other modules imported into it, including child components, are considered part of the client bundle.
Note: This additional step could be confusing for developers and is part of the learning curve that comes with Next.js 13.
'use client'

// Client Component, because it stores state and has the use client directive.

import { useState } from 'react'

export default function Counter() {
  const [count, setCount] = useState(0)

  return (
    <div>
      <p>You clicked {count} times</p>
      <button onClick={() => setCount(count + 1)}>Click me</button>
    </div>
  )
}
Composing client and server components
Next.js 13 offers an enhanced level of flexibility when it comes to composing your components. Server components can also render other server components and client components. On the other hand, client components can render other client components and can only render server components if they are passed in as a prop. This layered composition model allows for a high degree of interoperability and code reusability.
For instance, the following is not allowed in React:
'use client';

// ❌ You cannot import a Server Component into a Client Component
import MyServerComponent from './MyServerComponent';

export default function ClientComponent() {
  return (
    <>
      <MyServerComponent />
    </>
  );
}
Instead, you can pass a Server Component as a child or a prop to a Client Component as a workaround, as shown below.
// ✅ You can pass a Server Component as a child or prop of a Client Component.
import ClientComponent from "./ClientComponent";
import ServerComponent from "./ServerComponent";

export default function Page() {
  return (
    <ClientComponent>
      <ServerComponent />
    </ClientComponent>
  );
}
'use client';

// ✅ You can pass a Server Component as a child or prop of a Client Component.
export default function ClientComponent({children}) {
  return (
    <>
      {children}
    </>
  );
}
I get that the paragraph above is kind of mind-numbing. Here’s a nice diagram that Vercel folks created to help you visualize this concept better.

Next.js 13 Rendering Modes
Next.js 13 introduces different render environments and modes, allowing you to choose the optimal rendering strategy for your app on a component-by-component basis.
Content is rendered in two distinct environments:
Client side — Client Components are pre-rendered and cached on the server. JSON is generated for data used on client components and passed to React during Hydration.
Server side —Content is rendered on the server by React, and static HTML is generated. React uses static HTML to hydrate in the browser, requiring no additional JavaScript on the client.
On the server, there are two different rendering modes that are used:
Static — both client and server components are rendered as static HTML at build time. Static content can be revalidated, allowing it to be updated on a page-by-page basis in order to keep dynamic data up-to-date with its sources. Statically generated content is easily cacheable and leads to improved performance, user experience, and search engine optimization.
Dynamic — both client and server components are rendered on the server when a request is made. The content is not cached.
Previous versions of Next.js had different terminology that it used for these concepts. I’m including them below and showing how they relate to the new Next.js 13 terminology.
Static-site generation (SSG): Static rendering mode
Incremental Static Regeneration (ISR): Static rendering mode with revalidation
Server-side Rendering (SSR): Dynamic rendering mode
Client-side Rendering (CSR): Client components
Make sure to check out the Next.js documentation site on the topic.
When to Use Client vs. Server Components?
You only need to mark components as “use client“ when they use client hooks such as useState or useEffect.
It’s best to leave components that do not depend on client hooks without the directive so that they can automatically be rendered as a Server Component when they aren’t imported by another Client Component.
This helps ensure the smallest amount of client-side JavaScript.
The goal is to ship the smallest amount of client-side JavaScript.
Use Client Components when:
You use React hooks such as useState, useEffect, useReducer, etc*..*
There is interactivity within the component, with event listeners such as onClick().
There are custom hooks that depend on state or effects.
Using React Class Components.
Use Server Components when:
You fetch data from the server API.
Sensitive information needs to be stored (tokens, API keys, etc.).
You need to access backend resources directly.
There are large dependencies.
Server Components Vs. SSR: What’s the Difference?
The main difference between Server Components and SSR lies in the ‘when’ and ‘what.
SSR happens at the time of each page request. The server fetches data, generates the HTML, and then sends this HTML to the client. This process repeats with every request. SSR is great for pages with data that changes frequently, and it’s a fantastic boon for SEO.
SSR is the rendering of an entire page (which is composed of several components) on the server; Server Component is executing an individual component on the server, generate a static HTML response, and send it to the client.
On the other hand, Server Components run once at build time. They execute on the server, generate a static HTML response, and send this to the client. This process doesn’t repeat with every request. As such, Server Components are best for parts of your application that don’t change frequently, and they help in significantly reducing the amount of JavaScript shipped to the client.
Streaming
Previously, the user might have had to wait for the complete page to generate. Now the server will transmit to the client small pieces of the UI as it is generated. It implies that the bigger piece won’t get in the way of the smaller ones. Of course, as of right now, just the app directory is supported for this feature, and it doesn’t seem that this will change.
This new feature won’t benefit individuals with a strong internet connection or speedy wifi as much as those with a weaker connection. There are more of them than you would have thought, in fact. It’s great that a faster site loading time will improve user experience.
Server Actions (Alpha)
Next.js 13.4 introduces Server Actions (currently in alpha), which brings a whole level of flexibility and power to your applications. Server Actions allow you to handle server-side logic, such as fetching data or interacting with APIs, directly in your application. This feature not only simplifies your application architecture but also enables you to create faster and more efficient applications.
For an in-depth look at Server Actions and how they are transforming the way we build applications, check out this article: Why Next.js Server Actions are Game-Changing.
Turbopack: Now in Beta and More Feature Complete

With the release of Next.js 13.4, Turbopack has moved into the beta phase, offering a more feature-complete and stable experience. Turbopack is Next.js’s new Rust-based bundle designed to speed up local iterations in development, and soon, production builds. Thanks to the community’s support in testing and reporting bugs, Turbopack has grown in adoption, paving the way for a significantly faster and more efficient development experience in the future.
Next.js 12
Next.js has announced at their Next.js conference that Next.js 12 is going to be one of the biggest releases ever. So in this section, let’s quickly look into what the new amazing features are that Next.js 12 has provided us with:
There are roughly 6 new features that Next.js 12 has brought out. Let’s look into all of them.
Faster Builds
The new Next.js 12 ships with a new Rust compiler. This compiler takes advantage of native compilation. This translates into a much faster build and faster refresh time.

How does that work? The compiler is built on top of SWC, which stands for Speedy Web Compiler. It does consume Typescript/JavaScript and emits JavaScript code that can be executed on old browsers. It’s a Babel replacement. It’s about 20x faster than Babel on a single thread and up to 70x on a four-core benchmark.
This Rust compiler is now enabled by default. The improvement of the Vercel.com build is about 50% faster. It went from 3 minutes 41 seconds down to 1 minute and 58 seconds.
It is still not perfect because it might lack some compatibility with popular libraries like styled-components or emotion but that support will happen soon.
You can also use it to minify files by simply enabling it in the config. Here’s the code:
// next.config.js
module.exports = {
  swcMinify: true
}
Middleware
This is one of the most exciting features. At the moment, we have to choose between CDN or Server Side Rendering for building faster apps. When we build a dynamic page that we want to cache, we might use the latter.
Vercel’s new Edge functions feature makes this possible. It gives the benefits of static caching with the power of dynamic execution. Now we can run dynamic functions aka middleware, right before our CDN requests complete. All that with no cold start.
The Cloudflare and Amazon infrastructure have also implemented a similar feature not long ago. It is called edge computing or Lamdba@Edge. What is special about the Next.js version? It’s easy and integrates within the framework.
How to use it? By just creating a _middleware function in our pages directory and deploying it. There, we can do dynamic checks right at the CDN level. These middleware functions can be scoped and composed.
# Execution order for middleware composition
- /pages
  index.tsx
  - /profile
    _middleware.ts # will run first
    profile.tsx
    - /settings
      _middleware.ts # will run second
      _settings.tsx
What does a _middleware.ts file look like? Let’s see that through an example where we create a dummy authentication middleware.
In the code above, we can check if the request contains a valid JWT and otherwise return an error response.
What are the most common use cases for using middleware?
User Authentication
Bot protection
Redirects and rewrites
Handling unsupported browsers
Service-side analytics
Advanced 18n routing
Logging
URL Imports
The Next.js team has been working for a while to support ES modules. It was flagged as experimental in the previous version. In this new version, they are natively supported.
What does that mean? The URL imports can be built on top of those.
Why is this feature cool? We can now import directly tooling from the CDN without any extra builds or installs. We will be able to import those from the wire rather than having to build them locally.
You can now use cool CDN projects like Skypack in your Next.js app. It’s a package delivery network over CDN. It creates ready-for-production tools without the hassle of compiling and bundling them. It scans NPM and builds executable ES module packages that you can import from your browser.
How to enable this feature? The URL has to be specified in the next.config.js file. You need to only enable domains that you trust.
module.exports = {
  experimental: {
    urlImports: ['https://cdn.skypack.dev'],
  },
}
As you can see from the config, this URL import feature is still in the experimental phase.
What does the Next.js workflow look like?
on
next devthe will amend the download and add the file in anext.lockfileon
next buildthe engine will look up the generatednext.lockfile.
Let’s see a bit of code in action:
// next.config.js
module.exports = {
  reactStrictMode: true,
  experimental: {
    urlImports: ['https://cdn.skypack.dev'],
  },
}

// pages/index.js
import styles from '../styles/Home.module.css'
import confetti from 'https://cdn.skypack.dev/canvas-confetti'

export default function Home() {
  return (
    <div className={styles.container}>
      <main className={styles.main}>
        <h1 className={styles.title}>
          Welcome to <a href="https://nextjs.org">Next.js!</a>
        </h1>
        <button onClick={confetti}>
          Throw Confetti
        </button>
      </main>
    </div>
  )
}
Support for React 18 on the server-side
The React 18 version is coming soon, and after a boring release of React 17, it’s mainly focused on concurrency.
The Next.js framework is jumping early and anticipating some of React’s most-awaited features. Naturally, all these new features will also be under an experimental config flag.
HTML Server Side Streaming
One of the coolest React 18 features is the built-in support of server-side Suspend and streaming of HTML parts of your React application. You are no longer required to load all or nothing. You can progressively ship HTML to the browser.
The Next.js framework supports that and provides abstractions around all those mechanisms. For dynamically importing modules, you can use its next/dynamic utility.
React server-side components
The new React Server Component feature does simplify the SSR development and logic. They are always rendered on the server and streamed to the client. This reduces the need for handling different rendering scenarios. The usage of getServerSideProps and getStaticProps is not needed anymore. The shift the computation from the client to the server.
Those are big improvements; however, they still have some limitations:
They are stateless.
They can’t use lifecycle methods like
useStateoruseEffect.They can’t make usage of browser-only APIs.
Usage
How do you opt in to all these new React 18 goodies?
1. First, you need to install React 18 Alpha using the following code:
npm install next@latest react@alpha react-dom@alpha
2. Enable the experimental concurrent features in Next.js configuration, as shown below:
// next.config.js
module.exports = {
  experimental: {
    concurrentFeatures: true,
    serverComponents: true,
  },
}
With that, you are good to go.
On-demand Incremental Static Regeneration (Stable)
How many times can you redeploy in a workday? On-demand Incremental Static Regeneration (ISR) allows you to update content on your site without the need to redeploy. This makes it easy to update your site immediately when your site changes in your headless CMS or commerce platform. This is one of the most requested features from the community, and we are excited that it’s now stable.

Incremental Static Regeneration (ISR) works for any providers supporting the Next.js Build API (next build). When deployed to Vercel, on-demand revalidation propagates globally in ~300ms when pushing pages to the edge.
Smaller Images Using Avif
The Built-in Image Optimization API now supports AVIF images, enabling 20% smaller images compared to WebP.
AVIF images can take longer to optimize compared to WebP, so we're making this feature opt-in using the new images.formats property in next.config.js:
module.exports = { images: { formats: ['image/avif', 'image/webp'], },};
This list of formats is used to determine the optimized image format on demand using the request’s Accept header:
Since AVIF is first, it will be served if the browser supports AVIF. If not, WebP will be served if the browser supports WebP. If neither format is supported, the original image format will be served.
Output File Tracing
In Next.js 8, we introduced the target option. This allowed for outputting Next.js pages as standalone JavaScript bundles by bundling all dependencies using webpack during the build. We quickly realized this wasn't ideal and instead created @vercel/nft. @vercel/nft has been used for over 2 years on all deployments on the Vercel platform.
Now, we're bringing these improvements directly into the Next.js framework by default, for all deployment platforms, providing a significantly improved approach over the target option.
Next.js 12 automatically traces which files are needed by each page and API route using @vercel/nft, and outputs these trace results next to the next build output, allowing integrators to leverage the traces Next.js provides automatically.
These changes also optimize applications deployed using tools like Docker through next start. By leveraging @vercel/nft, we will be able to make the Next.js output standalone in the future. No dependencies will be required to be installed to run the application, massively reducing the Docker image size.
Bringing @vercel/nft into Next.js supersedes the target approach, making target deprecated in Next.js 12. Check out the documentation for more info.
Bot Aware ISR Fallback
Currently, Incremental Static Regeneration (ISR) with fallback: true renders a fallback state before rendering the page content on the first request to a page that was not generated yet. To block the page from loading (server-rendering), you would need to use fallback: block.
In Next.js 12, web crawlers will automatically server-render ISR pages using fallback: true, while still serving the previous behavior of the fallback state to non-crawler User-Agent. This prevents crawlers from indexing loading states.
References
https://medium.com/coding-beauty/the-new-next-js-15-changes-everything-cec14aaa50b3
https://medium.com/@mitali_shah/why-is-next-js-15-revolutionizing-web-app-development-8164875d6f0d
https://javascript.plainenglish.io/4-major-features-in-next-js-14-3e897f391068
https://focusreactive.com/breaking-down-next-js-14/
https://blog.bitsrc.io/next-js-13-4-is-finally-here-and-its-awesome-e9f5b27bccda
https://medium.com/better-programming/8-things-you-should-know-about-next-js-13-969291f168ec
https://medium.com/better-programming/5-new-killer-features-of-next-js-12-dfd1d766b539
Subscribe to my newsletter
Read articles from Tuan Tran Van directly inside your inbox. Subscribe to the newsletter, and don't miss out.
Written by
Tuan Tran Van
Tuan Tran Van
I am a developer creating open-source projects and writing about web development, side projects, and productivity.