GFG Day 20: Gradle
 sri parthu
Introduction to Gradle
Gradle is an open-source building tool that will handle the compilation and packaging of development tasks, including publishing, testing, and deployment.
It is an automation tool that is based on Apache Ant and Apache Maven.
This tool supports multiple languages, including Groovy, C++, Java, Scala, and C, and can create applications that meet industry requirements.
Working of Gradle
- The Gradle project is made up of one or more projects. These projects are made up of tasks. Let's examine both words' fundamentals.
1. Gradle Projects: A web application or a JAR file are the projects that Gradle creates. One or more tasks are combined into these projects. It is possible to implement these projects throughout several stages of development. Building a wall with N bricks—which can be thought of as tasks—is an example of a gradient project.
2. Gradle Tasks: The functions in charge of a particular role are called tasks. As part of the Gradle project's overall development, these jobs are in charge of producing classes, Javadoc, or publishing archives into the repository. Gradle uses these tasks to determine which input should be processed for a given output. Once more, there are two ways to classify tasks:
Default Task: These are the pre-established jobs that Gradle gives its users. When users don't declare any tasks on their own, these are given to them before they are executed. For instance, create a Gradle project and wrap the default tasks that users are given.
Custom Task: Tasks created by the developer to carry out a user-defined task are known as custom tasks. These are designed to perform a particular function within a project. Below, let's see how to create a Custom Task.
Example: Printing Welcome to Advance Java! with a task in Gradle.
build.gradle : task hello
{
    doLast
    {
        println 'Advance Java!'
    }
}
Output
> gradle -q hello
Advance Java!
Features of Gradle
| Feature | Description |
| 1. Incremental Builds | Gradle avoids rebuilding unchanged parts, speeding up the build process significantly. |
| 2. Dependency Management | Integrates with Maven and Ivy repositories to automatically download required libraries and manage transitive dependencies. |
| 3. Multi-Project Builds | Supports large, modular applications by allowing multiple sub-projects in a single build. |
| 4. Plugin Support | Offers a rich plugin ecosystem (e.g., Java, Application, Spring Boot) and allows you to create custom plugins. |
| 5. Groovy/Kotlin DSL | Uses expressive DSLs (Groovy or Kotlin) instead of XML, making build scripts more concise and powerful. |
| 6. Gradle Wrapper | Enables consistent builds across teams without requiring Gradle to be installed on every machine. |
| 7. Parallel & Incremental Builds | Executes tasks in parallel and skips tasks that haven't changed, improving performance. |
| 8. Task-Based Model | Builds are defined as a series of tasks (e.g., compile, test, jar), which are executed in order. |
| 9. IDE Integration | Integrates seamlessly with IntelliJ IDEA, Eclipse, Android Studio, and other major IDEs. |
| 10. Extensibility & Customization | Highly customizable; you can define your own tasks or extend existing ones. |
| 11. Build Scans | Provides detailed insights into build performance and failures via free online build scans. |
| 12. Continuous Integration Friendly | Easily integrates with CI/CD tools like Jenkins, GitHub Actions, GitLab CI, etc. |
| 13. Rich Logging & Diagnostics | Offers detailed output and diagnostics to help with debugging build failures. |
| 14. Support for Multiple Languages | Not limited to Java; supports Groovy, Kotlin, Scala, C++, Android, and more. |
History of Gradle
- When compared to Ant and Maven, Gradle is the most stable tool. This tool was first made available in late 2007 as a replacement for earlier models, which not only addressed their shortcomings but also replaced them. In 2019, its stable version was made available, and the most recent version is 6.6.
Pros of Using Gradle
Declarative and Scalable: Uses a clear DSL for configuration and scales well with project size.
Flexible Structure: Adapts to any project layout and supports custom plugins.
Deep API Access: Allows detailed control over build execution and behavior.
Improved Performance: Optimized for faster builds, even in large projects.
Strong Community: Offers rich documentation, tutorials and plugin resources.
Cons of Using Gradle
Learning Curve: Requires knowledge of Groovy/Java and an understanding of Gradle’s architecture.
Complex Configuration: Setup and plugin integration can be tricky for beginners.
Debugging Difficulty: Troubleshooting can be hard in large builds with many dependencies.
Resource Intensive: Can consume significant system resources during builds.
Migration Challenges: Transitioning from other build tools may require significant effort and expertise.
Gradle Build Script Structure
A Gradle build script provides instructions on how to manage project chores including code packaging, testing, and building. These scripts are often written in Groovy or Kotlin and are typically referred to as
build.gradle for Groovy
build.gradle.kts for Kotlin
Example to build simple build script
plugins {

    id 'java'

    id 'application'

}

repositories {

    mavenCentral()

}

dependencies {

    implementation 'org.springframework:spring-core:5.3.8'

    testImplementation 'junit:junit:4.13.2'

}
Note: Here, we are setting up a Java project with Spring and JUnit dependencies.
Now, let's understand the key parts of a Gradle build script for more understanding.
Key Parts of a Gradle Build Script
- The key parts of a gradle build script are listed below:
1. Plugins Block
- In the plugins section, we specify to the gradle which tools we require. Plugins are essentially gradle instructions that specify how to perform specific jobs. Java plugins are required when creating Java applications, and application plugins are required when creating runnable apps.
Example
plugins {

    // Apply the Java plugin to add support for Java compilation

    id 'java'

    // Apply the Application plugin for building and running Java applications

    id 'application'

}
Note: The Java plugin tells the gradle to work with Java and the application plugin is used when we need to specify the main class of the app.
2. Repositories Block
- Gradle is instructed where to search for external libraries or dependencies, such as Spring and JUnit, by the repositories block. Maven Central, where the majority of the libraries are housed, is the most popular location.
Example:
repositories {

     // Look for libraries in Maven Central

    mavenCentral()

}
3. Dependencies Block
- All of the project's libraries and tools are listed in the dependencies area. Dependencies can be used for testing (e.g., JUnit) or for executing the application (e.g., Spring). We will also see several kinds of dependencies, such as testImplementation (for libraries you require solely for testing) and implementation (for libraries your project needs to run).
Example:
dependencies {

    // Spring library

    implementation 'org.springframework:spring-core:5.3.8'

    // JUnit for tests

    testImplementation 'junit:junit:4.13.2'

}
Note: This will tell gradles to include spring for the project and Junit for the testing.
4. Task Definitions
- In Gradle, a task is a discrete action, such running tests or generating source code. Tasks like compileJava, which is essentially used to build Java code, can be created or the default ones can be used.
Example
task hello {

    doLast {

        // This task just prints a message

        println 'Hello, Gradle'

    }

}
Note: Here we have defined a custom task called as hello that prints a message when we run it.
5. Project Properties
- We can modify the build by defining project properties. Either a separate gradle.properties file or the build script itself can be used to set these properties.
Example:
/ Set the version of the project

project.version = '1.0.0'
6. Source Sets and Directories
- For example, for Java code, Gradle requires the code to be at src/main/java by default. However, if the project has a different structure, we can alter this.
Example:
sourceSets {

    main {

        java {

            // Custom directory for Java code

            srcDirs = ['src/main/java']

        }

    }

}
Note: Here, we are telling the gradle exactly from where to find the source code.
7. Tasks and Phases
- Gradle completes tasks in a predetermined order. We can regulate the order of tasks by defining dependencies between them. We may ensure, for instance, that clean taks executes before compileJava.
Example:
task clean {

    // Deletes the build directory

    delete 'build'

}


task compileJava {

    // Ensures clean runs before compileJava

    dependsOn clean

}
Note: Here the clean will delete the old build files and compileJava will run only after that.
8. Default Tasks
- If we don't specify a job, we can use create default tasks to execute. When we want a specific task, like building, to run, this is helpful.
Example:
/ Automatically runs the 'build' task

defaultTasks 'build'
Note: If we run gradle without specifying a task, it will run build by default.
Implementation:
- Here’s what a full Gradle script might look like for a simple Java application:
plugins {
     // Adds the Java plugin
    id 'java'
    // Adds the Application plugin
    id 'application'
}

repositories {
    // Fetches dependencies from Maven Central
    mavenCentral()
}

dependencies {
    // Spring
    implementation 'org.springframework:spring-core:5.3.8'
     // JUnit for tests
    testImplementation 'junit:junit:4.13.2'
}

application {
    // The main class of the app
    mainClassName = 'com.example.Main'
}

task hello {
    doLast {
        // Prints a greeting
        println 'Hello, Gradle'
    }
}
Gradle Dependency Management
- Dependencies are managed with Gradle. Dependencies are third-party tools or libraries that our project requires to function correctly. When constructing or operating the project, managing these dependencies ensures that all required components are available.
Types of Dependencies
Dependencies are categorized into different types, which are mentioned below:
Compile-time dependencies: It is needed when the code is being built.
Runtime dependencies: It is needed when our program is running.
Test dependencies: It is needed for testing the code.
Example of adding dependencies:
dependencies {
    implementation 'org.springframework.boot:spring-boot-starter-web:2.5.4'
    testImplementation 'junit:junit:4.13.2'
}
Note*: Here, implementation is for dependencies that are required when compiling the code, and testImplementation is for dependencies that we need only during testing.*
How Gradle Handles Dependencies
- Gradle handles dependencies in two ways, which are listed below:
1. Local Dependencies
- Libraries that we have installed locally are known as local dependencies. For instance, adding them locally is simple if we are creating our own custom library.
Example: Here, we are adding a local dependency:
dependencies {

implementation files('libs/my-local-library.jar')

}
2. Remote Dependencies
- Most of the dependencies are stored on the remote server like Maven Central or JCentral. Gradle can easily download them automatically from the repositories.
Note: To tell gradle where to find all these dependencies, we can simply add repositories like this which is shown below:
Example:
repositories {

mavenCentral()

jcenter()

}
Managing Versions of Dependencies
- Whenever we add a dependency we need to specify which version of the library we want to use. There are several ways of doing this:
1. Fixed Version: If we want a specific version then we just need to write like this.
Example:
dependencies {

implementation 'com.google.guava:guava:30.1-jre'

}
2. Version Range: We can also specify a range of versions, so that gradle can pick the latest version within that particular range.
Example:
dependencies {

implementation 'com.google.guava:guava:[29.0-jre,30.1-jre]'

}
3. Dynamic Version: Gradle can automatically pick the latest version.
Example:
dependencies {

implementation 'com.google.guava:guava:+'

}
Note: This is convenient but it is not recommended to use for production level because it can lead to unexpected error if the new version of the library is released.
Dependency Scopes in Gradle
Gradle allows us to specify where and when a dependency is needed. This is done with the help of different scopes or configurations.
Most commonly used scopes are listed below:
Implementation: This scope is required to compile the code.
Api: It is similar to implementation but exposed to other projects.
CompileOnly: This scope is needed only at compile time.
RuntimeOnly: This scope is needed only when the program is running.
TestImplementation: This scope is needed only for testing.
TestRuntimeOnly: This scope is needed only when testing the project.
Note: These scopes ensures that right dependencies are used at the right time.
Gradle Tasks and Lifecycle
- Tasks, such as executing tests or compiling code, are used by Gradle to describe units of work. Because these duties are arranged into a lifecycle, you may effectively construct and oversee your project.
Gradle Tasks
A single job in the build process is called a Gradle task. Any task, such as uploading files, building a package, running tests, or compiling code, could be involved. The build script (build.gradle) defines these tasks. Every task serves as a container for an activity that must be taken, like:
Compiling a source code.
Creating WAR and JAR files.
Running unit test.
Deploying applications
Gradle Tasks Lifecycle
- Gradle arranges all the tasks in a specified sequence to make sure that they run properly. The build lifecycle tells about the stages the gradle build goes through and these stages are listed below:
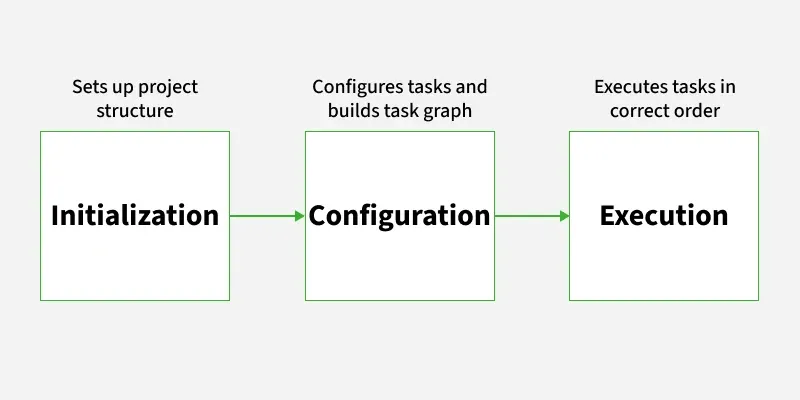
1. Initialization Phase: This is the first stage and in this, the gradle finds out which projects are part of the build and it only sets the project structure but it does not run any tasks.
2. Configuration Phase: This is the second stage and in this, the gradle sets up the project and prepares all the tasks that will be run later. No tasks are actually run yet. In this stage it is making everything ready only.
3. Execution Phase: This is the third stage and in this, all the tasks actually run based on the commands we pass to gradle. Gradle determines which tasks to execute and in what order. If dependencies exist between tasks, Gradle takes care of executing them in the correct order.
Types of Gradle Tasks
- Gradle provides two main types of tasks which are listed below:
1. Built-In Tasks: Built-In Tasks are tasks that come pre-configured with gradle. Common built-in tasks include:
build: It compiles and assembles the project.
clean: It deletes the build directory.
test: It runs unit tests for the project.
jar: It creates a JAR file from the compiled classes.
Note: These tasks are part of the default Gradle plugin and are available in any Gradle project.
2. Custom Tasks: Custom tasks are tasks that we define in our build.gradle file. We can create a task to automate any action that Gradle does not handle by default.
Example 1:
task helloWorld {
    doLast {
        println 'Welcome to the homePath'
    }
}
output: This task will print a message when you run:
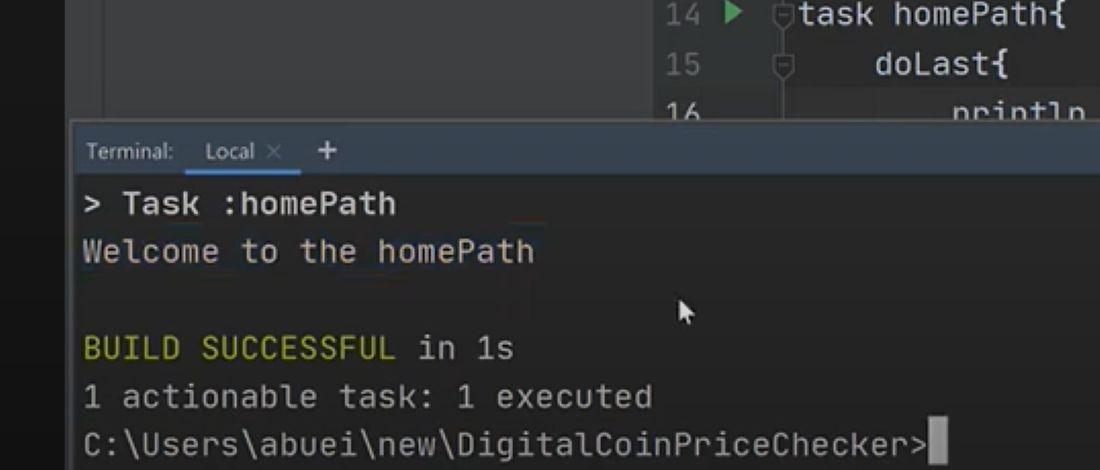
Note: In the above example, we have defined a custom task helloWorld and the doLast block defines the action that will be executed when the task is run.
How to Create and Configure Tasks
- Creating and configuring tasks in Gradle is very straightforward. We can define tasks using the task keyword in our build.gradle file.
Example:
task greet {
    doLast {
        println 'Hello from Gradle!'
    }
}
Note: This code will simply prints "Hello from Gradle!". The doLast block is used to define the action to be taken when the task is executed. We can also use doFirst to specify actions to be executed before any other actions in the task.
Connecting Tasks (Task Dependencies)
- What if you want one task to run before another? You can do that using dependsOn.
Example:
task taskA {
    doLast {
        println 'Running Task A'
    }
}

task taskB(dependsOn: taskA) {
    doLast {
        println 'Running Task B'
    }
}
Output
gradle taskB
Common Gradle Commands
- Some commonly used gradle commands are discussed below
| Command | Description |
gradle init | Initializes a new Gradle project (with Groovy or Kotlin DSL). |
gradle build | Compiles, tests, and builds the project. Produces .class, .jar, etc. |
gradle clean | Deletes the build/ directory (cleans the project). |
gradle assemble | Compiles code and packages without running tests. |
gradle test | Runs unit tests. |
gradle check | Runs tests and checks code quality. |
gradle tasks | Lists all available tasks in the project. |
gradle dependencies | Shows the project's dependency tree. |
gradle help | Displays help on using Gradle. |
gradle properties | Shows project properties (e.g., version, group, etc.). |
gradle run | Runs the main class (when using the Application plugin). |
gradle jar | Generates a .jar file of the project (if configured). |
gradle --version | Displays the installed Gradle version. |
gradle wrapper | Generates the Gradle Wrapper (gradlew, gradlew.bat). |
./gradlew build | Runs build using the Gradle Wrapper (recommended). |
./gradlew bootRun | Runs Spring Boot apps (if using Spring Boot plugin). |
gradle --daemon | Enables the Gradle daemon (faster repeated builds). |
All these commands helps us to manage the Gradle project more effectively.
Spring Boot Gradle Plugin
The Spring Boot Gradle plugin gives Gradle, a well-liked build tool for Java applications, a number of Spring Boot-specific functionality. It facilitates the development and administration of Spring Boot applications. We can use the Gradle build tool to create and manage our Spring Boot apps thanks to the Spring Boot Gradle plugin. This has a ton of features, including:
Building executable jar or war files.
Generating a Bill of Materials (BOM) for dependency management.
Creating a build-info file for version and build metadata.
Creating native executable images using the Packaging for Containers (PFC) technology.
Prerequisites
To use the Spring Boot Gradle Plugin, make sure you have the following:
JDK (Java Development Kit) 8 or later.
Gradle 4.0 or later.
Spring Boot 1.5.x or later.
We must Install the Spring tool (STS).
Gradle Plugin in Spring Boot
1. First, we apply the Spring Boot Plugin to your 'build.gradle' file.
groovy:
plugins {
    id 'org.springframework.boot' version '2.5.4'
}
2. We can also apply the Plugin using the legacy plugin application format:
groovy:
buildscript {
    repositories {
        mavenCentral()
    }
    dependencies {
        classpath("org.springframework.boot:spring-boot-gradle-plugin:2.5.4")
    }
}

apply plugin: "org.springframework.boot"
3. Dependency Management: To manage dependencies using Spring Boot Plugin, you can use the 'dependencyManagement' section to import the Spring Boot BOM.
groovy:
dependencyManagement {
    imports {
        mavenBom("org.springframework.boot:spring-boot-dependencies:2.5.4")
    }
}

dependencies {
    implementation "org.springframework.boot:spring-boot-starter-web"
}
4. Building Executable JAR and WAR files: To build an executable JAR or WAR file, we can use the 'bootJar' or bootWar' tasks.
groovy:
bootJar {
    mainClassName = 'com.example.demo.Application'
}
5. To build the application with a native image, we can use the 'bootBuildImage' task:
tasks.named("bootBuildImage") {
    imageName.set("docker.example.com/library/${project.name}")
}
6. Generating Build-Info Files: Generate a build-info file, you can use the 'bootBuildInfo' task:
springBoot {
    buildInfo {
        properties {
            artifact = 'example-app'
            version = '1.2.3'
            group = 'com.example'
            name = 'Example application'
        }
    }
}
Step-by-Step Implementation of Gradle Plugin in Spring Boot
Let's create a simple Spring Boot project by using Gradle.
Open Spring tool STS
Click on new project select spring starter project

and
Create a project name after this select Gradle groovy and click on Next.
Now, the Spring Boot project is created successfully.

build.gradle: Inside this, we have Gradle plugin dependencies as mentioned below:
  plugins {
      id 'org.springframework.boot' version '2.5.4'
      id 'io.spring.dependency-management' version '1.0.11.RELEASE'
      id 'java'
  }

  group = 'com.example'
  version = '0.0.1-SNAPSHOT'
  sourceCompatibility = '11'

  repositories {
      mavenCentral()
  }

  dependencyManagement {
      imports {
          mavenBom("org.springframework.boot:spring-boot-dependencies:2.5.4")
      }
  }

  dependencies {
      implementation "org.springframework.boot:spring-boot-starter-web"
      testImplementation "org.springframework.boot:
Happy Learning
Thanks For Reading! :)
SriParthu 💝💥
Subscribe to my newsletter
Read articles from sri parthu directly inside your inbox. Subscribe to the newsletter, and don't miss out.
Written by
sri parthu
sri parthu
Hello! I'm Sri Parthu! 🌟 I'm aiming to be a DevOps & Cloud enthusiast 🚀 Currently, I'm studying for a BA at Dr. Ambedkar Open University 📚 I really love changing how IT works to make it better 💡 Let's connect and learn together! 🌈👋