Three.js for Beginners
 Yuri Kim
Table of contents

What is Three.js?
Three.js is a high-level JavaScript library used to create and display 3D graphics directly in the browser.
It’s built on top of WebGL, handling all the complex setup and boilerplate for you.
Instead of writing low-level WebGL code, it gives you a simpler, more intuitive JavaScript API.
This lets you focus on the creative side—building scenes, adding lights, animations, and loading models—without needing deep graphics programming knowledge.
What is WebGL?
WebGL (Web Graphics Library) is a low-level JavaScript API that lets your browser communicate directly with your computer’s GPU (Graphics Processing Unit).
It provides the instructions to tell the GPU what to draw and how to draw it.
WebGL enables real-time 3D rendering on the web—but it’s complex and not beginner-friendly on its own.
What is Graphics Processing?
Graphics processing is the real-time rendering of 3D scenes on a screen. This involves:
Calculating the position, color, and lighting of every vertex (a point in 3D space).
Determining how each pixel on the screen should appear.
Running millions of calculations per second to keep everything smooth and responsive.
Why so complex?
Every object in a 3D scene is made up of vertices, each needing to be calculated and positioned in space.
For every single pixel, the computer must decide:
What color should this be?
Is it lit or in shadow?
Is something else in front of it?
All of this happens in real-time, which is why efficient code and specialized hardware are essential.
What is a GPU?
A Graphics Processing Unit (GPU) is specialized hardware designed to handle massive numbers of calculations in parallel.
Unlike a CPU (which is optimized for a few tasks at a time), a GPU excels at performing thousands of simple tasks simultaneously.
This parallel power is perfect for rendering complex 3D graphics at high speeds.
Without a GPU, 3D rendering (like games or simulations) would be painfully slow.
Installing Vite
Vite is a fast and modern build tool that makes setting up JavaScript projects simple and efficient. It’s great for Three.js projects because it supports ES modules, hot module replacement, and a smooth development experience.
Create a new project folder
 mkdir threejs-project
 cd threejs-project
Initialize a new Vite project
npm create vite@latest .You will be prompted to select a framework; choose vanilla for plain JavaScript or vanilla-ts for TypeScript.
Install dependencies and start development server
 npm install
 npm run dev
Your project will be available at
http://localhost:5173(or another port shown in the terminal).
How a Three.js App is Structured
Here’s a breakdown of the key components of a Three.js app (specifically the
main.jsfile):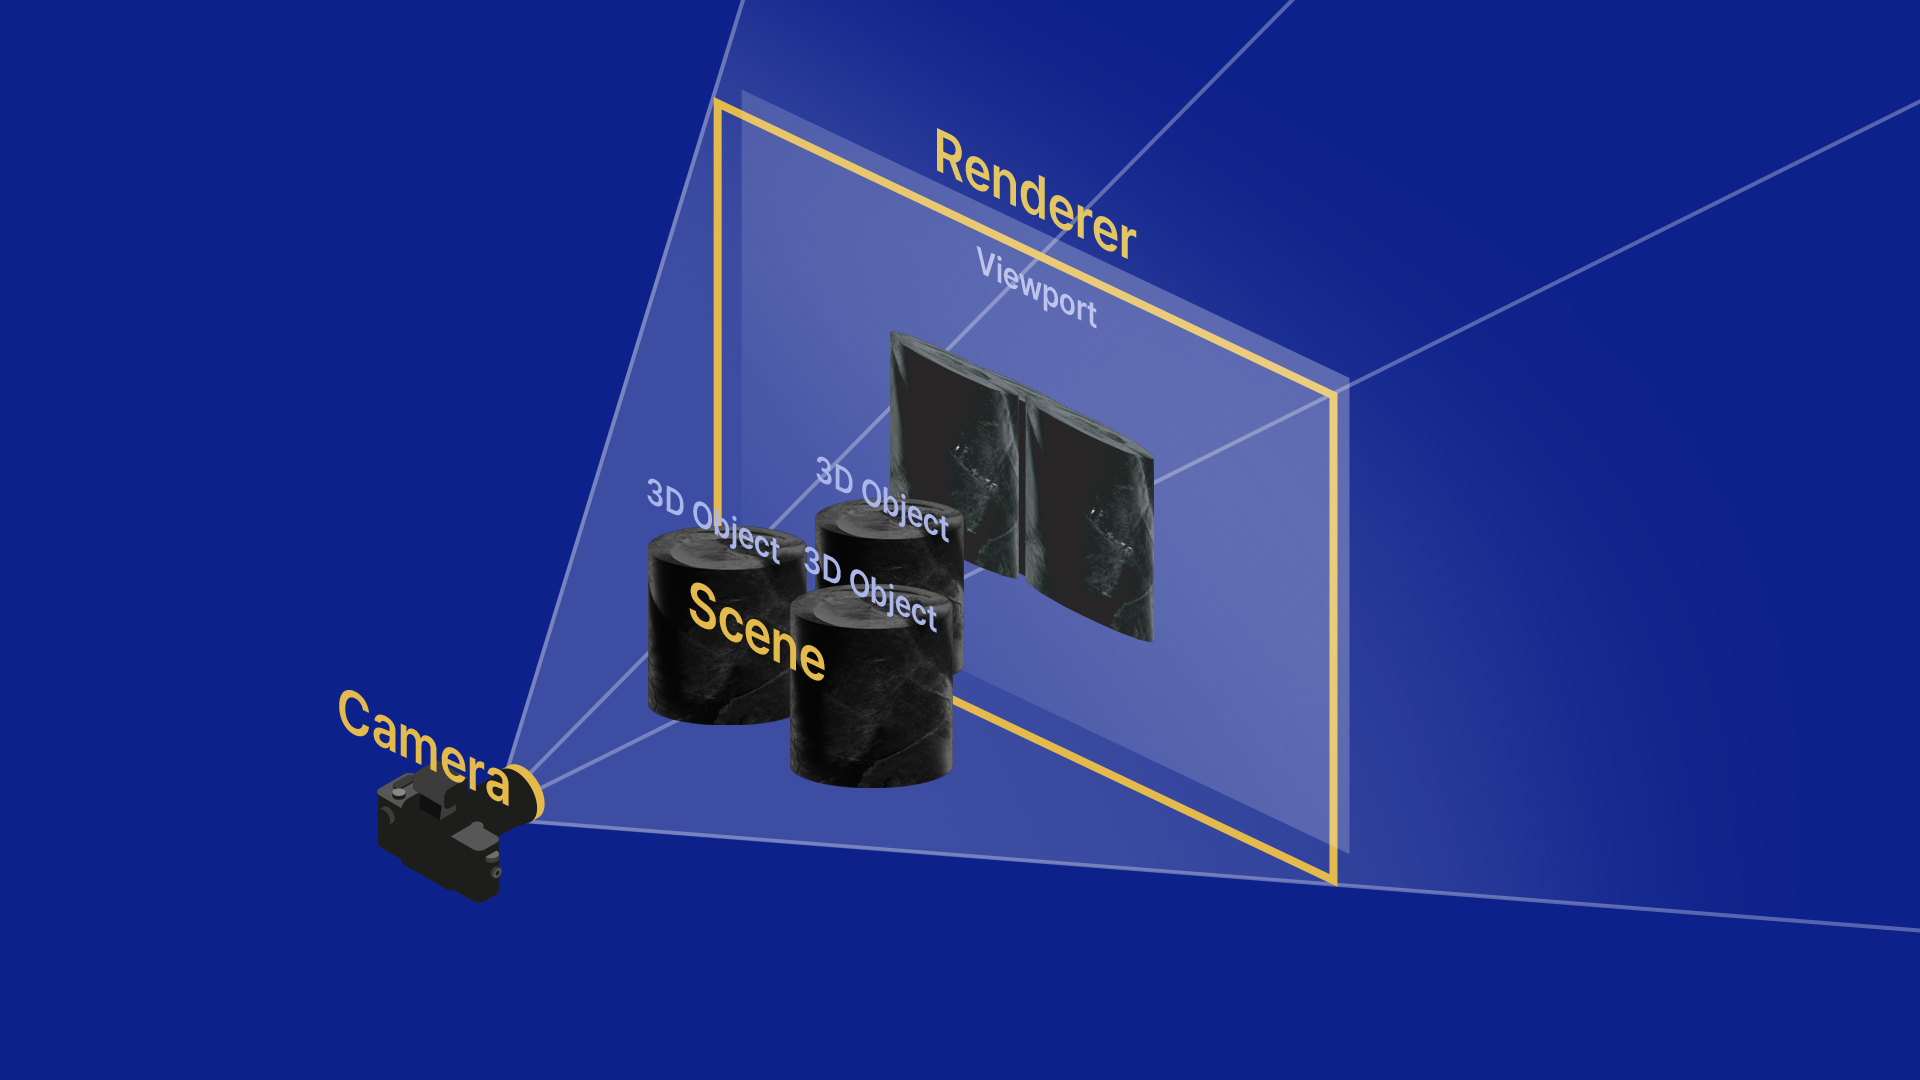
Scene
Think of the scene as the stage. It holds everything that gets rendered—objects, lights, cameras, and groups.
const scene = new THREE.Scene();
Meshes, Groups, & Lights
- A mesh is a combination of: Geometry (shape) + Material (how it looks)
- A group allows you to organize multiple meshes together and apply transformations to all of them.
Lights illuminate the scene so objects can be visible and shaded.
  const cubeGeometry = new THREE.BoxGeometry(1, 1, 1);
  const cubeMaterial = new THREE.MeshBasicMaterial({ color: "yellow" });
  const cubeMesh = new THREE.Mesh(cubeGeometry, cubeMaterial);
  scene.add(cubeMesh);
Textures
- A texture is an image or pattern applied to a material—like wood grain, metal, or fabric—used to add detail and realism.
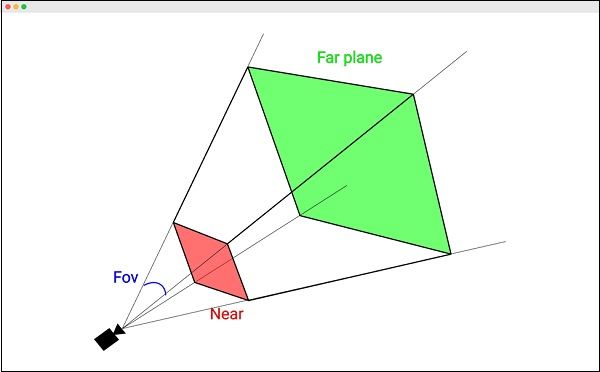
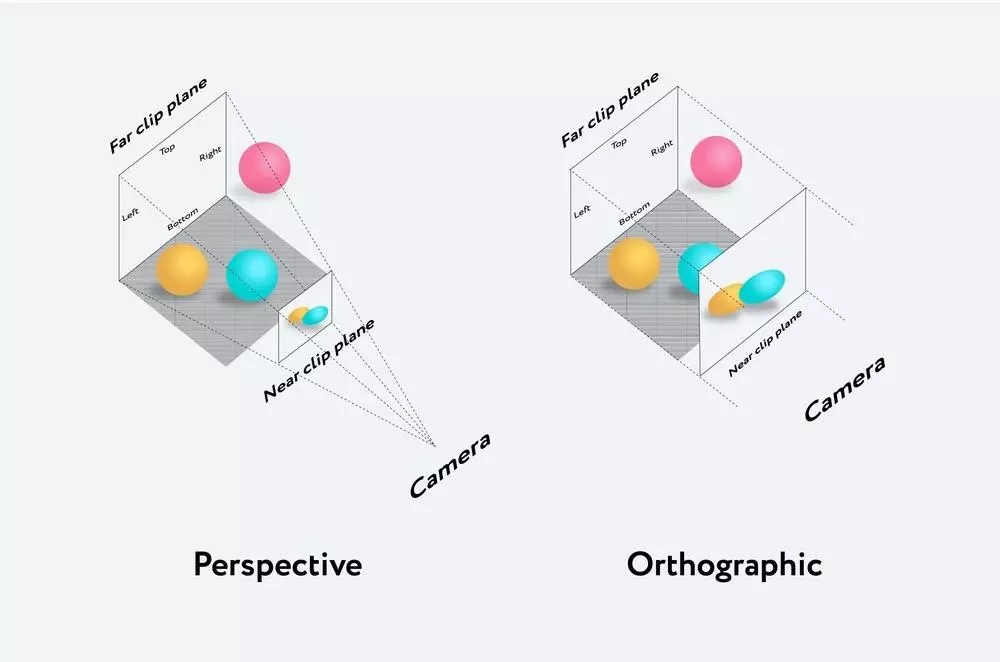
Camera, FOV, Aspect Ration, & Near and Far Clipping Planes
Camera defines the viewpoint. What the camera sees is what gets rendered.
PerspectiveCamera: the most commonly used camera in Three.js. It mimics the perspective projection of real-world cameras, creating a sense of depth and realism in the scene. Objects farther from the camera appear smaller, while those closer look larger, just like how our eyes perceive them.
OrthographicCamera: provides an orthographic projection, meaning objects appear the same size no matter their distance from the camera. It is often used for 2D games or architectural visualizations.
  const camera = new THREE.PerspectiveCamera(
    35,                                     // Field of view
    window.innerWidth / window.innerHeight, // Aspect ratio
    0.1,                                    // Near clipping plane
    200                                     // Far clipping plane
  );
  camera.position.z = 5;
  scene.add(camera);
Field of View (FOV) is the vertical angle, measured in degrees, that the camera lens “sees.”
Aspect Ratio is the ratio between the camera's width and height, typically matching your display or canvas size.
Near and Far Clipping Planes define the minimum and maximum distances from the camera at which objects are visible and rendered. Objects closer than the near plane or farther than the far plane are not drawn.
The near clipping plane is often set to a small positive value like
0.1or0.5. It cannot be zero (or less) because it breaks the depth calculations.The far clipping plane depends on your scene size; for example,
200means objects farther than 200 units away won’t be rendered.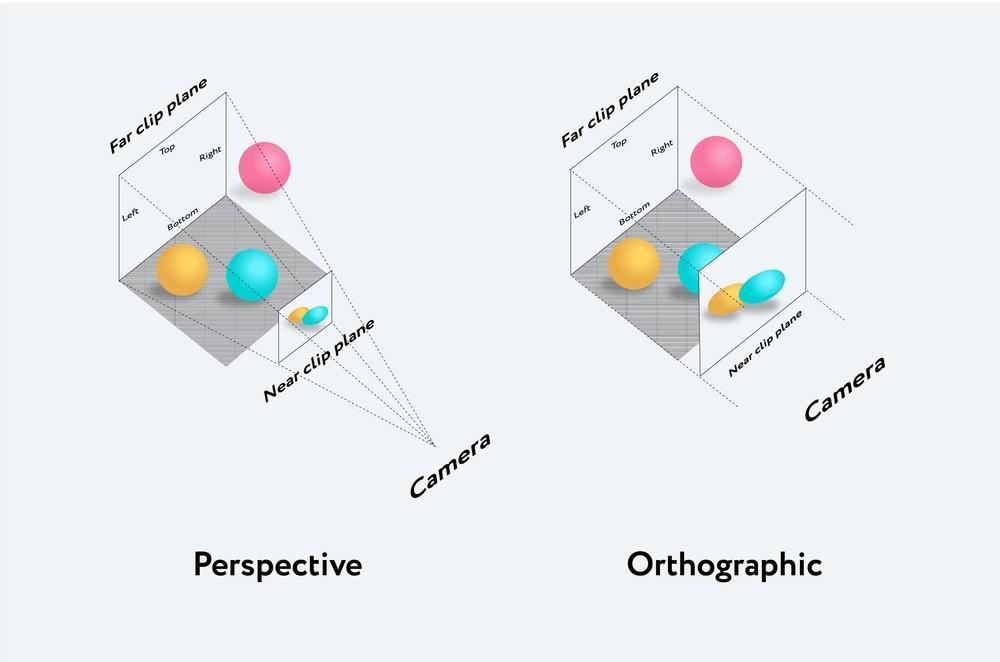
Renderer
The renderer takes the scene and camera and turns everything into pixels on the screen.
  const canvas = document.querySelector("canvas.threejs");
  const renderer = new THREE.WebGLRenderer({ canvas: canvas });
  renderer.setSize(window.innerWidth, window.innerHeight);
  renderer.render(scene, camera);
Three.js Starter Template (Complete Code)
Here’s a minimal example to get a yellow cube on screen:
  import * as THREE from "three";

  // 1. Set up the scene
  const scene = new THREE.Scene();

  // 2. Create geometry and material
  const cubeGeometry = new THREE.BoxGeometry(1, 1, 1);
  const cubeMaterial = new THREE.MeshBasicMaterial({ color: "yellow" });

  const cubeMesh = new THREE.Mesh(cubeGeometry, cubeMaterial);
  scene.add(cubeMesh);

  // 3. Set up the camera
  const camera = new THREE.PerspectiveCamera(
    35,
    window.innerWidth / window.innerHeight,
    0.1,
    200
  );
  camera.position.z = 5;
  scene.add(camera);

  // 4. Set up the renderer
  const canvas = document.querySelector("canvas.threejs");
  const renderer = new THREE.WebGLRenderer({ canvas: canvas });
  renderer.setSize(window.innerWidth, window.innerHeight);
  renderer.render(scene, camera);
Orbit Controls & requestAnimationFrame()
OrbitControls is a utility that lets users pan, zoom, and rotate the scene.
import { OrbitControls } from "three/addons/controls/OrbitControls.js";const controls = new OrbitControls(camera, canvas); controls.enableDamping = true; controls.autoRotate = true;requestAnimationFrame() creates a smooth, browser-optimized loop. Within this loop, we update the camera controls (like OrbitControls) and render the current state of the scene from the camera’s perspective.
  const renderloop = () => {
    controls.update();
    renderer.render(scene, camera);
    window.requestAnimationFrame(renderloop);
  };
import * as THREE from "three"; import { OrbitControls } from "three/addons/controls/OrbitControls.js"; // 1. Set up the scene const scene = new THREE.Scene(); // 2. Create geometry and material const cubeGeometry = new THREE.BoxGeometry(1, 1, 1); const cubeMaterial = new THREE.MeshBasicMaterial({ color: "yellow" }); const cubeMesh = new THREE.Mesh(cubeGeometry, cubeMaterial); scene.add(cubeMesh); // 3. Set up the camera const camera = new THREE.PerspectiveCamera( 35, window.innerWidth / window.innerHeight, 0.1, 200 ); camera.position.z = 5; // 4. Set up the renderer const canvas = document.querySelector("canvas.threejs"); const renderer = new THREE.WebGLRenderer({ canvas: canvas }); renderer.setSize(window.innerWidth, window.innerHeight); // 5. Set up orbit controls const controls = new OrbitControls(camera, canvas); controls.enableDamping = true; // Enable smooth transition (damping) controls.autoRotate = true; // Enable automatic camera rotation // 6. Set up animation loop to render the scene continuously const renderloop = () => { controls.update(); // Update controls (needed if damping is enabled) renderer.render(scene, camera); // Render the scene from the camera's perspective window.requestAnimationFrame(renderloop); // Keep the loop going }; renderloop(); // Start the render loop
window.addEventListener(), camera.updateProjectionMatrix(), & antialias
window.addEventListener()andcamera.updateProjectionMatrix()When a user resizes their browser window, the canvas size changes. To make sure the 3D content always fits the screen correctly, update the following:
camera's aspect ratio to match the new canvas dimensions.
camera’s projection matrix for the internal math used for rendering gets recalculated.
This is required after changing the aspect
camera.updateProjectionMatrix()tells Three.js to recalculate the matrix using the updatedaspectvalue. Without this call, your scene would appear stretched or distorted after resizing.
resize the renderer so it fills the new window size.
  window.addEventListener("resize", () => {
    camera.aspect = window.innerWidth / window.innerHeight; // aspect ratio
    camera.updateProjectionMatrix(); // camera's projection matrix
    renderer.setSize(window.innerWidth, window.innerHeight);
  });
antialias: true— Smoother edges for better visualsantialias: trueenables multisample anti-aliasing (MSAA).It helps smooth out jagged edges (aliasing) on rendered objects, especially noticeable on diagonal or curved lines. The result is a cleaner and more polished visual appearance.
const renderer = new THREE.WebGLRenderer({ canvas: canvas, antialias: true });import * as THREE from "three"; import { OrbitControls } from "three/addons/controls/OrbitControls.js"; const scene = new THREE.Scene(); const cubeGeometry = new THREE.BoxGeometry(1, 1, 1); const cubeMaterial = new THREE.MeshBasicMaterial({ color: "yellow" }); const cubeMesh = new THREE.Mesh(cubeGeometry, cubeMaterial); scene.add(cubeMesh); const camera = new THREE.PerspectiveCamera( 35, window.innerWidth / window.innerHeight, 0.1, 200 ); camera.position.z = 5; const canvas = document.querySelector("canvas.threejs"); const renderer = new THREE.WebGLRenderer({ canvas: canvas, antialias: true }); renderer.setSize(window.innerWidth, window.innerHeight); const controls = new OrbitControls(camera, canvas); controls.enableDamping = true; controls.autoRotate = true; window.addEventListener("resize", () => { camera.aspect = window.innerWidth / window.innerHeight; camera.updateProjectionMatrix(); renderer.setSize(window.innerWidth, window.innerHeight); }); const renderloop = () => { controls.update(); renderer.render(scene, camera); window.requestAnimationFrame(renderloop); }; renderloop();
Subscribe to my newsletter
Read articles from Yuri Kim directly inside your inbox. Subscribe to the newsletter, and don't miss out.
Written by