2. IAM Policies Federation STS and MFA
 Arindam Baidya
Inline vs Managed Policy
AWS Identity and Access Management (IAM) offers flexible controls to secure resources. In this guide, we explore the differences between AWS managed policies, customer managed policies, and inline policies. You'll learn when to use each type and see a hands-on demo for granting temporary S3 access.
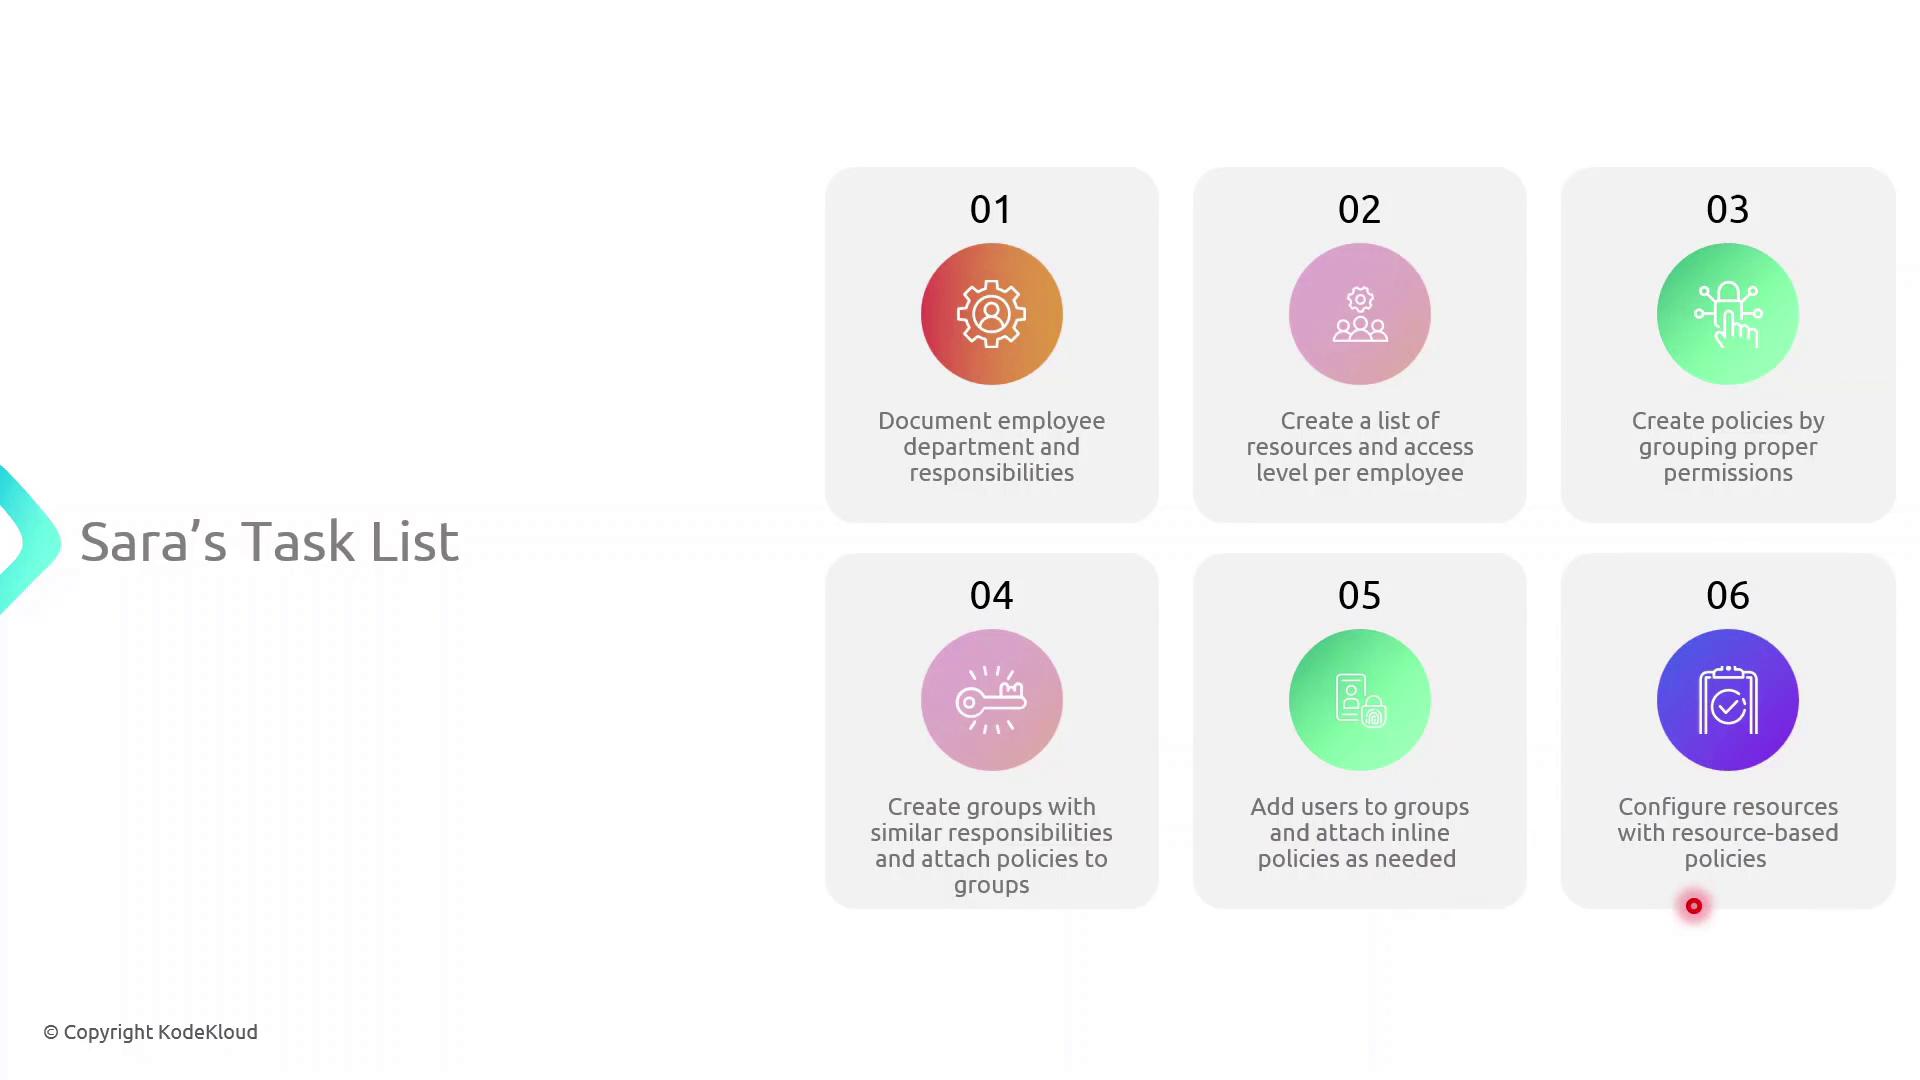
Scenario: Organizing Roles and Permissions
Sarah must implement access controls across multiple departments. Her workflow includes:
Mapping each department and listing team members’ responsibilities (e.g., John in HR handles onboarding).
Identifying required AWS resources and permission levels for every user.
Crafting IAM policies—collections of permissions tied to resources.
Creating IAM groups for teams with similar roles and attaching the appropriate policies.
Attaching inline policies to users, groups, or roles for unique scenarios.
Applying resource-based policies (e.g., for S3 buckets) where needed.
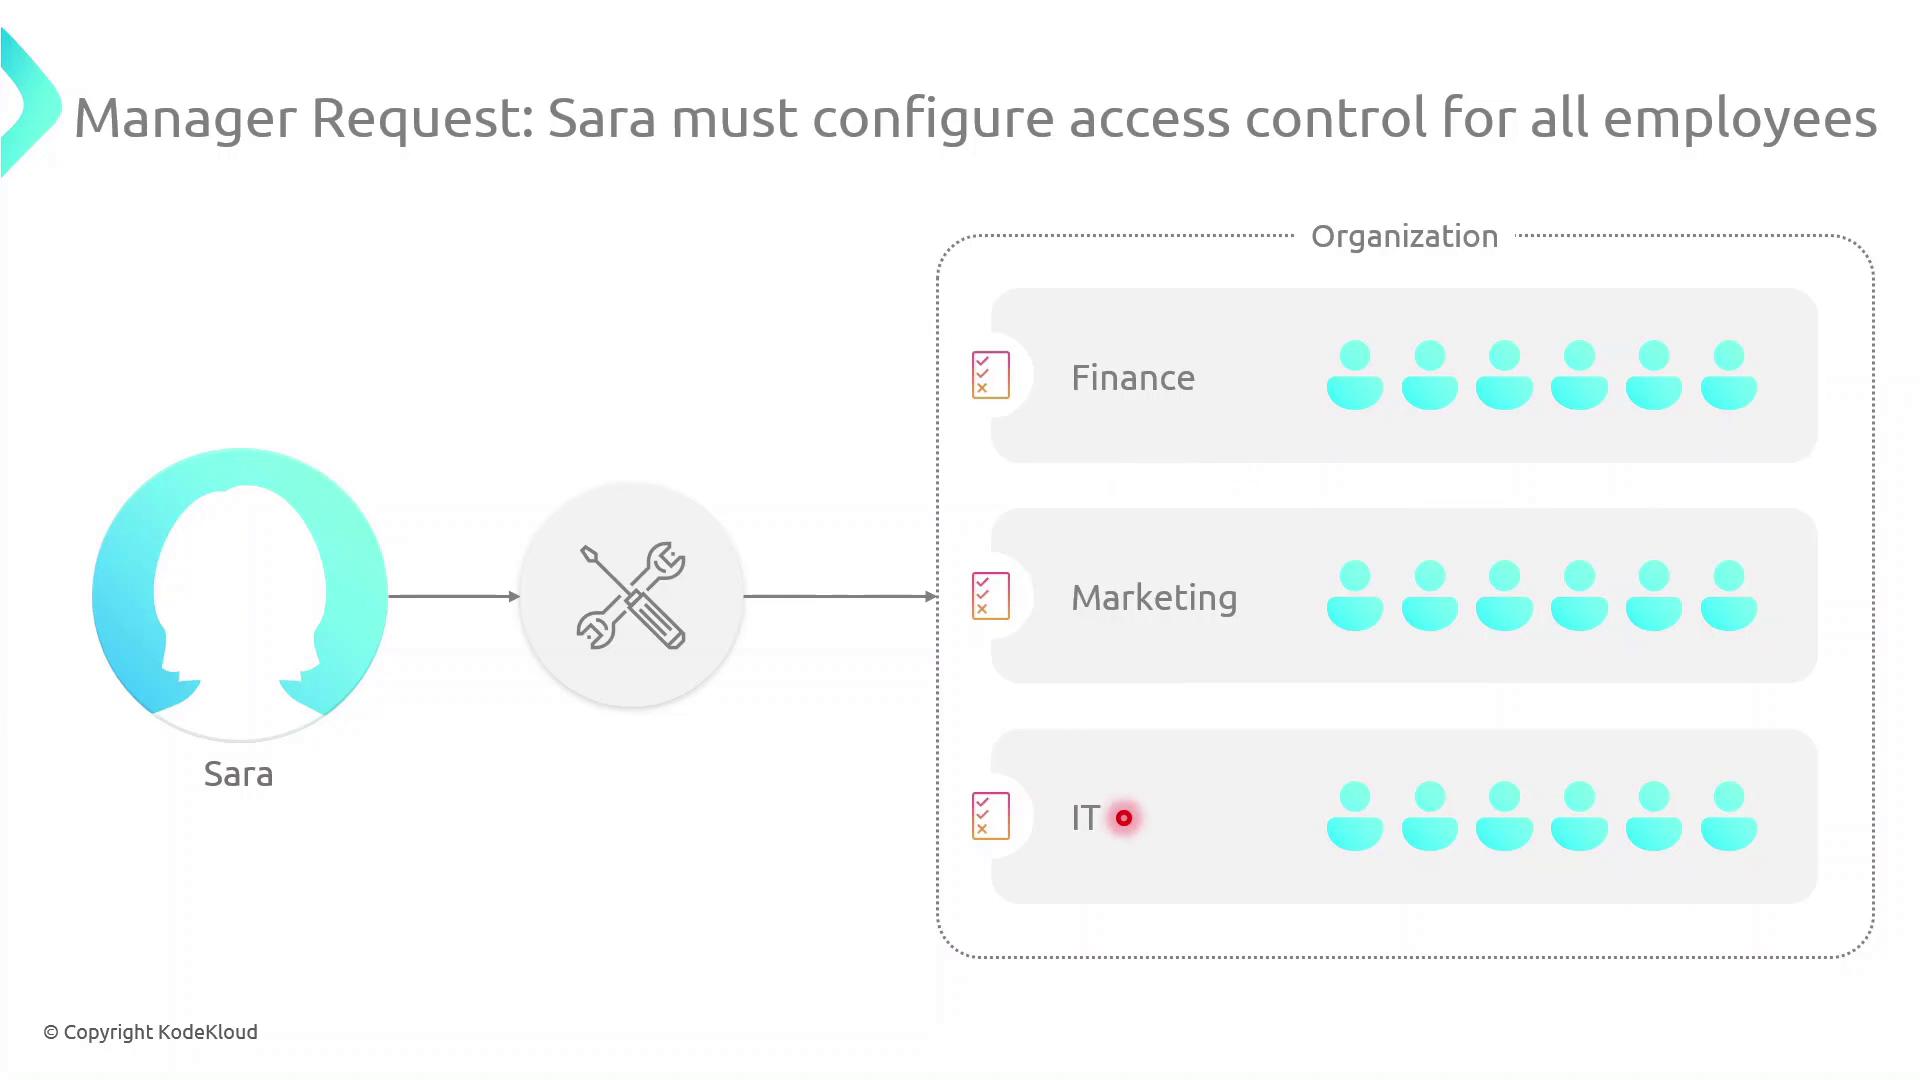
Her manager has also requested a consolidated access control plan spanning Finance, Marketing, and IT:
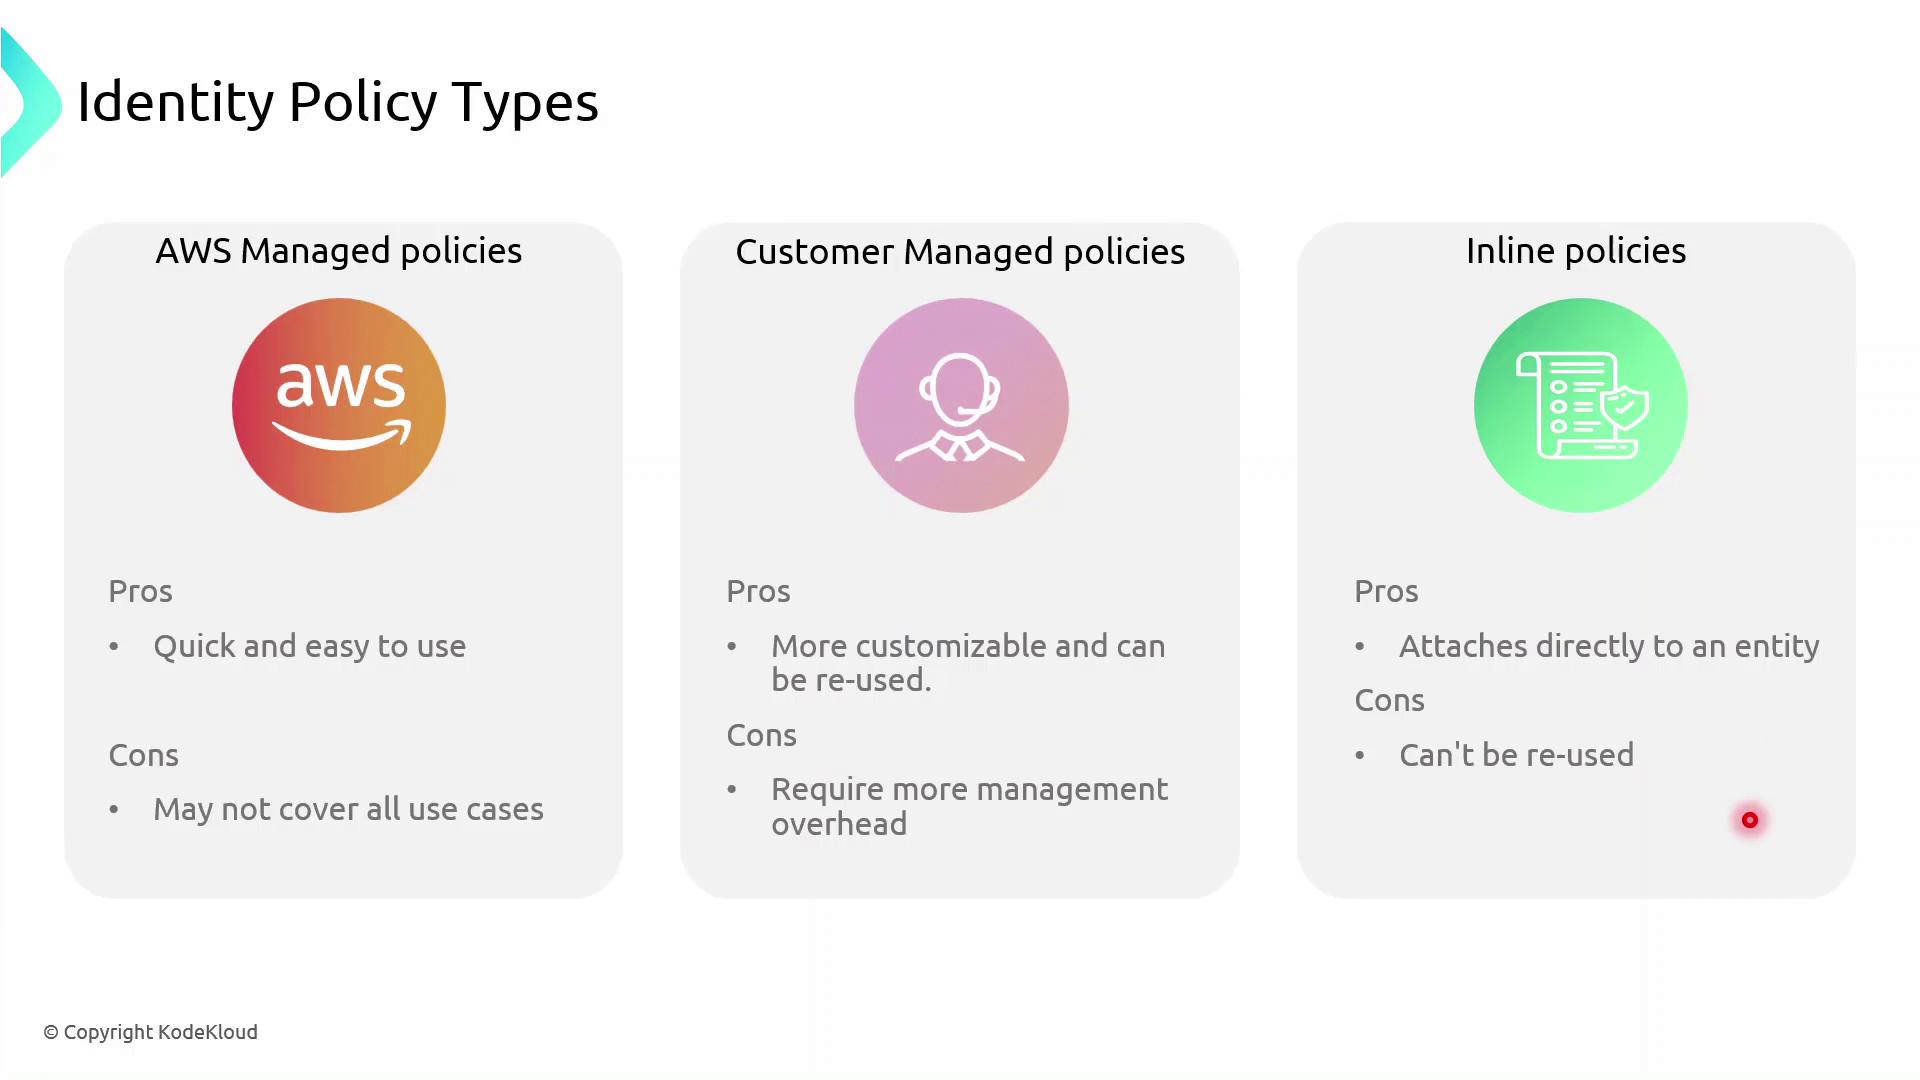
Types of Identity-Based Policies
AWS IAM supports three identity-based policy types:
AWS Managed Policies: Predefined and maintained by AWS.
Customer Managed Policies: Custom, reusable policies you create and maintain.
Inline Policies: Embedded within a single user, group, or role; not reusable.
Policy Comparison Table
| Policy Type | Maintenance | Reuse | Best For |
| AWS Managed Policy | AWS-maintained | High | Common permissions across multiple accounts |
| Customer Managed Policy | Customer-maintained | Medium | Tailored permissions shared across teams or projects |
| Inline Policy | Entity-specific | None | One-off exceptions and tightly scoped use cases |
Choosing the Right Policy
AWS managed policies simplify administration, but they may not cover every custom scenario. Use customer managed policies for greater control, and reserve inline policies for exceptional cases.
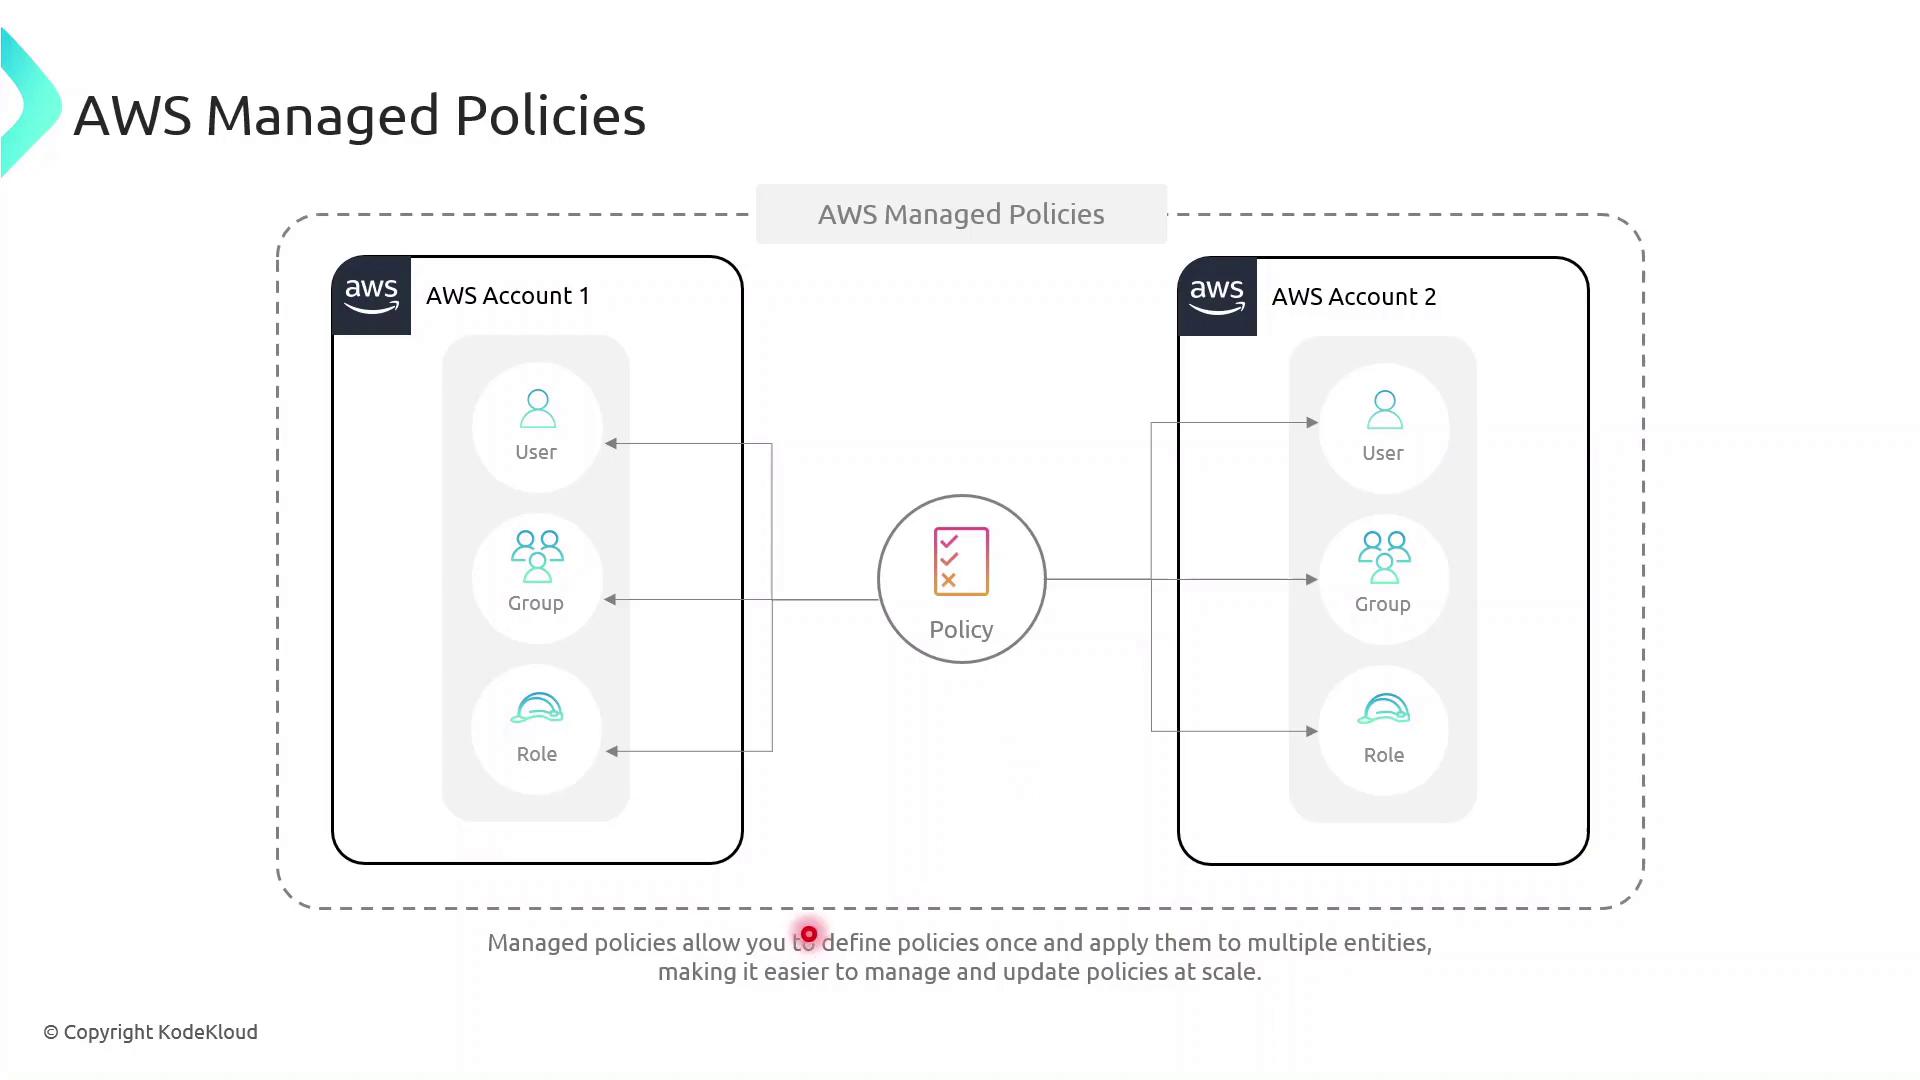
Inline vs Managed: Key Differences
Inline Policies attach directly to a single IAM entity (user, group, or role).
AWS Managed Policies exist as separate objects and can be attached to multiple entities, even across AWS accounts, reducing duplication.
Demo: Granting Temporary S3 Access
In this example, we give the DevOps engineer, Alice, limited S3 access until year-end using a customer managed policy with a date-based condition.
Create the JSON policy document temporary_s3_access_policy.json:
{
  "Version": "2012-10-17",
  "Statement": [
    {
      "Sid": "TemporaryS3Access",
      "Effect": "Allow",
      "Action": [
        "s3:GetObject",
        "s3:ListBucket"
      ],
      "Resource": [
        "arn:aws:s3:::example-bucket",
        "arn:aws:s3:::example-bucket/*"
      ],
      "Condition": {
        "DateLessThanEquals": {
          "aws:CurrentTime": "2023-12-31T23:59:59Z"
        }
      }
    }
  ]
}
Then use the AWS CLI to create and attach the policy:
aws iam create-policy \
  --policy-name TemporaryS3AccessPolicy \
  --policy-document file://temporary_s3_access_policy.json


aws iam attach-user-policy \
  --user-name Alice \
  --policy-arn arn:aws:iam::123456789012:policy/TemporaryS3AccessPolicy
Update the AWS Account ID
Replace 123456789012 with your actual AWS account ID before running these commands.
Next Steps
Explore multi-factor authentication (MFA) to add an extra layer of security.
Learn about identity federation and STS for single sign-on.
Configure AWS Resource Access Manager to share resources across accounts.
Set up VPC endpoints to control network traffic to AWS services.
Demo Inline Policy
In this walkthrough, we’ll attach an inline IAM policy to our DevOps engineer, Alice, allowing her to upload objects to the my-deployment-bucket S3 bucket only until December 31, 2023. Inline policies are embedded directly on a single IAM identity—ideal for granting one-off or time-limited permissions.
Note
Inline policies are specific to the IAM user, group, or role they’re attached to and cannot be reused by other identities. For reusable permissions, consider using managed policies.
Policy Structure
Below is an overview of the key elements in our inline policy:
| Field | Description | Example |
| Version | Specifies the policy language version. | 2012-10-17 |
| Statement | Container for one or more individual permission statements. | See breakdown below |
| Effect | Whether the statement allows or denies access. | Allow |
| Action | The specific API call(s) permitted. | s3:PutObject |
| Resource | The ARN of the S3 bucket (and objects) to which it applies. | arn:aws:s3:::my-deployment-bucket/* |
| Condition | Optional restrictions (e.g., time, IP) on when the action applies. | DateLessThan with aws:CurrentTime |
Statement Breakdown
Effect:
AllowAction:
s3:PutObjectResource: All objects in my-deployment-bucket
Condition: Only if the request timestamp is before 2023-12-31T23:59:59Z
Steps to Create the Inline Policy
Open the IAM console and select the user Alice.
Go to the Permissions tab, then click Add permissions → Create inline policy.
Switch to the JSON editor and paste the following policy:
 {
   "Version": "2012-10-17",
   "Statement": [
     {
       "Effect": "Allow",
       "Action": "s3:PutObject",
       "Resource": "arn:aws:s3:::my-deployment-bucket/*",
       "Condition": {
         "DateLessThan": {
           "aws:CurrentTime": "2023-12-31T23:59:59Z"
         }
       }
     }
   ]
 }
Provide a name for the policy (e.g., Alice-S3-Access-Inline-Policy) and click Create policy.
Back under Alice’s Permissions tab, verify the new inline policy appears in the list.
Warning
After December 31, 2023 at 23:59:59 UTC, Alice’s upload requests will be denied. Monitor or update the policy before it expires if continued access is needed.
Verification
Use the AWS CLI or console to attempt an S3 upload as Alice:
aws s3 cp ./local-file.txt s3://my-deployment-bucket/ --profile aliceBefore the expiration date, the upload should succeed. Afterward, you’ll receive an
AccessDeniederror.
IAM Policy Building Blocks
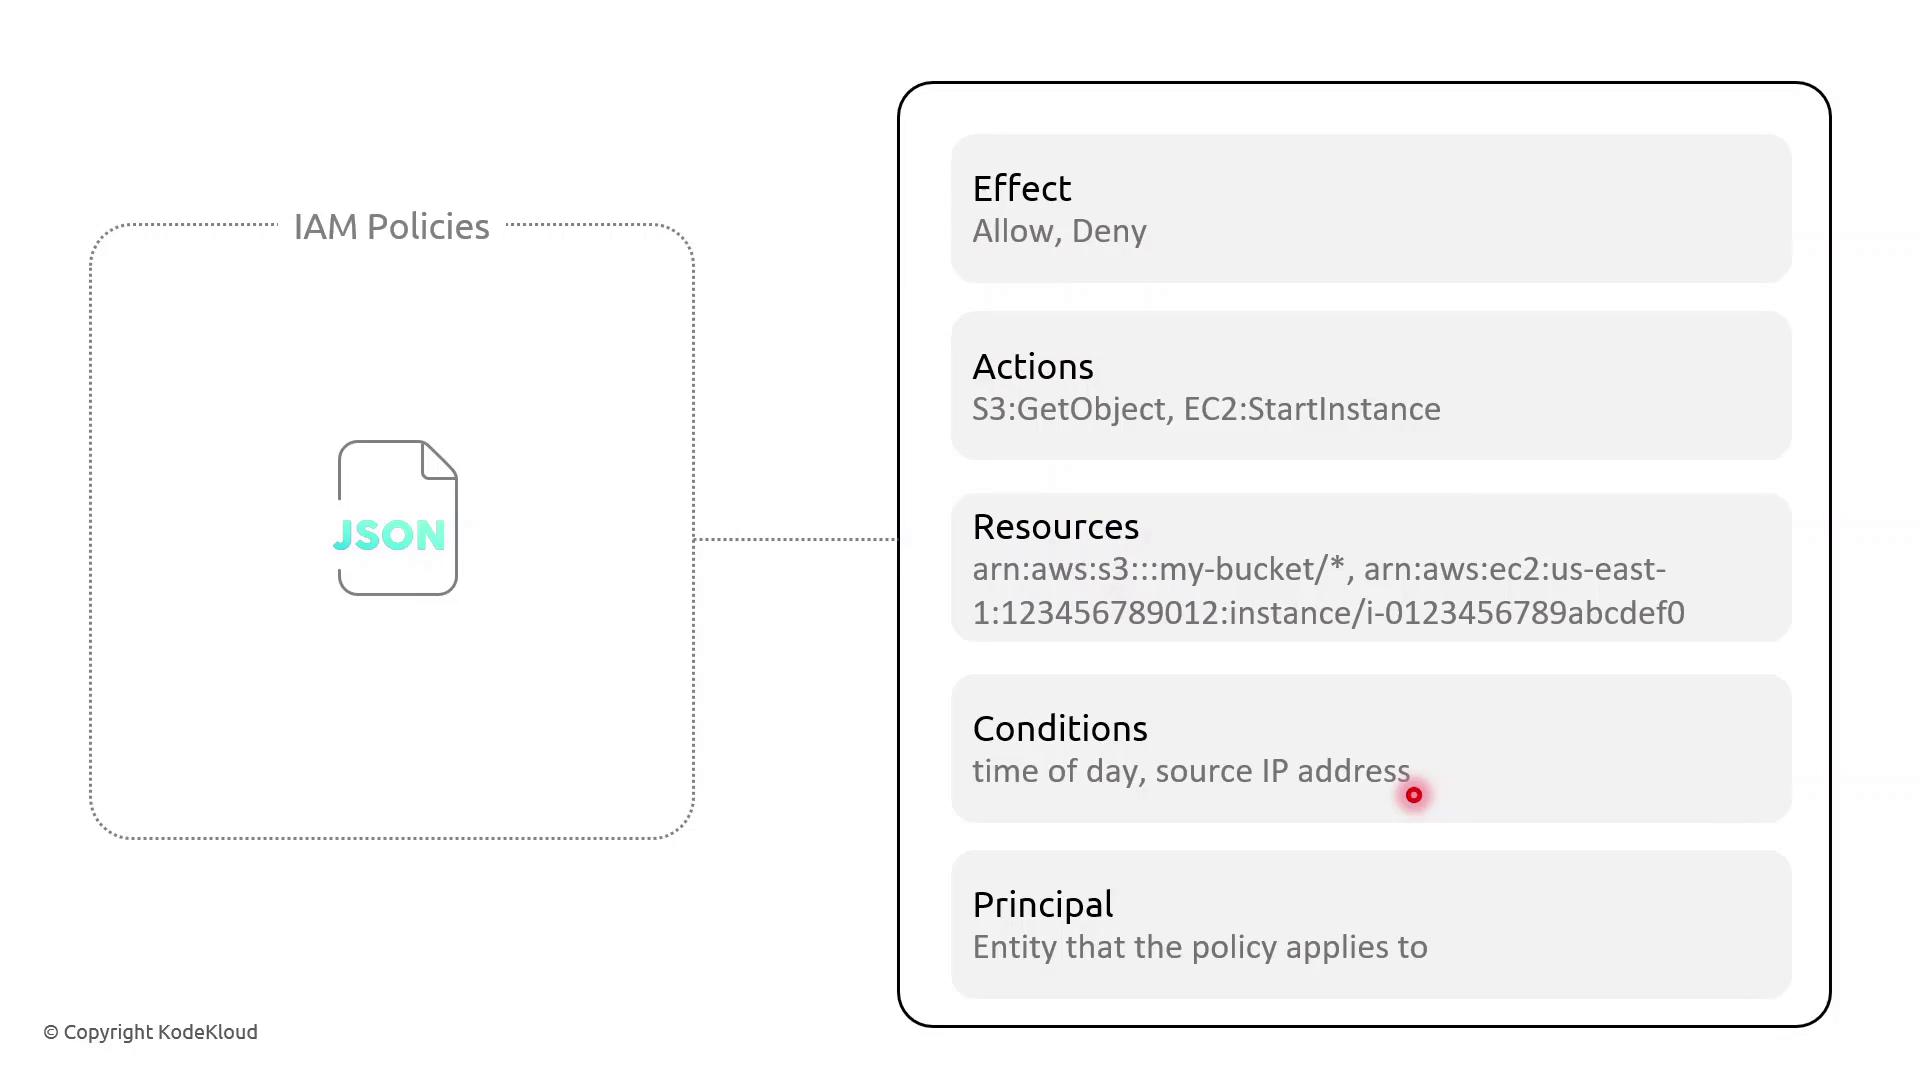
In AWS Identity and Access Management (IAM), policies are JSON documents that grant or deny permissions. Understanding the core components—Effect, Action, Resource, Condition, and Principal—allows you to craft fine-grained access controls.
Key Policy Elements
| Element | Description | Example |
| Effect | Whether to Allow or Deny the specified action | "Effect": "Allow" |
| Action | One or more AWS API operations | "s3:GetObject", "ec2:StartInstances" |
| Resource | Amazon Resource Names (ARNs) targeted by policy | "arn:aws:s3:::my-bucket/*" |
| Condition | Optional restrictions (time, IP address, MFA) | "DateLessThan": {"aws:CurrentTime":"09:00:00Z"} |
| Principal | Who the policy applies to (users, services) | "Principal":{"Service":"lambda.amazonaws.com"} |
Example: Resource-Based Policy with Time and IP Conditions
This resource-based policy denies all actions on all resources unless the request originates from specified IP ranges and occurs between 09:00–17:00 UTC:
{
  "Version": "2012-10-17",
  "Statement": [
    {
      "Effect": "Deny",
      "Action": "*",
      "Resource": "*",
      "Condition": {
        "NotIpAddress": {
          "aws:SourceIp": [
            "203.0.113.0/24",
            "198.51.100.0/24"
          ]
        },
        "DateLessThan": {
          "aws:CurrentTime": "2023-01-01T09:00:00Z"
        },
        "DateGreaterThan": {
          "aws:CurrentTime": "2023-01-01T17:00:00Z"
        }
      }
    }
  ]
}
Note
AWS IAM requires full ISO 8601 date/time strings (for example, 2023-01-01T09:00:00Z). To enforce recurring daily time constraints, consider pairing policies with AWS Lambda functions or scheduled Amazon CloudWatch Events.
Policy Breakdown
Effect: Deny all actions when conditions aren’t met.
NotIpAddress: Blocks requests outside the trusted IP CIDRs.
DateLessThan and DateGreaterThan: Restrict access before 09:00 UTC or after 17:00 UTC.
Demo Scenario: Enforcing Access Hours
Sarah supervises a team of junior solution architects and needs to limit their administrative tasks to business hours from managed networks. Follow these steps in the AWS IAM console:
Open Policies and choose Create policy.
Paste the JSON above, adjust the IP ranges, and set your UTC window.
Review, name the policy (e.g.,
RestrictedBusinessHours), and save.Attach this policy to the IAM group or role for Sarah’s team.
Now, any API call outside 09:00–17:00 UTC or from unapproved IP ranges will be denied automatically.
Demo Policy with Conditions
Demo Policy with IP and Time-Based Conditions
In this tutorial, you’ll learn how to create an AWS IAM policy that restricts administrative actions to:
Two specific source IP address ranges
A strict time window between 09:00 – 17:00 UTC
This approach is ideal for junior administrators or use cases requiring both network- and time-based controls.
Prerequisites
An AWS account with IAM permissions to create policies
Familiarity with JSON policy syntax
Step 1: Open the IAM Console
Sign in to the AWS Management Console.
Navigate to IAM → Policies → Create policy.
Select the JSON tab.
Step 2: Define the Policy JSON
Paste the following JSON into the editor. This policy uses a single Deny statement with three conditions:
{
  "Version": "2012-10-17",
  "Statement": [
    {
      "Effect": "Deny",
      "Action": "*",
      "Resource": "*",
      "Condition": {
        "NotIpAddress": {
          "aws:SourceIp": [
            "200.200.200.0/24",
            "200.200.201.0/24"
          ]
        },
        "DateLessThan": {
          "aws:CurrentTime": "2023-10-08T09:00:00Z"
        },
        "DateGreaterThan": {
          "aws:CurrentTime": "2023-10-08T17:00:00Z"
        }
      }
    }
  ]
}
Note
Modify the aws:CurrentTime ISO 8601 values to reflect your desired UTC time window.
Common IAM Condition Keys
| Condition Key | Purpose | Example Value |
| NotIpAddress | Deny if source IP is outside allowed CIDRs | ["200.200.200.0/24", "200.200.201.0/24"] |
| DateLessThan | Deny if current time is before this UTC timestamp | "2023-10-08T09:00:00Z" |
| DateGreaterThan | Deny if current time is after this UTC timestamp | "2023-10-08T17:00:00Z" |
Step 3: Review and Create
Click Next.
Provide a Name (e.g.,
JuniorAdminsPolicy) and an optional Description.Review the settings, then choose Create policy.
Search for your newly created policy by name in the IAM console to confirm that your IP and time-based restrictions are in place.
MFA and Password Policies
Enhancing your AWS account’s security posture involves two critical measures:
Enabling Multi-Factor Authentication (MFA) for IAM users
Defining and enforcing a robust password policy
This guide explains why MFA and strong password rules matter, outlines the key policy settings, and provides step-by-step instructions to configure both in the AWS Management Console.
Why Enforce Multi-Factor Authentication?
Multi-Factor Authentication adds an additional proof of identity beyond a username and password. After entering their credentials, users must supply a one-time code from a hardware token or a virtual MFA app like Google Authenticator. This secondary factor dramatically reduces the risk of unauthorized access, even if passwords are compromised.
Note
Virtual MFA apps (e.g., Authy, Google Authenticator) are free and easy to deploy across multiple devices.
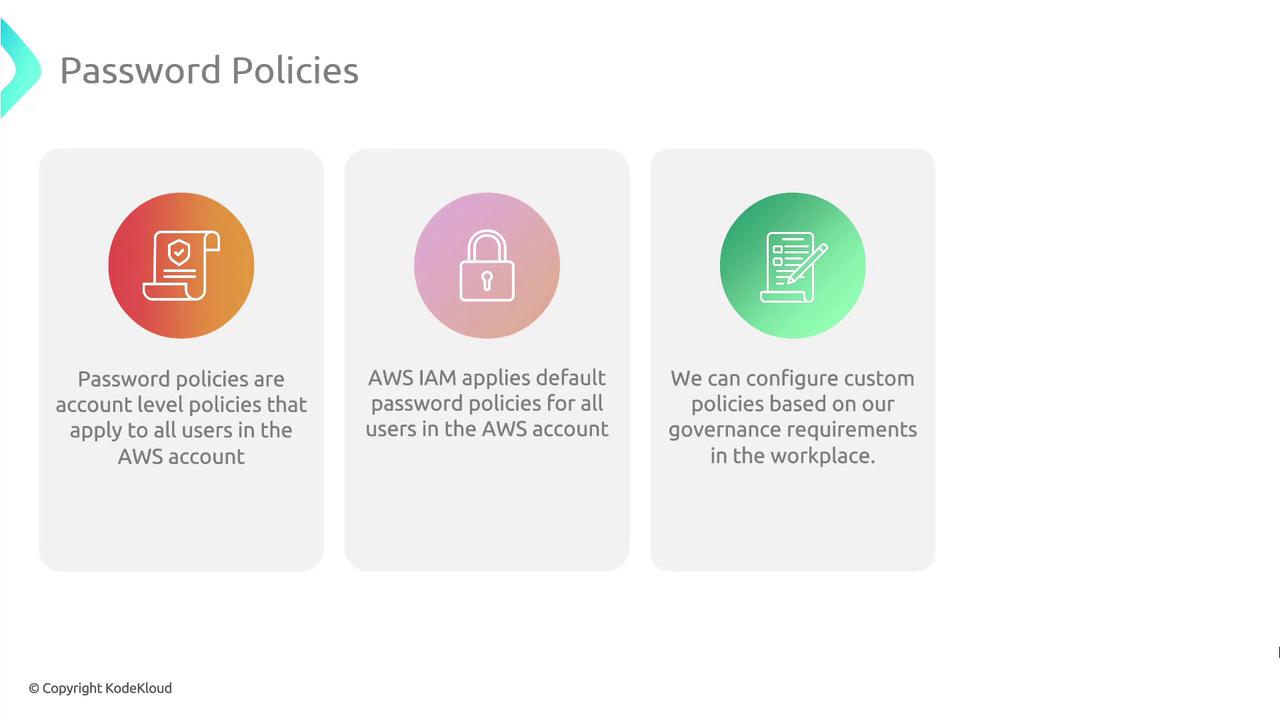
Understanding IAM Password Policies
By default, AWS IAM does not enforce any password policy. Creating a custom policy allows you to align password complexity, expiration, and reuse rules with your organization’s governance standards.
Key Password Policy Settings
| Policy Setting | Description | Example |
| Minimum password length | Enforces a lower bound on characters | 12 |
| Maximum password length | (Optional) Caps password size to reduce system load | 128 |
| Require uppercase characters | Ensures at least one A–Z | Enabled |
| Require lowercase characters | Ensures at least one a–z | Enabled |
| Require numbers | Ensures at least one digit 0–9 | Enabled |
| Require non-alphanumeric characters | Ensures at least one symbol (e.g., !@#$%^&*) | Enabled |
| Password expiration | Forces periodic password updates (in days) | 90 |
| Prevent password reuse | Blocks reuse of the last N passwords | Last 5 |
Warning
Enabling password expiration without a notification process can lead to unexpected lockouts. Communicate expiration policies clearly to your team.
Step-by-Step: Enable MFA and Configure a Password Policy
Follow these steps in the AWS Management Console:
1. Sign In to the AWS Management Console
- Navigate to https://console.aws.amazon.com/ and open the IAM service.
2. Enable MFA for an IAM User
In the left sidebar, choose Users.
Select the target user name.
Open the Security credentials tab.
Under Assigned MFA device, click Manage.
Follow the prompts to activate a hardware or virtual MFA device.
3. Define Your Account Password Policy
From the IAM dashboard, click Account settings.
Under Password policy, select Manage.
Configure the policy using your organization’s minimums for length, complexity, expiration, and reuse.
Click Save changes to apply.
Demo MFA and Password Policies
In this tutorial, you’ll learn how to secure your AWS environment by enabling Multi-Factor Authentication (MFA) for IAM users and enforcing custom password policies in the AWS Identity and Access Management (IAM) console.
Configuring MFA for an IAM User
Sign in to the AWS Management Console and open the IAM dashboard.
Select Users in the navigation pane to view all IAM accounts.
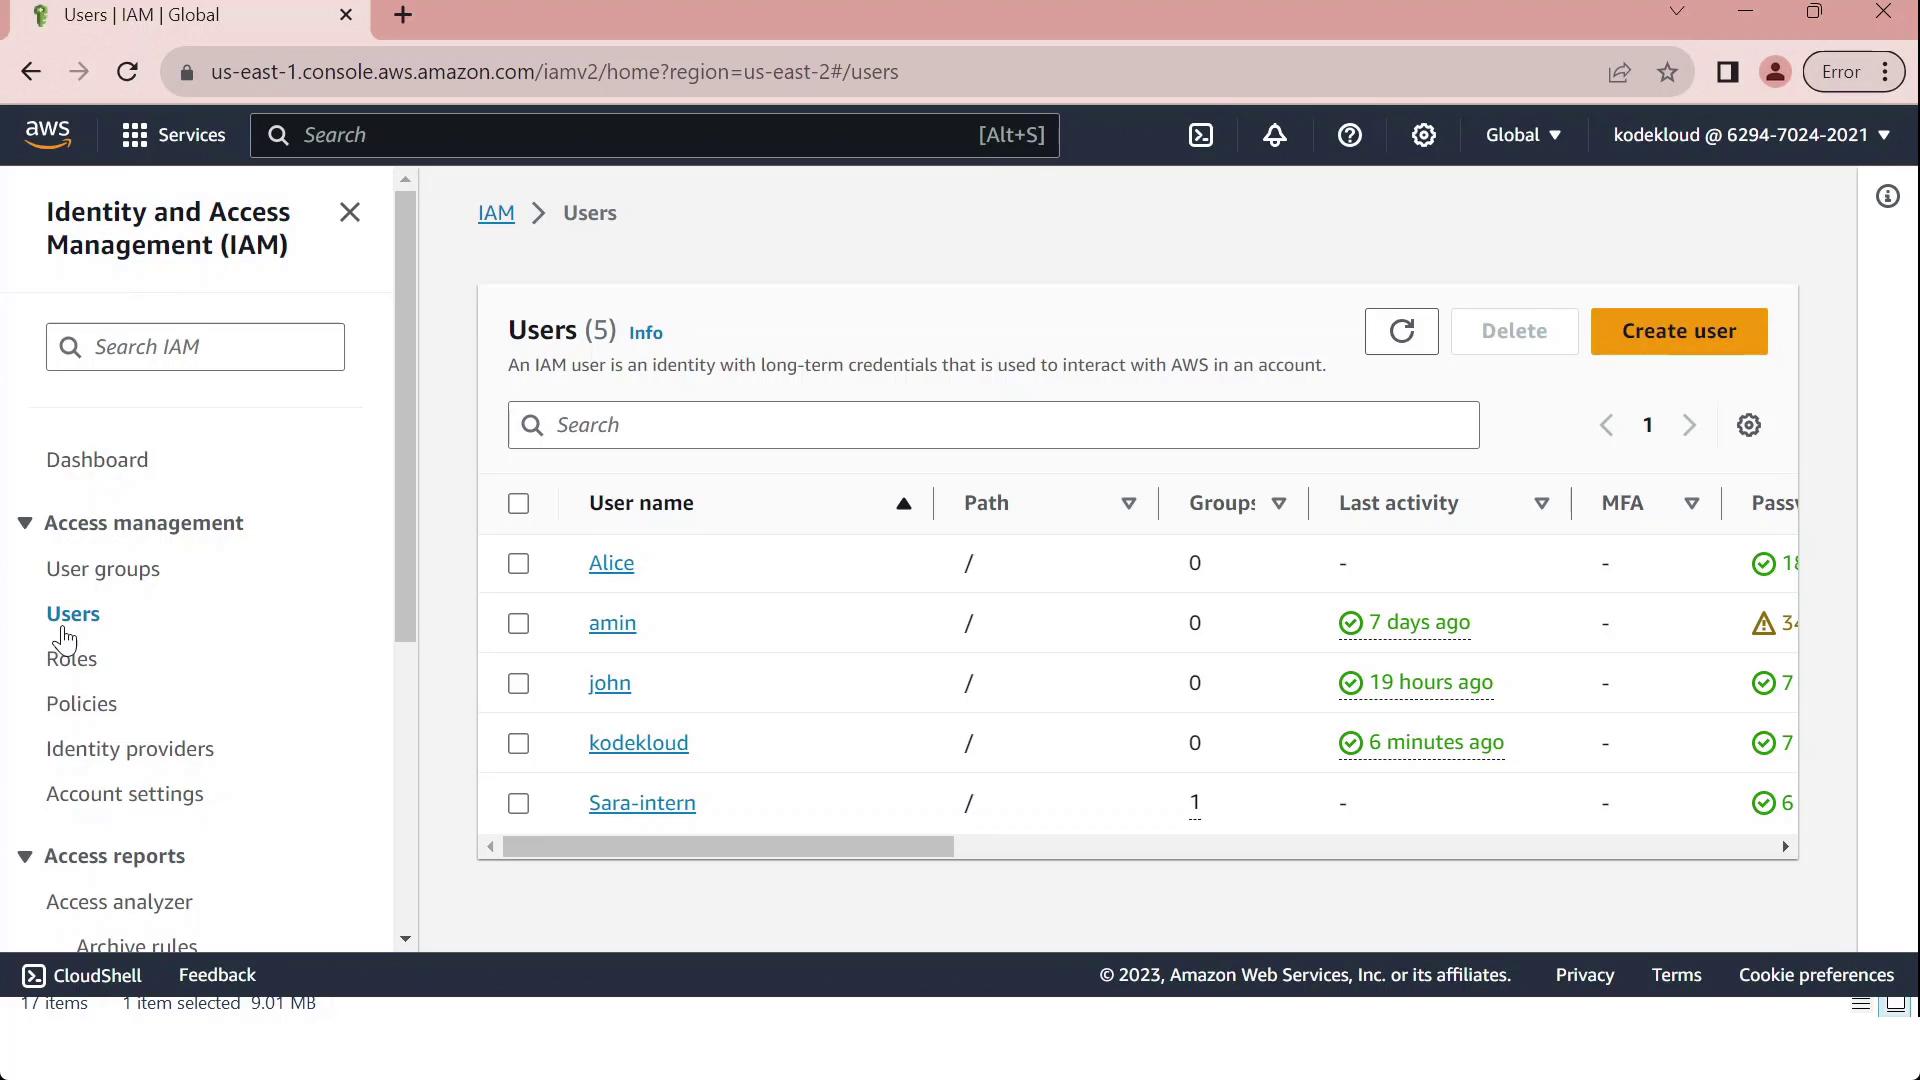
Click on the user John, then open the Security credentials tab.
Under Multi-Factor Authentication (MFA), click Assign MFA device.
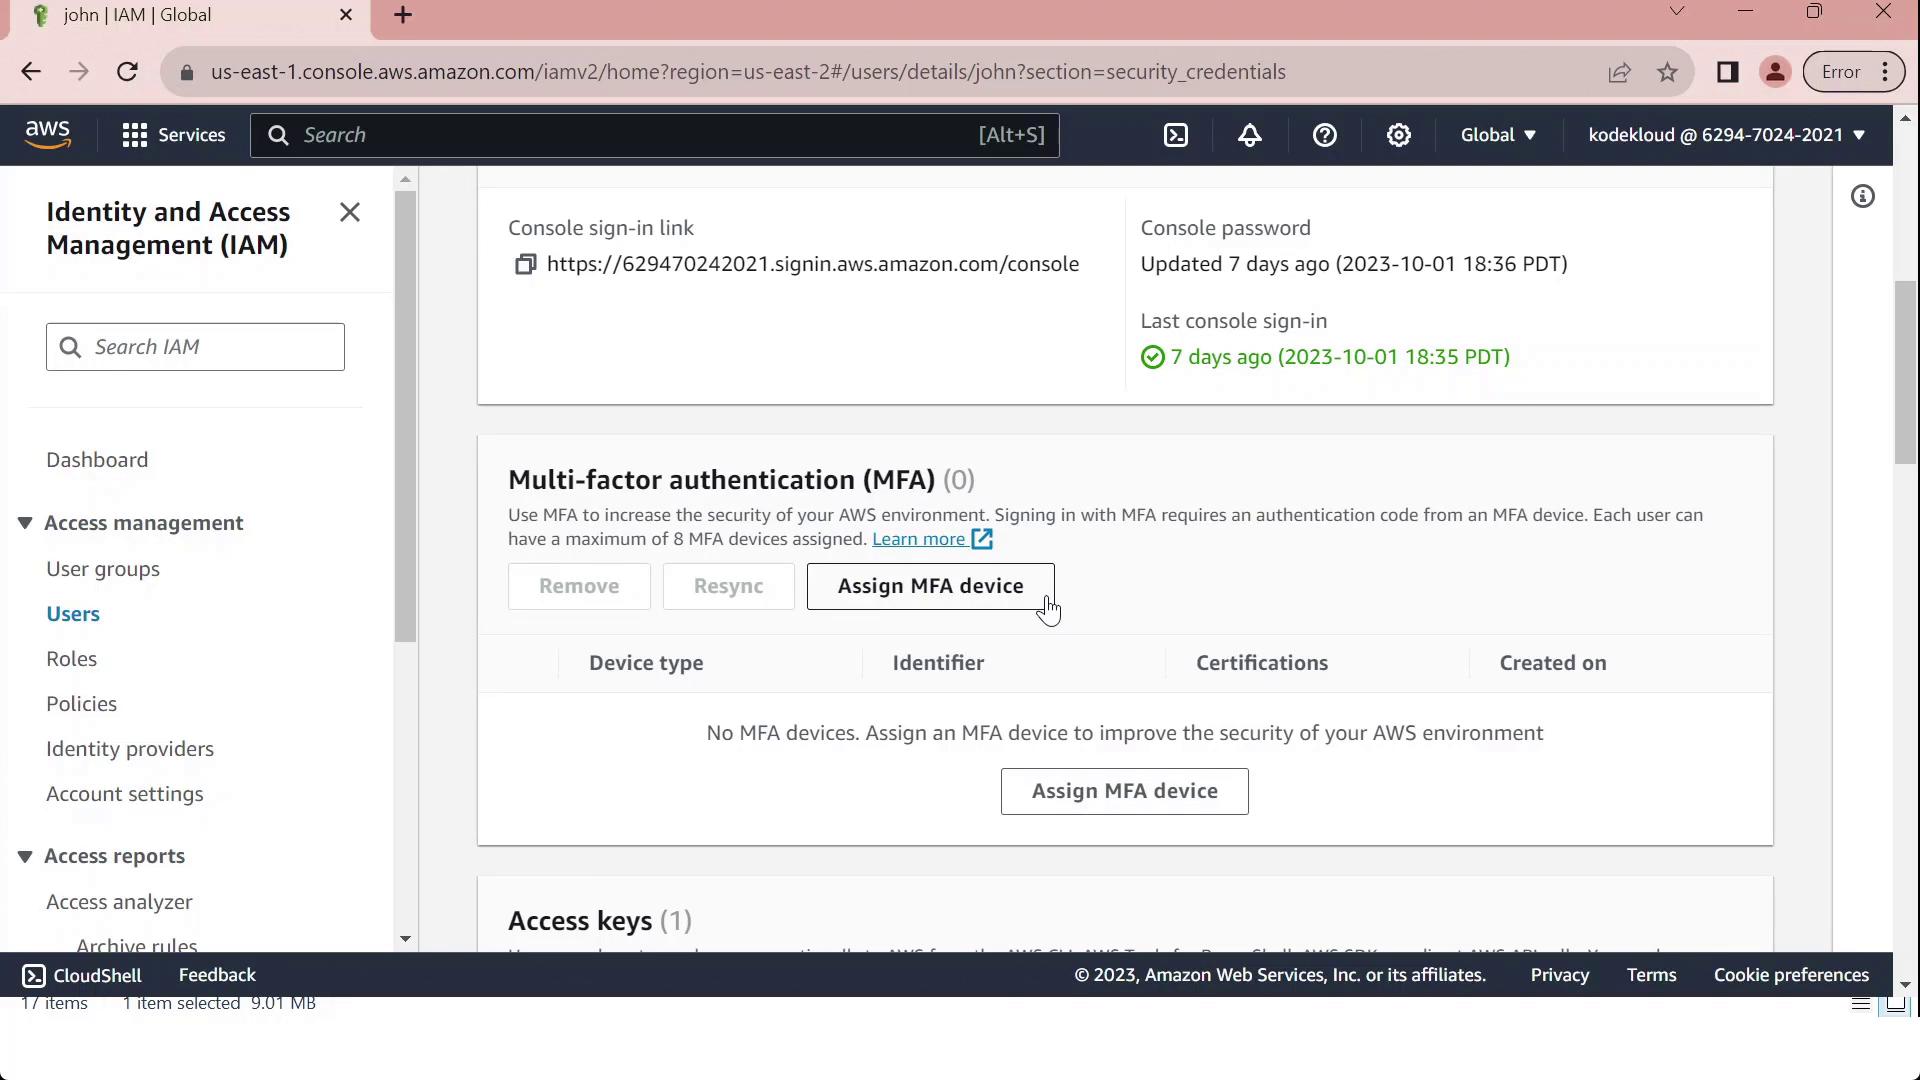
- Provide a Device label (for example, “MFA”) and choose your device type from the table below:
| Device Type | Description |
| Virtual MFA device | Software authenticator (Google Authenticator, Authy, Duo Mobile) |
| Security key | FIDO2/WebAuthn hardware key |
| Hardware TOTP token | Physical token generating time-based codes |

Note
Make sure your chosen authenticator app supports Time-based One-Time Passwords (TOTP).
To set up a Virtual MFA device:
Install and open a compatible authenticator app.
Scan the QR code displayed in the console.
Enter the two consecutive codes from your app (MFA Code 1 and MFA Code 2).
Click Assign MFA to finalize.
Warning
If you lose access to your MFA device and haven’t saved the seed key, you may need to contact your AWS account administrator or use your root credentials to regain access.
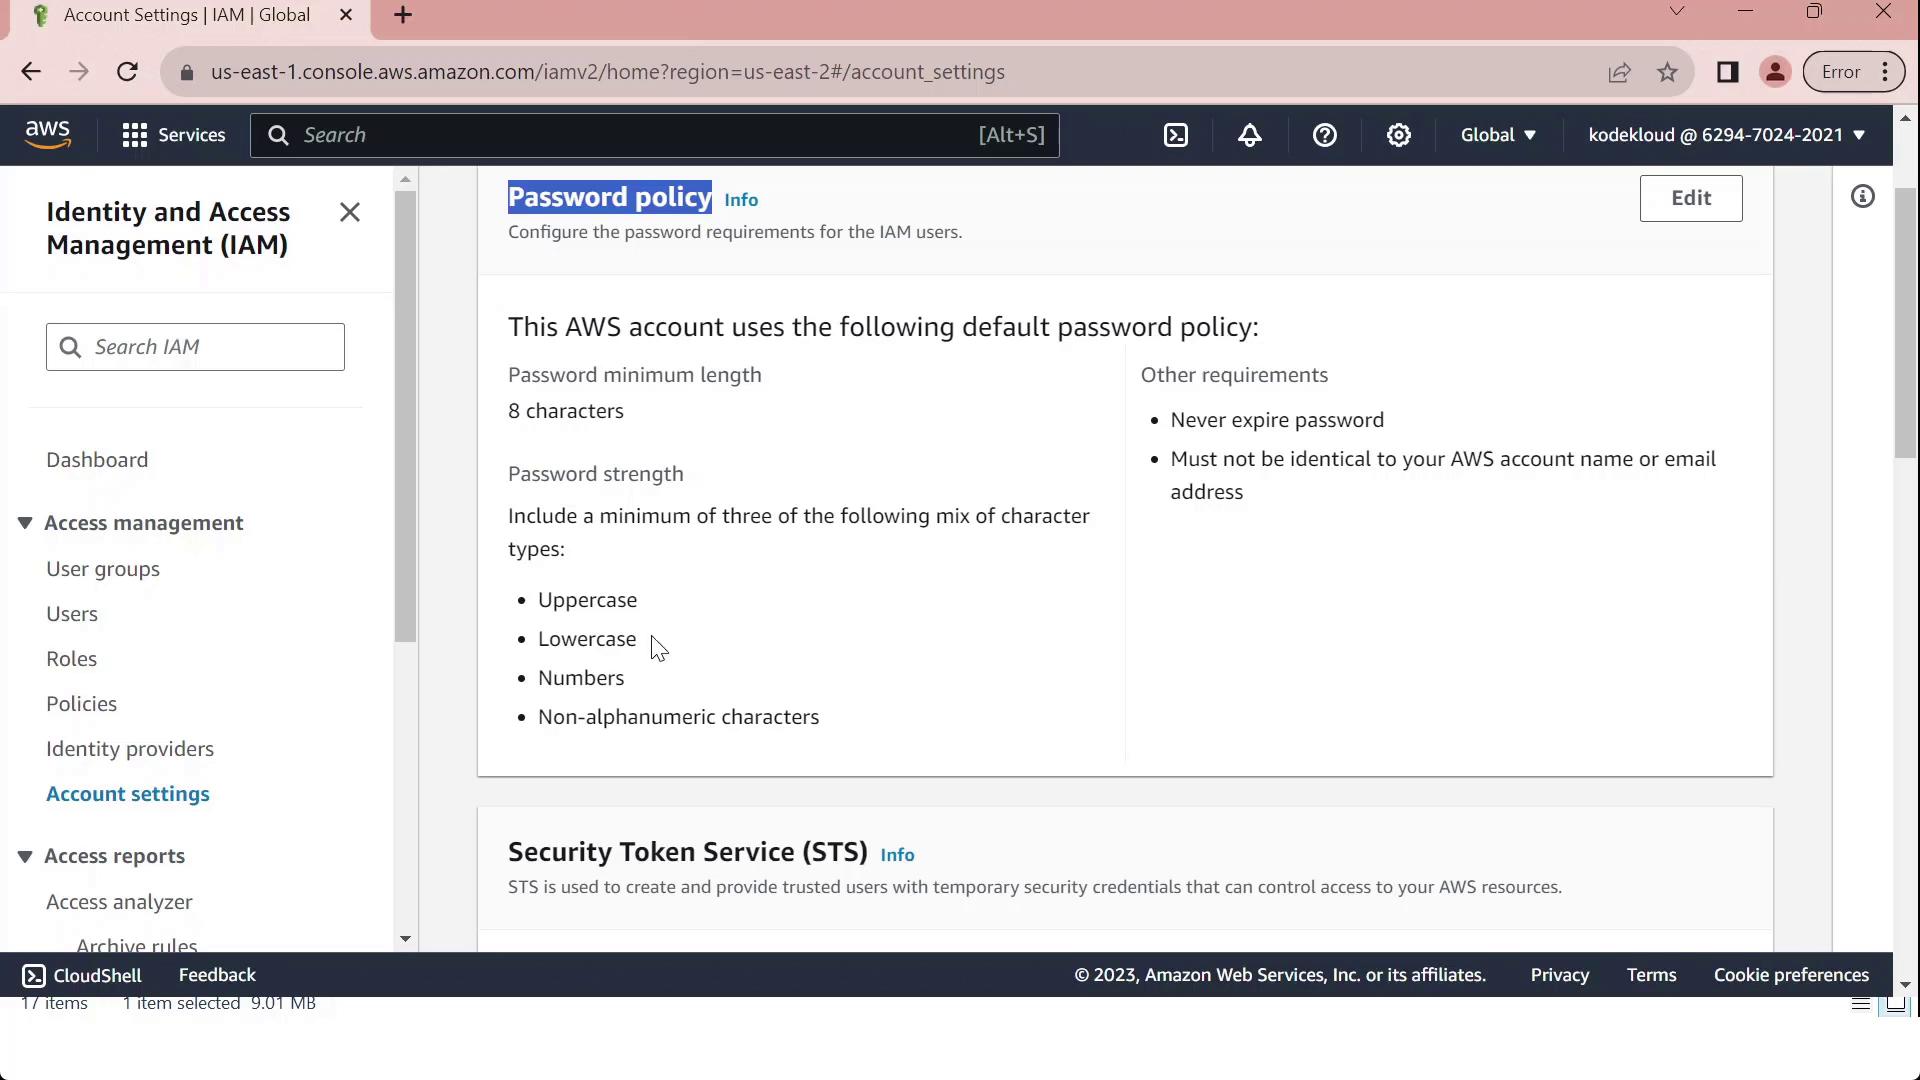
Customizing Password Policies
In the IAM console, select Account settings to view the Password policy section.
Review the default requirements, which ensure basic password strength:
| Requirement | Default Setting |
| Minimum length | 8 characters |
| Character categories | At least 3 of: uppercase, lowercase, numbers, special characters |
| Exclusions | Cannot match username or email address |
| Password expiration | Disabled |
| Password reuse prevention | None |
Click Edit, select Custom, and modify settings such as:
Minimum password length
Maximum password age
Required character types
Prevent password reuse
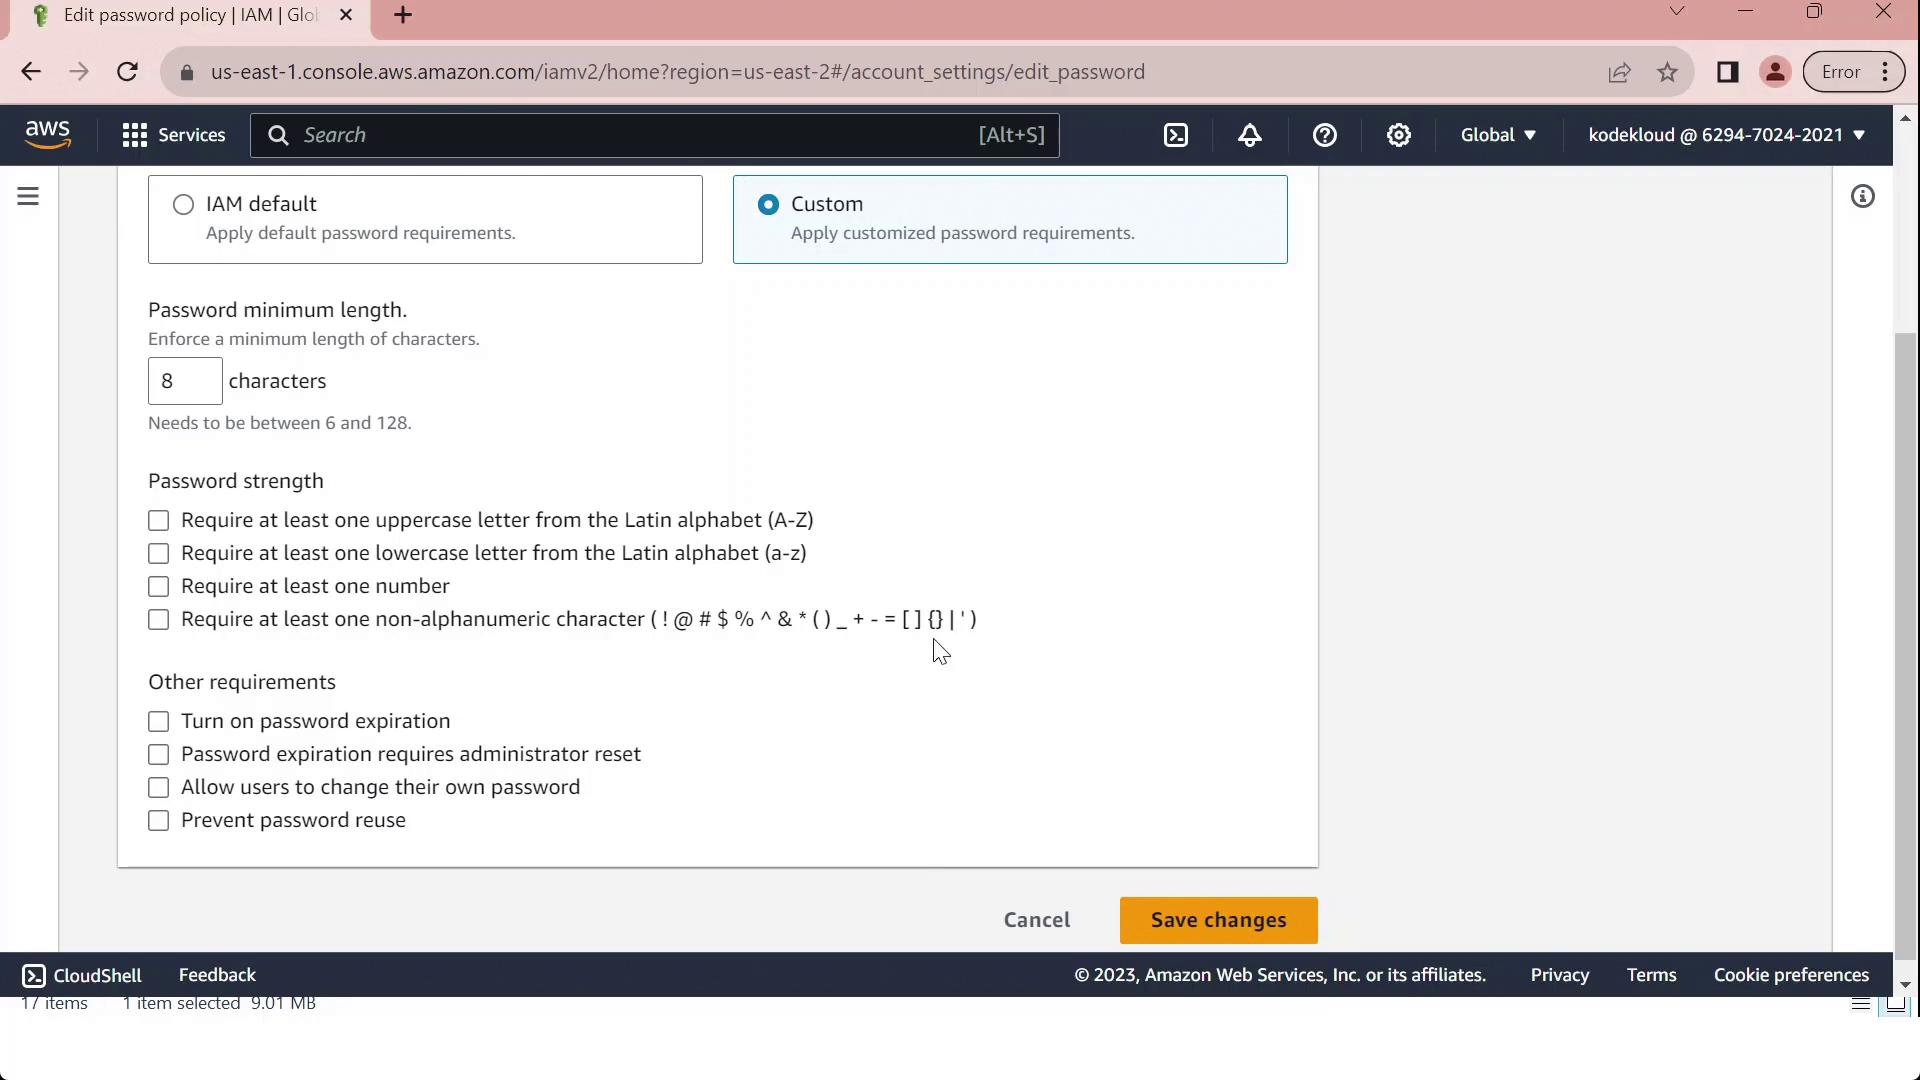
- Once you've tailored the policy to your organizational standards, click Save changes. All IAM users will now be subject to the updated policy.
Security Token ServiceSTS
AWS Security Token Service (STS) is a managed web service that issues temporary, limited-privilege credentials for IAM users, IAM roles, or federated identities. By leveraging STS, you can enforce the principle of least privilege, avoid long-term credentials, and securely grant short-term access to AWS resources.
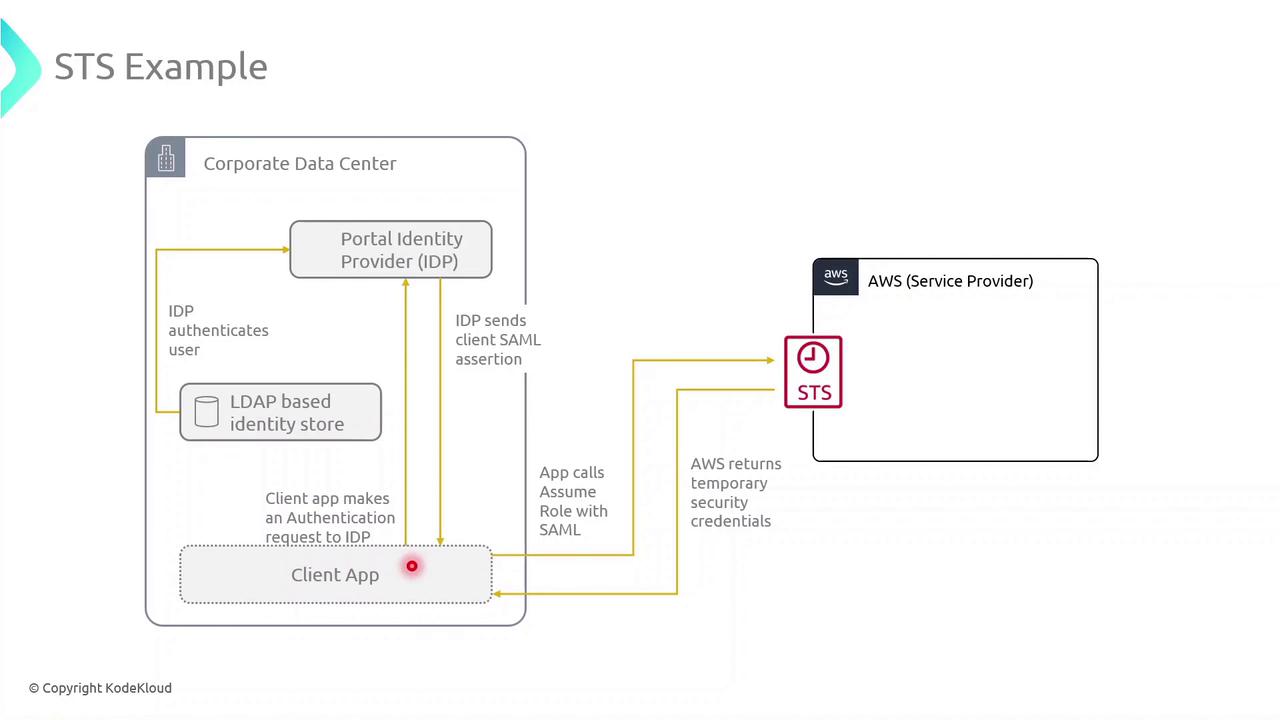
Use Case: External Application Access to Amazon S3
Consider an application running on-premises in your corporate data center. To retrieve objects from an S3 bucket without embedding long-term AWS keys, you can integrate STS with your identity provider (IdP) and SAML federation.
Step 1: Authenticate with Your Identity Provider
The client application prompts the user for corporate credentials.
These credentials are sent to an external LDAP-based IdP for verification.
Upon successful login, the IdP issues a SAML assertion to the client.
Why SAML Federation?
SAML federation lets you use existing corporate credentials for AWS access, reducing password sprawl and improving security posture.
Step 2: Call AssumeRoleWithSAML to Obtain Temporary Credentials
With the SAML assertion in hand, the application calls the STS endpoint:
aws sts assume-role-with-saml \
  --role-arn arn:aws:iam::123456789012:role/S3AccessRole \
  --principal-arn arn:aws:iam::123456789012:saml-provider/CorpIdP \
  --saml-assertion file://assertion-response.xml
STS validates the SAML assertion, then returns these temporary credentials:
| Credential | Description |
| Access Key ID | Unique identifier for the session |
| Secret Access Key | Secret used to sign AWS API requests |
| Session Token | Token that authorizes API calls for the session |
These credentials inherit the permissions defined in the assumed role’s policy and expire automatically (up to 12 hours).
Step 3: Use the Temporary Credentials to Access S3
Export the returned credentials into your environment:
export AWS_ACCESS_KEY_ID=ASIAXXXXXXXXXXXXXXXX
export AWS_SECRET_ACCESS_KEY=XXXXXXXXXXXXXXXXXXXXXXXXXXXX
export AWS_SESSION_TOKEN=XXXXXXXXXXXXXXXXXXXXXXXXXXXXXXXXXXXXXXXXXXXXXXXXXXXXXXXXXXXXXXXX
Now you can run S3 operations with least-privilege access:
aws s3 ls s3://your-bucket-name/path/
Temporary Credentials Expire
Temporary credentials automatically expire after the duration specified in the role trust policy (maximum 12 hours). Always handle session renewal and error retries in your application.
AWS Resource Access Manager
In this guide, you’ll learn how AWS Resource Access Manager (AWS RAM) enables secure, scalable sharing of AWS resources across accounts and within AWS Organizations. By centralizing resource-sharing configurations, AWS RAM reduces operational overhead and enforces consistent access controls in multi-account environments.
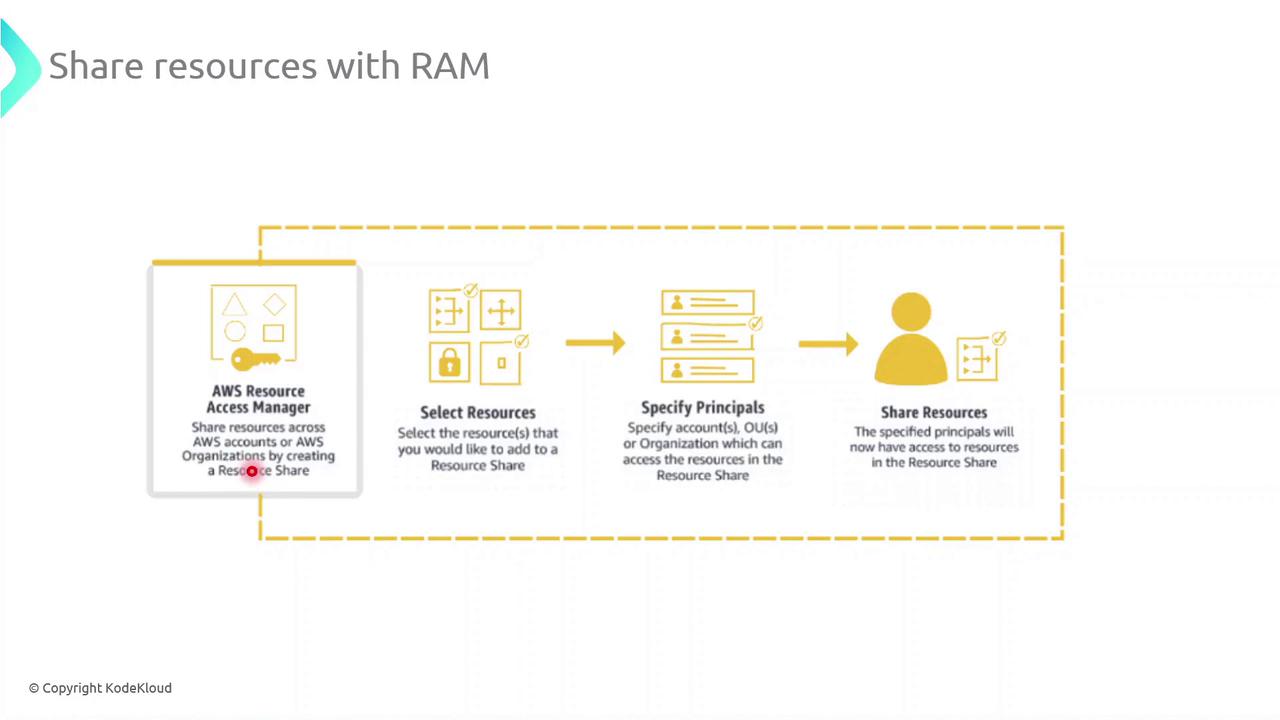
Key Steps for Sharing Resources with AWS RAM
Select Resources
Choose the resource types you want to share—such as subnets, transit gateways, or AWS License Manager configurations—and add them to a new resource share.Specify Principals
Grant access to AWS accounts, organizational units (OUs), or your entire AWS Organization. You can mix and match account IDs, OU IDs, or organization IDs as principals.Create the Resource Share
Review your configuration and create the share. AWS RAM will provision permissions automatically so that authorized principals see and use the resources in their own accounts.
Note
Once a resource share is active, shared resources appear in the AWS Console of each authorized account under “Shared with me.” IAM policies and service-linked roles must be configured appropriately to allow full access.
Common AWS RAM Resource Types
| Resource Type | Description | Example Use Case |
| Amazon VPC Subnet | Share VPC subnets across multiple accounts | Deploy EC2 instances in a shared network |
| AWS Transit Gateway | Central hub for inter-VPC connectivity | Connect VPCs across different accounts |
| AWS License Manager | Distribute and manage software licenses | Centralize license pools organization-wide |
| Route 53 Resolver Rule | Share DNS resolution policies | Enforce DNS rules across environments |
Best Practices
Implement least-privilege IAM roles and policies for shared resources.
Audit resource share activity using AWS CloudTrail.
Tag shared resources for cost allocation and tracking.
Identity Federation
Identity federation enables users authenticated by an external Identity Provider (IdP) to access AWS resources without managing separate AWS credentials. By establishing a trust relationship between your IdP and AWS Security Token Service (STS), you can issue temporary, scoped credentials that improve security and simplify user management.
How Identity Federation Works
When you federate identities with AWS:
A user signs in to your organizational IdP (e.g., Active Directory Federation Services, Okta).
The IdP returns an authentication response (SAML assertion, OIDC token).
Your application or client calls AWS STS to exchange the response for temporary credentials.
AWS STS issues short-lived security credentials (access key ID, secret access key, session token).
The user or application uses these credentials to call AWS APIs.
Note
Temporary credentials are valid for a limited duration (from 15 minutes up to 12 hours). Always request only the permissions required to follow the principle of least privilege.
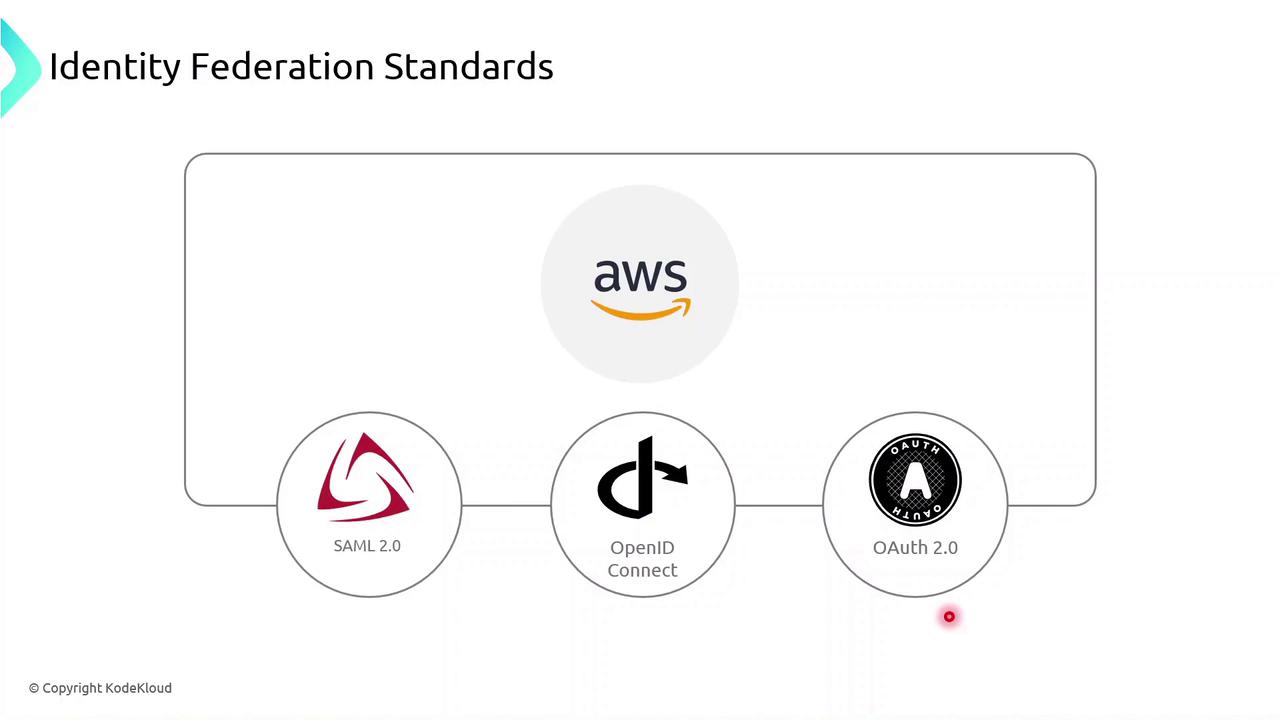
AWS Federation Standards
AWS supports multiple federation protocols, enabling integration with on-premises directories, web identity providers, and custom IdPs.
| Protocol | Use Case | AWS Integration |
| SAML 2.0 | Enterprise federation (LDAP, Active Directory) | AssumeRoleWithSAML API |
| OpenID Connect | Modern web/mobile apps | AssumeRoleWithWebIdentity API |
| OAuth 2.0 | Granular authorization for APIs | Supported via OIDC/OAuth flows |
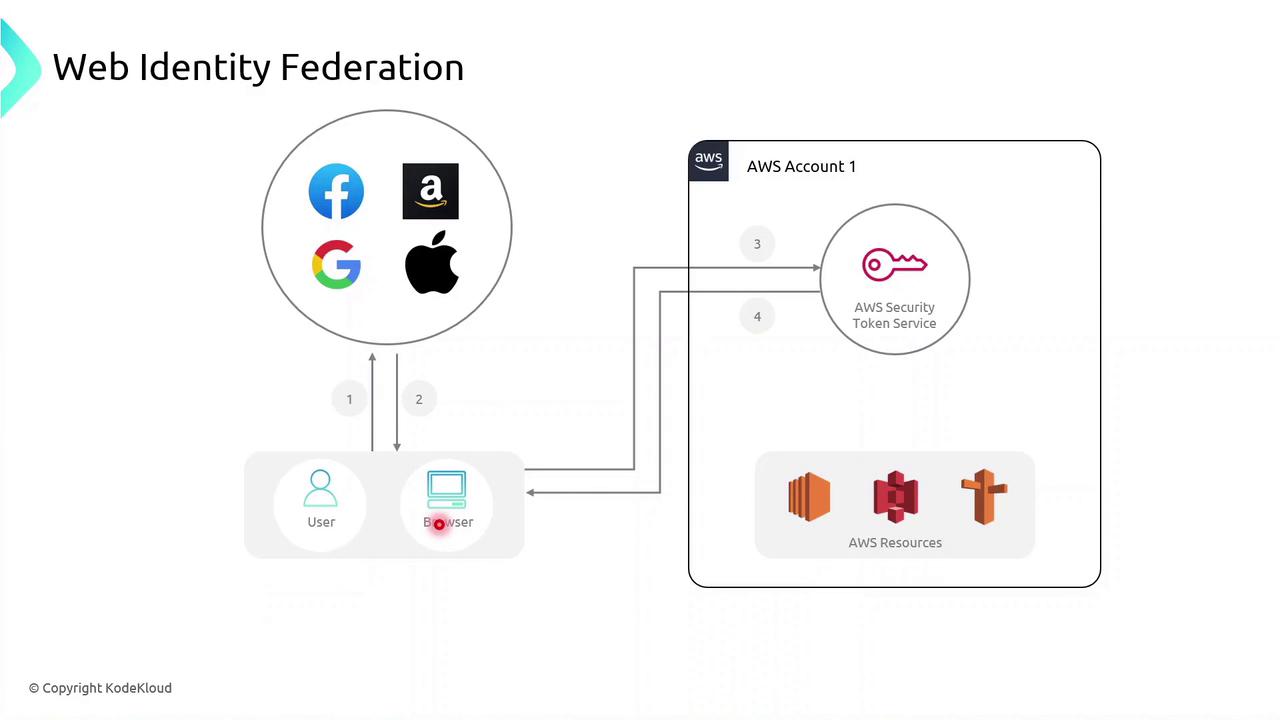
Web Identity Federation
Web and mobile applications can let users sign in with social or external IdPs (e.g., Facebook, Google, Amazon, Apple). The flow typically follows these steps:
User selects a provider (e.g., Google) on your app’s login page.
User authenticates and the provider returns an identity token (OIDC ID token).
App calls
AssumeRoleWithWebIdentityon AWS STS, passing the token.STS returns temporary AWS credentials.
App uses these credentials to access AWS services on behalf of the user.
aws sts assume-role-with-web-identity \
  --role-arn arn:aws:iam::123456789012:role/WebIdentityRole \
  --role-session-name WebSession \
  --web-identity-token file://token.jwt
Warning
Do not embed long-lived AWS keys in your mobile or browser-based applications. Always use temporary credentials obtained through web identity federation.
Benefits of AWS Identity Federation
Simplified User Management
Leverage existing corporate or social identities—no separate AWS passwords.Centralized Access Control
Define policies in IAM roles and manage permissions in one place.Enhanced Security
Temporary, automatically rotated credentials reduce the risk of compromised keys.
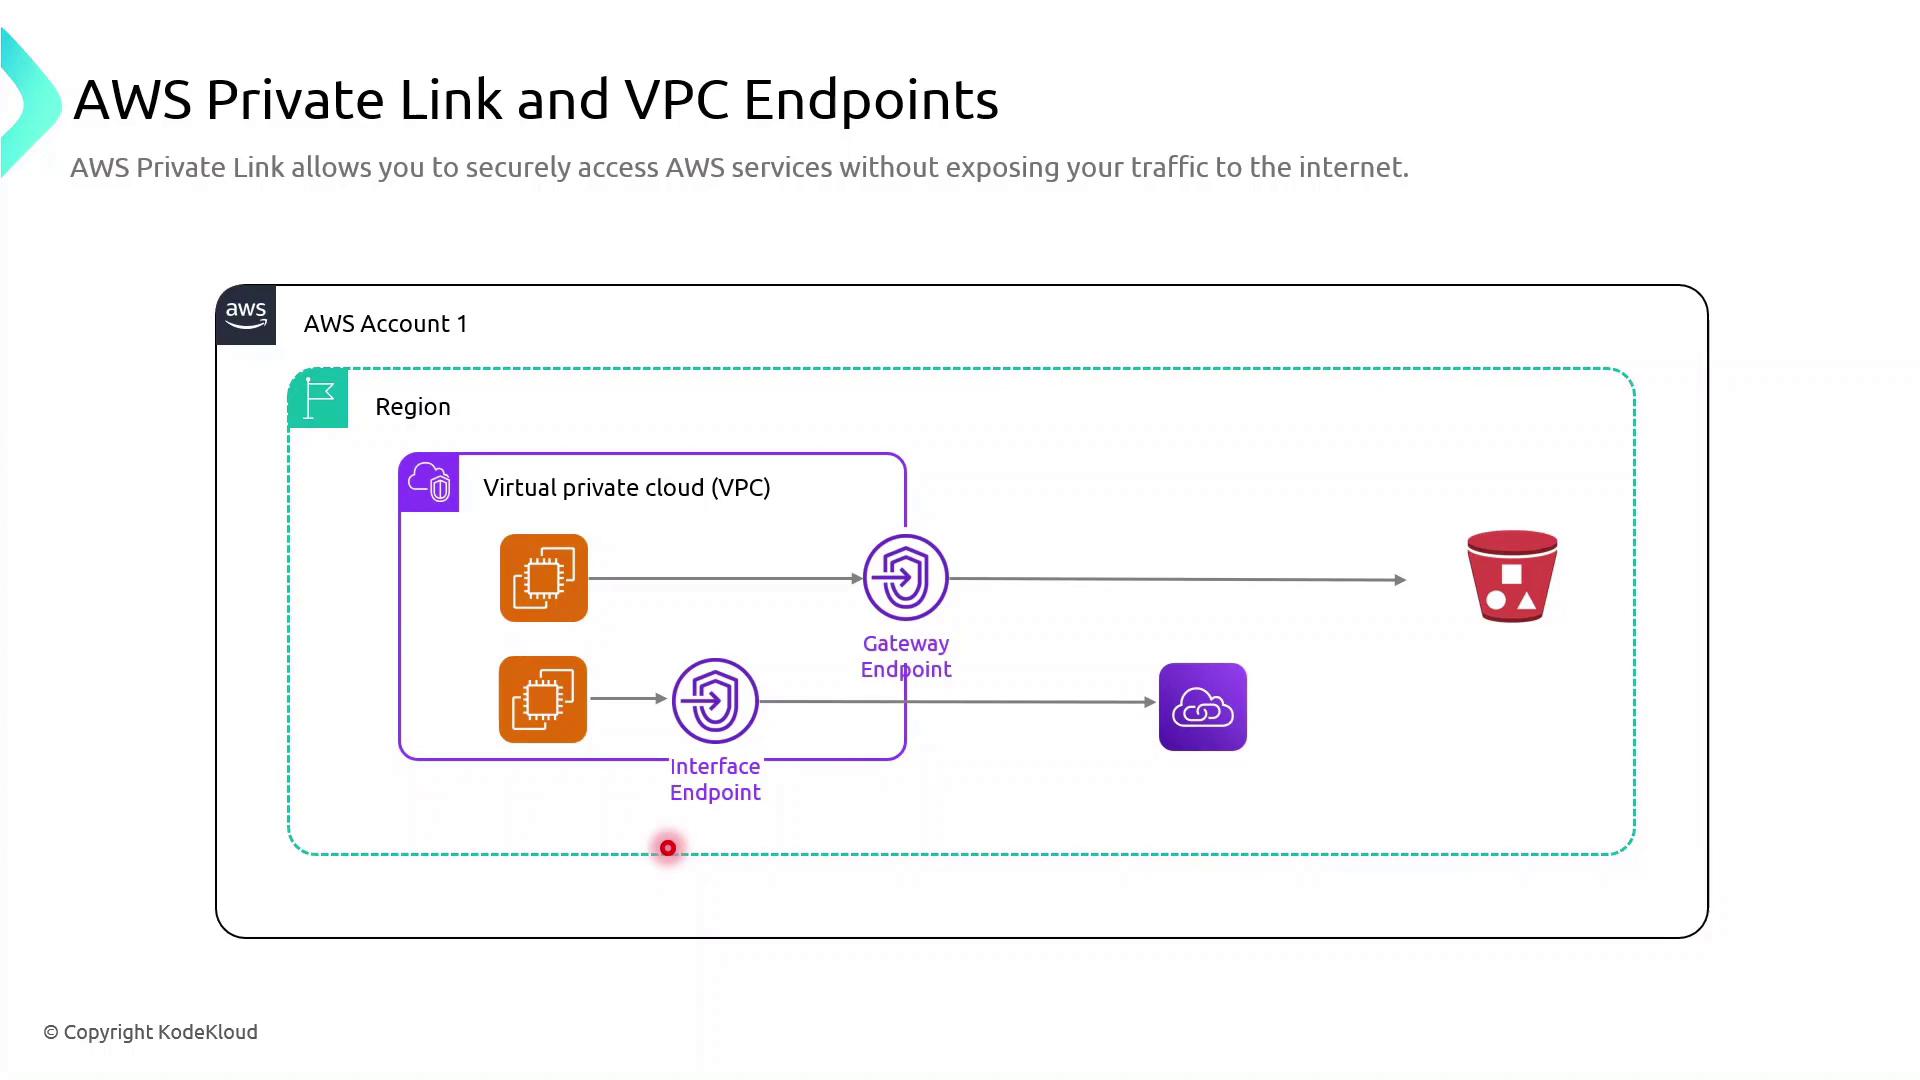
AWS Private Link
AWS PrivateLink provides private, low-latency connectivity between your Amazon VPC and supported AWS services without using the public internet. By leveraging VPC endpoints, you can enhance security, improve performance, and simplify network architecture.
AWS VPC Endpoint Types
AWS VPC endpoints come in two flavors:
| Endpoint Type | Supported Services | Mechanism | Primary Use Case |
| Gateway Endpoint | Amazon S3, DynamoDB | Route tables | Private data access to S3/DynamoDB |
| Interface Endpoint | 100+ AWS services (Lambda, Kinesis, SNS, etc.) | Elastic Network Interfaces (ENIs) | Private API calls to AWS services |
Note
Gateway endpoints are free of data processing charges, whereas interface endpoints incur hourly and per-GB data processing fees.
Gateway Endpoint: Accessing Amazon S3 Privately
To keep traffic between your VPC and Amazon S3 entirely on the AWS network, create a gateway endpoint:
aws ec2 create-vpc-endpoint \
  --vpc-id vpc-12345678 \
  --service-name com.amazonaws.us-east-1.s3 \
  --route-table-ids rtb-12345678
All S3 requests from your EC2 instances now use the private endpoint in your VPC, reducing latency and eliminating exposure to the public internet.
Warning
Gateway endpoints support only Amazon S3 and DynamoDB. For other services, use interface endpoints.
Interface Endpoint: Calling AWS Lambda Privately
When your applications need to invoke Lambda functions without leaving the AWS backbone, deploy an interface endpoint:
aws ec2 create-vpc-endpoint \
  --vpc-id vpc-12345678 \
  --service-name com.amazonaws.us-east-1.lambda \
  --subnet-ids subnet-abcdefgh \
  --security-group-ids sg-1234abcd
This command provisions ENIs in your selected subnets, each with private IP addresses mapped to the Lambda service endpoint. All Lambda invocations remain on the Amazon network, ensuring secure, low-latency communication.
Subscribe to my newsletter
Read articles from Arindam Baidya directly inside your inbox. Subscribe to the newsletter, and don't miss out.
Written by
Arindam Baidya
Arindam Baidya
🚀 Aspiring DevOps & Cloud Engineer | Passionate about Automation, CI/CD, Containers, and Cloud Infrastructure ☁️ I work with Docker, Kubernetes, Jenkins, Terraform, AWS (IAM & S3), Linux, Shell Scripting, and Git to build efficient, scalable, and secure systems. Currently contributing to DevOps-driven projects at Assurex e-Consultant while continuously expanding my skills through hands-on cloud and automation projects. Sharing my learning journey, projects, and tutorials on DevOps, AWS, and cloud technologies to help others grow in their tech careers. 💡 Let’s learn, build, and innovate together!