1. Introduction to AWS Identity and Access Management
 Arindam Baidya
Table of contents
- Why AWS IAM Matters
- What You’ll Learn
- IAM Key Components
- IAM Overview
- AWS Account
- Demo Creating AWS Account
- IAM Users
- Demo Create IAM User
- AWS CLI and SDK
- Demo IAM Groups
- IAM Policies and Permissions
- Demo Identity Policy
- IAM Resource Based Policy
- Demo Resource Based Policy
- IAM Permission Boundaries
- Demo Permission Boundaries
- IAM Roles
- Demo Creating IAM Role
- IAM Session Policies
- Demo Session Policies
- Auditing with CloudTrail
- Demo CloudTrail

AWS Identity and Access Management (IAM) are responsible for securing cloud access, or manage permissions for your organization’s users and applications.
Why AWS IAM Matters
AWS IAM is the foundational service for controlling secure access to AWS resources. With IAM, you can:
Create and manage users, groups, and roles
Define fine-grained permissions using policies
Implement robust access control for applications, services, and end users
Think of IAM as your roadmap to secure and compliant cloud operations.
What You’ll Learn
In this lesson, we will:
Understand the core concepts of IAM (users, groups, roles, policies)
Explore IAM best practices for least-privilege access
Walk through hands-on labs to configure real-world scenarios
Discover advanced features like managed policies, identity providers, and cross-account access
Whether you’re new or have some IAM experience, we’ll start with fundamentals and gradually move into advanced topics.
Note
Ensure you have an active AWS account with administrative privileges to follow along with the labs.
IAM Key Components
| Resource Type | Description | Common Use Case |
| User | An individual identity | Grant CLI or console access to an employee |
| Group | A collection of IAM users | Apply shared permissions to multiple users |
| Role | A set of permissions assumed by entities | Enable cross-account access or service permissions |
| Policy | A JSON document defining permissions | Attach to users, groups, or roles to allow or deny actions |
IAM Overview
AWS Identity and Access Management (IAM) is the cornerstone of security and access control in the AWS Cloud. With IAM, you can centrally manage permissions, enforce the principle of least privilege, and govern how your users and applications authenticate and authorize with AWS services.
What You’ll Learn
IAM Users: Create dedicated accounts for individuals to access AWS via Management Console, CLI, or SDKs.
AWS CLI & SDKs: Automate IAM operations and integrate AWS services into your applications.
IAM Groups: Simplify permission management by grouping users and attaching policies.
IAM Roles: Grant short-term permissions to AWS resources without storing long-term credentials.
Identity Policies: Define JSON-based permissions and attach them to users, groups, or roles.
Resource-Based Policies: Attach permissions directly to AWS resources (e.g., S3 buckets, SQS queues).
Session Policies: Scope down permissions for a single session to enforce tighter control.
Permission Boundaries: Limit the maximum permissions an IAM entity can acquire, enforcing least-privilege.

Key IAM Components
| Component | Description | Common Use Case |
| IAM Users | Long-term credentials for individual identity | Team members accessing the AWS Console or CLI |
| IAM Groups | Collections of users for bulk permission management | Granting developers access to specific AWS services |
| IAM Roles | Temporary credentials assumed by AWS services or federated users | EC2 instances needing S3 read/write access |
| Identity Policies | JSON documents specifying “Allow” or “Deny” actions | Attaching S3-read policy to a developer group |
| Resource Policies | Permissions attached directly to AWS resources (bucket, queue, etc) | S3 bucket policy to allow CloudFront distribution |
| Session Policies | Inline policies passed in a role or user session | Limiting an API call to only a particular DynamoDB table |
| Permission Boundaries | Maximum permissions an IAM entity can obtain | Ensuring contractors cannot escalate privileges |
Note
Use permission boundaries to enforce least-privilege at scale. They act as an upper-limit guardrail, even if an identity has broader permissions via attached policies.
AWS Account
To start using AWS resources and services, you must first create an AWS account. AWS operates on a pay-as-you-go model—there are no upfront costs, and you only pay for what you use at the end of each billing cycle. Many organizations leverage multiple accounts for isolation, billing, and security, then consolidate costs using AWS Organizations.
Why Create an AWS Account?
Instant access to cloud services (compute, storage, databases, and more)
Flexible, pay-as-you-go pricing with no long-term commitments
Strong isolation between development, testing, and production environments
Consolidated billing across multiple accounts for streamlined cost management
Secure cross-account resource sharing and access control
Key Benefits of AWS Accounts
| Benefit | Description | Example |
| Access to AWS Services | Onboard to cloud resources instantly | Launch an EC2 instance in minutes |
| Pay-as-you-go Pricing | No upfront fees; only pay for what you consume | Monthly cost based on compute hours |
| Account Isolation | Separate environments for different teams or projects | Dedicated Dev, Test, and Prod accounts |
| Consolidated Billing | Aggregate charges across accounts in a single invoice | Manage all costs via AWS Organizations |
| Cross-Account Resource Sharing | Securely share resources with other AWS accounts | Grant S3 bucket access to another account |

Demo: Creating an AWS Account
Follow these steps to register and activate your AWS account:
Open your web browser and navigate to https://aws.amazon.com.
Click Create an AWS Account.
Enter a valid email address and choose a strong password.
Specify an account name (alias) to identify your AWS account.
Complete the registration form with contact details, payment information, and identity verification.
After receiving confirmation, sign in as the root user using your registered email.
Warning
Avoid using the root user for daily operations. Create IAM users with the least privilege necessary and manage permissions through AWS IAM.

Demo Creating AWS Account
Here, you’ll learn how to set up a brand-new AWS account for your HR team. We’ll cover:
Creating and verifying a root user
Signing in for the first time
Accessing the AWS Management Console
Step 1: Navigate to the AWS Homepage
Open your browser and go to https://aws.amazon.com.
In the top-right corner, click Create an AWS Account.

Note
Ensure you’re using a secure and private network when creating your AWS root account.
Step 2: Provide Root User Email and Account Name
On the signup form:
Under Root user, enter the email address that HR will manage:
HR@company1.comUnder Account name, choose a clear identifier:
HRClick Verify email address.
You’ll receive a one-time code—enter it to confirm your email.
Step 3: Sign In as the Root User
Return to https://aws.amazon.com and click Sign In.
Select Root user (since no IAM users exist yet).
Enter the same email you used during signup, then click Next.

Step 4: Authenticate and Access the Console
Enter your chosen password at the prompt.
Click Sign In.
You’ll land on the AWS Management Console as the root user.
Warning
Your root user has full account access. Avoid using these credentials for everyday tasks. After setup, create an IAM admin user and assign least-privilege permissions.
AWS Account Setup Overview
| User Type | Description | Best Practice |
| Root user | Full access to all AWS resources | Use only for billing, support, and setup tasks |
| IAM user | Permission-scoped user accounts | Assign roles and policies for daily operations |
IAM Users
In this lesson, you’ll learn how to set up IAM users and grant them access to AWS services. An IAM user can interact with AWS through the Management Console, AWS CLI, or SDKs, based on the permissions you attach.
Why IAM User Permissions Matter
Note
By default, a newly created IAM user has no permissions. You must attach policies to grant access.
AWS Services and CLI Examples
| Service | Description | CLI Example |
| Amazon EC2 | Virtual machines in the cloud | aws ec2 describe-instances |
| Amazon RDS | Managed relational databases | aws rds describe-db-instances |
| Amazon EKS | Kubernetes clusters | aws eks list-clusters |
| AWS Lambda | Serverless compute for code | aws lambda list-functions |
| Amazon DynamoDB | Fast NoSQL database | aws dynamodb list-tables |
| Amazon S3 | Object storage for files | aws s3 ls s3://your-bucket |
| Elastic Load Balancing (ELB) | Distribute incoming traffic | aws elb describe-load-balancers |
| Amazon Route 53 | Scalable DNS service | aws route53 list-hosted-zones |
| Amazon VPC | Isolated virtual networks | aws ec2 describe-vpcs |
| Amazon SNS | Pub/Sub messaging and notifications | aws sns list-topics |
Methods to Attach IAM Policies
You can grant AWS permissions by attaching policies to:
IAM Users: Directly attach policies to the user.
IAM Groups: Assign users to groups; they inherit group policies.
IAM Roles: Allow users or services to assume roles with temporary credentials.
Creating an IAM User
1. Using the AWS Management Console
Sign in to the AWS Management Console.
Navigate to IAM > Users > Add users.
Enter a User name and select the access type:
Programmatic access (for AWS CLI/SDK).
AWS Management Console access (for web console).
Click Next: Permissions and choose how to assign permissions:
Add user to group
Attach existing policies directly
Copy permissions from existing user
Review and create the user. Download or copy the Access Key ID and Secret Access Key.
2. Using the AWS CLI
Create an IAM user:
aws iam create-user --user-name alice
Generate access keys for programmatic access:
aws iam create-access-key --user-name alice
Attach a policy (e.g., AmazonS3ReadOnlyAccess):
aws iam attach-user-policy \
  --user-name alice \
  --policy-arn arn:aws:iam::aws:policy/AmazonS3ReadOnlyAccess
Warning
Store your Access Key ID and Secret Access Key securely. Treat them like password credentials.
Demo Create IAM User
In this tutorial, you’ll learn how to create a new IAM user in AWS, verify console access, and configure AWS CLI credentials using AWS CloudShell. We’ll use john as our example user.
Prerequisites
You must be signed in to the AWS Management Console with an account or IAM user that has administrator privileges.
1. Access the IAM Console
Sign in to the AWS Management Console.
In the search bar, type IAM and select Identity and Access Management.
On the IAM dashboard, review any security recommendations (e.g., enabling MFA).

- In the left navigation pane, click Users to view existing IAM users.
2. Create a New IAM User
Click Add users.
Enter john as the User name.
Under Select AWS access type, choose one or both of the following:
| Access Type | Description |
| AWS Management Console access | Enables web console sign-in |
| Programmatic access | Generates access keys for CLI/SDK interaction |

- For Console password, select Custom password and enter your desired password.

- Enable Require password reset to force
johnto set a new password at first sign-in.

On the Set permissions page, assign policies or skip this step to configure permissions later.
Click Next until you reach the Review page, verify all settings, then click Create user.
Choose Return to users.

3. Test the Console Sign-In
Open a private/incognito browser window.
Navigate to https://aws.amazon.com and click Sign In.
Select IAM user, enter your AWS account ID, then click Next.
Provide Username:
johnand the initial password you set.

- You’ll be prompted to change the password:

- Enter the old password, choose a new one, and confirm.

After confirmation, you will be signed in as john.
4. Configure AWS CLI for the New User
Next, we’ll set up AWS CLI credentials in CloudShell for the john profile.
From the AWS Console, open CloudShell.
Verify your current identity (should show your admin user, e.g.,
kodekloud):
aws sts get-caller-identity
{
  "UserId": "AIDAZFD2ZUTSVCJWCHYKF",
  "Account": "629470240221",
  "Arn": "arn:aws:iam::629470240221:user/kodekloud"
}
Create access keys for
john:In IAM Console, go to Users > john.
Select the Security credentials tab.
Under Access keys, click Create access key.
For Use case, pick Command line interface and proceed.
Copy the Access key ID and Secret access key.

Warning
Keep the secret access key confidential. Do not commit it to version control or share it.
- Back in CloudShell, configure a dedicated profile:
aws configure --profile john
When prompted, enter:
AWS Access Key ID:
<paste access key ID>AWS Secret Access Key:
<paste secret key>Default region name:
us-west-2(or your preferred region)Default output format: (leave blank or choose
json)
- Validate the
johnprofile:
aws sts get-caller-identity --profile john
{
  "UserId": "AIDAZFD2ZUTS3DCUVP",
  "Account": "629470240221",
  "Arn": "arn:aws:iam::629470240221:user/john"
}
You have now successfully created an IAM user, tested console sign-in, and configured AWS CLI access for john.
AWS CLI and SDK
In this lesson, you’ll learn how to streamline your AWS workflows using the AWS Command Line Interface (CLI) and AWS SDKs. We’ll cover:
Creating an IAM user with console and programmatic access
Configuring the AWS CLI on your local machine
Integrating AWS SDKs within your applications
Organizing permissions using IAM groups
For more details, refer to the AWS CLI User Guide and the AWS SDKs & Tools.
1. IAM User with Access Keys
To enable both console and programmatic access, create an IAM user (e.g., John) and generate an Access Key ID and Secret Access Key. These credentials allow John to authenticate with AWS services via CLI or SDKs.
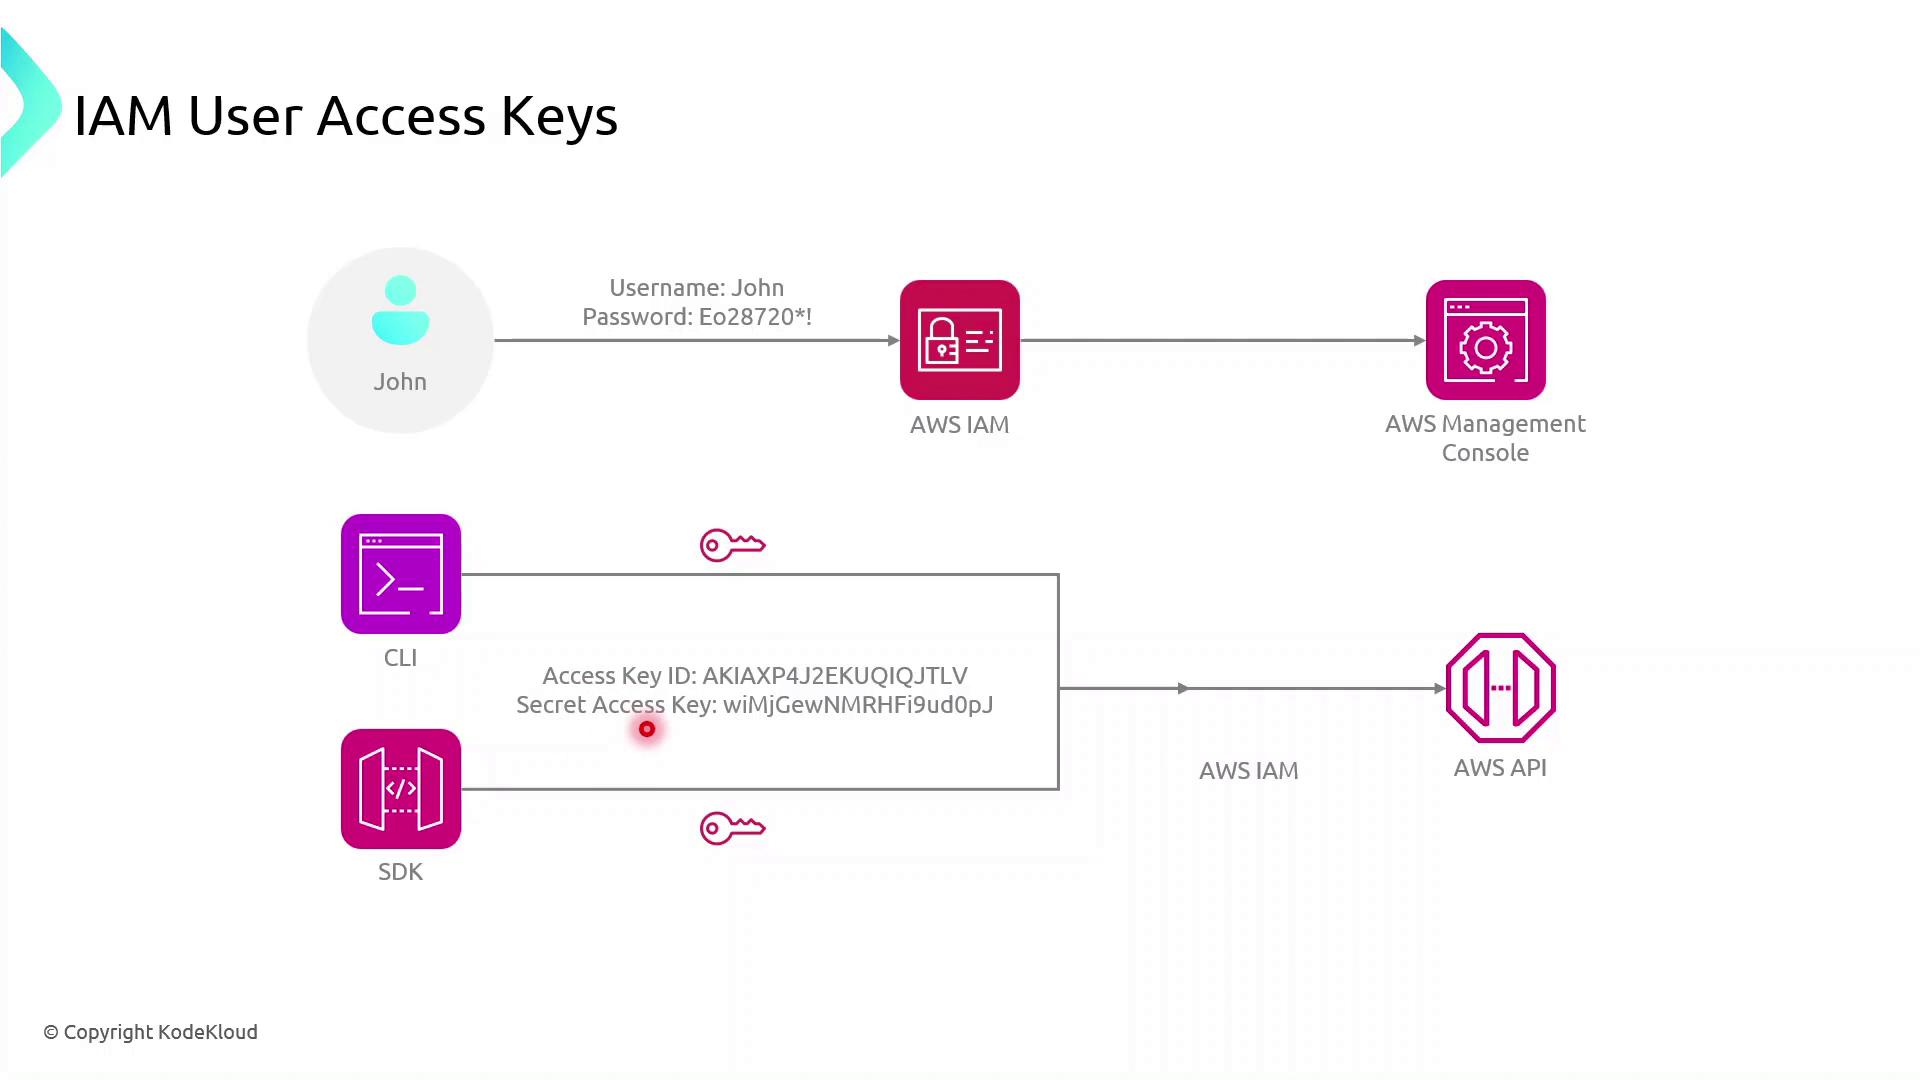
John can now:
Execute AWS CLI commands
Use AWS SDKs in applications to call AWS service APIs
Warning
Keep your Access Key ID and Secret Access Key secure. Never commit them to version control or expose them in client-side code.
2. Configuring the AWS CLI
Install the AWS CLI, then run:
aws configure
You’ll be prompted for:
AWS Access Key ID
AWS Secret Access Key
Default region name (e.g.,
us-east-1)Default output format (e.g.,
json)
Example:
$ aws configure
AWS Access Key ID [None]: AKIAS7790KQGK63WUK6T5
AWS Secret Access Key [None]: kkQEiBjSKrDkWBLO9G/JJKQWIOKL/CpHjMGyoiJWW
Default region name [None]: us-east-1
Default output format [None]: json
Note
Credentials and configuration are stored in:
~/.aws/credentials~/.aws/config
These files are used by both AWS CLI and AWS SDKs.
Now, any AWS CLI command you execute uses John’s credentials, targets the specified region, and returns JSON output by default.
3. Using AWS SDKs in Applications
AWS SDKs enable you to interact with AWS services programmatically. Below is a high-level flow for a browser-based app using the AWS SDK for JavaScript:
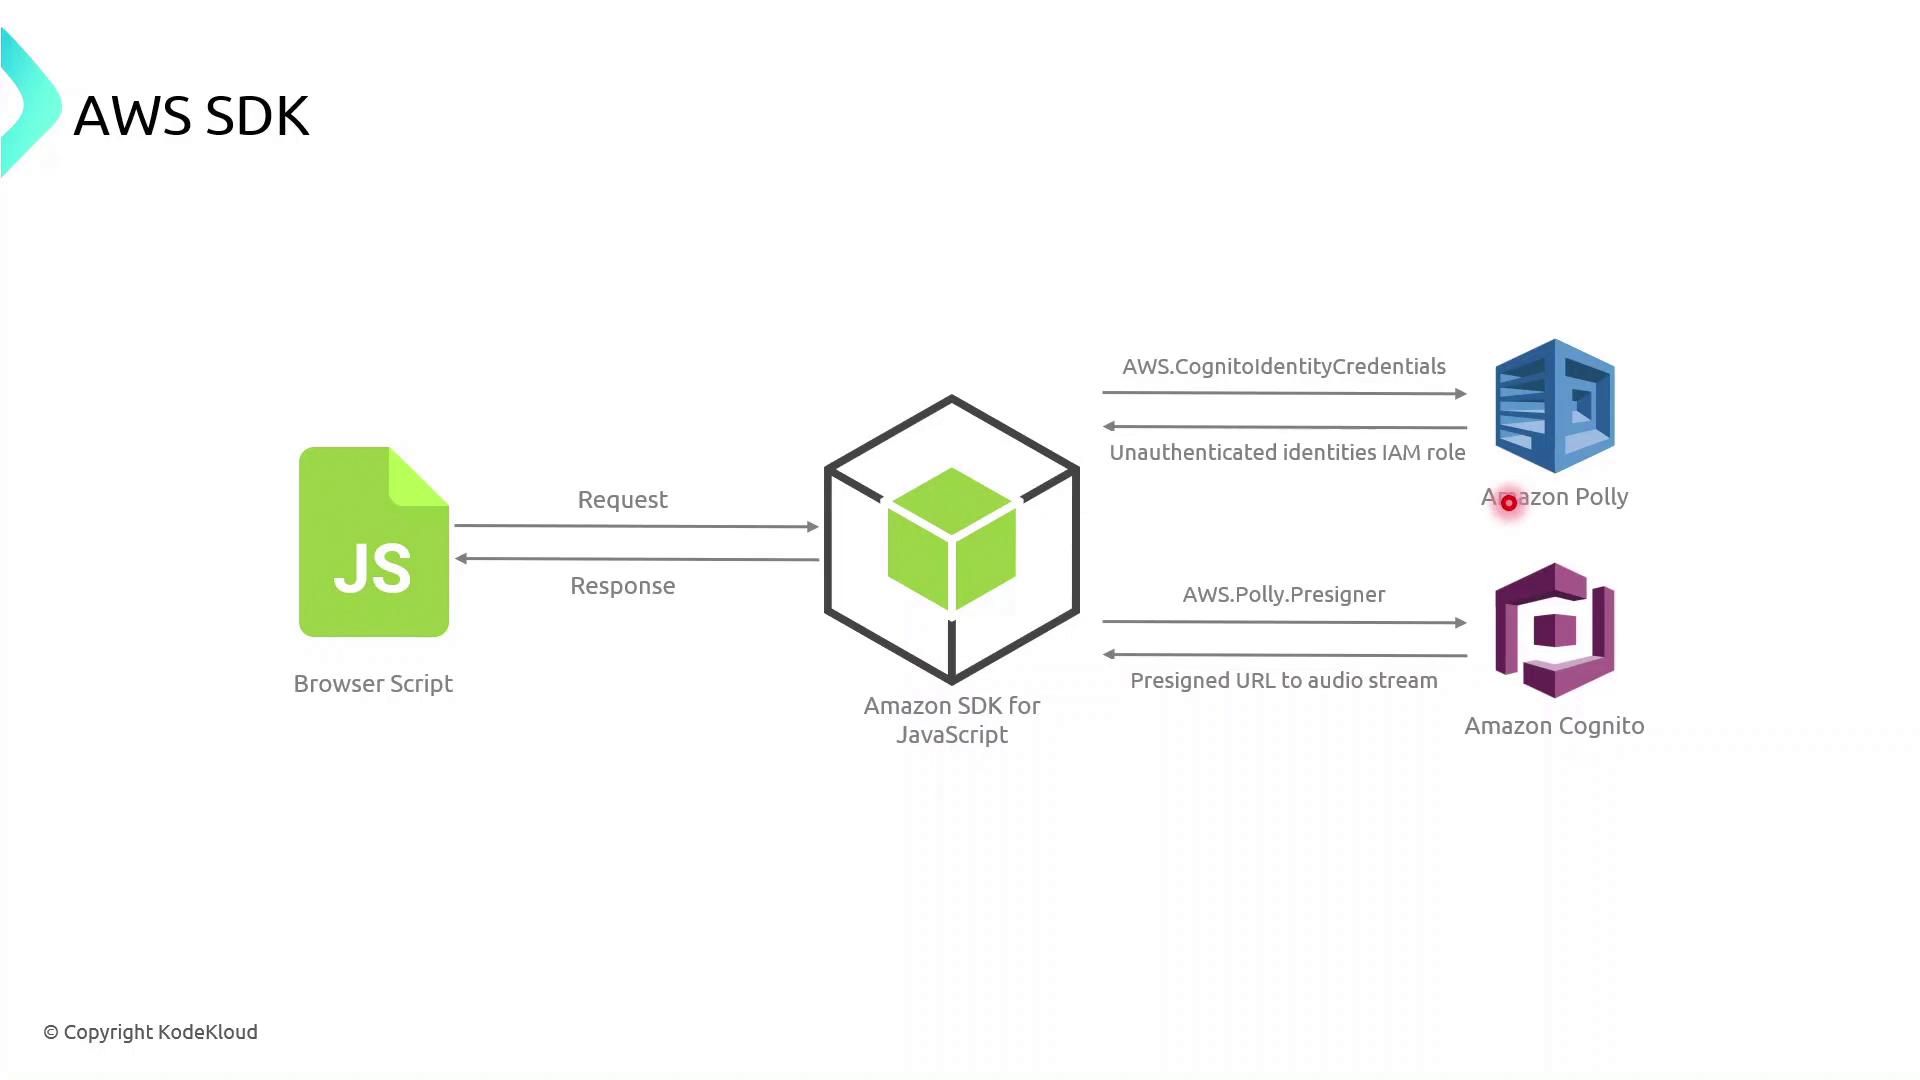
The browser script initializes the AWS SDK with temporary credentials (often retrieved via Amazon Cognito).
It calls an AWS service API (for example, Polly’s
SynthesizeSpeech).AWS processes the request and returns a response, which the application then handles and renders.
Example: AWS SDK for JavaScript (v3)
import { CognitoIdentityClient } from "@aws-sdk/client-cognito-identity";
import { fromCognitoIdentityPool } from "@aws-sdk/credential-provider-cognito-identity";
import { PollyClient, SynthesizeSpeechCommand } from "@aws-sdk/client-polly";


const REGION = "us-east-1";
const IDENTITY_POOL_ID = "us-east-1:xxxxxxxx-xxxx-xxxx-xxxx-xxxxxxxxxxxx";


// Initialize credentials
const credentials = fromCognitoIdentityPool({
  client: new CognitoIdentityClient({ region: REGION }),
  identityPoolId: IDENTITY_POOL_ID,
});


// Create Polly client
const polly = new PollyClient({ region: REGION, credentials });


async function synthesizeText(text) {
  const command = new SynthesizeSpeechCommand({
    OutputFormat: "mp3",
    Text: text,
    VoiceId: "Joanna",
  });
  const response = await polly.send(command);
  // Process response.AudioStream
}
4. Managing Permissions with IAM Groups
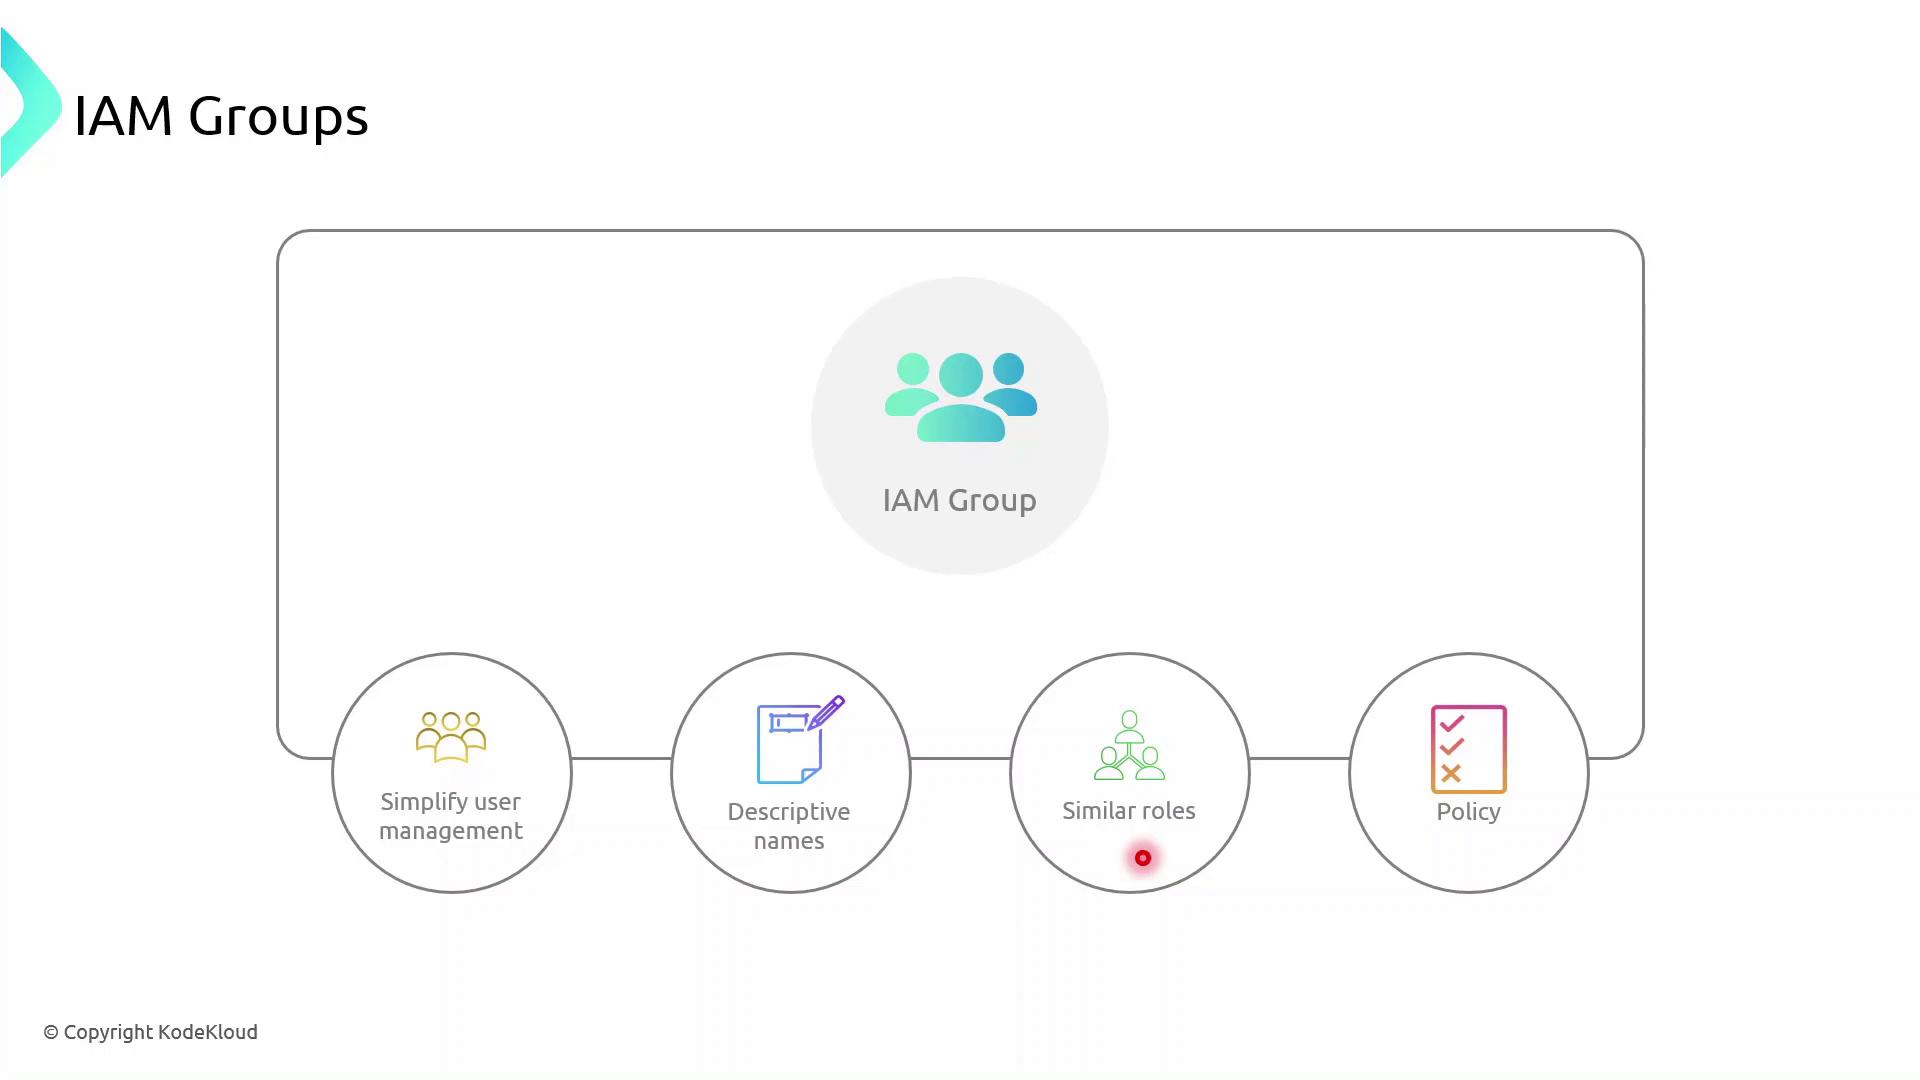
IAM groups simplify permission management by allowing you to assign policies to multiple users at once. Follow these best practices:
| Best Practice | Description | Example |
| Descriptive Names | Use clear, role-based group names | Developers, DataScientists, Admins |
| Granular Policies | Attach least-privilege policies to groups | AmazonS3ReadOnlyAccess |
| Role Similarity | Group users with similar responsibilities | Marketing, Engineering, Finance |
Demo: Creating an IAM Group
Sign in to the AWS Management Console and open the IAM console.
In the navigation pane, choose User groups → Create group.
Enter a group name (e.g.,
MarketingTeam).Attach one or more policies to grant required permissions.
Add existing users (like John) to the group.
Once created, every user in the group inherits the attached policies automatically.
Demo IAM Groups
In this tutorial, you'll learn how to create IAM groups in the AWS Management Console, attach policies, and add existing users. We’ll set up two groups:
HR: Grants access to a specific S3 bucket.
IT: Provides full administrative privileges.
Best Practice
Always follow the principle of least privilege when assigning permissions. Create custom policies scoped to the resources your team actually needs.
Prerequisites
An AWS account with sufficient privileges to manage IAM resources.
Existing IAM users (e.g., John, Sarah).
Step 1: Open the IAM Console
Sign in to the AWS Management Console.
Navigate to Services > Security, Identity, & Compliance > IAM.
In the left pane, select User groups.
You should see a list of your current IAM user groups (if any).
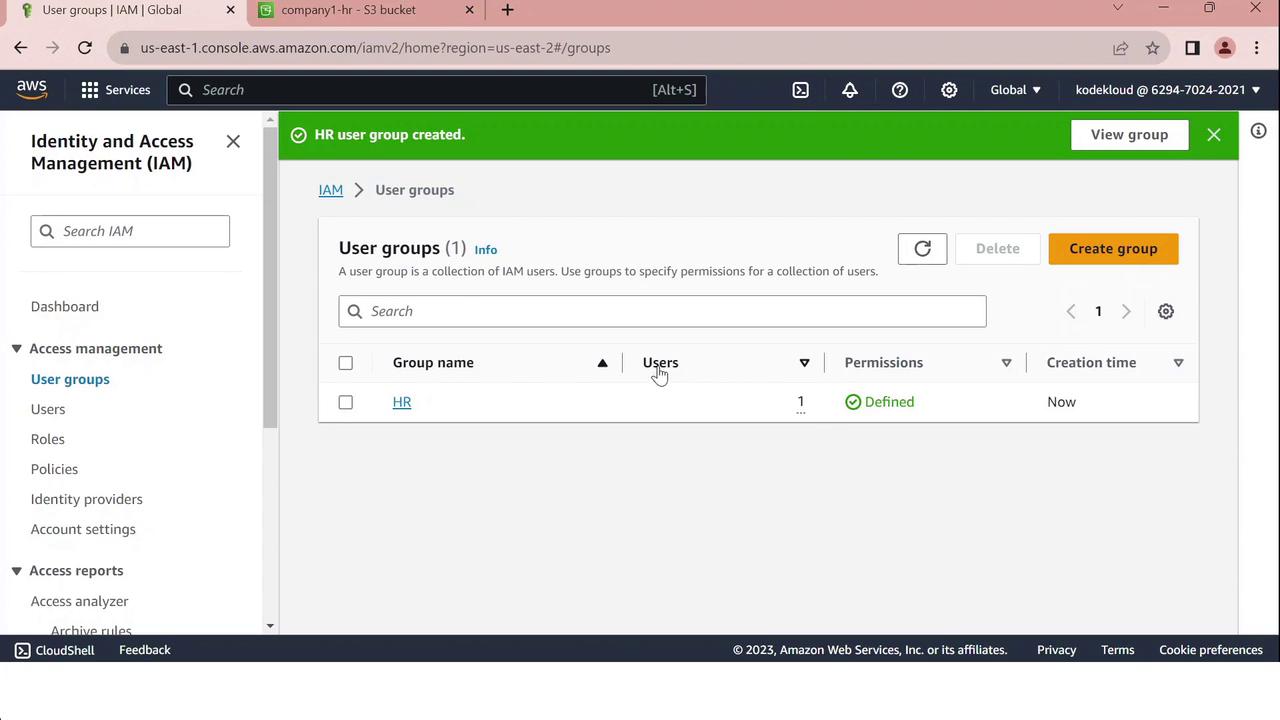
Step 2: Create the “HR” Group
Click Create group.
Enter
HRas the Group name.Under Add users to group, select John.
In Attach managed policies, click Create policy, then paste the JSON below:
 {
   "Version": "2012-10-17",
   "Statement": [
     {
       "Sid": "HRPolicy",
       "Effect": "Allow",
       "Action": "s3:*",
       "Resource": [
         "arn:aws:s3:::company1-hr-bucket",
         "arn:aws:s3:::company1-hr-bucket/*"
       ]
     }
   ]
 }
Review the policy, give it a name like
HRPolicy, and attach it to the group.Click Create group to finalize.
Step 3: Create the “IT” Group
Click Create group again.
Enter
ITas the Group name.Select Sarah under Add users to group.
In Attach managed policies, search for and select AdministratorAccess.
Click Create group.
The IT group will now have full AWS administrative access.
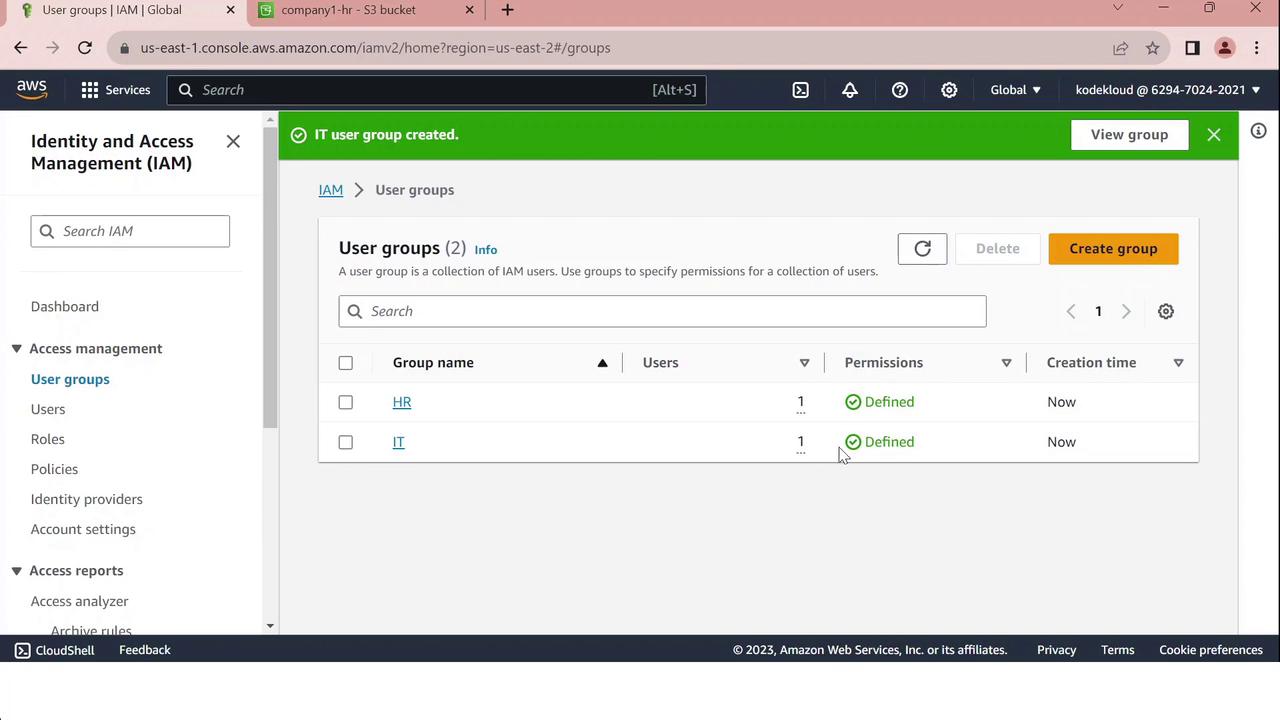
Summary of IAM Groups
| Group | User | Policy | Access Scope |
| HR | John | HRPolicy | company1-hr-bucket S3 bucket |
| IT | Sarah | AdministratorAccess | Full AWS services and resource control |
Warning
Review and regularly audit your IAM policies to ensure compliance and security.
IAM Policies and Permissions
In AWS, IAM policies and permissions control who can perform which actions on which resources. Applying the Principle of Least Privilege—granting only the access needed to perform a task—helps secure your environment.
Principle of Least Privilege
Grant users and roles only the permissions they require. In this example, Sarah creates three groups:
Admins (Bob and Susan): full management rights across AWS services.
Developers: access limited to a specific Sales folder.
Test (Kathy and Alan): no access to the Sales folder.
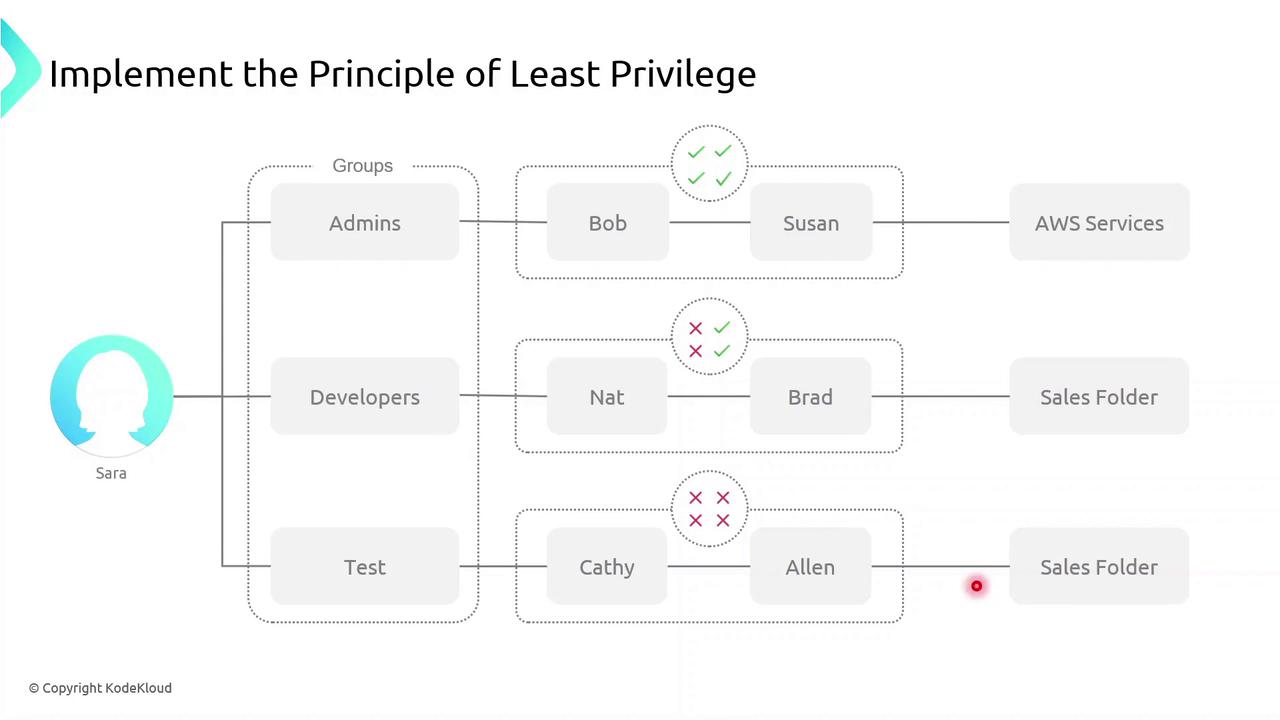
Note
Applying least privilege minimizes the blast radius if credentials are compromised.
Defining Permissions
A permission is a fine-grained control that authorizes an action on an AWS resource. Common permission examples:
ec2:StartInstances– start an EC2 instances3:GetObject– download an object from an S3 bucketsqs:CreateQueue– create a new SQS queuesns:DeleteTopic– delete an SNS topic
A policy is a collection of one or more permissions.
What Is an IAM Policy?
An IAM policy is a JSON document that defines:
Who (user, group, role) can perform
What actions on
Which resources
IAM policies give you granular control over access.
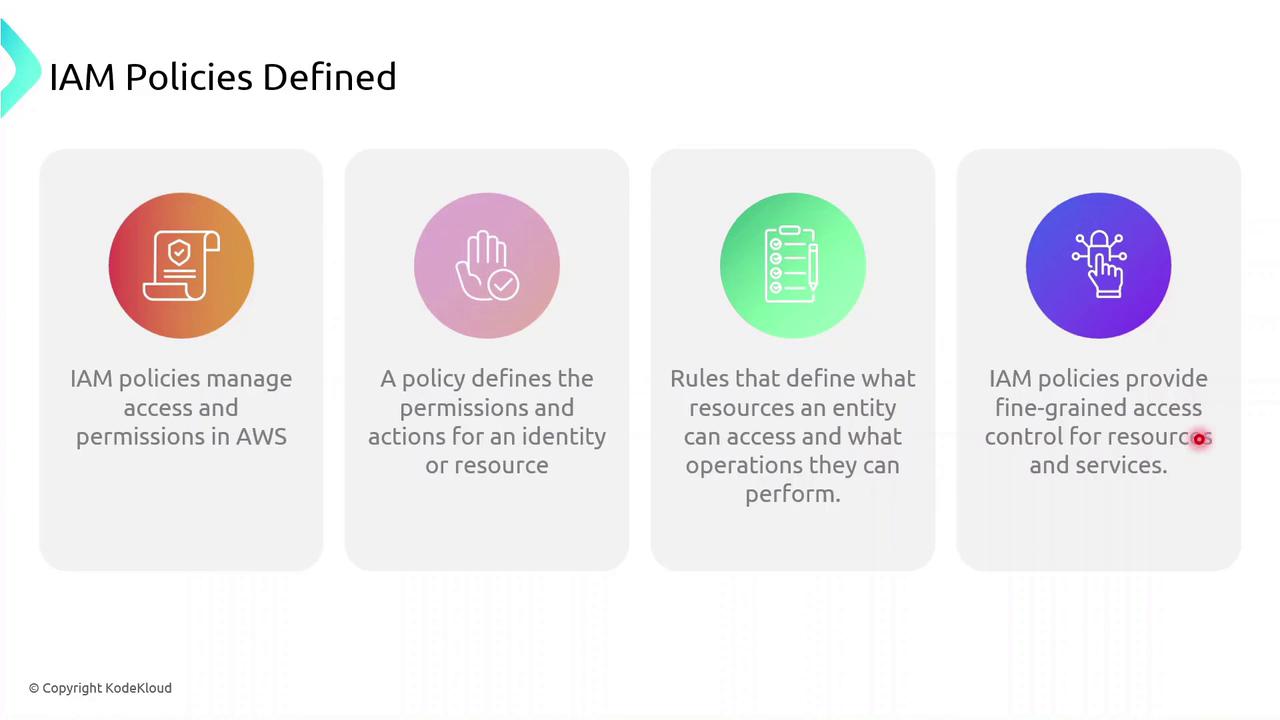
Policy Types
IAM policies fall into two primary categories:
| Policy Type | Attachment Point | Use Case |
| Identity-based policy | Users, groups, roles | Grant permissions to IAM identities |
| Resource-based policy | AWS resources (e.g., S3, Lambda) | Attach policies directly to resources themselves |
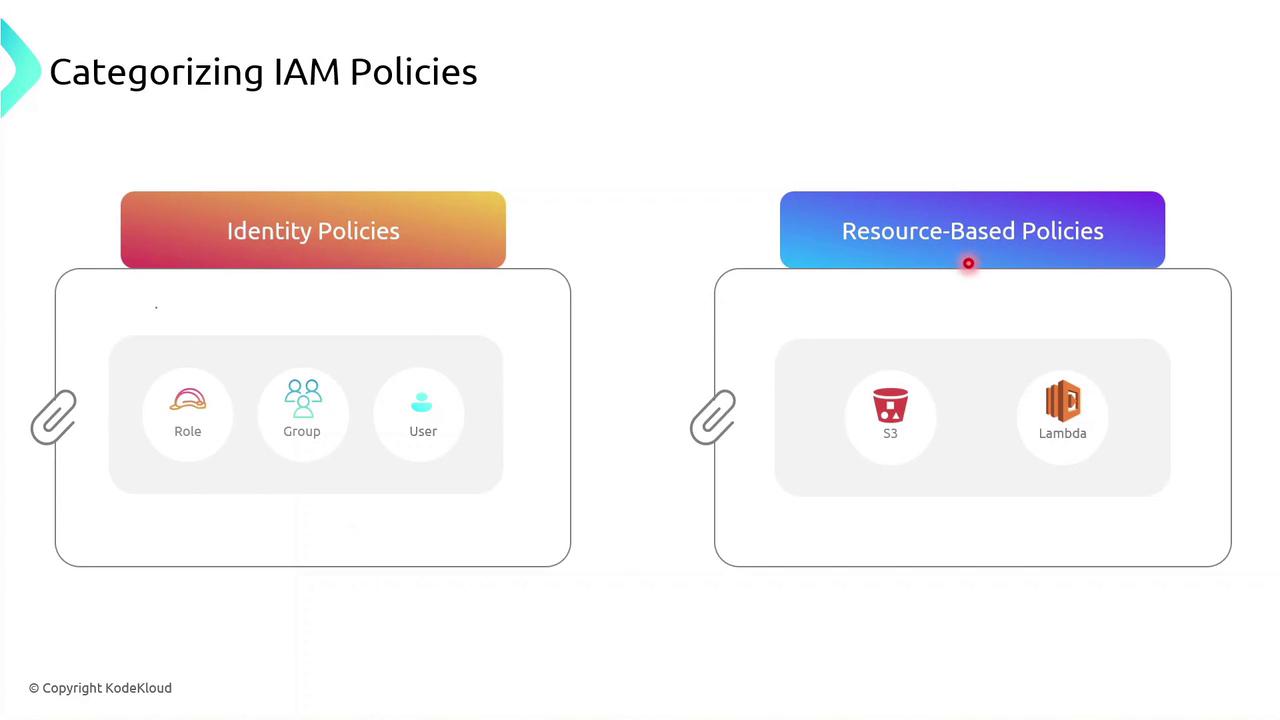
You can attach an identity-based policy to a group of developers or assign a role to an EC2 instance so your applications inherit those permissions.
Identity-based Policy Example
Below is a sample JSON identity policy with two statements:
{
  "Version": "2012-10-17",
  "Statement": [
    {
      "Effect": "Allow",
      "Action": [
        "s3:*"
      ],
      "Resource": [
        "arn:aws:s3:::<bucket-name>"
      ]
    },
    {
      "Effect": "Allow",
      "Action": [
        "ec2:StartInstances"
      ],
      "Resource": [
        "arn:aws:ec2:<region>:<account-id>:instance/<instance-id>"
      ]
    }
  ]
}
The first statement allows all S3 actions on a specific bucket.
The second statement allows starting a particular EC2 instance.
Warning
Use wildcard (*) actions sparingly. Overly broad permissions increase security risks.
Demo: Creating an Identity Policy
Follow these steps in the AWS Management Console to create and attach an identity-based policy to a group:
Sign in to the IAM console.
Navigate to Policies > Create policy.
Use the JSON editor to paste your policy document.
Review and Create policy.
Attach the new policy to your IAM group.
Demo Identity Policy
No, you’ll see how to create a custom IAM identity policy in AWS, attach it to a user group, and then refine its permissions using both the Visual editor and the JSON editor. By the end, you’ll have a policy that grants S3 read access, full EC2 permissions, and explicitly denies the ability to stop EC2 instances.
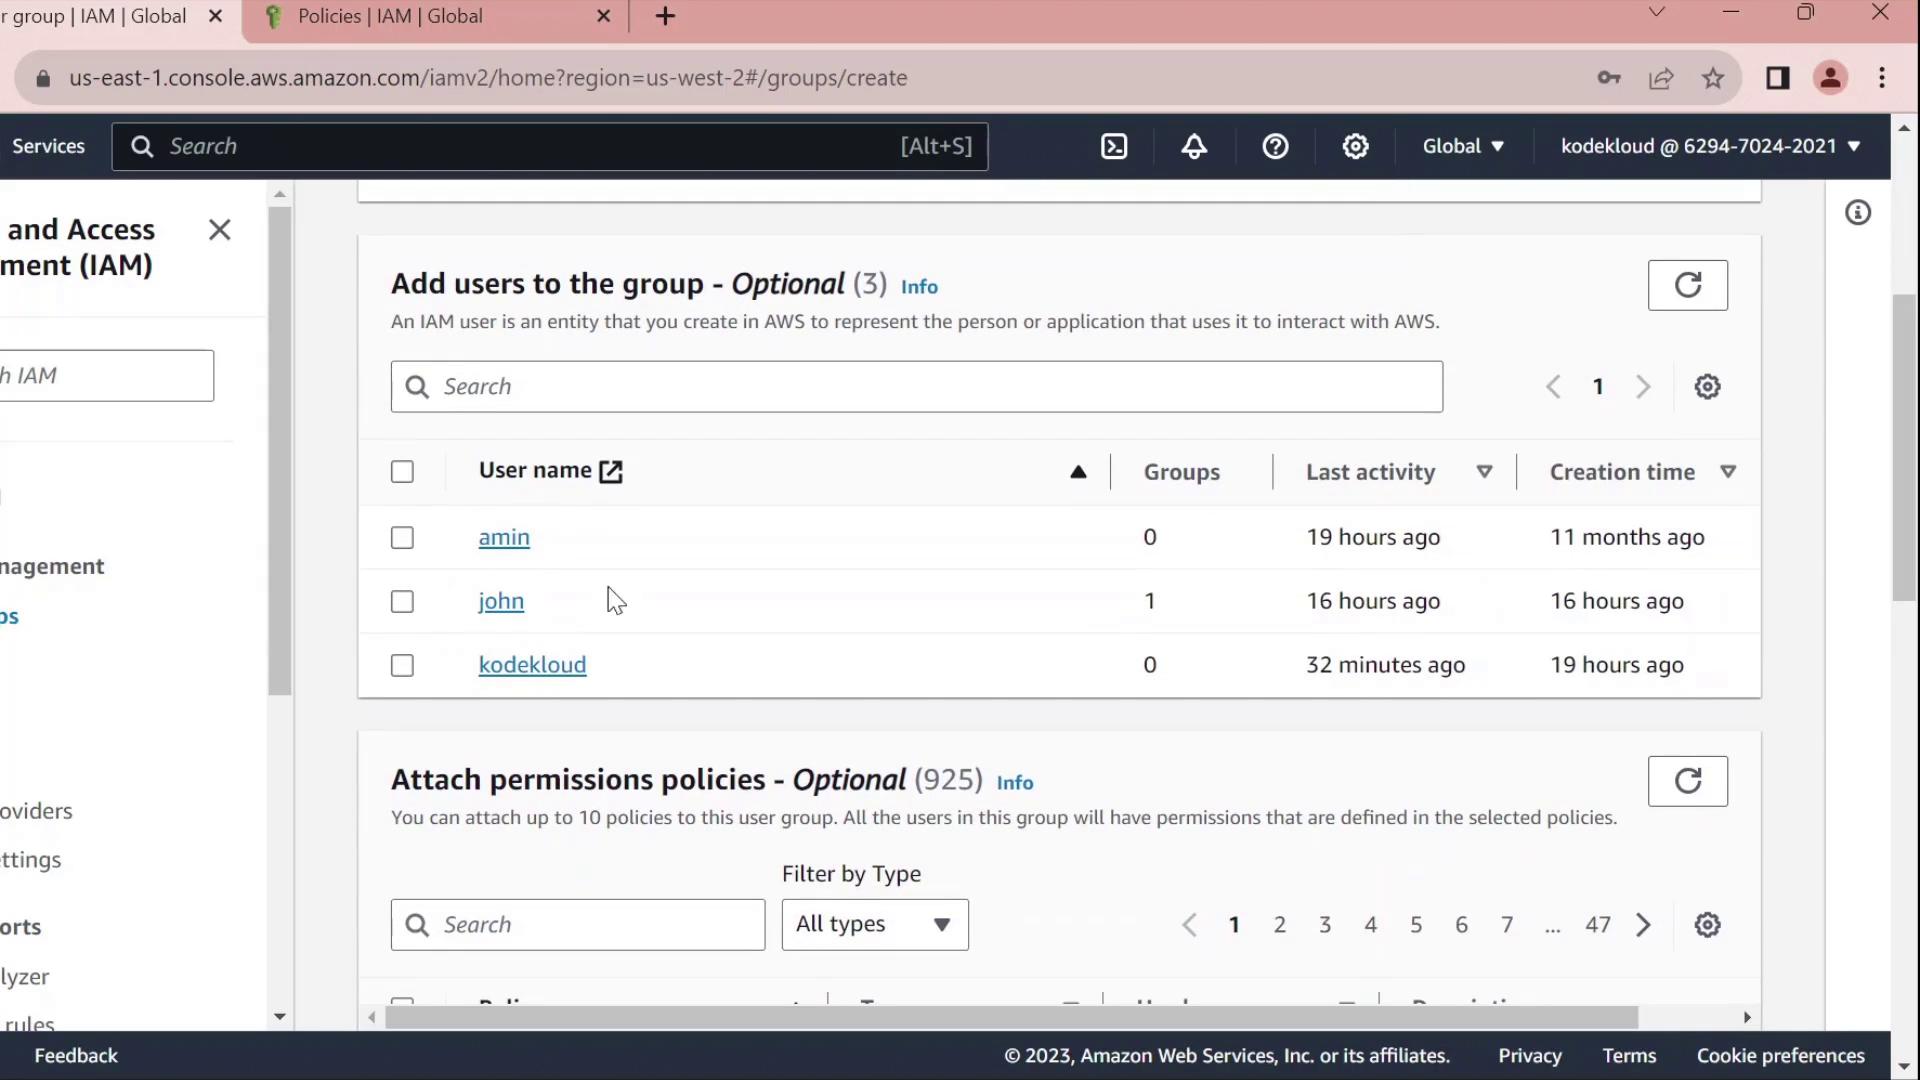
1. Create a Developers Group
In the AWS Management Console, navigate to IAM → User groups.
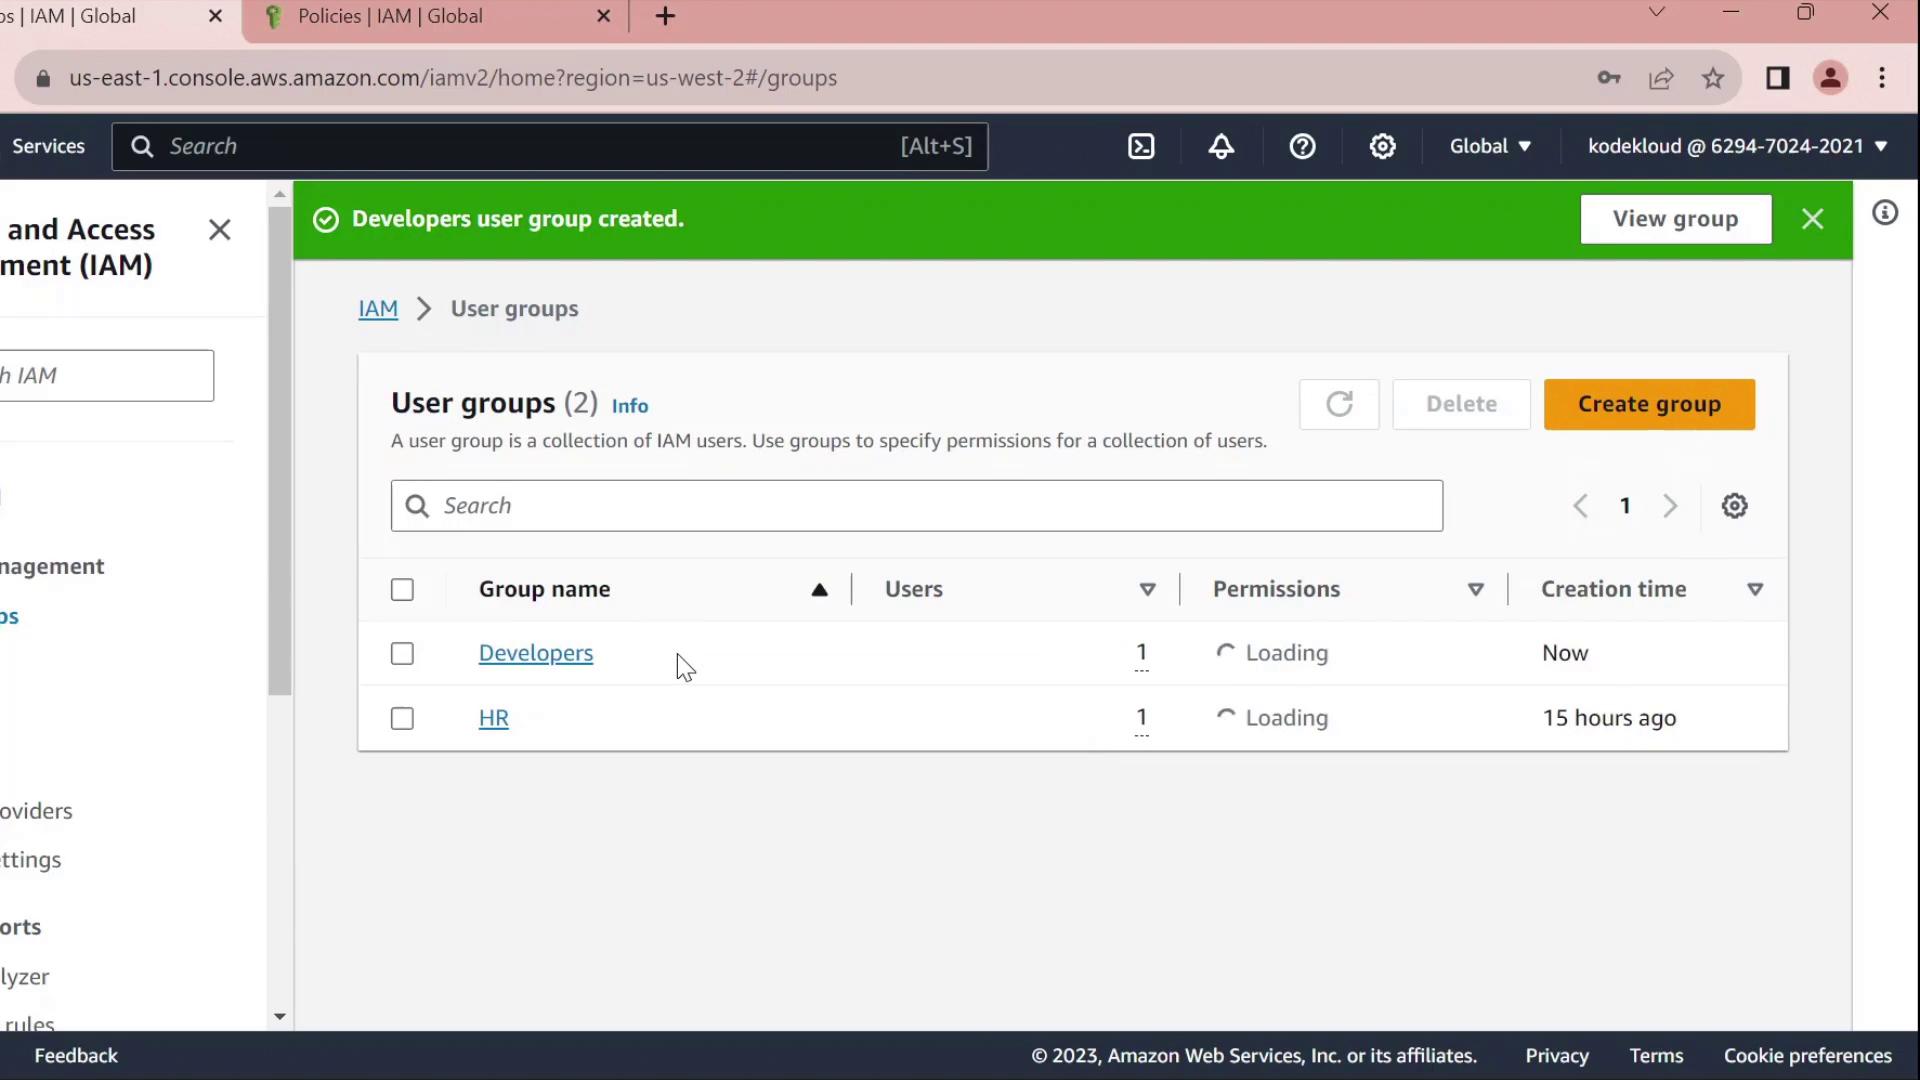
Click Create group, name it Developers, and add the user John to the group.
Skip attaching any policies for now and finish the wizard.
Once created, you’ll see Developers listed without any permissions:
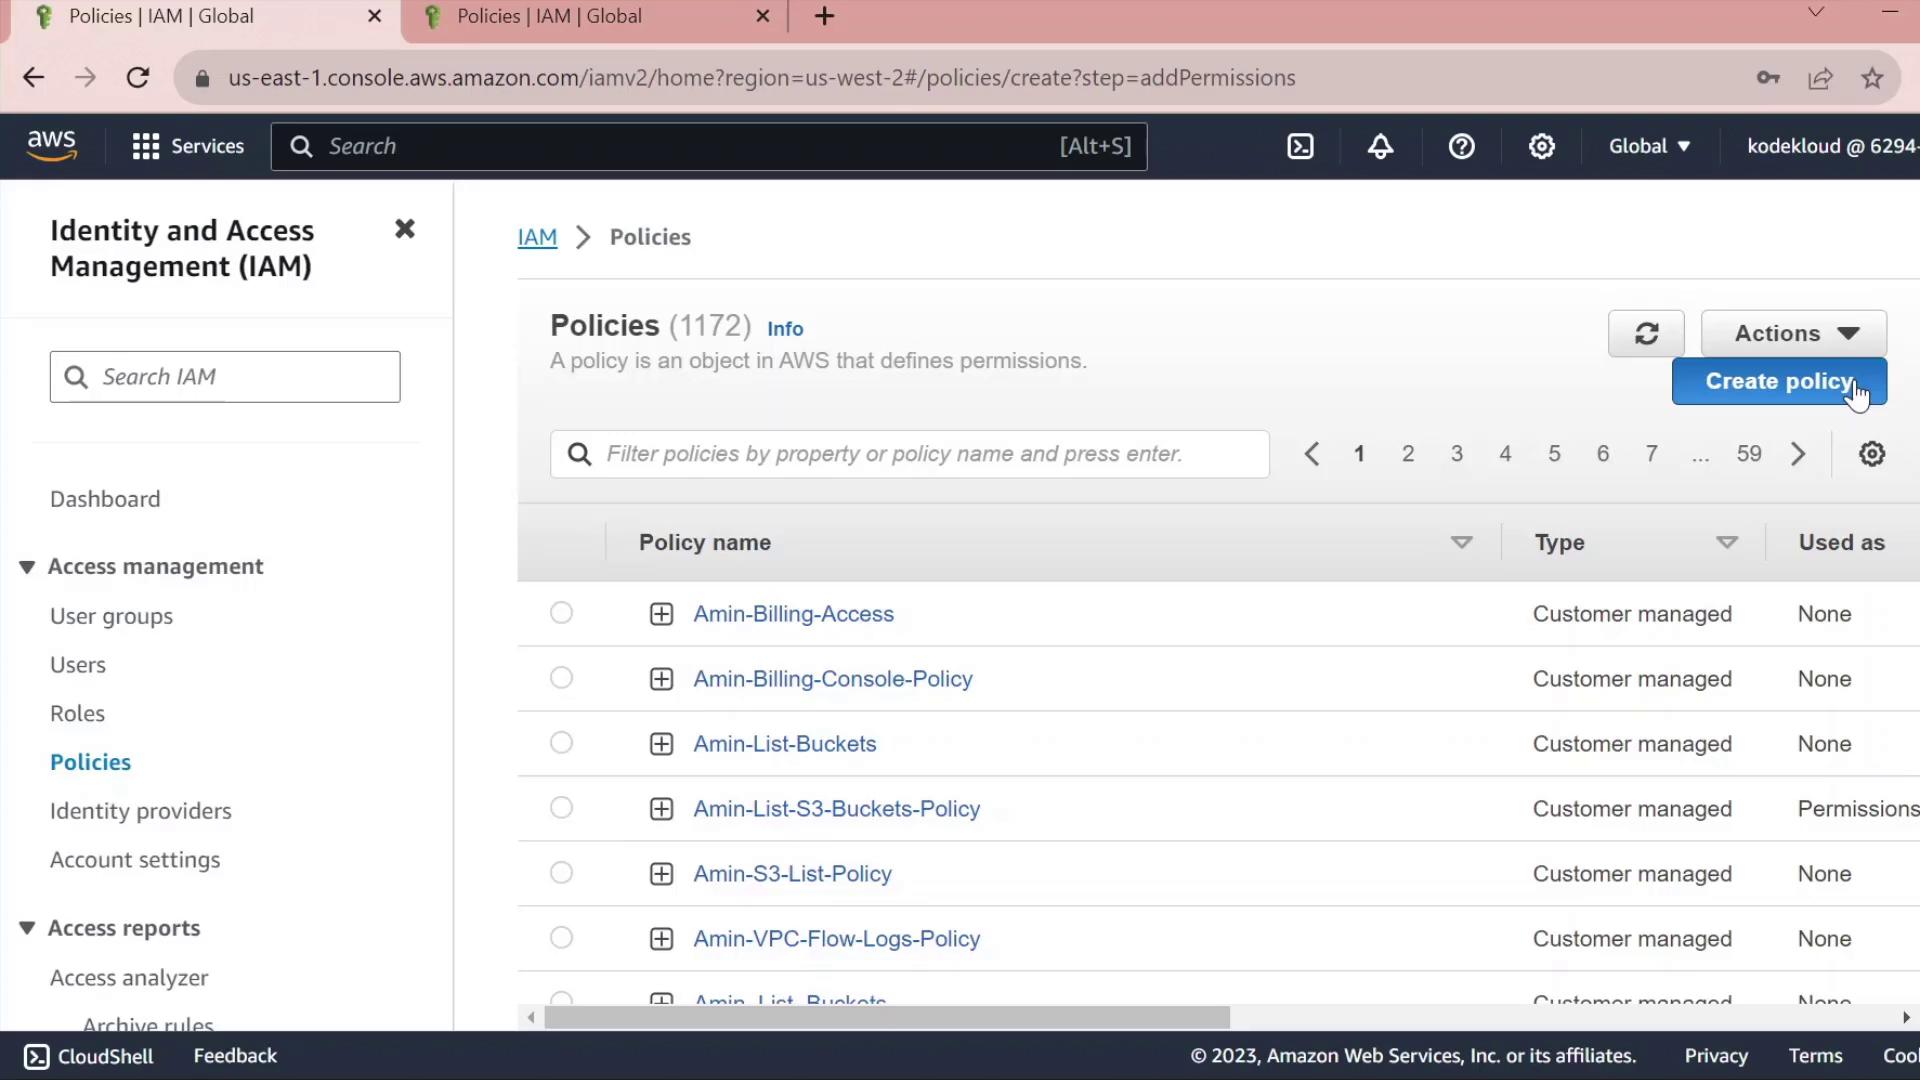
2. Create a Custom Policy
In the IAM sidebar, select Policies.
Click Create policy.
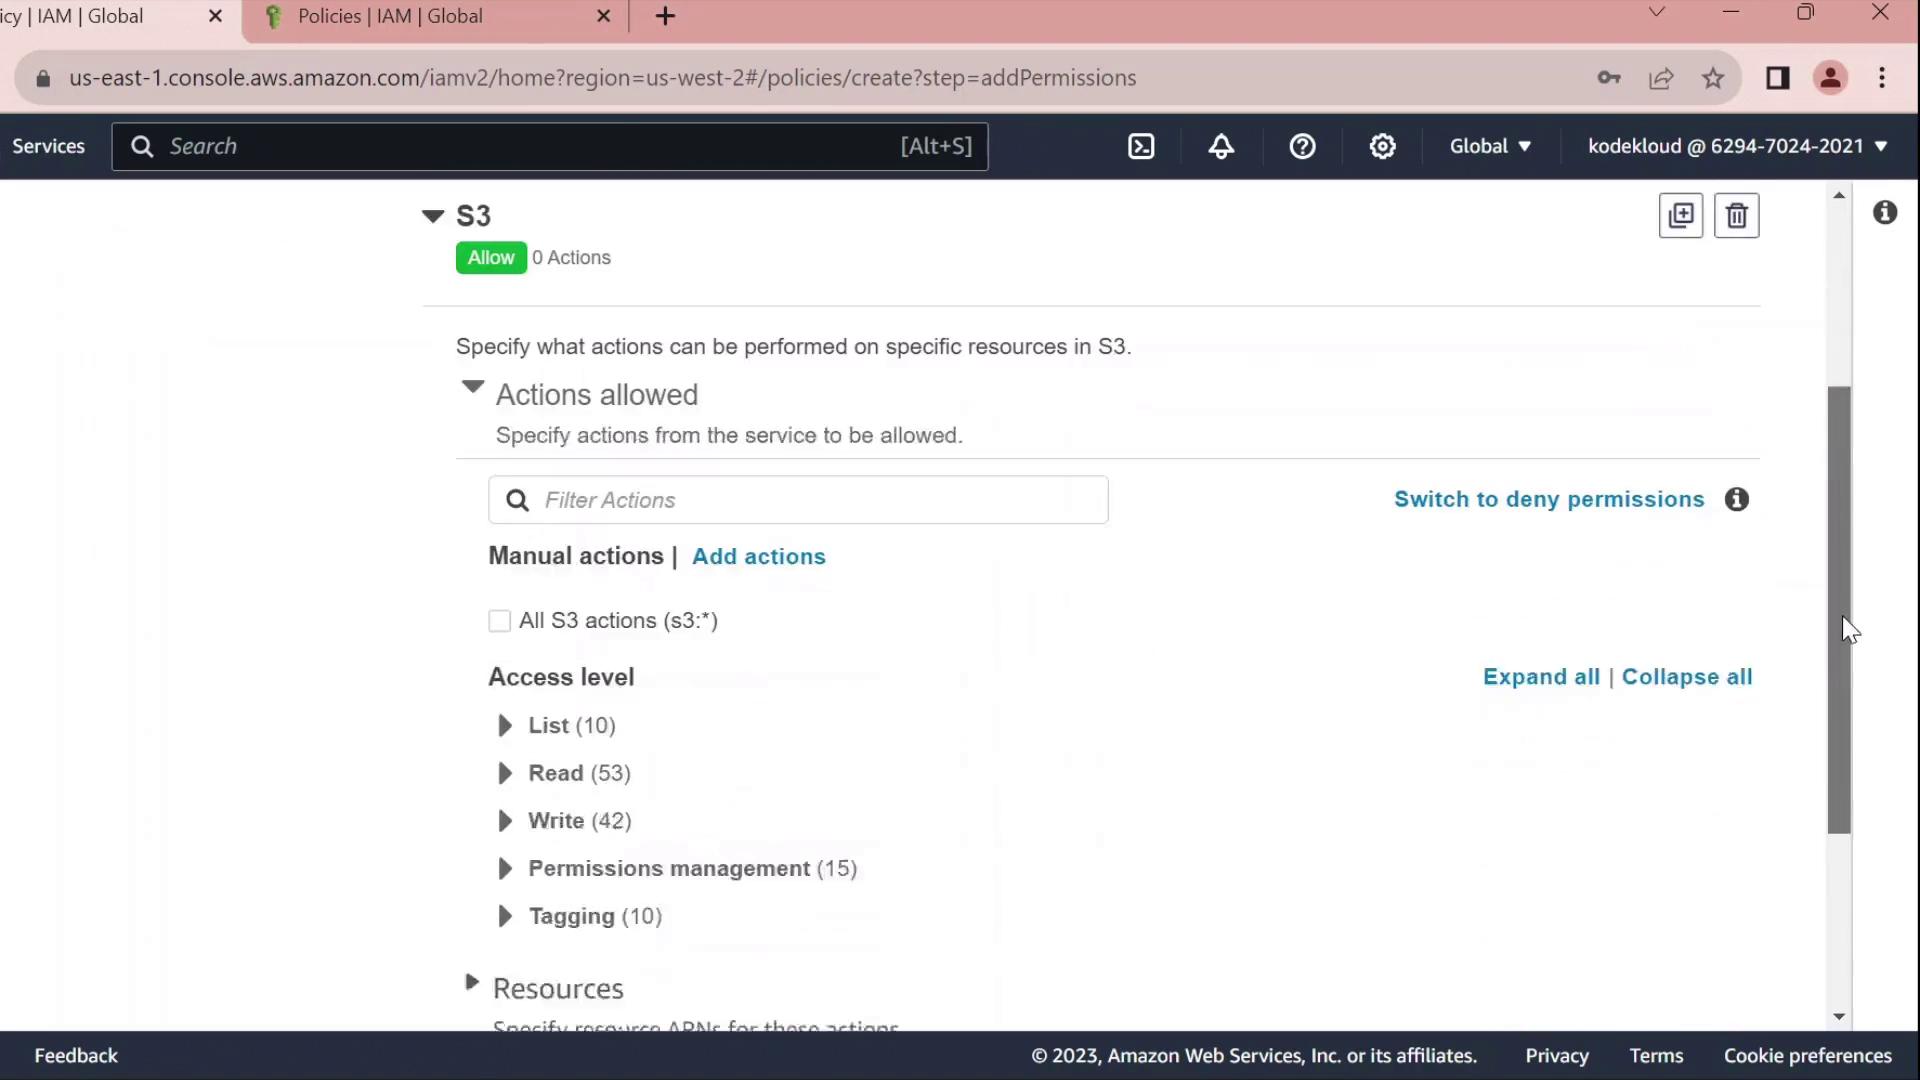
2.1 Grant S3 Read Access
Under Service, choose S3.
In Actions, expand Read and check GetObject.
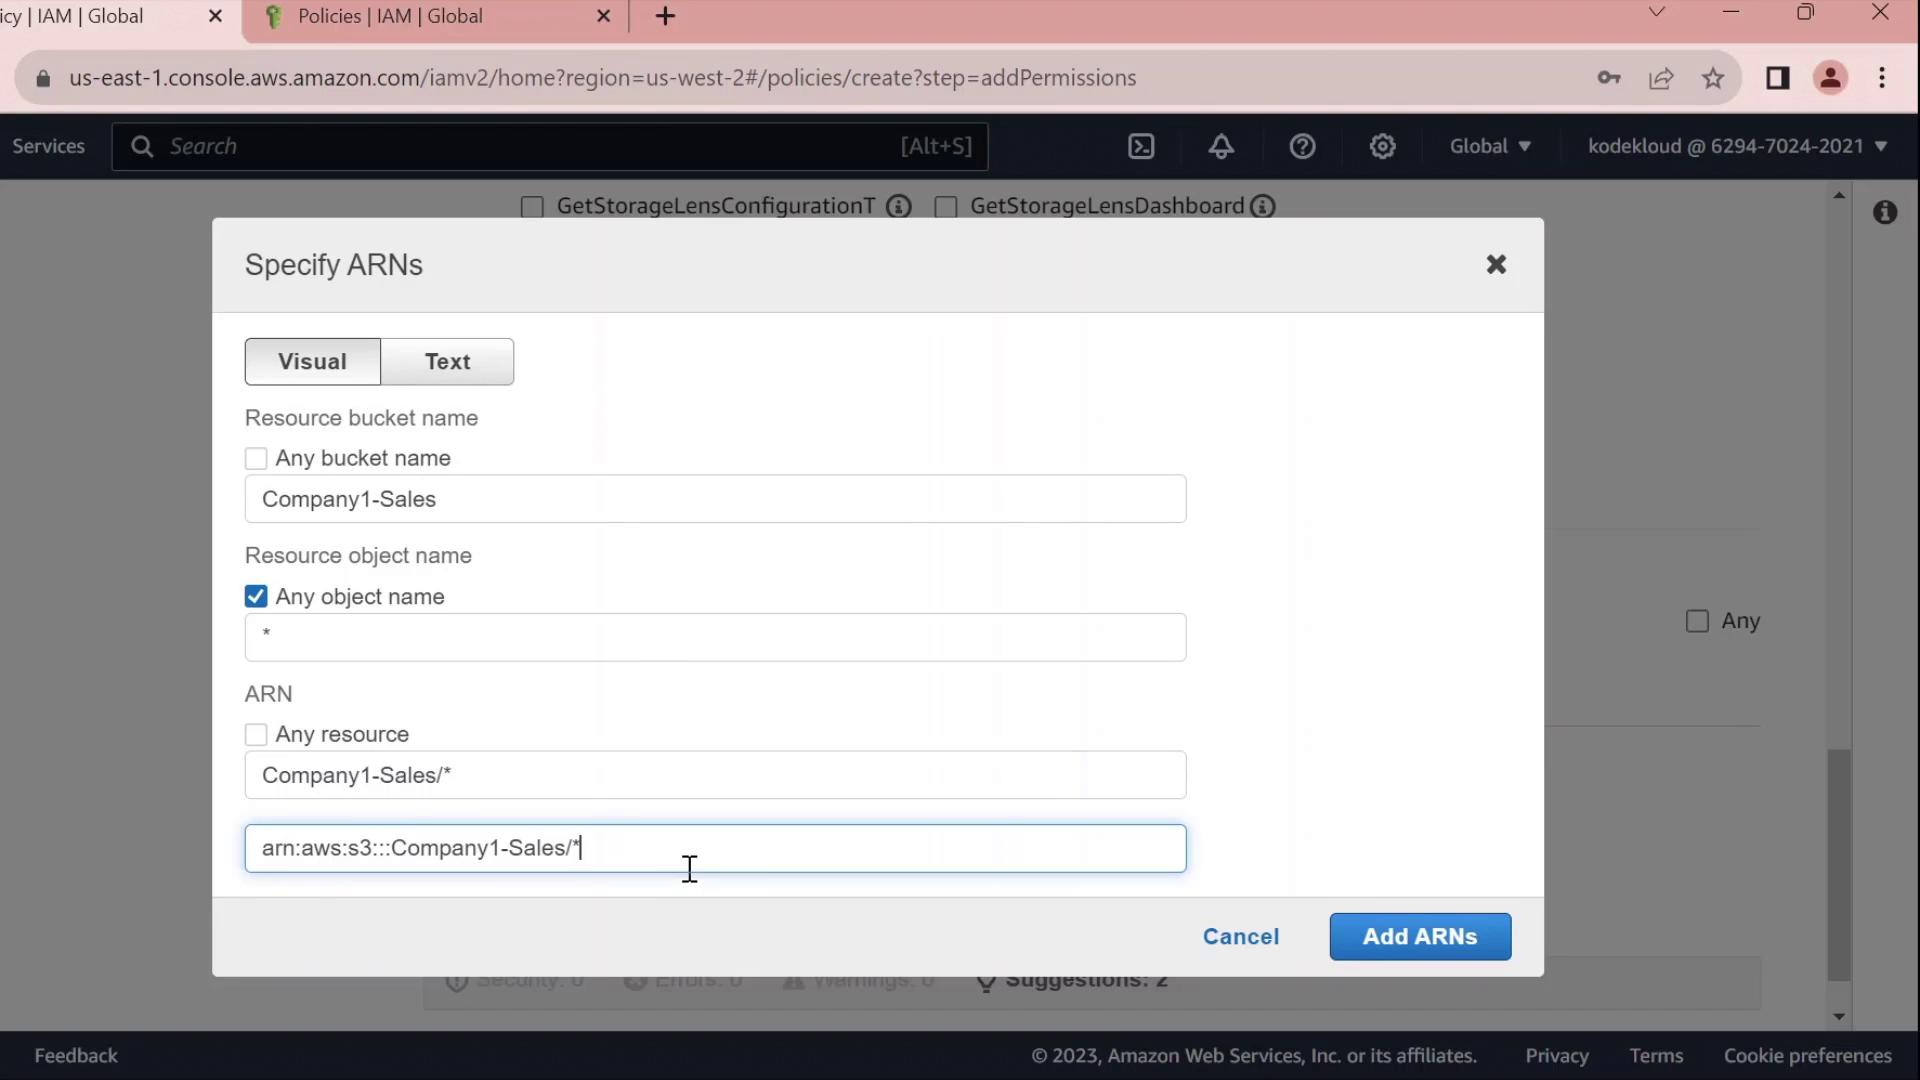
Under Resources → Add ARN, enter:
Bucket:
company1-salesObject:
*
The console will build the ARN for you.
2.2 Grant EC2 Full Access
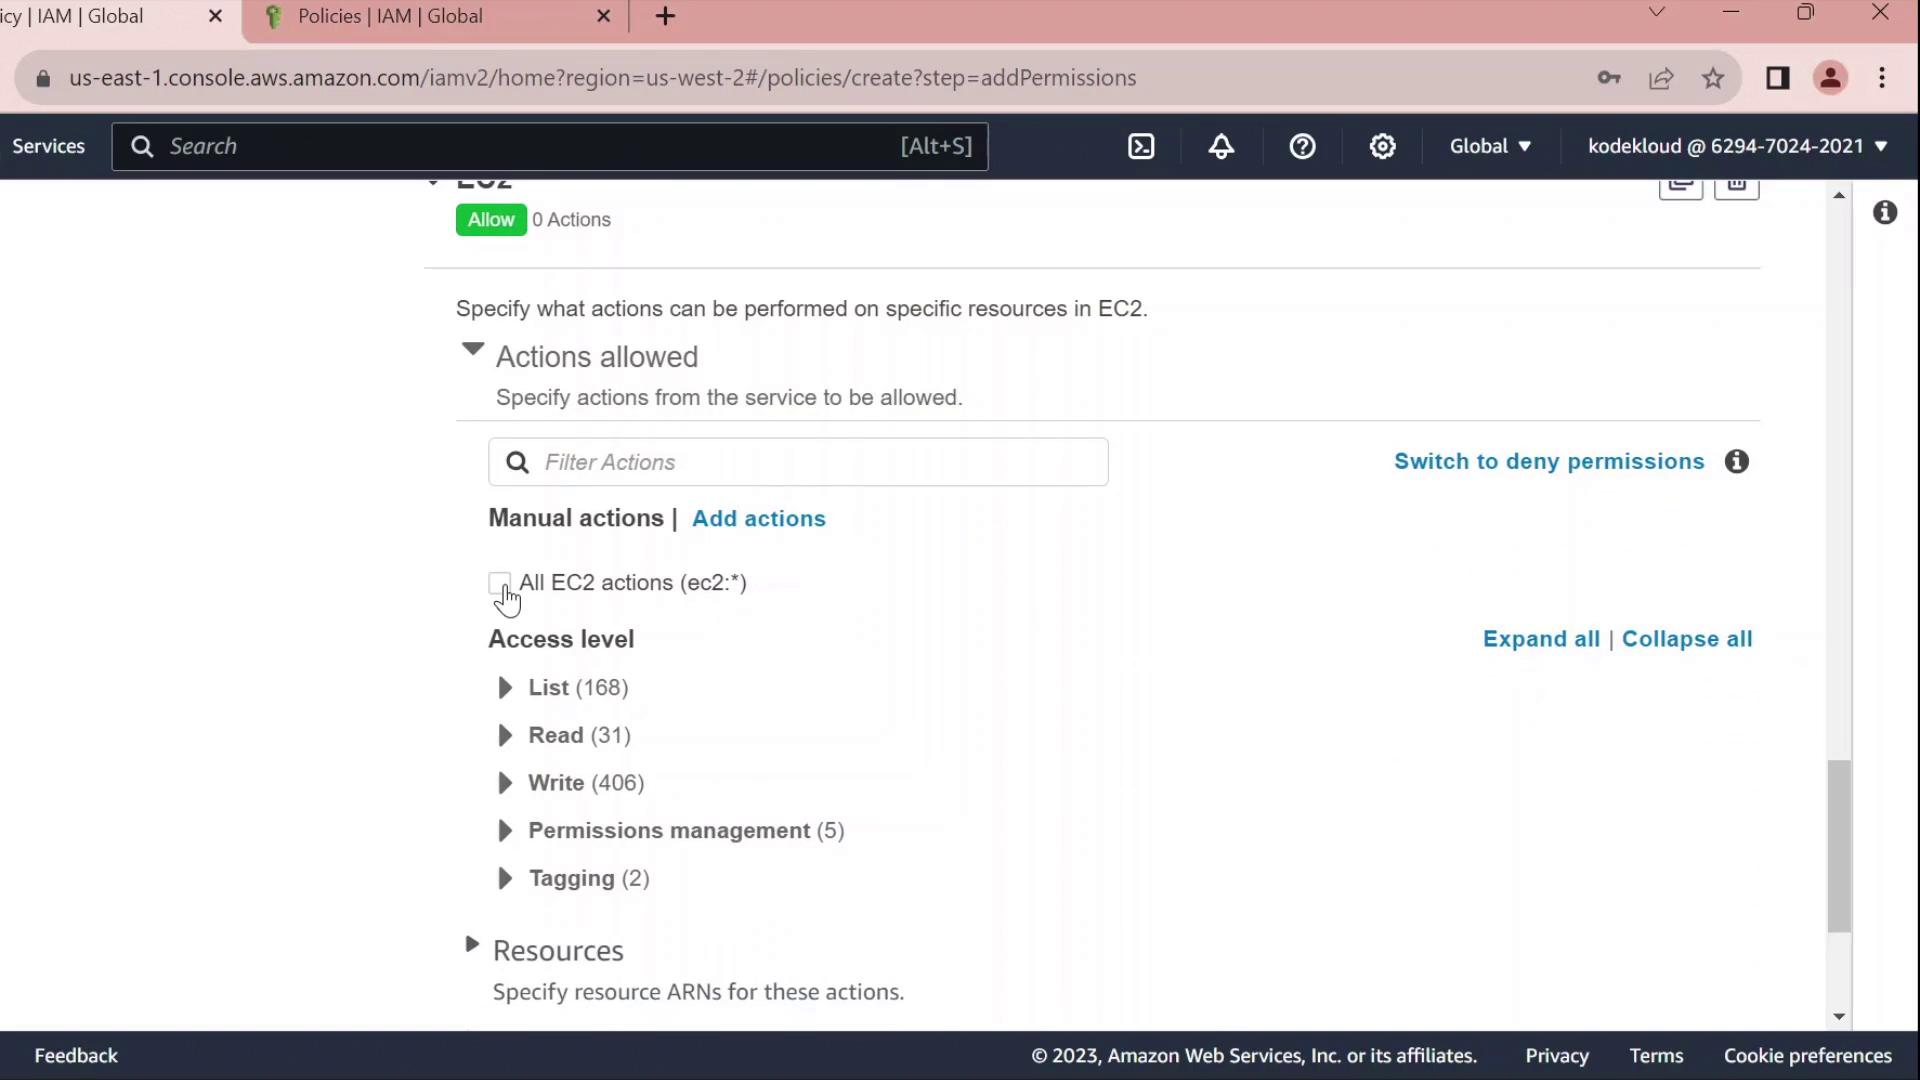
Click Add permissions → EC2.
Select All EC2 actions under Actions.
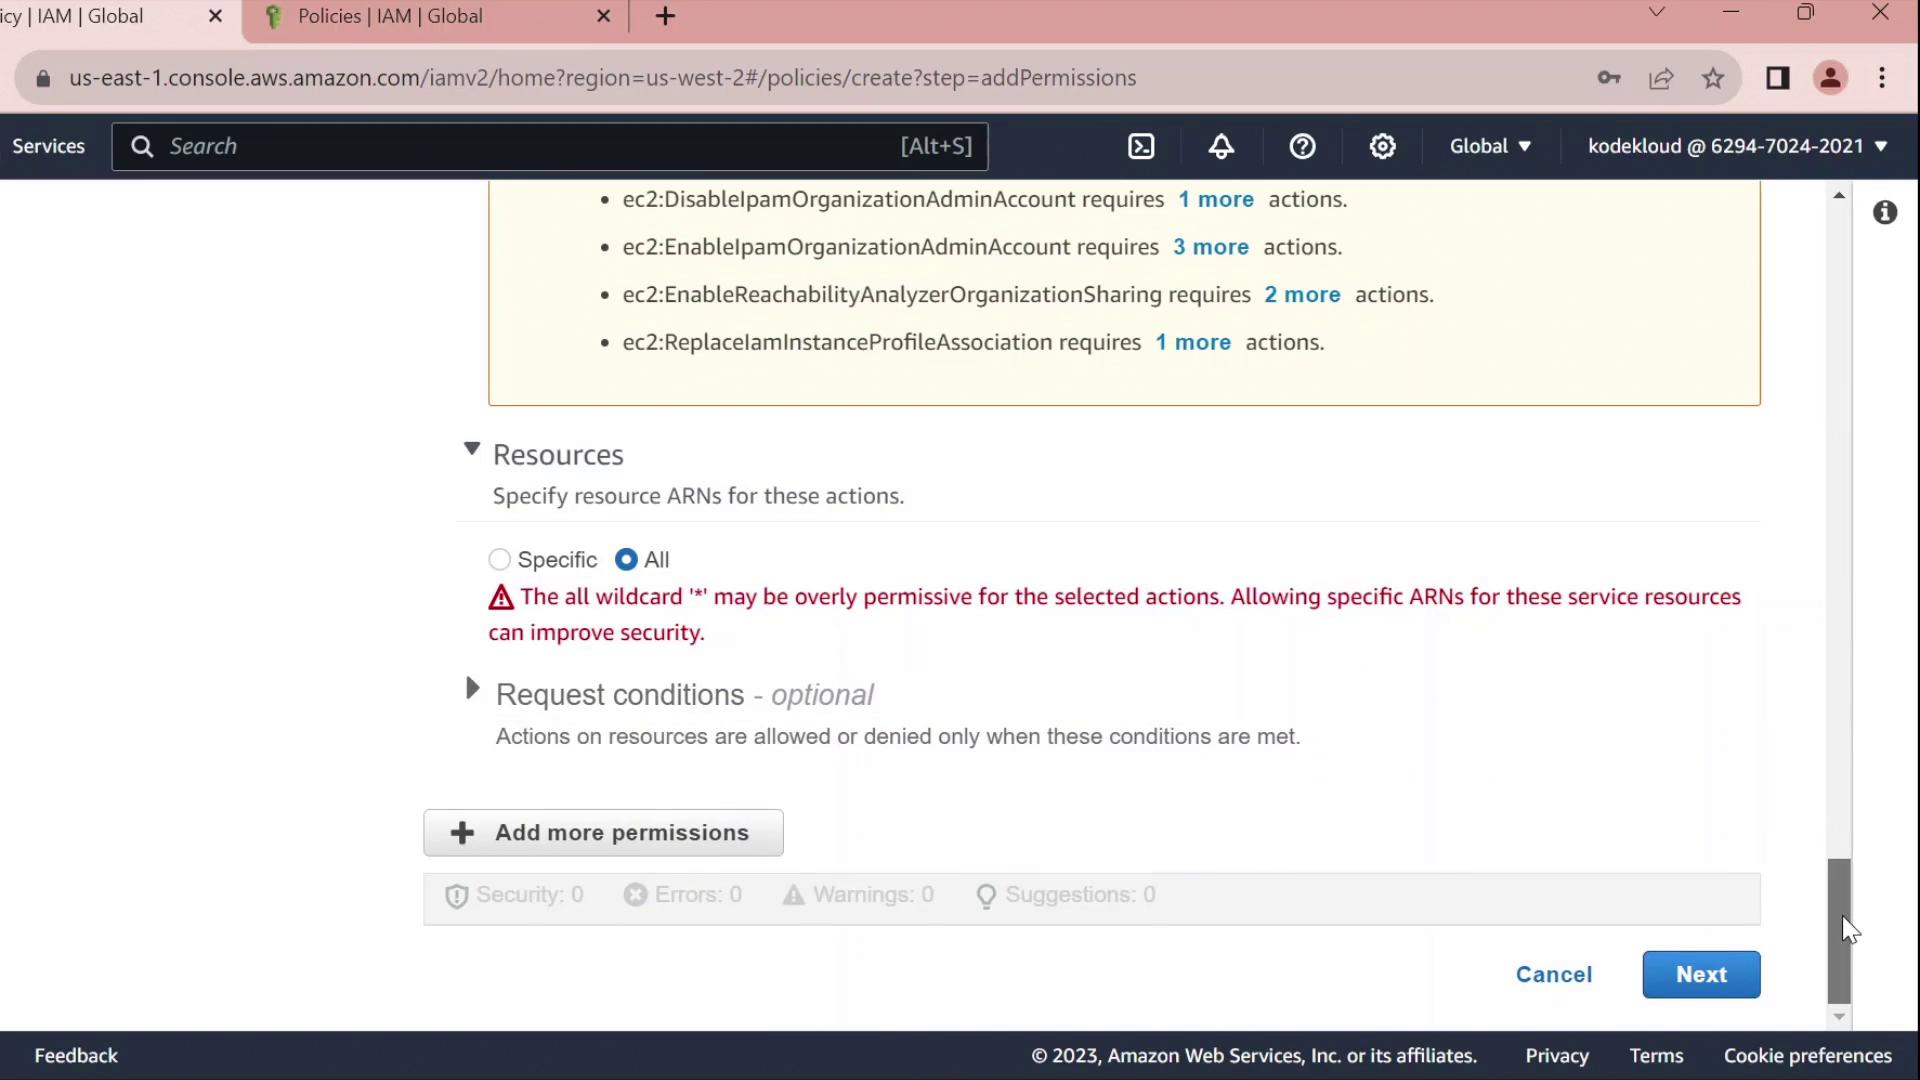
Leave the resource set to
*for all instances.
Warning
Using * for resources grants full access to all EC2 instances. In production, scope this down by specifying ARNs for specific instances or regions.
2.3 Review, Name, and Create
Click Next until you reach Review policy.
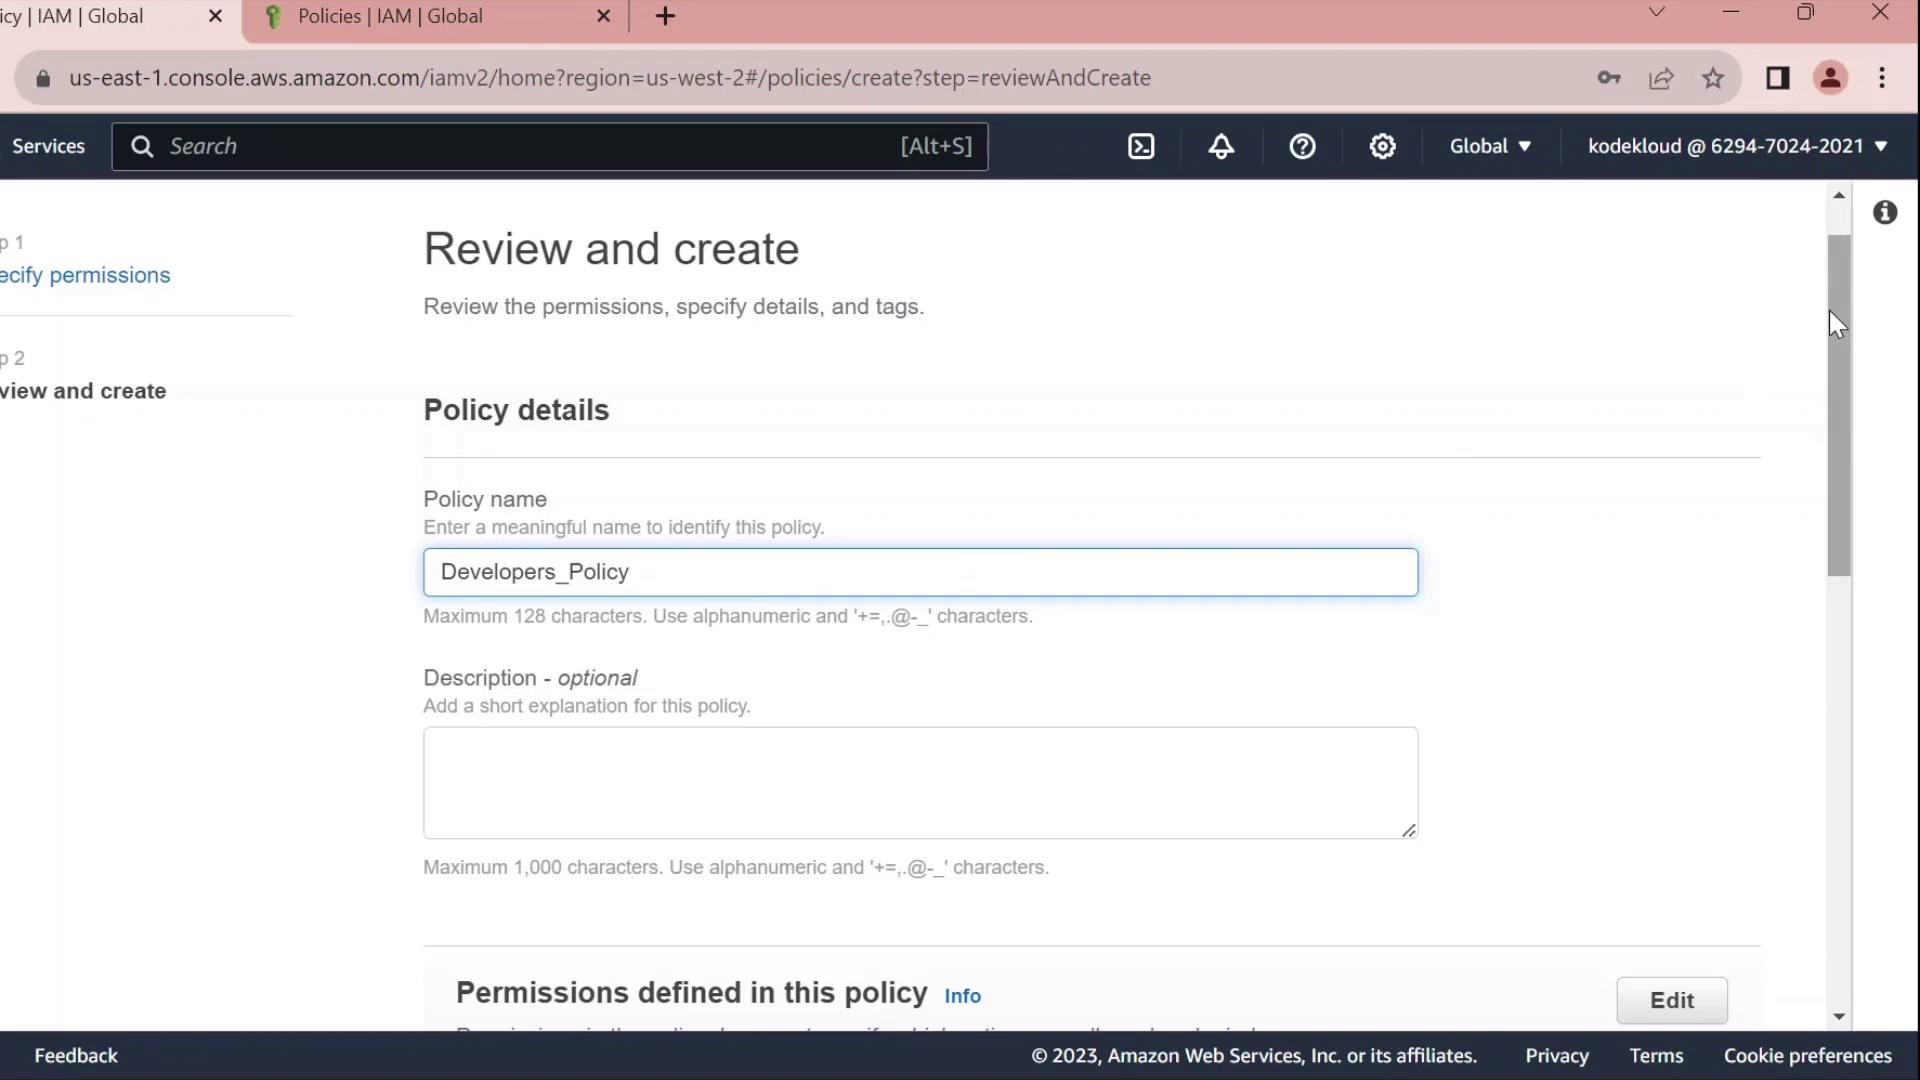
Set Name to
Developers_Policyand add an optional description.Click Create policy.
3. Attach Policy to the Developers Group
Return to IAM → User groups.
Select Developers.
Under the Permissions tab, click Attach policies.
Search for and select Developers_Policy, then click Attach policy.
Once attached, you can click the JSON icon to inspect the policy:
{
  "Version": "2012-10-17",
  "Statement": [
    {
      "Sid": "VisualEditor0",
      "Effect": "Allow",
      "Action": "ec2:*",
      "Resource": "*"
    },
    {
      "Sid": "VisualEditor1",
      "Effect": "Allow",
      "Action": "s3:GetObject",
      "Resource": "arn:aws:s3:::company1-sales/*"
    }
  ]
}
4. Edit the Policy
Click Edit policy on the Permissions tab to open the policy editor. You can switch between the Visual editor and the JSON tab.
4.1 Rename Statement IDs
Replace autogenerated Sid values with clear identifiers:
{
  "Version": "2012-10-17",
  "Statement": [
    {
      "Sid": "AllowAllEC2Actions",
      "Effect": "Allow",
      "Action": "ec2:*",
      "Resource": "*"
    },
    {
      "Sid": "AllowS3GetObject",
      "Effect": "Allow",
      "Action": "s3:GetObject",
      "Resource": "arn:aws:s3:::company1-sales/*"
    }
  ]
}
4.2 Deny Stopping EC2 Instances
Add a statement to prevent developers from stopping instances:
{
  "Sid": "DenyStopInstances",
  "Effect": "Deny",
  "Action": "ec2:StopInstances",
  "Resource": "*"
}
4.3 Final Policy JSON
Combine all statements into your final policy:
{
  "Version": "2012-10-17",
  "Statement": [
    {
      "Sid": "AllowAllEC2Actions",
      "Effect": "Allow",
      "Action": "ec2:*",
      "Resource": "*"
    },
    {
      "Sid": "AllowS3GetObject",
      "Effect": "Allow",
      "Action": "s3:GetObject",
      "Resource": "arn:aws:s3:::company1-sales/*"
    },
    {
      "Sid": "DenyStopInstances",
      "Effect": "Deny",
      "Action": "ec2:StopInstances",
      "Resource": "*"
    }
  ]
}
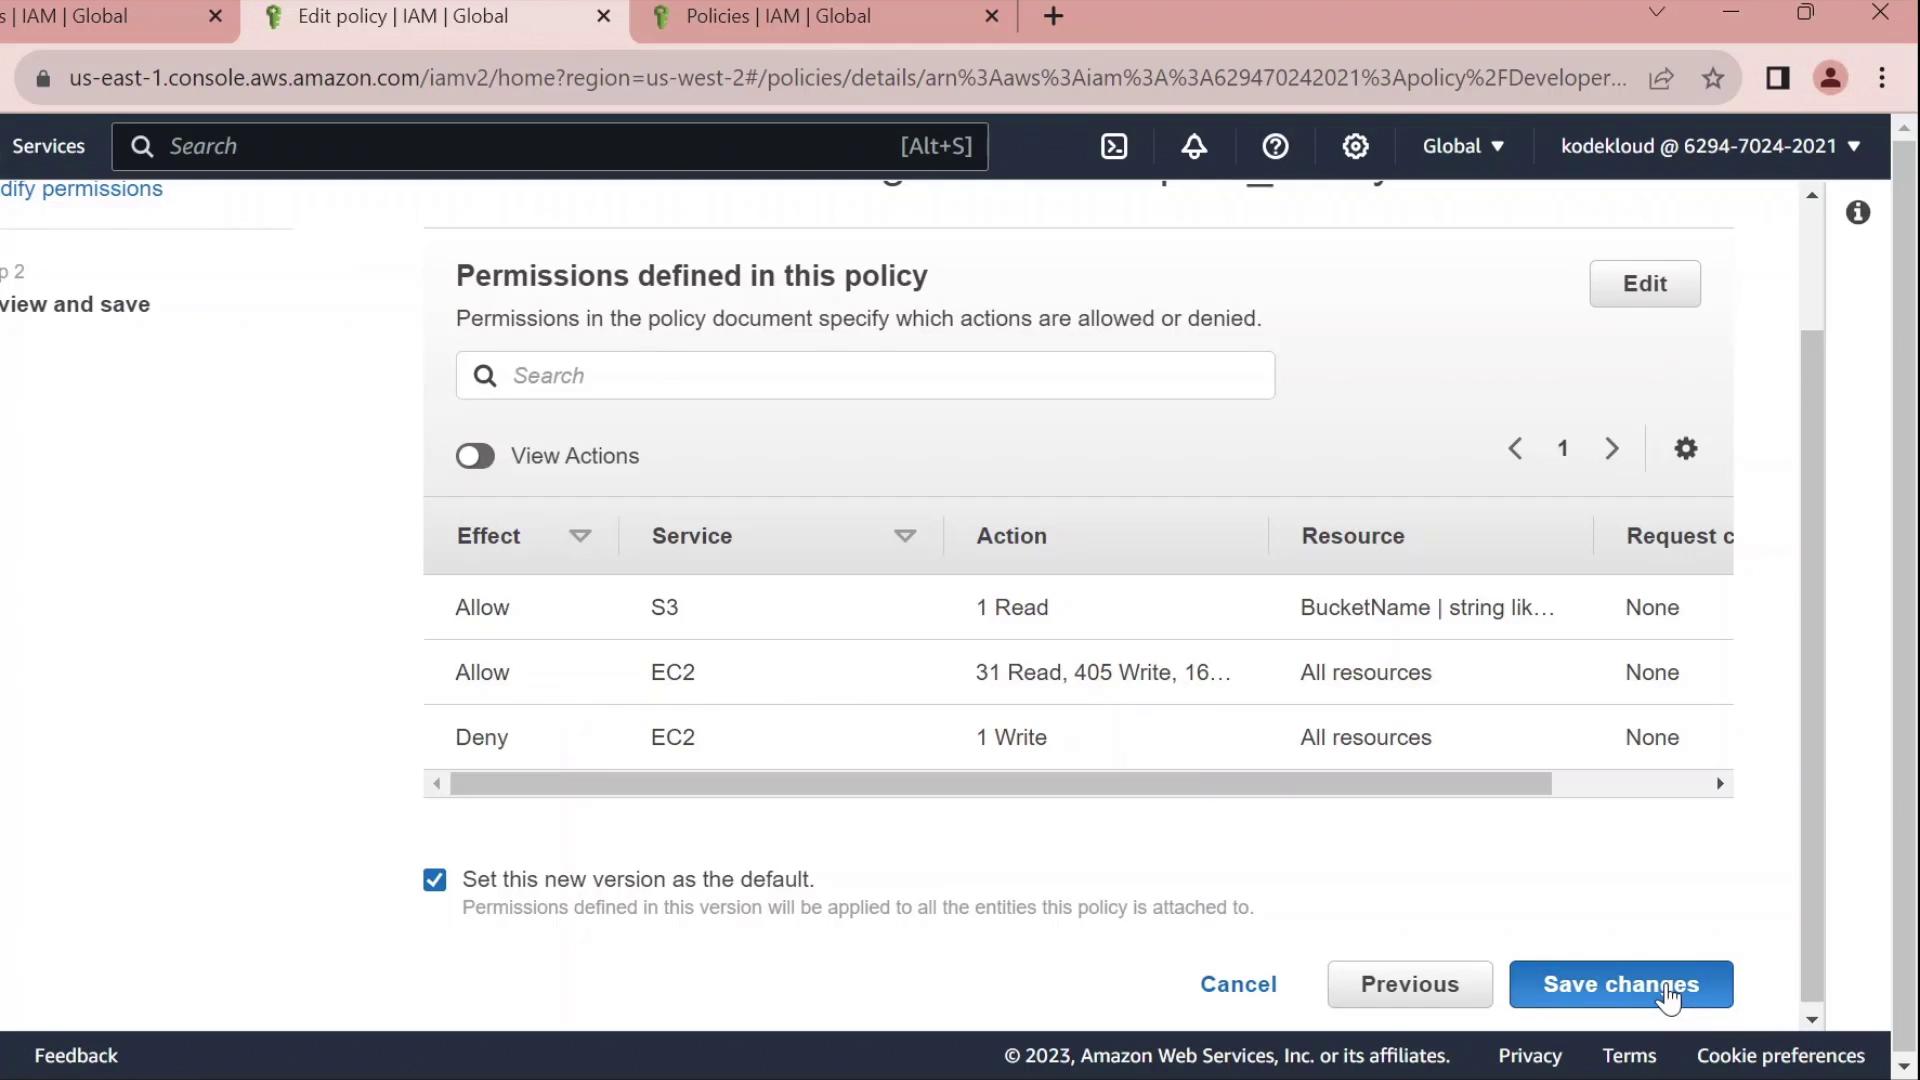
| Sid | Effect | Action | Resource |
| AllowAllEC2Actions | Allow | ec2:* | * |
| AllowS3GetObject | Allow | s3:GetObject | arn:aws:s3:::company1-sales/* |
| DenyStopInstances | Deny | ec2:StopInstances | * |
Click Save changes to apply the updated policy.
IAM Resource Based Policy
Now, we’ll explore how IAM resource-based policies work in AWS, focusing on S3 bucket policies. Resource-based policies are attached directly to resources—such as S3 buckets—to specify which AWS principals can perform actions on them.
Key Components of a Resource-Based Policy
| Element | Description |
| Version | Defines the policy language version (e.g., 2012-10-17). |
| Statement | Contains one or more permission statements. |
| Principal | Specifies the AWS entity (user, role, account, or group) to which the policy applies. |
| Effect | Indicates whether to Allow or Deny specified actions. |
| Action | Lists AWS operations (for example, s3:DeleteObject). |
| Resource | Defines the ARN(s) of the target resource(s). |
Example: Explicit Deny in an S3 Bucket Policy
The following policy blocks the accounting group from deleting objects or the bucket itself in the accounting1 S3 bucket:
{
  "Version": "2012-10-17",
  "Statement": [
    {
      "Effect": "Deny",
      "Principal": {
        "AWS": "arn:aws:iam::123456789:group/accounting"
      },
      "Action": [
        "s3:DeleteBucket",
        "s3:DeleteObject"
      ],
      "Resource": [
        "arn:aws:s3:::accounting1",
        "arn:aws:s3:::accounting1/*"
      ]
    }
  ]
}
Warning
Explicit denies always override any allows. Ensure you review all policies for unintended deny statements.
IAM Policy Evaluation Logic
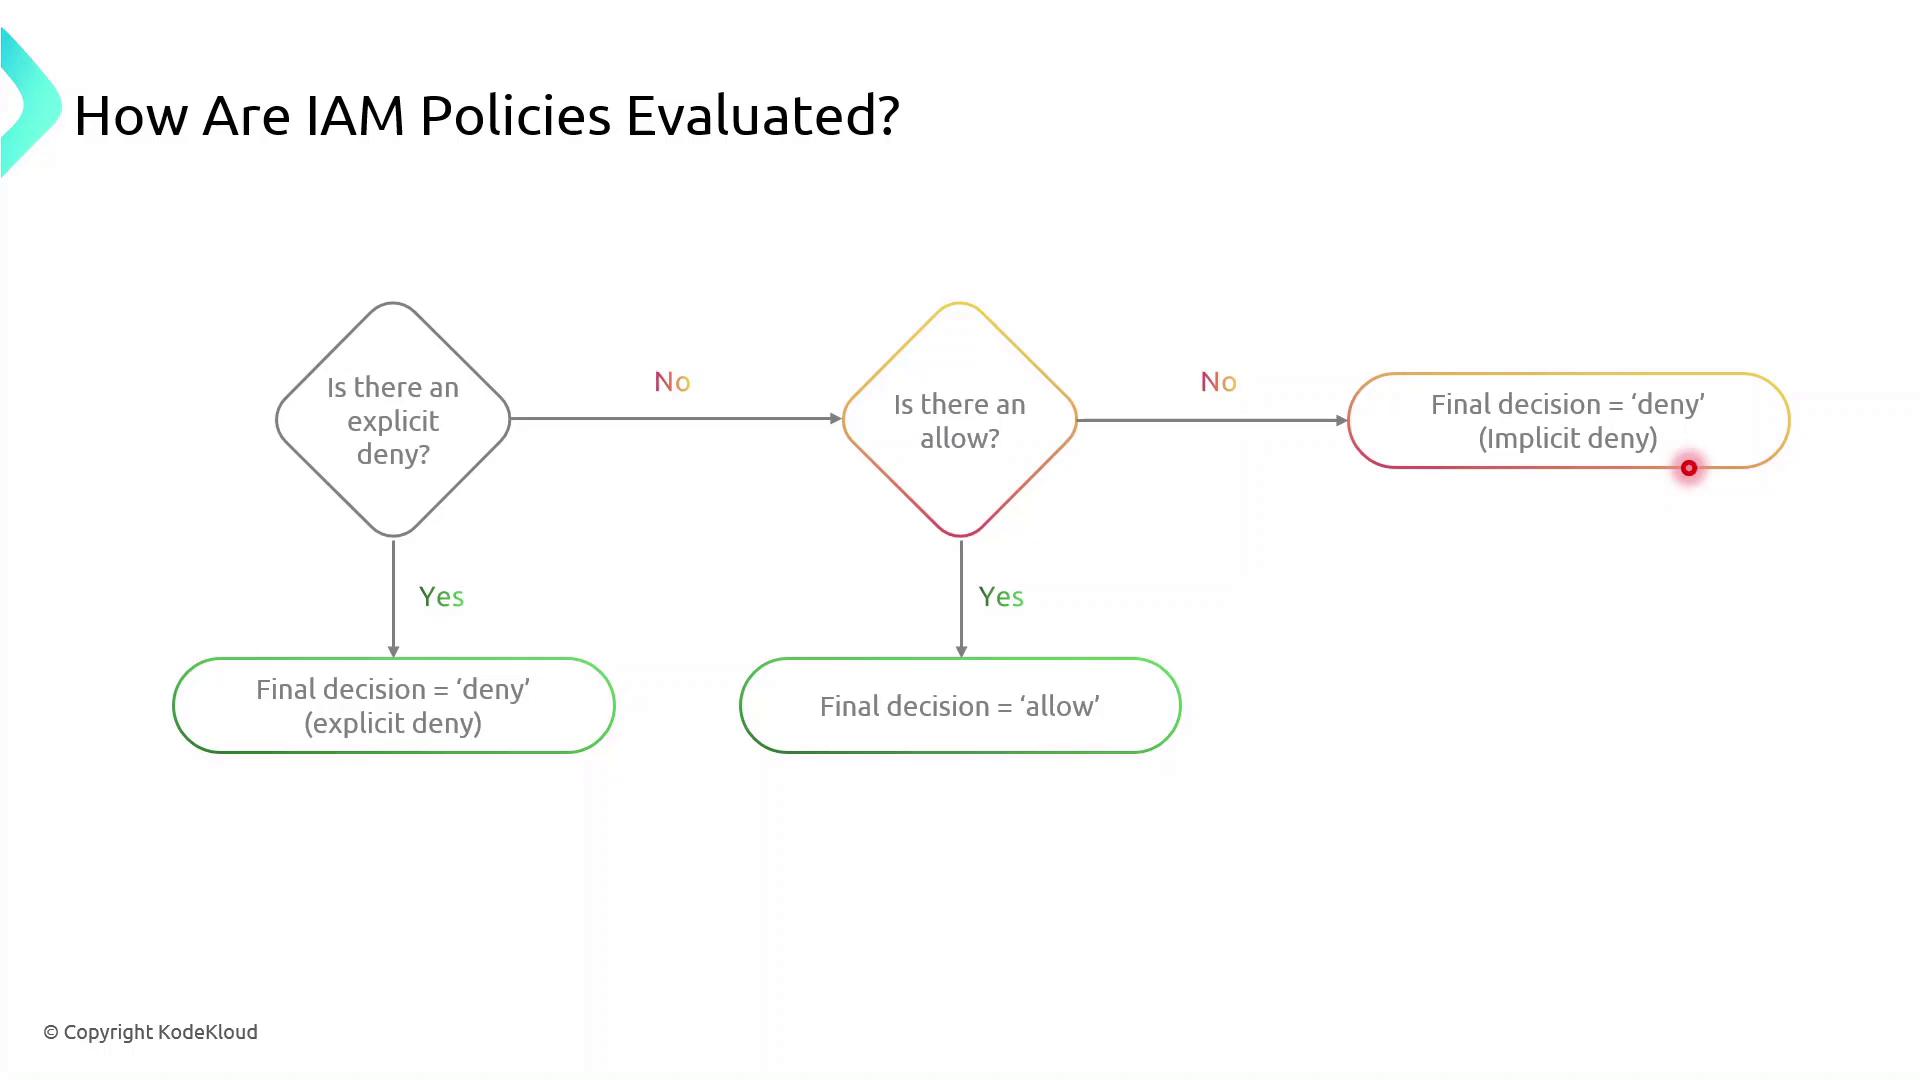
When multiple statements or policies apply to a request, AWS evaluates them in this order:
| Order | Evaluation Step | Outcome |
| 1 | Explicit Deny present | Request is denied immediately. |
| 2 | Explicit Allow (no Deny) | Request is granted. |
| 3 | Neither Deny nor Allow | Request is implicitly denied. |
Note
Implicit denies occur when no policy explicitly allows an action. You must explicitly allow all required operations.
Creating and Attaching Your S3 Bucket Policy
Follow these steps to apply a resource-based policy to an S3 bucket:
Sign in to the AWS Management Console.
Open the IAM service and choose Policies.
Click Create policy, then select JSON.
Paste your policy document and review.
Attach the policy to the target S3 bucket under the Permissions tab.
Note
Make sure you have the necessary IAM permissions to create and attach policies. Failure to do so will result in authorization errors.
Demo Resource Based Policy
Now, we’ll walk through attaching a resource-based policy to an existing S3 bucket in your AWS account. You’ll learn how to use the Policy Generator, customize the JSON, and apply it to grant fine-grained access.
1. Navigate to the S3 Console
Open the AWS Management Console and go to S3.
Click Buckets and use the filter to find company1-sales.
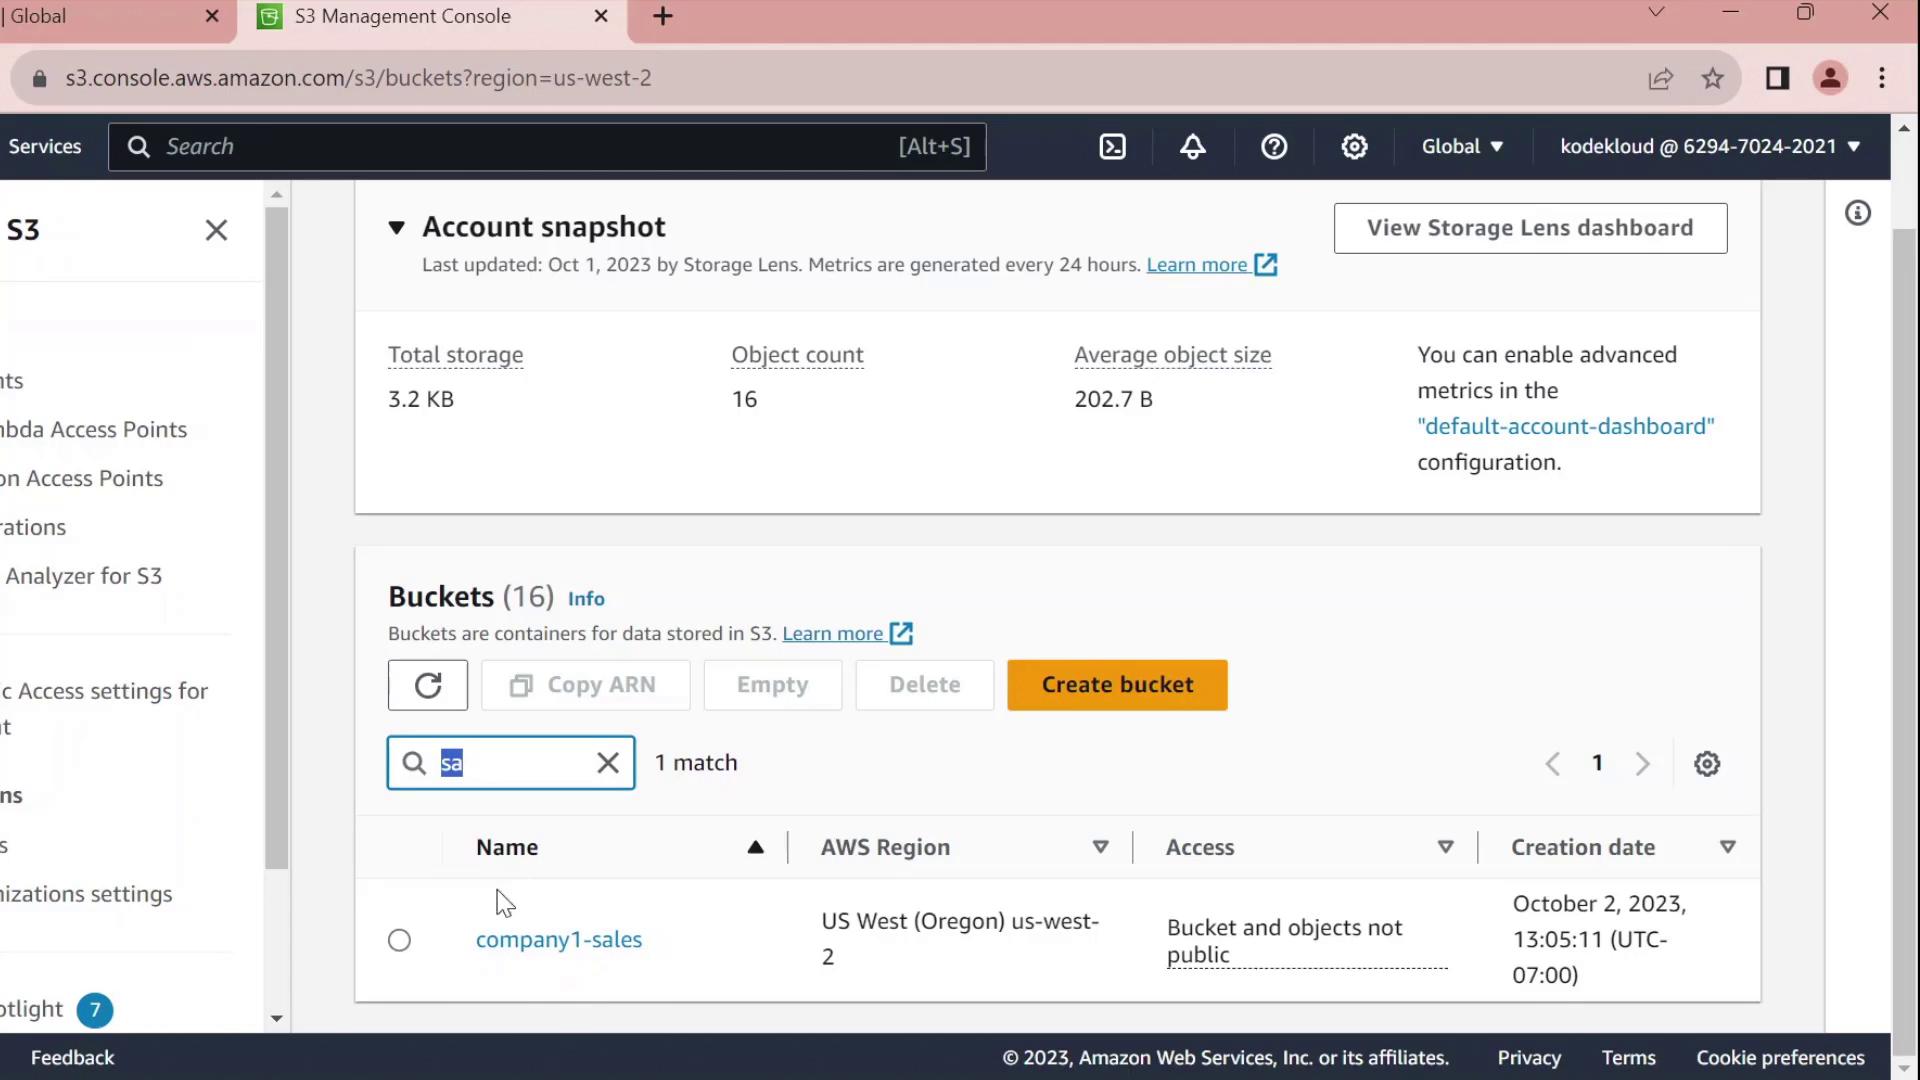
Select company1-sales and switch to the Permissions tab.
Scroll to Bucket policy and click Edit.
At the top of the editor, choose Policy Generator instead of writing raw JSON.
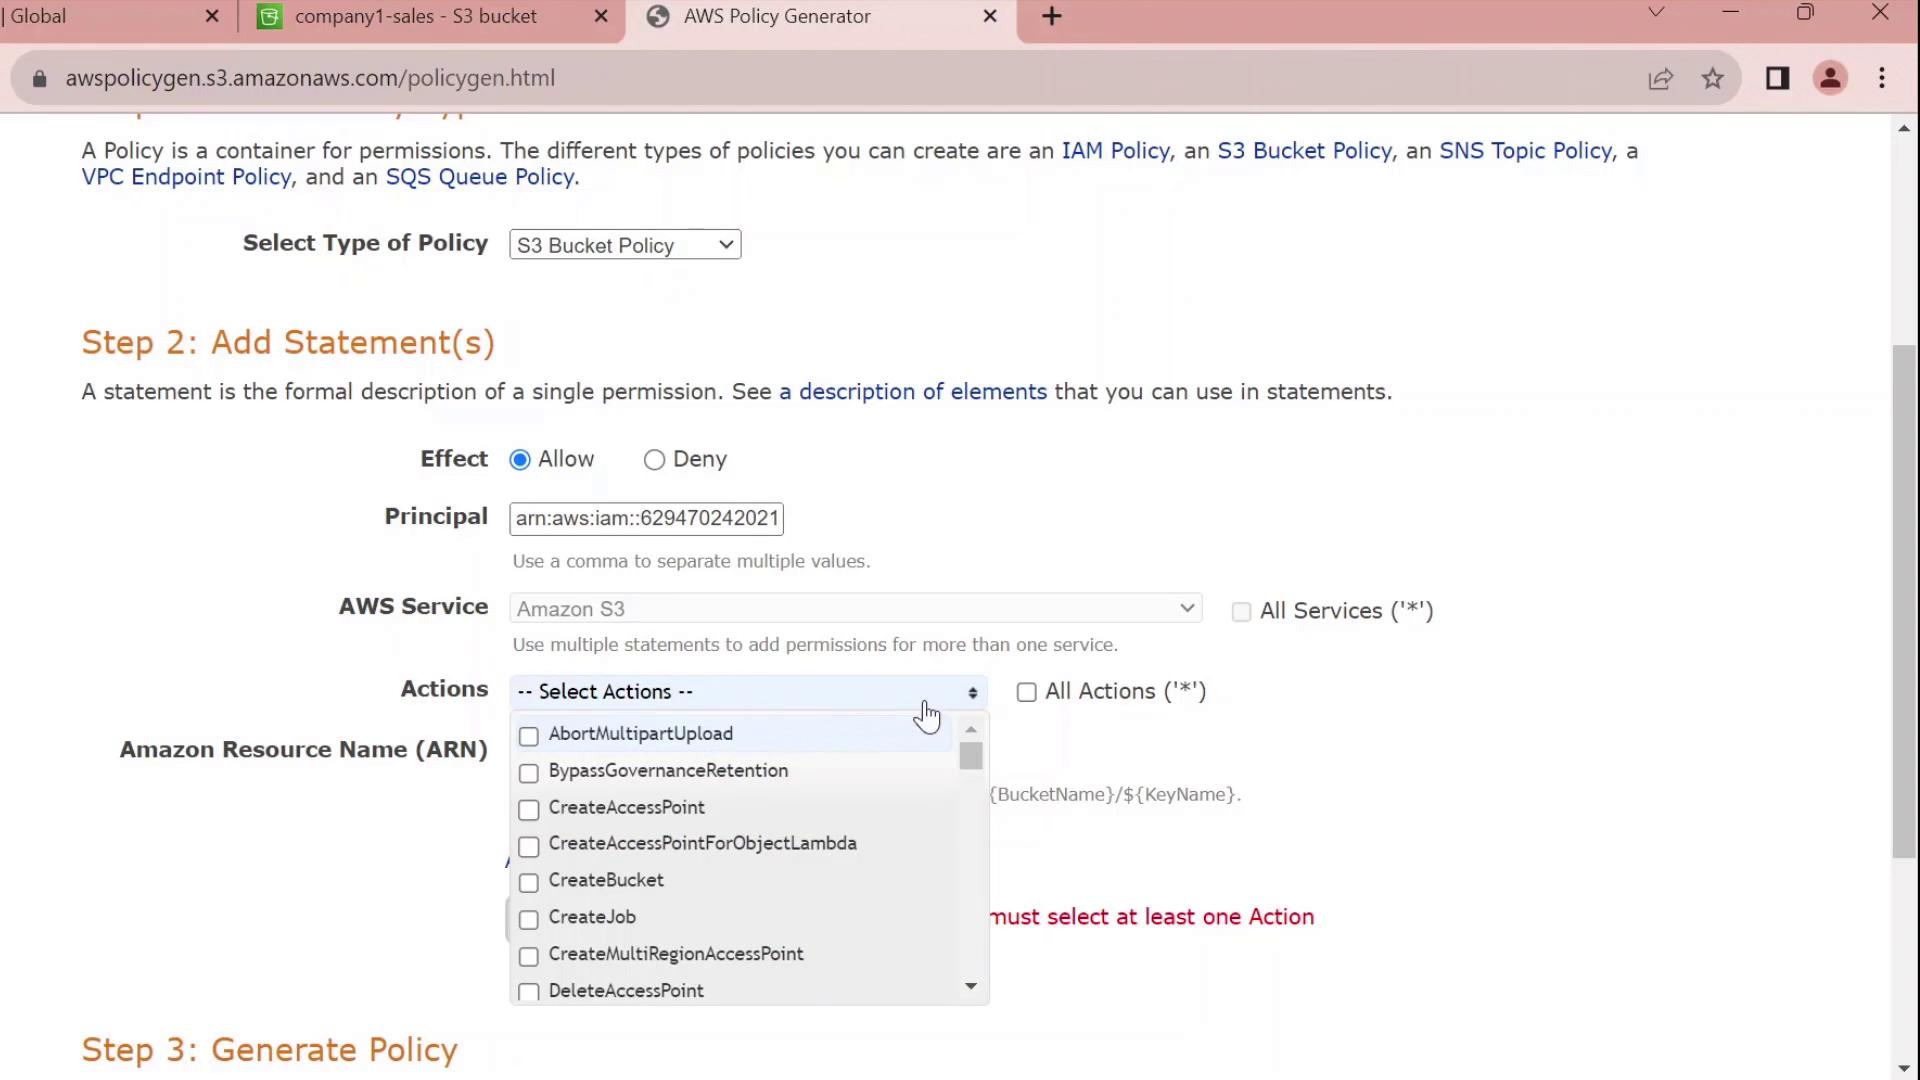
2. Generate a Bucket Policy
In the Policy Generator form:
| Field | Value |
| Effect | Allow |
| Principal | arn:aws:iam::629470242021:user/john |
| Service | S3 |
| Actions | All Actions (s3:*) |
| Resource | arn:aws:s3:::company1-sales |
Click Add Statement, then Generate Policy.
3. Review and Customize the JSON
The generator outputs a JSON policy similar to this:
{
  "Id": "Policy1696277356902",
  "Version": "2012-10-17",
  "Statement": [
    {
      "Sid": "Stmt1696277354841",
      "Effect": "Allow",
      "Principal": {
        "AWS": [
          "arn:aws:iam::629470242021:user/john"
        ]
      },
      "Action": "s3:*",
      "Resource": "arn:aws:s3:::company1-sales"
    }
  ]
}
Customize the Statement ID
Replace the auto-generated SID with something meaningful, for example JohnFullAccessToCompany1SalesBucket:
{
  "Id": "Policy1696277356902",
  "Version": "2012-10-17",
  "Statement": [
    {
      "Sid": "JohnFullAccessToCompany1SalesBucket",
      "Effect": "Allow",
      "Principal": {
        "AWS": "arn:aws:iam::629470242021:user/john"
      },
      "Action": "s3:*",
      "Resource": "arn:aws:s3:::company1-sales"
    }
  ]
}
Note
By default, this policy grants permissions only on the bucket itself. To allow object-level actions (e.g., GetObject, PutObject), add the ARN arn:aws:s3:::company1-sales/* to the Resource array.
4. Apply the Policy
Copy the finalized JSON.
Paste it into the Bucket policy editor.
Click Save changes.
You’ve now successfully attached a resource-based policy that grants the IAM user john full control over the company1-sales bucket.
Policy Statement Elements
| Element | Description | Example |
| Sid | Unique identifier for the statement | JohnFullAccessToCompany1SalesBucket |
| Effect | Allow or Deny the action | Allow |
| Principal | The IAM user, role, or service | arn:aws:iam::629470242021:user/john |
| Action | The S3 operations permitted | s3:* |
| Resource | The bucket or object ARNs | arn:aws:s3:::company1-sales<br>arn:aws:s3:::company1-sales/* |
IAM Permission Boundaries
Now, you’ll learn how to enforce the principle of least privilege for new IAM users—such as interns—by using permission boundaries. This lets you assign them to existing groups (e.g., Accounting and Dev) without granting any permissions beyond what you intend.
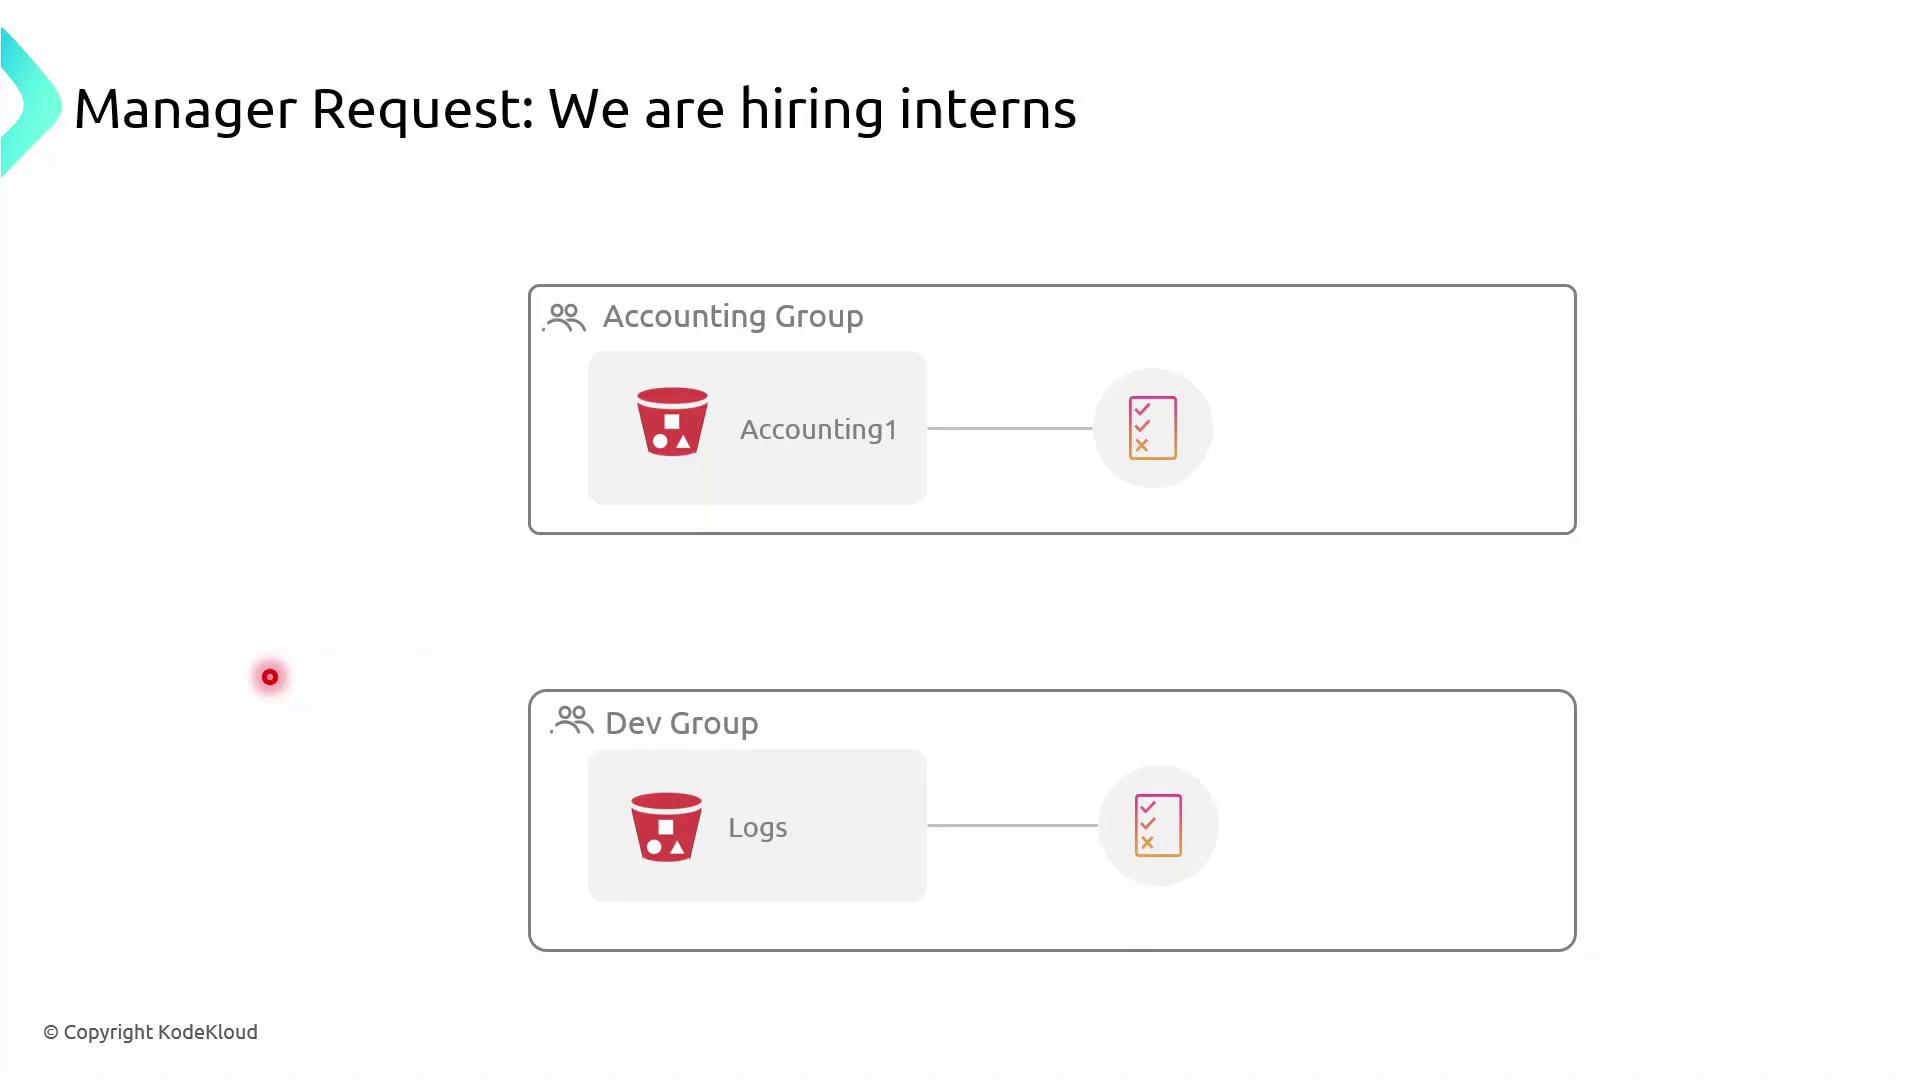
Currently, both the Accounting Group and the Dev Group have rights to specific S3 buckets. If you simply add interns to these groups:
Accounting interns could view or modify confidential financial data.
Dev interns could access or change log files in S3.
To prevent over-permissioning, apply a permission boundary that caps the maximum actions an intern can perform—even if their group policies allow more.
What Is a Permission Boundary?
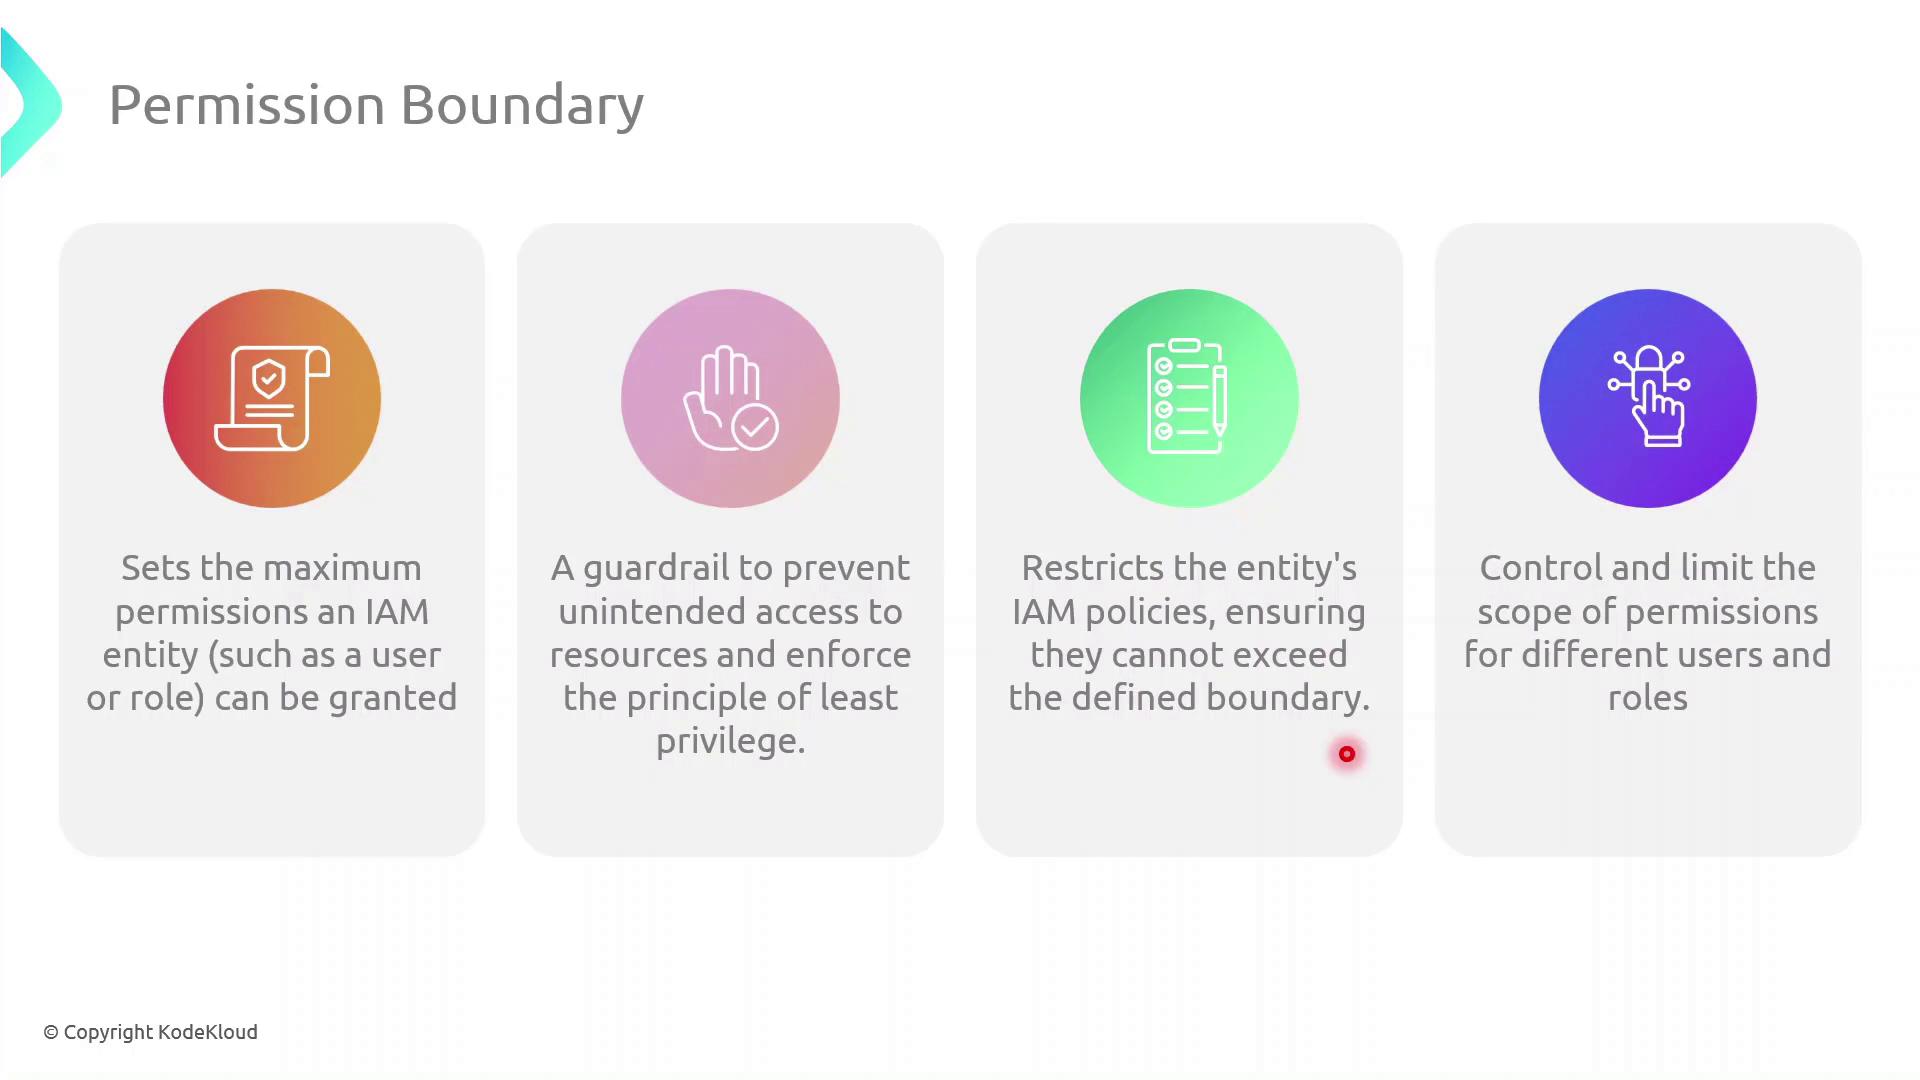
A permission boundary is an advanced IAM feature that specifies the upper limit of permissions an identity (user or role) can have. No matter how many permissions you attach via identity-based or group policies, the boundary ensures the principal cannot exceed its scope.
Note
Permission boundaries do not grant permissions by themselves. They only restrict the maximum permissions that an IAM principal can utilize.
Step-by-Step: Create and Attach a Permission Boundary
Follow these steps in the AWS Management Console:
| Step | Console Navigation | Action |
| 1 | IAM Dashboard | Click Policies → Create policy |
| 2 | JSON tab | Paste the boundary policy definition (see below) |
| 3 | Review policy | Name it InternBoundaryPolicy and create |
| 4 | Users → Select User | Under Permissions pick Add permissions boundary and attach the new policy |
{
  "Version": "2012-10-17",
  "Statement": [
    {
      "Effect": "Allow",
      "Action": [
        "s3:ListBucket"
      ],
      "Resource": [
        "arn:aws:s3:::example-log-bucket"
      ]
    }
  ]
}
Warning
Even if an intern’s group policy grants broader access, they cannot exceed the actions allowed by their permission boundary.
Assigning Interns to Groups
Once the boundary is in place:
Attach the
InternBoundaryPolicyas a permissions boundary to each intern’s IAM user.Add the intern to the relevant group (Accounting or Dev).
The intern inherits group permissions, but all actions are capped by the boundary.
Benefits of Using Permission Boundaries
| Benefit | Description |
| Enforce Least Privilege | Limits every principal to only the actions you explicitly allow |
| Granular Control | Applies max-permission caps even when multiple policies overlap |
| Risk Mitigation | Prevents accidental or malicious privilege escalation |
Demo Permission Boundaries
Now, we’ll demonstrate how to enforce the principle of least privilege in AWS IAM by using permission boundaries. You’ll learn how to restrict a new user’s effective permissions so that they can only list S3 buckets without gaining full access.
1. Identify the Target S3 Bucket
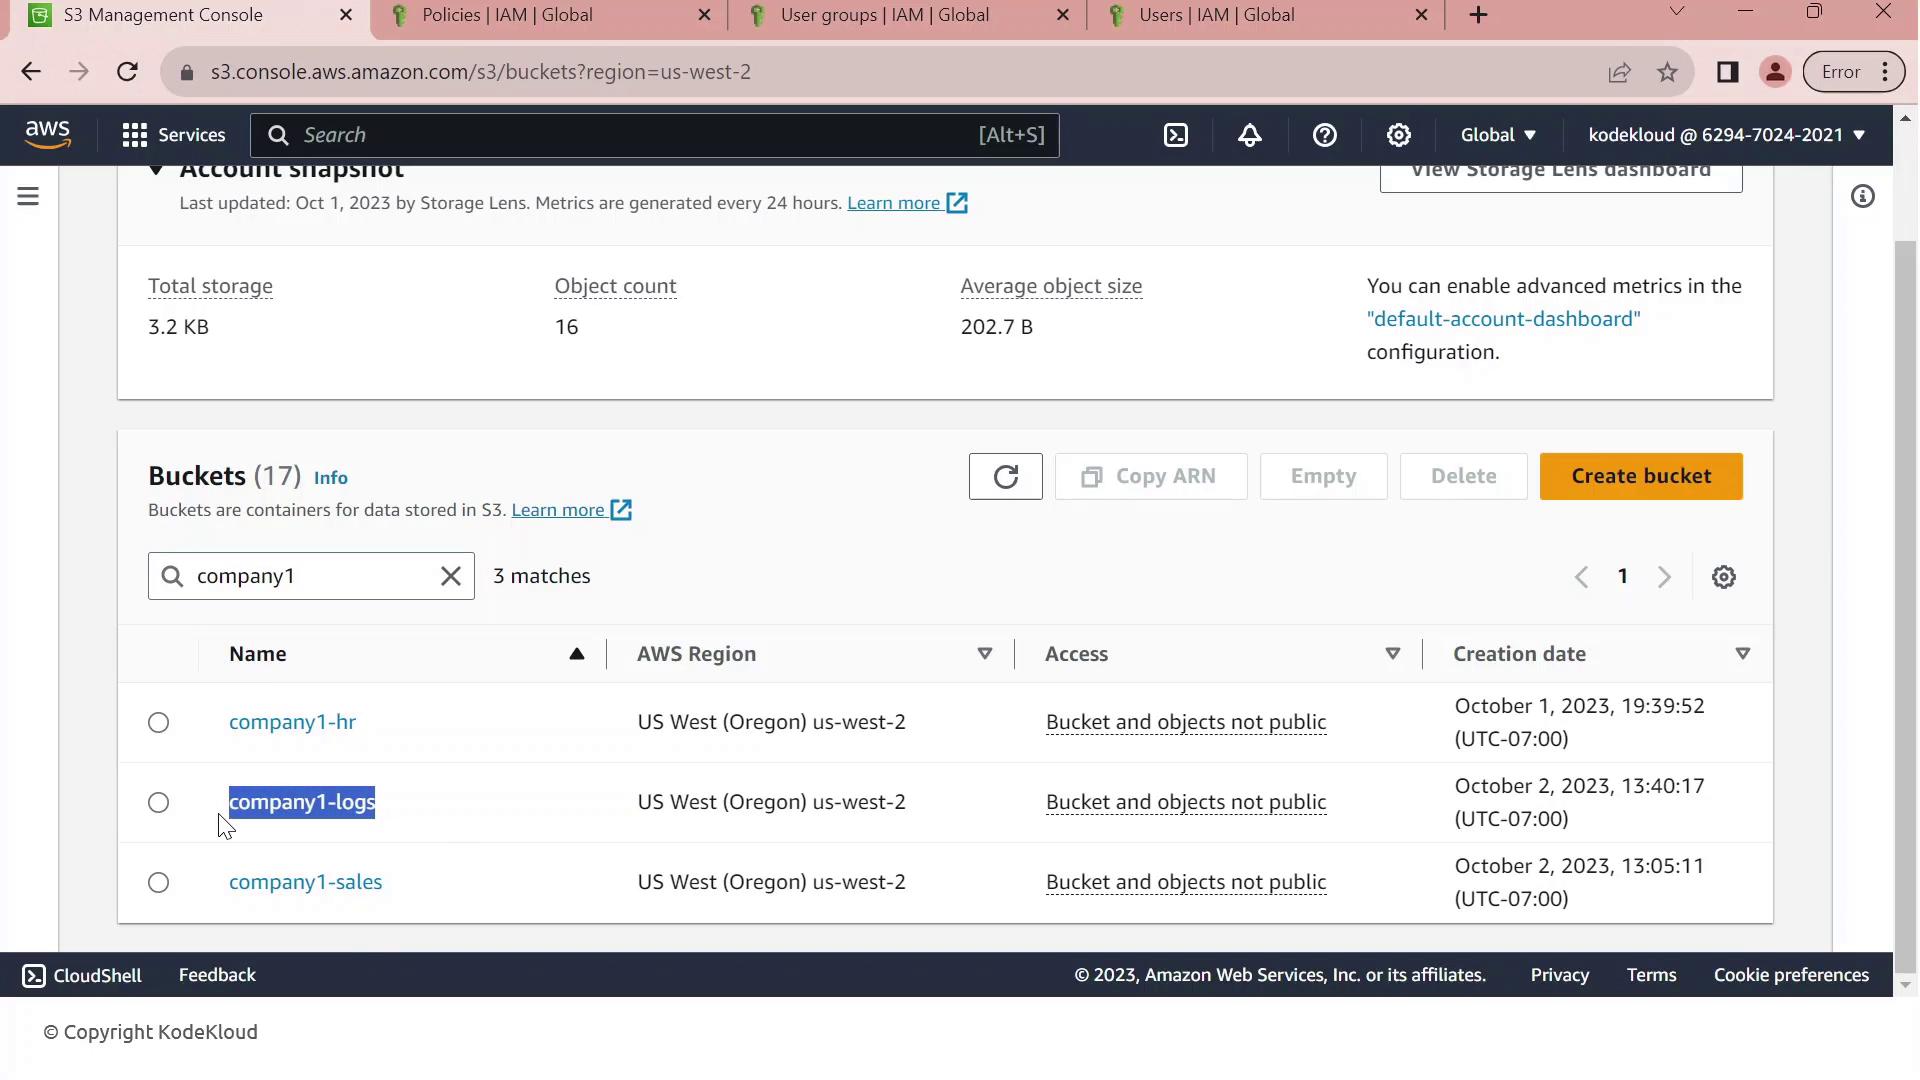
First, open the Amazon S3 Management Console. Filter your buckets by the prefix “Company1” and locate company1-logs, which stores daily logs used by your development team.
2. Review Customer-Managed Policies
Next, navigate to the IAM console and filter customer-managed policies by “company1.” You should see:
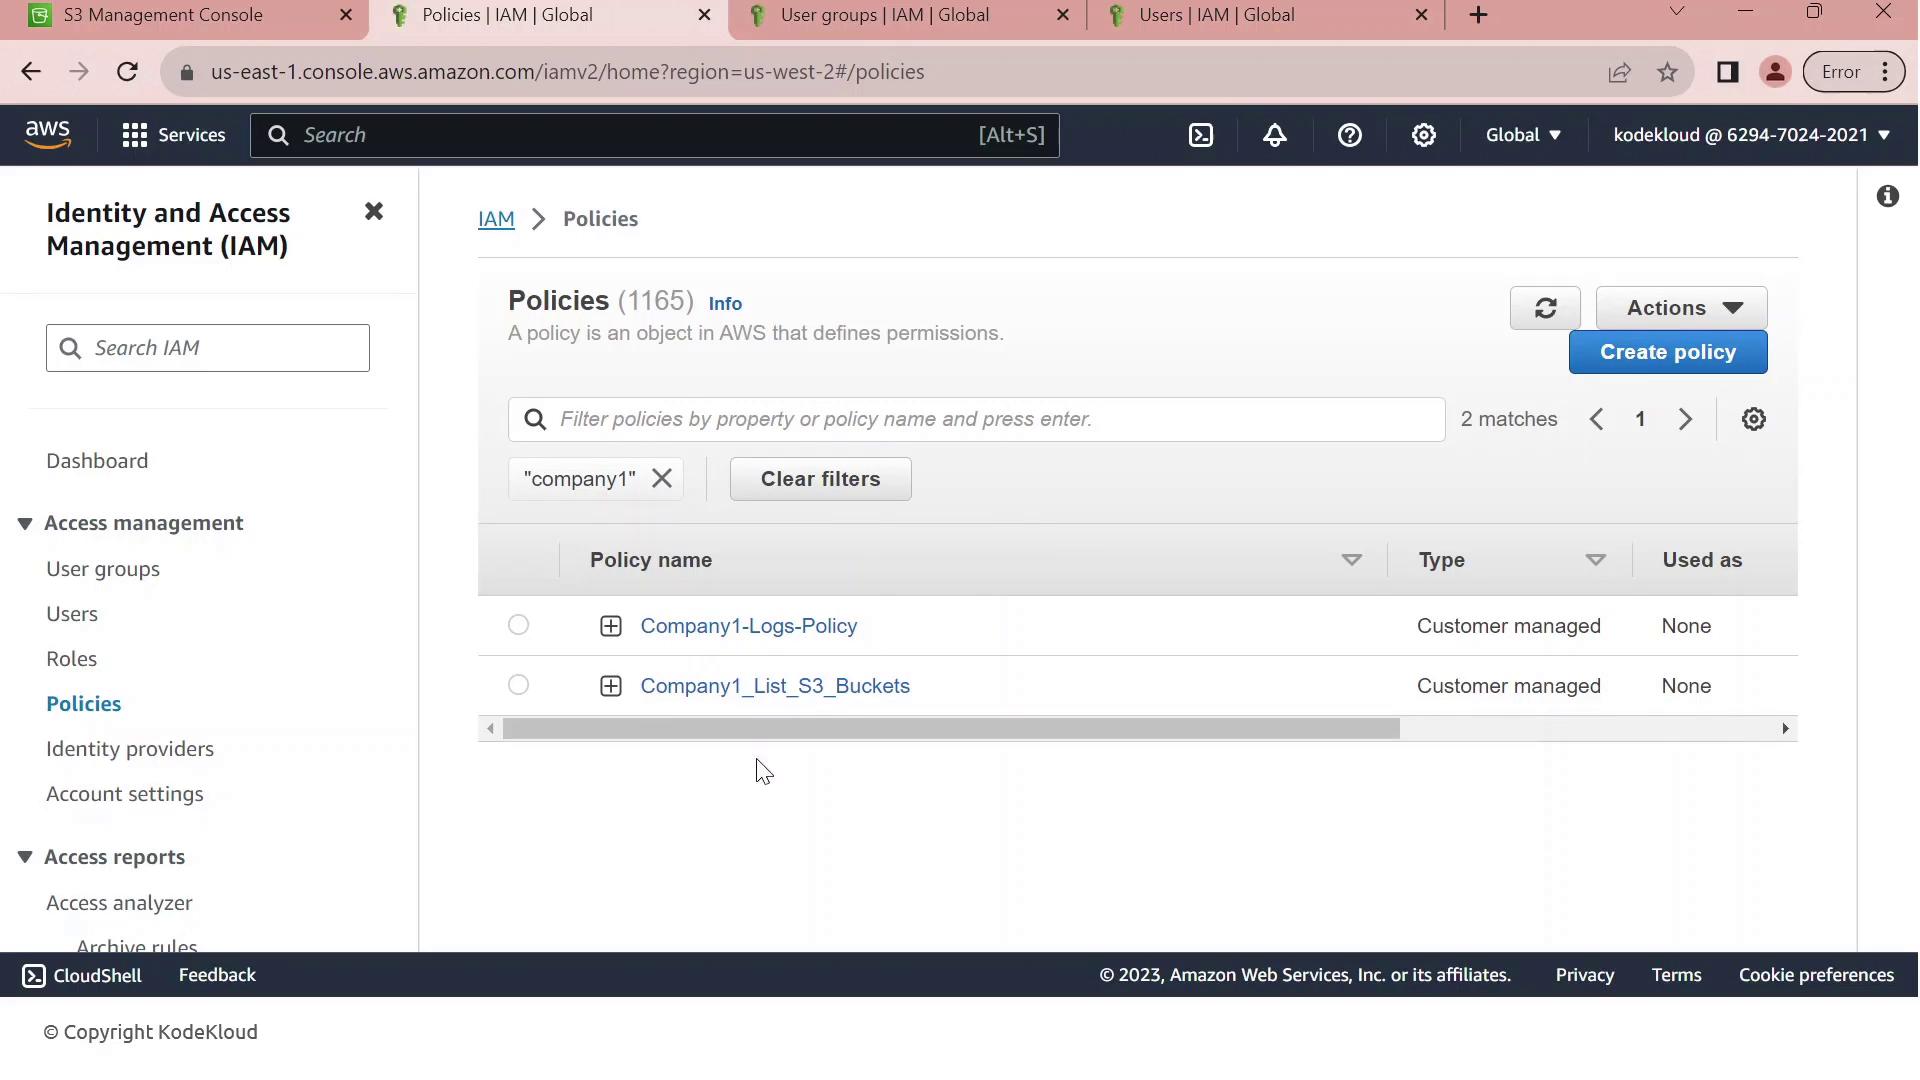
| Policy Name | Purpose | Key Actions |
| Company1-Logs-Policy | Full S3 access to company1-logs | s3:ListBucket, s3:GetObject, s3:PutObject, s3:DeleteObject |
| Company1_List_S3_Buckets | Read-only listing of all S3 buckets | s3:ListAllMyBuckets, s3:GetBucketLocation |
3. Inspect the Full-Access Logs Policy
Click on Company1-Logs-Policy to view its JSON document. This policy grants any principal full control over the company1-logs bucket.
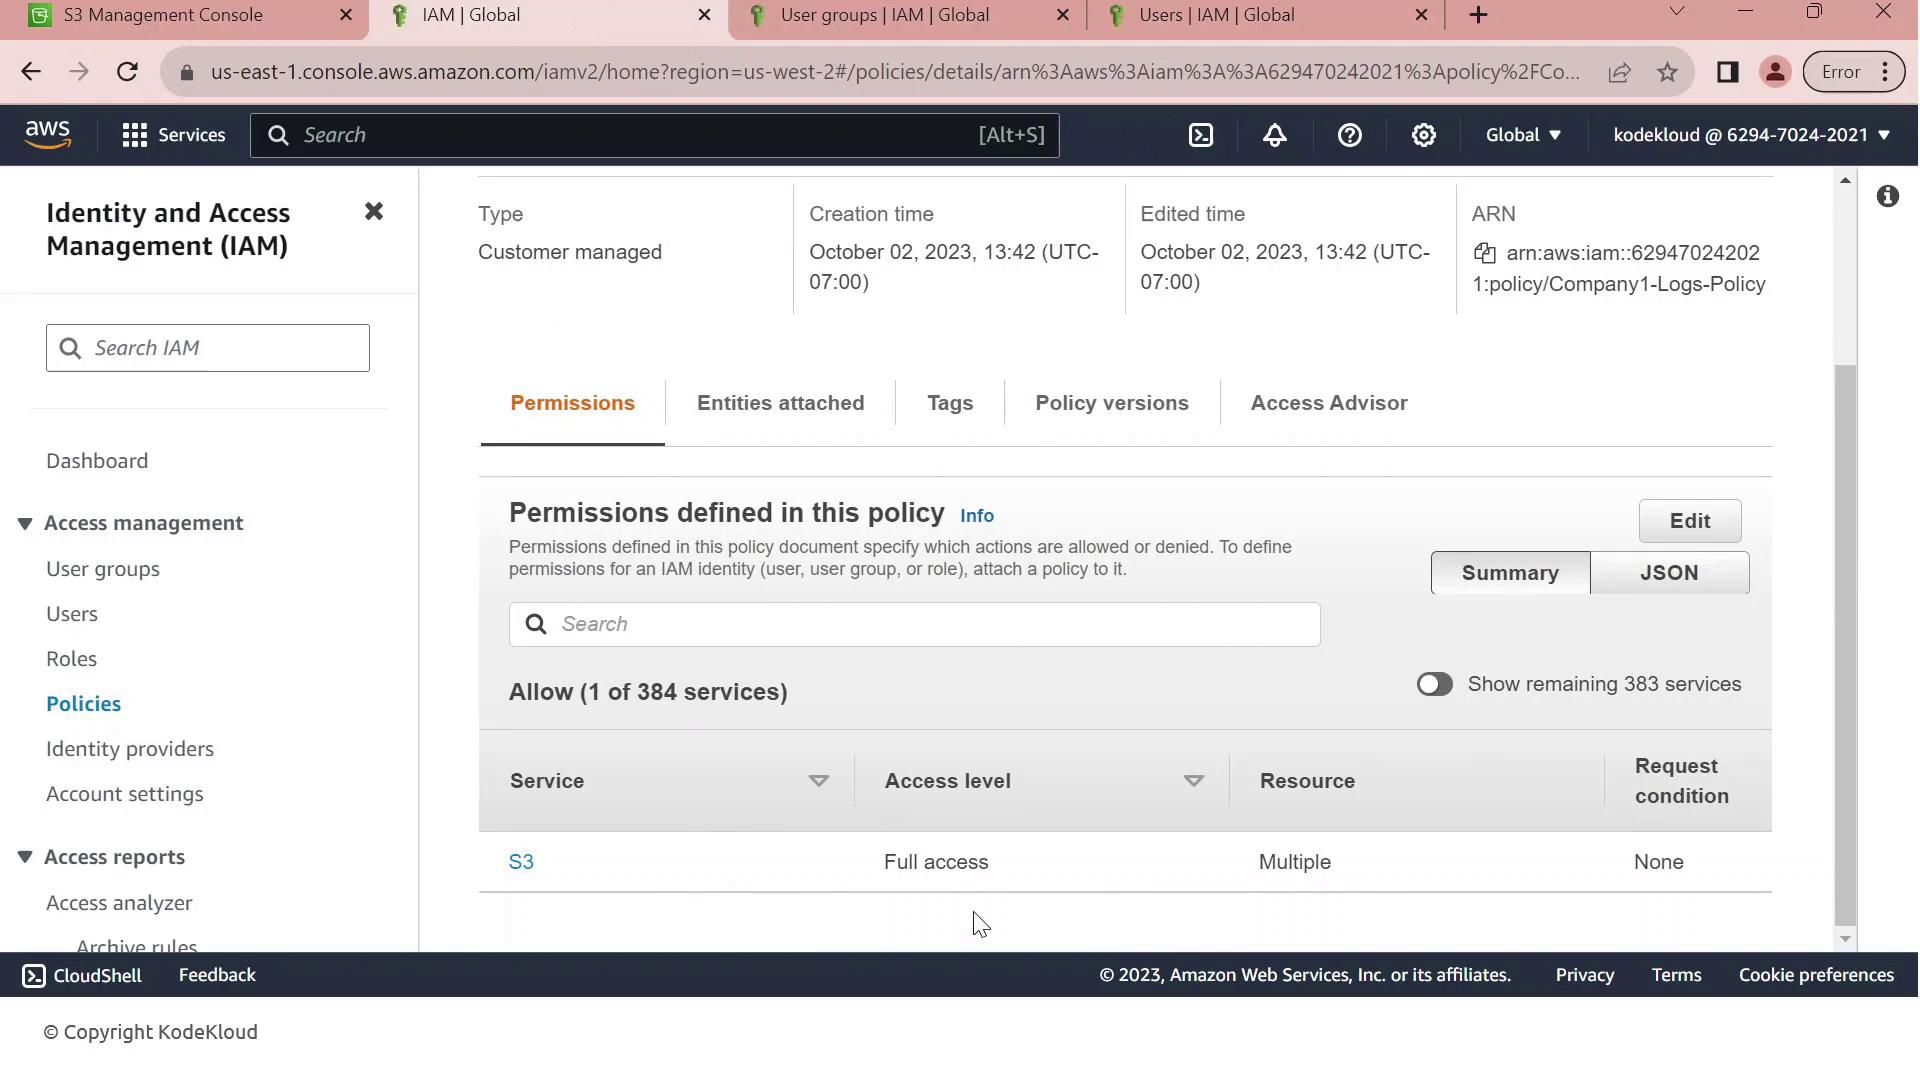
Currently, this policy is attached to the Developers group. All members—like John—inherit full S3 permissions on company1-logs.
4. Scenario: Hiring a New Intern
We’ve hired an intern, Sara, but we want to limit her permissions to bucket listing only. Without adjustments, adding her to the Developers group would grant full S3 access.
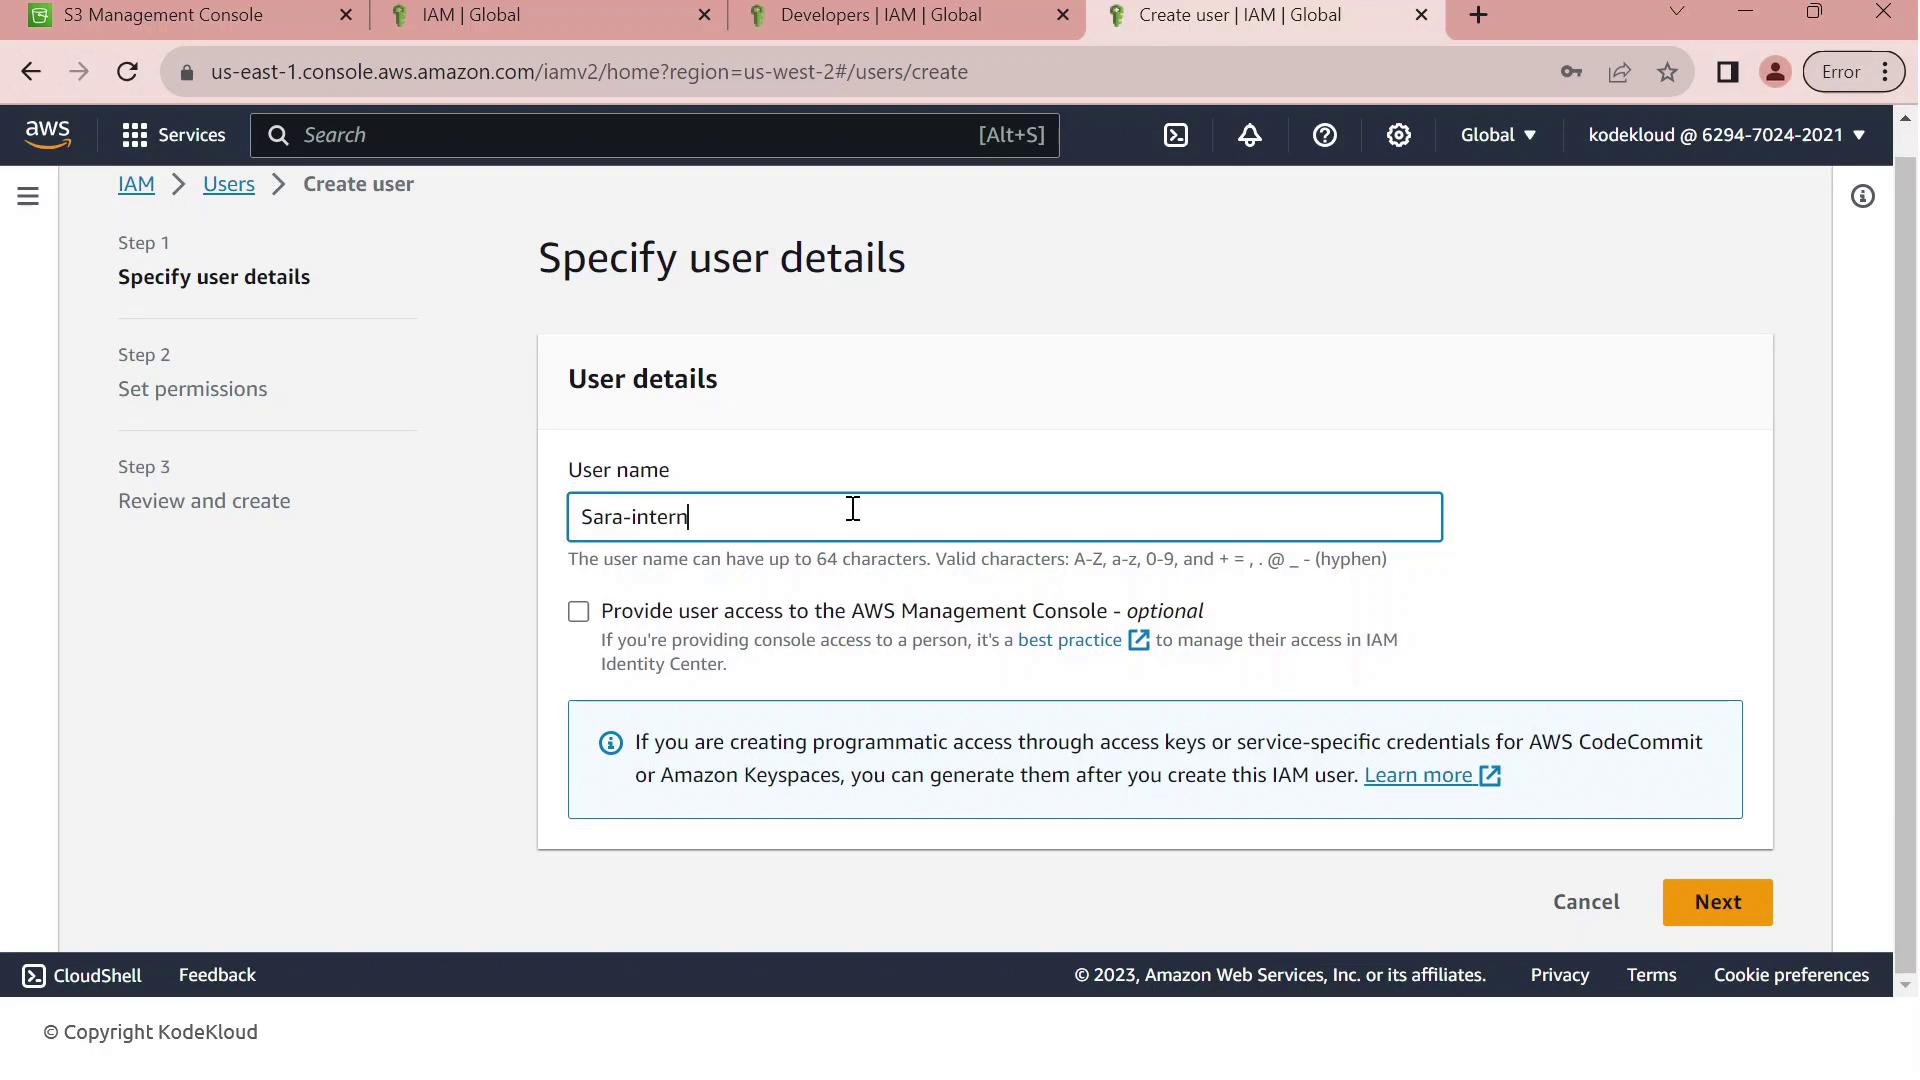
In the IAM console, click Create User.
Enter Sara-intern as the username.
Enable AWS Management Console access, generate a password, and require a reset on first login.
Add Sara-intern to the Developers group and complete the user creation.
Note
By default, Sara inherits every permission granted to the Developers group. We need a permissions boundary to cap her maximum privileges.
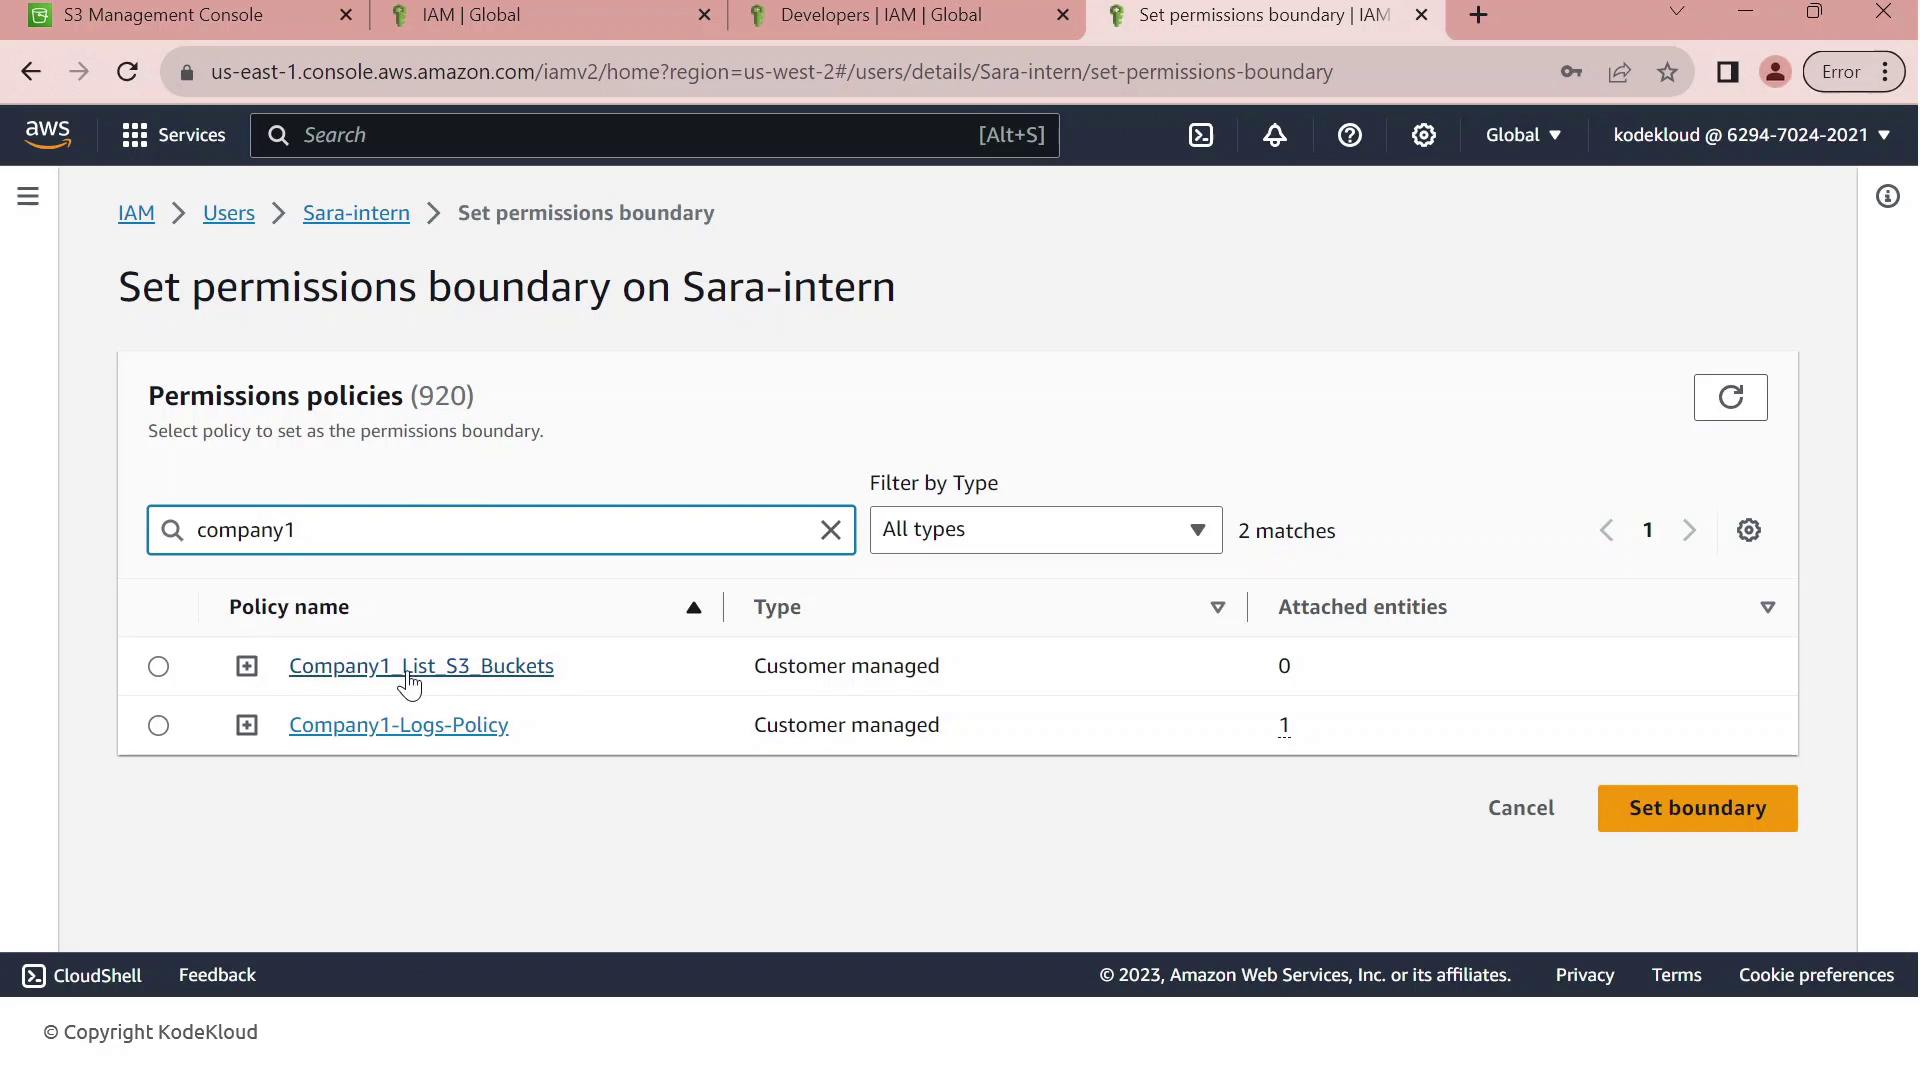
5. Apply the Permissions Boundary
To restrict Sara’s permissions:
Open Sara-intern’s user summary and go to the Permissions tab.
Click Set permissions boundary.
Select Company1_List_S3_Buckets and save.
Warning
A permissions boundary only defines the maximum rights a user can have. The user’s effective permissions are the intersection of their group policies and the boundary. Always validate by testing in a non-production account.
With Company1_List_S3_Buckets as Sara’s boundary, she can list bucket names (s3:ListAllMyBuckets) but cannot read, write, or delete any objects. This enforces least privilege for new users.
IAM Roles
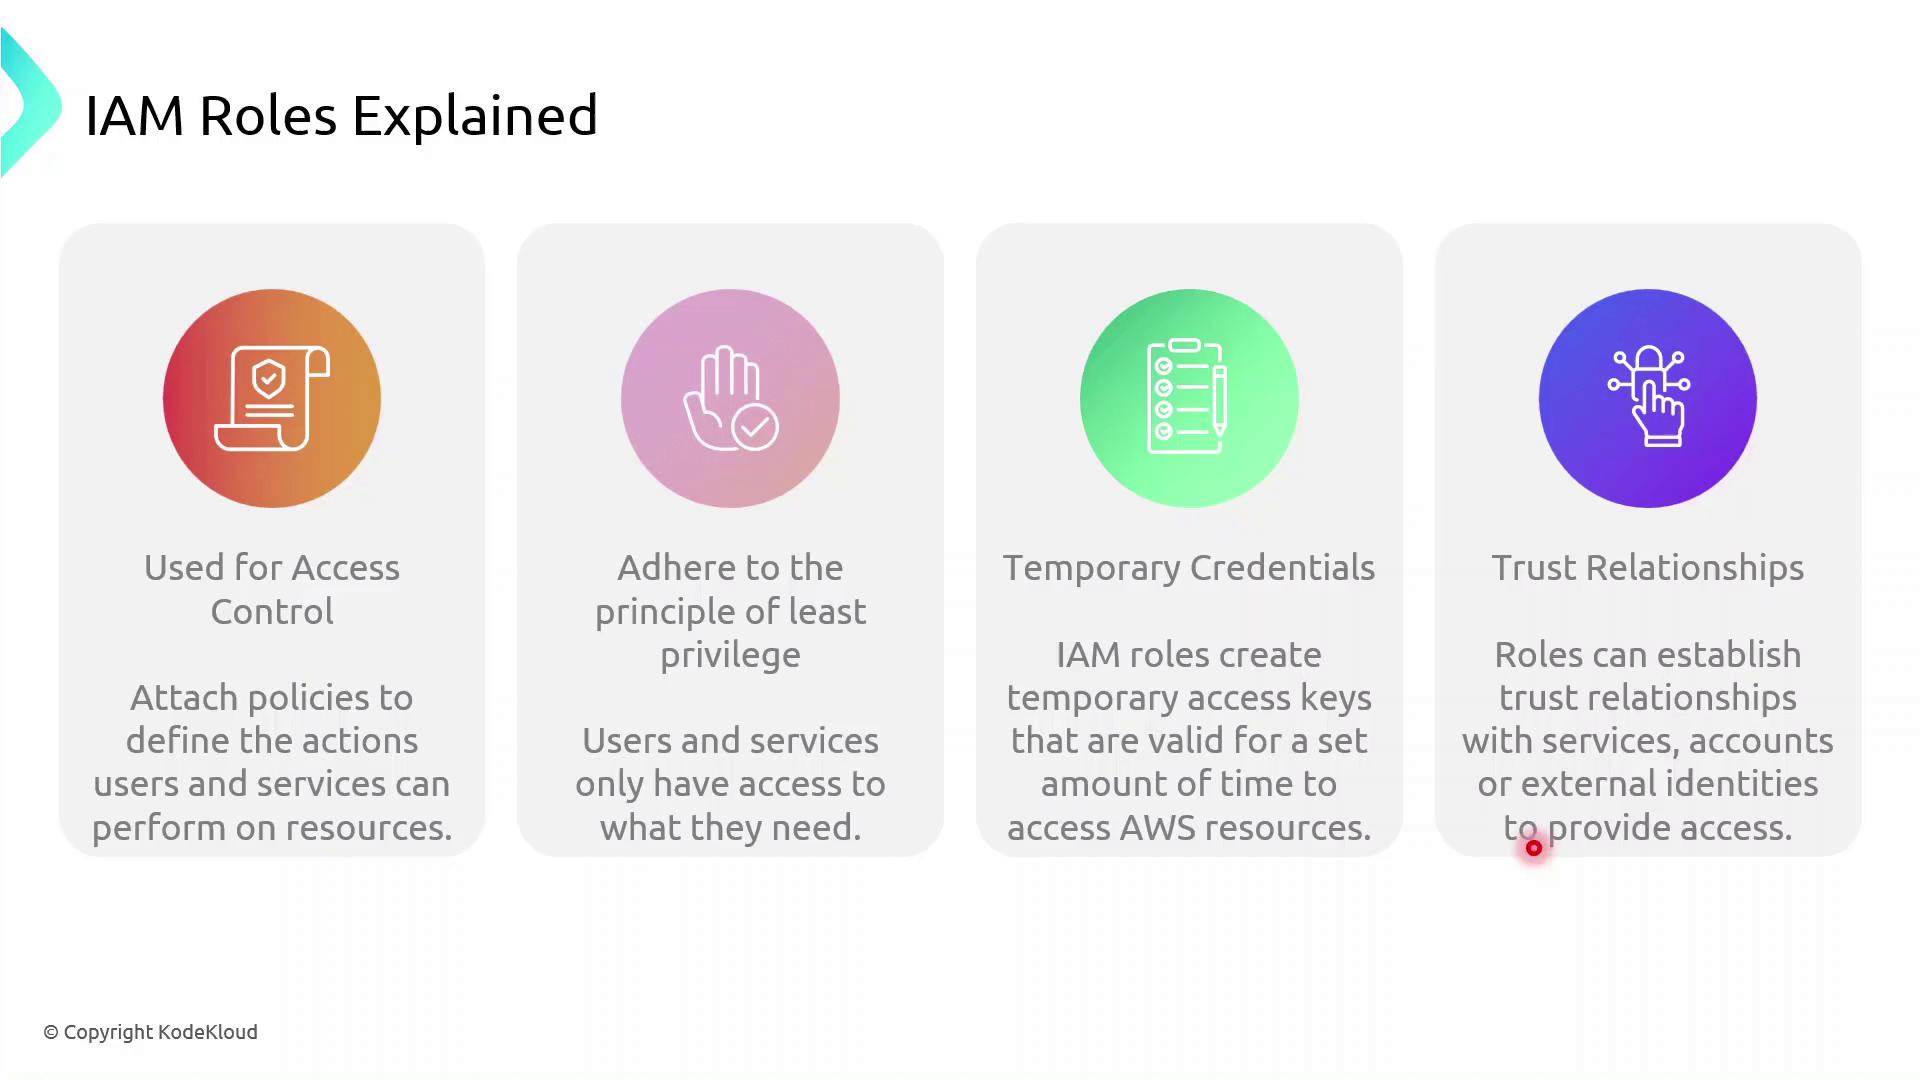
AWS Identity and Access Management (IAM) roles enable secure, temporary access to AWS resources without embedding long-term credentials. By defining fine-grained permissions and trust relationships, you can enforce the principle of least privilege and reduce exposure risk.
| Component | Description | Example |
| Role | An identity with attached permissions and a trust policy | S3AccessRole |
| Permissions Policy | A JSON document specifying allowed or denied actions | AmazonS3ReadOnlyAccess |
| Trust Policy | Defines which principals (services, users, or accounts) can assume the role | EC2 service: ec2.amazonaws.com |
| Temporary Tokens | Short-lived credentials issued by AWS STS | AccessKeyId, SecretAccessKey, SessionToken |
How IAM Roles Enhance Security
Instead of hard-coding long-term AWS keys:
A principal (user or service) calls
sts:AssumeRole.AWS returns temporary credentials.
The principal uses these credentials to access resources.
Credentials expire automatically, minimizing the blast radius.
Note
Always follow the principle of least privilege. Grant only the permissions required for the task.
Role Assumption Flow
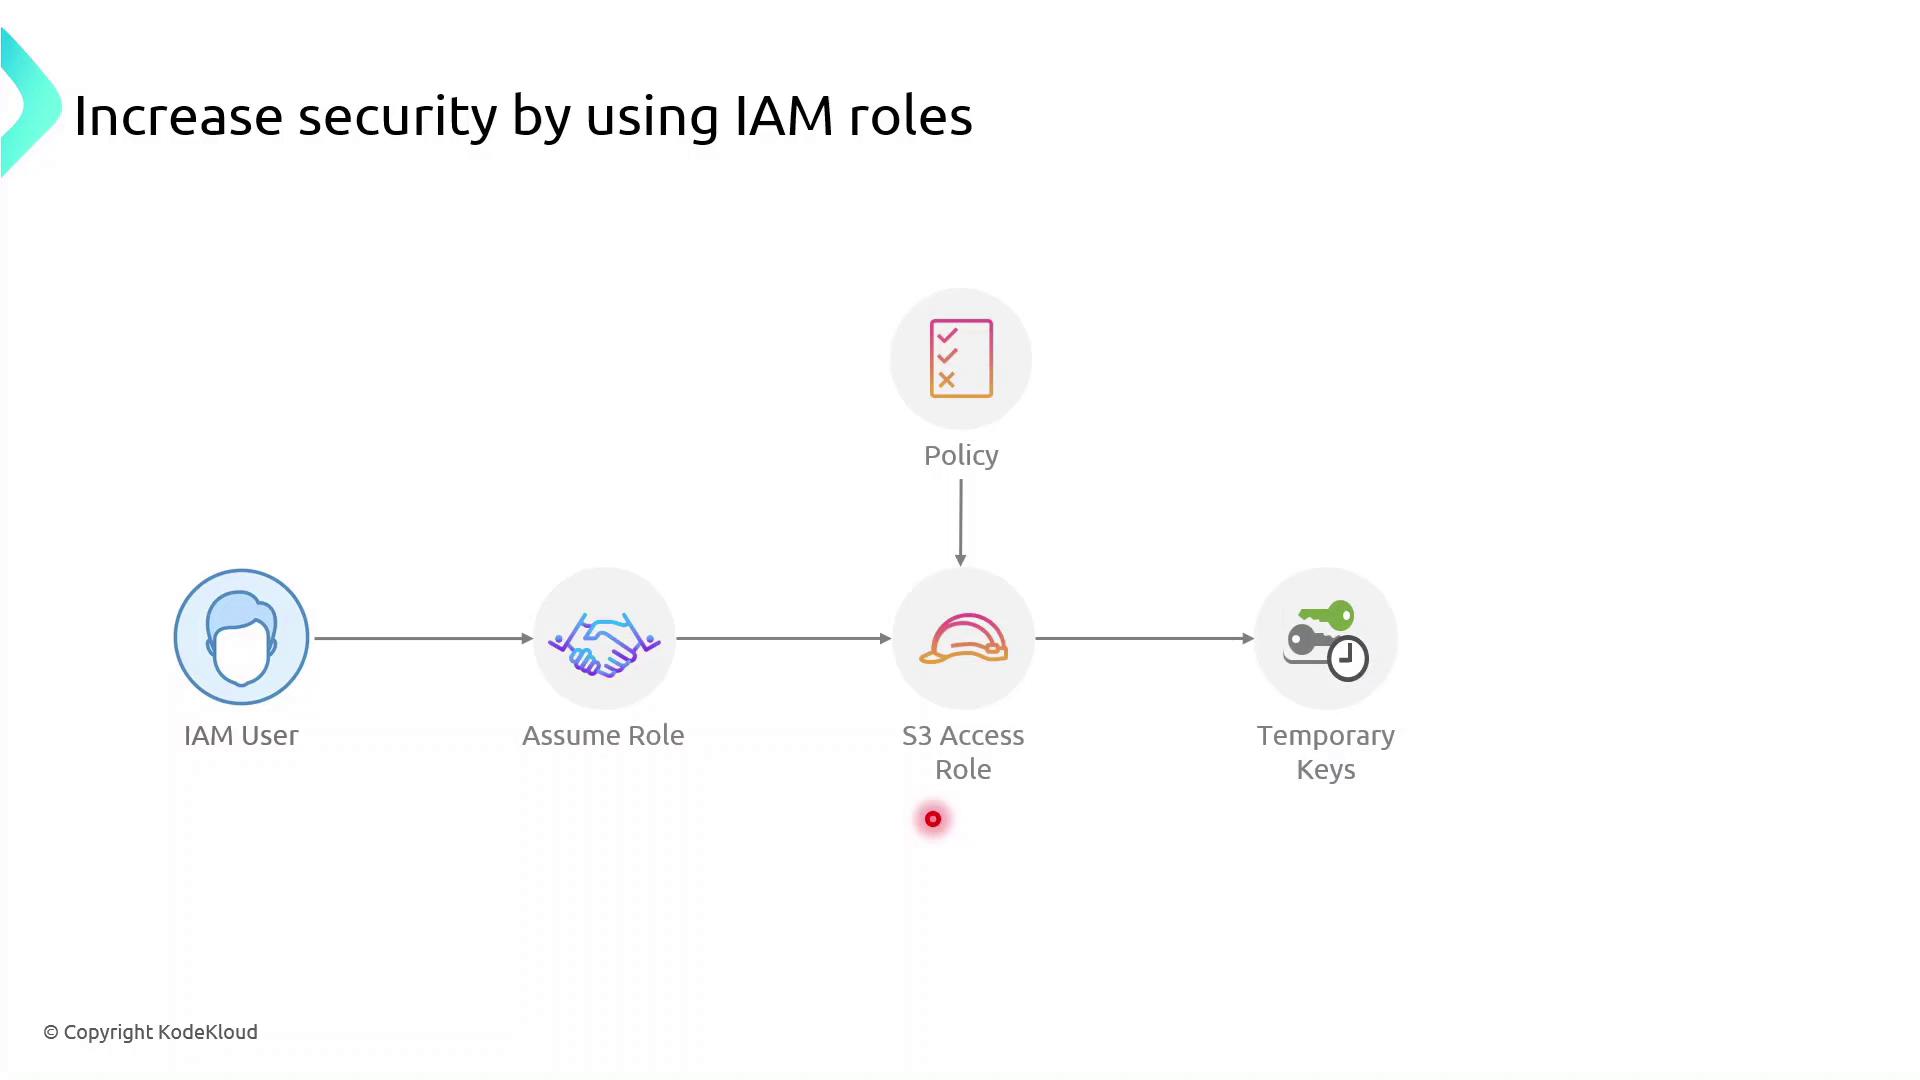
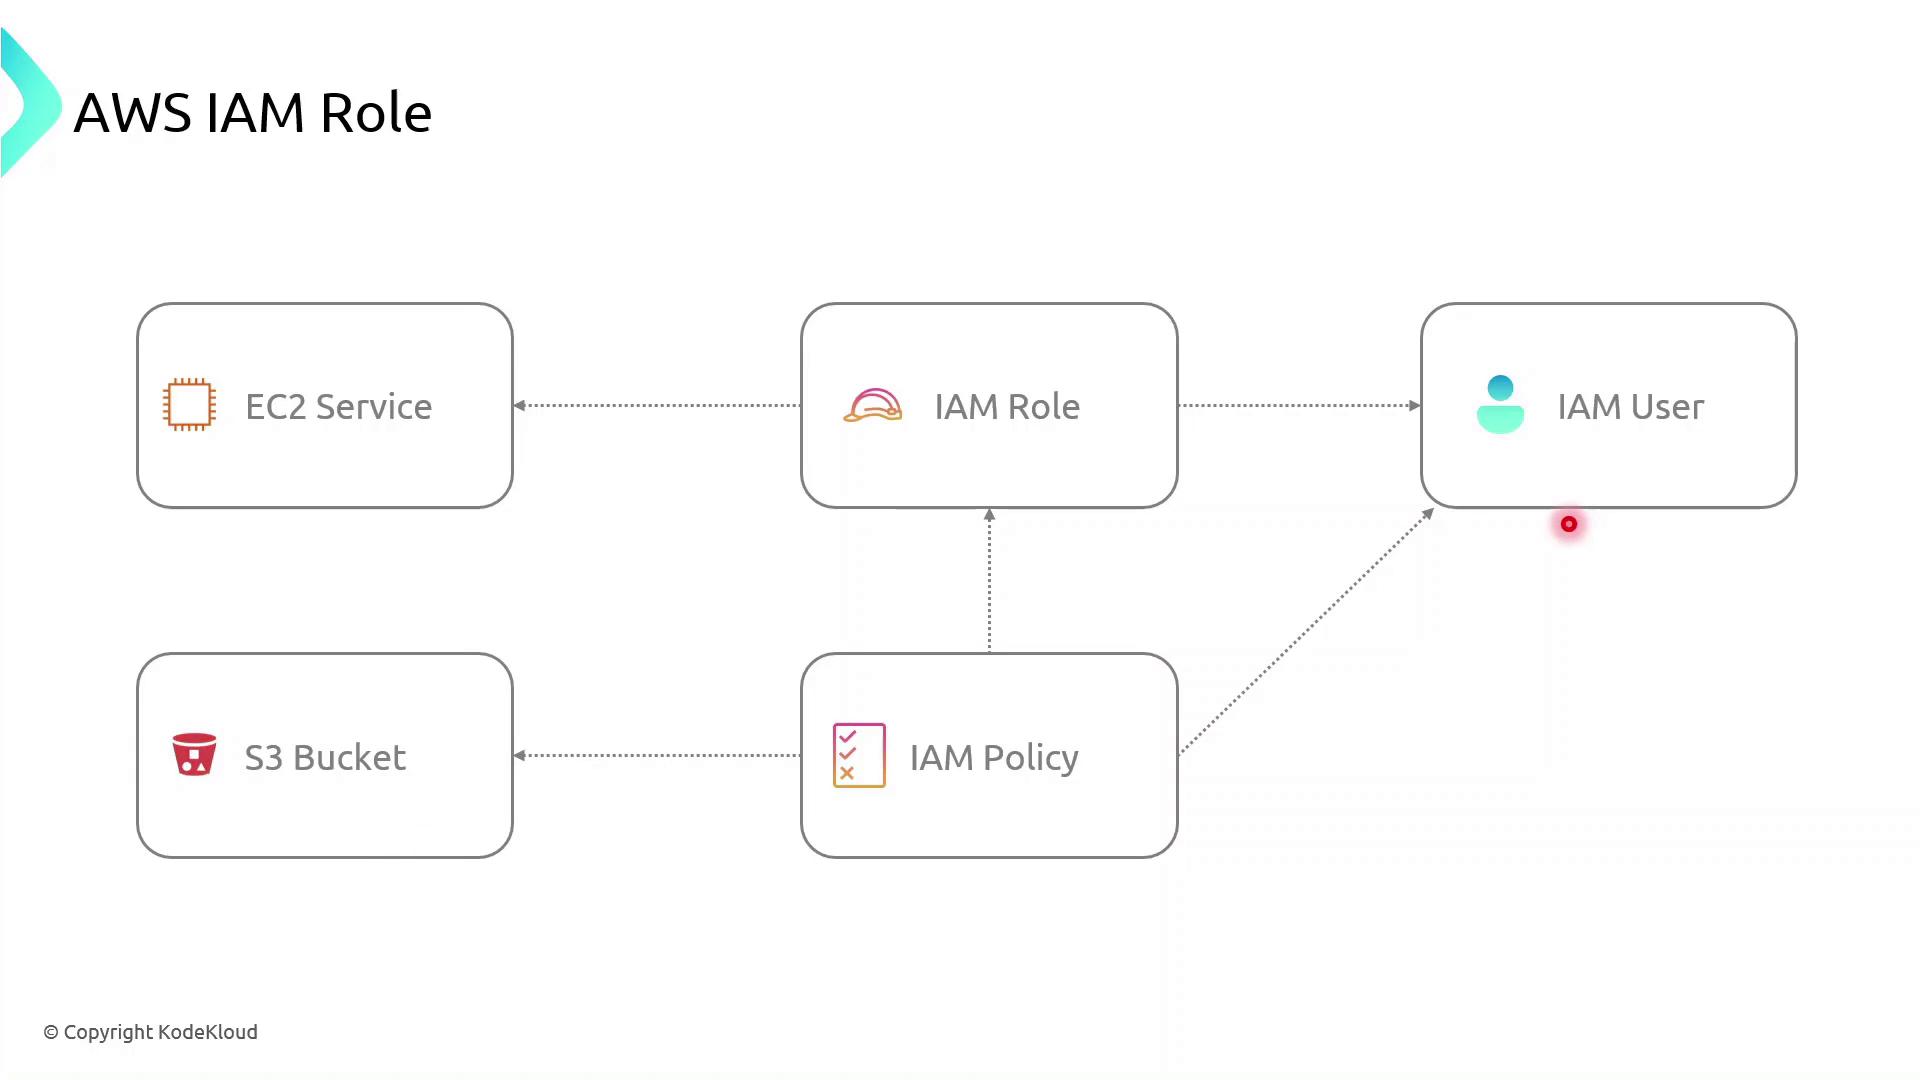
Roles can be assumed not only by IAM users but also by AWS services such as EC2, Lambda, and ECS. The permissions come from attached policies, while the trust policy specifies who can assume the role.
AWS Components Interaction
Demo: Create an IAM Role for EC2 to Access S3
Follow these steps in the AWS Management Console or use the AWS CLI commands shown.
Console Steps
Open the IAM console
https://console.aws.amazon.com/iamCreate a new role
In the navigation pane, choose Roles → Create role.
Under Select trusted entity, choose AWS service, then EC2, and click Next.
Attach permissions
Search for AmazonS3ReadOnlyAccess (or attach your custom policy).
Select it and click Next.
Name and create
Enter Role name:
S3AccessRoleReview settings and click Create role.
Attach the role to an existing EC2 instance
Open the EC2 console, select your instance.
Choose Actions → Security → Modify IAM role.
Select S3AccessRole and click Save.
AWS CLI Alternative
First, create a trust policy file (trust-policy.json):
{
  "Version": "2012-10-17",
  "Statement": [
    {
      "Effect": "Allow",
      "Principal": { "Service": "ec2.amazonaws.com" },
      "Action": "sts:AssumeRole"
    }
  ]
}
Then run:
# Create the role
aws iam create-role \
  --role-name S3AccessRole \
  --assume-role-policy-document file://trust-policy.json


# Attach the AmazonS3ReadOnlyAccess policy
aws iam attach-role-policy \
  --role-name S3AccessRole \
  --policy-arn arn:aws:iam::aws:policy/AmazonS3ReadOnlyAccess
Verify from the EC2 Instance
SSH into your EC2 instance and confirm the role is in effect:
# Check the caller identity (should show the assumed role ARN)
aws sts get-caller-identity


# List S3 buckets or contents to verify permissions
aws s3 ls s3://your-bucket-name
If you see the bucket contents, the role is correctly configured—no long-term keys required.
Demo Creating IAM Role
In this step-by-step guide, you'll learn how to create an AWS Identity and Access Management (IAM) role that grants an Amazon EC2 instance permission to read objects from an S3 bucket named company1-logs. By leveraging IAM roles, you avoid hardcoding credentials on your server and follow AWS best practices for secure access management.
Prerequisites
An AWS account with administrative privileges
A running EC2 instance
An existing S3 bucket named
company1-logs
Step 1: Create the IAM Role
Open the IAM console, select Roles, then click Create role.
On Select trusted entity, choose AWS service.
Under Use cases for other AWS services, select EC2.
Click Next to move to the permissions page.
In Permissions, search for company1 and select the Company1 logs policy which grants
s3:GetObjectaccess to thecompany1-logsbucket.Click Next, then enter a Role name (e.g.,
Company1-Logs-Role) and an optional description.Review the Trust relationship to ensure EC2 can assume this role. It should resemble:
 {
   "Version": "2012-10-17",
   "Statement": [
     {
       "Effect": "Allow",
       "Action": ["sts:AssumeRole"],
       "Principal": {"Service": ["ec2.amazonaws.com"]}
     }
   ]
 }
(Optional) Add tags to categorize your role, then click Create role.
Note
You’ve successfully created an IAM role that EC2 instances can assume to access S3 resources securely.
Step 2: Attach the IAM Role to Your EC2 Instance
Go to the EC2 console, select Instances, and choose your running instance.
From the Actions menu, select Security > Modify IAM role.
In the IAM role dropdown, pick Company1-Logs-Role.
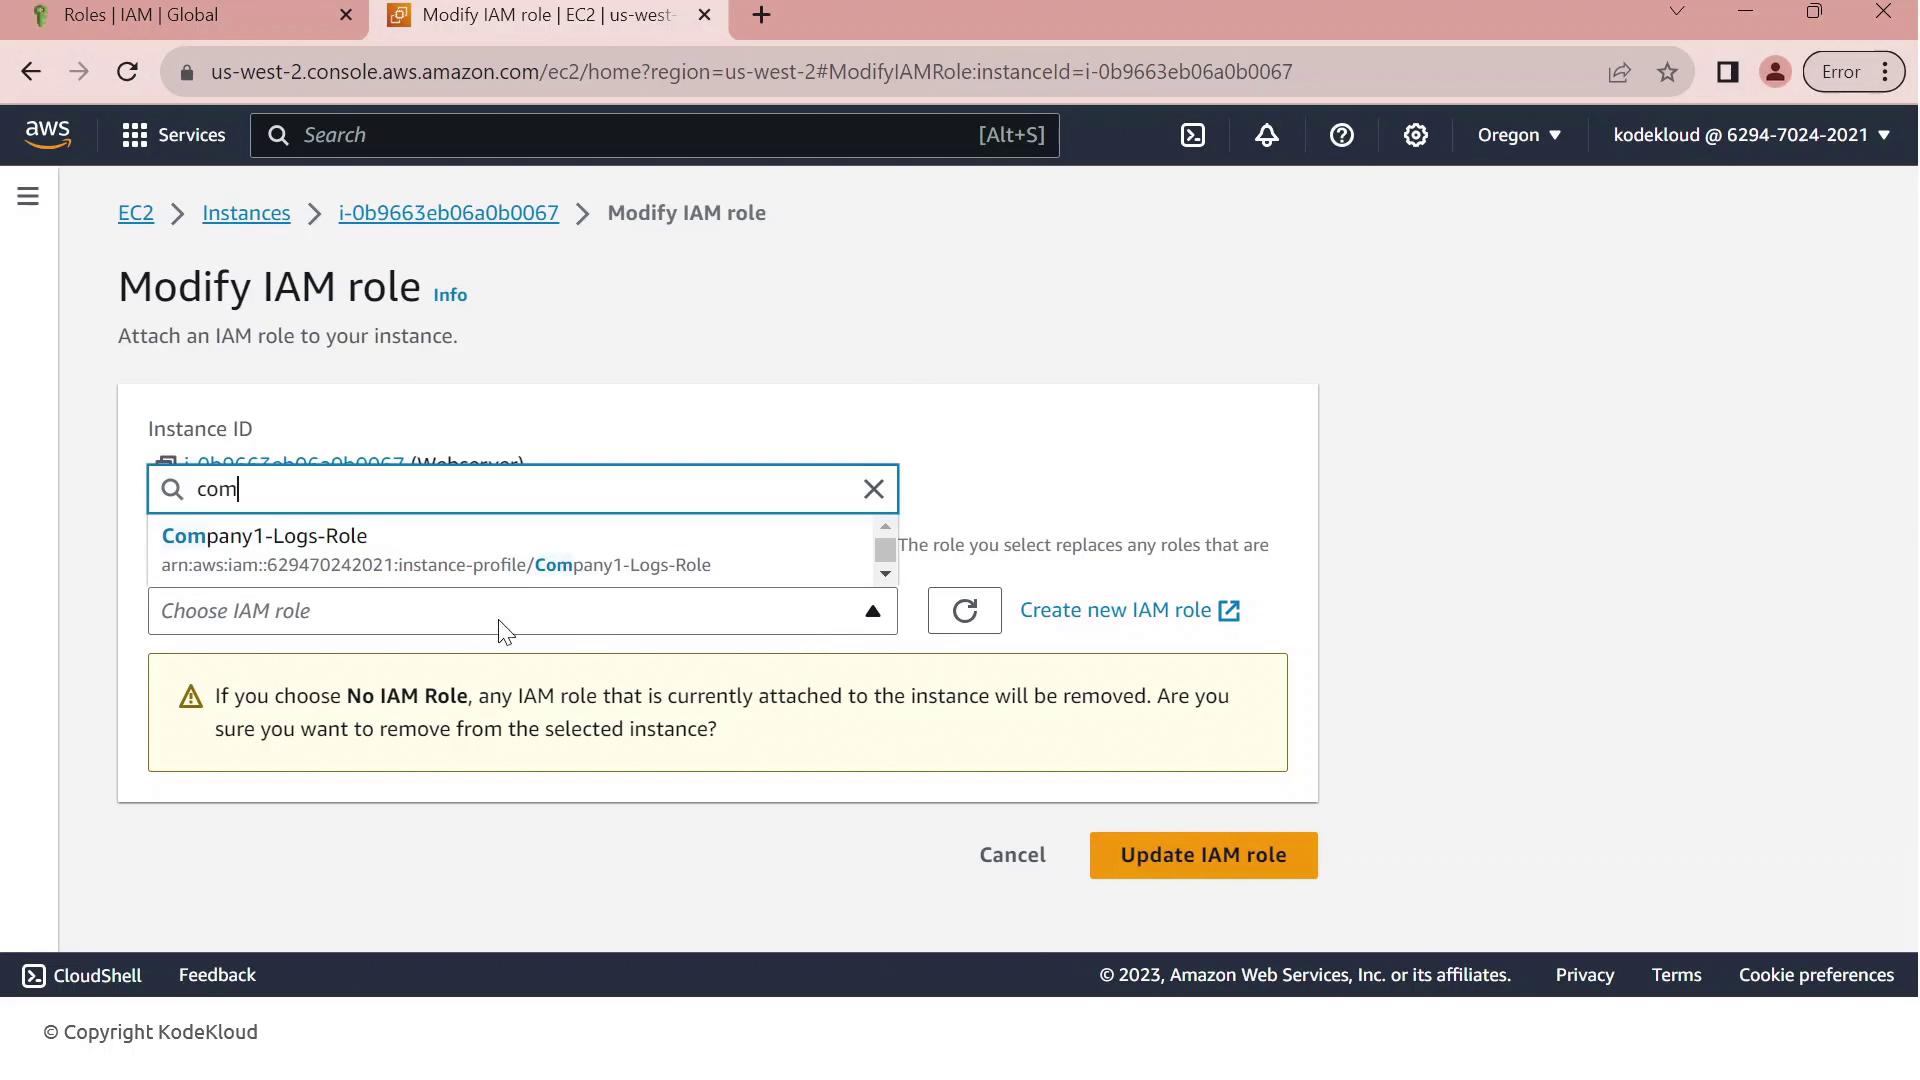
Click Update IAM role to apply the change.
Warning
If your EC2 instance already has an IAM role attached, updating it will replace the existing role and associated permissions. Ensure this change aligns with your security policies.
Your EC2 instance now inherits the permissions defined in Company1-Logs-Role, allowing it to securely read log files from the company1-logs bucket without embedded credentials.
IAM Session Policies
In this lesson, we’ll explore how to grant an IAM user temporary upload access to an S3 bucket by using session policies. Our user currently has a policy allowing only the s3:GetObject action, but now needs permission to upload files (s3:PutObject). We’ll create a session policy, attach the upload permissions to it, and generate temporary credentials that enforce both the user’s existing rights and the new session policy.
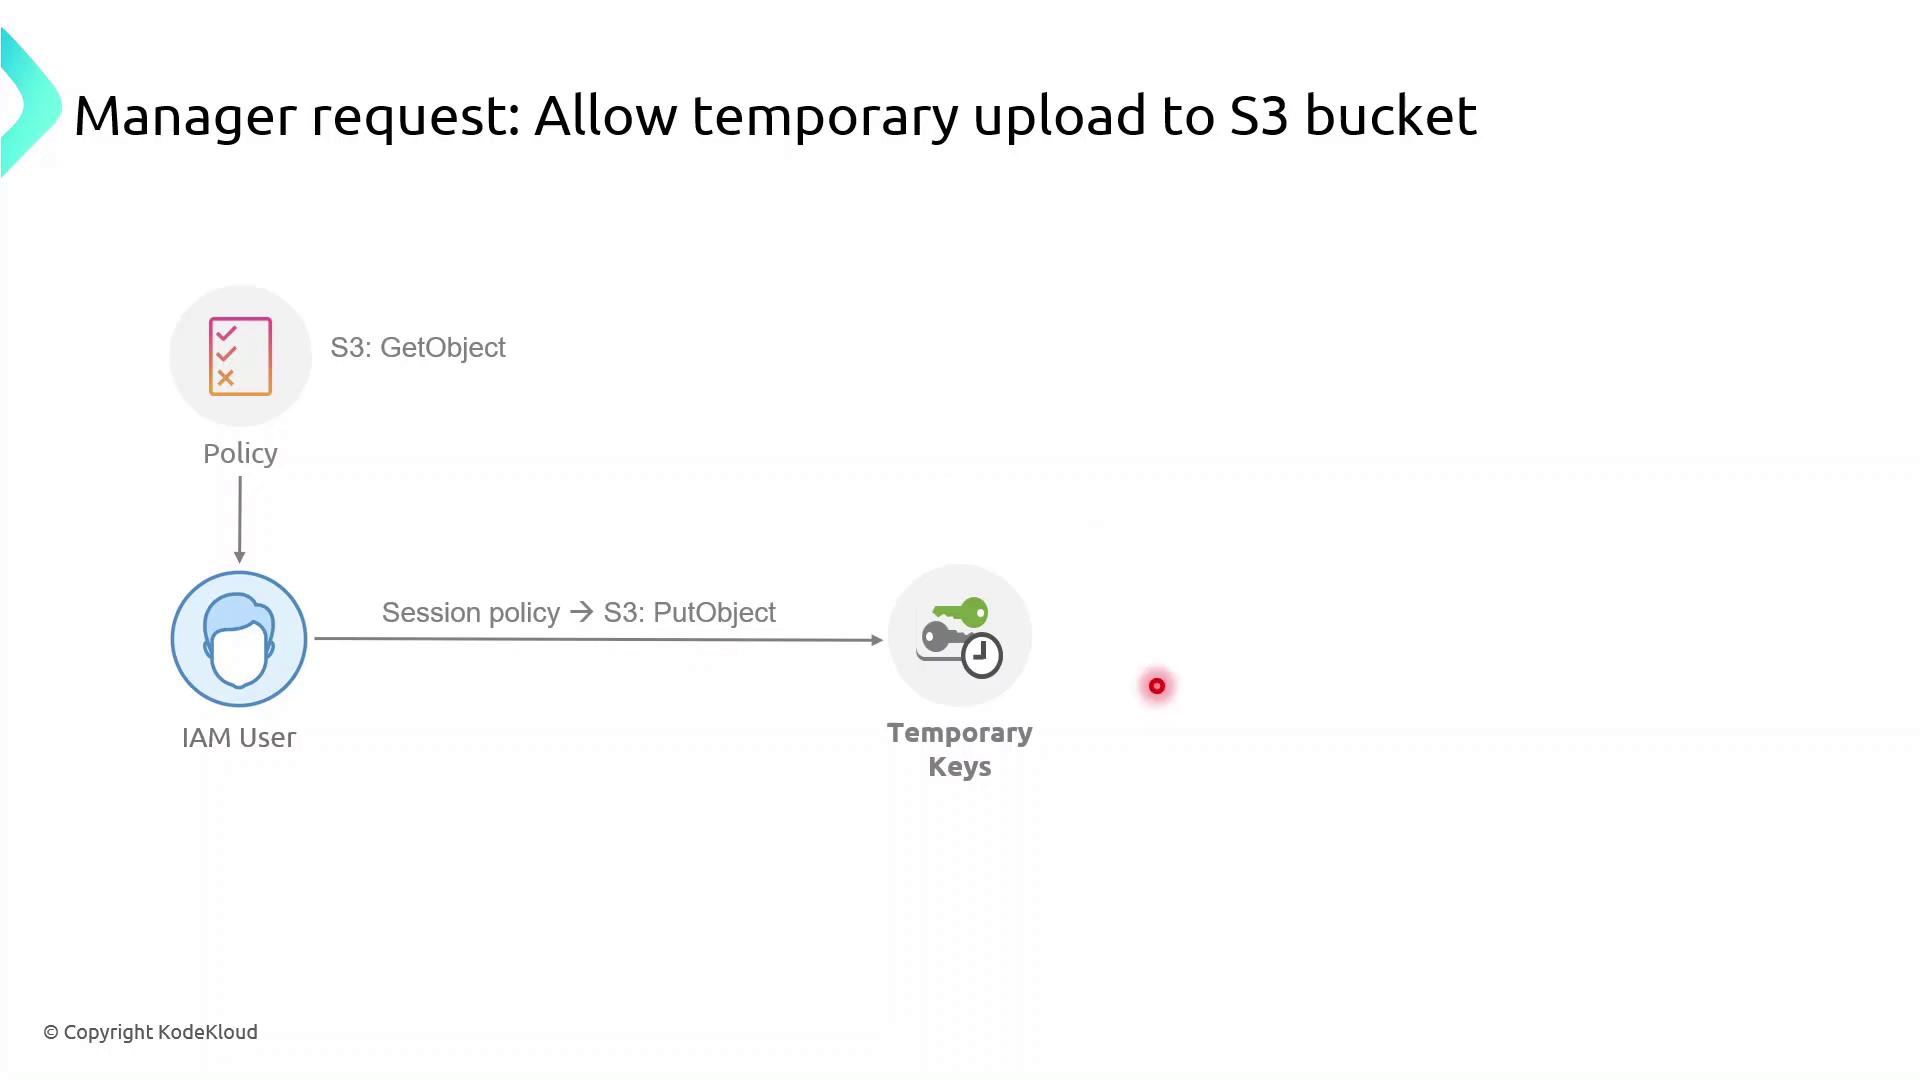
What Are Session Policies?
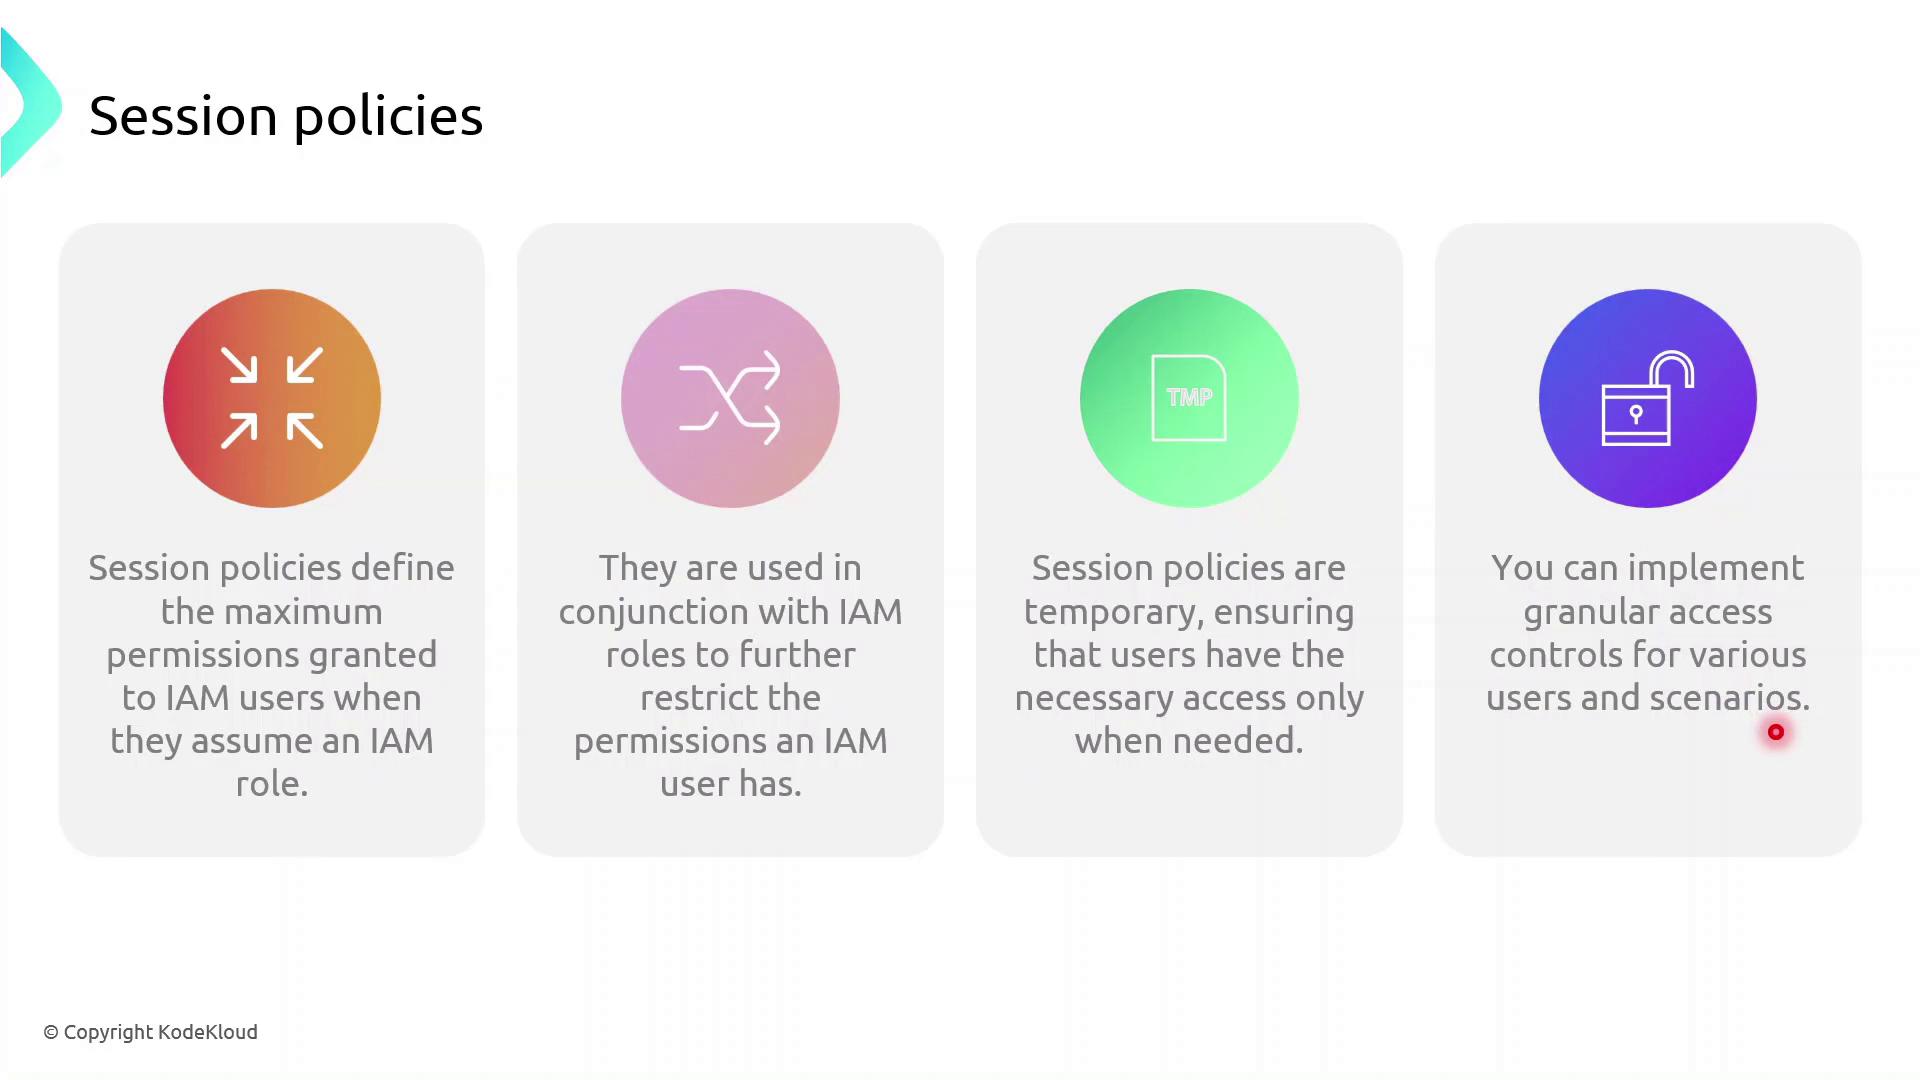
Session policies are inline JSON policies you pass when you assume a role. They:
Define the maximum permissions an IAM principal can have during a session
Are temporary and apply only for the session’s duration
Further restrict permissions granted by identity or resource policies
Enable fine-grained, scenario-specific access control
Note
Session policies never grant more permissions than allowed by the user’s identity or resource policies. They only tighten the scope for the session.
Demo: Granting Temporary Upload Access
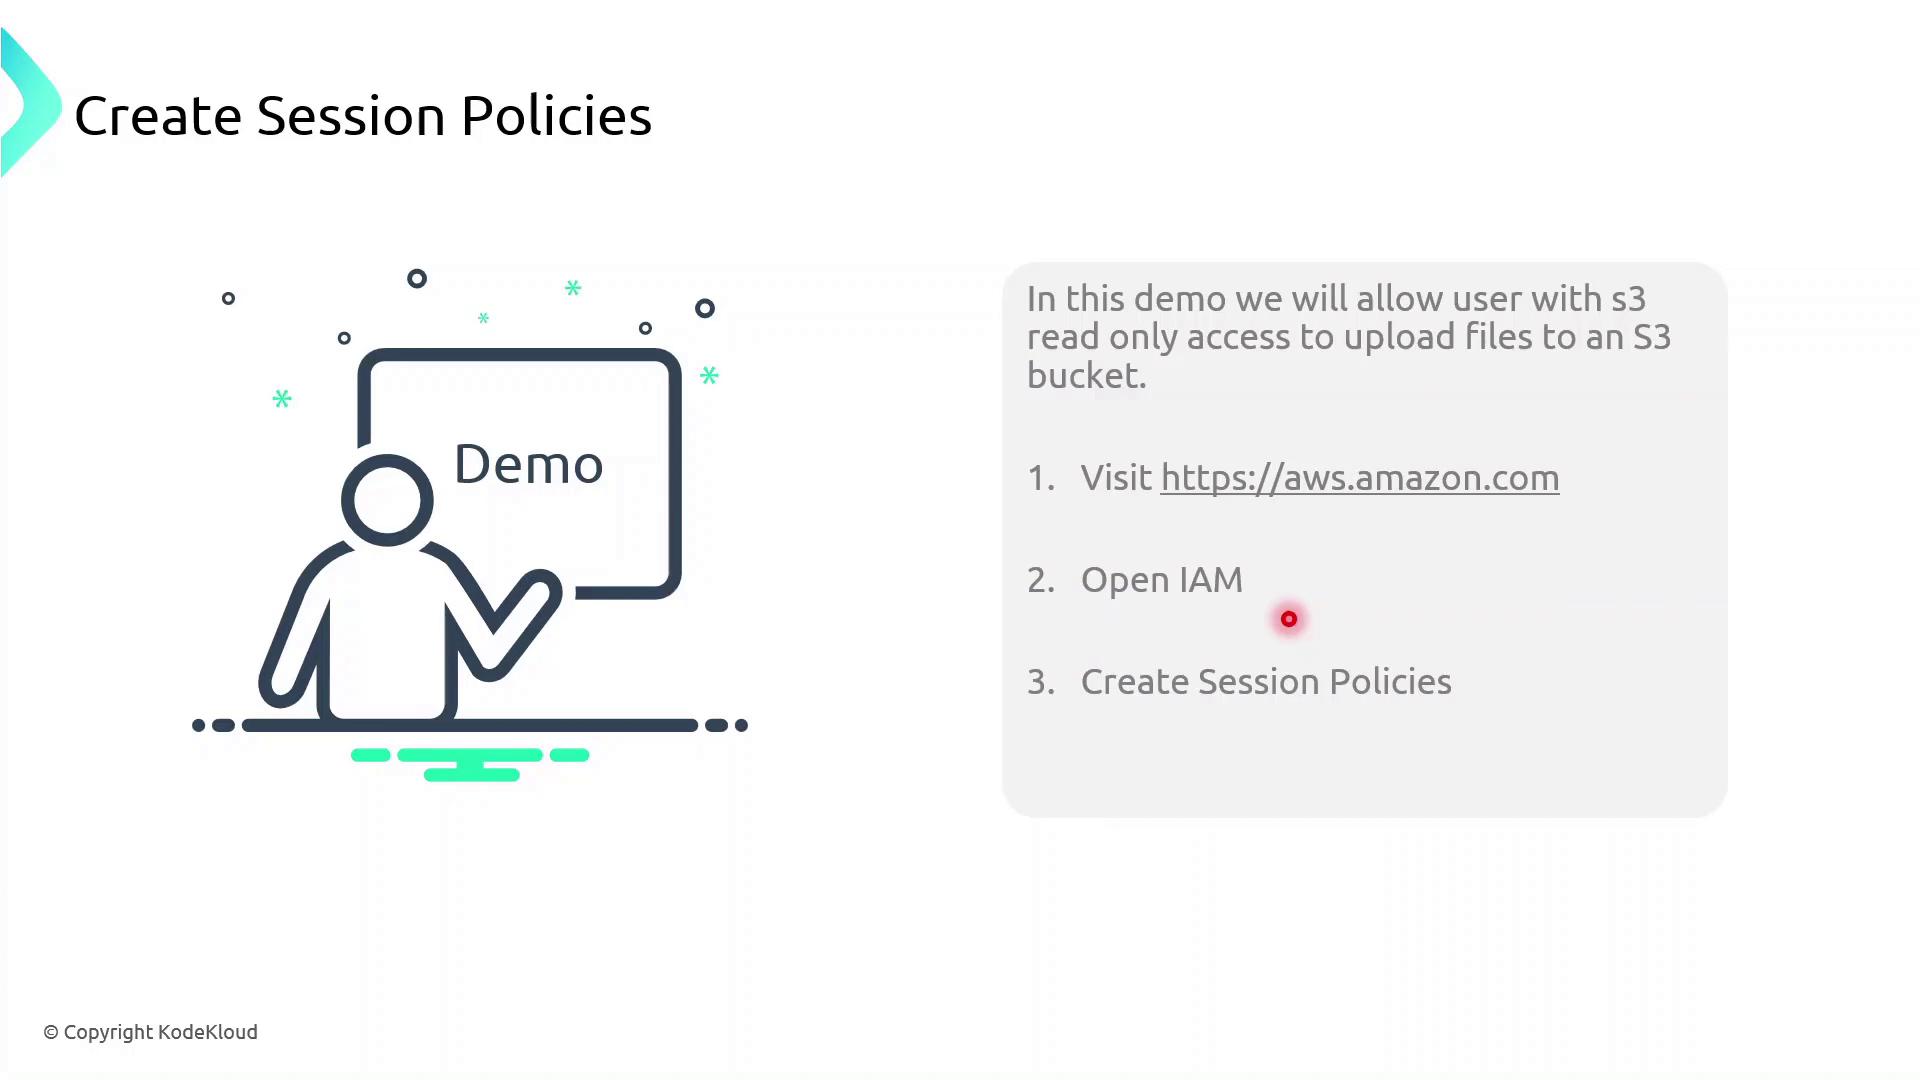
In this demo, we will:
Identify an IAM user with read-only S3 access
Create a session policy granting
s3:PutObjectAssume a role with that session policy to obtain temporary credentials
Verify the ability to upload objects to the bucket
First, sign in to the AWS Management Console, navigate to IAM, and begin creating the session policy.
1. Create the Session Policy JSON
Save the following JSON as session-policy.json. Replace YOUR_BUCKET_NAME with your actual bucket name.
{
  "Version": "2012-10-17",
  "Statement": [
    {
      "Effect": "Allow",
      "Action": "s3:PutObject",
      "Resource": "arn:aws:s3:::YOUR_BUCKET_NAME/*"
    }
  ]
}
2. Assume the Role with Session Policy
Use the AWS CLI to assume the role and apply your session policy:
aws sts assume-role \
  --role-arn arn:aws:iam::ACCOUNT_ID:role/ROLE_NAME \
  --role-session-name uploadSession \
  --policy file://session-policy.json \
  --duration-seconds 3600
This returns temporary credentials:
{
  "Credentials": {
    "AccessKeyId": "ASIAXXXX...",
    "SecretAccessKey": "wJalrXUtnFEMI/K7MDENG/bPxRfiCYzEXAMPLEKEY",
    "SessionToken": "IQoJb3JpZ2luX2VjEO3//////////wEaCXVzLWVhc3QtMSJGMEQCH3...",
    "Expiration": "2023-08-01T12:34:56Z"
  }
}
3. Export Temporary Credentials
export AWS_ACCESS_KEY_ID="ASIAXXXX..."
export AWS_SECRET_ACCESS_KEY="wJalrXUtnFEMI/K7MDENG/bPxRfiCYzEXAMPLEKEY"
export AWS_SESSION_TOKEN="IQoJb3JpZ2luX2VjEO3//////////wEaCXVzLWVhc3QtMSJGMEQCH3..."
Warning
These credentials are temporary. Do not commit them to source control or share them publicly.
4. Verify Upload Capability
Now try uploading a file:
echo "Hello, S3!" > test.txt
aws s3 cp test.txt s3://YOUR_BUCKET_NAME/
If successful, you’ve confirmed that the session policy is working as expected.
Policy Comparison
| Policy Type | Scope | Duration | Purpose |
| Identity Policy | User or Role | Permanent | Grants base permissions |
| Session Policy | STS Session | Temporary | Restricts permissions during a session |
Demo Session Policies
Now, you’ll grant the IAM user John temporary file-upload permissions to the S3 bucket company1-hr using an AWS STS session policy and a dedicated IAM role. By the end, John will be able to upload objects for a limited time without altering his long-term permissions.
Prerequisites
AWS CLI installed and configured for user John
Bucket
company1-hralready exists in account629470240201Basic familiarity with IAM, STS, and S3 permissions
Step 1: Verify Current AWS Identity
Confirm you’re authenticated as John:
aws sts get-caller-identity
Expected output:
{
  "UserId": "AIDAZFDZUTSTSYQ6QFLS",
  "Account": "629470240201",
  "Arn": "arn:aws:iam::629470240201:user/john"
}
Step 2: List Bucket Contents and Test Upload
Check existing objects and verify that upload is currently denied:
aws s3 ls s3://company1-hr
aws s3 cp new-file.txt s3://company1-hr
# fatal error: An error occurred (AccessDenied) when calling the PutObject operation: Access Denied
Step 3: Define the Session Policy
Create a JSON policy that allows listing, reading, and uploading:
{
  "Version": "2012-10-17",
  "Statement": [{
    "Effect": "Allow",
    "Action": [
      "s3:ListBucket",
      "s3:GetObject",
      "s3:PutObject"
    ],
    "Resource": [
      "arn:aws:s3:::company1-hr",
      "arn:aws:s3:::company1-hr/*"
    ]
  }]
}
| Action | Description |
| s3:ListBucket | List the bucket’s objects |
| s3:GetObject | Download or read bucket objects |
| s3:PutObject | Upload new objects to the bucket |
Note
Save this policy as SessionPolicy-UploadFile.json and upload it as a customer-managed policy named SessionPolicy-UploadFile.
Step 4: Create and Configure the IAM Role
In the IAM console or via AWS CLI, create a role JohnUploadRole.
Attach the
SessionPolicy-UploadFilepolicy to this role.
Update the role’s trust policy so that John can assume it:
{
  "Version": "2012-10-17",
  "Statement": [{
    "Effect": "Allow",
    "Principal": {
      "AWS": "arn:aws:iam::629470240201:user/john"
    },
    "Action": "sts:AssumeRole"
  }]
}
Warning
Ensure the trust relationship is properly updated—otherwise, John will not be able to assume the role.
Step 5: Assume the Role and Export Temporary Credentials
Have John run the following to get short-lived credentials:
aws sts assume-role \
  --role-arn arn:aws:iam::629470240201:role/JohnUploadRole \
  --role-session-name JohnUploadSession
Sample response:
{
  "Credentials": {
    "AccessKeyId": "ASIAFD2ZUTS3J3PIX55",
    "SecretAccessKey": "iqhGcv6Lp3Y4wUgmIiRiRHhS4KinLURta92SW5V",
    "SessionToken": "IQoJb3JpZ2luX2VjE/////////WwECAa...",
    "Expiration": "2023-10-08T21:53:20Z"
  }
}
Export these values to the environment:
export AWS_ACCESS_KEY_ID="ASIAFD2ZUTS3J3PIX55"
export AWS_SECRET_ACCESS_KEY="iqhGcv6Lp3Y4wUgmIiRiRHhS4KinLURta92SW5V"
export AWS_SESSION_TOKEN="IQoJb3JpZ2luX2VjE/////////WwECAa..."
Step 6: Verify Upload Succeeds
With the new session credentials, repeat the list and upload:
aws s3 ls s3://company1-hr
aws s3 cp new-file.txt s3://company1-hr
aws s3 ls s3://company1-hr
# 2023-10-08 17:45:42      7 Test.txt
# 2023-10-08 20:55:38      3 new-file.txt
The file new-file.txt is now uploaded. These permissions automatically expire when the session token’s Expiration time is reached.
Auditing with CloudTrail
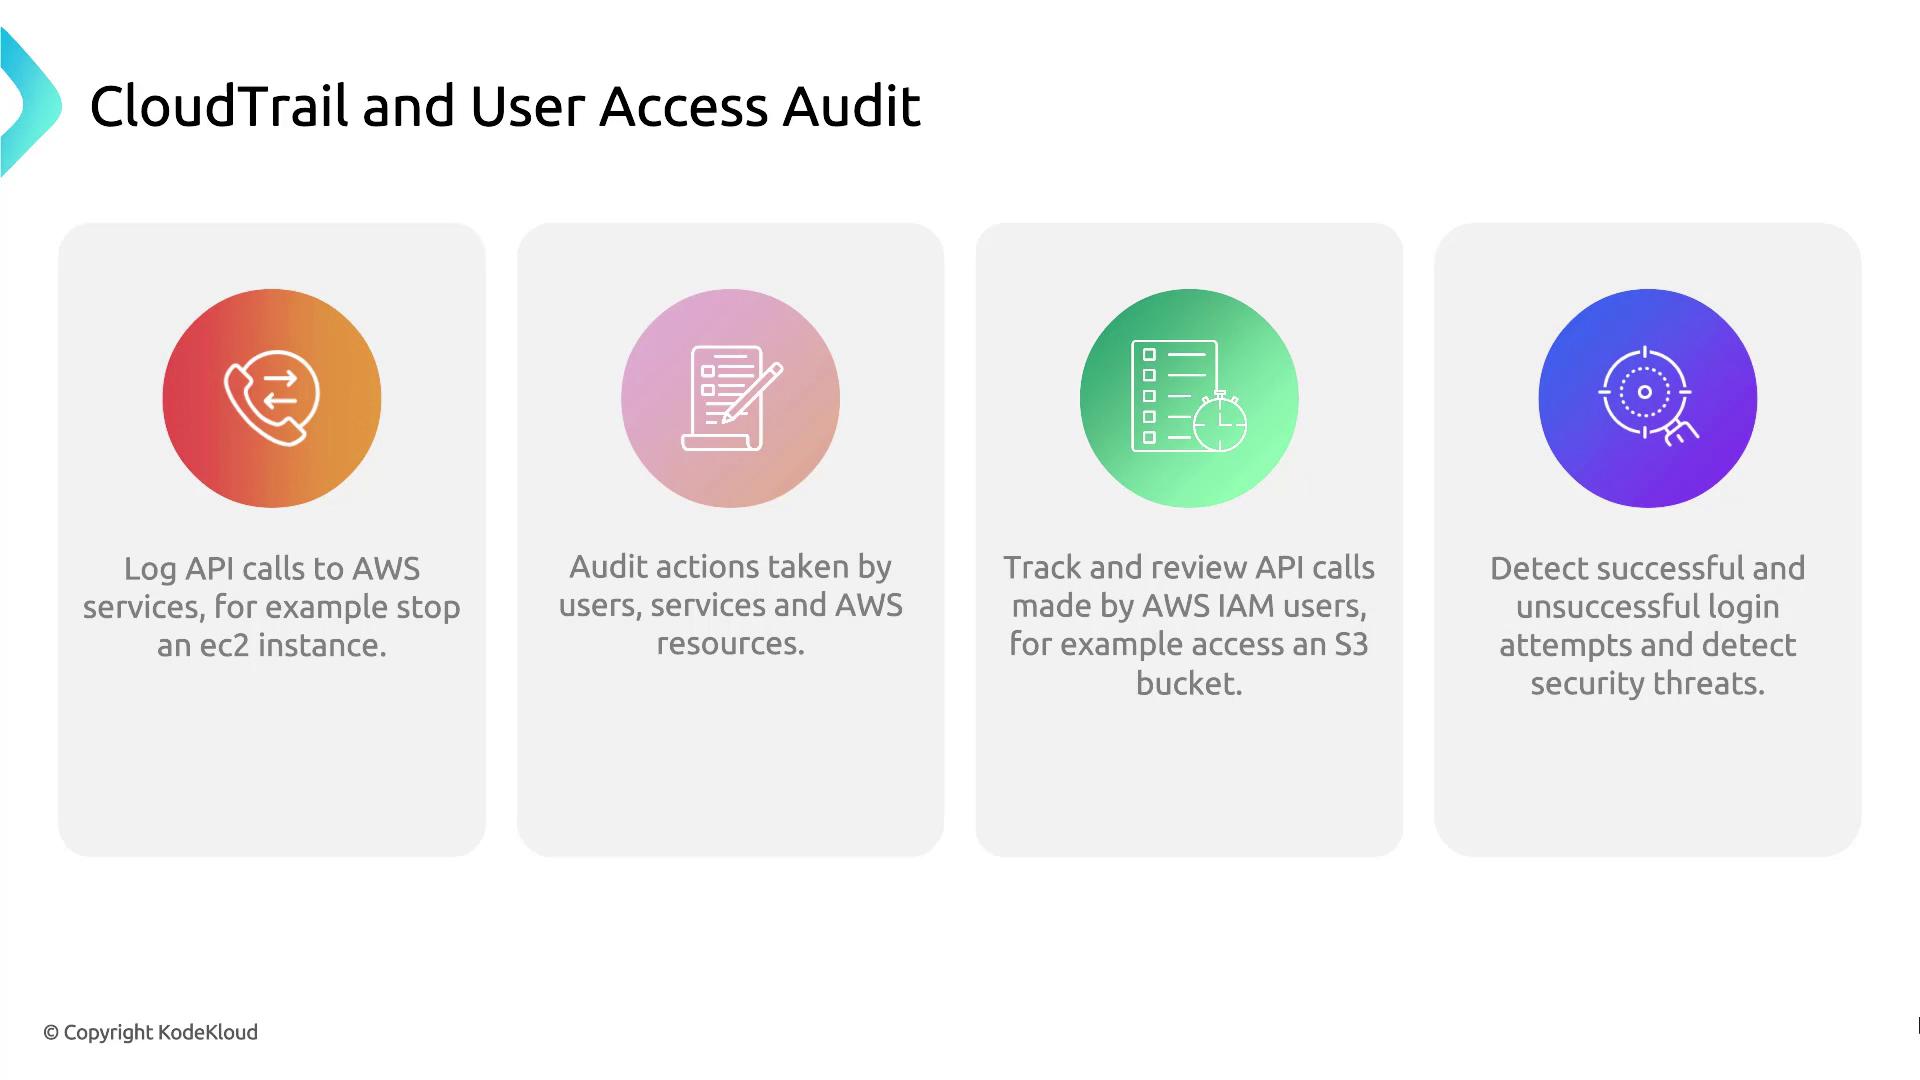
In this lesson, you’ll learn how to track and audit S3 access using AWS CloudTrail. When an IAM user performs actions—like deleting an object in an S3 bucket—you need to know who did it, when it happened, and exactly which operation was called. AWS CloudTrail records all API calls to your AWS resources, making this audit process straightforward.
Note
Make sure CloudTrail is enabled across all regions before you begin so that no API activity goes unrecorded.
Why Audit S3 Access?
By analyzing CloudTrail logs, you can:
| Feature | Description |
| API call logging | Capture every AWS API request, whether from users, services, or resources. |
| Action auditing | Review who performed which operations on your resources. |
| API call tracking | Filter logs by IAM users, resources, or specific event names. |
| Security event detection | Identify both successful and failed login attempts. |
Demo: Use CloudTrail to Audit User Access
Follow these steps to search the event history in the CloudTrail console:
Sign in to the AWS Management Console and open CloudTrail.
In the sidebar, select Event history.
Use the filter bar to narrow down by Event name, Username, or Resource name.
Click an individual event to view details such as the request time, source IP, and whether the request succeeded or failed.
Demo CloudTrail
In this lesson, you’ll explore the AWS CloudTrail console to audit API calls by inspecting event history. By the end, you’ll know how to navigate events, read their details, and extract key metadata.
Viewing Event History
Sign in to the AWS Management Console and open CloudTrail.
In the left navigation pane, select Event history.
You’ll see a searchable list of API events with the following details:
| Column | Description |
| Event name | The API action (for example, RunInstances) |
| Time | Timestamp when the action occurred |
| Username | IAM user or role that made the request |
| Event source | AWS service endpoint (e.g., ec2.amazonaws.com) |
| Resources | Affected resource types and identifiers |
Select an event (for example, RunInstances) to view its full record.
Event Summary
The Summary pane displays metadata for the selected event:
Timestamp: When the API call occurred
User identity: IAM user or role and access key
Service: The AWS service that received the call
Source IP: Originating IP address
Region: AWS region of the operation
Resources count: Number of resources referenced by the event
Below is a truncated JSON snippet of a RunInstances event:
{
  "eventVersion": "1.08",
  "userIdentity": {
    "type": "IAMUser",
    "principalId": "AIDAZFDZ2ZUTSWJCHYKF",
    "arn": "arn:aws:iam::629470242021:user/kodekloud",
    "accountId": "629470242021",
    "accessKeyId": "ASIAZFDZ2ZUTSYABGGX",
    "userName": "kodekloud",
    "sessionContext": {
      "sessionIssuer": {},
      "webIdFederationData": {},
      "attributes": {
        "creationDate": "2023-10-08T17:21:45Z",
        "mfaAuthenticated": "false"
      }
    }
  },
  "eventTime": "2023-10-08T17:50:24Z",
  "eventSource": "ec2.amazonaws.com",
  "eventName": "RunInstances"
}
Note
The console shows the last 90 days of event history by default. For long-term retention, create a CloudTrail trail to deliver logs to an S3 bucket.
Request Parameters and Response Elements
Scrolling down shows the inputs you passed to the API and AWS’s response. The example below illustrates:
AMI ID and instance configuration
Key pair, security group, and tags
Network interfaces and instance state
{
  "awsRegion": "us-east-2",
  "sourceIPAddress": "70.175.135.47",
  "userAgent": "AWS Internal",
  "requestParameters": {
    "instancesSet": {
      "items": [
        {
          "imageId": "ami-036f5574583e16426",
          "minCount": 1,
          "maxCount": 1,
          "keyName": "Ohio-Key"
        }
      ]
    }
  },
  "responseElements": {
    "instancesSet": {
      "items": [
        {
          "instanceId": "i-0123456789abcdef0",
          "instanceType": "t3.micro",
          "placement": {
            "availabilityZone": "us-east-2b"
          },
          "state": {
            "code": 0,
            "name": "pending"
          },
          "privateIpAddress": "172.31.29.166",
          "dnsName": "ip-172-31-29-166.us-east-2.compute.internal",
          "keyName": "Ohio-Key",
          "groupSet": {
            "items": [
              {
                "groupId": "sg-00ca240f71292feb2",
                "groupName": "Webserver_SG"
              }
            ]
          },
          "tagSet": {
            "items": [
              {
                "key": "Name",
                "value": "Server1"
              }
            ]
          },
          "networkInterfaceSet": {
            "items": [
              {
                "networkInterfaceId": "eni-0892be3483f983663",
                "subnetId": "subnet-d07cb873ce0ee06",
                "vpcId": "vpc-0fd1744d0f9c0fe7a",
                "attachment": {
                  "attachmentId": "eni-attach-07bbe98b3bf06adea",
                  "status": "attaching",
                  "attachTime": 1696787423000,
                  "deleteOnTermination": true,
                  "deviceIndex": 0,
                  "networkCardIndex": 0
                },
                "privateIpAddressesSet": {
                  "items": [
                    {
                      "privateIpAddress": "172.31.29.166",
                      "privateDnsName": "ip-172-31-29-166.us-east-2.compute.internal",
                      "primary": true
                    }
                  ]
                },
                "ipv6AddressesSet": {},
                "sourceDestCheck": true
              }
            ]
          }
        }
      ]
    }
  }
}
Additional CloudTrail Metadata
At the bottom of each event record, CloudTrail provides management-level details that aid traceability:
{
  "maintenanceOptions": {
    "autoRecovery": "default"
  },
  "privateDnsNameOptions": {
    "hostnameType": "ip-name",
    "enableResourceNameDnsARecord": true,
    "enableResourceNameDnsAAAARecord": false
  },
  "requestID": "b3116925-dea3-43fd-9b10-19932ce1925",
  "eventID": "e2f69382-7637-4deb-83ed-e6ee31cac1c4",
  "readOnly": false,
  "eventType": "AwsApiCall",
  "managementEvent": true,
  "recipientAccountId": "629470242021",
  "eventCategory": "Management",
  "sessionCredentialFromConsole": "true"
}
Warning
Make sure your IAM policy includes the cloudtrail:LookupEvents permission to view this data.
Subscribe to my newsletter
Read articles from Arindam Baidya directly inside your inbox. Subscribe to the newsletter, and don't miss out.
Written by
Arindam Baidya
Arindam Baidya
🚀 Aspiring DevOps & Cloud Engineer | Passionate about Automation, CI/CD, Containers, and Cloud Infrastructure ☁️ I work with Docker, Kubernetes, Jenkins, Terraform, AWS (IAM & S3), Linux, Shell Scripting, and Git to build efficient, scalable, and secure systems. Currently contributing to DevOps-driven projects at Assurex e-Consultant while continuously expanding my skills through hands-on cloud and automation projects. Sharing my learning journey, projects, and tutorials on DevOps, AWS, and cloud technologies to help others grow in their tech careers. 💡 Let’s learn, build, and innovate together!