DOM Manipulation in JavaScript
 Lord Abiolla
Table of contents

Advanced DOM Manipulation
DOM Manipulation is an important topic worth learning in Web development, this is because it is one of JavaScript’s main uses to make web pages interactive.
This article will cover topics like how to traverse the DOM and what DOM events are.
Let’s get started!
Table of Contents
What is the DOM
Selecting DOM elements
getElementByIdgetElementByClassNamegetElementByTagNamequerySelectorquerySelectorAll
Changing content of DOM elements
The
innerHTMLpropertyThe
innerTextandtextContentproperties
Working with attributes of DOM elements
The
getAttributemethodThe
setAttributemethodThe
removeAttributemethodThe
hasAttributemethod
Changing styles on DOM elements
Selecting styles with the .style property
Setting styles with classes
Traversing the DOM
Difference between Node and Element
Selecting parent with
parentNodevsparentElementSelecting elements with
childNodevs childrenSelecting the First or Last Child element
Selecting a sibling of nodes in the DOM
DOM events and event listeners
Difference between event listener and event handler
Ways to register events in JavaScript
Event object
Types of events
Event flow in JavaScript
Event bubbling
Event capturing
Event
stopPropagationmethod
What is the DOM
DOM stands for Document Object Model.
The Document refers to the web page you see in the browser, including the text, images, links, and other elements that make up the page. It is the HTML document that handles the structure of the page’s content.
Object means the elements. Things like images, headers, and paragraphs, with each object having its properties like id, class, style, and methods. It is these properties that we use to manipulate the elements.
Model is the representation or copy of the HTML documents as a hierarchical tree. This tree includes all the elements, and it captures the parent-child relationship between them.
The DOM is always identical to the HTML document since the browser always ensures they are in sync. i.e., if something changes in the HTML, it’s updated in the DOM as well.

Above is the graphical representation of the HTML DOM tree
At the very top of the hierarchy is the Document object, with only one child - the html/root element. The html element has two children, the head and body elements, with each of them also having their own children.
DOM manipulation enables you the developer to interact with the structure, style and content of web pages. Some of the things you can do with the DOM includes;
Changing and removing existing elements in the DOM.
Creation and addition of new elements to the page.
Changing element styles and adding event listeners to make them interactive.
Selecting DOM elements
To perform something like adding interactivity to DOM elements, they first have to be selected. Some of the ways of selecting the DOM elements include;
- getElementById() method
This is a method used to select elements with an id attribute. Ids are unique identifiers, meaning, if an elements has an id of “paragraph“, then no other element on the page can have the same id value.
Example:
<p id="greeting">Hello World!</p>

<script>
    let element = document.getElementById("greeting");
    console.log(element);
</script>
This example selects the paragraph element and assigns it to element variable then we log the element to the console. This will print the paragraph element to the console as shown below;

- getElementByClassName() method
This method selects more than one object. It takes the value of a class attribute as an argument and selects all elements in the DOM that has the given class. Unlike ids, you can give the same class value to different HTML elements.
Example:
<p class="message">First message</p>
<p class="message">Second message</p>

<script>
    let elements = document.getElementsByClassName("message");
    console.log(elements);
</script>
This returns a collection of all elements with the given class. HTML collection looks like an array, and it’s elements can be accessed using the bracket notation just like an array - but you cannot apply array methods like map, filter, and forEach.

- getElementsByTagName() method
This method selects elements using their ta name, returning an HTML collection of the selected elements.
<h2>Title 1</h2>
<h2>Title 2</h2>

<script>
    let headings = document.getElementsByTagName("h2");
    console.log(headings);
</script>
A collection of h2 tags are returned as shown below;

- querySelector() method
This is a method used to select any HTML element in the DOM. It returns only one element that matches the given selector first.
The querySelector() method works how CSS selectors work. e.g., when selecting an element with an id, you use the # symbol and . in front of class name for elements with a class.
Example:
<p class="note">Note 1</p>
<p class="note">Note 2</p>

<script>
    let firstNote = document.querySelector(".note");
    console.log(firstNote);
</script>
This example returns only the first element with the class of note and ignores the rest, as shown on the output below.

- querySelectorAll() method
This method also selects HTML elements using CSS selectors. The difference with querySelector() method is that it returns all elements that match the selector instead of returning only the first one.
Example:
<p class="note">Note 1</p>
<p class="note">Note 2</p>

<script>
    let firstNote = document.querySelector(".note");
    console.log(firstNote);
</script>
querySelectorAll() returns a NodeList of selected elements. NodeList is slightly different from HTML collection and you don’t need to convert it to an array to apply forEach array method.
However, you cannot apply array methods like map and filter on NodeList if it has not been converted to an array.

Changing contents of DOM elements
Now that we can select DOM elements, how do we change their content?
To change contents of a DOM element, first select it using any of the methods we’ve already learned, then apply any of the methods we’re about to learn to change the content of the element.
The methods include:
- The
innerHTMLproperty
This method enables you to read or update both the structure and content of the elements. It enables you insert HTML tags too.
Example:
<p id="demo">Old content</p>

<script>
    document.getElementById("demo").innerHTML = "<b>New bold content</b>";
</script>
The example above selects the element using getElementById() method first, then uses innerHTML to change the text “Old content“ to “New bold content“.
innerHTML however, poses potential security risks such as cross-site scripting(XSS) attacks.
If the content you’re inserting comes from user input or untrusted source, it can be validated and sanitized using DOMPurify first, then use innerHTML to prevent XSS attacks.
When working with plain text, consider using other methods such as innerText or textContent.
- The
innerTextandtextContentProperties
Both innerText and textContent ignore the HTML tags and treat them as part of a string. They can both be used to read or update the text of DOM elements, with key difference being how they treat the text.
innerText returns the text as it appears on the screen, while textContent returns the text as it appears in the markup.
For example:
<p>
    Key = <span style="display: none;"> ABC123 <span>
</p>

<script>
    const paragraph = document.querySelector('p');
    console.log("innerText: ", paragraph.innerText);
    console.log("textContent: ", paragraph.textContent);
</script>
This example has a paragraph with a span that contains a key. The key doesn’t appear on screen because of the inline style set to display of none.

We can see from the output above that, innerText returns the text as appears on the screen without the value of key which is hidden in CSS, while textContent returns the text including the hidden elements and white space.
Working with DOM elements’ attributes
HTML attributes provides more information about HTML elements and are always included in the opening tag of the element.
The attributes are made up of name and a value. When the browser is generating the DOM based on the HTML structure, it translates these attributes into dynamic properties of the DOM object.
To interact and manipulate these attributes using JavaScript, we use the following methods:
- The
getAttribute()method
This method is used to get the value of an existing attribute on an element. It accepts an argument (name of the attribute) and returns the value of the attribute. If the attribute passed as an argument doesn’t exist, the method returns null.
Example:
<img src="image.jpg" alt="My image">
<script>
    const imageElement = document.querySelector('img')
    console.log(imageElement.getAttribute('src'))
</script>
Here, we use getAttribute method to get value of the src attribute. You can tell that the value returned in an image element, image.jpg.
- The
setAttribute()method
This method is used to set or change the attribute of an element. The method takes two arguments, first argument being the name of attribute you want to change, and the second argument being the new value you want to give the attribute.
Example;
<img src="image.jpg" alt="My image">

<script>
const imageElement = document.querySelector('img')

    console.log("BEFORE:", imageElement.getAttribute('src'))
    imageElement.setAttribute('src', 'new-image.jpg')
    console.log("AFTER:", imageElement.getAttribute('src'))
</script>
setAttribute method updates the value of src attribute in the code above.

We can see the value of src attribute before using setAttribute, and the value of src after using setAttribute to change it from image.jpg to new-image.jpg.
- The
removeAttribute()method
You can use this method to remove attributes that have been set to the HTML elements. You simply pass the name of the attribute you want to remove from the element as argument to the method to remove it.
Example:
<img src="image.jpg" alt="My image" height="200">

<script>
    const imageElement = document.querySelector('img')

    console.log("BEFORE:", imageElement.getAttribute('height'))
    imageElement.removeAttribute('height', '200')
    console.log("AFTER:", imageElement.getAttribute('height'));
</script>

We can see from the output above that the first log statement prints the height value as 200, but after using removeAttribute(), the second log statement prints null to indicate that height attribute from the image has been removed.
- The
hasAttribute()method
This method is used to check whether or not an element has a specific attribute. It returns true if the specified attribute exists and false if it does not.
Example:
<img src="image.jpg" alt="My image" height="200">

<script>
    const imageElement = document.querySelector('img')

    console.log("HEIGHT:", imageElement.hasAttribute('height'));
    console.log("WIDTH:", imageElement.hasAttribute('width'));
</script>
The example above will return true for the first log statement because height exists and false for the second log statement because width doesn’t exist.
Changing style on DOM elements
There are only two main ways of styling the DOM elements. i.e., the .style property or classes.
- Setting style with
.styleproperty
The .style enable us make changes to a single element by allowing us set styles directly as inline styles for elements. By using it, you get access to all the individual CSS properties.
Example;
<h1>Styling elements in JS</h1>
<script>
    const headers = document.querySelector('h1');
    console.log(headers.style);
</script>
You can see from the output below that console.log prints the CSS style declaration with all of the CSS properties for the h1 element.
We can also change the h1 text color and add a background color as shown below;
<h1>Styling elements in JS</h1>
<script>
    const headers = document.querySelector('h1');

    headers.style.color = 'red';
    headers.style.backgroundColor = 'black';
</script>
Note that you cannot use hyphen if the CSS property name includes two or more words. e.g., background-color becomes backgroundColor.
- Setting style with classes
You can use classes to set styles once and apply it to different elements to make the code more maintainable. This can be done using the following;
The
classNameproperty: This represent the class attribute of a DOM element, and it can be used to get or set the value of the class attribute. For example;<h1 class="greeting"> Hello World! </h1> <script> const greeting = document.querySelector('h1'); console.log(greeting.className); greeting.className = 'greet-world'; console.log(greeting.className); </script>
In the above example, the first log statement prints the original value of the class. And after updating the
className, the second log statement prints the new value for class.The
classListproperty: You can add/remove classes with this property. Moreover, toggling, replacing existing class values with new ones, and checking if class contains a specific value can also be done. For example;<h1 class="greeting"> Hello World! </h1> <script> const greeting = document.querySelector('h1'); console.log(greeting.classList); </script>The code above will show the current classList with only one value of greeting as shown below.

When we use
classList.add()as shown below, the code adds new classessayandhelloto the class list<h1 class="greeting"> Hello World! </h1> <script> const greeting = document.querySelector('h1'); greeting.classList.add('say', 'hello'); console.log(greeting.classList); </script>
We can also remove classes using the
classList.remove()method as shown below. For instance, let’s remove thesayclass.<h1 class="greeting"> Hello World! </h1> <script> const greeting = document.querySelector('h1'); greeting.classList.remove('say'); console.log(greeting.classList); </script>
classList.replace()function replace the name of the class as indicated below.<h1 class="greeting"> Hello World! </h1> <script> const greeting = document.querySelector('h1'); greeting.classList.replace('greet-world', 'greet'); console.log(greeting.classList); </script>The output

The output shows that the class
greet-worldhas been replace withgreet.Other methods include
classList.contains()which checks if the class passed to it is contained in the class list. It returnstrueif it’s included in the class list andfalseif it’s not included in the class list.Finally, the
classList.toggle()which first checks the presence of a class in the list. If it exists, it will remove it and if it doesn’t exists it will add it.
Traversing the DOM
Traversing the DOM simply means moving between different elements/nodes within the HTML document, as you select or access the parent, child/sibling elements/nodes to get information or manipulate the document structure.
Nodes are the building blocks of the DOM, representing different components in the HTML structure, while elements are specific type of nodes that define the structure of the document’s content.
The DOM can be traversed as follows;
- Selecting parent with
parentNodevsparentElement
Both of the mentioned methods will get the parent of the element passed to them. Let’s see an example of selecting the parent of an element.
<div class="container">
    <p class="full-text">
        <i id="italics">Some italicized text</i>
    </p>
</div>

<script>
    const italicizedText = document.getElementById('italics');

    console.log(italicizedText.parentNode);
    console.log(italicizedText.parentNode.parentNode);
</script>
The output
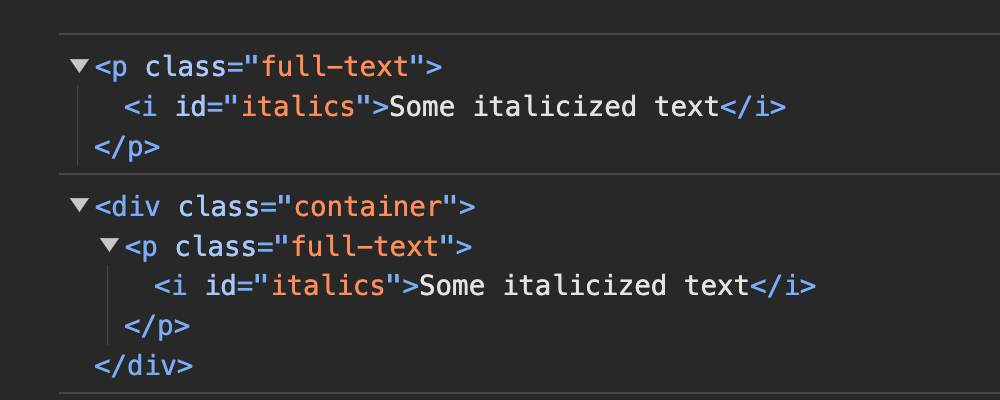
We first select the element, chain the parentNode method to it to get the parent, and then we can also chain another parentNode property to get a parent element like in the second log statement from the output.
- Selecting elements with
childNodesvschildren.
You can select contents of an element using both the .childNodes and .children properties even though they work differently.
childNodes return a NodeList of all the child nodes within the selected elements, including elements and non-element nodes like text nodes, comment nodes, etc, as shown below;
<div id="container">
    A text node
    <p>Some paragraph</p>
    <!-- This is a comment -->
    <span>Span Element</span>
</div>

<script>
    const container = document.getElementById('container');

    const containerChildNodes = container.childNodes;
    const containerChildren = container.children;

    console.log(containerChildNodes);
    console.log(containerChildren);
</script>
The output
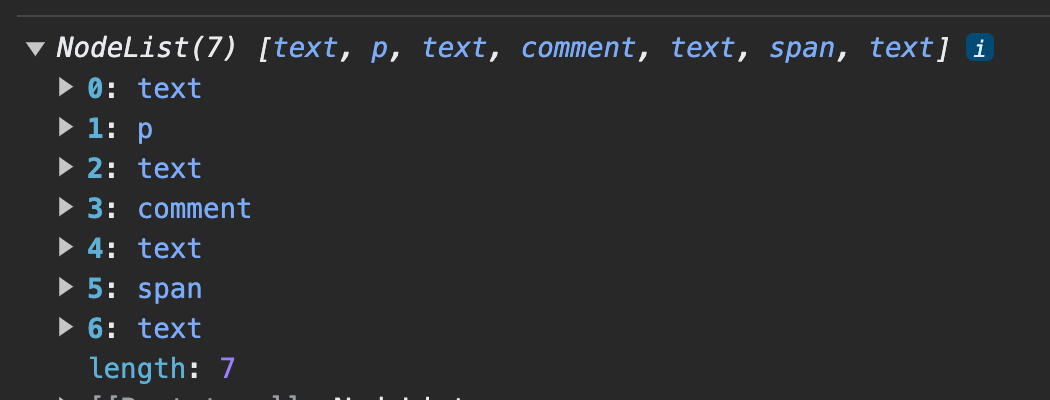
children will only returns the child elements (paragraph and the span)

Example of using the .children property
Selecting the first or last child/element: You can use these four methods to select the first/last child or element.
firstChild: Selects only the child node of the parent element.lastChildselects only the last child node of the parent element.firstElementChild selects only the first child element of the parent
lastElementChildselects only the last child element of the parent.Example;
  <div id="container">
      A text node
      <p>Some paragraph</p>
      <!-- This is a comment -->
      <span>Span Element</span>
  </div>
  <script>
      const container = document.getElementById('container');

      console.log("FIRST CHILD:", container.firstChild);
      console.log("LAST CHILD:", container.lastChild);
      console.log("FIRST ELEMENT: ", container.firstElementChild);
      console.log("LAST ELEMENT:", container.lastElementChild);
  </script>
The output
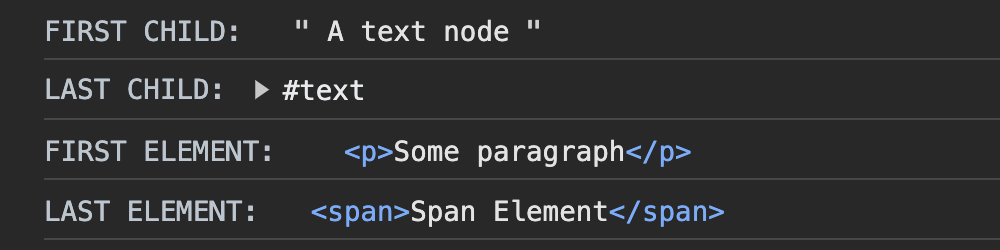
firstChildreturns the first text node, whilefirstElementChildreturns the first paragraph element instead. In other words,firstElementChildskips over the text node that appears before the paragraph.Similarly,
lastChildcan return a text node even when it seems, from the HTML, that nothing follows the<span>element. This happens becauselastChildcounts the line break or whitespace between the closing</span>tag and the closing</div>tag as a node.For this reason, it’s usually safer to use
firstElementChildandlastElementChildwhen working with DOM elements.Selecting sibling of nodes in the DOM: We can select a sibling of an element using the following properties.
nextSiblingwhich selects the next node within the same parent element.nextElementSiblingselects the next element, and ignores any non-element nodes.previousSiblingselects the previous node within the same parent element.previousElementSiblingselects the previous element, and ignores any non-element nodes.Example;
  <div>
      <p id="one">First paragraph</p>
      text node
      <p id="two">Second paragraph</p>
      another text node
      <p id="three">Third paragraph</p>
      <p id="four">Fourth paragraph</p>
    </div>

  <script>
      const paragraphTwo = document.getElementById('two')

      console.log("nextSibling: ", paragraphTwo.nextSibling)
      console.log("nextElementSibling: ", paragraphTwo.nextElementSibling)
      console.log("previousSibling: ", paragraphTwo.previousSibling)
      console.log("previousElementSibling: ", paragraphTwo.previousElementSibling)
  </script>
The output
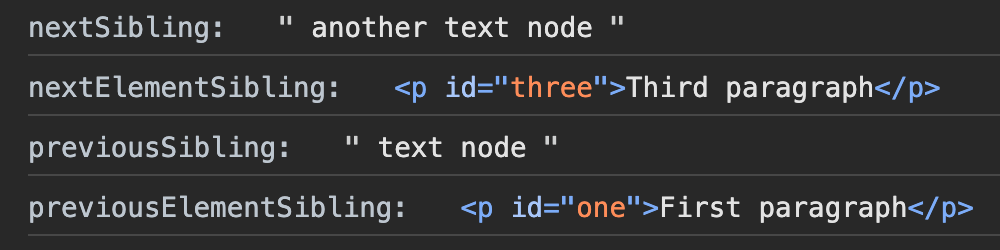
nextSiblingandpreviousSiblingselect the text nodes because they consider all nodes within the parent. WhilenextElementSiblingandpreviousElementSiblingselect only the paragraph elements because they ignore non-element nodes like text.
DOM Events and Event Listeners
Events are actions that take place in the browser, to allow developers make websites interactive. Some of these events are user-initiated like clicking, moving the mouse, or typing on the keyboard while others are browser-initiated like when a page finishes loading.
An event listener is a method that lets you know when an event has taken place. It listens or keep an eye out for DOM events, and when an event happens, you can do something.
An event handler on the other hand is a response to the event. It’s a function that runs when an event occurs.
In this case, the event listener informs your app when an event occurs and then triggers a response which runs when the event occur.
- Ways of registering events in JavaScript
The main three ways you can listen to and respond to DOM events using JavaScript include;
Using inline event handlers: This is when you add an event listener to an attribute to HTML element. It was the only way to add events in JavaScript back in the days.
An example;
  <button onclick='alert("Hello")'>
      Click me!
  </button>
Using on-event handlers: This is used when an element has only one event handler. Adding multiple event handlers using this method will only trigger the last event handler to run as it will override others before it.
An example;
  <button> Click me! </button>

  <script>
      const button = document.querySelector('button');

      button.onclick = function() {
          console.log('Run first handler');
      }

      button.onclick = function() {
          console.log('Run second handler');
      }
  </script>
The result of the above script will be
“Run second handler“because the browser will only run the second event handler ignoring the first one.Using the
addEventListenermethod: This allows you to attach more than one event handler to an element and executes them in the order in which they were added.addEventListenermethod takes two arguments, the first is the event you want to listen to, and the second is the event handler which’s a function you want to run when the event occurs.An example;
  <button> Click me! </button>

  <script>
      const button = document.querySelector('button');

      button.addEventListener('click', function () {
          console.log('Run first handler');
      })

      button.addEventListener('click', function () {
          console.log('Run second handler');
      })
  </script>
The output

You can see from the output that the method executes both event handlers simultaneously.
- The Event Object
Event object is a JavaScript object the browser passes as an argument to the event handler function anytime an event occurs. Some of the properties and methods included in the object include;
typewhich indicates the type of event such as click, mouseover, keydown, etc.targetis the element on which the event occurred.clientXandclientYare the horizontal and vertical coordinates of the mouse pointer at the time the event occurred.preventDefault()prevents default actions associated with the events like preventing a form submission on the submit event.stopPropagation()prevents the event from propagating through the DOM
Full list of the properties and methods can be found on the MDN web docs
- Types of Events
Some of the different DOM events the browser allows you listen to include the following;
Mouse events:
click: when the element is clicked.dbclick: when the element is double clicked.mouseover: when the mouse pointer enters the element.mouseleave: when the mouse pointer leaves the element.mousedown: when the mouse is pressed down over an element.mouseup: when the mouse is released over an element.
Keyboard events:
keydown: when a key on the keyboard is pressed down.keyup: when a key on the keyboard is released.keypress: when a key is pressed and shows the actual key that was pressed. Note that this event is not fired for all keys, especially non-printable keys.
Form events:
submit: when a form is submitted.input: when the value of an input field changes.change: when the value of a form element changes and loses focus.
Window events:
load: when the browser finishes loading the page.unload: when the user leaves the page.resize: when the browser window is resized.scroll: when the user scrolls through the document.
You can see a list of DOM events on DOM events.
Event Flow in JavaScript
In JavaScript, when an event occurs, it’s propagated or travels from the target where it occurred to the outermost element in the DOM or vice verse.
For instance when a button on a page is clicked, by clicking it, you’ve also clicked its parent element and any other element the button is inside within the DOM hierarchy.
Let’s dive deeper;
Event bubbling: This is when an event is first registered on the target (or specified element) on which the event happened, and then registered outwards to the parent and onward to the outermost element.
For example;
  <!DOCTYPE html>
  <html>
      <head>
          <title>Event bubbling DEMO</title>
      </head>
      <body>
          <div id="outer">
              <div id="inner">
                <button id='btn'>Click Here</button>
              </div>
          </div>
      </body>
  </html>
When the button above is clicked, the event goes through the following sequence, it starts bubbling up from the target element back to the outermost ancestor.

Event capturing: This is the opposite of event bubbling. The event starts from the outermost ancestor element and travels down the DOM tree to the target element.
During capturing, event listeners attached to an element are executed in the order of the hierarchy from the topmost ancestor to the target element.

For example;
<!DOCTYPE html>
<html>
    <head>
        <title>Event bubbling DEMO</title>
    </head>
    <body>
        <div id="outer">
            <div id="inner">
              <button id='btn'>Click Here</button>
            </div>
        </div>

    <script>
        const button = document.getElementById('btn')
        const innerDiv = document.getElementById('inner')
        const outerDiv = document.getElementById('outer')

        button.addEventListener('click', function() {
          console.log('Click on button')
        })

        innerDiv.addEventListener('click', function() {
          console.log('Click on inner Div')
        })

        outerDiv.addEventListener('click', function() {
          console.log('Click on outer Div')
        })
    </script>
    </body>
</html>
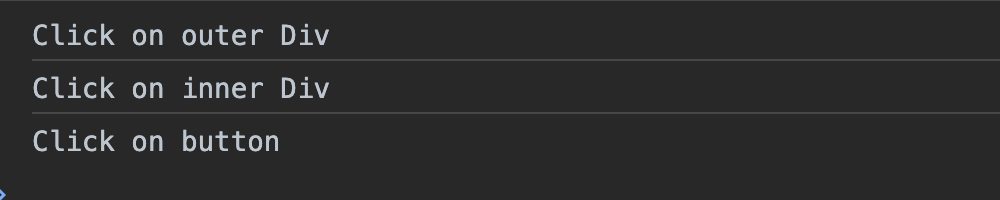
Browsers use event bubbling by default. Therefore, this would be order in which the event handler will run in response to a click on the button.
button#innerDiv#outerDiv

To use event capturing, we have to pass a third argument true to the event listener as shown below.
const button = document.getElementById('btn')
const innerDiv = document.getElementById('inner')
const outerDiv = document.getElementById('outer')

button.addEventListener('click', function() {
  console.log('Click on button')
}, true)

innerDiv.addEventListener('click', function() {
  console.log('Click on inner Div')
}, true)

outerDiv.addEventListener('click', function() {
  console.log('Click on outer Div')
}, true)
This will change the order to be as follows;
#outerDiv#innerDivbutton
The event
stopPropagation()method: This method is used to prevent the event from propagating through the whole DOM. Basically, if you don’t want capturing and bubbling to register on the entire DOM,stopPropagation()is used.For example;
  button.addEventListener('click', function(event) {
    event.stopPropagation()
    console.log('Click on button')
  })

  innerDiv.addEventListener('click', function() {
    console.log('Click on inner Div')
  })

  outerDiv.addEventListener('click', function() {
    console.log('Click on outer Div')
  })
stopPropagation()only allows the execution of only the first event listener. Meaning, in the code above, only the event handler on the button is fired. Others on theinnerDivandouterDivare not fired because of thestopPropagation()method on the button.
Conclusion
If you’ve read this far, congratulations. You now have good understanding of JavaScript DOM manipulation, and with more practice, you will soon be confident enough to handle advanced projects that require knowledge of these DOM manipulation concepts.
This knowledge of Vanilla JavaScript will come in handy when you start learning JavaScript frameworks/libraries such as React, Angular, Vue, Svelte, etc.
Subscribe to my newsletter
Read articles from Lord Abiolla directly inside your inbox. Subscribe to the newsletter, and don't miss out.
Written by
Lord Abiolla
Lord Abiolla
Passionate Software Developer with a strong enthusiasm for data, technology, and entrepreneurship to solve real-world problems. I enjoy building innovative digital solutions and currently exploring new advancements in data, and leveraging my skills to create impactful software solutions. Beyond coding, I have a keen interest in strategic thinking in business and meeting new people to exchange ideas and collaborate on exciting projects.