Why Your Jakarta Imports Fail in Eclipse and How to Fix Them
 Tuanhdotnet
5 min read
1. Understanding the Problem with Jakarta Imports
Before diving into solutions, it is essential to understand the root causes of import errors when working with Jakarta in Eclipse. Import errors typically manifest as "Cannot resolve symbol" or "Package does not exist" errors.
Misaligned Dependencies in Your Project
Jakarta EE relies on specific dependencies that need to be correctly configured in your build system (Maven, Gradle) or added to your classpath. If these dependencies are missing or incorrectly defined, Eclipse cannot resolve the imports.
Outdated Eclipse or Java Version
Jakarta EE moved its namespace from javax. to jakarta. starting with version 9. Older Eclipse versions may not fully support Jakarta imports, causing build path issues.
Incorrect Project Setup in Eclipse
Even with the correct dependencies, an improperly configured Eclipse project can prevent Jakarta packages from being imported. This often involves mismatched build paths or missing facets for Jakarta EE.
2. Methods to Fix Jakarta Import Errors in Eclipse
To resolve import errors effectively, follow these steps in sequence. Each step tackles a specific aspect of the problem.
2.1 Ensure You Have the Correct Dependencies
Jakarta EE requires specific dependencies. For instance, if you’re using Jakarta Servlets or Jakarta Persistence, ensure your pom.xml (for Maven projects) includes the necessary artifacts. Below is an example for Jakarta Servlet API:
Example Code: Adding Jakarta Servlet Dependency
<dependencies>
    <dependency>
        <groupId>jakarta.servlet</groupId>
        <artifactId>jakarta.servlet-api</artifactId>
        <version>5.0.0</version>
        <scope>provided</scope>
    </dependency>
</dependencies>
Explanation:
- The groupId and artifactId identify the Jakarta library.
- The scope is set to provided because the server typically provides these dependencies.
After adding the dependency, update your Maven project in Eclipse:
- Right-click your project in Eclipse.
- Navigate to Maven > Update Project.
- Ensure "Force update of Snapshots/Releases" is checked.
2.2 Update Eclipse to the Latest Version
Eclipse versions prior to 2021 may not fully support Jakarta EE 9+. Ensure you are using the latest Eclipse IDE for Enterprise Java Developers.
Steps to Update Eclipse:
- Go to Help > Check for Updates.
- Install all available updates and restart Eclipse.
- Alternatively, download the latest version of Eclipse from eclipse.org.
2.3 Configure Jakarta EE Facets for Your Project
Eclipse uses facets to determine the capabilities of your project. If the Jakarta EE facet is missing or incorrectly set, your imports may fail.
Steps to Configure Facets:
- Right-click your project and select Properties.
- Go to Project Facets.
- Enable Jakarta EE and ensure the correct version is selected (e.g., Jakarta EE 9 or 10).
- Apply and close the dialog.
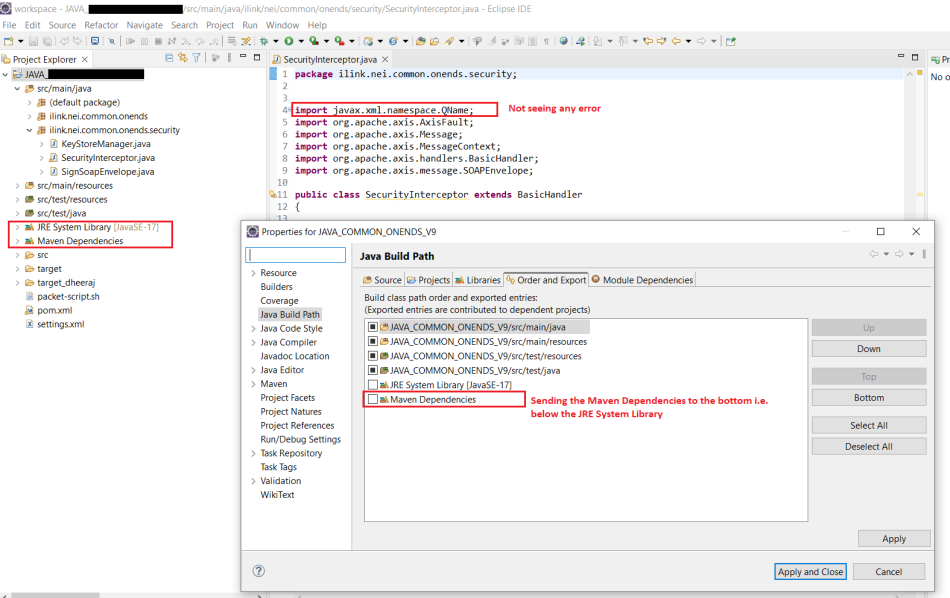
2.4 Add Jakarta Libraries to the Build Path
For non-Maven projects, you must manually add Jakarta libraries to the build path.
Example Code: Adding Jakarta JARs
Download the required JARs from Maven Central.
- Download the required JARs from Maven Central.
- Place them in a lib folder in your project directory.
- Add them to the build path:
- Right-click your project, go to Build Path > Configure Build Path.
- Add the JARs under Libraries.
3. Common Pitfalls and How to Avoid Them
Even after following the above steps, some errors may persist due to overlooked issues.
3.1 Conflicting Dependencies
Jakarta EE often conflicts with older Java EE (javax.*) dependencies. Check your pom.xml for such conflicts using the Maven dependency tree:
Command to Analyze Dependencies
mvn dependency:tree
Remove or exclude any conflicting javax.* dependencies.
3.2 Incorrect Java Version
Jakarta EE 9+ requires Java 11 or later. Ensure your Eclipse project is using the correct JDK version:
- Go to Preferences > Java > Installed JREs.
- Add and select a JDK 11+ runtime.
3.3 IDE Cache Issues
Eclipse caches project settings and can sometimes cause phantom errors. Clean your project to resolve such issues:
- Go to Project > Clean and rebuild.
4. Example: Creating a Jakarta Servlet Project
Below is a complete example of a Jakarta Servlet-based project to demonstrate the above fixes.
pom.xml
<dependencies>
    <dependency>
        <groupId>jakarta.servlet</groupId>
        <artifactId>jakarta.servlet-api</artifactId>
        <version>5.0.0</version>
        <scope>provided</scope>
    </dependency>
</dependencies>
Servlet Code
package com.example;

import jakarta.servlet.;
import jakarta.servlet.http.;
import java.io.IOException;

public class HelloWorldServlet extends HttpServlet {
    @Override
    protected void doGet(HttpServletRequest request, HttpServletResponse response) throws ServletException, IOException {
        response.setContentType("text/html");
        response.getWriter().println("<h1>Hello, Jakarta EE!</h1>");
    }
}
Deployment Steps:
- Package the project using Maven (mvn clean package).
- Deploy the generated WAR file to a Jakarta EE-compatible server like Payara or WildFly.
- Access the servlet at /HelloWorldServlet.
5. Conclusion
Jakarta import errors in Eclipse can be resolved through proper dependency management, IDE configuration, and environment updates. By following the methods outlined in this article, you can ensure a smooth development experience with Jakarta EE.
If you have any questions or encounter additional challenges, feel free to leave a comment below. Let’s discuss and solve them together!
Read more at : Why Your Jakarta Imports Fail in Eclipse and How to Fix Them
0
Subscribe to my newsletter
Read articles from Tuanhdotnet directly inside your inbox. Subscribe to the newsletter, and don't miss out.
Written by
Tuanhdotnet
Tuanhdotnet
I am Tuanh.net. As of 2024, I have accumulated 8 years of experience in backend programming. I am delighted to connect and share my knowledge with everyone.