How to Automate Invoices in C# with HTML to PDF Conversion
 syncfusion
TL;DR: Manual invoice creation is slow, error-prone, and difficult to scale. This guide walks developers through automating invoice generation using HTML to PDF conversion in C#. By injecting dynamic data into structured HTML templates and applying custom headers and footers, you can produce professional, print-ready invoices programmatically, saving time and improving consistency across billing workflows.
Tired of manually creating invoices for every client or transaction? As developers, we know how repetitive and error-prone that process can be, especially when scaling billing systems. What if you could automate it using HTML, C#, and a reliable PDF conversion workflow?
In this blog, we’ll explore how to automate sales invoice generation using Syncfusion’s HTML to PDF converter. By leveraging a dynamic HTML template with placeholders, we can inject real-time data, such as customer details, itemized billing, and totals, into a structured layout. We’ll also demonstrate how to add custom headers and footers to reflect your brand identity and include essential information like logos, contact details, and terms. This approach provides a flexible and professional solution for generating print-ready PDF invoices with ease.
Implementing the HTML to PDF converter
To automate invoice generation, you’ll need a .NET development environment and the Syncfusion® HTML to PDF converter library.
Prerequisites:
.NET SDK (version 8.0 or later).
Syncfusion® HTML to PDF converter NuGet package.
A basic HTML invoice template with placeholders.
A JSON file or any other data sources containing customer data.
Install Syncfusion® NuGet package:
To install the Syncfusion® HTML to PDF converter, run the following command in your terminal or package manager console:
dotnet add package Syncfusion.HtmlToPdfConverter.Net.Windows
Designing the HTML invoice template
The HTML template serves as the structural foundation for your invoice. It contains placeholders that will be dynamically replaced with real data at runtime, such as customer details, invoice numbers, itemized billing, and totals.
You can use a custom-designed HTML file or even adapt an existing webpage layout by embedding placeholders where dynamic content should appear. This approach allows for complete control over branding, layout, and styling, ensuring that the final PDF is professional and consistent.
The template used in our example includes:
A dynamic table for purchased items.
A summary section for subtotal, tax, and total.
Placeholders like {{PurchasedItems}}, {{Subtotal}}, {{SalesTax}}, and {{TotalAmountDue}}.
Here’s the snippet of the template:
<!DOCTYPE html>
<html>
    <head>
        <meta charset="UTF-8">
        <title>Invoice Generation</title>
        <style>
            body {
                font-family: Helvetica;
                margin: 40px;
                font-size: 14px;
            }

            .section {
                margin-top: 200px;
            }

            table {
                width: 100%;
                border-collapse: collapse;
                margin-top: 15px;
            }

            th, td {
                border: 1px solid #ccc;
                padding: 10px;
                text-align: left;
            }

            .totals {
                text-align: right;
            }
        </style>
    </head>
    <body>
        <div class="section">
            <table id="invoiceTable">
                <thead>
                    <tr>
                        <th>Purchased Item</th>
                        <th>No of License</th>
                        <th>License Price Per Unit</th>
                        <th>Total</th>
                    </tr>
                </thead>
                <tbody>
                    {{PurchasedItems}}
                </tbody>
            </table>
            <div class="totals">
                <p><strong>Subtotal:</strong> $ {{Subtotal}}</p>
                <p><strong>Sales Tax (8.5%):</strong> $ {{SalesTax}}</p>
                <p><strong>Total Amount Due:</strong> $ {{TotalAmountDue}}</p>
            </div>
            <p style="text-align: left;">
                <strong>Bank Details:</strong><br>
                Bank Name: ACAC Bank<br>
                Account Number: 123-456-7890
            </p>
        </div>
    </body>
</html>
Preparing dynamic invoice data
To populate your HTML invoice template with real-time values, you’ll need structured data that maps directly to the placeholders in your template. JSON is an ideal format for this purpose; it’s lightweight, easy to read, and integrates seamlessly with .NET applications.
While this example uses a JSON file, customer_data.json, to supply invoice data, you’re not limited to JSON. You can easily replace it with any data source, such as SQL Server, MySQL, CSV, XML, etc.
The key is to ensure that the data is properly mapped to your application’s object model, such as CompanyInvoice and Item in this example, which can then be used to dynamically populate the HTML template.
Replacing placeholders with real data
Once your HTML template and invoice data are ready, the next step is to dynamically inject the data into the template by replacing the placeholders. This is typically done using simple string replacement logic in your .NET application.
Each placeholder in the HTML template (e.g., {{PurchasedItems}}, {{Subtotal}}, {{SalesTax}}, and {{TotalAmountDue}}) should be replaced with the corresponding value from your data model (e.g., CompanyInvoice and Item).
For placeholders like {{PurchasedItems}}, which represent a list of items, you’ll need to build the HTML rows dynamically using a loop, and then insert the generated rows into the template.
You can also compute and inject financial summaries such as the subtotal, tax, and total amount due.
Refer to the code example below.
// Load customer data from JSON file
string customerDataJsonPath = "customer_data.json";
string customerDataJsonContent = File.ReadAllText(customerDataJsonPath);
List companies = JsonSerializer.Deserialize<list>(customerDataJsonContent);

// Load HTML invoice template
string templatePath = "invoice_template.html";
string htmlTemplate = File.ReadAllText(templatePath);

// Initialize HTML to PDF converter with Blink rendering engine
HtmlToPdfConverter htmlConverter = new HtmlToPdfConverter();
BlinkConverterSettings settings = new BlinkConverterSettings
{
    Scale = 1.0f
};
htmlConverter.ConverterSettings = settings;

foreach (var company in companies)
{
    string filledHtmlTemplate = htmlTemplate;
    StringBuilder itemRows = new StringBuilder();
    decimal subtotal = 0;

    foreach (var item in company.PurchaseItems)
    {
        decimal itemTotal = item.NoOfLicensePurchased * item.UnitPrice;
        subtotal += itemTotal;

        itemRows.AppendLine($@"
            <tr>
                <td>{item.ItemName}</td>
                <td>{item.NoOfLicensePurchased}</td>
                <td class='unit-price' data-price='{item.UnitPrice}'>{item.UnitPrice:C2}</td>
                <td class='row-total'>{itemTotal:C2}</td>
            </tr>");
    }

    // Calculate Tax and Total
    decimal taxRate = 0.085m;
    decimal salesTax = subtotal * taxRate;
    decimal total = subtotal + salesTax;

    // Replace placeholders in HTML template with actual values
    filledHtmlTemplate = htmlTemplate
        .Replace("{{PurchasedItems}}", itemRows.ToString())
        .Replace("{{Subtotal}}", subtotal.ToString("F2"))
        .Replace("{{SalesTax}}", salesTax.ToString("F2"))
        .Replace("{{TotalAmountDue}}", total.ToString("F2"));

    // Convert HTML to PDF document
    PdfDocument document = htmlConverter.Convert(filledHtmlTemplate, "");
}
Adding custom headers and footers
Syncfusion® allows you to define custom headers and footers using dynamic HTML templates, just like the main content. These templates are integrated into the PDF document using the PdfDocumentTemplate class.
Adding headers and footers enhances the invoice with a clean, well-structured format that improves readability and professionalism. It also helps streamline invoice processing by presenting key information consistently across all documents.
Once configured, headers and footers are automatically applied to every generated invoice, saving time and ensuring brand consistency as your business scales.
In this example, we dynamically include the following:
Header: Includes the company logo, name, address, and invoice-specific details (e.g., invoice number, date).
Footer: Contains the company’s email address, contact information, terms and conditions, and a thank-you note.
Refer to the code example below.
// ----------------------------
// HEADER SECTION
// ----------------------------

// Create header section in PDF Document
PdfPageTemplateElement header = new PdfPageTemplateElement(document.Pages[0].GetClientSize().Width, 120);
PdfGraphics gHeader = header.Graphics;

PdfFont headerFont = new PdfStandardFont(PdfFontFamily.Helvetica, 10, PdfFontStyle.Bold);
PdfFont subFont = new PdfStandardFont(PdfFontFamily.Helvetica, 9);

float currentYLeft = 0;
float currentYRight = 0;

// Load and embed company logo
string imagePath = "company-logo.jpg";
byte[] imageBytes = File.ReadAllBytes(imagePath);
string base64String = Convert.ToBase64String(imageBytes);
company.CompanyLogo = "data:image/jpeg;base64," + base64String;

using (MemoryStream ms = new MemoryStream(imageBytes))
{
    PdfBitmap logo = new PdfBitmap(ms);
    gHeader.DrawImage(logo, new RectangleF(35, currentYLeft, 100, 30));
    currentYLeft += 45;
    currentYRight += 45;
}

// Add customer billing information to the left
gHeader.DrawString("Bill To:", headerFont, PdfBrushes.Black, new PointF(35, currentYLeft += 15));
gHeader.DrawString(company.CustomerName, headerFont, PdfBrushes.Black, new PointF(35, currentYLeft += 15));
gHeader.DrawString(company.CustomerAddress, subFont, PdfBrushes.Black, new PointF(35, currentYLeft += 15));
gHeader.DrawString($"Phone: {company.CustomerPhone} | Email: {company.CustomerEmail}", subFont, PdfBrushes.Black, new PointF(35, currentYLeft += 15));

// Add invoice details on the right
float rightX = 400;
PdfFont largeHeaderFont = new PdfStandardFont(PdfFontFamily.Helvetica, 18, PdfFontStyle.Bold);
gHeader.DrawString("Invoice", largeHeaderFont, PdfBrushes.Black, new PointF(rightX, 5));
gHeader.DrawString($"{company.InvoiceTitle} - #{company.InvoiceNumber}", headerFont, PdfBrushes.Black, new PointF(rightX, currentYRight += 15));
gHeader.DrawString($"Date: {company.InvoiceDate:dd MMM yyyy}", subFont, PdfBrushes.Black, new PointF(rightX, currentYRight += 15));
gHeader.DrawString($"Due Date: {company.DueDate:dd MMM yyyy}", subFont, PdfBrushes.Black, new PointF(rightX, currentYRight += 15));
gHeader.DrawString($"Sales Tax No: {company.SalesTaxNumber}", subFont, PdfBrushes.Black, new PointF(rightX, currentYRight += 15));

document.Template.Top = header;

// ----------------------------
// FOOTER SECTION
// ----------------------------

// Create Footer section in PDF Document
PdfPageTemplateElement footer = new PdfPageTemplateElement(document.Pages[0].GetClientSize().Width, 70);
PdfGraphics gFooter = footer.Graphics;

PdfFont footerFont = new PdfStandardFont(PdfFontFamily.Helvetica, 9);
PdfFont footerFontBold = new PdfStandardFont(PdfFontFamily.Helvetica, 10, PdfFontStyle.Bold);

// Add thanks message
string thankYouText = "Thank you for your business!";
SizeF textSize = footerFont.MeasureString(thankYouText);
float centerX = (document.Pages[0].GetClientSize().Width - textSize.Width) / 2;
gFooter.DrawString(thankYouText, footerFont, PdfBrushes.Black, new PointF(centerX, 0));

// Add terms and conditions
string termsLabel = "Terms and Conditions:";
SizeF termsLabelSize = footerFontBold.MeasureString(termsLabel);
gFooter.DrawString(termsLabel, footerFontBold, PdfBrushes.Black, new PointF(0, 20));
gFooter.DrawString(company.TermsAndConditions, footerFont, PdfBrushes.Black, new PointF(termsLabelSize.Width, 20));

// Add separator line
gFooter.DrawLine(new PdfPen(PdfBrushes.Black, 0.5f), new PointF(0, 40), new PointF(600, 40));

// Add seller address and contact info
gFooter.DrawString("Address:", footerFontBold, PdfBrushes.Black, new PointF(0, 45));
gFooter.DrawString(company.SellerAddress, footerFont, PdfBrushes.Black, new PointF(0, 60));

string emailLabel = "Email: ";
SizeF emailLabelSize = footerFontBold.MeasureString(emailLabel);
gFooter.DrawString(emailLabel, footerFontBold, PdfBrushes.Black, new PointF(450, 45));
gFooter.DrawString(company.SellerEmail, footerFont, PdfBrushes.Black, new PointF(450 + emailLabelSize.Width, 45));

string phoneLabel = "Phone: ";
SizeF phoneLabelSize = footerFontBold.MeasureString(phoneLabel);
gFooter.DrawString(phoneLabel, footerFontBold, PdfBrushes.Black, new PointF(450, 60));
gFooter.DrawString(company.SellerPhoneNumber, footerFont, PdfBrushes.Black, new PointF(450 + phoneLabelSize.Width, 60));

document.Template.Bottom = footer;
Converting HTML to PDF
Finally, convert the populated HTML content into a PDF using HtmlToPdfConverter, and save the generated document locally.
Here’s the example code snippet:
// Convert filled HTML to PDF document
PdfDocument document = htmlConverter.Convert(filledHtmlTemplate,"");

// Save PDF
Directory.CreateDirectory("../../../Output");
string outputPath = $"../../../Output/Invoice_{company.CustomerName}.pdf";

using MemoryStream stream = new MemoryStream();
document.Save(stream);
File.WriteAllBytes(outputPath, stream.ToArray());
Build and run the application
To test the application, run the project. This example generates three invoices for different companies and saves them locally.
Each invoice is dynamically created based on the respective company’s data. Below is a sample output of what a generated invoice for one company might look like.
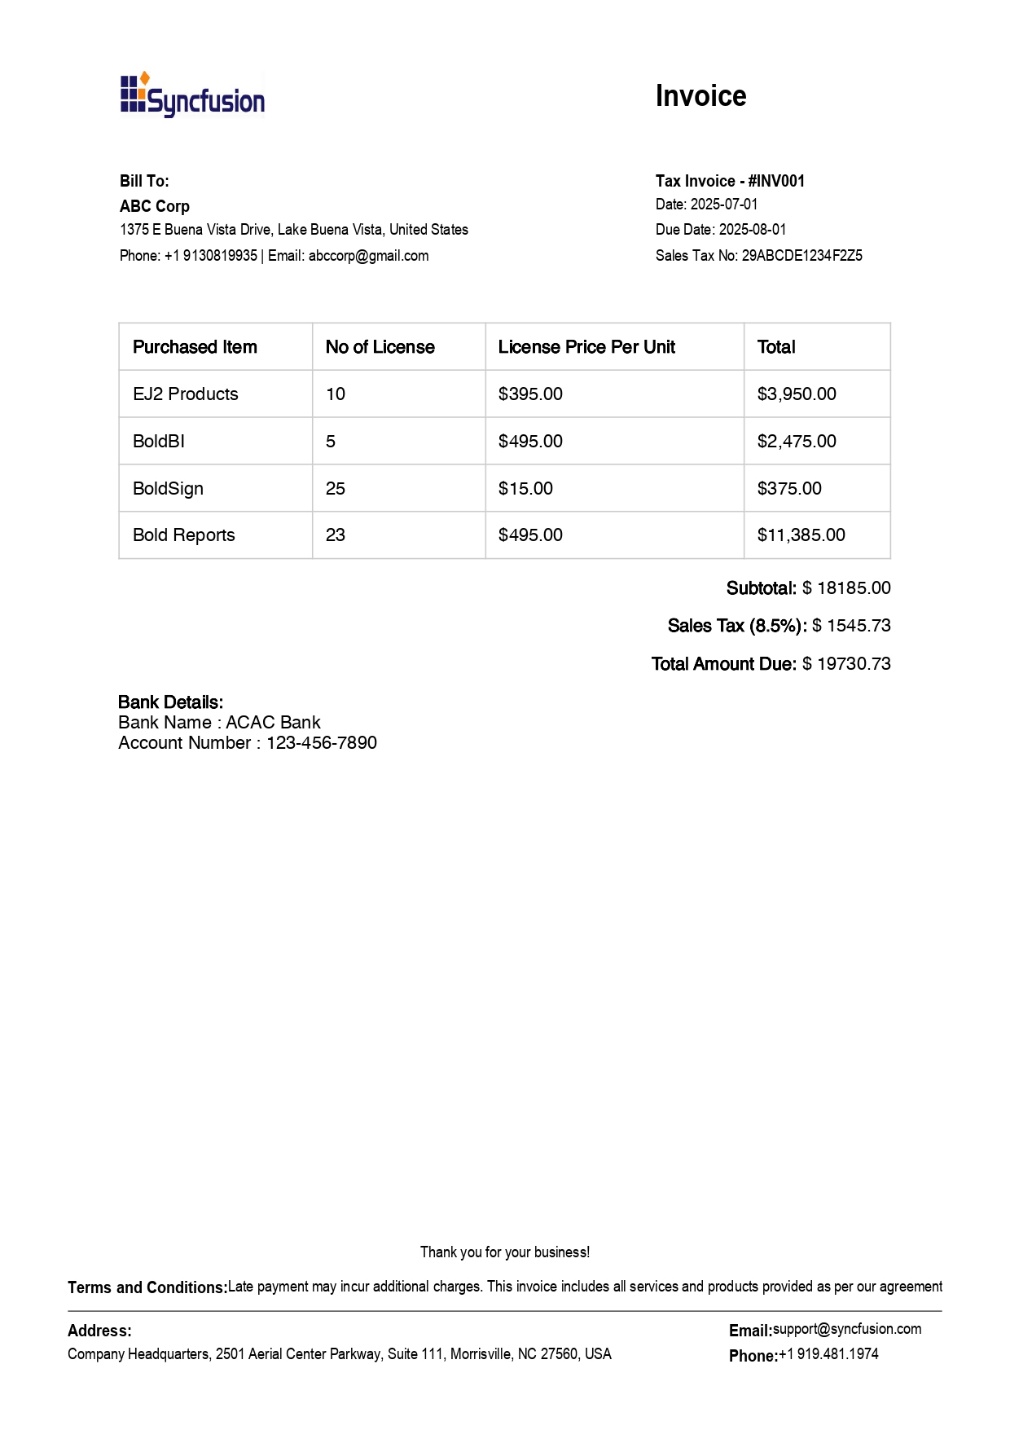
Generated Invoice Output
GitHub reference
For a complete project, refer to the GitHub demo.
Conclusion
Thank you for reading! Efficient invoice generation is essential for smooth business operations, and Syncfusion’s HTML to PDF converter provides a powerful, flexible solution for automating this process. Using HTML and CSS for layout and design, you can create professional, branded, visually appealing, and functionally robust invoices.
Whether building a standalone invoicing tool or integrating it into a larger system, Syncfusion® simplifies PDF generation with customizable rendering and layout options. With thoughtful design, like custom headers, footers, and precise formatting, you can deliver polished, print-ready invoices that enhance internal workflows and customer experience.
The new version is available for current customers to download from the license and downloads page. If you are not a Syncfusion® customer, you can try our 30-day free trial for our newest features.
You can also contact us through our support forums, support portal, or feedback portal. We are always happy to assist you!
Related Blogs
Subscribe to my newsletter
Read articles from syncfusion directly inside your inbox. Subscribe to the newsletter, and don't miss out.
Written by
syncfusion
syncfusion
Syncfusion provides third-party UI components for React, Vue, Angular, JavaScript, Blazor, .NET MAUI, ASP.NET MVC, Core, WinForms, WPF, UWP and Xamarin.