What is a Webhook? A Simple Explanation of Webhook Meaning
 Robbie Cahill
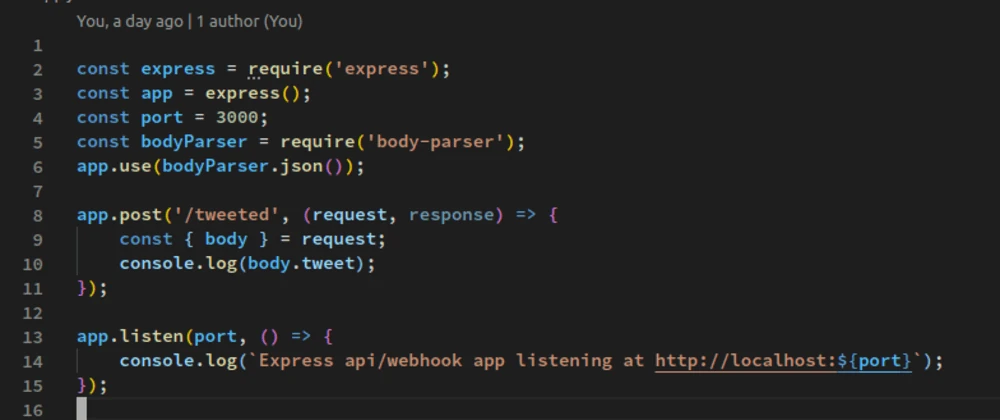
In the world of software development, seamless communication between different applications is crucial. For years, the primary method for this was the API (Application Programming Interface). However, a more efficient and modern approach has become standard for real-time events: the webhook. If you've ever heard the term but been unclear on the exact webhook meaning, this guide is for you.
Imagine you've ordered a pizza online. You have two ways to know when it's ready. You could repeatedly call the restaurant every five minutes and ask, "Is my pizza done yet?" This is like a traditional API, where you have to constantly ask for updates. Or, the pizza shop could send you a text message the moment your pizza comes out of the oven. This is a webhook—an automated, real-time notification.
This article will break down the meaning of webhooks, explain how they work, contrast them with traditional APIs, and show you how to start using them for local development with the open-source tool, Tunnelmole.
What is a Webhook? The Core Concept Explained
At its core, a webhook is an automated message sent from one application (the source) to another (the receiver) when a specific event occurs. They are a mechanism for one system to notify another about an event in real-time, without the receiving system having to ask for it.
Because the flow of information is "pushed" from the source to the receiver, webhooks are often called "Reverse APIs" or "HTTP Push APIs."
To fully grasp the webhook meaning, let's break down its essential components:
The Event (or Trigger): This is a predefined action in the source application that initiates the webhook. Examples include:
- A new user signing up on your website.
- A payment being successfully processed by a payment gateway like Stripe.
- A new commit being pushed to a code repository on GitHub.
- A new message being posted in a Slack channel.
The Payload: This is the actual data about the event that is sent by the webhook. It's typically structured in a machine-readable format like JSON (JavaScript Object Notation) and contains relevant details. For a new user signup, the payload might include the user's name, email, and sign-up date.
The Endpoint (or Webhook URL): This is a special URL in the receiving application that is designed to listen for incoming webhook messages. You must register this URL with the source application, telling it, "When this event happens, send the payload to this address."
When the event happens, the source application automatically sends an HTTP POST request containing the payload to the registered endpoint. Your application can then process this data to perform a follow-up action.
Webhooks vs. APIs: What's the Difference?
The most common point of confusion when learning about webhooks is understanding how they differ from traditional APIs. While both enable applications to communicate, they do so with opposite approaches.
An API (Application Programming Interface) works on a request-response model. Your application (the client) must actively send a request to another application's server to ask for data. This process of repeatedly asking for new data is called polling.
A Webhook works on an event-driven model. Your application doesn't ask for data. Instead, it provides a URL and waits. The source application automatically "pushes" data to that URL as soon as an event occurs.
Let's use a comparison table to make the distinction clear:
| Feature | Traditional API (Polling) | Webhooks (Push) |
| Communication Style | Request-driven (Pull) | Event-driven (Push) |
| Data Flow Initiator | Your application (the client) initiates the request. | The external service (the server) initiates the request. |
| Efficiency | Can be resource-intensive. Many requests might be "wasted" if no new data is available. | Highly efficient. Data is sent only when there is a meaningful update. |
| Timeliness | Near real-time at best. The delay depends on how frequently you poll for data. | Truly real-time. The notification is sent the instant the event occurs. |
| Analogy | Repeatedly checking your mailbox to see if a package has arrived. | Getting a delivery notification on your phone the moment the package is dropped off. |
Polling with an API is inefficient for both the client (which has to keep making requests) and the server (which has to keep answering them). Webhooks solve this by eliminating the need for constant polling, making them the superior choice for real-time event notifications.
How Do Webhooks Work? A Step-by-Step Breakdown
The workflow of a webhook is straightforward and can be broken down into four simple steps:
Step 1: Register the Endpoint You start by giving the source application (e.g., Shopify, GitHub, Stripe) a unique URL from your application. This URL is your webhook endpoint. In the source application's settings, you'll typically find a "Webhooks" section where you can paste your URL and select which specific events you want to be notified about (e.g.,
repo:push,order:created,payment:succeeded).Step 2: The Event is Triggered Later, an event you subscribed to occurs in the source application. For example, a customer creates a new order on your Shopify store.
Step 3: The HTTP POST Request is Sent As soon as the order is created, Shopify's servers automatically compile a JSON payload with the order details. It then sends an HTTP
POSTrequest with this payload to the webhook URL you registered in Step 1.Step 4: Your Application Receives and Acts Your application, which is actively listening at the endpoint URL, receives the incoming
POSTrequest. It parses the JSON payload to extract the order information and then performs a corresponding action, such as:- Adding the order details to a shipping management system.
- Sending a confirmation email to the customer.
- Updating inventory levels in a database.
Practical Use Cases: Where Are Webhooks Used?
Webhooks are the invisible backbone of modern automation, connecting countless services to create seamless workflows. Here are a few common examples:
- Continuous Integration/Continuous Deployment (CI/CD): When a developer pushes code to a GitHub or GitLab repository, a webhook notifies a CI/CD platform like Jenkins or CircleCI. This automatically triggers a build, runs tests, and deploys the application if the tests pass.
- Payment Processing: When a customer makes a purchase, a payment gateway like Stripe or PayPal sends a webhook to your e-commerce platform. This allows you to verify the payment (
charge.succeeded), update the order status to "Paid," and start the fulfillment process without any delay. - Real-time Notifications: A service like IFTTT (If This Then That) relies heavily on webhooks. You could create a rule that says, "If I receive an email with the word 'urgent' in the subject, send a webhook to my custom script," which then sends you a push notification via another service. Similarly, Slack's Incoming Webhooks allow external applications to post messages into channels.
- Synchronizing Data: If a customer's contact information is updated in your CRM (e.g., Salesforce), the CRM can send a webhook to your marketing automation platform (e.g., Mailchimp) to ensure the mailing list is always synchronized.
Working with Webhooks: The Local Development Challenge
Now that you understand the webhook meaning and its power, you'll want to start building with them. However, developers quickly run into a significant challenge: webhook providers exist on the public internet, but your development environment runs on localhost.
A service like GitHub or Stripe cannot send a request to http://localhost:3000 because that address is private to your machine. To receive webhooks, you need a publicly accessible HTTPS URL, which localhost is not.
The Solution: Using an Open Source Tunneling Tool like Tunnelmole
This is where a tunneling tool becomes essential. A tunneling tool creates a secure connection, or "tunnel," from a public URL on the internet directly to your application running on localhost.
Tunnelmole is a simple, fast, and open-source tool designed for exactly this purpose. It gives your local server a temporary public URL, allowing you to receive and test webhooks without deploying your application.
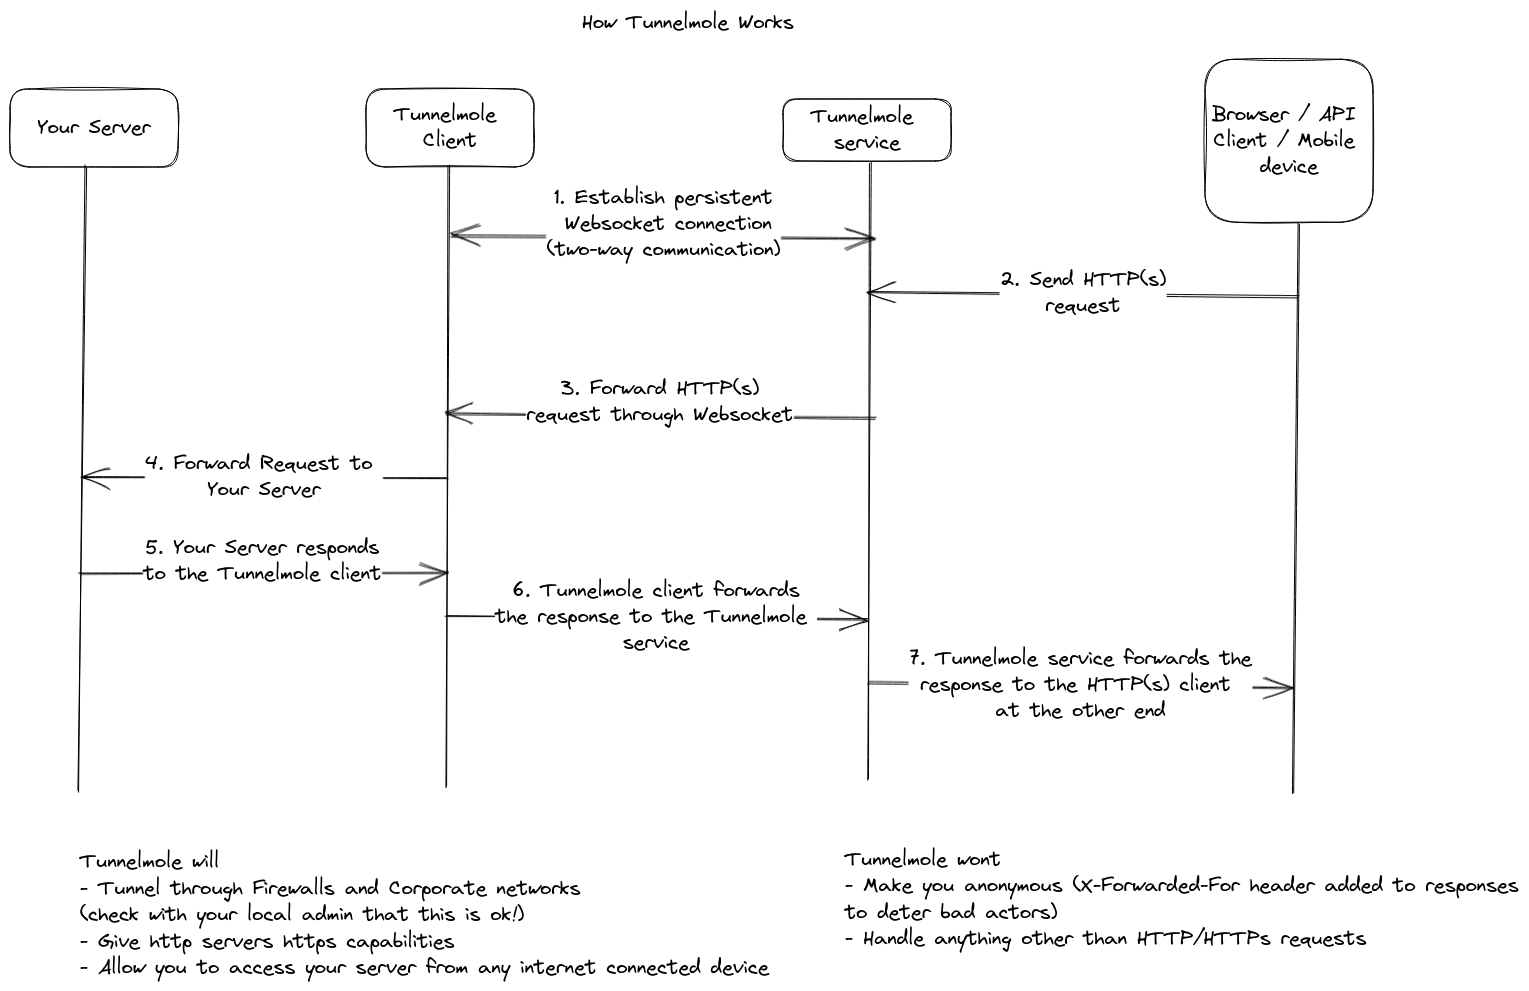
As shown in the diagram, the Tunnelmole client on your machine connects to the public Tunnelmole service, which generates a public URL. When a webhook provider sends a request to this URL, the service forwards it through the secure tunnel to your local application.
A key advantage of Tunnelmole is its commitment to open source. Both the client and the server are fully open source, providing complete transparency. For those with advanced security or customization needs, you even have the option to self-host the Tunnelmole service on your own infrastructure.
A Quick Example with Tunnelmole
Getting started is incredibly easy.
Make sure your local application is running. For instance, you might have a Node.js Express app listening on port
3000.Install Tunnelmole. Open your terminal and run the installation script for Linux, Mac, or WSL.
curl -O https://install.tunnelmole.com/xD345/install && sudo bash installFor Windows, you can download the executable and add it to your PATH.
Start the tunnel. In your terminal, run
tmolefollowed by your application's port number.tmole 3000Get your public URL. Tunnelmole will display your public URL, which now points to your local server.
$ tmole 3000
Your Tunnelmole Public URLs are below and are accessible internet wide. Always use HTTPs for the best security

https://cqcu2t-ip-49-185-26-79.tunnelmole.net ⟶ http://localhost:3000
http://cqcu2t-ip-49-185-26-79.tunnelmole.net ⟶ http://localhost:3000
Use the URL. You can now take the
https://<your_subdomain>.tunnelmole.netURL, append your local endpoint path (e.g.,/webhook-receiver), and use it as your webhook endpoint in any third-party service. All requests sent to that public URL will now arrive at your local application.
Conclusion
The webhook meaning is no longer a mystery. It is a simple yet powerful concept: an automated, event-driven notification that allows applications to communicate in real-time. By "pushing" data instead of waiting for it to be "pulled," webhooks provide an efficient, scalable, and modern foundation for building interconnected and automated systems.
While developing with webhooks presents the challenge of bridging the gap between the public internet and your private localhost, open-source tools like Tunnelmole provide an elegant and straightforward solution. By creating a secure tunnel to your local machine, Tunnelmole empowers you to build, test, and debug webhook integrations with ease.
Ready to dive in and build your own real-time integrations? Give Tunnelmole a try and see how simple it is to bring the power of webhooks to your local development environment.
Subscribe to my newsletter
Read articles from Robbie Cahill directly inside your inbox. Subscribe to the newsletter, and don't miss out.
Written by