What Are Webhooks? A Comprehensive Guide for Developers
 Robbie Cahill
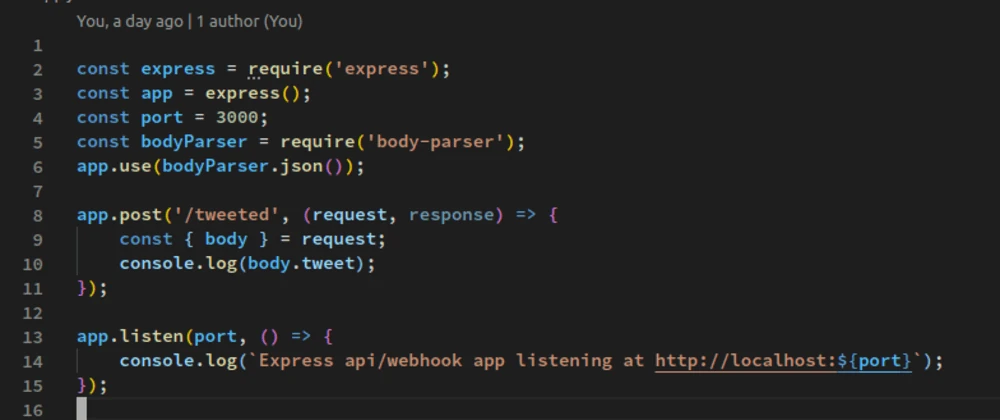
In the world of web development, getting real-time data is crucial for building modern, responsive applications. For years, the standard method was API polling, where your application would repeatedly ask a server, "Is there anything new yet?" This is like a child on a road trip asking "Are we there yet?" every five minutes—inefficient and resource-intensive. This is where web hooks come in, offering a more elegant, efficient, and modern solution.
This comprehensive guide will demystify web hooks (often spelled as a single word, "webhooks"). We'll dive deep into what they are, how they fundamentally differ from traditional APIs, and why they've become an indispensable tool for developers. We'll go beyond theory and walk you through building a practical webhook listener using Node.js and Express. You'll learn how to overcome the common challenge of testing webhooks locally by using Tunnelmole, an open-source tool that gives your local server a public URL. Finally, we'll cover essential best practices for securing and managing your webhooks in a production environment.
By the end of this article, you'll not only understand the "what" and "why" of web hooks but also possess the practical skills to integrate them into your own projects with confidence.
What Exactly Are Web Hooks? The "Reverse API" Explained
At its core, a webhook is an automated message sent from one application to another when a specific event occurs. Instead of your application polling for data (the "pull" model), the source application pushes the data to your application in real-time. This is why webhooks are often referred to as "reverse APIs" or "push APIs."
Let's break down the core components:
The Webhook Provider: This is the application or service that sends the notification. It's the source of the event. Examples include:
- GitHub: Notifying you when code is pushed to a repository.
- Stripe: Alerting you when a customer makes a successful payment.
- Shopify: Informing you when a new order is placed.
- Slack: Sending a message to a channel when an external event happens.
The Event: This is the specific trigger that causes the webhook to be sent. For GitHub, the event might be a
push, apull_request, or a newissue. For Stripe, it could bepayment.succeededorcustomer.subscription.created. You typically configure which events you want to be notified about in the provider's dashboard.The Webhook URL (or Endpoint): This is the crucial piece of the puzzle that you own. It's a URL within your application that is specifically designed to receive the incoming data from the webhook provider. When the event occurs, the provider makes an HTTP
POSTrequest to this URL.The Payload: This is the data sent by the webhook provider to your webhook URL. It contains detailed information about the event that just occurred. The payload is almost always formatted as JSON, making it easy to parse and use in your application.
Think of it like subscribing to a magazine. Instead of going to the newsstand every day to check for a new issue (polling), you provide your address (the webhook URL), and the publisher (the webhook provider) sends the new issue (the payload) directly to your mailbox when it's published (the event).
API Polling vs. Web Hooks: A Clear Comparison
To truly appreciate the power of web hooks, it's essential to see how they stack up against the traditional method of API polling. The difference in efficiency and architecture is stark.
| Feature | API Polling | Web Hooks |
| Data Flow | Pull Model: Your app repeatedly requests data from the server. | Push Model: The server pushes data to your app when it's available. |
| Efficiency | Low: Many requests are wasted if there's no new data. Consumes significant resources on both client and server. | High: A request is only made when there is new data. Minimal wasted resources. |
| Real-Time | Near Real-Time at Best: Timeliness depends on the polling frequency. High frequency leads to high server load. | True Real-Time: Notifications are sent moments after the event occurs. |
| Scalability | Poor: As more clients poll, the server load increases dramatically, leading to performance bottlenecks. | Excellent: The server's load is directly proportional to the number of actual events, not the number of clients waiting for them. |
| Architecture | Request-Response: Client initiates communication. | Event-Driven: Server initiates communication based on a trigger. |
| Complexity | Simple to implement initially, but complex to manage state and scaling. | Requires a publicly accessible endpoint but results in a cleaner, more scalable architecture. |
While API polling has its place for certain use cases, for any scenario that requires immediate reaction to an event, web hooks are the superior architectural choice.
How Do Web Hooks Work in Practice?
Understanding the theory is one thing, but seeing the data flow makes it click. Let's visualize the journey of a webhook request from the provider to your local development machine.
Normally, services on the public internet can't connect to an application running on localhost. This is a fundamental security feature of computer networking. However, for development, you need a way to bridge this gap. This is where a tunneling tool like Tunnelmole comes into play.
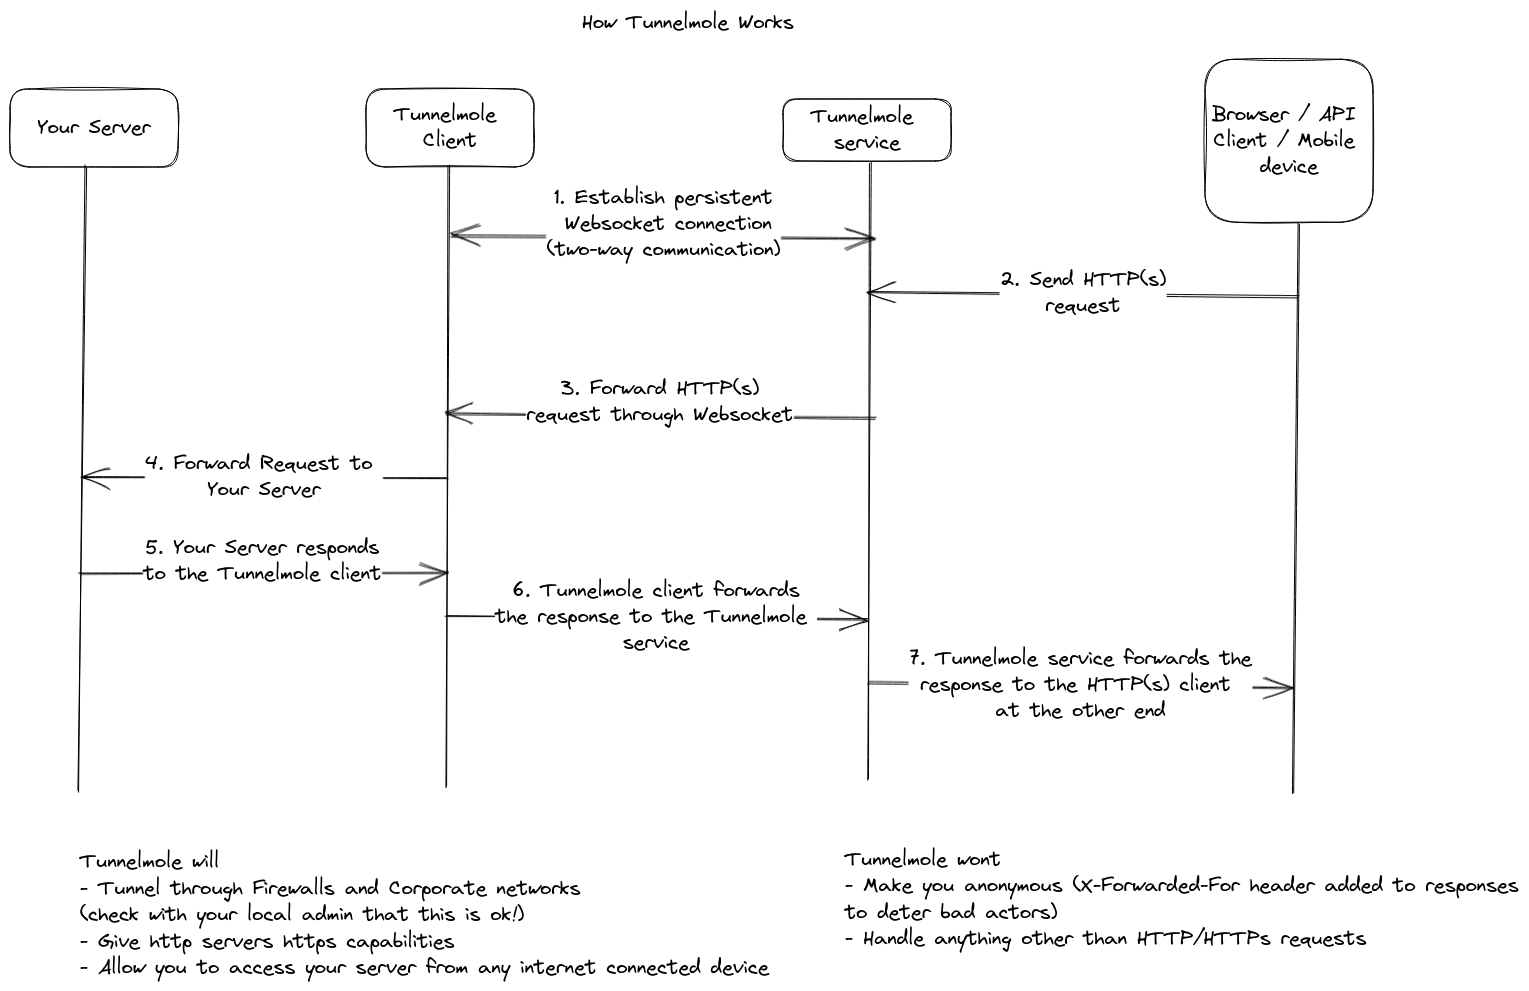
Here’s a step-by-step breakdown of the flow illustrated in the diagram:
- Event Occurs: A user performs an action in the provider's system (e.g., they push code to a GitHub repository).
- Provider Sends Webhook: GitHub's servers recognize this event and prepare a JSON payload with details about the push. It then sends an HTTP
POSTrequest to the publicly accessible URL you provided. - Request Hits the Tunnel: The request travels over the internet to the Tunnelmole service. Tunnelmole's job is to act as a secure intermediary.
- Forwarding Through the Tunnel: The Tunnelmole service forwards the exact same HTTP request through the persistent, secure connection it maintains with the Tunnelmole client running on your machine.
- Client Delivers to Localhost: The Tunnelmole client receives the request and forwards it to your local web server (e.g.,
http://localhost:3000). - Your Application Processes the Request: Your web application, running locally, receives the request at its webhook endpoint (e.g.,
/github-webhook). It parses the JSON payload and executes its logic—perhaps sending a notification to a Slack channel or updating a project management board.
This entire process happens within seconds, allowing you to develop and debug your webhook logic in your familiar local environment without ever needing to deploy your code.
Practical Use Cases: Where Web Hooks Shine
Web hooks are not just a niche technology; they are the backbone of countless integrations and automations that power the modern web. Here are some of the most common and powerful use cases:
- Continuous Integration & Deployment (CI/CD): This is a classic example. When you push code to a branch in GitHub or GitLab, a webhook can trigger a CI server like Jenkins or a service like Vercel to automatically build, test, and deploy your application.
- E-commerce Workflow Automation: When a customer places an order on a Shopify or BigCommerce store, a webhook can trigger a series of actions: send the order to a fulfillment center, add the customer to a mailing list in Mailchimp, and post a celebratory message in the company's Slack channel.
- Real-time Payment Notifications: Stripe, PayPal, and other payment gateways use webhooks extensively. When a payment succeeds, a subscription is canceled, or a chargeback is initiated, a webhook immediately notifies your application so you can update the user's account status, grant access to services, or alert your support team.
- Content Management System (CMS) Integrations: When a writer publishes a new article in a headless CMS like Contentful or Strapi, a webhook can trigger a build process on a static site generator (like Next.js or Gatsby) to regenerate the site with the new content.
- Connecting IoT Devices: An IoT sensor (like a smart thermostat or a security camera) can send a webhook to a central server when it detects a change (e.g., temperature drops below a threshold, motion is detected), allowing for immediate action.
- Social Media Monitoring: You can set up a webhook to be notified whenever your brand is mentioned on Twitter or Instagram, allowing for real-time social listening and customer engagement.
Building Your First Webhook Listener with Node.js and Tunnelmole
Talk is cheap. Let's build something! We'll create a simple webhook listener using Node.js and the Express framework. This server will listen for incoming webhook requests, parse the body, and log it to the console.
Prerequisites
- Node.js and npm: Ensure you have a recent version of Node.js (16.x or higher) and npm installed. You can get them from the official Node.js website.
Step 1: Set Up Your Node.js Project
First, create a new directory for your project, navigate into it, and initialize a new Node.js project.
mkdir webhook-listener
cd webhook-listener
npm init -y
Now, install Express and body-parser, which is a middleware to help parse the incoming JSON payload.
npm install express body-parser
Step 2: Create the Express Server
Create a file named server.js and add the following code:
const express = require('express');
const bodyParser = require('body-parser');

const app = express();
const PORT = 3000;

// Use the body-parser middleware to parse JSON request bodies
app.use(bodyParser.json());

// Define a basic route for the root to confirm the server is running
app.get('/', (req, res) => {
    res.send('Webhook listener is alive!');
});

// This is your webhook endpoint!
app.post('/webhook-receiver', (req, res) => {
    console.log('🎉 Webhook received!');

    // The payload from the provider is in req.body
    console.log('--- Payload Start ---');
    console.log(JSON.stringify(req.body, null, 2));
    console.log('--- Payload End ---');

    // Always respond with a 200 OK to let the provider know
    // that you've successfully received the webhook.
    res.status(200).send('Webhook received successfully.');
});

app.listen(PORT, () => {
    console.log(`🚀 Server is running on http://localhost:${PORT}`);
});
Let's quickly break down this code:
- We import
expressandbody-parser. app.use(bodyParser.json());tells our Express app to automatically parse any incoming request with aContent-Type: application/jsonheader.- We create our webhook listener at the
/webhook-receiverpath, which listens forPOSTrequests. - Inside the handler, we log the received payload (
req.body) to the console. - Crucially, we send back a
200 OKstatus. This is vital. If the webhook provider doesn't receive a2xxresponse, it will assume the delivery failed and may try to send the webhook again, leading to duplicate processing.
Start your server:
node server.js
You should see 🚀 Server is running on http://localhost:3000. Your server is running, but it's only accessible on your machine.
Step 3: Get a Public URL with Tunnelmole
Now, let's expose our local server to the internet. This is where Tunnelmole shines with its simplicity.
First, install Tunnelmole. The quickest way on Linux or macOS is with this command:
curl -O https://install.tunnelmole.com/xD345/install && sudo bash install
For Windows, you can download the executable and add it to your PATH. Full instructions are on the Tunnelmole website.
Once installed, open a new terminal window (leave your Node.js server running in the first one) and run the following command to tunnel port 3000:
tmole 3000
Tunnelmole will start up and provide you with public URLs.
$ tmole 3000
Your Tunnelmole Public URLs are below and are accessible internet wide. Always use HTTPs for the best security

https://krcn2t-ip-1-2-3-4.tunnelmole.net ⟶ http://localhost:3000
http://krcn2t-ip-1-2-3-4.tunnelmole.net ⟶ http://localhost:3000
Grab the https URL. Your full webhook URL is this URL plus your endpoint path. In this case, it would be https://krcn2t-ip-1-2-3-4.tunnelmole.net/webhook-receiver.
Step 4: Test Your Webhook
Now you can use any tool that can make an HTTP request to test your endpoint. We'll use curl. Open a third terminal window and run the following command, replacing the URL with your own Tunnelmole URL.
curl -X POST \
  https://your-unique-url.tunnelmole.net/webhook-receiver \
  -H 'Content-Type: application/json' \
  -d '{
    "event_type": "test.event",
    "user": {
      "id": "user_123",
      "name": "Jane Doe"
    },
    "timestamp": "2025-01-01T12:00:00Z"
  }'
If everything is set up correctly, you'll see "Webhook received successfully" in your curl terminal.
Now, check the terminal where your Node.js server is running. You should see the logged output:
🎉 Webhook received!
--- Payload Start ---
{
  "event_type": "test.event",
  "user": {
    "id": "user_123",
    "name": "Jane Doe"
  },
  "timestamp": "2025-01-01T12:00:00Z"
}
--- Payload End ---
Congratulations! you have successfully built and tested a webhook listener on your local machine. You can now use this public URL in the webhook configuration of services like GitHub, Stripe, or any other provider.
Securing Your Web Hooks: Don't Trust, Verify
A publicly exposed URL is a potential target for malicious actors. Anyone who finds your webhook URL could send fake or malicious data to it, potentially corrupting your database or causing unintended behavior. You must verify that incoming requests are from the legitimate provider.
The most common and robust method for this is HMAC (Hash-based Message Authentication Code) signature verification.
Here's how it works:
- Shared Secret: When you set up a webhook in the provider's dashboard (e.g., GitHub), you are given a secret key. You must configure this same secret key in your application's environment variables. Never hardcode it in your source code.
- Signing the Payload: When the provider sends a webhook, it creates a signature by hashing the request payload with the shared secret (using an algorithm like SHA256). This signature is then sent along with the request, typically in an HTTP header (e.g.,
X-Hub-Signature-256for GitHub orStripe-Signaturefor Stripe). - Verifying the Signature: When your application receives the request, it performs the exact same hashing process on the raw request body using the same shared secret.
- Comparing Signatures: You then compare the signature you just calculated with the one received in the header. If they match, you can be confident that the webhook is authentic and its payload has not been tampered with. If they don't match, you should reject the request with a
401 Unauthorizedor403 Forbiddenstatus code and log the incident.
Implementing signature verification adds a critical layer of security that should be considered non-negotiable for any production webhook listener.
Best Practices for Production-Ready Webhook Listeners
Beyond security, there are several best practices to ensure your webhook integration is robust, scalable, and reliable.
- Respond Immediately: Webhook providers have timeouts (usually a few seconds). Your endpoint should do the absolute minimum work required before sending a
200 OKresponse. Its only job is to acknowledge receipt and validate the signature. - Use a Queue for Processing: If the webhook triggers a long-running task (e.g., processing a video, generating a report, calling other APIs), don't do it synchronously. Instead, after validating the webhook, push the payload into a message queue (like RabbitMQ, AWS SQS, or even a simple in-memory queue for smaller applications). A separate background worker process can then pick up jobs from the queue and process them asynchronously. This ensures your endpoint responds instantly and avoids timeouts.
- Handle Retries and Idempotency: Network issues happen. Providers know this and will often retry sending a webhook if they don't receive a
200 OKresponse. This can lead to your application receiving the same event multiple times. Your system must be idempotent, meaning it can safely process the same event more than once without causing duplicate actions. A common strategy is to log the unique ID of every processed event (most providers include one in the payload) and check against this log before processing a new one. - Extensive Logging: Log everything. Log the reception of a webhook, the result of the signature validation, when it’s placed in a queue, and the final outcome of the background processing. When things go wrong, these logs will be invaluable for debugging.
Why Choose Open Source? The Tunnelmole Advantage
When you need to test web hooks locally, you have a few options, but choosing an open-source tool like Tunnelmole offers distinct advantages:
- Transparency and Trust: Tunnelmole's source code for both the client and the server is publicly available. You can inspect the code yourself to understand exactly what it's doing with your data, providing a level of trust that closed-source proprietary solutions cannot match.
- Security and Control with Self-Hosting: While you can use the convenient hosted Tunnelmole service, you also have the freedom to self-host the entire system on your own infrastructure. This gives you ultimate control over your data, security, and uptime, a critical requirement for many organizations with strict compliance needs.
- No Black Boxes: With an open-source tool, you are not dependent on a single company's business model or future. You can maintain, modify, and extend the tool to fit your specific needs.
- Community and Collaboration: By using an open-source tool, you can contribute to its development, report issues, and benefit from the collective improvements of a global community of developers.
Conclusion
Web hooks represent a fundamental shift from the old "pull" paradigm to a more efficient, real-time "push" architecture. They are the glue that connects the services of the modern web, enabling powerful automations and seamless integrations.
In this guide, we've journeyed from the basic definition of a webhook to the practical steps of building, testing, and securing your own listener. You've seen how an open-source tool like Tunnelmole can dramatically simplify your development workflow by providing a secure and easy way to expose your local environment to the public internet.
By embracing web hooks and following the best practices for security and reliability, you can build more responsive, efficient, and intelligent applications. The next time you need two services to talk to each other in real-time, you'll know that a webhook is likely the right tool for the job.
Subscribe to my newsletter
Read articles from Robbie Cahill directly inside your inbox. Subscribe to the newsletter, and don't miss out.
Written by