Mastering HubSpot Webhooks: A Developer's Guide to Local Development
 Robbie Cahill
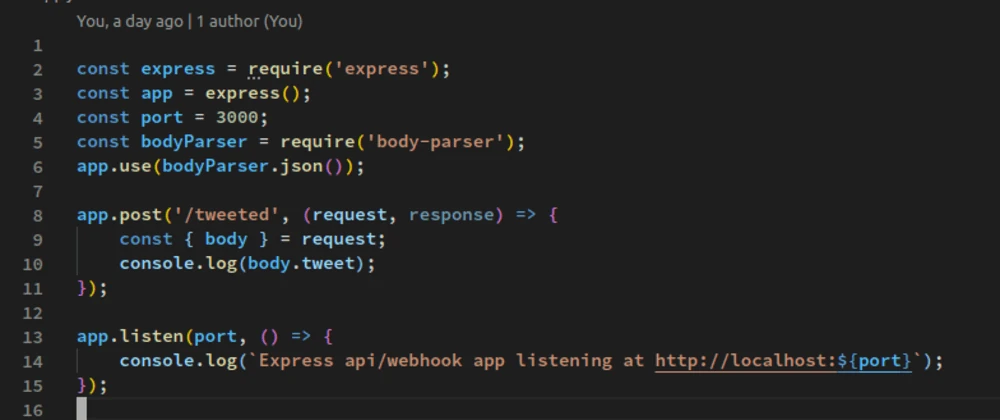
Mastering HubSpot Webhooks: A Developer's Guide to Local Development
HubSpot is a powerful CRM and marketing automation platform, but its true potential is unlocked when you start building custom integrations. Webhooks are the cornerstone of these integrations, allowing your applications to receive real-time notifications about events happening in a HubSpot account.
However, developing and testing webhooks can be a frustrating experience. HubSpot needs to send data to a public, secure (HTTPS) URL, but your development environment runs on localhost, which is inaccessible from the public internet. This creates a classic development gap that can slow down your workflow with endless deployments just to test a small change.
This comprehensive guide will show you how to solve this problem permanently. You will learn how to set up a local webhook handler with Node.js and Express, and then use Tunnelmole, an open-source tunneling tool, to expose your local server to HubSpot for seamless end-to-end testing.
What Exactly Are HubSpot Webhooks?
At its core, a webhook is an automated message sent from one application to another when a specific event occurs. Think of it as a push notification for servers. Instead of your application constantly asking HubSpot "Has anything new happened yet?" (a process called polling), HubSpot proactively tells your application "Hey, something just happened!" the moment it occurs.
This event-driven approach is far more efficient and provides the real-time data flow necessary for modern, responsive applications. When an event you've subscribed to happens in a HubSpot account, HubSpot gathers information about that event into a JSON payload and sends it as an HTTP POST request to a URL you specify.
Common use cases for HubSpot webhooks include:
- Syncing data: Instantly update your own database when a contact is created or updated in HubSpot.
- Triggering workflows: Start a custom workflow in your application when a deal stage changes.
- Enriching data: When a new company is added, use a webhook to trigger a process that looks up and adds additional firmographic data.
- Automating notifications: Send a custom Slack message to your sales team when a new lead is assigned to them.
Here are some of the subscription types available through HubSpot's Webhooks API:
| Subscription Type | Trigger |
contact.creation | A new contact is created. |
contact.deletion | A contact is deleted. |
contact.propertyChange | A property on a contact record is changed. |
company.creation | A new company is created. |
company.propertyChange | A property on a company record is changed. |
deal.creation | A new deal is created. |
deal.propertyChange | A property on a deal record is changed. |
conversation.creation | A new conversation is created in the inbox. |
By leveraging these, you can build powerful integrations that react instantly to user and system activity within HubSpot.
Building Your First Webhook Receiver in Node.js and Express
Before we can receive webhooks, we need to build a simple web server that can listen for incoming HTTP requests. We'll use Node.js and the popular Express.js framework to create a basic webhook endpoint.
Prerequisites
- Node.js and npm: Make sure you have a recent version of Node.js (16.10 or higher) and npm installed. You can download them from the official Node.js website.
Step 1: Project Setup
First, create a new directory for your project and initialize it with npm.
mkdir hubspot-webhook-handler
cd hubspot-webhook-handler
npm init -y
Next, install Express.js, which we'll use to create the web server.
npm install express
Step 2: Create the Express Server
Create a file named index.js in your project directory and add the following code:
const express = require('express');
const app = express();
const port = 3000;

// Middleware to parse JSON bodies.
// HubSpot sends webhooks with a 'application/json' content type.
app.use(express.json());

// Define the endpoint that will receive the webhooks
app.post('/hubspot-webhooks', (req, res) => {
  console.log('🎉 Webhook received!');

  // The webhook data is in the request body
  const webhookData = req.body;
  console.log('Webhook Body:', JSON.stringify(webhookData, null, 2));

  // HubSpot expects a 200 OK response to acknowledge receipt
  res.status(200).send('Webhook received successfully.');
});

// Start the server
app.listen(port, () => {
  console.log(`Server listening at http://localhost:${port}`);
});
Let's break down this code:
- We import the
expresslibrary. - We create an Express application instance.
app.use(express.json())is crucial middleware that tells Express to automatically parse incoming request bodies that are in JSON format.app.post('/hubspot-webhooks', ...)defines a route handler that listens forPOSTrequests on the/hubspot-webhookspath. This is our webhook endpoint.- Inside the handler, we log the received data (
req.body) to the console so we can inspect it. - Finally,
res.status(200).send(...)sends a success response back to HubSpot, letting it know the webhook was received successfully. app.listen(port, ...)starts our server on port 3000.
Step 3: Run the Server
Start your local server by running the following command in your terminal:
node index.js
You should see the message: Server listening at http://localhost:3000. Your server is now running, but it's only accessible on your local machine.
The Public URL Challenge: Why localhost Isn't Enough
Your Express server is listening at http://localhost:3000. This address is a special loopback address that your computer uses to refer to itself. It's perfect for development, but it's completely invisible and inaccessible to the outside world.
When you configure a webhook in HubSpot, you're telling HubSpot's servers—which are on the public internet—to send a request to your server. If you give HubSpot a localhost URL, its servers will try to send a request to themselves, not to your development machine.
To successfully receive a webhook from HubSpot, you need two things:
- A publicly accessible URL that HubSpot's servers can reach.
- An HTTPS URL, as HubSpot requires secure endpoints for sending webhooks.
This is where a tunneling tool becomes essential for local development.
Solution: Get a Public URL with Tunnelmole
Tunnelmole is a free and open-source tool that creates a a public URL for your local development server. It's a simple command-line utility that solves the public URL problem in seconds, without requiring complex network or firewall configurations.
How Tunnelmole Works
Tunnelmole simplifies local webhook testing by creating a bridge between the public internet and your localhost.
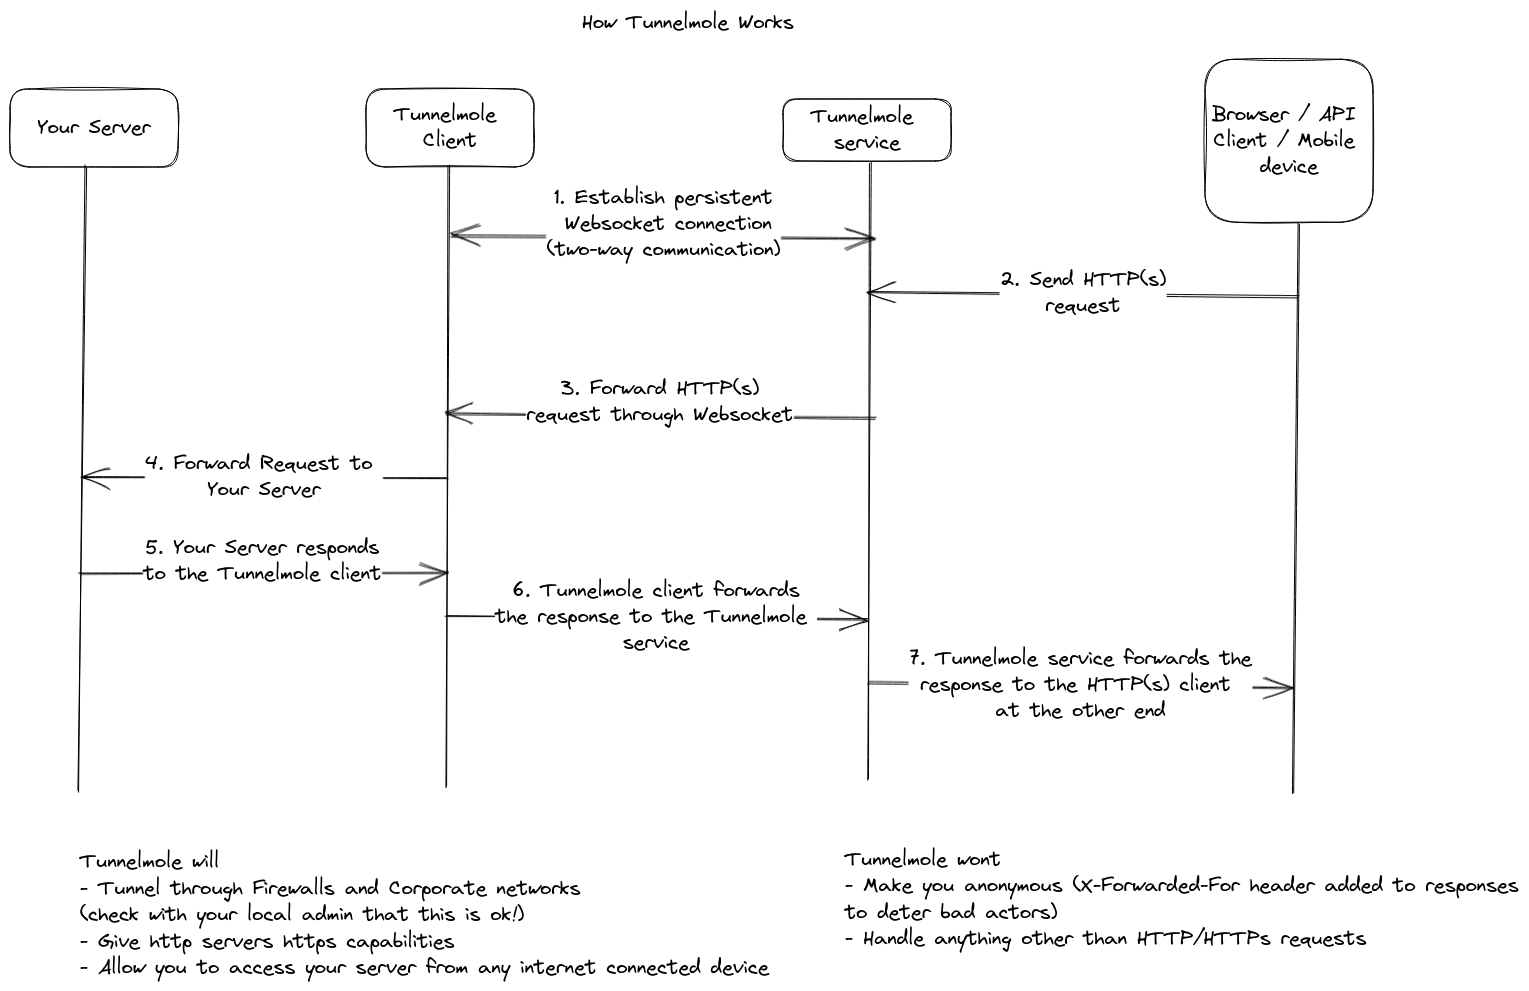
- You run the Tunnelmole client on your machine, telling it which local port your server is running on (e.g., port 3000).
- The client establishes a secure, persistent WebSocket connection to the global Tunnelmole service.
- The Tunnelmole service generates a unique, public HTTPS URL (e.g.,
https://cqcu2t-ip-49-185-26-79.tunnelmole.net). - When HubSpot sends a webhook to this public URL, the Tunnelmole service receives it and forwards it through the secure tunnel to the Tunnelmole client on your machine.
- The client then passes the request on to your local server running on
localhost:3000, exactly as if the request had originated locally.
Installing Tunnelmole
Installation is straightforward. For Linux, macOS, or Windows Subsystem for Linux (WSL), you can use the following script:
curl -O https://install.tunnelmole.com/xD345/install && sudo bash install
If you're on Windows without WSL, you can download the tmole.exe executable and add it to your PATH.
Alternatively, if you have Node.js installed, you can install Tunnelmole globally via npm:
sudo npm install -g tunnelmole
Running Tunnelmole
With your Express server still running, open a new terminal window and run the following command to start Tunnelmole:
tmole 3000
Tunnelmole will start and display your public URLs:
$ tmole 3000
Your Tunnelmole Public URLs are below and are accessible internet wide. Always use HTTPs for the best security

https://cqcu2t-ip-49-185-26-79.tunnelmole.net ⟶ http://localhost:3000
http://cqcu2t-ip-49-185-26-79.tunnelmole.net ⟶ http://localhost:3000
Grab the https URL. This is the public address you'll provide to HubSpot. Any request sent to it will now be forwarded directly to your local server on port 3000.
Configuring Your Webhook in the HubSpot Developer App
Now that you have a public URL, you can configure HubSpot to send webhook notifications to it.
- Log in to your HubSpot Developer Account at developers.hubspot.com.
- Navigate to your App. If you don't have one, create a new private app for testing purposes.
- In your app's settings, click on "Webhooks" in the left sidebar.
- Click the "Create subscription" button in the top right.
- In the "Target URL" field, paste your public Tunnelmole URL, making sure to append your endpoint path. For our example, this would be
https://cqcu2t-ip-49-185-26-79.tunnelmole.net/hubspot-webhooks. - For the "Event type", select a subscription from the dropdown menu. A good one for testing is "Contact created" (
contact.creation). - Click "Create subscription".
Your webhook subscription is now active. HubSpot will send a POST request to your Tunnelmole URL every time a new contact is created in the connected account.
Triggering and Testing Your First HubSpot Webhook
Let's test the entire setup.
- Keep your Express server and Tunnelmole running in their respective terminals.
- Go to the HubSpot account connected to your app.
- Navigate to Contacts and create a new contact. Fill in some basic information like an email address and name.
- As soon as you save the contact, HubSpot will fire the
contact.creationwebhook.
Now, check your terminals.
- In the Tunnelmole terminal, you'll see a log of the HTTP request it forwarded.
- In your Express server terminal, you should see the output from your
console.logstatements:
🎉 Webhook received!
Webhook Body: [
  {
    "eventId": 12345678,
    "subscriptionId": 12345,
    "portalId": 987654,
    "occurredAt": 1678886400000,
    "subscriptionType": "contact.creation",
    "attemptNumber": 0,
    "objectId": 501,
    "properties": {
      "email": "test@example.com",
      "firstname": "John",
      "lastname": "Doe"
    }
  }
]
Success! You a have received a real webhook from HubSpot on your local machine.
Essential Security: Verifying HubSpot's Signature
Right now, your endpoint is public and anyone who knows the URL could send fake data to it. To ensure that incoming requests are genuinely from HubSpot, you must verify the request signature. HubSpot includes a special header in every webhook request for this purpose: X-HubSpot-Signature-v3.
Here's how the verification process works:
- You retrieve your app's Client Secret from the HubSpot Developer Portal.
- You construct a "source string" by concatenating the HTTP method, the full URI, and the raw request body.
- You use your Client Secret to create an HMAC-SHA256 hash of the source string.
- You compare your calculated hash (Base64 encoded) with the value of the
X-HubSpot-Signature-v3header. If they match, the request is valid.
Implementing Signature Verification in Express.js
Let's update our index.js to include this crucial security check.
First, you need to read the raw request body, because the signature is calculated based on the raw bytes, not the parsed JSON. We can configure Express to save this for us. We'll also need Node's built-in crypto module.
const express = require('express');
const crypto = require('crypto');
const app = express();
const port = 3000;

// Your HubSpot App's Client Secret
const HUBSPOT_CLIENT_SECRET = 'YOUR_HUBSPOT_CLIENT_SECRET';

// Middleware to parse JSON and save the raw body
app.use(express.json({
  verify: (req, res, buf) => {
    req.rawBody = buf;
  }
}));

// The webhook handler endpoint
app.post('/hubspot-webhooks', (req, res) => {
  // 1. Verify the signature
  const signature = req.get('X-HubSpot-Signature-v3');
  const requestBody = req.rawBody.toString();
  const fullUrl = `${req.protocol}://${req.get('host')}${req.originalUrl}`;

  const sourceString = `POST${fullUrl}${requestBody}`;

  const hash = crypto
    .createHmac('sha256', HUBSPOT_CLIENT_SECRET)
    .update(sourceString)
    .digest('base64');

  if (signature !== hash) {
    console.error('Signature verification failed!');
    return res.status(401).send('Unauthorized');
  }

  console.log('✅ Signature verified successfully!');

  // 2. Process the webhook if signature is valid
  console.log('🎉 Webhook received!');
  const webhookData = req.body;
  console.log('Webhook Body:', JSON.stringify(webhookData, null, 2));

  res.status(200).send('Webhook received successfully.');
});

// Start the server
app.listen(port, () => {
  console.log(`Server listening at http://localhost:${port}`);
});
Before running this:
- Get your Client Secret from your HubSpot app's "Auth" settings page and replace
'YOUR_HUBSPOT_CLIENT_SECRET'with it. - Restart your Node.js server to apply the changes.
Now, when you trigger the webhook again, your server will first validate the signature before processing the data, making your endpoint secure.
Advanced Considerations for Robust Webhook Handling
- Acknowledge Requests Quickly: HubSpot expects a
200 OKresponse within a few seconds. If your webhook processing takes a long time, acknowledge the request first and then process the data asynchronously using a job queue (like RabbitMQ, Redis, or even a simple in-memory queue for smaller applications). - Handle Retries and Idempotency: Network glitches can cause HubSpot to send the same webhook more than once. Design your handler to be idempotent, meaning processing the same event multiple times won't cause duplicate data or errors. You can achieve this by logging the
eventIdof each incoming webhook and skipping any events you've already processed.
Open Source and Self-Hosting
One of the key advantages of Tunnelmole is that it's fully open source. You can inspect the code for both the client and the server on GitHub to understand exactly how it works.
For production environments or for maximum control over your infrastructure, you can also self-host the Tunnelmole service. This gives you complete privacy and allows you to use your own domains without a subscription. You can learn more at the Tunnelmole Service GitHub repository.
Conclusion
You've successfully mastered the end-to-end workflow for developing and testing HubSpot webhooks locally. You've learned how to build a webhook handler in Node.js, use Tunnelmole to bridge the gap between localhost and the public internet, configure the webhook in HubSpot, and secure your endpoint with signature verification.
This setup eliminates the slow, frustrating cycle of deploying code to test every change. You can now build powerful, real-time integrations with HubSpot faster and more efficiently than ever before.
Subscribe to my newsletter
Read articles from Robbie Cahill directly inside your inbox. Subscribe to the newsletter, and don't miss out.
Written by