What is a Webhook API? A Deep Dive for Developers
 Robbie Cahill
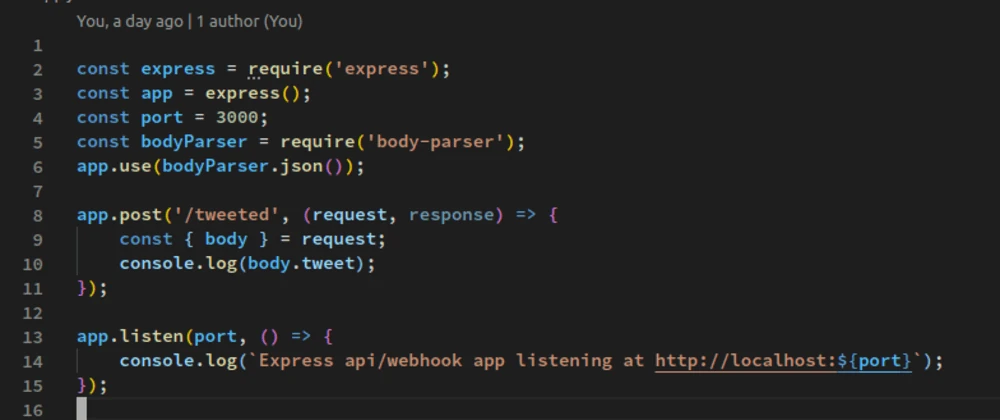
In the world of web development, APIs (Application Programming Interfaces) are the bedrock of communication between different software systems. Traditionally, this communication has been a one-way street: your application "pulls" data from a server by making a request. But what if the server could "push" data to you the moment it's available? This is the powerful concept behind the Webhook API, a cornerstone of modern, real-time web applications.
This guide will provide a deep dive into Webhook APIs. We'll explore what they are, how they fundamentally differ from traditional APIs, and why they are essential for building efficient, event-driven systems. We will also walk through a practical example of how to develop and test a webhook handler locally using Node.js and the open-source tool, Tunnelmole.
What is a Webhook? The "Reverse API" Explained
At its core, a webhook is a mechanism for one application to send another application real-time information. It's often called a "reverse API," "push API," or a "server-to-server push notification."
Here’s a simple analogy:
- Traditional API (Polling): Imagine you're expecting a package. You have to repeatedly call the post office every hour and ask, "Has my package arrived yet?" This is inefficient, consumes your time, and you only get the update when you actively seek it.
- Webhook API (Push): Now, imagine you've given the post office your phone number. The moment your package arrives, they send you a text message. You get the information instantly, without having to do any work.
In technical terms, a webhook is an HTTP POST request that is automatically sent from a source application to a destination application when a specific event occurs. The destination application provides a unique URL—the "webhook endpoint"—which is designed to receive this request.
How Does a Webhook API Work?
The webhook workflow involves three key components:
- The Provider: The application or service that sends the webhook notification. This could be a payment gateway like Stripe, a version control system like GitHub, or a communication platform like Twilio.
- The Event: The specific trigger that causes the Provider to send a notification. Examples include a successful credit card payment, a new commit to a repository, an incoming SMS message, or a new customer subscription.
- The Listener (Your Application): Your application's endpoint (a specific URL) that listens for incoming webhook requests from the Provider.
The process unfolds in a few simple steps:
- Registration: You register a URL from your application with the webhook provider. This URL is your webhook endpoint, and it tells the provider where to send the data.
- Event Trigger: An event happens within the provider's system. For example, a user pays for a product on your site via Stripe.
- HTTP Request: The provider's server immediately constructs and sends an HTTP POST request to your registered URL. This request contains a payload, usually in JSON format, with detailed information about the event.
- Action: Your listener application receives this POST request, parses the JSON payload, and executes a piece of code based on the data. For instance, it might update a customer's order in your database, send a confirmation email, or trigger a shipping workflow.
Webhook API vs. Traditional API: A Head-to-Head Comparison
The primary difference between a webhook and a traditional API lies in their communication model: push vs. pull. Understanding this distinction is crucial for designing efficient and scalable applications.
| Feature | Traditional API (Polling / Pull) | Webhook API (Push) |
| Initiator | The client application initiates the request. | The server (provider) application initiates the request. |
| Data Flow | Pull Model: The client pulls data from the server. | Push Model: The server pushes data to the client. |
| Efficiency | Can be highly inefficient. Many requests may be needed to get a single update, consuming resources on both client and server sides. | Highly efficient. Data is sent only when an event occurs, minimizing unnecessary network traffic and server load. |
| Timeliness | Near real-time at best. Data is only as fresh as the last poll. A high polling frequency can overload the server. | Real-time. The notification is sent the instant the event happens. |
| Complexity | The client must manage the state and logic for polling intervals, error handling for failed requests, and checking for new data. | The client simply needs to set up an endpoint to receive data. The complexity lies in handling the incoming request. |
| Use Case | Best for getting data on-demand, like fetching a user's profile when they log in. | Best for reacting to events as they happen, like processing a new order or reacting to a CI/CD build failure. |
| Analogy | Repeatedly checking your mailbox for a letter. | Receiving a text alert the moment a letter is delivered. |
While polling has its place, for any application that needs to react to asynchronous events, a webhook API is almost always the superior architectural choice.
Developing and Testing a Webhook API Locally
One of the biggest hurdles when developing a webhook integration is that your development environment typically runs on localhost, which is not accessible from the public internet. Webhook providers like Stripe or GitHub need a public HTTPS URL to send requests to.
So, how can you test your webhook listener without deploying it to a public server every time you make a change? The answer is a tunneling tool.
Introducing Tunnelmole: Your Open-Source Tunneling Solution
Tunnelmole is an open-source tool that creates a secure tunnel from a public URL to your local development machine. By running a simple command, you get a public HTTPS address that forwards all incoming requests to your local web server.
Key features of Tunnelmole that make it ideal for webhook development:
- Open Source: Both the client and server are fully open source, giving you complete transparency and control. You can inspect the code to see exactly how it works.
- Self-Hostable: For maximum security and control, you can host the Tunnelmole service on your own infrastructure.
- Easy to Use: It requires just one command to get a public URL for your local server.
Step-by-Step Guide: Building and Testing a Node.js Webhook Listener
Let's build a simple webhook listener using Node.js and Express and test it with Tunnelmole.
Step 1: Build the Webhook Listener
First, ensure you have Node.js and npm installed. Create a new project folder, run npm init -y, and install Express:
npm install express
Now, create a file named app.js and add the following code. This simple Express server listens on port 3000 and has a /webhook endpoint that logs the body of any incoming POST request.
const express = require('express');
const app = express();
const port = 3000;

// Middleware to parse JSON bodies. This is crucial for webhook payloads.
app.use(express.json());

app.get('/', (req, res) => {
  res.send('Webhook listener is running! Provide the /webhook endpoint to your provider.');
});

// This is your webhook listener endpoint
app.post('/webhook', (request, response) => {
    console.log('🎉 Webhook received!');

    // The webhook payload is in the request body
    console.log('Payload:', request.body);

    // Some providers check the response status code
    response.status(200).send('Webhook received successfully.');
});

app.listen(port, () => {
    console.log(`Server running at http://localhost:${port}`);
    console.log(`Webhook endpoint is http://localhost:${port}/webhook`);
});
Run your server by executing:
node app.js
You will see a message confirming that the server is running on http://localhost:3000.
Step 2: Install and Run Tunnelmole
Now, let's expose our local server to the internet. The easiest way to install Tunnelmole is to run the following command in your terminal:
curl -O https://install.tunnelmole.com/xD345/install && sudo bash install
Alternatively, if you have Node installed, you can use npm: sudo npm install -g tunnelmole.
With your Node.js server running, open a new terminal window and run Tunnelmole, telling it to forward to port 3000:
tmole 3000
Tunnelmole will start and display your public URLs:
Your Tunnelmole Public URLs are below and are accessible internet wide. Always use HTTPs for the best security

https://cqcu2t-ip-49-185-26-79.tunnelmole.net ⟶ http://localhost:3000
http://cqcu2t-ip-49-185-26-79.tunnelmole.net ⟶ http://localhost:3000
Step 3: Register and Test the Webhook
You now have a public HTTPS URL! The webhook endpoint for our example is https://cqcu2t-ip-49-185-26-79.tunnelmole.net/webhook.
You would now go to your webhook provider's dashboard (e.g., GitHub, Stripe, Shopify) and paste this URL into their webhook configuration form.
To test it without setting up a third-party service, you can use a tool like curl or Postman. Open another terminal and send a test POST request:
curl -X POST -H "Content-Type: application/json" -d '{"event": "test_payment", "amount": 1000, "currency": "usd"}' https://cqcu2t-ip-49-185-26-79.tunnelmole.net/webhook
Go back to the terminal where your Node.js app is running. You should see the following output, confirming that your local server received the request via Tunnelmole:
🎉 Webhook received!
Payload: { event: 'test_payment', amount: 1000, currency: 'usd' }
You can now develop your webhook logic locally, with changes reflected instantly. Set breakpoints, debug your code, and iterate quickly without ever needing to deploy.
How Tunnelmole Works Under the Hood
The magic of Tunnelmole lies in its use of a persistent connection to a publicly accessible relay server.
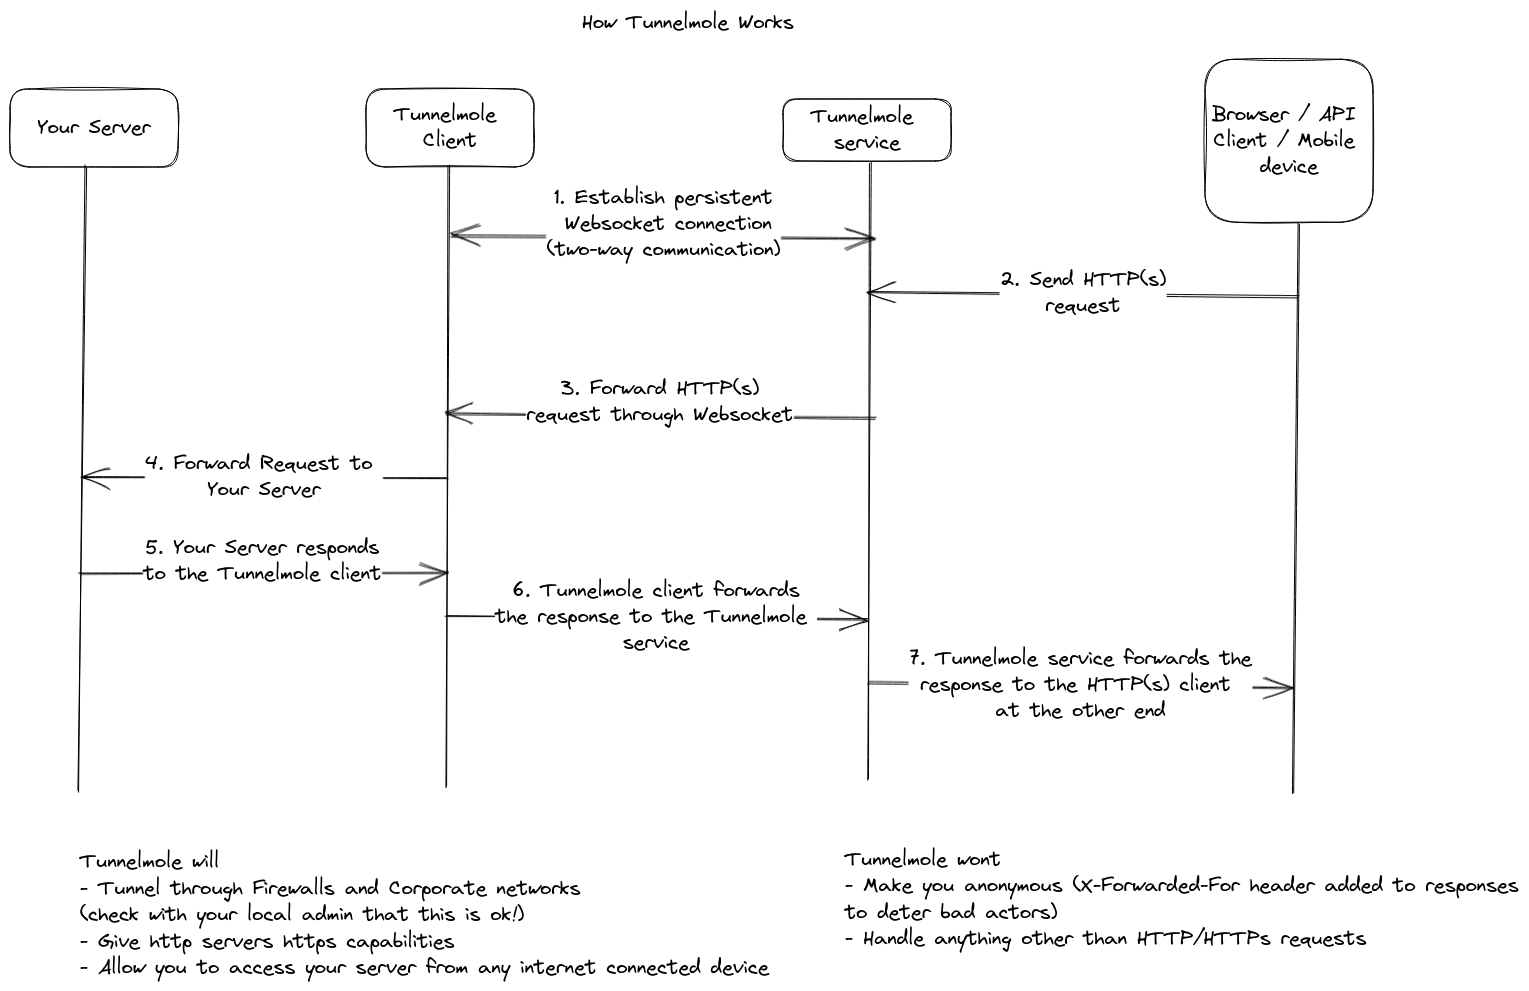
- The Tunnelmole client on your machine initiates a secure connection to the Tunnelmole service running on a public server.
- The service assigns you a unique public URL.
- When an external service (like a webhook provider) sends a request to your public URL, the Tunnelmole service receives it.
- The service then forwards the entire HTTP request through the established tunnel to the client on your machine.
- The client receives the request and forwards it to your local web server (e.g.,
http://localhost:3000). - The response from your local server travels back through the same tunnel to the service, which then delivers it to the original caller.
Because Tunnelmole is open source, you can run the entire stack on your own servers for complete data privacy and control.
Securing Your Webhook API
A publicly exposed webhook endpoint is a potential target for malicious actors. Securing it is not optional; it's a requirement.
1. Signature Verification
The most critical security measure is signature verification. Most reputable webhook providers include a cryptographic signature in the request headers. This allows you to verify that the request genuinely came from the provider and that its payload has not been tampered with.
The process works like this:
- The provider gives you a secret key.
- When sending a webhook, the provider creates a hash-based message authentication code (HMAC) of the request payload using this secret.
- The resulting signature is included in a header, such as
X-Hub-Signature-256(GitHub) orStripe-Signature(Stripe). - Your application must recalculate the HMAC using the same secret and the received payload. If your calculated signature matches the one in the header, the request is valid. If not, it should be discarded.
Always verify webhook signatures before processing the payload.
2. Use HTTPS
Data sent over the internet should always be encrypted. Always provide an https:// URL for your webhook endpoint. This prevents man-in-the-middle attacks where an attacker could intercept and read or modify the webhook data. Tunnelmole provides free HTTPS URLs out of the box.
3. Handle Replays and Idempotency
Due to network issues, a webhook provider might send the same event notification more than once. Your application should be idempotent, meaning that processing the same request multiple times does not cause duplicate side effects.
A common strategy is to log the unique ID of each processed event (most providers include one in the payload). When a new webhook arrives, check if you've already processed that event ID. If you have, you can safely ignore the duplicate request.
Real-World Use Cases for Webhook APIs
Webhook APIs are used across countless industries to power real-time, event-driven workflows:
- E-commerce (Stripe, Shopify): Triggering order fulfillment, sending receipt emails, updating inventory, and logging transactions the moment a payment is confirmed.
- DevOps (GitHub, GitLab, Jenkins): Kicking off CI/CD pipelines on a new commit, notifying a Slack channel about a failed build, or automating code deployment after a pull request is merged.
- Communications (Twilio, SendGrid): Processing incoming SMS messages, handling voice call events, or tracking email delivery statuses and open rates.
- Marketing & CRM (HubSpot, Mailchimp): Syncing customer data between systems when a new lead fills out a form or unsubscribes from a newsletter.
- IoT (Internet of Things): A smart home sensor sending an alert to a central server when motion is detected or a door is opened.
- Social Media (Twitter, Facebook): Receiving notifications about new posts, mentions, or messages to power social listening tools or auto-responders.
Conclusion
Webhook APIs represent a paradigm shift from the traditional request-response model of the web. By enabling applications to push data in real-time, they provide the foundation for more efficient, scalable, and responsive systems. They eliminate the need for resource-intensive polling and ensure that your application can react instantly to events as they occur.
Developing and testing these integrations can be challenging due to the need for a public endpoint. However, open-source tools like Tunnelmole bridge this gap, allowing you to build and debug your webhook listeners in the comfort of your local environment. By creating a secure tunnel from a public URL to your localhost, you can accelerate your development cycle and build robust, reliable webhook integrations with confidence.
The next time you need your application to react to an external event, consider the power of a Webhook API. It's the modern, efficient way to build a connected and event-driven software ecosystem.
Subscribe to my newsletter
Read articles from Robbie Cahill directly inside your inbox. Subscribe to the newsletter, and don't miss out.
Written by