CI/CD deep-dive: Deploy a scalable Multi-Environment React App to AWS S3 + CloudFront with GitHub Actions
 Antonin Marxer
Table of contents

You're launching an MVP and want to deploy you React app with minimal overhead, while limiting costs? In this tutorial, you’ll learn how to deploy a multi-environment React app to AWS S3. You can find the code in the launchplate-react-terraform repo template.

The template includes:
Lightning-fast Vite + SWC build setup
TailwindCSS + ShadCN for clean styling
Structured project with Domain-Driven Design (DDD)
Built-in multi-environment config support
CI/CD ready for AWS S3 + CloudFront quasi-free static hosting
It everages Terraform Infrastructure as Code to handle:
S3 buckets creation: A primary S3 bucket is created for each environment, as well as a secondary S3 bucket in production to ensure fault-tolerance.
CloudFront Caching: The S3-hosted websites are served exclusively through a CloudFront distribution, which caches content to improve load times, reduce latency, and minimize direct requests to the S3 buckets.
Multi-DNS providers support: DNS entries can be created either on Cloudflare or AWS Route53 DNS providers. SSL Certificates are managed using AWS ACM with DNS validation.
Optional Features: S3 buckets encryption (disabled by default), WAF protection (disabled by default)
Redirect from root to www: Enabled by default when using Cloudflare, based on Page Rules. This feature isn't supported when using Route53. :::
Want to dive into Terraform setup
→ I’ll cover that in an upcoming tutorial—stay tuned.
Maintaining code standards
"If you want to go fast, if you want to get done quickly, if you want your code to be easy to write, make it easy to read" Robert C. Martin, Clean Code: A Handbook of Agile Software Craftsmanship
To make sure your app is maintainable, it must be easy to read, which makes it easy to continue its development.
- Configure your IDE for linting and auto-formatting
In order to maintain styling standards during development, we can install the following extensions:
Tailwind CSS IntelliSense, which provides intellisense for tailwind classes.
ESLint extension and Prettier - Code formatter.
In VS Code settings (CTRL + ,):
Update "Editor: default formatter" to "Prettier - Code formatter".
Enable "Editor: Format on Save"
- Use Domain-Driven Design (DDD) + Clean Structure
Instead of dumping all components into a components/ folder and praying for clarity, we organize code by business feature, not technical and overly generic type.
Each business feature should have its own dedicated folder containing its components, hooks, etc, forming what we call a bounded context.
What is a bounded context in DDD? Imagine a user model. In the Auth feature, the model is an email/password pair. In the Admin feature, it's actually roles/permissions. Those business objects have the same name, but different responsibilities. So we isolate them in bounded contexts!
A
bounded contextdefines the boundaries of your feature.
Project Structure
src/features: One folder per business capability (e.g., auth, theme, dashboard)
src/core: Reusable, app-agnostic components (e.g., Button, Layout, useDebounce)
src/shared: Project-wide reusable but project-specific logic/components
src/pages: Each page (e.g. home, 404, etc)
src/assets: Global images/icons
- Best practices when using DDD
Group files by feature Each feature manages its own components and states, including its own Zustand slices under
features/X/store/X.slice.tsif you use Zustand.Expose a minimal public API with a
barrel exportEach feature should have anìndex.tsfile that exports everything a feature exposesKeep
core/generic Don't leak feature logic intocore/Shared = Project-Specific Utilities
- What are DDD anti-patterns?
Don't put business logic in
core/Do not use global stores in
src/stores/for state management, this breaks the DDD logic.Don't overt-abstract The more flat the architecture is, the better. Keep It Simple, Stupid (KISS)
- Special cases: Use Open/Closed principle
OCPfromSOLID
Bonus: Open/Closed Principle for Reusability In features/theme/components, create a generic ThemeToggleButton, then create a ConnectedThemeToggle that plugs into Zustand or Redux. Boom – portable and extendable.
ThemeToggleButton is a closed, reusable component that takes callbacks.
Hosting: AWS S3 + CloudFront vs Netlify/Render/Cloudflare
A React app is just static files (HTML/CSS/JS), so why not host it on S3 for cents/month?
The dynamic content displayed in your website is fetched on client side when the user loads the page. That means you can just build your website and host the files on a static site hosting solution such as a quasi-free S3 bucket (HTTP).
S3 + CloudFront (Static Hosting + CDN + SSL)
Buy a domain name on a domain name registrar such as porkbun, Namecheap, etc. I recommend you to compare domain names prices by going to https://tld-list.com/
Delegate DNS to AWS Route53 or Cloudflare.
DNS recordsare instructions that state how to handle request and associate IP addresses to the domain.You can use AWS Route 53 hosted zone for 0.50€/month, or Cloudflare, which provides DNS management and a web application firewall for free. There will however me more DNS configuration steps to serve the CloudFront distributions.The DNS provider of your choice will ask you to register theirnameserversin your domain name registrar DNS settings.Set up SSL via AWS Certificate Manager
Serve via CloudFront (CDN + HTTPS + cache)
Upload static build to S3 bucket
Alternatives (Cloudflare Pages / Netlify / Render)
They offer:
Git-based CI/CD
Easy custom domains
Serverless functions (like Cloudflare Workers)
Great free tiers for hobby projects
Which one to use? Depends on your needs and what each platform's ecosystem can provide:
Cloudflare Pages is arguably the best free-tier platform for static sites and Workers, which are serverless functions that always run at the edge, making them incredibly fast.
Firebase , made by Google, is great if you want backend capabilities like database and auth.
Disclaimer: Firebase Authentication free tier (Spark Plan) has strong limitations when it comes to phone auth (limited to 10k verifications/month in the US, or to ~100-300 verifications/month in other countries) or to MFA, which is just plain unavailable.For authentication, there's not even to hesitate – Start with Supabase Cloud for a quick setup and a generous free tier (50k
Montly Active Users (MAU)+ $8/mo for 100k MAU). Then if needed, forget the subscription and self-host Supabase which is open-source. Since march 2025 Supabase introduced the Supabase UI Library base on tailwind CSS and ShadCN, which was the only missing element from this wholesome solution.Render is strong if you need both static and backend services in one place.
Multi-environment deployment
When your web application starts having lots of traffic, you need to make a pre-release to ensure the changes do not break production. Real projects need:
dev: unstable, local testing
qa: for internal team testing
stg: user testing / UAT
prod: customer-facing production
Your configuration will usually vary between environments:
Different API URLs: When relying on APIs, The staging & dev environment will use the sandboxed version of the APIs.
Different feature toggles: You can use feature flags to disable a feature for various reasons: 1) A new feature is under active development and has been merged into the main codebase for agility's sake. 2) A published feature doesn't meet the customers' standards and has been disabled to be reworked.
We'll bake the configuration at build time. This means we build the app once per environment.
Vite variable support
Vite exposes env variables under import.meta.env object as strings automatically. These variables must be prefixed with VITE_ in .env files. We can use them like so:
console.log(import.meta.env.VITE_API_ENDPOINT);
// resolves to "http://localhost:8080/"
Built-in Constants
By default, when running vite, NODE_ENV is set to developmentand .env.development is used. When running vite build, NODE_ENV is set to productionand .env.production is used.
Vite provides the following built-in constants:
import.meta.env.PROD: true if NODE_ENV equals to productionimport.meta.env.DEV: true if NODE_ENV equals to development (always the opposite ofimport.meta.env.PROD)import.meta.env.SSR: whether the app is running in the server.
Another concept from Vite is the Mode, which takes by default the same values ad NODE_ENV. You can overwrite the default mode by passing the --mode and retrieve it using import.meta.env.MODE. If you want to build your app for a staging mode, create a .env.staging and run vite build --mode staging.
Environment configurations
For our setup, define the following .env.[mode] files:
.env.development:
VITE_API_URI="http://localhost:8080/".env.qa:
VITE_API_URI="https://api-qa.example.com/".env.stg:
VITE_API_URI="https://api-staging.example.com/".env.production
VITE_API_URI="https://api.example.com/"Also add the lineVITE_APP_VERSION=$npm_package_versionto each .env files. This makes the app version specified inpackage.jsonaccessible in the whole app throughimport.meta.env.VITE_APP_VERSION.
Add type definitions for custom env variables in src/vite-environment.d.ts to augment ImportMetaEnv:
# src/vite-environment.d.ts
/// <reference types="vite/client" />
/// <reference types="vite/types/importMeta.d.ts" />
/// <reference types="vite-plugin-svgr/client" />
/// <reference types="vite/client" />

interface ViteTypeOptions {
  // By adding this line, you can make the type of ImportMetaEnv strict
  // to disallow unknown keys.
  strictImportMetaEnv: unknown
}

// eslint-disable-next-line unicorn/prevent-abbreviations
interface ImportMetaEnv {
  readonly VITE_APP_VERSION: string
  readonly VITE_API_URI?: string
  // more env variables...
}

interface ImportMeta {
  readonly env: ImportMetaEnvironment
}
In package.json, define one build command per environment:
"scripts": {
  "start": "vite",
  "lint": "eslint .",
  "test": "vitest run",
  "build": "vite build",
  "build:prod": "vite build",
  "build:stg": "vite build --mode stg",
  "build:qa": "vite build --mode qa",
}
CI — GitHub Actions: Automated & Manual Workflows
Auto-Deploy by Branch Name
| Source Branch | Environment |
main | production |
staging | staging |
qa | qa |
release/* | qa |
feature/* | qa |
bugfix/* | qa |
Listen to Github events by creating a workflow (.github/workflows/deploy.yml):
on:
  push:
    branches:
      - 'main'
      - 'staging'
      - 'qa'
      - 'release/*'
      - 'feature/*'
      - 'bugfix/*'
The push event is triggered on direct push to branch and when a PR is merged into branch.
Compute the target mode based on Github workflow github.* context:
env:
  MODE: (github.ref_name == 'main' && 'prod' || github.ref_name == 'staging' && 'stg' || 'qa') }}
The environment variable ${{ env.MODE }} takes the values 'prod' | 'staging' | 'qa'.
In the build stage, reference that environment variable:
- name: Build project
  run: npm run build:${{ env.MODE }}
Finally we upload the built React app artifact, so that we can re-use it in the deployment job:
- name: Upload build artifacts
  uses: actions/upload-artifact@v4
  with:
    name: web-dist
    path: ./dist
    retention-days: 1
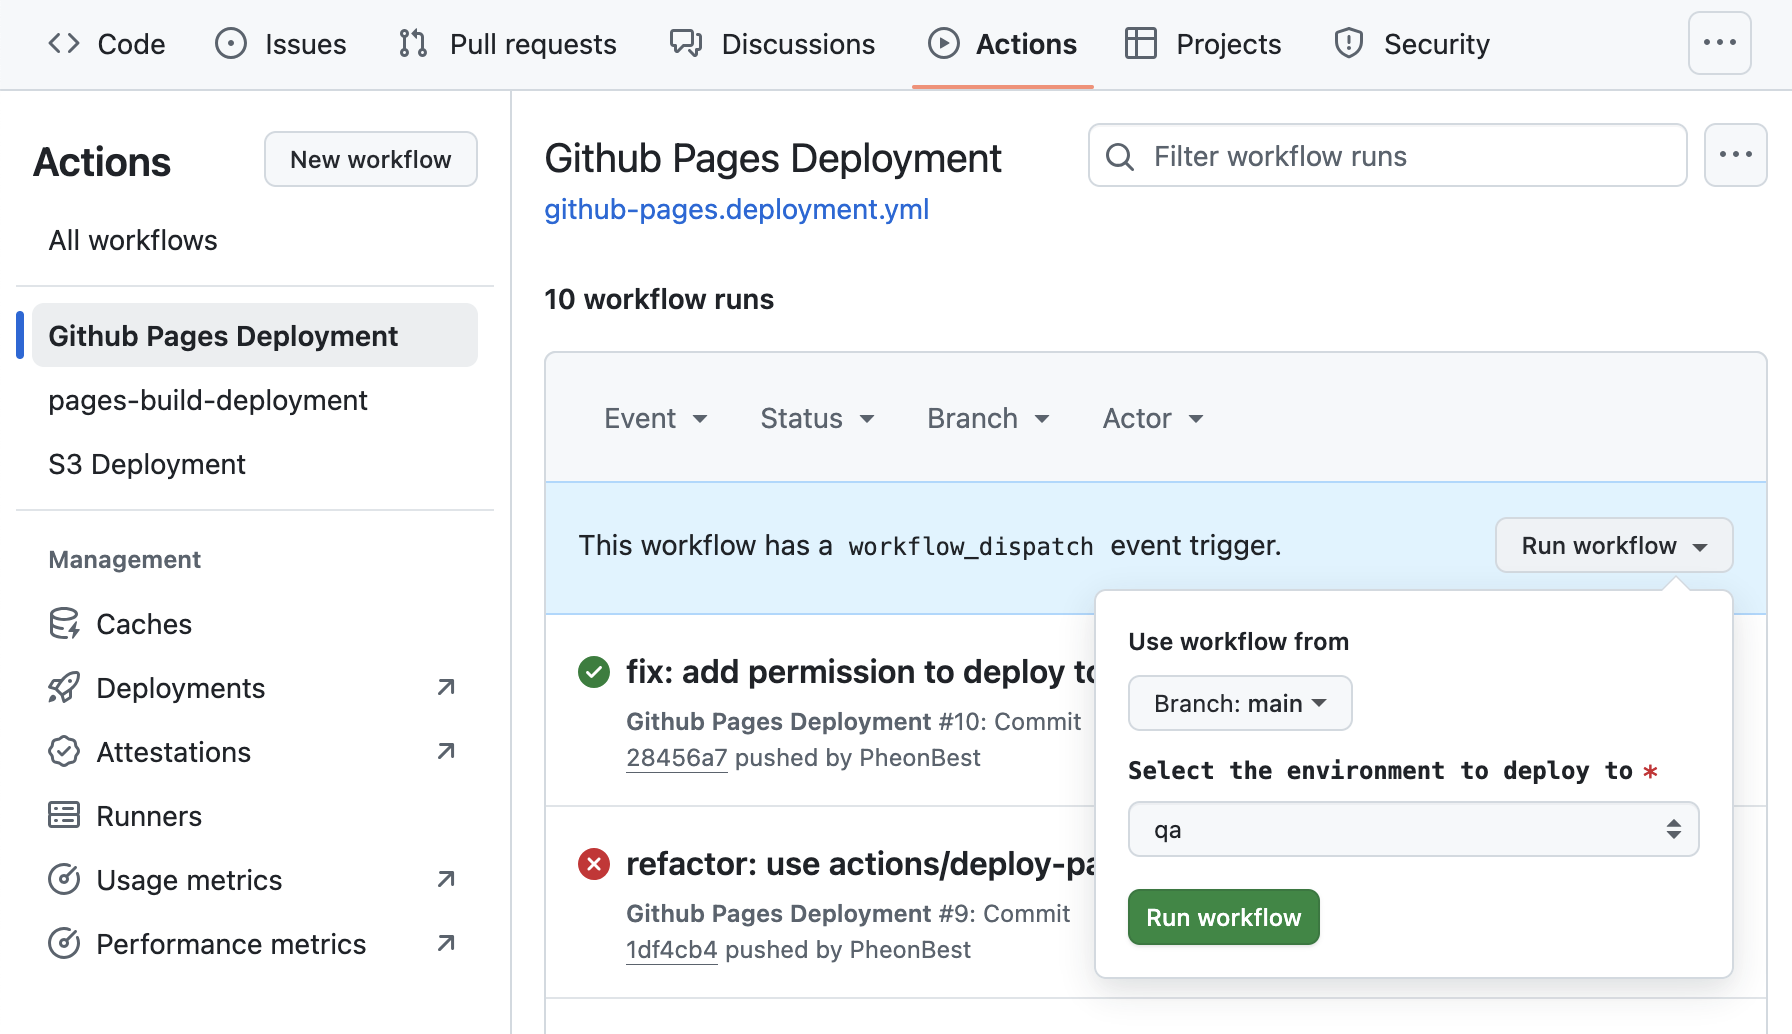
Manual Deploys with workflow_dispatch
Trigger deploys manually and select the environment from the GitHub UI.
on:
  workflow_dispatch:
    inputs:
      environment:
        type: choice
        options:
          - prod
          - stg
          - qa
Usually, multiple features are being developped at the same time. This means not everyone can push their single under development feature on the staging branch. To easily let developers deploy to that environment, we'll use workflow_disatch.
First, we need to listen the workflow_dispatch event:
on:
  workflow_dispatch:
    inputs:
      environment:
        description: 'Select the environment to deploy to'
        required: true
        default: 'qa'
        type: choice
        options:
          - qa
          - staging
          - production
  push:
    branches:
      - 'main'
      - 'staging'
      - 'qa'
      - 'release/*'
      - 'feature/*'
      - 'bugfix/*'
Modify the target deployment environment specifically when the source event is workflow_dispatch:
env:
  ENVIRONMENT: ${{ github.event_name == 'workflow_dispatch' && github.event.inputs.environment || (github.ref_name == 'main' && 'production' || github.ref_name == 'staging' && 'staging' || 'qa') }}
In your repo's Actions you can select the target environment to deploy to under Run workflow.
CD — Deploy to AWS (S3 + CloudFront)
We're now able to build our application with the target environment's configuration both in an automated and manual way with workflow dispatch, ensuring flexibility for our development team.
We'll host each environment in a separate S3 bucket to ensure isolation. In this tutorial we will assume that the S3 buckets already exist. The pipeline will only upload the newer app's distributable. All buckets should only be accessible through CloudFront to enable caching, so you'll have one CloudFront distribution per environment.
As the website is only static, a developer could deploy to the target environment from its computer by using the following scripts in package.json:
{
    ...
    "scripts" {
        "build:prod": "vite build --mode prod",
        "build:stg": "vite build --mode stg",
        "build:dev": "vite build --mode dev",
        "build": "vite build --mode prod",
        "sync:prod": "aws s3 sync dist s3://prod-launchplate-react-primary && aws cloudfront create-invalidation --distribution-id XXXX1 --paths '/*'",
        "sync:stg": "aws s3 sync dist s3://stg-launchplate-react-primary && aws cloudfront create-invalidation --distribution-id XXXX2 --paths '/*'",
        "sync:dev": "aws s3 sync dist s3://dev-launchplate-react-primary && aws cloudfront create-invalidation --distribution-id XXXX3 --paths '/*'"
    }
}
Please replace the values with your buckets names and cloudfront distribution id.
We want the Github Workflow to perform these S3 synchronizations for us. To enable the workflow to communicate with AWS, we can leverage AWS OIDC Authentication, which doesn't require any exchange of secrets.
1. Set up AWS IAM OIDC Provider
# Create the OIDC provider in AWS
aws iam create-open-id-connect-provider \
  --url https://token.actions.githubusercontent.com \
  --client-id-list sts.amazonaws.com \
  --thumbprint-list "a031c46782e6e6c662c2c87c76da9aa62ccabd8e"
You get the following output:
{
  "OpenIDConnectProviderArn": "arn:aws:iam::AWS_ACCOUNT_ID:oidc-provider/token.actions.githubusercontent.com"
}
2. Create an IAM Role for the Github Actions to assume
Create an IAM role named ReactLaunchplateGitHubActionsOIDCRole with the following trust policy:
{
  "Version": "2012-10-17",
  "Statement": [
    {
      "Effect": "Allow",
      "Principal": {
        "Federated": "arn:aws:iam::<AWS_ACCOUNT_ID>:oidc-provider/token.actions.githubusercontent.com"
      },
      "Action": "sts:AssumeRoleWithWebIdentity",
      "Condition": {
        "StringEquals": {
          "token.actions.githubusercontent.com:aud": "sts.amazonaws.com"
        },
        "StringLike": {
          "token.actions.githubusercontent.com:sub": "repo:<GITHUB_ORG>/<REPO_NAME>:*"
        }
      }
    }
  ]
}
Replace <AWS_ACCOUNT_ID> with your AWS account ID, retrieved from the previous step. Replace <GITHUB_ORG> and <REPO_NAME> with your GitHub organization and repository names.
You can also create the role using aws CLI. Create a file oidc-provider-role.json containing the previous JSON, then run:
cd docs
aws iam create-role --role-name ReactLaunchplateGitHubActionsOIDCRole --assume-role-policy-document file://oidc-provider-role.json
As an output, we get:
{
    "Role": {
        "Path": "/",
        "RoleName": "ReactLaunchplateGitHubActionsOIDCRole",
        "Arn": "arn:aws:iam::<AWS_ACCOUNT_ID>:role/ReactLaunchplateGitHubActionsOIDCRole",
        ...
    }
}
3. Attach Policies to the Role
We need to attach the necessary policies to this role (e.g., S3FullAccess, CloudFrontFullAccess, Route53FullAccess, etc.)
First, we need to create the policy. Create a file named provider-policy.json with the following content:
{
  "Version": "2012-10-17",
  "Statement": [
    {
      "Effect": "Allow",
      "Action": [
        "s3:*",
        "dynamodb:GetItem",
        "dynamodb:PutItem",
        "dynamodb:DeleteItem",
        "dynamodb:UpdateItem",
        "cloudfront:*",
        "acm:DescribeCertificate",
        "acm:ListCertificates",
        "acm:ListTagsForCertificate",
        "acm:GetCertificate"
      ],
      "Resource": [
        "arn:aws:s3:::<PROJECT_NAME>-tfstate",
        "arn:aws:s3:::<PROJECT_NAME>-tfstate/*",
        "arn:aws:dynamodb:eu-west-3:YOUR_AWS_ACCOUNT_ID:table/<PROJECT_NAME>-tfstate-locks",
        "arn:aws:s3:::*-<PROJECT_NAME>-primary",
        "arn:aws:s3:::*-<PROJECT_NAME>-primary/*",
        "arn:aws:s3:::*-<PROJECT_NAME>-failover",
        "arn:aws:s3:::*-<PROJECT_NAME>-failover/*",
        "arn:aws:s3:::*-<PROJECT_NAME>-log",
        "arn:aws:s3:::*-<PROJECT_NAME>-log/*",
        "arn:aws:cloudfront::<AWS_ACCOUNT_ID>:distribution/*",
        "arn:aws:acm:us-east-1:<AWS_ACCOUNT_ID>:certificate/*",
        "arn:aws:cloudfront::***:origin-access-identity/*"
      ]
    },
    {
      "Effect": "Allow",
      "Action": [
        "s3:ListAllMyBuckets",
        "acm:ListCertificates",
        "cloudfront:ListDistributions"
      ],
      "Resource": "*"
    },
    {
      "Effect": "Allow",
      "Action": ["route53:GetHostedZone", "route53:ListResourceRecordSets"],
      "Resource": "arn:aws:route53:::hostedzone/*"
    },
    {
      "Effect": "Allow",
      "Action": ["route53:ChangeResourceRecordSets"],
      "Resource": "arn:aws:route53:::hostedzone/*"
    },
    {
      "Effect": "Allow",
      "Action": ["route53:ListHostedZones"],
      "Resource": "*"
    }
  ]
}
Modify oidc-provider-policy.json by replacing <PROJECT_NAME> with your project name (e.g., launchplate-react) and <AWS_ACCOUNT_ID> with your AWS account ID. Then run:
aws iam create-policy --policy-name ReactLaunchplateGitHubActionsOIDCRolePolicy --policy-document file://oidc-provider-policy.json
You get the following output:
{
    "Policy": {
        "PolicyName": "ReactLaunchplateGitHubActionsOIDCRolePolicy",
        "Arn": "arn:aws:iam::<AWS_ACCOUNT_ID>:policy/ReactLaunchplateGitHubActionsOIDCRolePolicy",
        ...
    }
}
Now than the policy is created, we can attach it to the role:
aws iam attach-role-policy --role-name ReactLaunchplateGitHubActionsOIDCRole --policy-arn arn:aws:iam::<AWS_ACCOUNT_ID>:policy/ReactLaunchplateGitHubActionsOIDCRolePolicy
Update the application with aws sync
The Github workflow authenticates to AWS usin the action aws-actions/configure-aws-credentials@v2 to which we pass the ARN of the role to assume, as well as the targeted AWS region.
In your repository's secrets, set AWS_ROLE_ARN to arn:aws:iam::<AWS_ACCOUNT_ID>:role/ReactLaunchplateGitHubActionsOIDCRole.
Add this job to the workflow:
env:
  aws_region: eu-west-3


jobs:
  ...
  deploy:
    name: Web Sync to S3
    needs: build
    runs-on: ubuntu-latest
    steps:
      - name: Checkout repository
        uses: actions/checkout@v4

      - name: Setup AWS credentials
        uses: aws-actions/configure-aws-credentials@v2
        with:
          role-to-assume: ${{ secrets.AWS_ROLE_ARN }}
          aws-region: ${{ env.aws_region }}

      - name: Download build artifacts
        uses: actions/download-artifact@v4
        with:
          name: web-dist
          path: ./dist

      - name: Sync to S3 and invalidate CloudFront cache
        run: npm run sync:${{ env.MODE }}
Your website is now automatically synced on S3, and the cache is invalidated to make the changes instantly visible.
Branch security measures
To ensure the review process is followed, you should disallow pushing to the main branch by going to Settings > Rules > New branch ruleset.
Ruleset Name: Branch proteciton rules
Targets: Add target > Include default branch
Enable the following rules:
Restrict deletions
Require a pull request before merging. I do not recommend adding required approvals, as it makes the whole pull request process slower. I like the way Gitlab let us set approvals as required while allowing self-approval; The process of bypassing approvals become conscious and make a step back; Does my PR requires improvements or should I approve it already?
You can add a bypass setting to let certain roles bypass the ruleset:

You can also bypass force push by going to Classic Branch protection rules > Branches > Add rule.
Set branch name pattern to
*Check "Require a pull request before merging"
Check "Require approvals" to 1 approval.
Under Rules applied to everyone including administrators, check Allow force pushes, then select Specify who can force push.
Final github workflow
name: AWS Deployment

on:
  workflow_dispatch:
    inputs:
      environment:
        description: 'Select the environment to deploy to'
        required: true
        default: 'qa'
        type: choice
        options:
          - qa
          - stg
          - prod
  push:
    branches:
      - 'main'
      - 'staging'
      - 'qa'
      - 'release/*'
      - 'feature/*'
      - 'bugfix/*'

env:
  MODE: ${{ github.event_name == 'workflow_dispatch' && github.event.inputs.environment || (github.ref_name == 'main' && 'prod' || github.ref_name == 'staging' && 'stg' || 'qa') }}

jobs:
  build:
    name: Lint, Test & Build
    runs-on: ubuntu-latest
    outputs:
      app_version: ${{ steps.get_version.outputs.app_version }}

    steps:
      - name: Checkout repository
        uses: actions/checkout@v4

      - name: Setup Node
        uses: actions/setup-node@v4
        with:
          node-version: '20' # specify a version if needed

      - name: Setup pnpm
        uses: pnpm/action-setup@v4.1.0
        with:
          version: latest
          run_install: true

      - name: Run Vitest tests
        run: pnpm test
        env:
          CI: true

      - name: Get App version
        id: get_version
        run: |
          APP_VERSION=$(node -p "require('./package.json').version")
          echo "app_version=$APP_VERSION" >> $GITHUB_OUTPUT
          echo "App Version: $APP_VERSION"

      - name: Build project
        run: npm run build:${{ env.MODE }}

      - name: Upload production-ready build files
        id: deployment
        uses: actions/upload-pages-artifact@v3
        with:
          path: ./dist

  deploy:
    name: Web Sync to S3
    needs: build
    runs-on: ubuntu-latest
    steps:
      - name: Checkout repository
        uses: actions/checkout@v4

      - name: Setup AWS credentials
        uses: aws-actions/configure-aws-credentials@v2
        with:
          role-to-assume: ${{ secrets.AWS_ROLE_ARN }}
          aws-region: ${{ env.aws_region }}

      - name: Download build artifacts
        uses: actions/download-artifact@v4
        with:
          name: web-dist
          path: ./dist

      - name: Sync to S3 and invalidate CloudFront cache
        run: npm run sync:${{ env.MODE }}
Notify your team on deployment
I find it really useful to get notified on Slack at the end of the workflow:
I instantly know when the Github Action has ended and can go check the results.
This confirms other team members that a new version has been deployed.
You can get Slack notifications by creating a Slack App that has an incoming webhook. To do that please check out Slack's tutorial.
Once done, you can add the following job to your Github workflow:
slack:
  name: Slack
  needs: [build, deploy]
  runs-on: ubuntu-latest
  if: always()
  steps:
    - uses: technote-space/workflow-conclusion-action@v3

    - uses: 8398a7/action-slack@v3
      with:
        status: custom
        fields: workflow,job,commit,repo,ref,author,took
        custom_payload: |
          {
            attachments: [{
                color: '${{ env.WORKFLOW_CONCLUSION }}' === 'success' ? 'good' : '${{ env.WORKFLOW_CONCLUSION }}' === 'failure' ? 'danger' : 'warning',
                text: `${process.env.AS_WORKFLOW} — *${{ env.WORKFLOW_CONCLUSION }}*
                ${process.env.AS_AUTHOR} deployed ${process.env.AS_REPO}@${process.env.AS_REF} (${process.env.AS_COMMIT}) in ${process.env.AS_TOOK}

                *Environment:* ${{ needs.build.outputs.app_version }}`
              }]
          }
      env:
        GITHUB_TOKEN: ${{ secrets.GITHUB_TOKEN }}
        SLACK_WEBHOOK_URL: ${{ secrets.SLACK_WEBHOOK_URL }}
Only set the slack webhook url in your Github repo's secrets, as secrets.GITHUB_TOKEN is automatically set.
Final Thoughts
You now have:
A modern React project template
DDD architecture best practices
CI/CD for multi-env deploys
S3 + CloudFront static site hosting
Peace of mind and bragging rights
Want to skip the boilerplate? Just clone the repo: launchplate-react-terraform ;)
Subscribe to my newsletter
Read articles from Antonin Marxer directly inside your inbox. Subscribe to the newsletter, and don't miss out.
Written by
Antonin Marxer
Antonin Marxer
I'm a fullstack freelance developer & DevOps engineer based in Strasbourg, France. I share blogs that spark joy and curiosity on React, Cloud, Serverless, meta-frameworks and AI + Model Context Protocols Graduate of INSA Lyon engineer school ❤️