How to Test Zapier Webhooks Locally with Tunnelmole
 Robbie Cahill
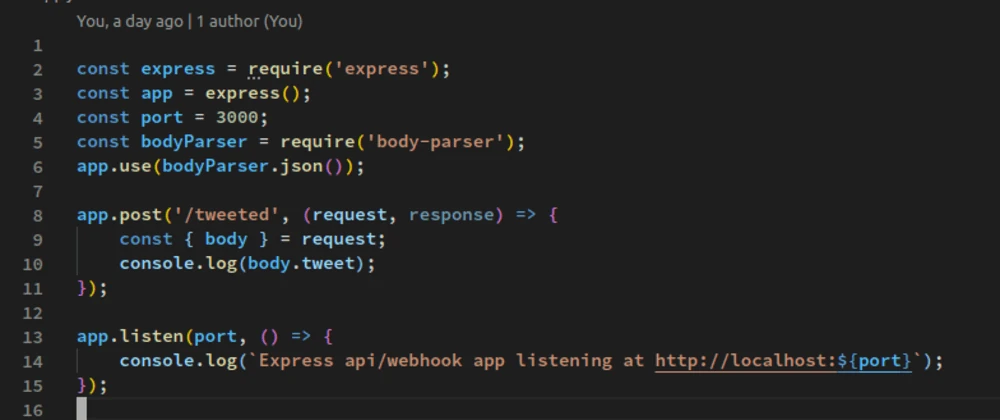
In the world of workflow automation, Zapier stands as a titan. It allows you to connect thousands of apps and automate tasks without writing a single line of code. At the heart of Zapier's most flexible integrations are webhooks. A webhook from Zapier can be the magical glue that connects an unsupported app to your automated workflow or allows you to build completely custom integrations.
However, developing and testing these webhook integrations can be a challenge. Zapier needs to send data to a public, internet-accessible URL, but your development environment is typically running on localhost, a private address on your computer. This creates a frustrating disconnect: how can you test your webhook handler in real-time if Zapier can't reach it?
This is where Tunnelmole comes in. Tunnelmole is an open-source tool that creates a secure tunnel from a public URL to your local machine. In just a few seconds, you can get a public HTTPS URL that forwards all requests directly to your local development server.
In this comprehensive guide, we will walk you through everything you need to know about using a webhook from Zapier. We'll cover:
- What Zapier webhooks are and how they empower your workflows.
- How to set up a basic Node.js and Express application to receive webhook data.
- The step-by-step process of installing Tunnelmole and exposing your local server to the internet.
- How to configure a Zap in Zapier to send test webhooks to your new public URL.
- How to receive and process the webhook data in your local application.
- Advanced concepts, troubleshooting tips, and best practices.
By the end of this article, you'll be able to seamlessly test your Zapier webhook integrations from the comfort of your local development environment, dramatically speeding up your workflow and debugging process.
What Exactly is a Webhook from Zapier?
Before we dive into the technical setup, let's solidify our understanding of what webhooks are, especially in the context of Zapier.
Think of a regular API (Application Programming Interface). When you want to get data from a service, you make a request to its API endpoint. You are the one initiating the communication. Webhooks flip this model on its head.
A webhook is an automated message sent from one app to another when a specific event occurs. Instead of you pulling data from a service, the service pushes data to you in real-time. This is often called a "reverse API" or an "HTTP push."
Zapier's "Webhooks by Zapier" feature is a premium offering that acts as both a trigger and an action.
As a Trigger ("Catch Hook"): You can create a Zap that starts when it receives a webhook. Zapier provides you with a unique URL. You then configure another service to send an HTTP request (usually a POST request with a JSON payload) to this URL whenever an event happens. For example, a custom-built CRM could send a webhook to Zapier every time a new lead is created.
As an Action ("POST", "PUT", "GET"): You can create a Zap where the final step is to send a webhook to another service. For instance, when you receive a new email in Gmail (the trigger), you could have Zapier send a POST request to your own application's API endpoint.
This guide focuses on the second scenario: creating an application that can receive a webhook from Zapier. This is incredibly powerful because it lets you trigger custom logic in your own applications based on events happening in any of the 4,000+ apps Zapier integrates with.
Why is this a big deal? Imagine you want to:
- Update a custom dashboard every time a sale is made on Shopify.
- Send a highly customized Slack notification when a new issue is created in a niche project management tool that doesn't have a native Zapier integration.
- Log specific data to your own database whenever a new subscriber is added to your Mailchimp list.
With Zapier webhooks, all of this and more becomes possible. The challenge, as mentioned, is testing the code that handles these incoming webhooks.
Setting Up Your Local Webhook Handler
To receive a webhook, you need a web server that listens for incoming HTTP requests. For this guide, we'll use Node.js and the Express framework, a popular and straightforward combination for building web applications and APIs in the JavaScript ecosystem.
Prerequisites
- Node.js and npm: Make sure you have Node.js (which includes npm, the Node.js package manager) installed on your system. You can download it from nodejs.org.
- A text editor or IDE: Visual Studio Code (VS Code) is a great free option.
Step 1: Initialize Your Project
First, create a new folder for your project, navigate into it using your terminal, and initialize a new Node.js project.
mkdir zapier-webhook-handler
cd zapier-webhook-handler
npm init -y
The npm init -y command creates a package.json file with default settings, which is used to manage your project's dependencies and scripts.
Step 2: Install Express
Next, we'll install Express, the only dependency we need for this simple example.
npm install express
Step 3: Create the Express Server
Now, create a file named app.js in your project folder and add the following code:
// Import the Express library
const express = require('express');

// Create an instance of an Express application
const app = express();

// Define the port the server will run on. 3000 is a common choice for development.
const port = 3000;

// This is a crucial piece of middleware. It tells Express to automatically
// parse incoming request bodies that are in JSON format. Zapier webhooks
// will send data this way.
app.use(express.json());

// Define our webhook endpoint.
// We're using app.post() because Zapier will send a POST request.
// The '/zapier-webhook' path is what we'll give to Zapier.
app.post('/zapier-webhook', (req, res) => {
    console.log("🚀 Webhook received!");

    // The data sent by Zapier will be in the request body (req.body).
    // Let's log it to the console to see what we got.
    console.log("Payload:", req.body);

    // It's good practice to send a response back to Zapier to let it know
    // that you've successfully received the data.
    // A 200 OK status code is standard for success.
    res.status(200).json({
        status: "success",
        message: "Webhook received successfully!"
    });
});

// A simple root route to check if the server is running
app.get('/', (req, res) => {
    res.send('Zapier Webhook Handler is running! Ready to receive webhooks.');
});

// Start the server and have it listen on the defined port
app.listen(port, () => {
    console.log(`✅ Server is listening on http://localhost:${port}`);
    console.log(`👂 Waiting for webhooks at the /zapier-webhook endpoint...`);
});
Step 4: Run Your Server
It's time to bring your webhook handler to life. Go to your terminal and run:
node app.js
You should see the following output, confirming that your server is running and ready for action:
✅ Server is listening on http://localhost:3000
👂 Waiting for webhooks at the /zapier-webhook endpoint...
Right now, your server is only accessible from your own computer at http://localhost:3000. If you try to give this URL to Zapier, it will fail because it can't reach your private localhost. Let's fix that.
Exposing Your Local Server with Tunnelmole
Tunnelmole is the key that unlocks local webhook development. It's a simple, open-source command-line tool that creates a public URL and forwards any requests it receives to a port on your local machine.
Why Tunnelmole?
- Open Source: You can inspect the code yourself for security and peace of mind. The client and server are both fully open source.
- Easy to Use: It requires a single command to get up and running.
- Self-Hostable: For advanced use cases or corporate environments with strict security policies, you can host the Tunnelmole service on your own infrastructure, giving you complete control.
- No Sign-up Required: For quick testing with random URLs, you can use it immediately without creating an account.
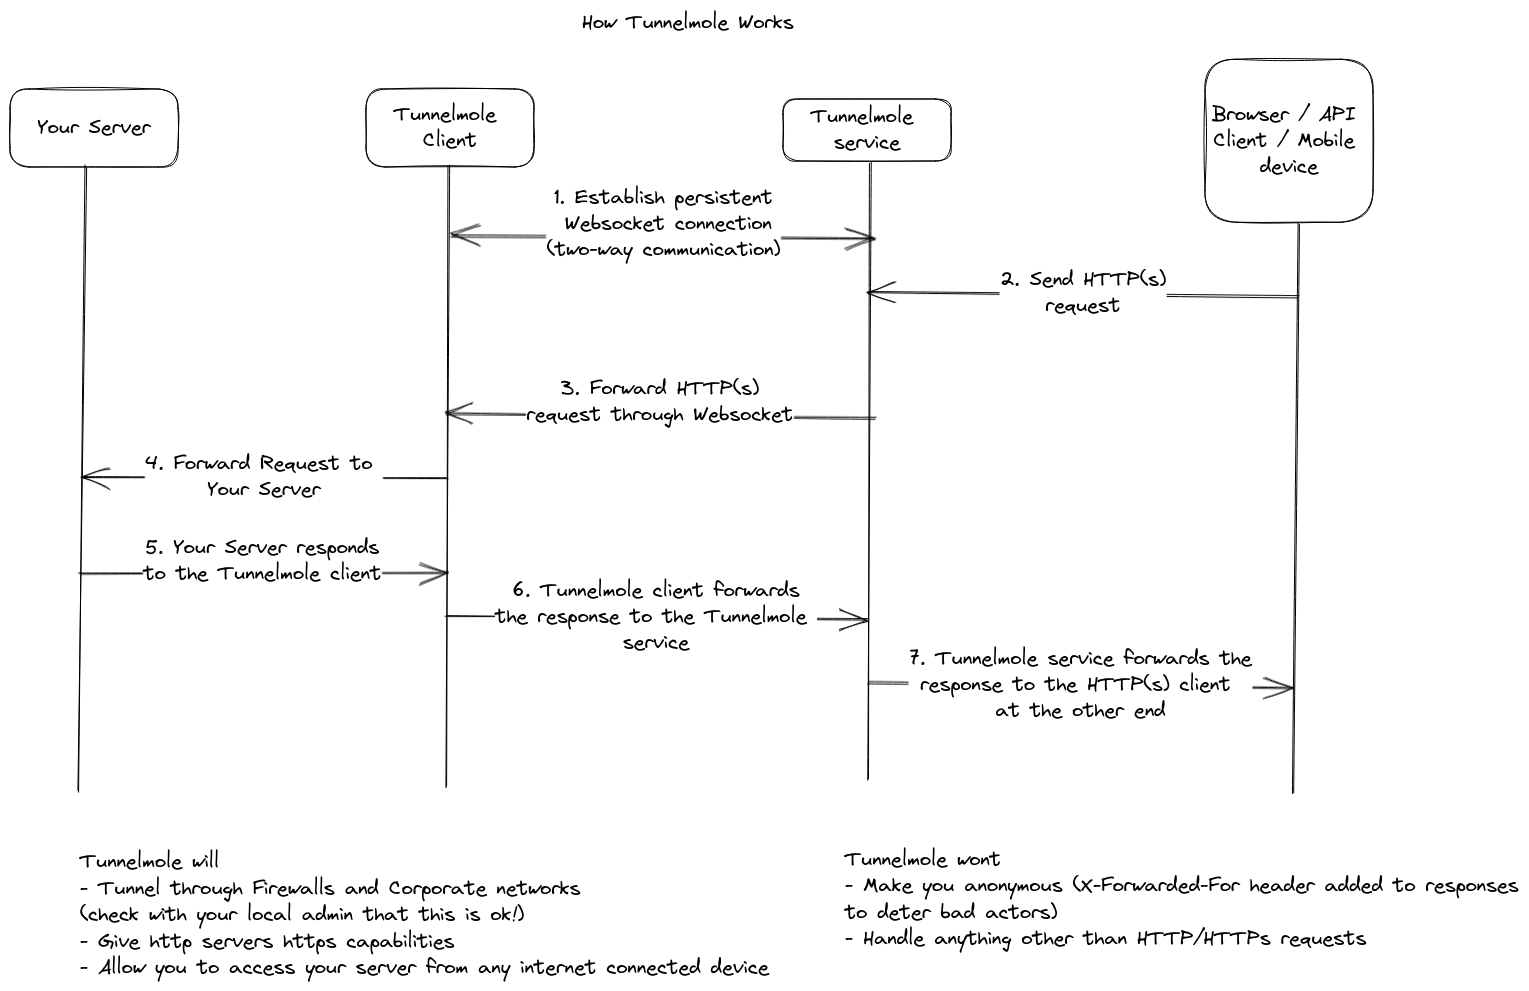
How Tunnelmole Works
The concept is straightforward. The Tunnelmole client on your machine establishes a persistent, secure connection to the Tunnelmole service running on the public internet. When Zapier (or any other service) sends a request to your public Tunnelmole URL, the service relays that request through the tunnel to the client, which then forwards it to your local server running on localhost:3000. The response from your server travels back along the same path.
Step 1: Install Tunnelmole
Installing Tunnelmole is a breeze. Open a new terminal window (don't close the one running your Node.js server!) and follow the instructions for your operating system.
For Linux, macOS, or Windows Subsystem for Linux (WSL):
Paste this command into your terminal:
curl -O https://install.tunnelmole.com/xD345/install && sudo bash install
This script will detect your OS and install the correct binary.
For Windows:
- Download
tmole.exefrom the Tunnelmole website. - Place it in a folder that is included in your system's PATH environment variable for easy access from any directory.
Alternatively, if you have Node.js and npm installed, you can install it as a global package:
sudo npm install -g tunnelmole
Step 2: Run Tunnelmole
With your Node.js server still running and listening on port 3000, go to your new terminal window and run:
tmole 3000
Tunnelmole will spring into action, and you'll see output similar to this:
Your Tunnelmole Public URLs are below and are accessible internet wide. Always use HTTPs for the best security

https://k2vgw6-ip-12-34-56-78.tunnelmole.net ⟶ http://localhost:3000
http://k2vgw6-ip-12-34-56-78.tunnelmole.net ⟶ http://localhost:3000
This is the magic moment! You now have a public, HTTPS-enabled URL (https://k2vgw6-ip-12-34-56-78.tunnelmole.net in this example) that points directly to your local server on port 3000. Copy the https URL—you'll need it for the next step.
Creating Your Zapier Webhook
Now that we have a public endpoint, we can configure Zapier to send it a webhook.
Step 1: Create a New Zap
Log in to your Zapier account and click the "Create Zap" button.
Step 2: Configure the Trigger
For the trigger, we'll use a simple, manual one for testing purposes. Search for and select the "Schedule by Zapier" app.
- Trigger Event: Choose "Every Day".
- Continue and on the test screen, just choose to Skip test. This trigger is just a placeholder to get our Zap started.
Step 3: Configure the Webhook Action
Now for the main event. Click the + button to add an action step.
- Search for and select "Webhooks by Zapier".
For the Action Event, choose "POST". This matches the
app.post()method we used in our Express code. Click Continue.Now, you'll configure the details of the POST request. This is the most important part.
- URL: This is where you paste your public Tunnelmole URL. Don't forget to add the
/zapier-webhookendpoint path at the end! It should look like this:https://k2vgw6-ip-12-34-56-78.tunnelmole.net/zapier-webhook. - Payload Type: Select "Json" from the dropdown. This tells Zapier to send the data in a format our Express server can understand and to set the
Content-Typeheader toapplication/json. - Data: This is where you define the data you want to send in the webhook. For our test, let's create a couple of fields. Type "message" in the left box and "Hello from Zapier!" in the right box. Add another row with "user" and "ZapierTestUser". You can add as many fields as you like. You can also pull in data from previous steps in your Zap.
Your configuration should look something like this:
| Field | Value | | :--- | :--- | | URL |
https://your-unique-subdomain.tunnelmole.net/zapier-webhook| | Payload Type | Json | | Data (message) | Hello from Zapier! | | Data (user) | ZapierTestUser | | Data (timestamp)| {{zap_meta_human_now}} |We've added a dynamic timestamp using Zapier's meta variables to show how you can include live data.
- URL: This is where you paste your public Tunnelmole URL. Don't forget to add the
Leave the other fields (Wrap Request in Array, Unflatten, Headers) as their defaults for now. Click Continue.
Step 4: Test the Webhook
Zapier will now show you a summary of the request it's about to send. Click the "Test action" button.
Now, quickly switch to the terminal window where your Node.js server is running. If everything is configured correctly, you should see the webhook arrive within seconds!
🚀 Webhook received!
Payload: {
  message: 'Hello from Zapier!',
  user: 'ZapierTestUser',
  timestamp: '2025-07-15T10:30:00Z'
}
Congratulations! You have successfully tested a Zapier webhook integration with your local development server. Zapier sent a request to your public Tunnelmole URL, which was securely forwarded to your localhost:3000, and your Express app received and logged the payload.
You can now publish your Zap and continue developing your webhook handler locally. Every time the Zap runs, the webhook will be sent to your machine, allowing for rapid, iterative development and debugging.
Advanced Concepts and Best Practices
Now that you have the basic workflow down, let's explore some more advanced topics.
Responding to Webhooks ("Reply to Webhook")
Sometimes, you might need to send data back to Zapier immediately within the same Zap run. The "Webhooks by Zapier" trigger has a sibling called "Catch Hook" which can do this. If your Zap is triggered by a Catch Hook, your server can include a JSON body in its response. The data in that response will then be available to use in subsequent steps of the same Zap.
This is useful for workflows where you need your application to perform a lookup or calculation and provide the result back to Zapier to be used in another app.
Example app.js code:
app.post('/zapier-lookup-webhook', (req, res) => {
    const customerId = req.body.id;
    // In a real app, you'd look this up in a database.
    const customerData = {
        name: "Jane Doe",
        email: "jane.doe@example.com",
        lifetimeValue: 5432
    };

    // The JSON body of this response will be available
    // in the subsequent steps of your Zap.
    res.status(200).json(customerData);
});
Securing Your Webhooks
Since your Tunnelmole URL is public, anyone who knows it could potentially send requests to your local server. For production applications, this is a major security risk. For local development, the risk is lower, but it's still good practice to secure your endpoint. Here are a few methods:
Secret in URL (Security by Obscurity): You can make the endpoint URL hard to guess. For example, instead of
/zapier-webhook, you could use/zapier-webhook-A7b4fG9kLpQ3rT. This is not true security but can deter casual scanners.Basic Authentication: Zapier's webhook action allows you to add Basic Auth credentials.
- In Zapier: Fill in the "Username" and "Password" fields in the webhook action configuration.
- In your Node.js app: You would need to add middleware to check for the
Authorizationheader and validate the credentials. Libraries likeexpress-basic-authcan simplify this.
HMAC Signature Verification (Most Secure): This is the industry-standard way to secure webhooks.
- You define a secret key that is known only to you and Zapier.
- In the Zapier webhook action, you can add a special header, for example,
X-Custom-Secretwith your secret key as the value. - In your Node.js app, you'd write middleware that checks for this header and compares its value to the secret key stored in your environment variables. If the header is missing or the key doesn't match, you reject the request with a
401 Unauthorizedor403 Forbiddenstatus.
Using Custom Subdomains with Tunnelmole
The free version of Tunnelmole provides a random subdomain each time you run it. This is fine for quick tests, but it means you have to update your Zapier action's URL every time you restart the tunnel.
For a more stable workflow, Tunnelmole offers paid plans that allow you to use a custom subdomain. You can run tmole 3000 as myapp.tunnelmole.net and this URL will be reserved for you. This is highly recommended for any serious or long-term development, as it provides a stable endpoint that you only need to configure in Zapier once.
Conclusion
Developing and testing webhook integrations no longer needs to be a cumbersome process of deploying every minor change to a staging server. By combining the power of Zapier webhooks with the simplicity of Tunnelmole, you can create a fast, efficient, and enjoyable development loop.
We've covered the entire process:
- Understanding the role of webhooks in automation.
- Building a local Node.js server with Express to handle incoming requests.
- Installing the open-source tool Tunnelmole to create a public URL for our local server.
- Configuring a Zap to send a POST request to our local application.
- Verifying the end-to-end connection and receiving data in real-time.
This workflow empowers you to build more complex and custom integrations, debug issues by setting breakpoints directly in your local code, and get immediate feedback on your changes. As an open-source and self-hostable tool, Tunnelmole provides both the flexibility for personal projects and the security and control required for enterprise environments.
The next time you need to build a custom solution that connects to the vast ecosystem of apps on Zapier, you'll have the tools and knowledge to do it right, right from your local machine. Happy automating!
Subscribe to my newsletter
Read articles from Robbie Cahill directly inside your inbox. Subscribe to the newsletter, and don't miss out.
Written by