3. Deploying a new application from scratch
 Arindam Baidya
Table of contents
- Demo Creating new cluster
- Demo Creating Task Definition
- Demo Deploying task revisions
- Demo Deleting application
- Understanding multi container application
- Demo Creating security group
- Demo Creating multi container application
- 1. Creating the Task Definition
- 2. Configuring the MongoDB Container
- 3. Configuring the Web API Container
- 4. Defining a Volume for MongoDB
- 5. Mounting the EFS Volume in the MongoDB Container
- 6. Creating the ECS Service and Configuring the Load Balancer
- 7. Testing the Application
- 8. Enhancing Security Group Rules
- Conclusion

Demo Creating new cluster
In this lesson, you will learn how to create a new Amazon ECS cluster using the AWS Management Console. Follow the steps below to configure your cluster with Fargate and avoid launching EC2 instances.
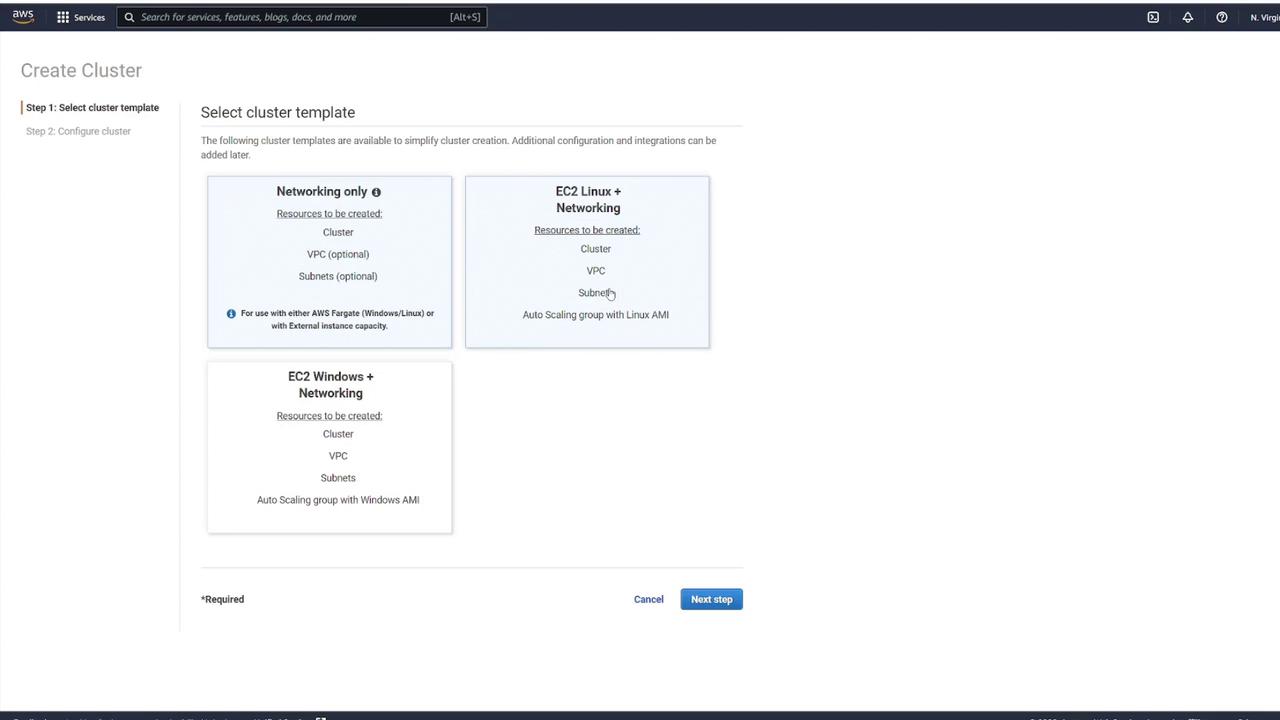
Step 1: Choose a Cluster Template
Click on the Create Cluster button. You will see three template options:
Networking only – Ideal for using Fargate.
EC2 Linux + Networking – Use this if you plan to run EC2 instances with Linux.
EC2 Windows + Networking – Use this if you plan to run EC2 instances with Windows.
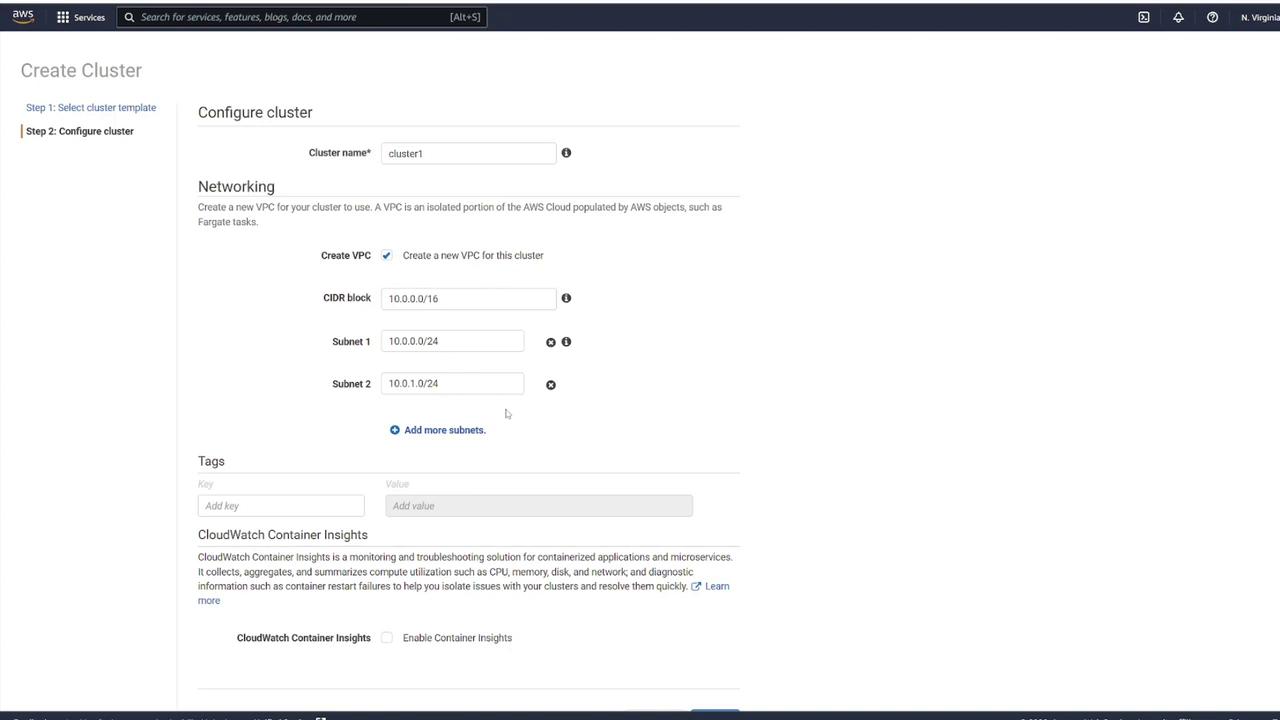
Since the goal is to use Fargate, select the Networking only option. Then, provide a name for your cluster, such as cluster1. You also have the option to customize your VPC configuration by modifying the default CIDR block and subnets. If no customization is required, leave these settings as they are. When you click Create, the system will automatically provision a VPC with your specified CIDR block and two subnets.
Step 2: Configure Networking Settings
After selecting your cluster template, adjust any additional networking settings as needed. This includes configuring the VPC, CIDR block, and subnets. You may also add tags or enable CloudWatch Container Insights. Once you have reviewed the settings, click Create to continue.
Note
After configuring your networking settings, ensure that the VPC and subnet settings meet your organizational requirements.
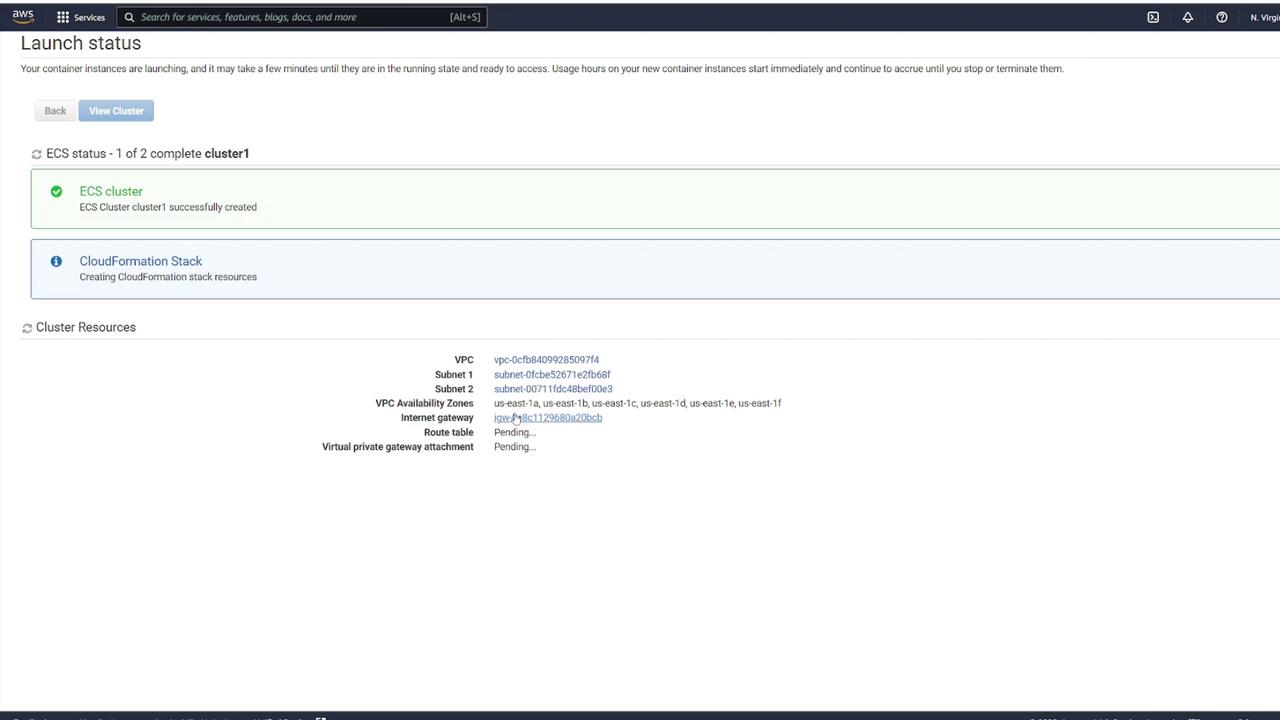
Step 3: View Cluster Details
Once the cluster is created, click View Cluster to access its details. This action will take you to the cluster details page where you can verify the successful creation and review the configuration details.
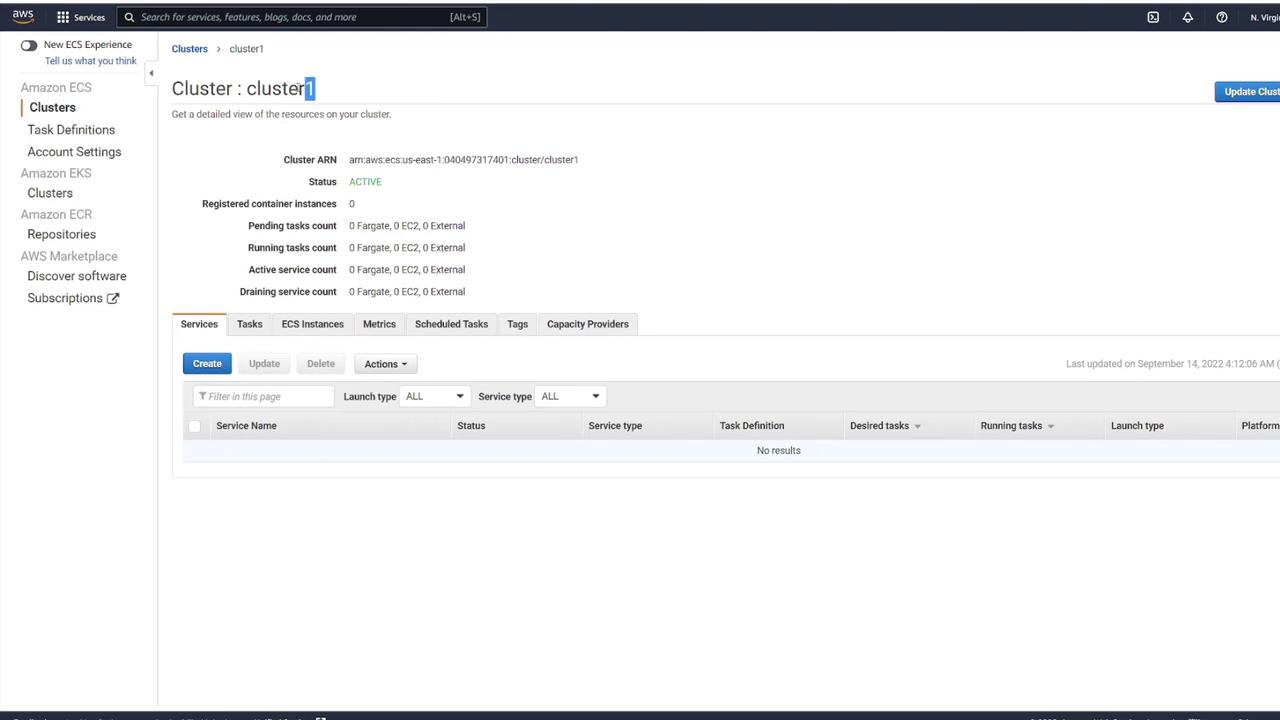
On the details page, you will see that cluster1 is now active. The dashboard provides an overview of the cluster status, task counts, and services. Although the cluster is active, note that there are no registered container instances or running tasks yet.
Warning
Ensure you have reviewed all configuration parameters and networking settings before finalizing your cluster creation to avoid configuration issues later.
Demo Creating Task Definition
After setting up your cluster for deployment, the first step is to create Task Definitions that serve as a blueprint for your application. In this guide, we will walk through defining a new task, configuring container settings, and launching the task as a service on AWS Fargate.
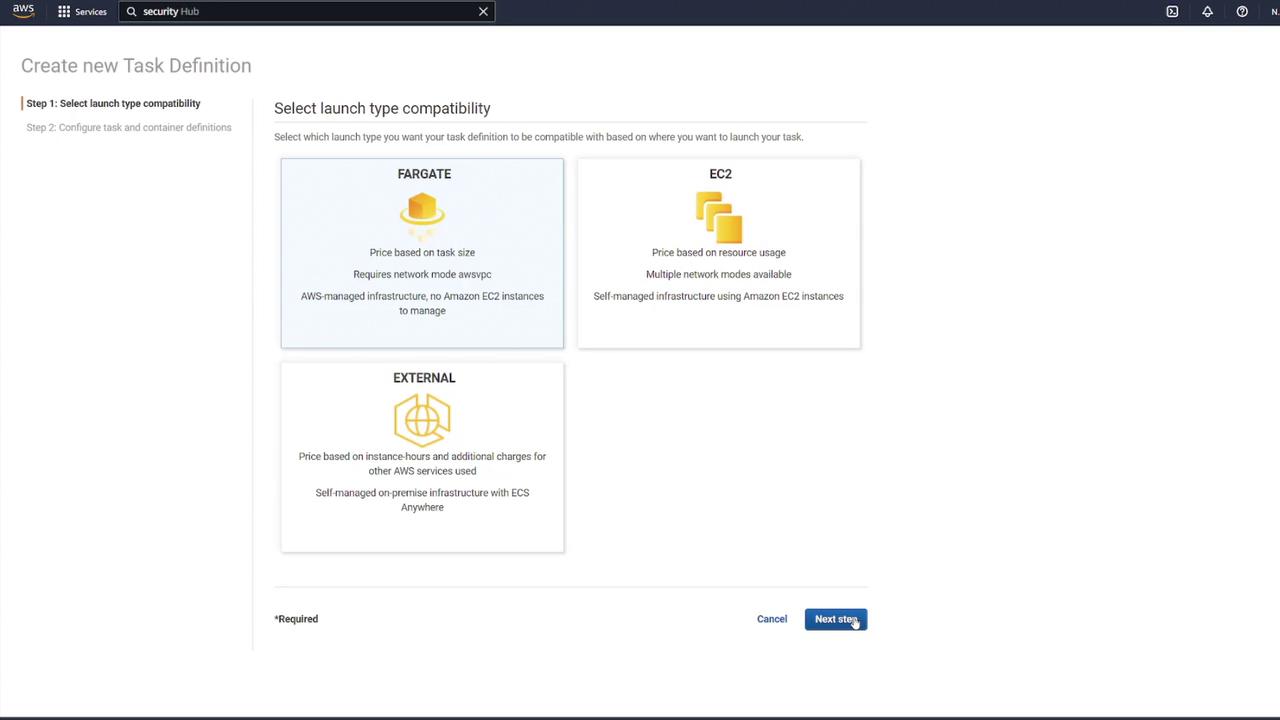
Step 1: Create a New Task Definition
Navigate to the Task Definitions section in your AWS ECS console and select Create new Task Definition. Since the deployment target is Fargate, choose Fargate as the launch type. Provide a task definition name (for example, "ECS-Project1") and select the pre-created role.
Tip
If you have not run the initial quick start wizard, make sure to do so in order to establish the necessary permissions for ECS to manage underlying resources.
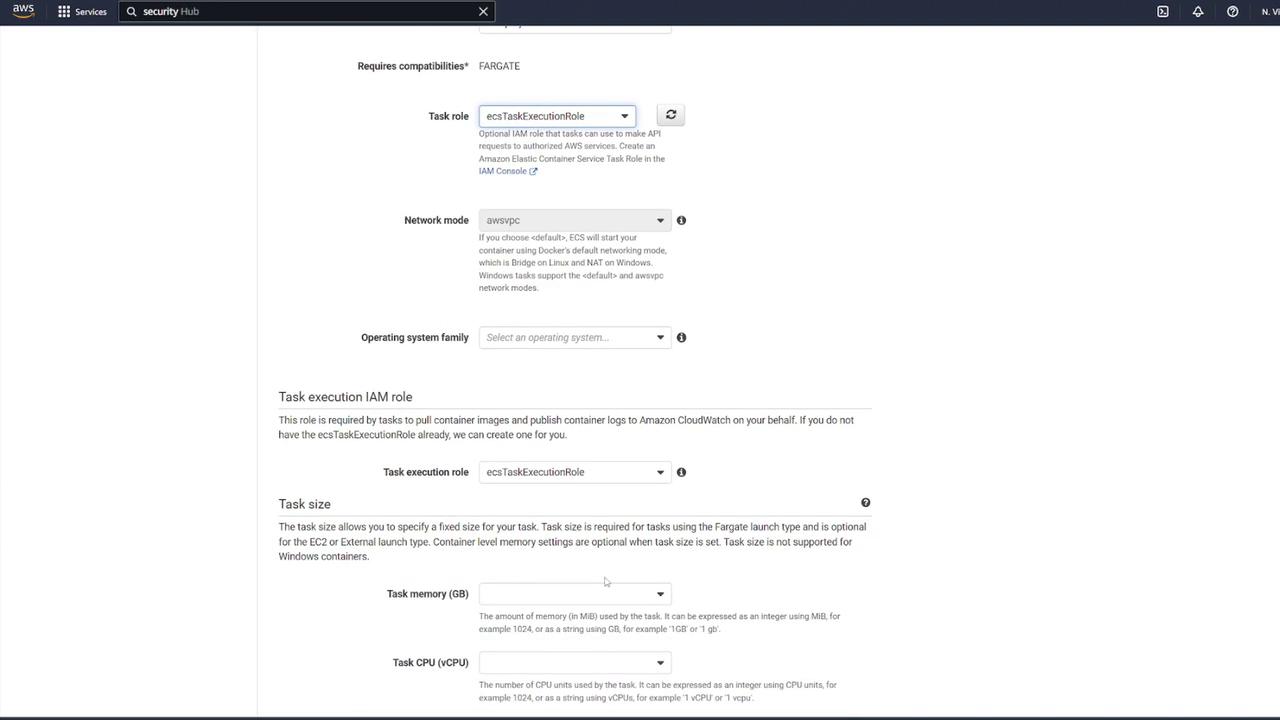
Next, choose Linux as the operating system and retain the same Execution IAM role. Then, specify the task size based on your application’s CPU and memory requirements. For this demo, select the smallest configuration available.
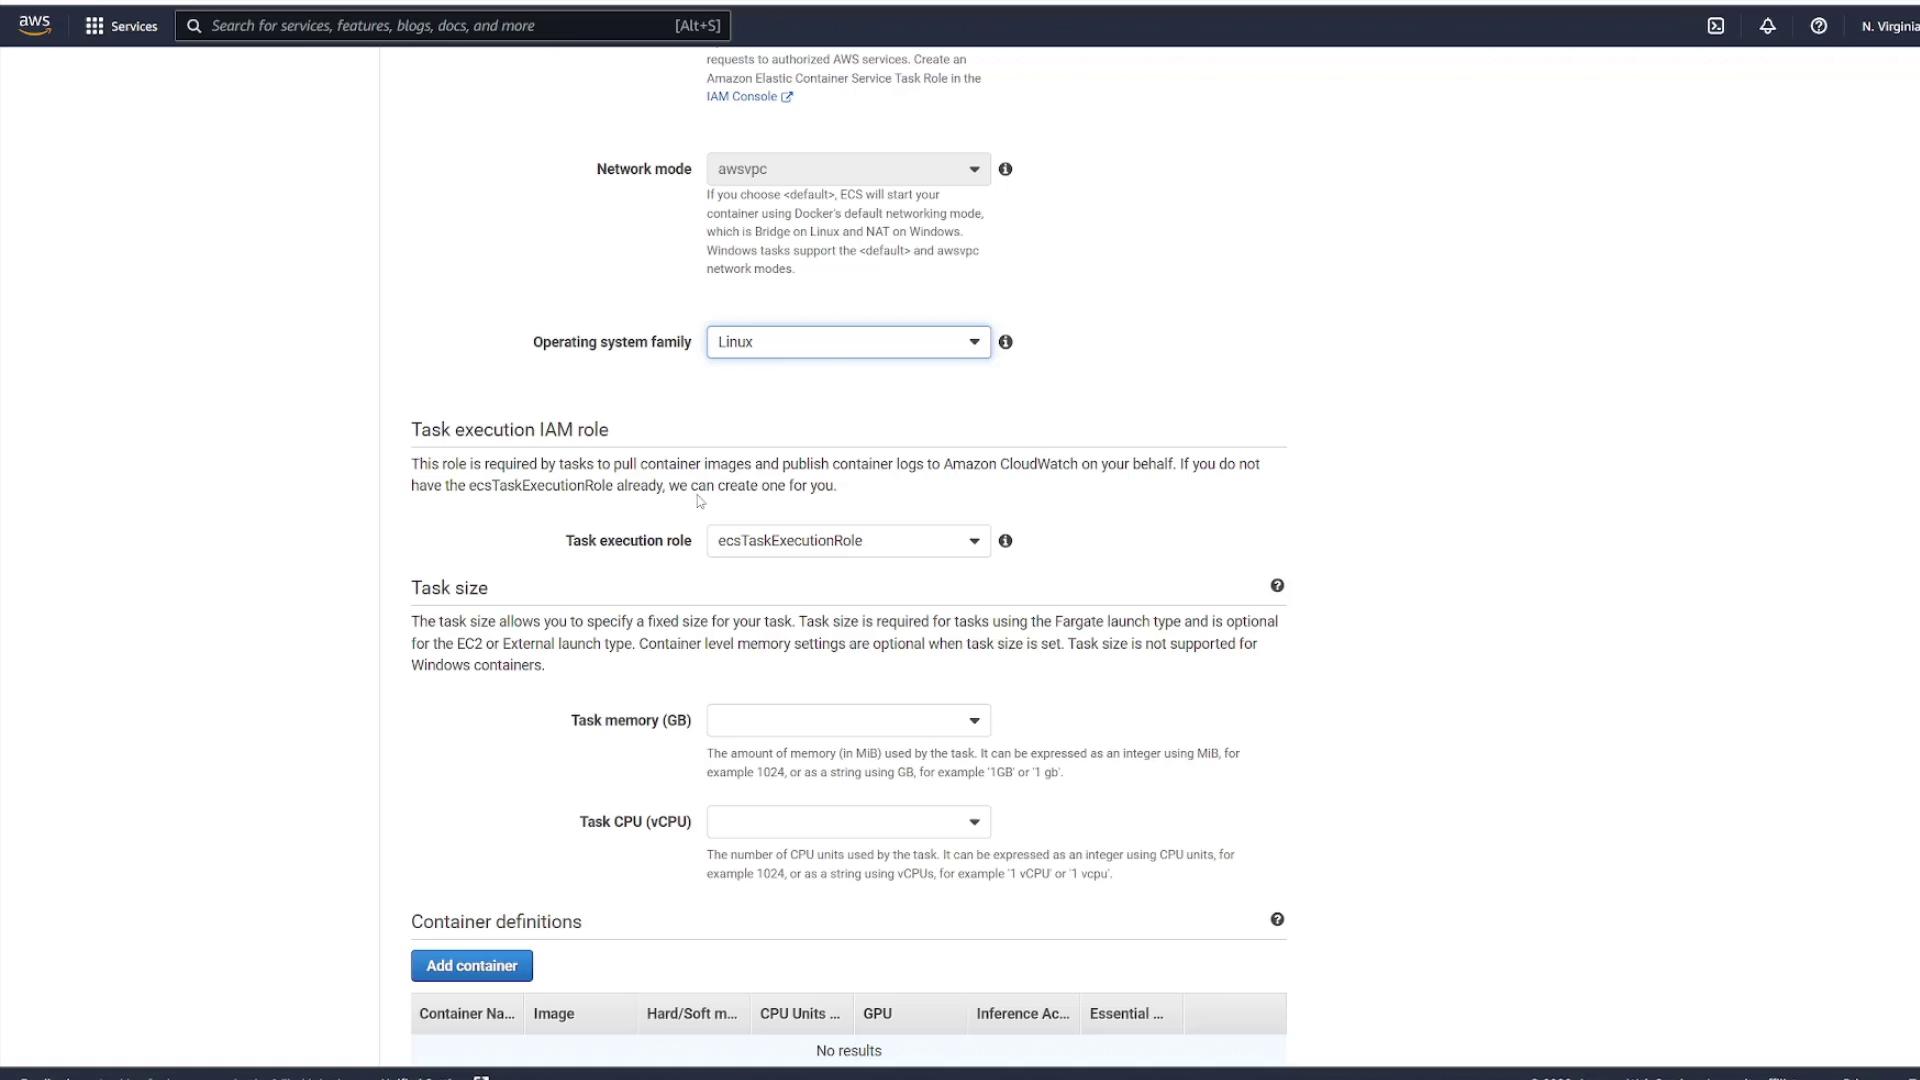
Step 2: Add a Container Definition
Add a container definition by entering a container name (for instance, "node_app_image") and specifying the container image you used previously. Configure the startup command by including the following check to ensure your application starts correctly:
CMD-SHELL, curl -f http://localhost/ || exit 1
Set up port mapping to expose port 3000. Although you can modify additional configurations, the defaults are sufficient for this demonstration. Click Add to include the container, then Create to finalize your task definition.
After creation, choose View Task Definition to review the blueprint. Keep in mind that this task definition outlines how your task will run but does not instantiate any tasks.
Step 3: Launch the Task Definition as a Service
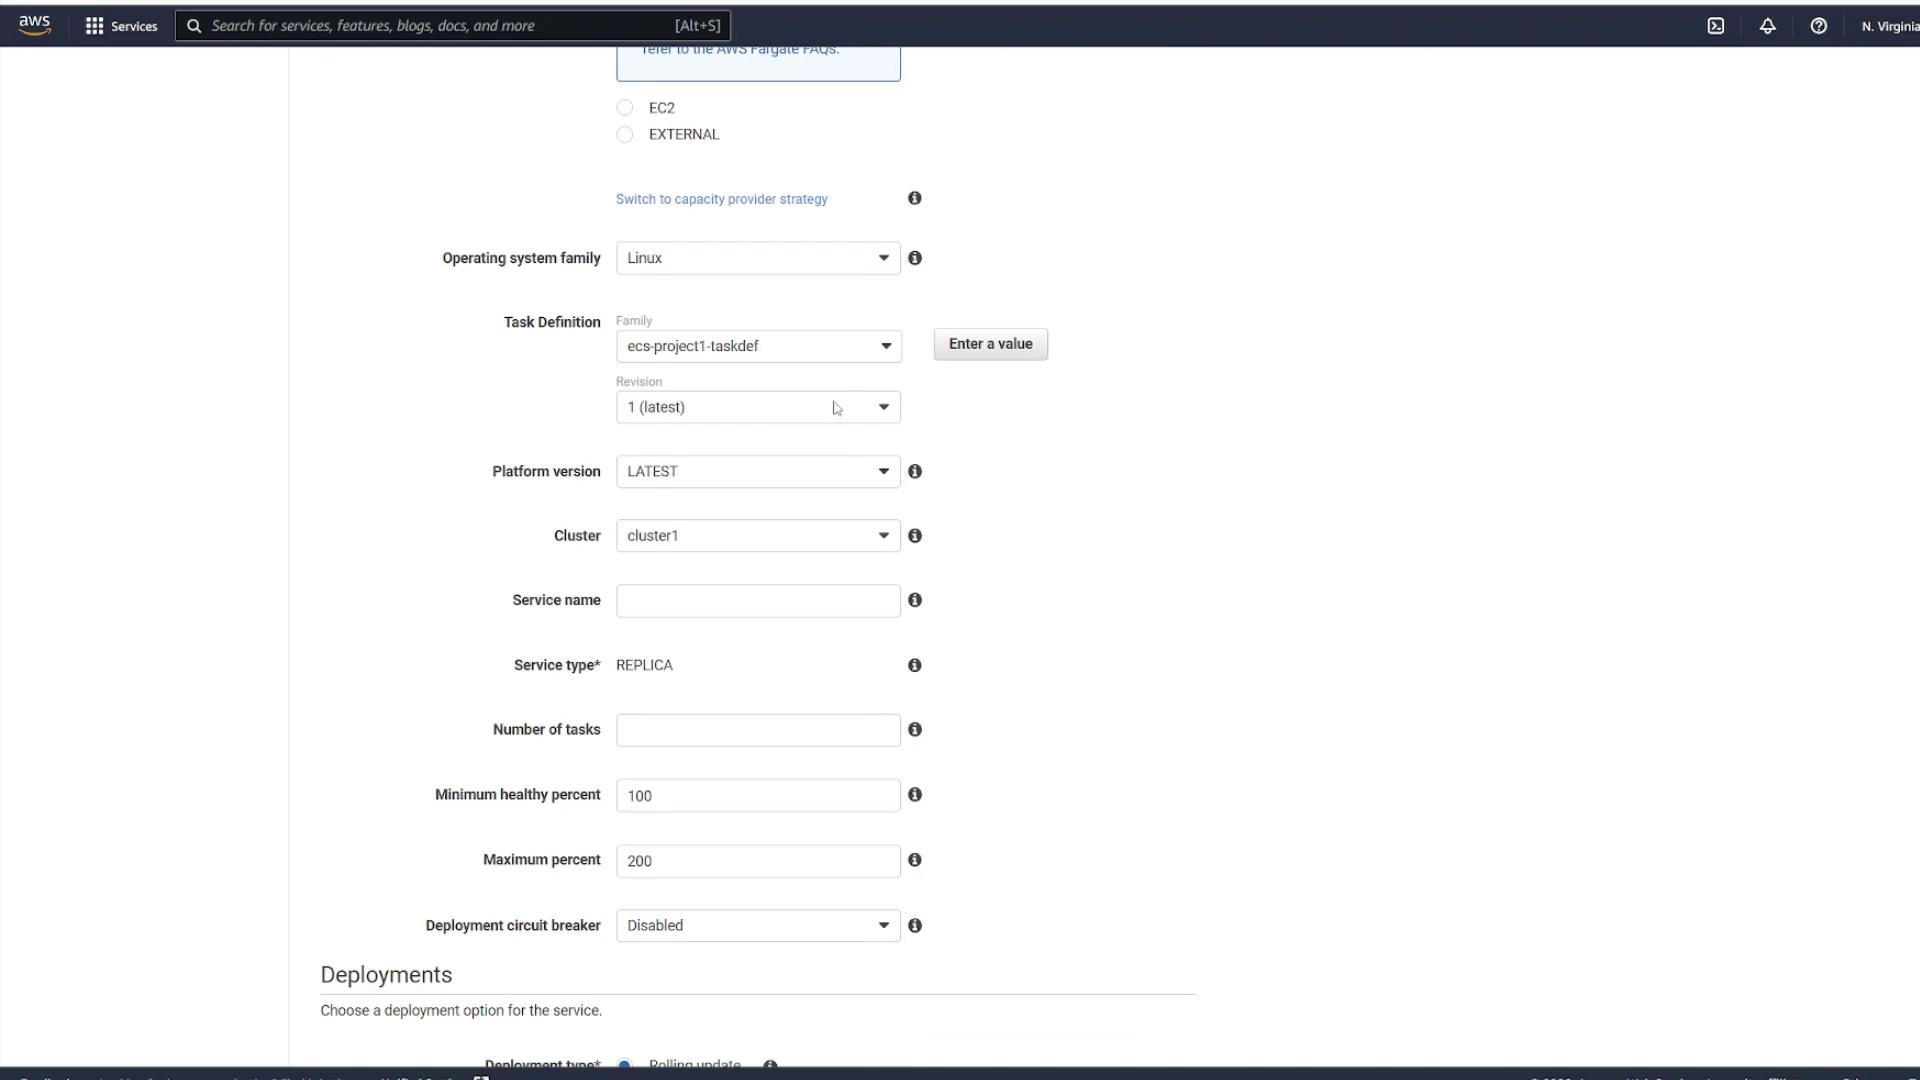
To run an instance of your task definition, navigate to the Services section within your cluster. Click on your cluster (for example, "cluster one") and go to the Services tab. When creating a service, use the following settings:
Launch type: Fargate
Operating system: Linux
Task Definition: Select your created file (e.g., "ECS-Project1") and choose the latest revision.
Cluster: Use the default cluster.
Service Name: Enter a name such as "project1-service".
Number of Tasks: Specify the desired instances (for example, select two to create two task instances).
Step 4: Configure Networking and Security
Proceed by selecting the appropriate VPC (the one created specifically for ECS) along with two subnets. Configure your security groups to control traffic for the service.
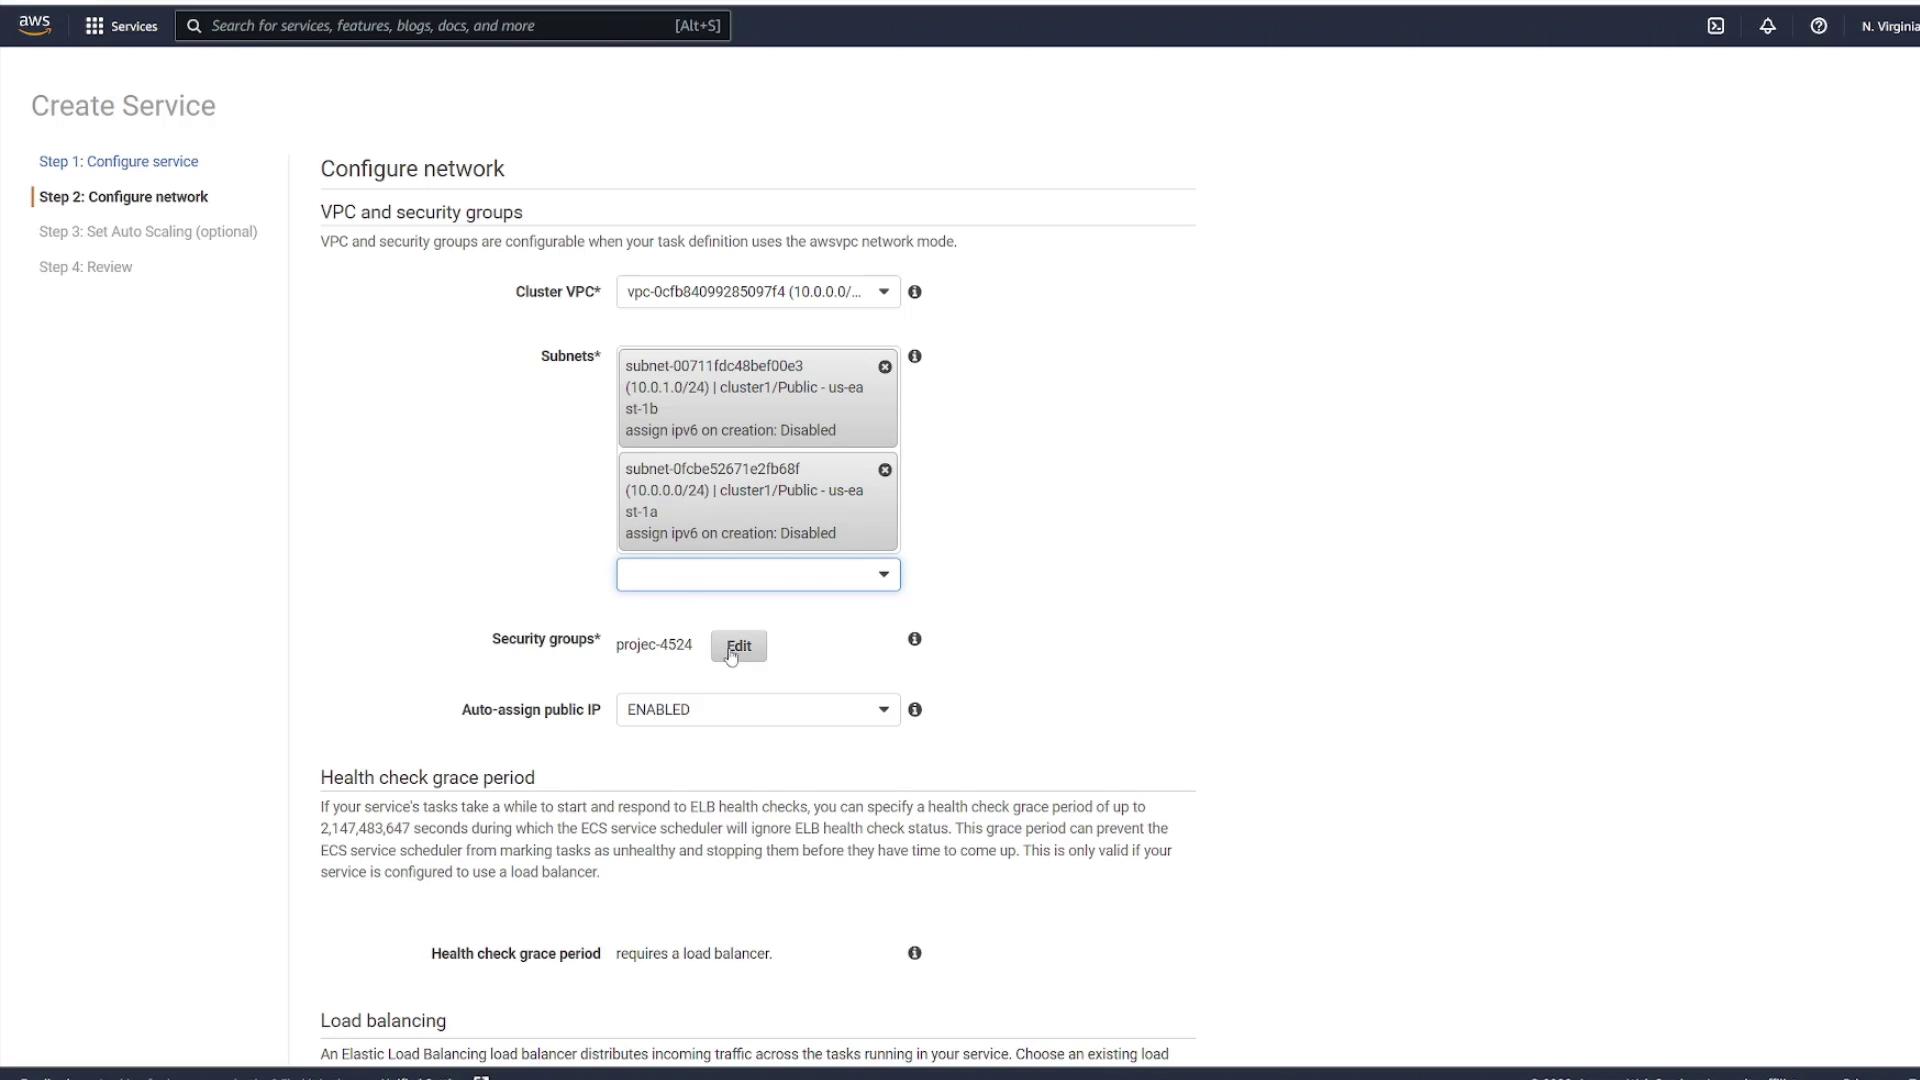
In the security group settings, you can edit an existing group or create a new one. For instance, create a new security group called "project." Although the default settings might allow inbound traffic on port 80, change the rule to allow custom TCP traffic on port 3000 from any source.
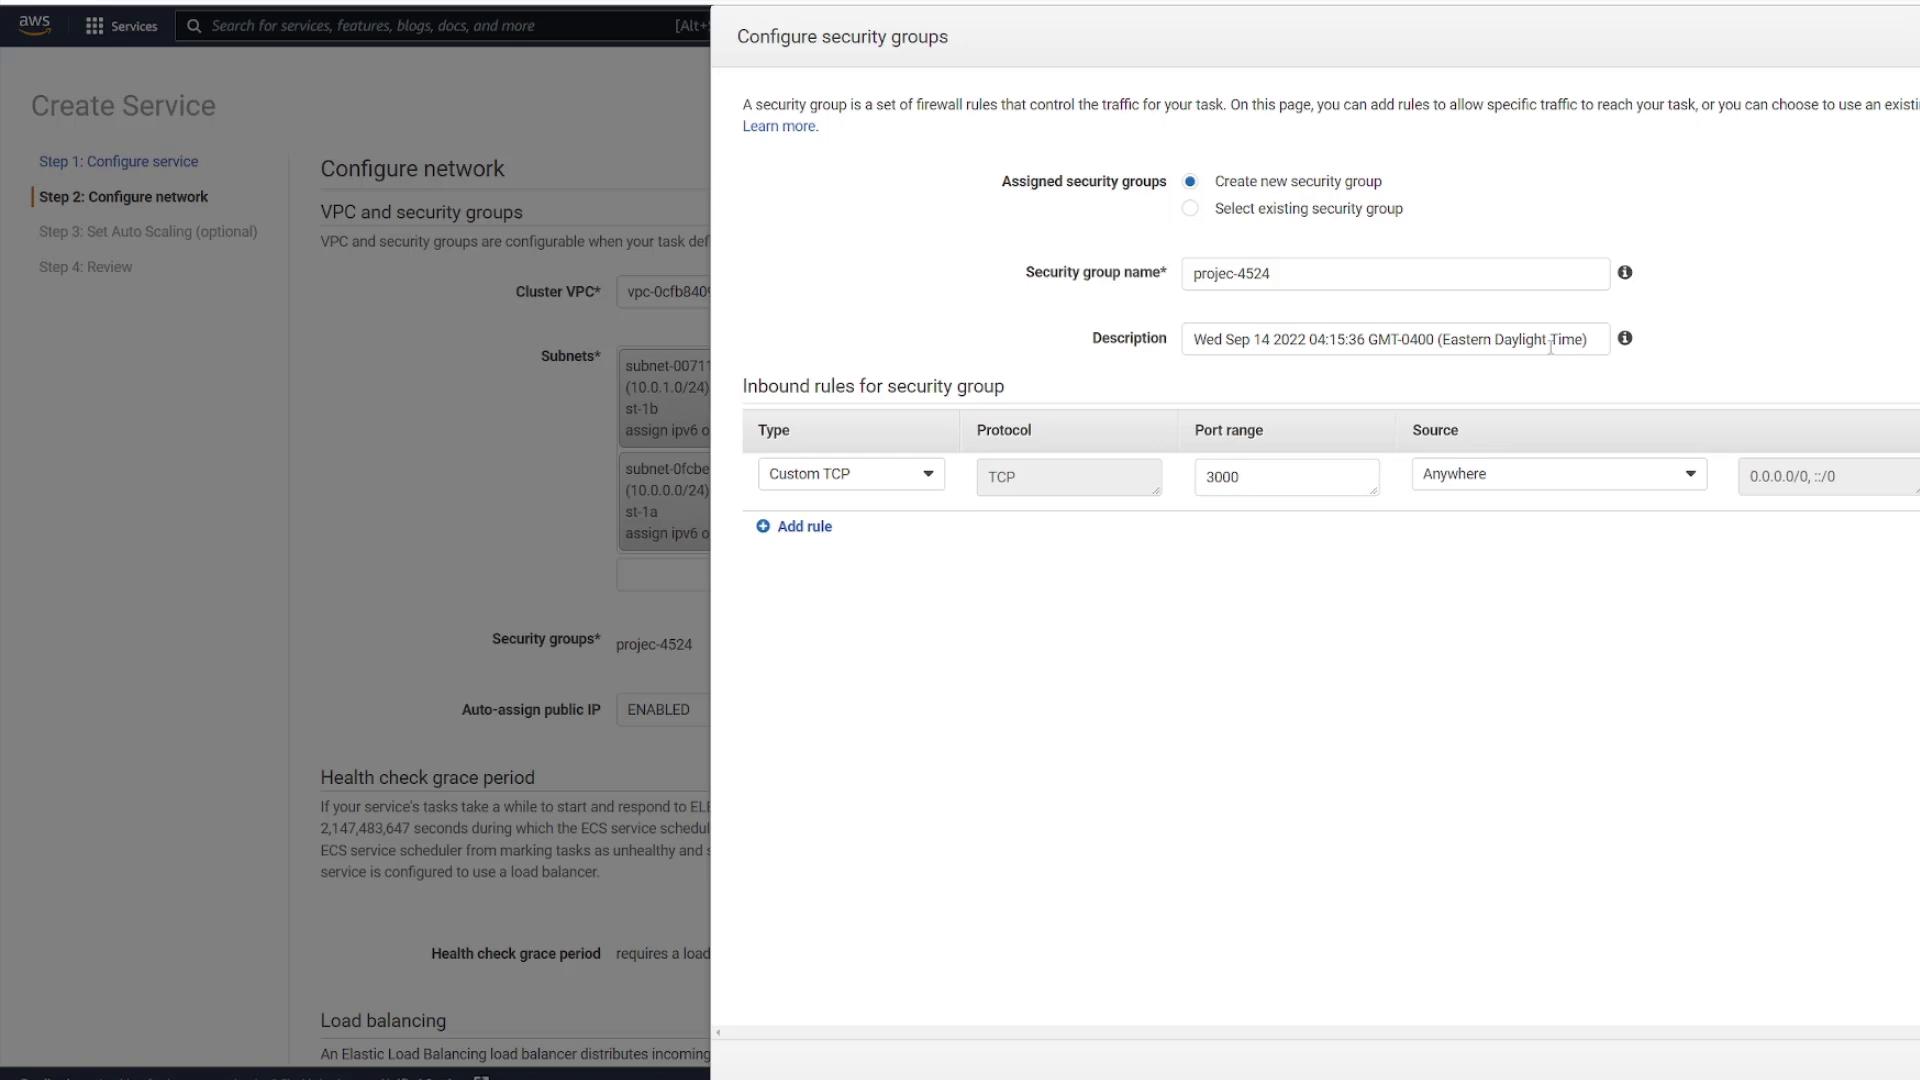
Click Save to apply your changes and leave the remaining settings as default. When prompted to add a load balancer, select No thanks since load balancing will be covered in a later lesson.
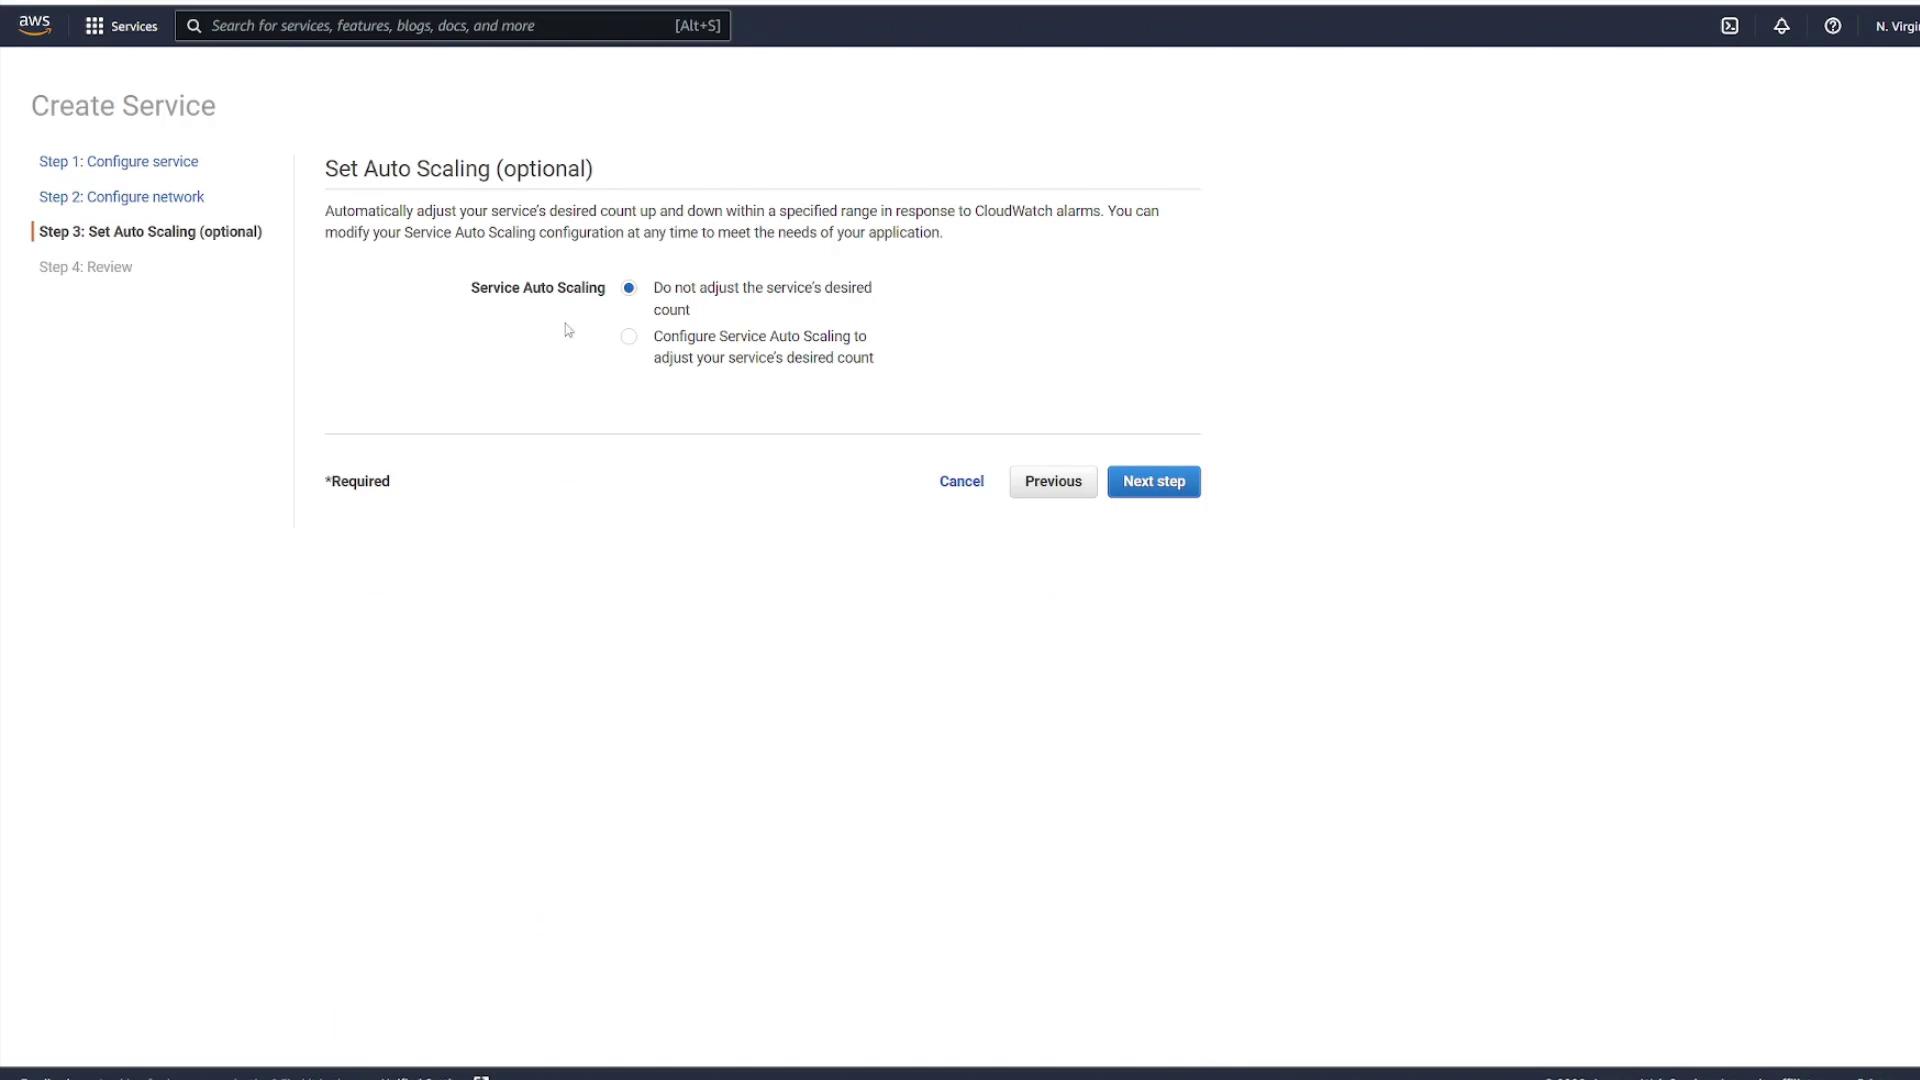
Step 5: Configure Auto Scaling and Create the Service
In the subsequent step, you have the option to configure auto scaling for the service. For this demonstration, disable auto scaling. Review all configurations carefully, then click Create Service.
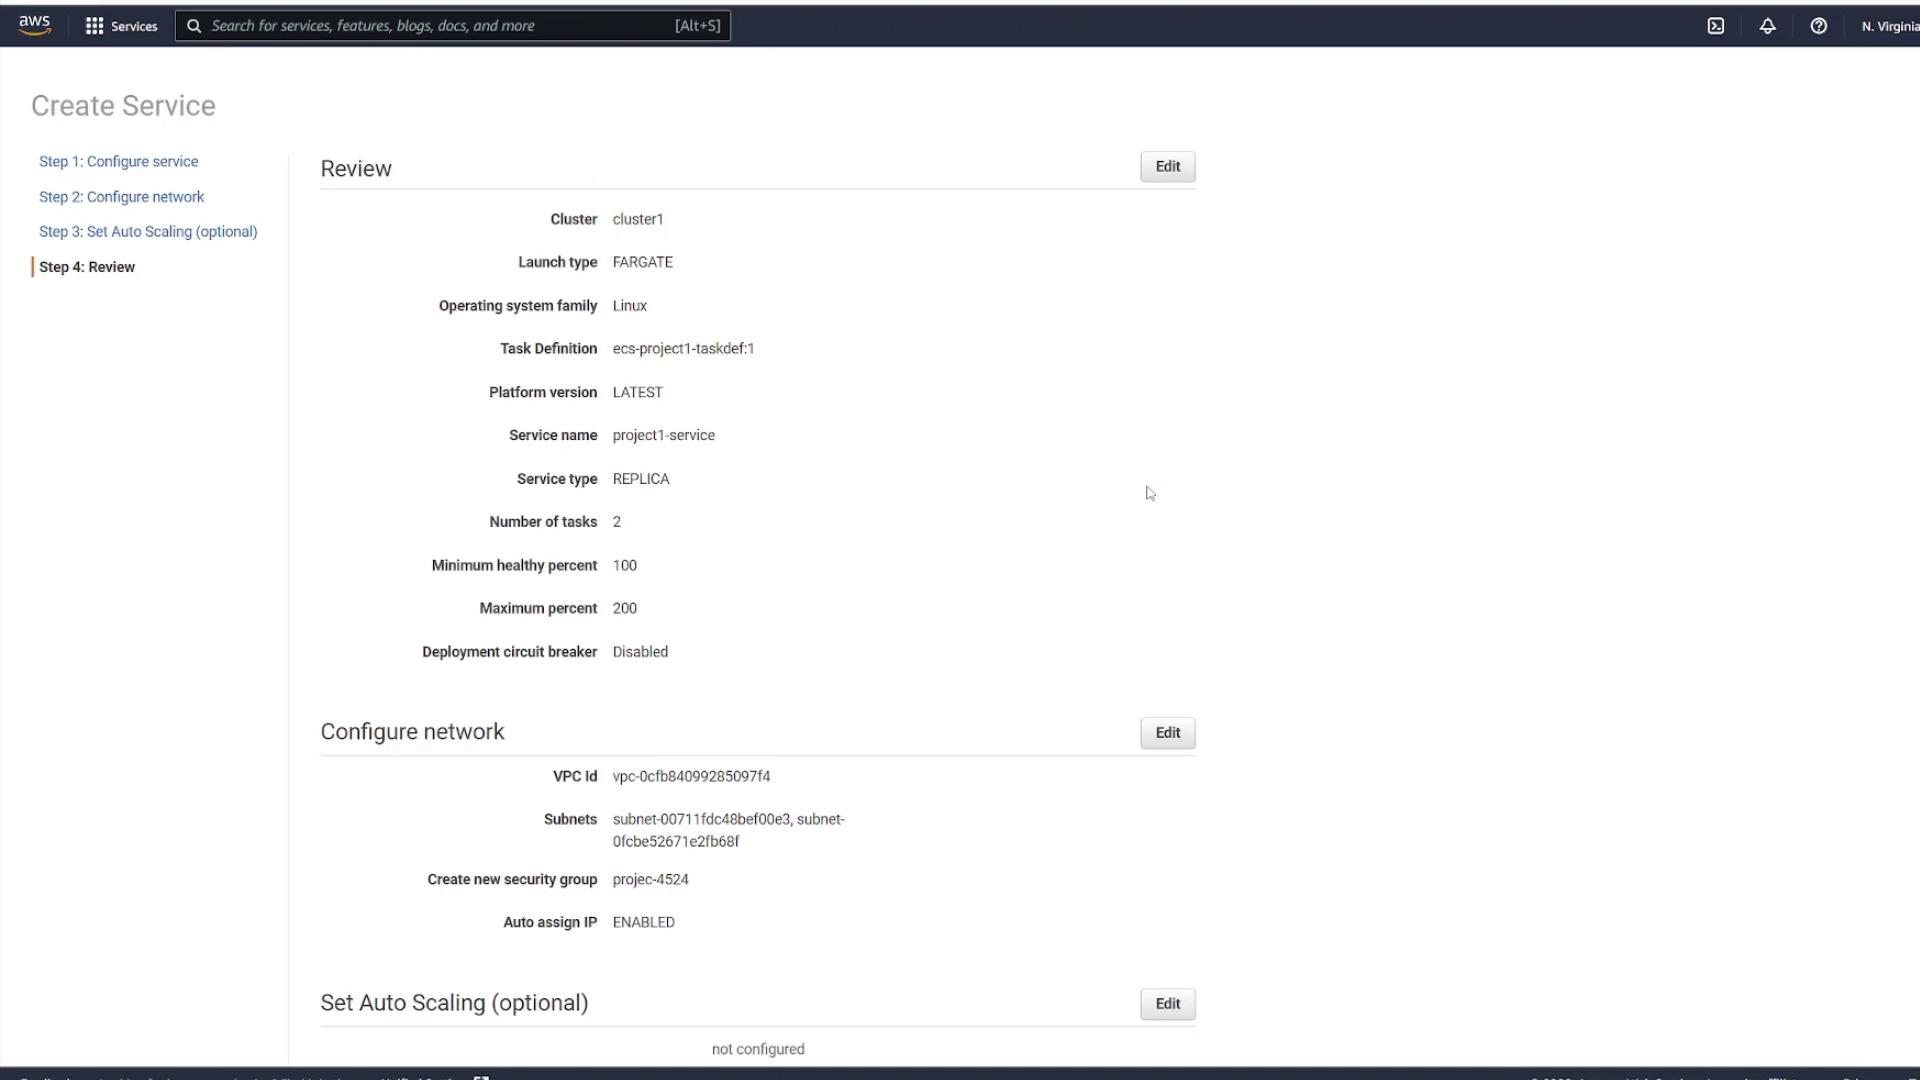
Step 6: Review and Monitor Your Service
Once the service is created, select View Service. Initially, you might see no running tasks; however, a refresh will reveal that provisioning has begun based on the number of tasks selected (in this example, two).
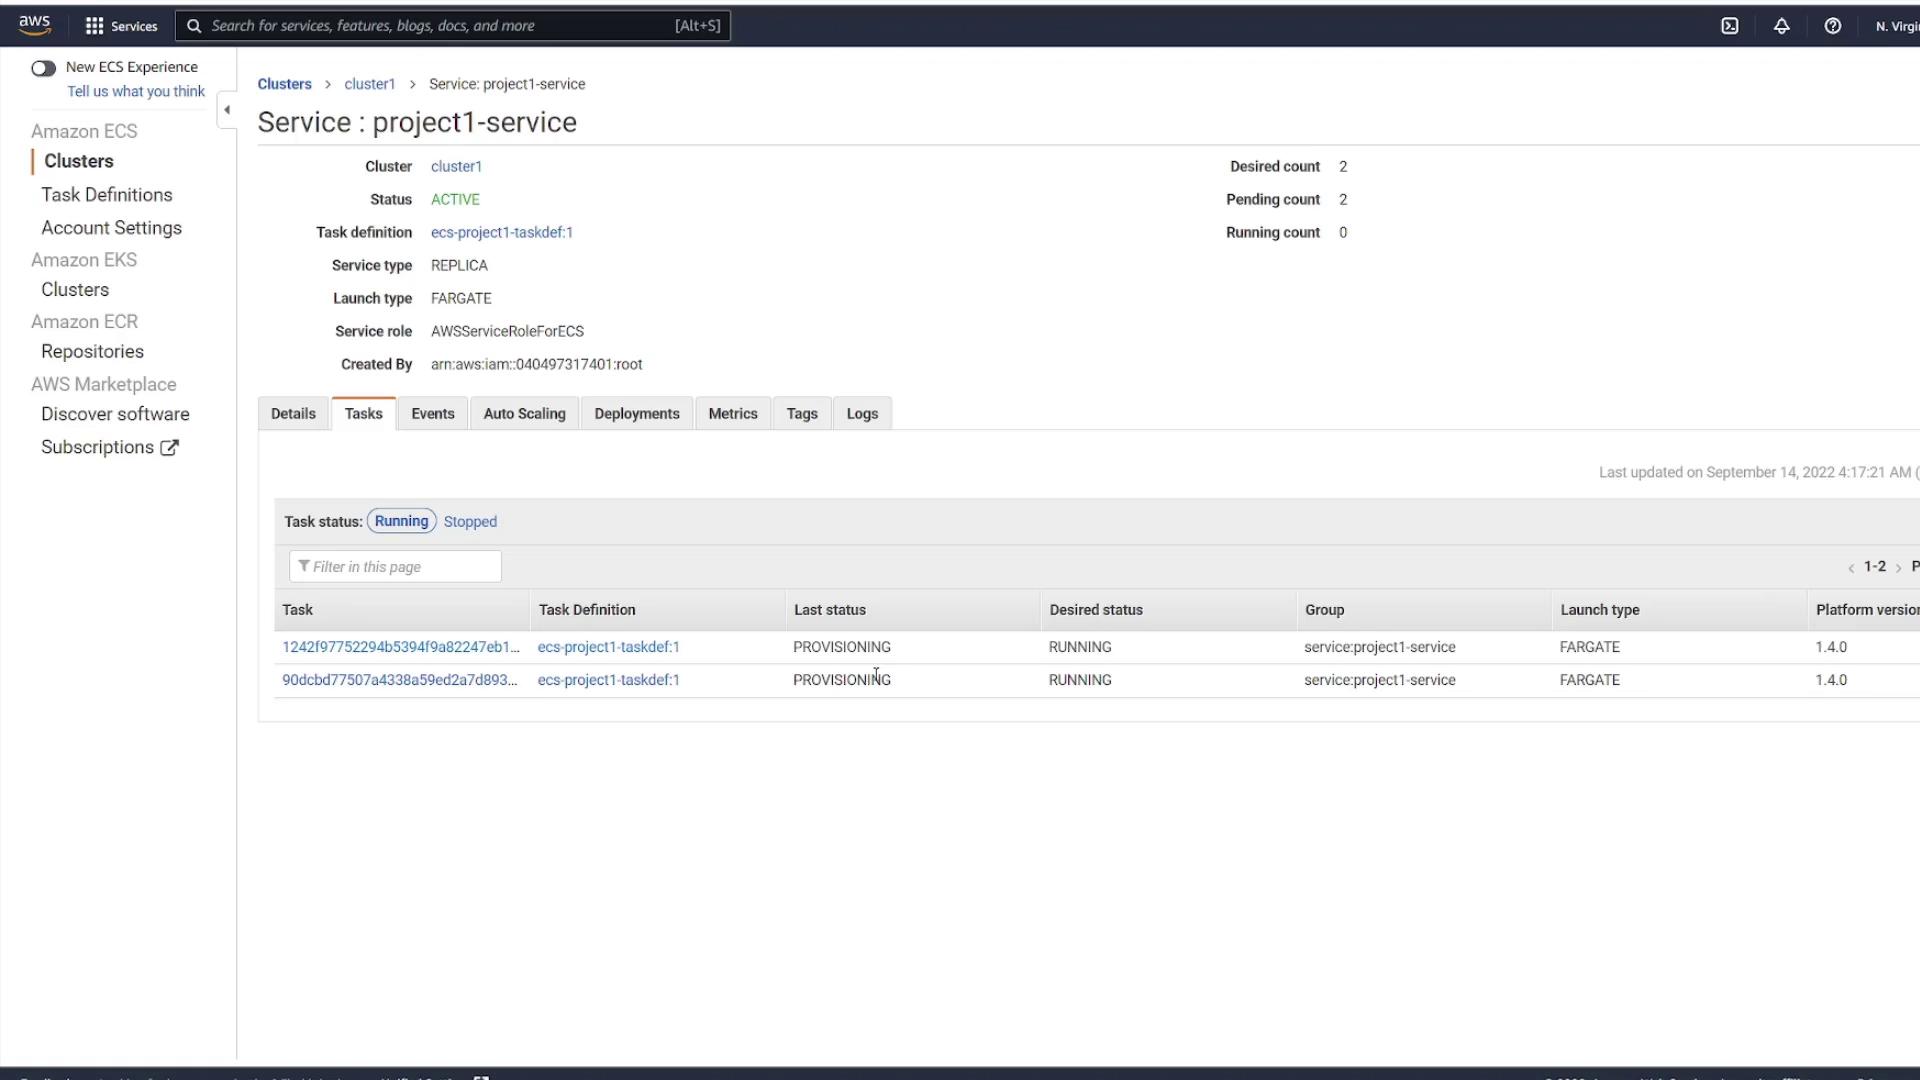
Each task is deployed as a separate instance, even though they share the same task definition. This is why unique public IP addresses are assigned to each. When you inspect a task, its status may initially display as pending before transitioning to running.
After the tasks are running, retrieve the public IP address from one of the tasks and test your application in a browser. You’ll observe that each task has a unique IP address.
Scaling Consideration
For front-end applications, having a single IP or DNS name can simplify traffic management. In robust architectures, consider configuring a load balancer to distribute incoming requests evenly across tasks. This approach exposes a single endpoint while managing dynamic IP addresses behind the scenes.
Demo Deploying task revisions
In this guide, you'll learn how to update your application, rebuild and push a new Docker image to Docker Hub, and deploy the updated image using Amazon ECS. Follow along to modernize your deployment process and ensure seamless application updates.
Making Application Changes
Begin by modifying your application. For this demonstration, we update the HTML file by adding extra exclamation points to the H1 tag. The updated HTML file now appears as follows:
<!DOCTYPE html>
<html lang="en">
<head>
    <meta charset="UTF-8" />
    <meta http-equiv="X-UA-Compatible" content="IE=edge" />
    <meta name="viewport" content="width=device-width, initial-scale=1.0" />
    <link rel="stylesheet" href="css/style.css" />
    <title>Document</title>
</head>
<body>
    <h1>ECS Project 1!!!!</h1>
</body>
</html>
Next, build a new Docker image to incorporate your changes. Tag the image as "KodeKloud/ecs-project1" and execute the Docker build command. The console output may look similar to this:
user1 on user1 in ecs-project1 [!] is v1.0.0 via took 3s
Pushing the Updated Image
Once the Docker image is built successfully, push it to Docker Hub. During the push, you may notice that many layers already exist. Finally, the output provides a digest confirming a successful push:
8cba2b7a5a3d: Layer already exists
2713d9662e94: Layer already exists
72140ff0db3: Layer already exists
93a6676ff6e4: Layer already exists
c77311ff502e: Layer already exists
ba9804f7abed: Layer already exists
a5186a09280a: Layer already exists
1e69438976e4: Layer already exists
47b6660a2b9b: Layer already exists
5cbc21d1985: Layer already exists
07b905e91599: Layer already exists
20833a96725e: Layer already exists
latest: digest: sha256:98216dd964fd5bb910fb23a527ed9e9d804b5cedaaa47fb45264cebe664006b size: 3261
user1 on user1 in ecs-project1 [!] is v1.0.0 via took 4s
Now that your image is updated on Docker Hub, it's time to inform ECS of the new changes so that it pulls the latest image for your service.
Updating the ECS Service
Refreshing your application immediately after pushing the updated image may still display the old version. This happens because ECS hasn't been notified of the change. To update your deployed service, follow these steps in the ECS Console:
Navigate to Clusters and select your cluster.
Choose the service you wish to update.
Click on Update.
Enable the Force New Deployment option.
Note
Forcing new deployment instructs ECS to pull the latest image and replace the old tasks with new ones.
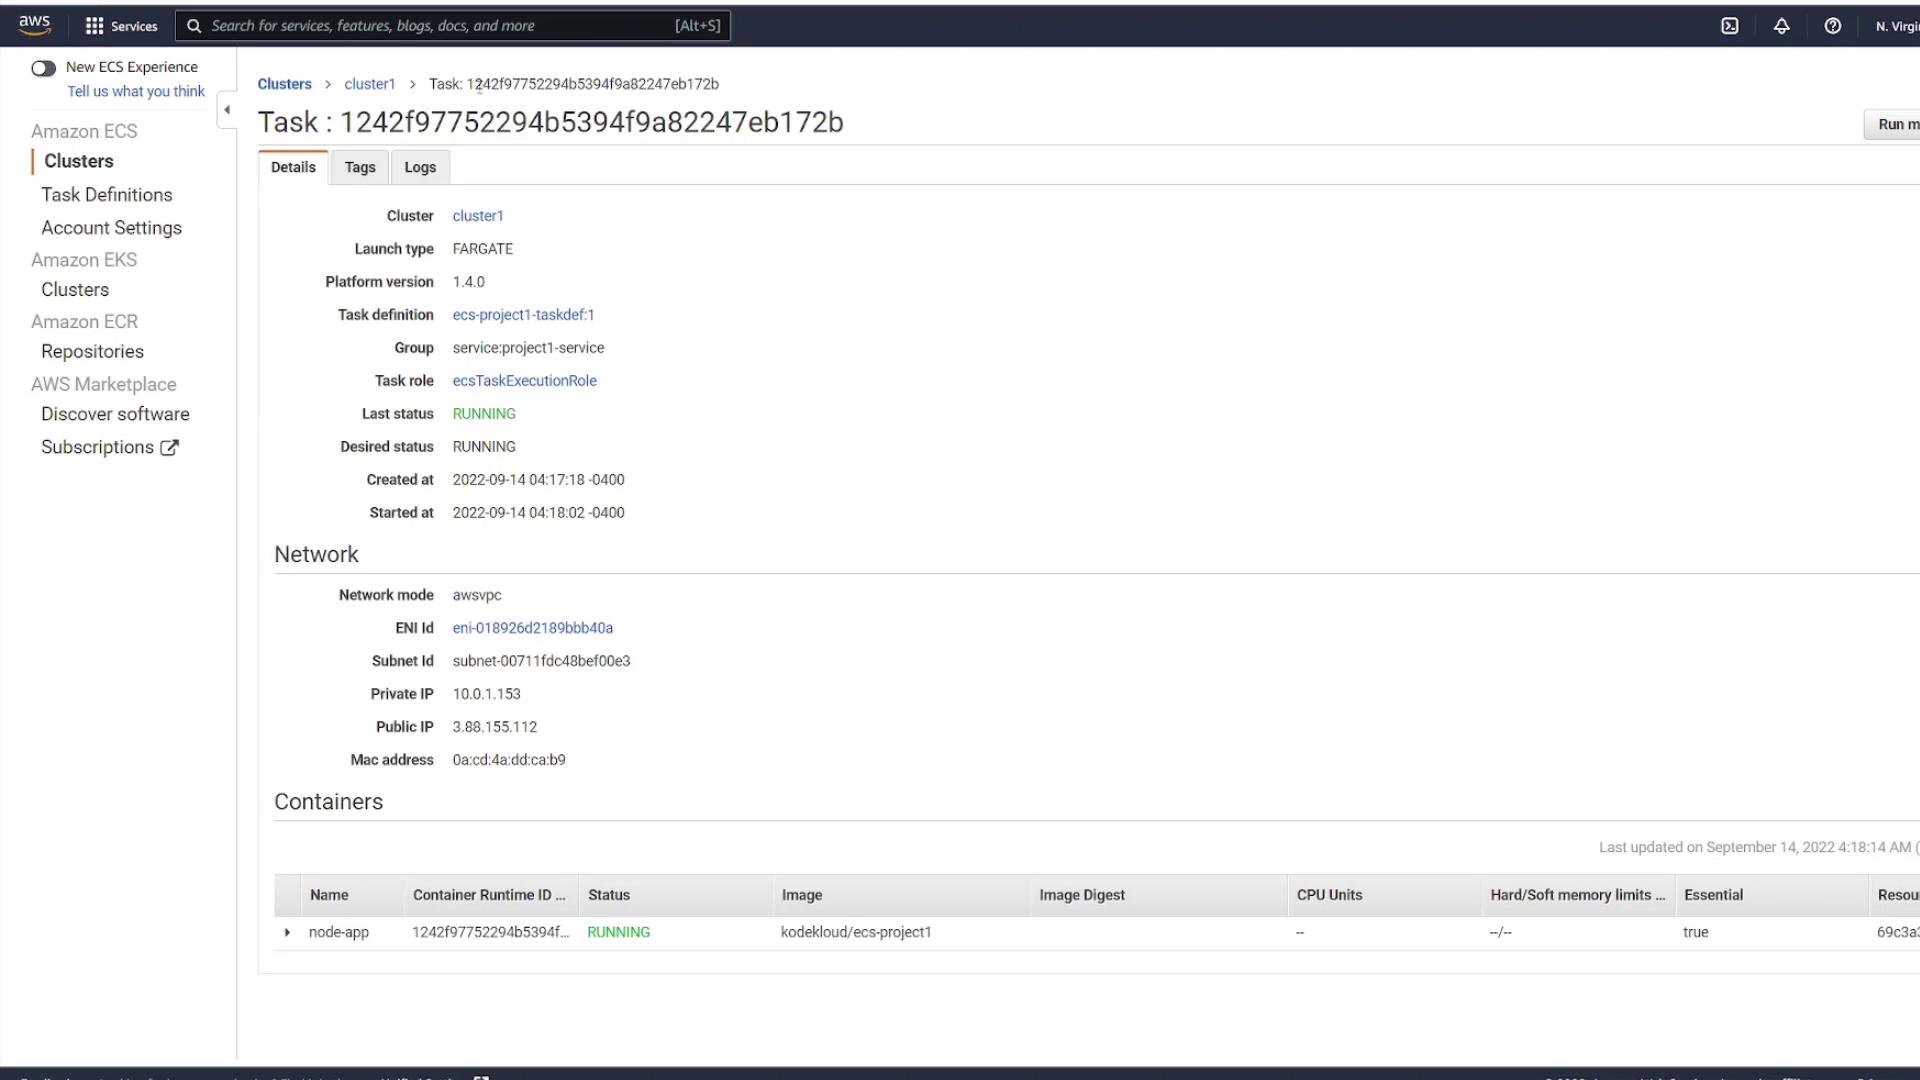
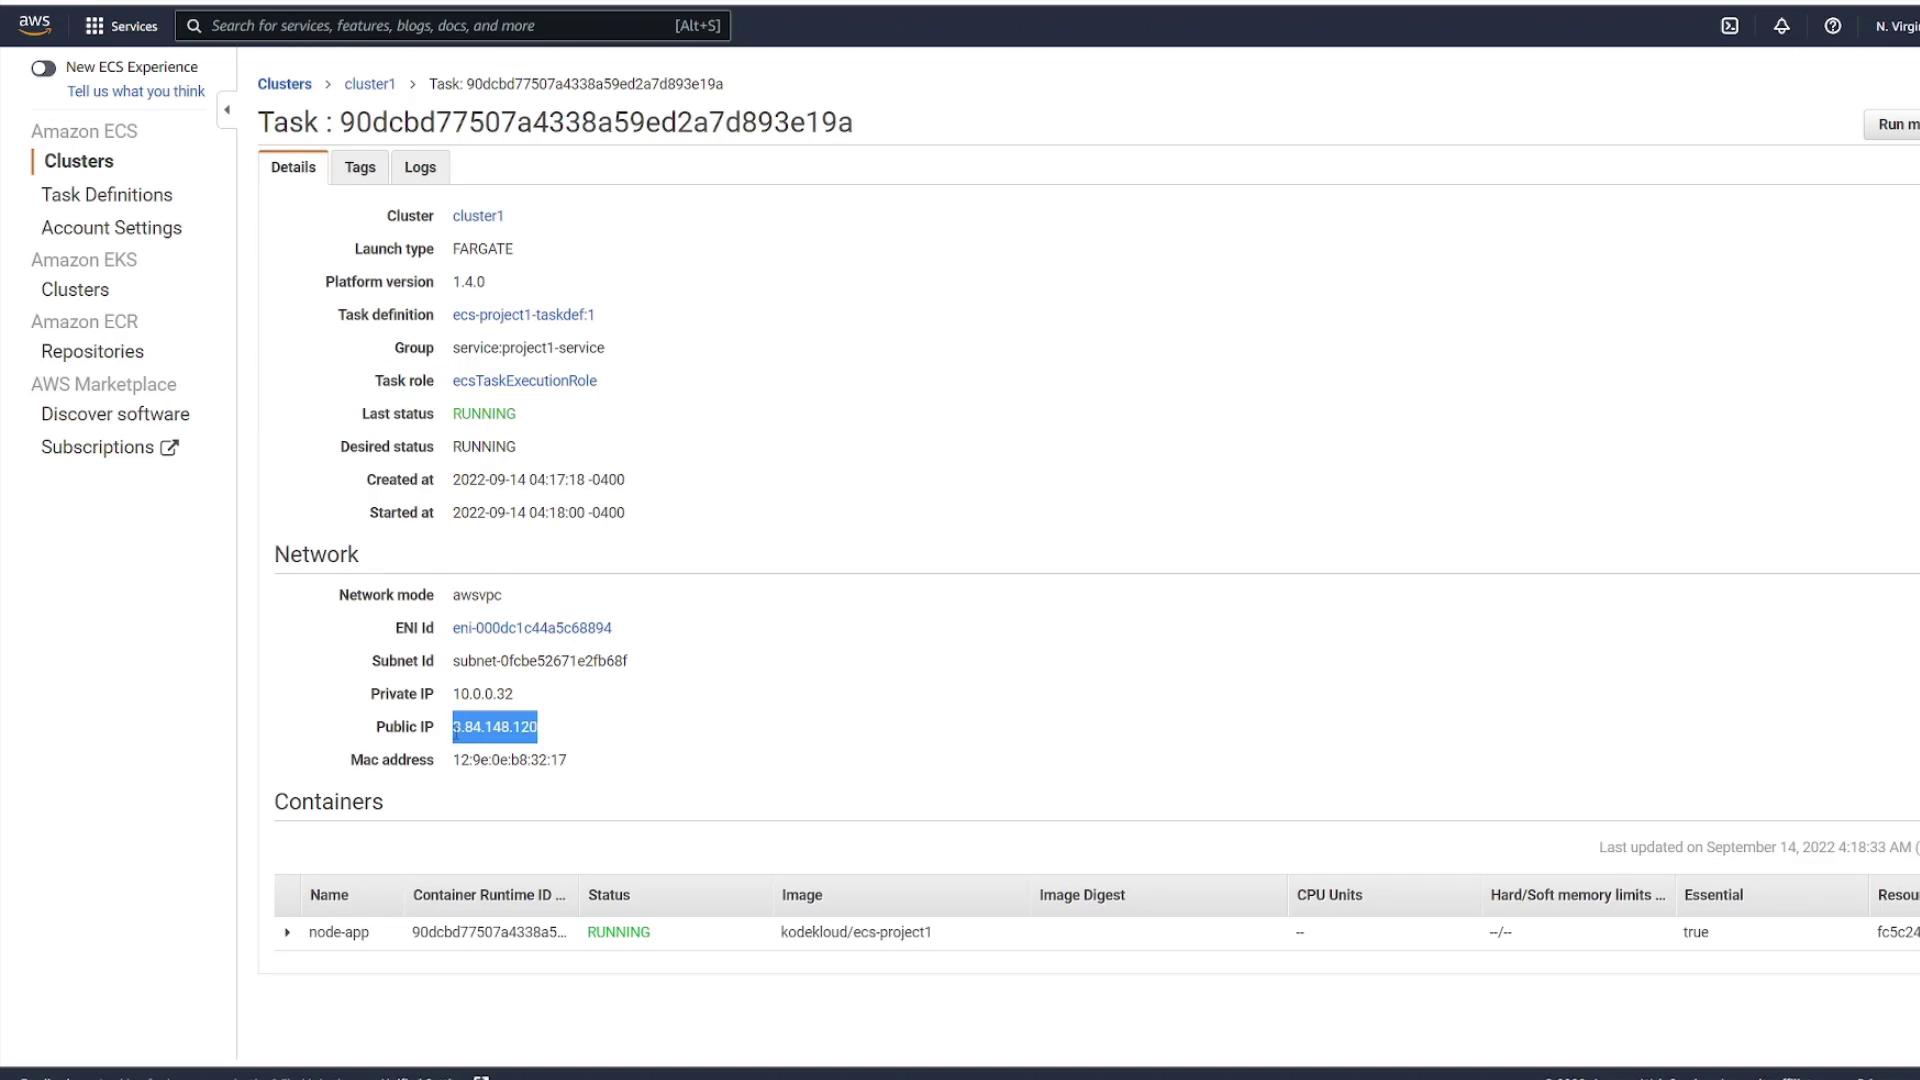
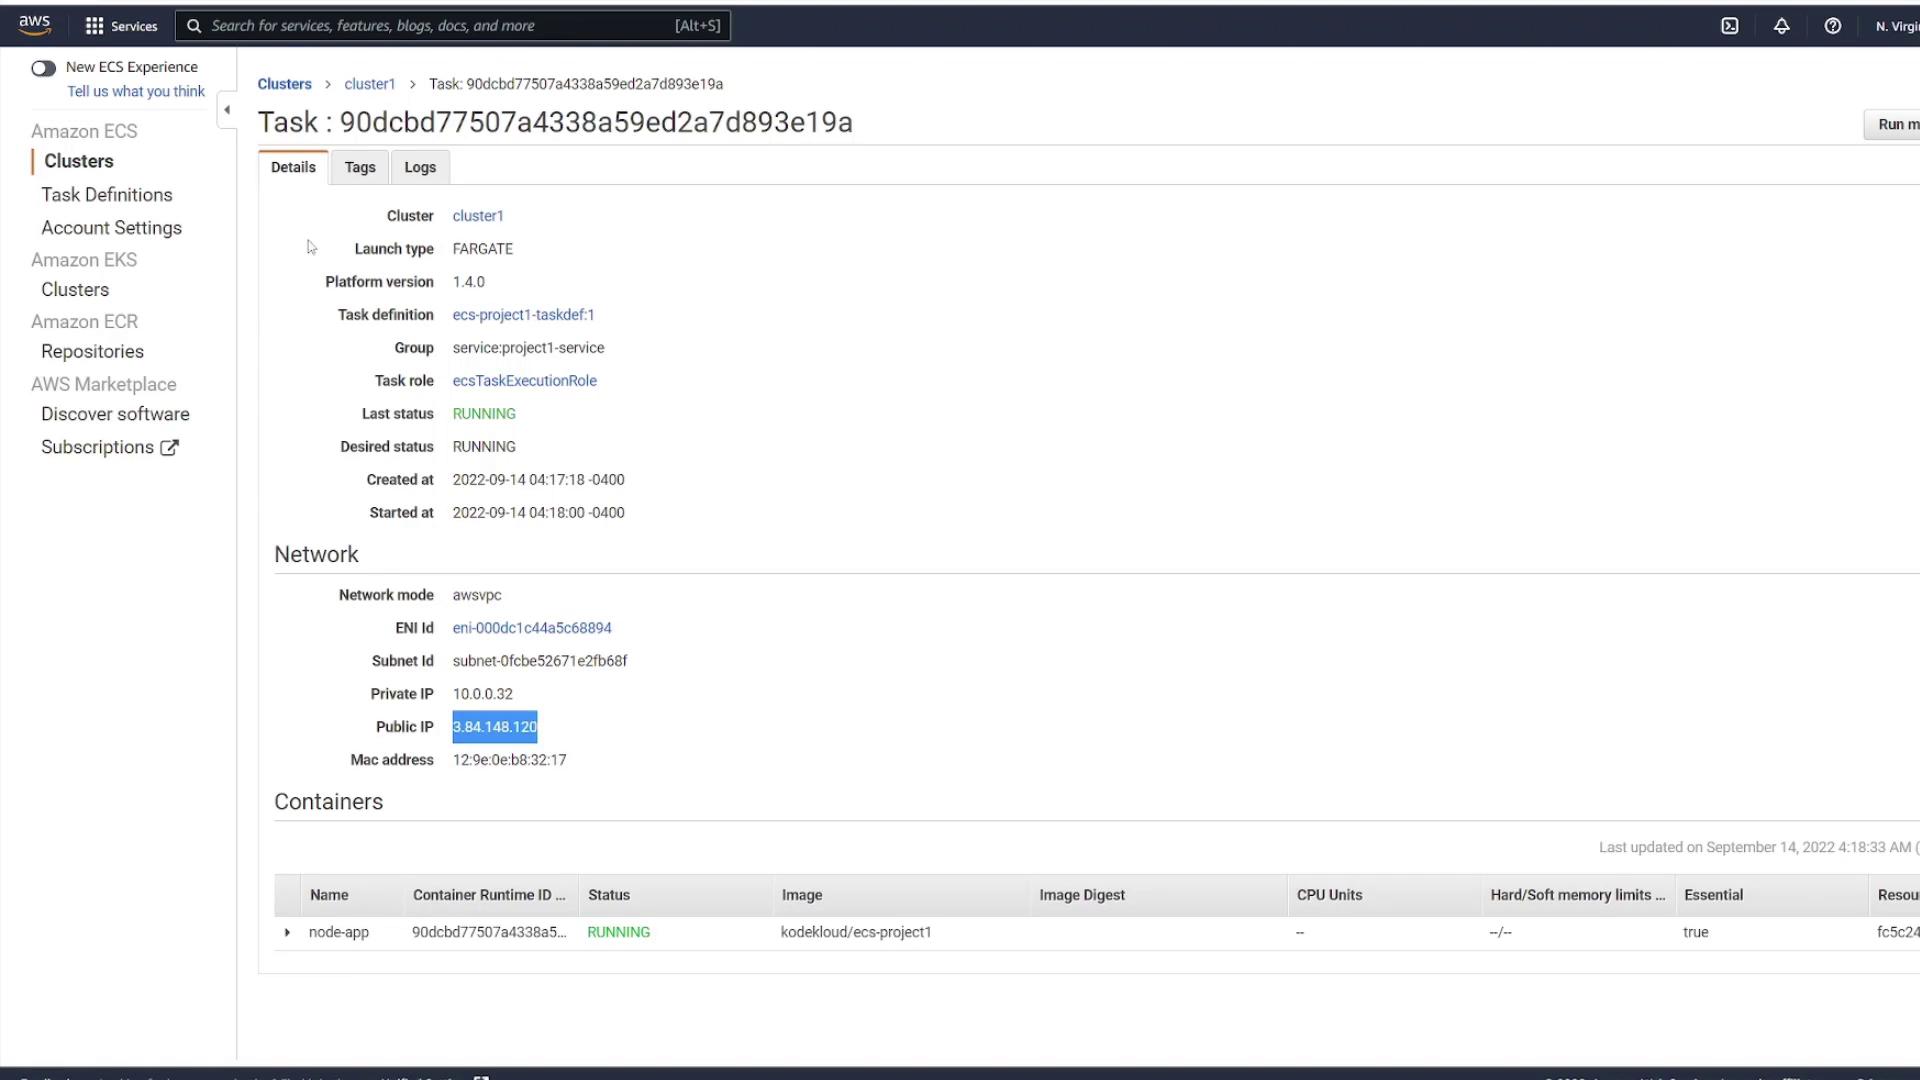
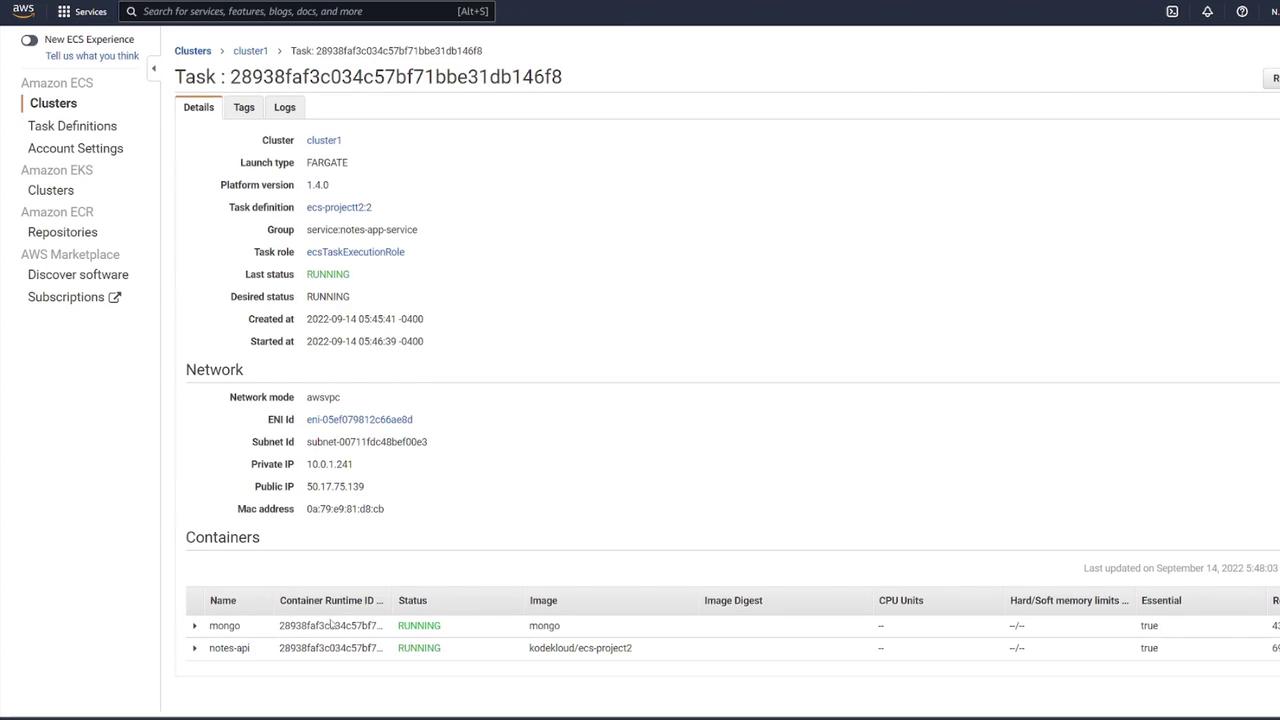
The diagram below shows the AWS ECS Task Details page, which provides essential information about running tasks, including network settings and container statuses:
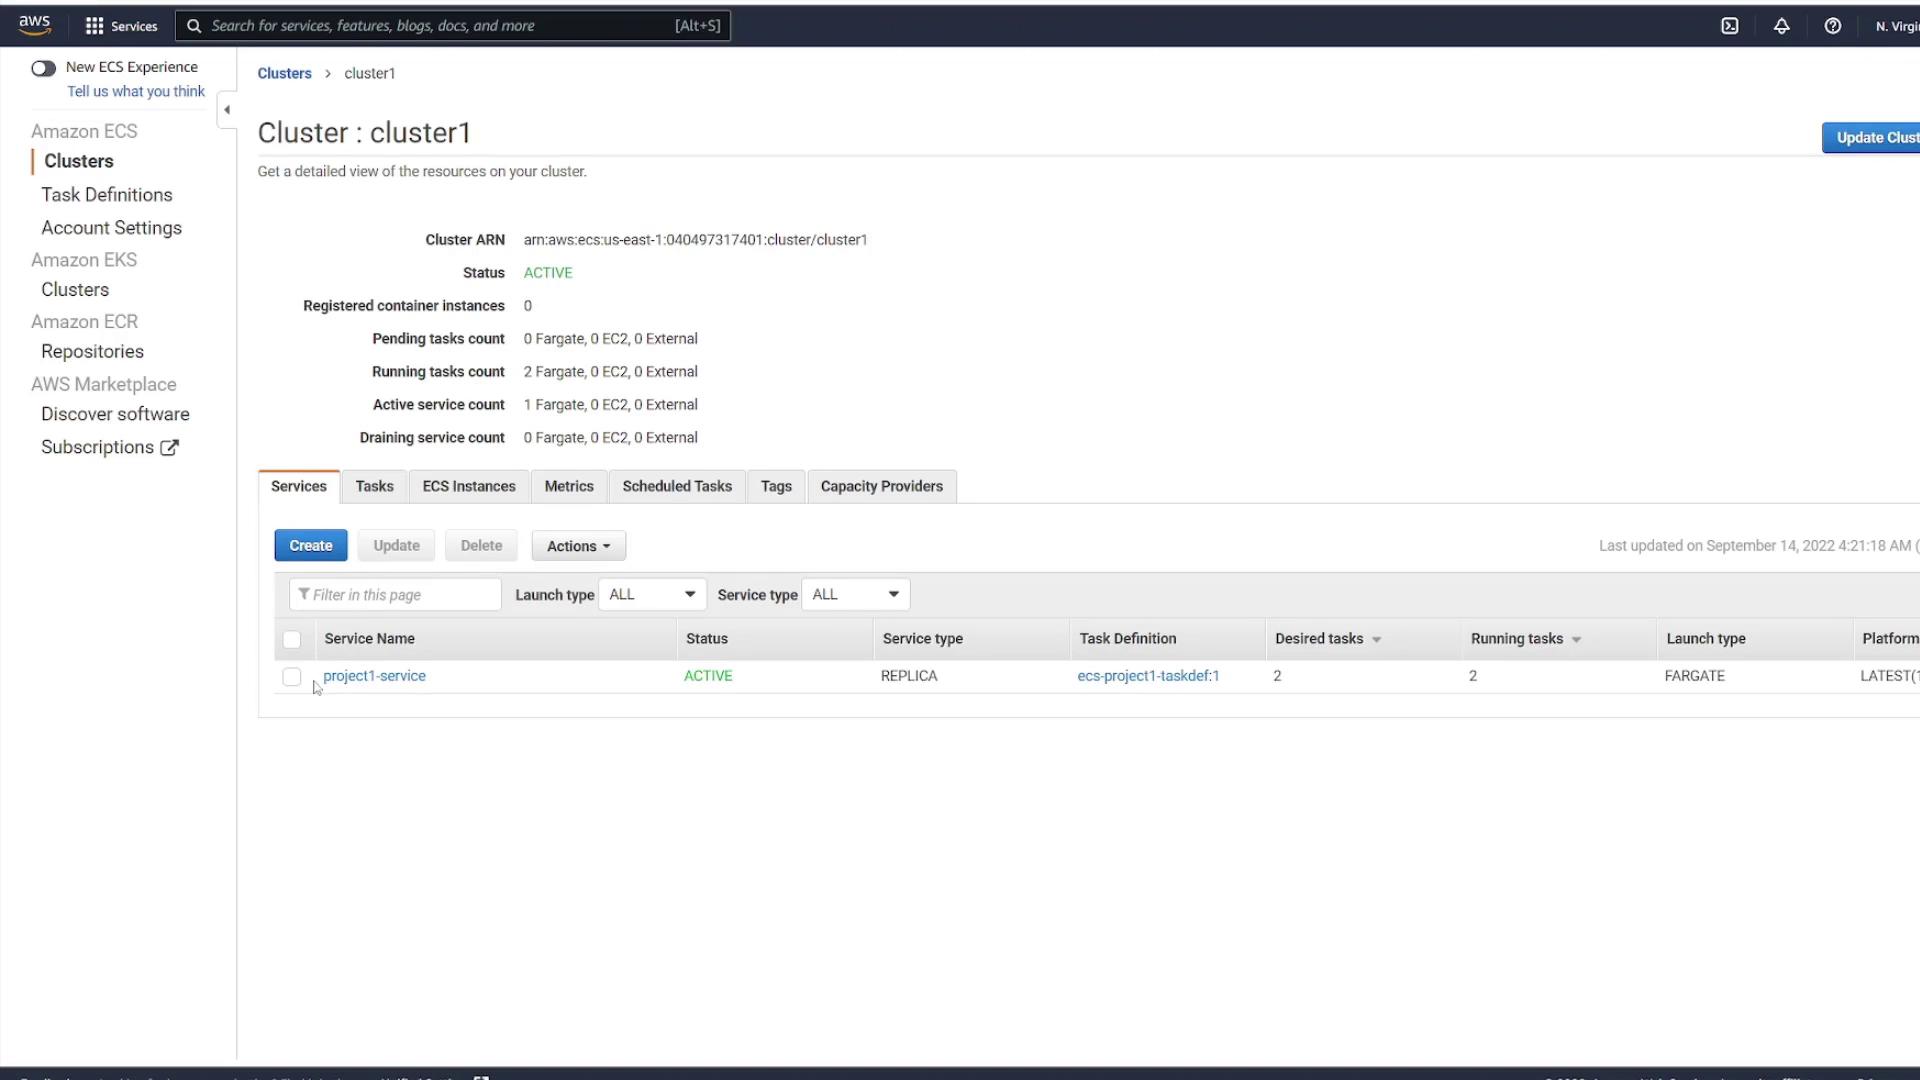
Additionally, observe the following diagram that illustrates a cluster with an active service:
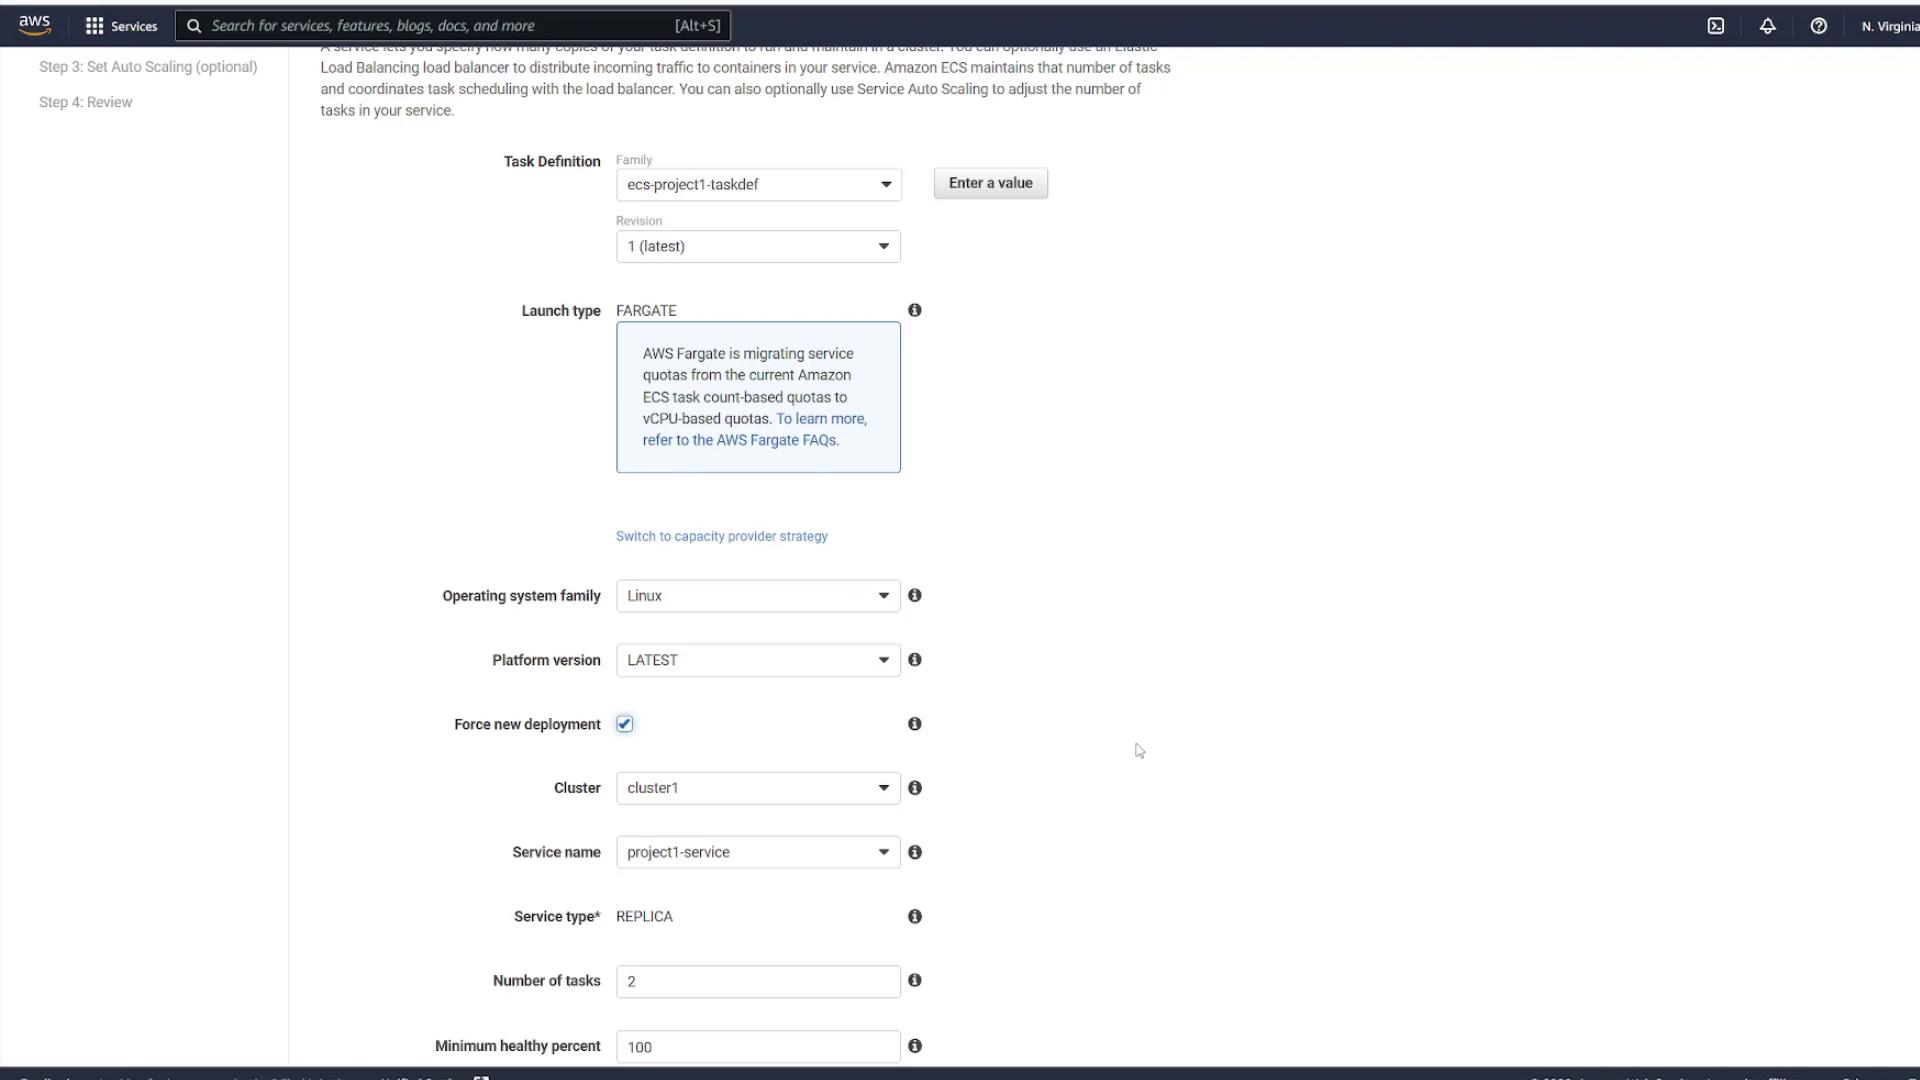
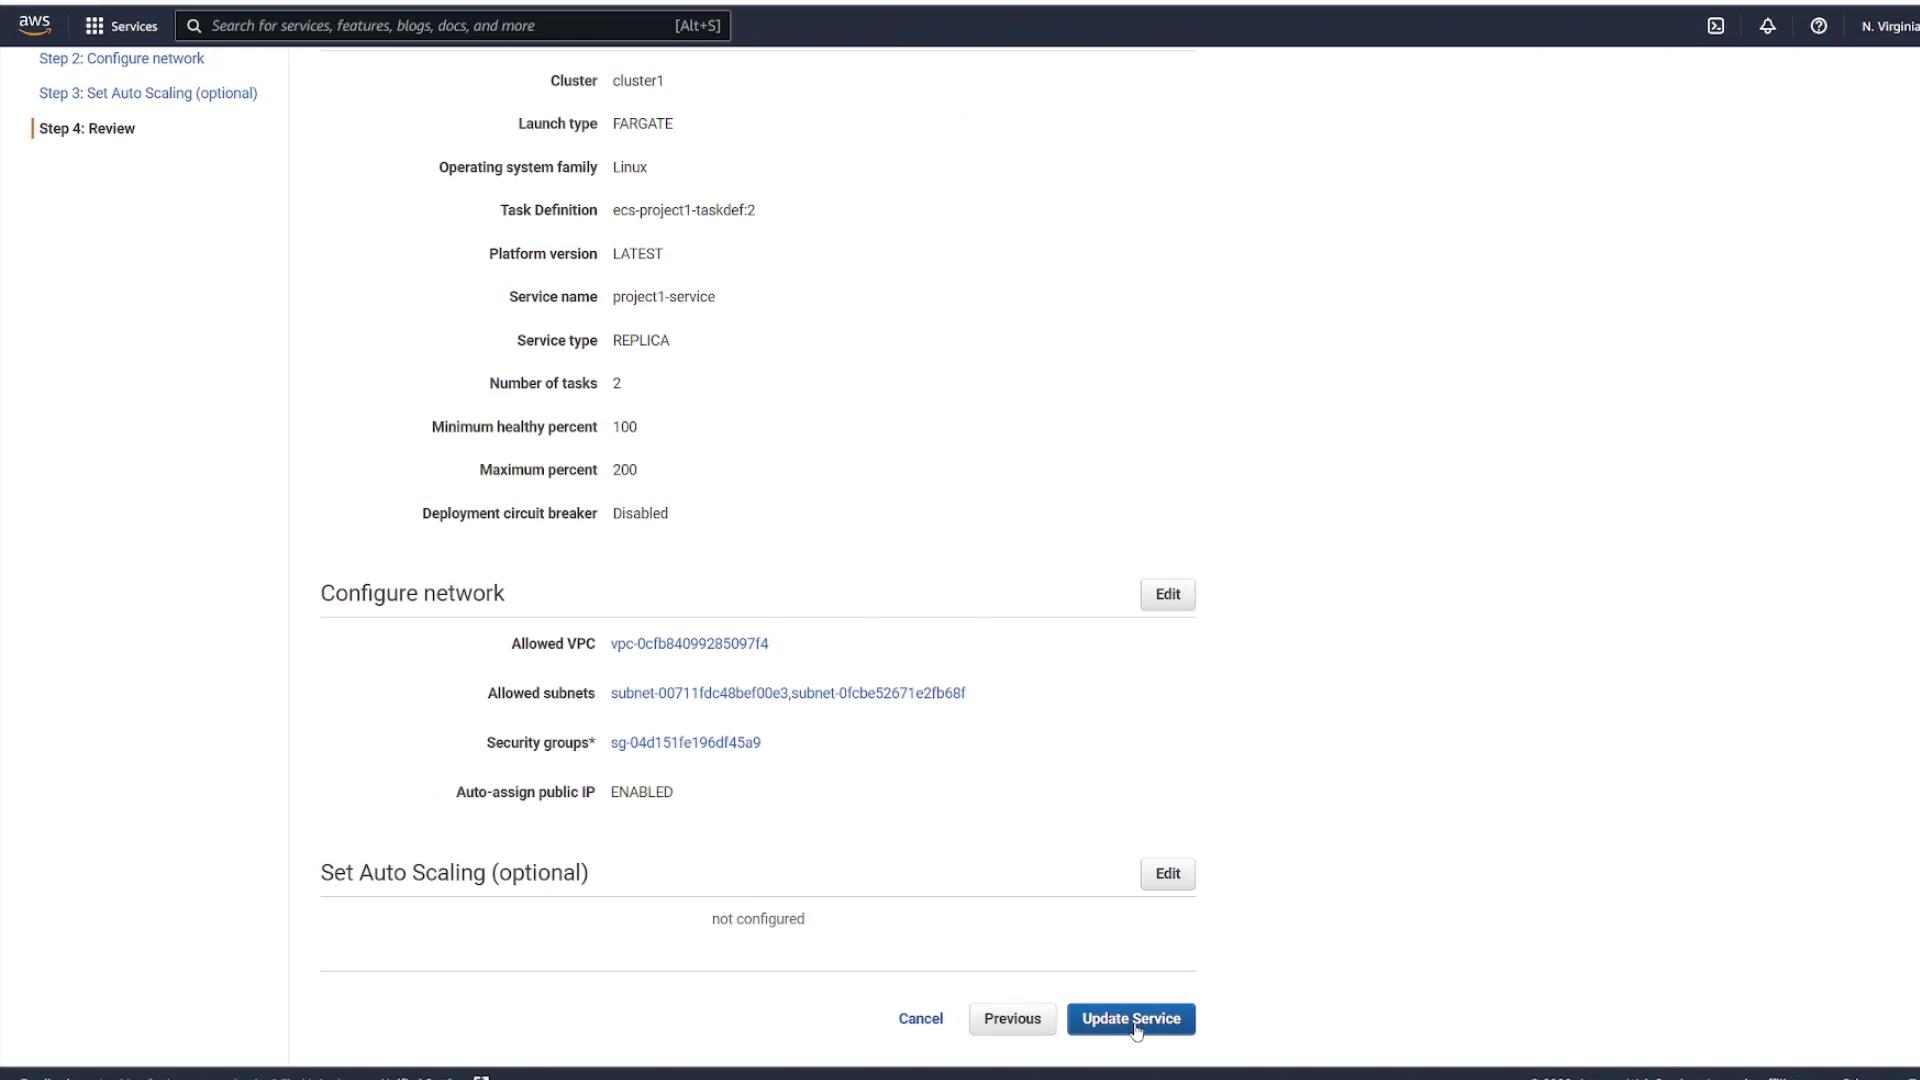
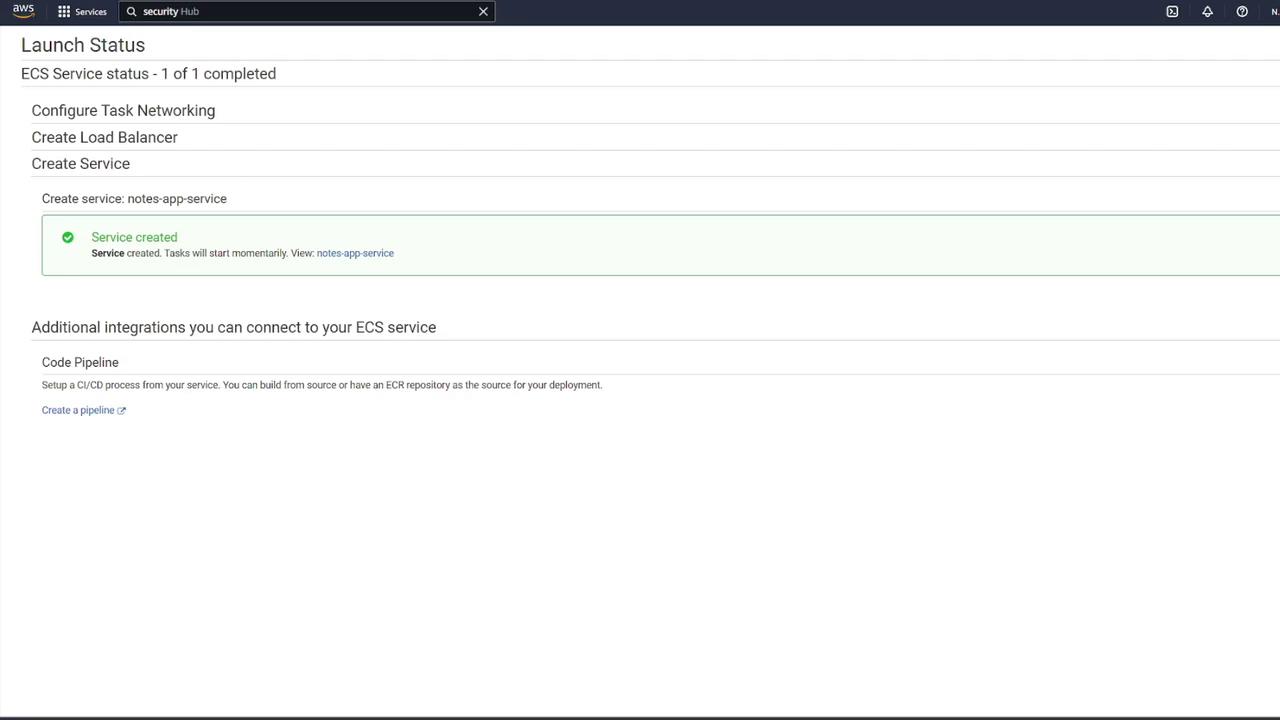
After applying the force deployment, ECS pulls the updated image and redeploys the tasks. Review the ECS Service Configuration screen as shown in the following diagram:
If you also modify the task definition file, a new revision of the task definition is created. For example, after updating "ecs-project1-taskdef", the ECS console may display multiple revisions:

Then, review the updated service configuration before finalizing the update:
After updating the service, ECS starts new tasks using the latest image while gradually shutting down the older tasks once the new ones pass all health checks. You can monitor this transition in the ECS Tasks view.
Verifying the Deployment
After the deployment, refresh the ECS service page and inspect one of the running tasks. Keep in mind that the task's IP address changes with each new deployment. The diagram below illustrates the network details and container status of a running task:
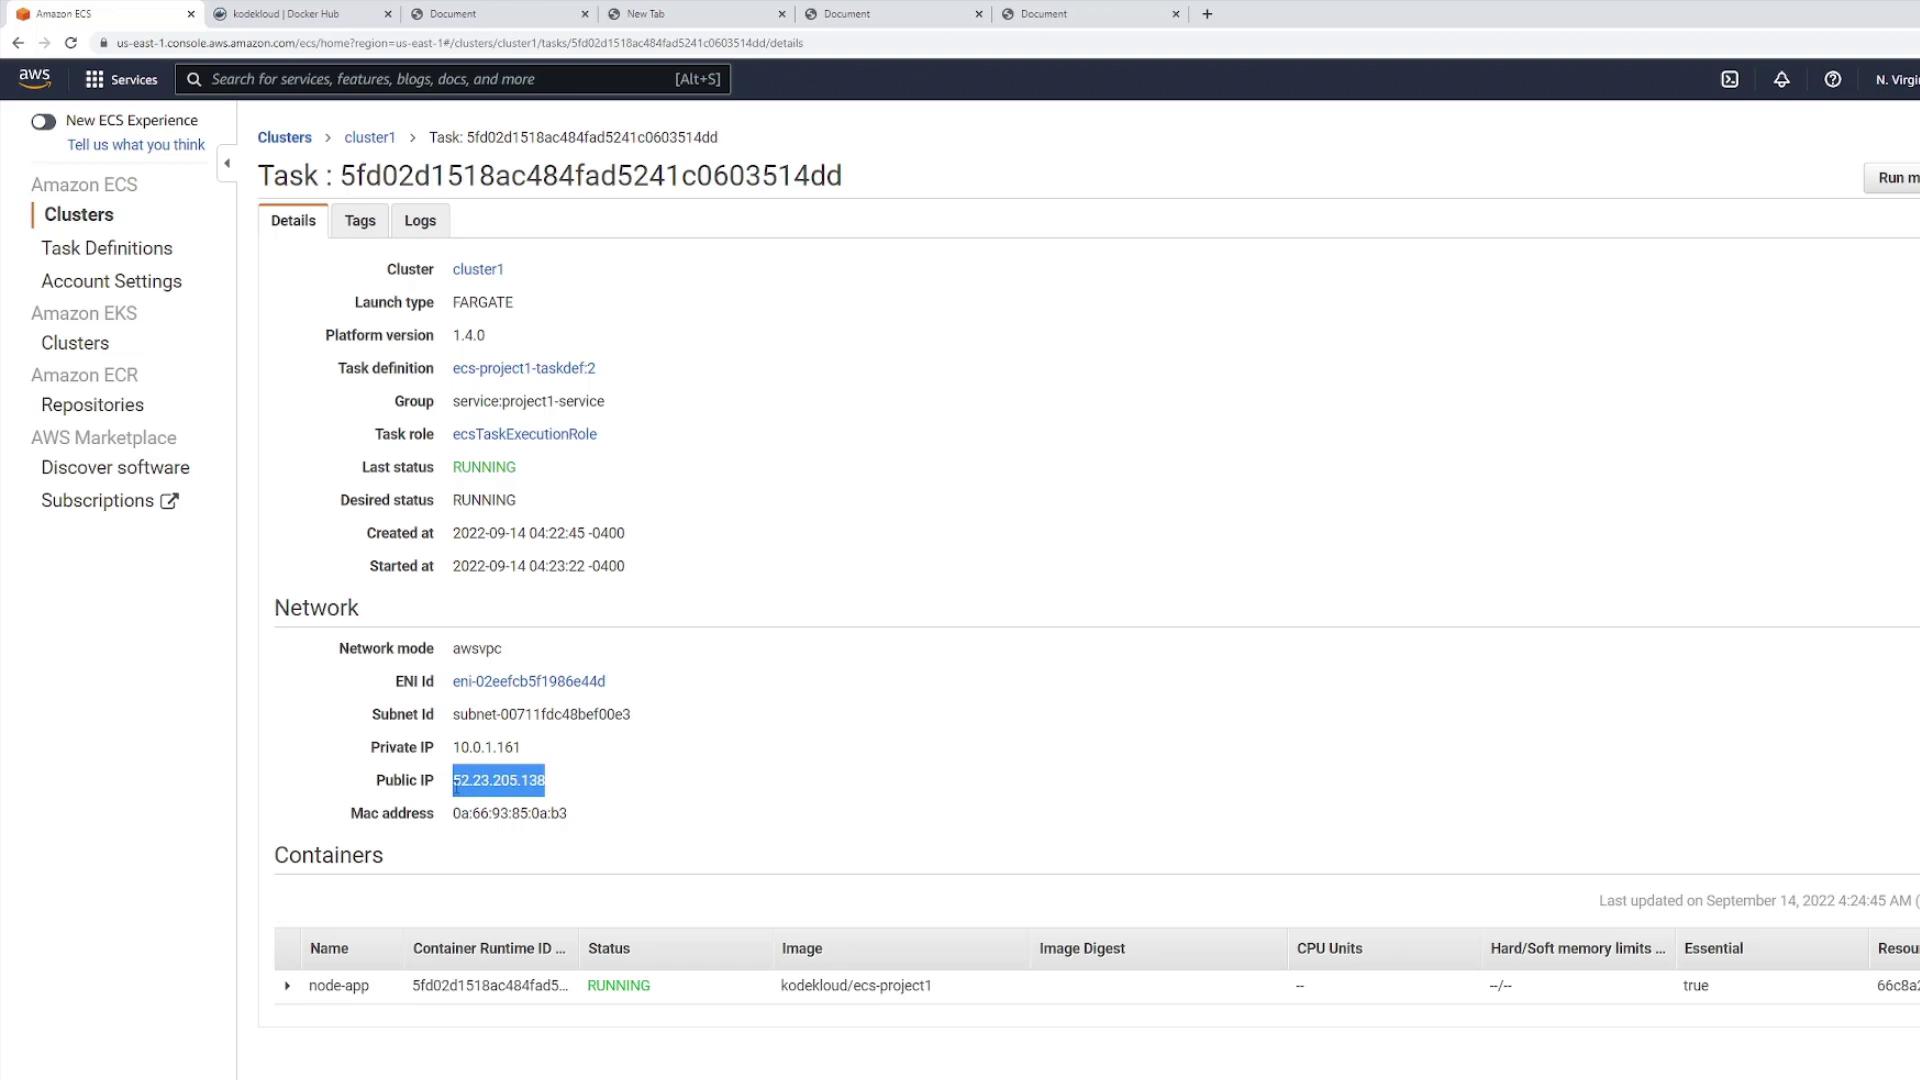
Once you confirm the update on port 3000, you'll notice the additional exclamation points in the H1 tag. However, be aware that changes in IP addresses could affect clients accessing the application directly.
The Role of a Load Balancer
Note
A load balancer addresses the potential issue of changing IP addresses by providing a consistent endpoint. It automatically routes traffic to the updated task IP addresses after each deployment, ensuring uninterrupted client connectivity.
By integrating a load balancer, you simplify deployment updates while maintaining reliable access to your application, regardless of changes in the infrastructure.
Demo Deleting application
In this guide, we will walk you through the process of deleting an application that is no longer needed. Later, we will cover deploying a more advanced application that integrates a database, a volume, and a load balancer.
Steps to Delete an Application
Navigate to your service interface and initiate the deletion of the application.
Proceed to the tasks section to verify that the deletion was successful.
Confirm that the application has been completely removed from the system.
Note
The cluster remains intact after the application deletion. This means you can reuse the same cluster to deploy other applications with additional features.
By following these steps, you can efficiently manage your resources and prepare your environment for future deployments.
Understanding multi container application
In this lesson, we explore an application architecture that leverages multiple containers to separate concerns effectively. The architecture consists of two containers:
An API container running a Node.js/Express application.
A MongoDB container using the default Mongo image.
This setup demonstrates how to configure inter-container communication using Docker Compose and how the API leverages environment variables to configure its connection to MongoDB.
Overview
The Node.js application integrates with MongoDB through Mongoose and implements a basic CRUD interface to manage notes.
Docker Compose Configuration
Below is an example Docker Compose configuration outlining the multi-container deployment. Two variants for the MongoDB volume configuration are provided based on your persistence needs.
API Container Setup
The API container is built from the project source and exposes port 3000. It uses environment variables for connecting to the MongoDB container, as illustrated by the following excerpt:
const express = require("express");
const mongoose = require("mongoose");
const cors = require("cors");
const Note = require("./models/noteModel");


const app = express();
app.use(cors());
app.use(express.json());


const mongoURL = `mongodb://${process.env.MONGO_USER}:${process.env.MONGO_PASSWORD}@${process.env.MONGO_IP}:${process.env.MONGO_PORT}/?authSource=admin`;
// Alternative connection string for local testing:
// const mongoURL = `mongodb://localhost:27017/?authSource=admin`;
Console Output Example
A sample console output upon running the application might appear as follows:
user1 on user1 in ecs-project2 [!] is 📦 v1.0.0 via 🐳
Docker Compose Variants
Variant 1 – Using a Bind Mount
This variant uses a bind mount for the MongoDB data directory to link the container's /data/db to a local folder.
version: "3"
services:
  api:
    build: .
    image: kodekloud/ecs-project2
    environment:
      - MONGO_USER=mongo
      - MONGO_PASSWORD=password
      - MONGO_IP=mongo
      - MONGO_PORT=27017
    ports:
      - "3000:3000"
  mongo:
    image: mongo
    environment:
      - MONGO_INITDB_ROOT_USERNAME=mongo
      - MONGO_INITDB_ROOT_PASSWORD=password
    volumes:
      - ./data:/data/db
Variant 2 – Using a Named Volume
This variant uses a named volume (mongo_data) to manage the persistence of MongoDB data.
version: "3"
services:
  api:
    build: .
    image: kodekloud/ecs-project2
    environment:
      - MONGO_USER=mongo
      - MONGO_PASSWORD=password
      - MONGO_IP=mongo
      - MONGO_PORT=27017
    ports:
      - "3000:3000"
  mongo:
    image: mongo
    environment:
      - MONGO_INITDB_ROOT_USERNAME=mongo
      - MONGO_INITDB_ROOT_PASSWORD=password
    volumes:
      - mongo_data:/data/db


volumes:
  mongo_data:
Important
Ensure that the environment variables for MongoDB (MONGO_USER, MONGO_PASSWORD, MONGO_IP, and MONGO_PORT) are correctly passed to the API container. This is crucial for establishing a successful connection.
API Endpoints
The API provides a set of endpoints for performing CRUD operations on a "notes" collection. Below are details of each endpoint with corresponding code examples.
| HTTP Method | Endpoint | Description |
| GET | /notes | Retrieve all notes from the database |
| GET | /notes/:id | Retrieve a single note by ID |
| POST | /notes | Create a new note entry |
| PATCH | /notes/:id | Update an existing note |
| DELETE | /notes/:id | Delete a specific note |
GET /notes
Retrieves all notes stored in the database.
app.get("/notes", async (req, res) => {
  try {
    const notes = await Note.find();
    res.status(200).json({ notes });
  } catch (error) {
    res.status(500).json({ error: error.message });
  }
});
GET /notes/:id
Retrieves the details of a single note based on the provided ID. (The relevant code for this endpoint is implied by the overall CRUD structure.)
POST /notes
Creates a new note entry in the database.
app.post("/notes", async (req, res) => {
  try {
    const note = await Note.create(req.body);
    res.status(201).json({ note });
  } catch (e) {
    console.log(e);
    res.status(400).json({ status: "fail" });
  }
});
PATCH /notes/:id
Updates an existing note and returns the updated note if successful.
app.patch("/notes/:id", async (req, res) => {
  try {
    const note = await Note.findByIdAndUpdate(req.params.id, req.body, {
      new: true,
      runValidators: true,
    });
    if (!note) {
      return res.status(404).json({ message: "Note not found" });
    }
    res.status(200).json({ note });
  } catch (e) {
    res.status(400).json({ error: e.message });
  }
});
DELETE /notes/:id
Deletes a note corresponding to a given ID.
app.delete("/notes/:id", async (req, res) => {
  try {
    const note = await Note.findByIdAndDelete(req.params.id);
    if (!note) {
      return res.status(404).json({ message: "Note not found" });
    }
    res.status(200).json({ status: "success" });
  } catch (e) {
    console.log(e);
    res.status(400).json({ error: e.message });
  }
});
A sample console output after executing these operations might be:
user1 on user1 in ecs-project2 [!] is 📦 v1.0.0 via 🐳
Connecting to MongoDB
The application uses Mongoose to establish a connection with the MongoDB container at startup. The connection relies on the environment variables defined earlier. Once the connection is successful, the server begins listening on port 3000.
mongoose
  .connect(mongoURL, {
    useNewUrlParser: true,
    useUnifiedTopology: true,
  })
  .then(() => {
    console.log("Successfully connected to DB");
    app.listen(3000, () =>
      console.log("Server is listening on PORT 3000")
    );
  })
  .catch((e) => {
    console.log(e);
    process.exit(1);
  });
Reminder
Make sure your environment variables for the MongoDB connection are properly set in your deployment configuration to avoid connectivity issues.
Demo Creating security group
In this guide, we will walk you through creating a security group for your Amazon Elastic Container Service (AWS ECS) application. A security group acts as a virtual firewall that controls network traffic for your devices. While this example uses a very basic rule, remember to configure only the necessary traffic for production environments.
Steps to Create a Security Group
Navigate to the EC2 Dashboard and locate the Security Groups section.
Open the Security Groups page in a new browser tab to simplify navigation.
Click on Create Security Group to begin the configuration.
Set the security group name to "ECS SG" and add a description, for example, "ECS security group".
Add an inbound rule that allows all traffic from any IP.
Warning
Allowing all traffic is not recommended for production. It is best to define explicit rules that permit only the required traffic.
Ensure that the security group is associated with the correct VPC—the one hosting your ECS cluster.
Review your settings and click Create Security Group to complete the process.
By following these steps, you have successfully created a basic security group for your AWS ECS application. You can later update these rules to restrict access further as your application requirements evolve.
Note
For more in-depth information on AWS ECS and best practices for security configurations, consider exploring the AWS ECS Documentation.
Demo Creating multi container application
In this guide, we demonstrate how to build and deploy a multi-container application on Amazon ECS using Fargate. We will create a task definition, configure containers for MongoDB and an Express-based web API, mount an Elastic File System (EFS) volume for persistent MongoDB data, and launch a service behind an Application Load Balancer (ALB) for efficient traffic routing.
1. Creating the Task Definition
Begin by navigating to your ECS dashboard and selecting Task Definitions. Create a new task definition by choosing Fargate as the launch type. Give it a meaningful name (for example, "ECS-Project1"), assign the ECS task execution role, and select the smallest available memory option. After these steps, proceed to add your containers.
2. Configuring the MongoDB Container
The first container will run the MongoDB database. Configure it with the following steps:
Name the container "Mongo" and select the default Mongo image from Docker Hub.
Set the port mapping to 27017 (MongoDB’s default port).
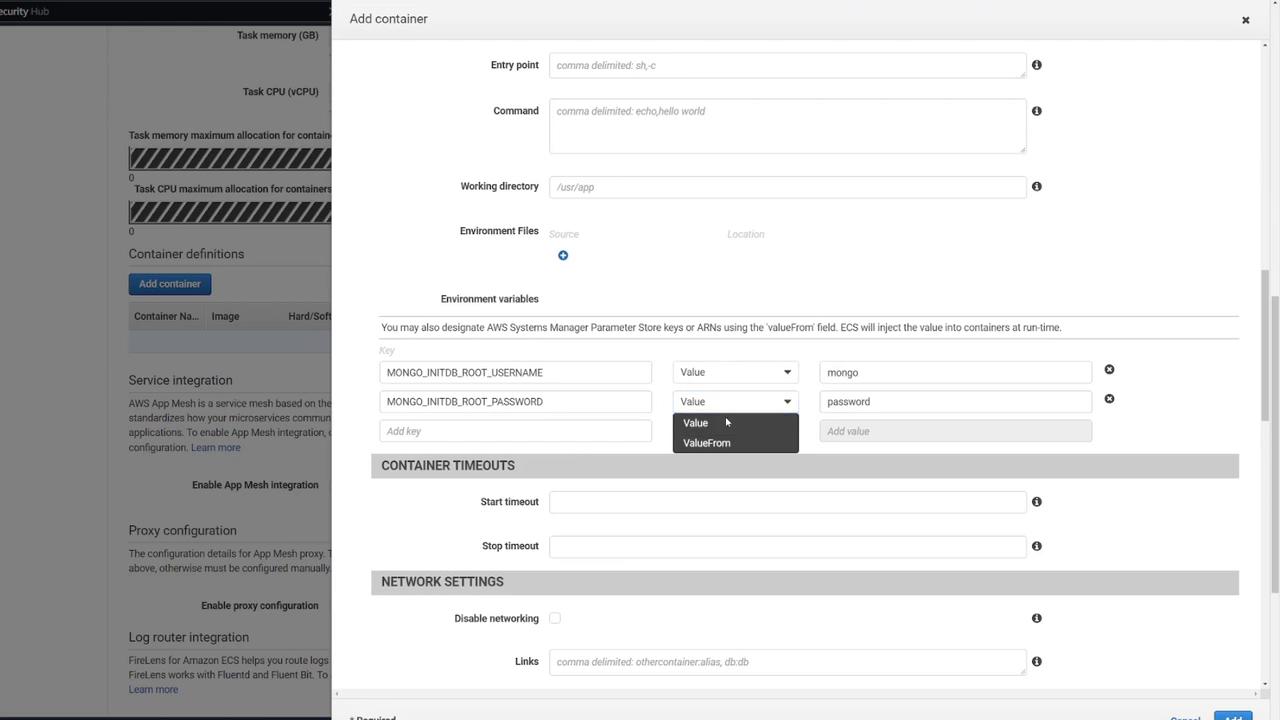
Define the necessary environment variables for MongoDB initialization.
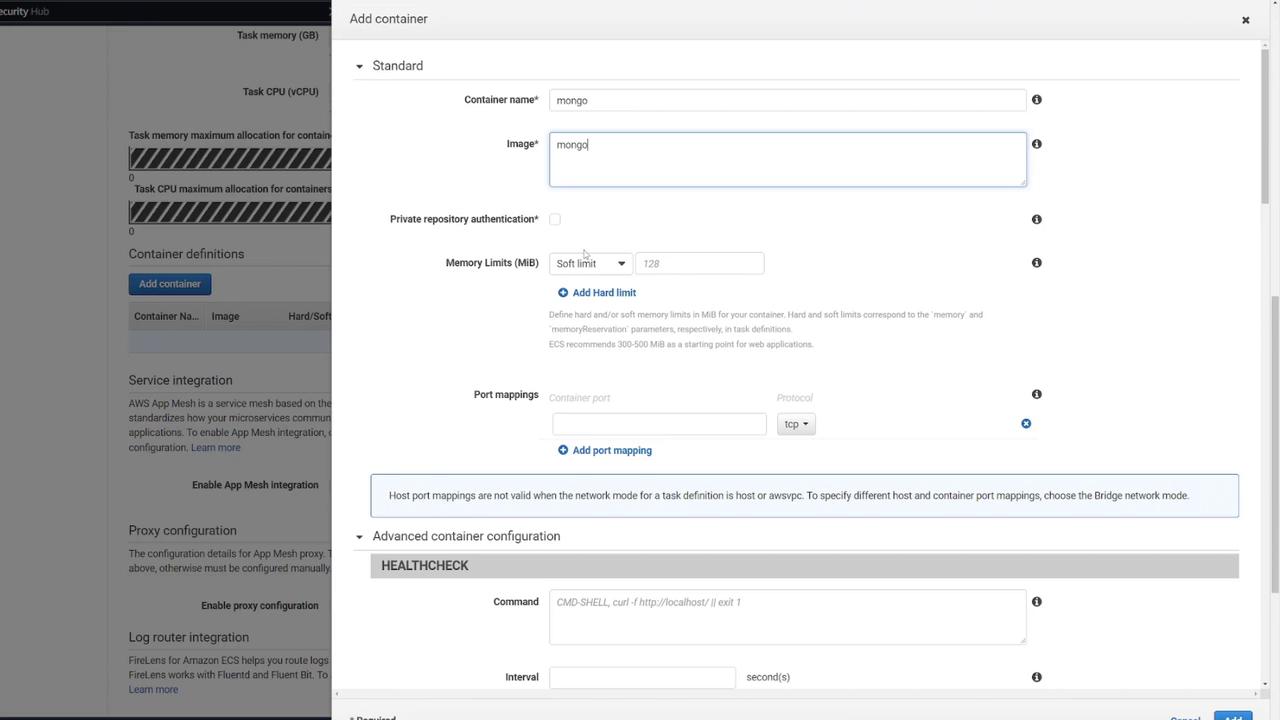
Health Check
You can add an optional health check for MongoDB. For example:
CMD-SHELL, curl -f http://localhost/ || exit 1
Next, include the following environment variables based on your docker-compose configuration:
environment:
  - MONGO_INITDB_ROOT_USERNAME=mongo
  - MONGO_INITDB_ROOT_PASSWORD=password
  - MONGO_IP=mongo
  - MONGO_PORT=27017
ports:
  - "27017:27017"
mongo:
  image: mongo
  environment:
    - MONGO_INITDB_ROOT_USERNAME=mongo
    - MONGO_INITDB_ROOT_PASSWORD=password
  volumes:
    - mongo-db:/data/db
volumes:
  mongo-db:
Security Notice
Using "password" for MongoDB credentials is not secure and is used here solely for demonstration purposes.
After confirming the settings, close the MongoDB container configuration.
3. Configuring the Web API Container
Next, configure the second container to host your Express-based web API:
Add a new container (for example, named "web API").
Use the image "ECS-Project2" from Docker Hub.
Set the container to listen on port 3000.
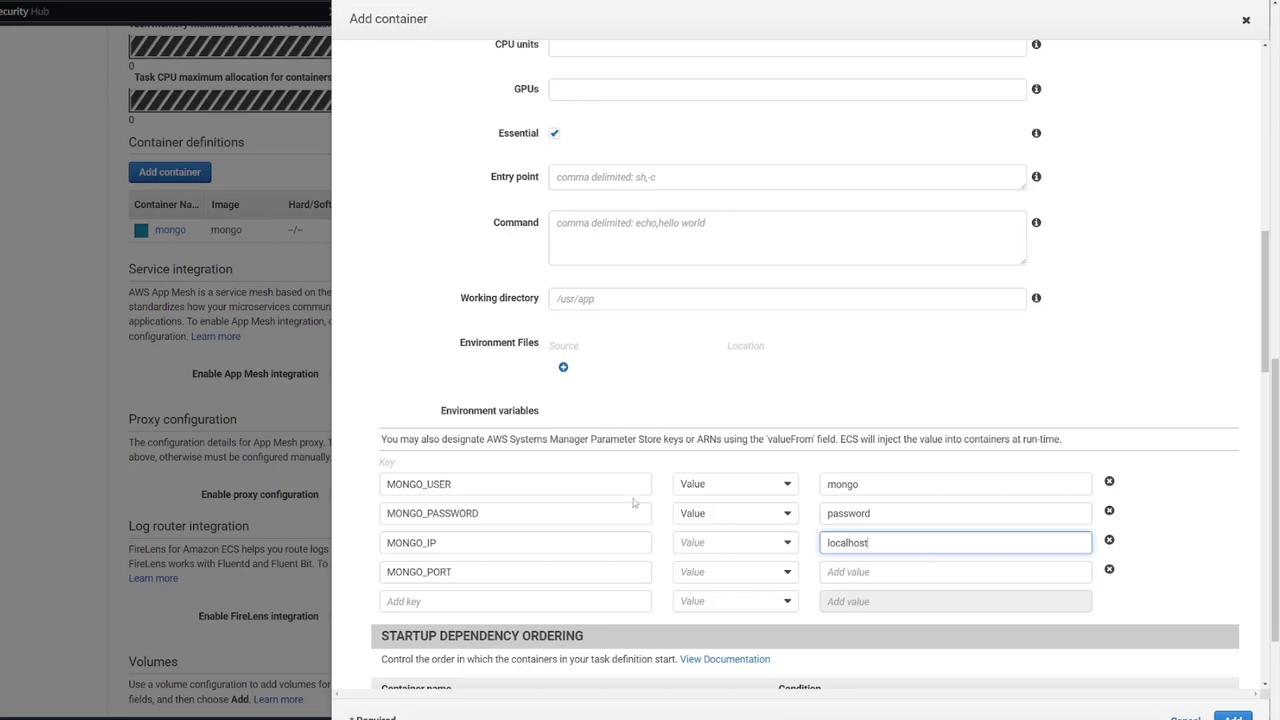
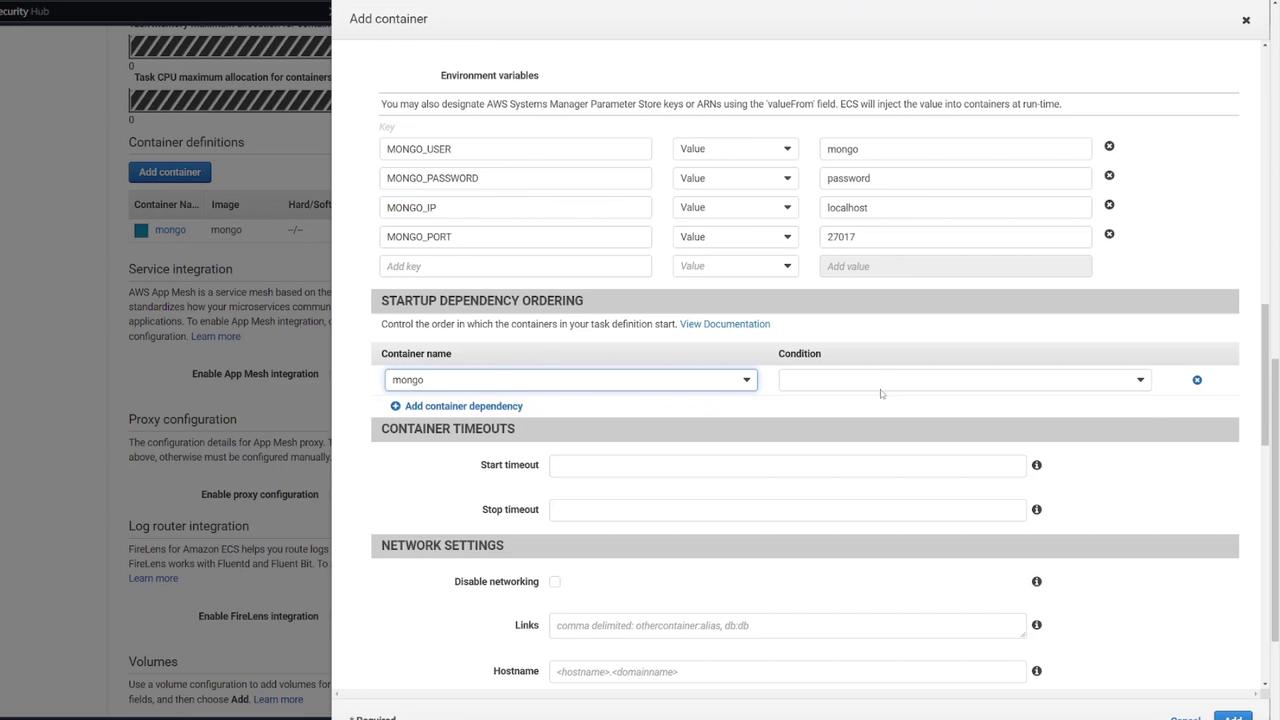
Ensure the environment variables match those from the MongoDB container for seamless connectivity:
version: "3"
services:
  api:
    build: .
    image: kodekloud/ecs-project2
    environment:
      - MONGO_USER=mongo
      - MONGO_PASSWORD=password
      - MONGO_IP=mongo
      - MONGO_PORT=27017
    ports:
      - "3000:3000"
  mongo:
    image: mongo
    environment:
      - MONGO_INITDB_ROOT_USERNAME=mongo
      - MONGO_INITDB_ROOT_PASSWORD=password
    volumes:
      - mongo-db:/data/db
Although Docker Compose supports built-in DNS resolution between services, ECS tasks do not. Therefore, ensure the web API leverages the proper host for intra-task communication.
A typical health check command for the web API may look like this:
HEALTHCHECK
  Command: CMD-SHELL, curl -f http://localhost/ || exit 1
  Interval: second(s)
While ECS does offer options to define container dependencies (ensuring MongoDB starts before the web API), this example does not include that configuration.
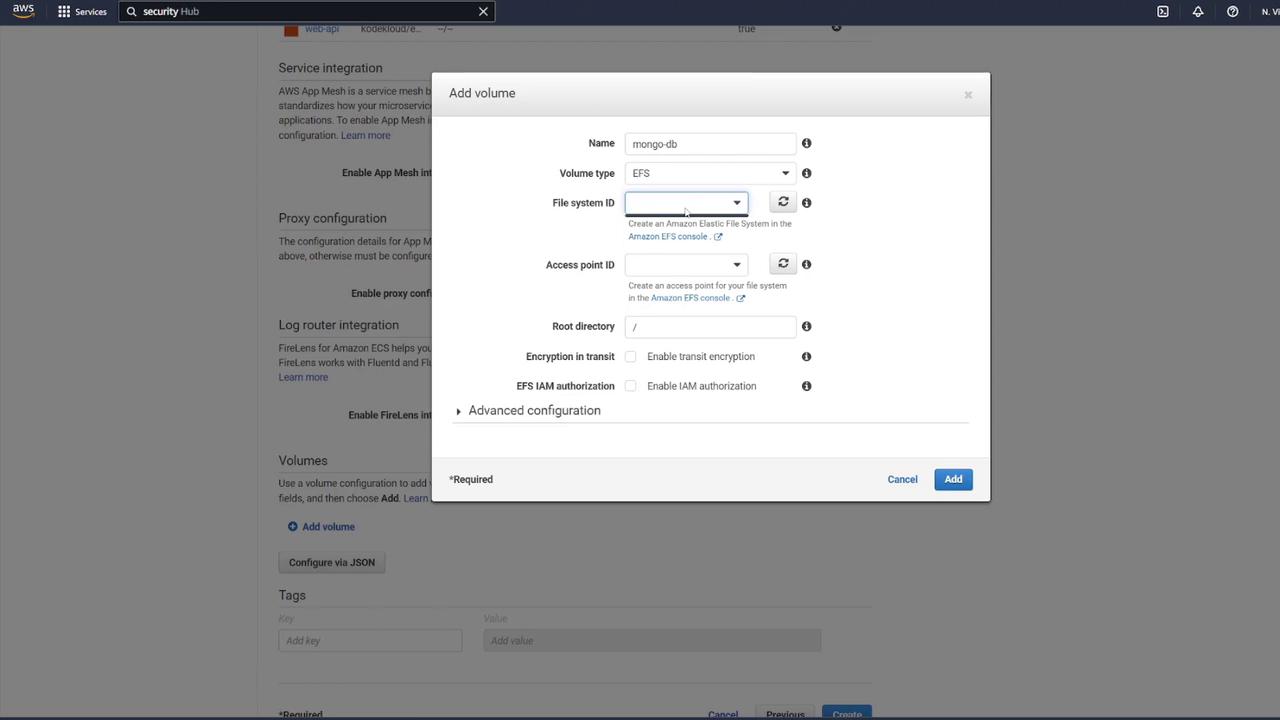
4. Defining a Volume for MongoDB
To ensure data persistence for MongoDB, attach an EFS volume to the MongoDB container:
In the ECS task definition, locate the volume section and add a new volume.
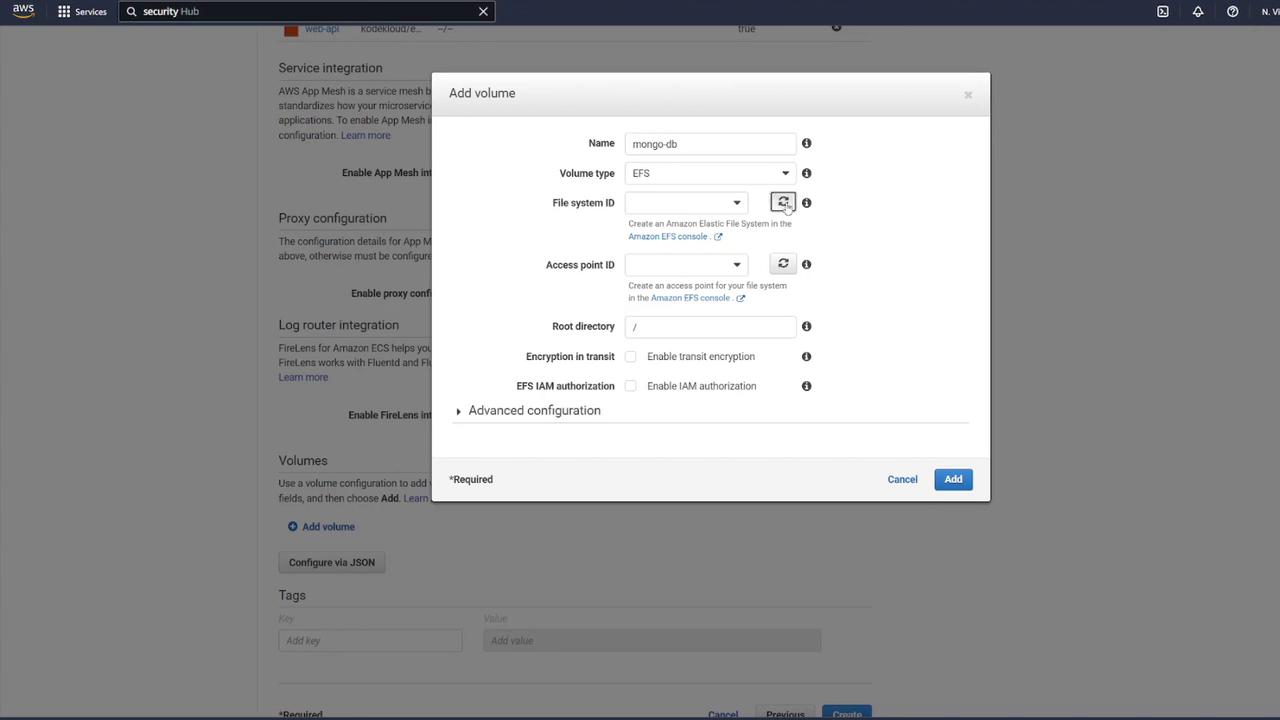
Name the volume "mongo-db" and choose AWS Elastic File System (EFS) as the volume type.
If no EFS is available, click the link to create a new one.
When creating the EFS:
Name it "mongo-db".
Use the same VPC as your ECS cluster.
Select the proper subnets and update the security group to permit ECS container communication.
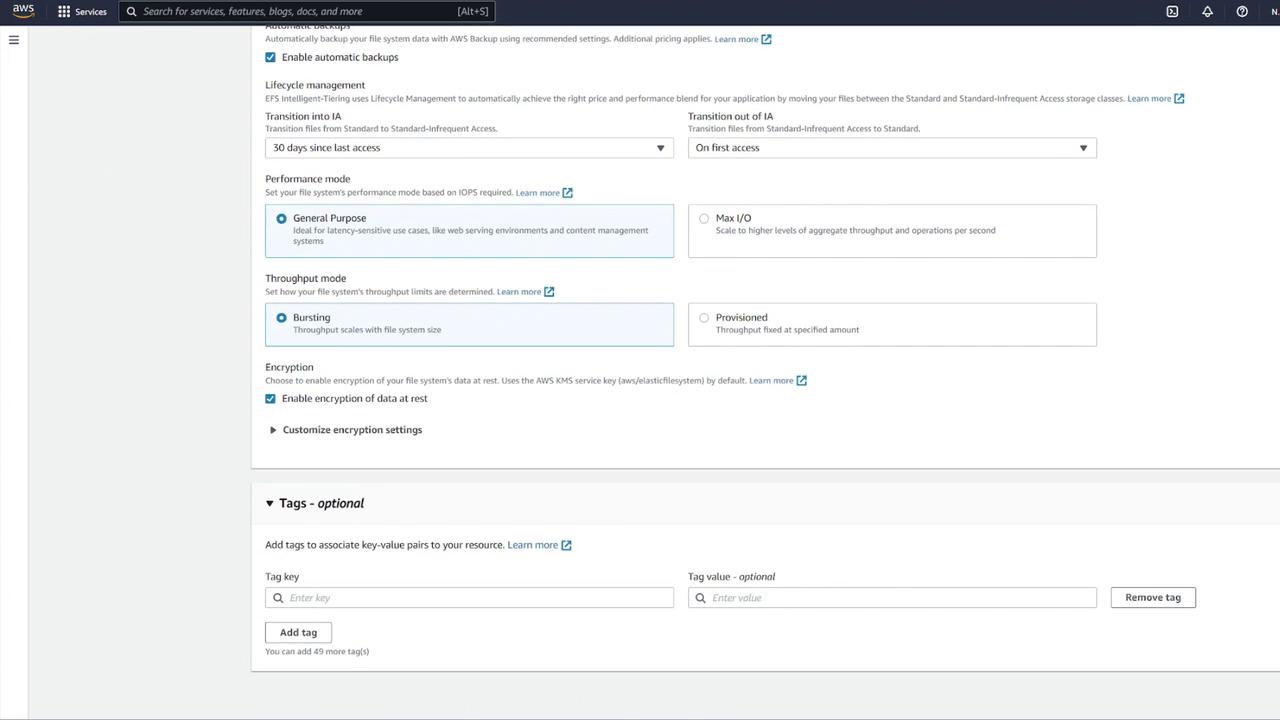
Create a dedicated security group for EFS (e.g., "EFS security group") and modify its inbound rules to allow NFS traffic (TCP port 2049) only from your ECS security group.

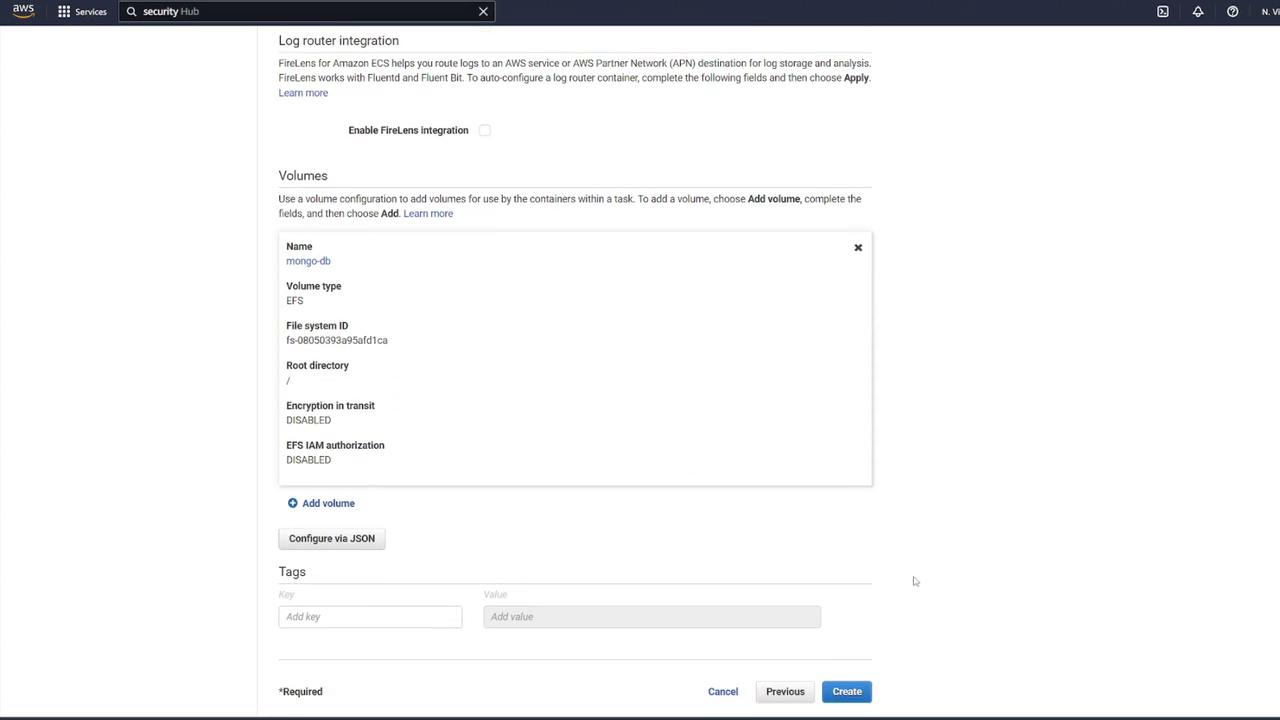
After updating the settings and refreshing the EFS dialog, remove any default security groups and proceed with volume creation.
5. Mounting the EFS Volume in the MongoDB Container
Associate the EFS volume with your MongoDB container by performing the following:
Edit the MongoDB container’s settings.
In the "Storage and Logging" section, select Mount Points.
Choose the "mongo-db" volume and set the container path to
/data/dbas recommended by MongoDB.
Example container settings snippet:
Command: echo,hello world
Environment variables:
  MONGO_INITDB_ROOT_PASSWORD: password
  MONGO_INITDB_ROOT_USERNAME: mongo
Click Update and then create your task definition. You may notice the task definition revision incrementing (e.g., revision 4).
6. Creating the ECS Service and Configuring the Load Balancer
Now that the task definition is complete, create a new ECS service:
Navigate to your ECS cluster (e.g., "cluster one") and create a service.
Select Fargate as the launch type and Linux as the operating system.
Choose the newly created task definition (e.g., "ECS-Project2") and assign a service name (for instance, "notes app service").
Set the number of tasks to 1.
Select the appropriate VPC, subnets, and ECS security group (e.g., "ECS-SG").
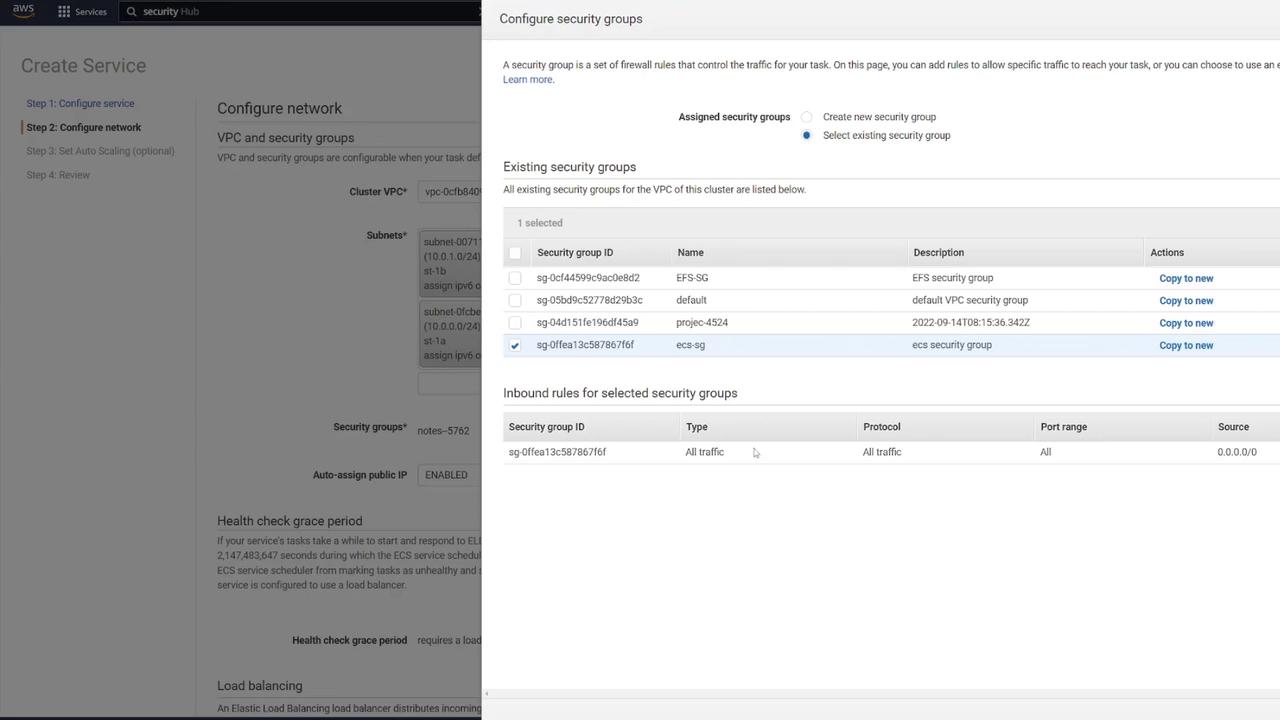
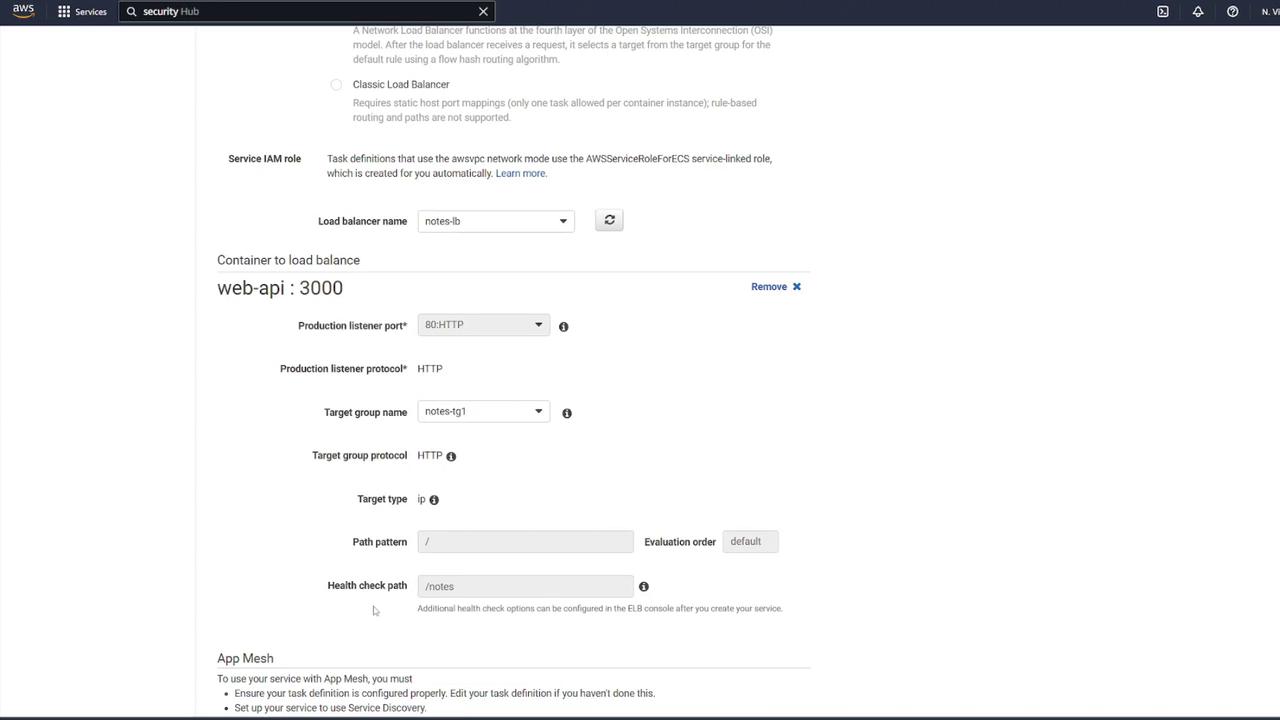
Configuring the Application Load Balancer
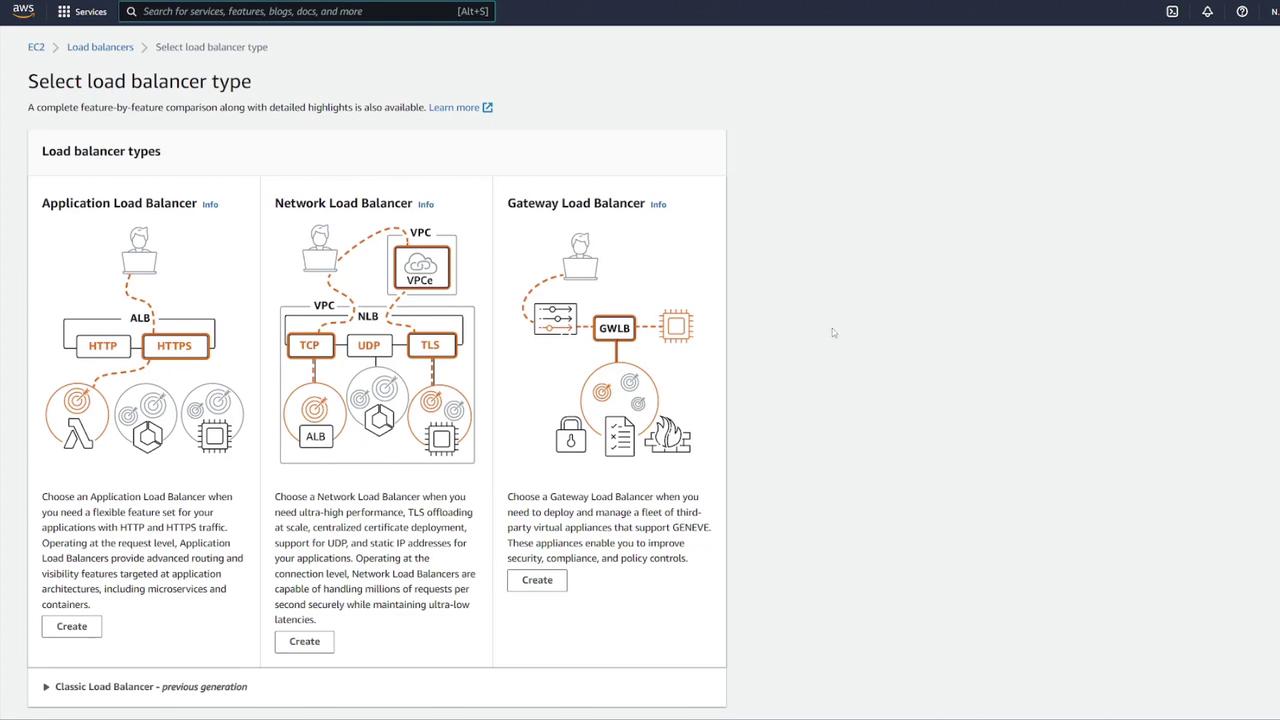
To distribute traffic and enhance scalability, set up an ALB:
Click the link to open the ALB configuration in a new tab.
Choose the Application Load Balancer type, set it as internet-facing, and select IPv4.
Map the ALB to the appropriate VPC.
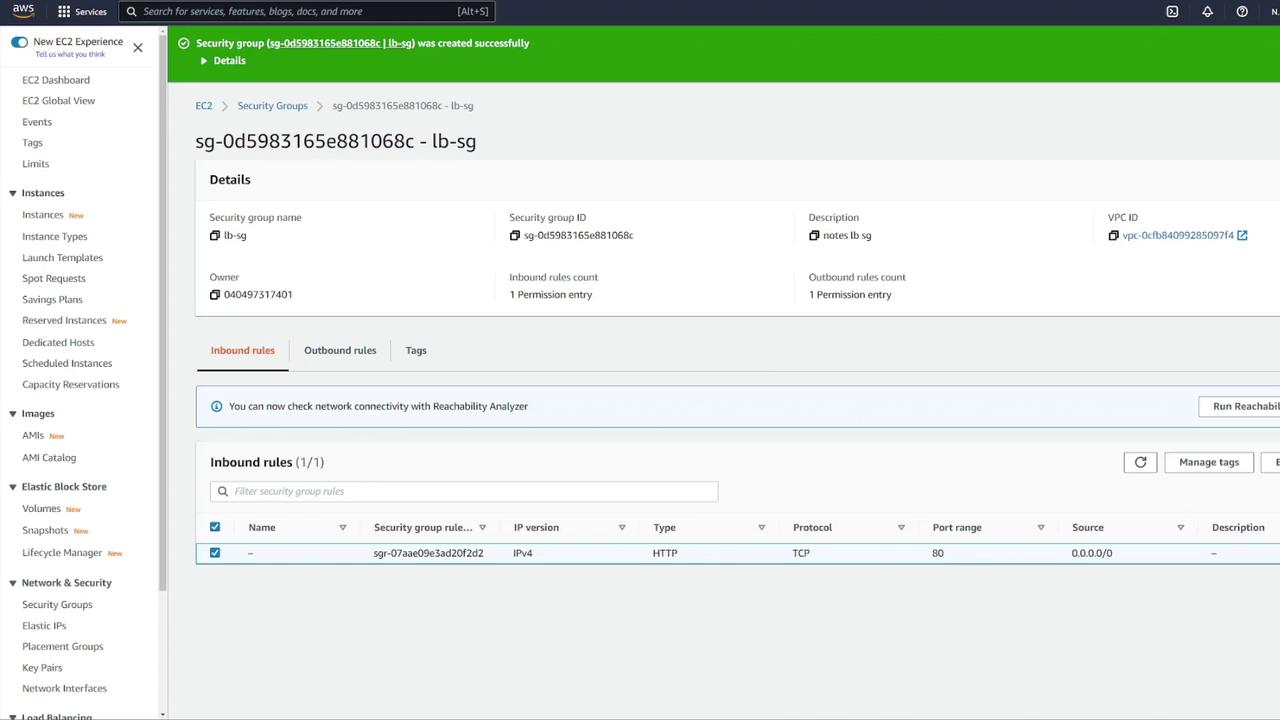
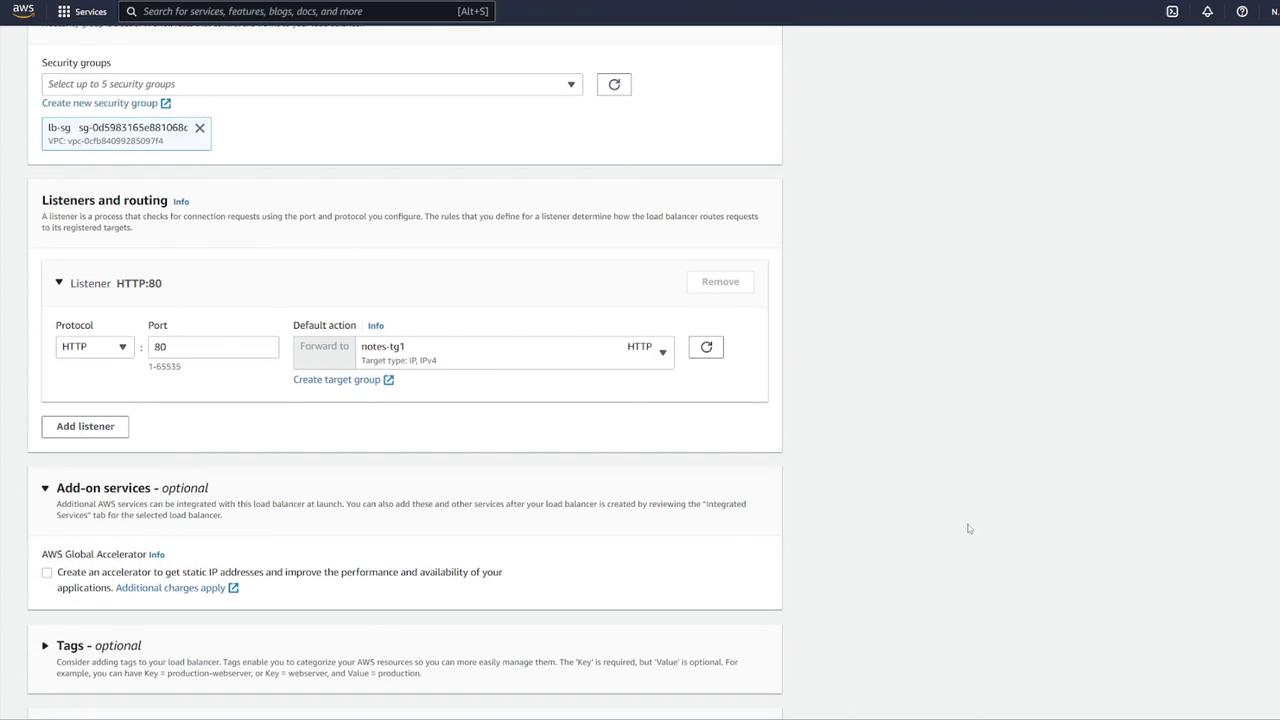
Create a new security group for the ALB (e.g., "LB-SG").
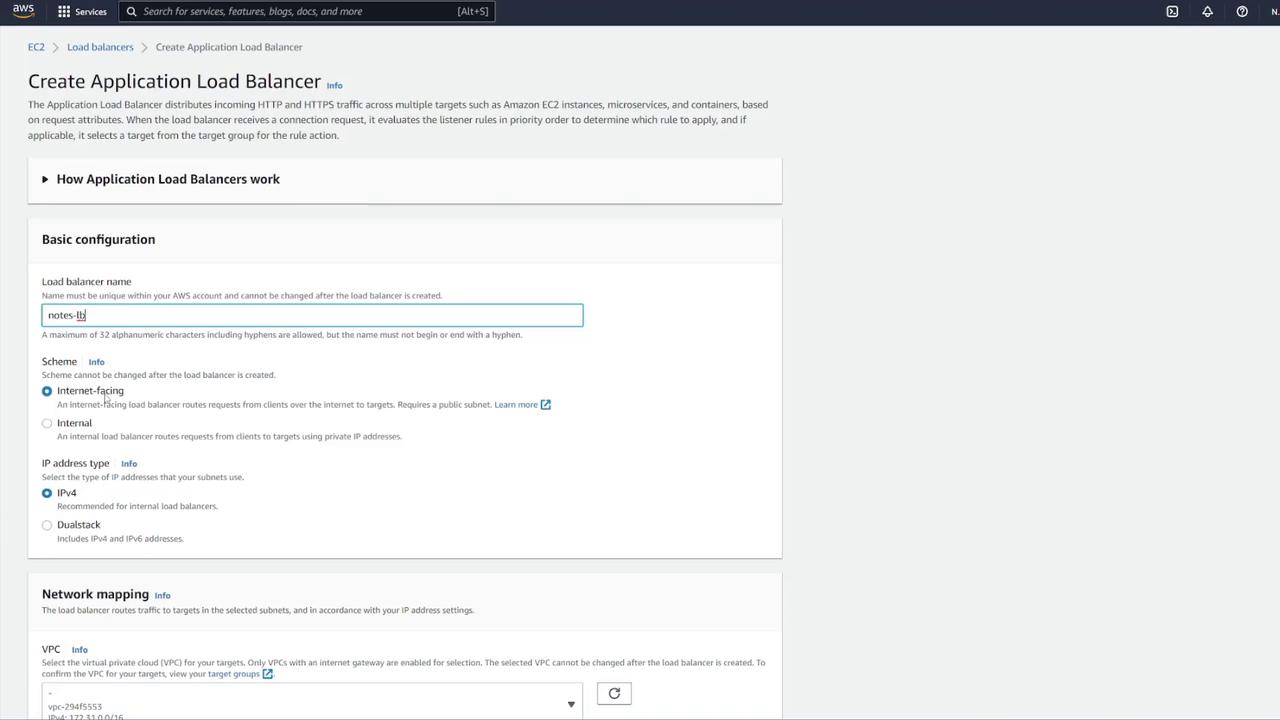
Configure the ALB with the following details:
Name it appropriately (e.g., "notes LB").
Set it as internet facing with IPv4.
Configure inbound rules to allow HTTP traffic on port 80. Although the container listens on port 3000, the ALB will forward requests to port 3000 using listener rules.
If any default security groups cause issues, create a custom ALB security group with the proper rules.
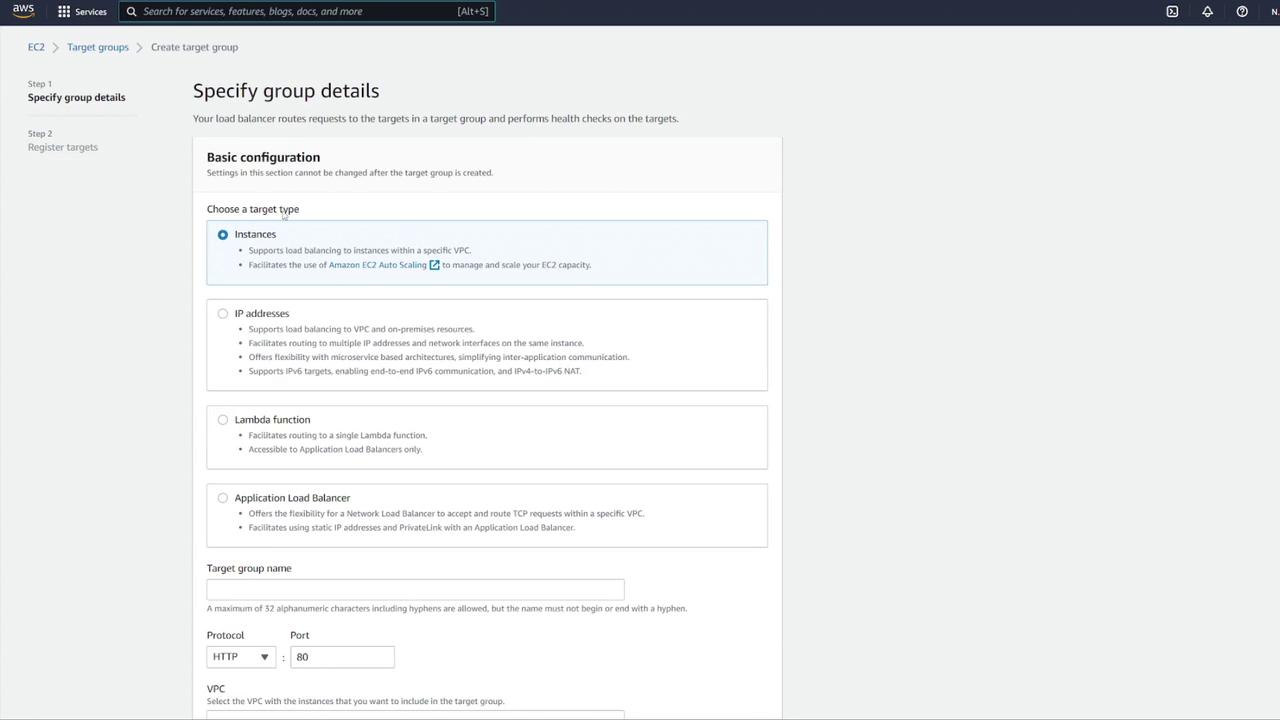
After confirming your ALB settings, create a target group by following these steps:
Select IP addresses as the target type.
Name the target group (e.g., "notes-tg1") and choose the correct VPC.
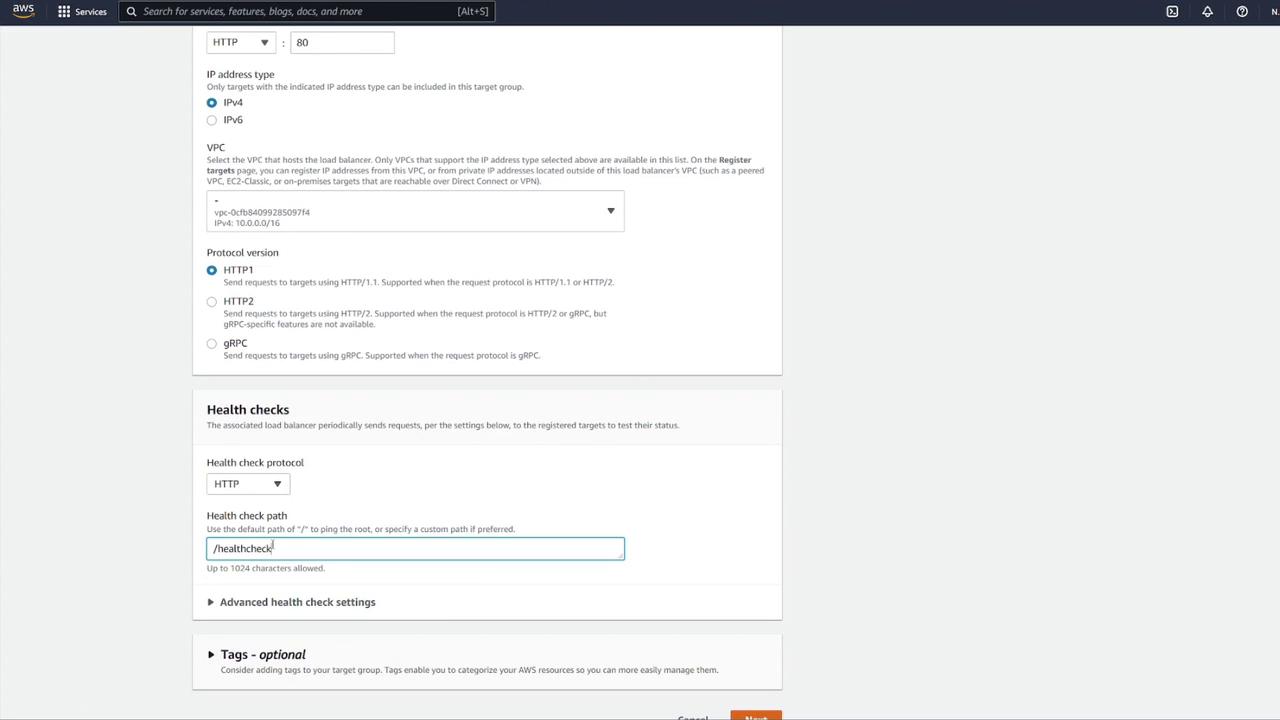
Modify the health check configuration: update the health check path to
/notesand override the health check port to 3000 if required.
Return to the load balancer configuration and associate the new target group (notes-tg1) to the listener on port 80, ensuring traffic is forwarded to port 3000.
Review all final settings, disable auto scaling if not necessary, and create the ECS service.
After the service is created, verify that at least one task transitions from provisioning to running. You can check the status by clicking the running task and confirming that both the "mongo" and "notes-api" containers operate as expected.
7. Testing the Application
Once your service is running, test your application using tools like Postman:
Send a GET request to the container's IP on port 3000 at the
/notesendpoint. The initial response should be:{ "notes": [] }Send a POST request with JSON data, such as:
{ "title": "second_note", "body": "remember to do dishes!!!!" }A subsequent GET request to
/notesshould display the newly created note:{ "notes": [ { "_id": "63211a3c034fdd55dec212834", "title": "second note", "body": "remember to do dishes!!!!", "__v": 0 } ] }
Since you configured a load balancer, test the application using the ALB’s DNS name. For example, navigate to:
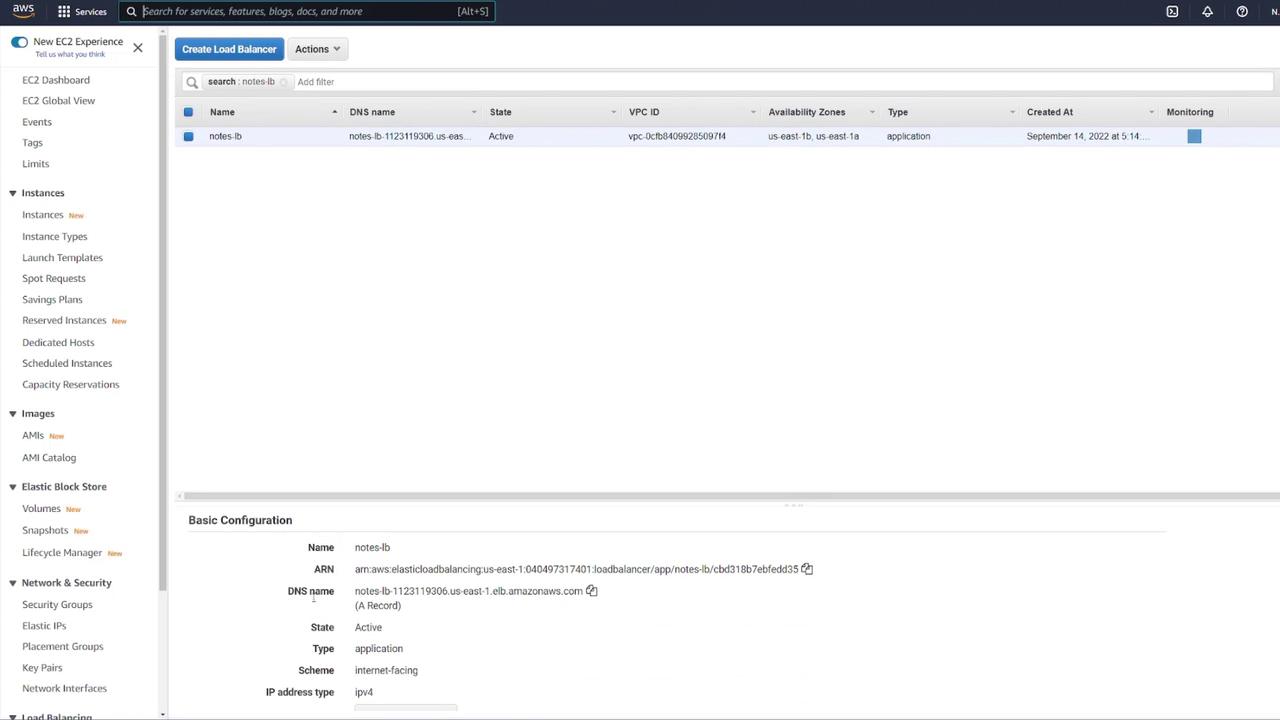
Ensure you do not include port 3000 in the URL because the ALB listens on port 80 and forwards the requests to port 3000 through the target group. For example:
GET http://notes-lb-1123119306.us-east-1.elb.amazonaws.com/
 {
   "notes": []
 }
After a POST request adds a note, a subsequent GET should display the updated results.
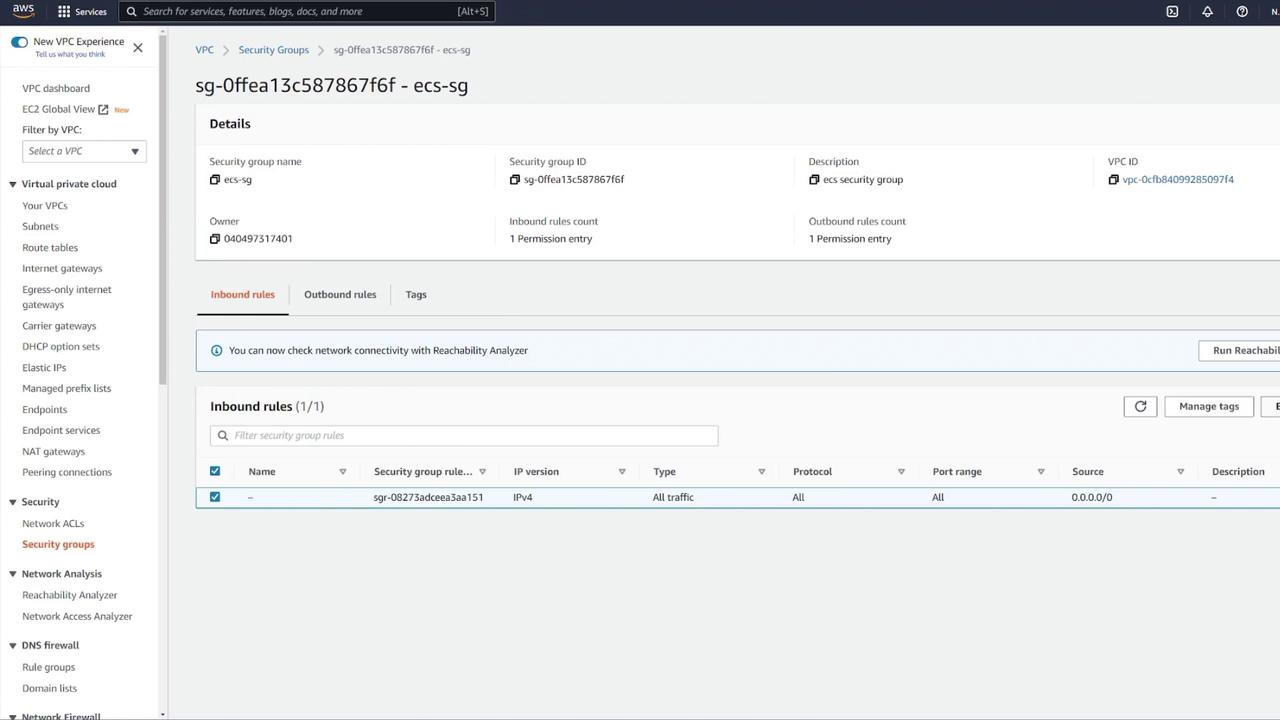
8. Enhancing Security Group Rules
For improved security, update your ECS security group rules:
Instead of allowing all IP addresses on any port, remove the overly permissive rule.
Add a custom TCP rule on port 3000 with the source set to your load balancer's security group. This ensures that only traffic routed through the ALB reaches your ECS containers.
In this article, we successfully deployed a multi-container application on Amazon ECS using Fargate. This deployment includes a MongoDB database with persistent EFS storage, an Express-based web API, an Application Load Balancer for efficient traffic distribution, and tightened security through proper security group configurations.
For more detailed information on ECS and related services, please refer to the following resources:
Happy deploying!
Conclusion
In this lesson, we covered the essential steps to deploy an application on Amazon Web Services (AWS) using Elastic Container Service (AWS ECS). This guide offers a comprehensive starting point for deploying containerized applications on AWS, ensuring you have a clear path to success.
Insight
If AWS ECS isn't your preferred method for container deployment, consider exploring AWS EKS for a managed Kubernetes solution that might better suit your needs.
We value your feedback! Please share your thoughts in the comments below and let us know if ECS is your go-to solution or if you prefer other alternatives.
Thank you for joining this lesson. We look forward to seeing you in the next session!
Subscribe to my newsletter
Read articles from Arindam Baidya directly inside your inbox. Subscribe to the newsletter, and don't miss out.
Written by
Arindam Baidya
Arindam Baidya
🚀 Aspiring DevOps & Cloud Engineer | Passionate about Automation, CI/CD, Containers, and Cloud Infrastructure ☁️ I work with Docker, Kubernetes, Jenkins, Terraform, AWS (IAM & S3), Linux, Shell Scripting, and Git to build efficient, scalable, and secure systems. Currently contributing to DevOps-driven projects at Assurex e-Consultant while continuously expanding my skills through hands-on cloud and automation projects. Sharing my learning journey, projects, and tutorials on DevOps, AWS, and cloud technologies to help others grow in their tech careers. 💡 Let’s learn, build, and innovate together!