2. Working with AWS ECS
 Arindam Baidya
Getting started with ECS
Before working with Amazon Elastic Container Service (ECS) via the AWS console, visit Docker Hub to review two demo projects created specifically for this ECS guide. These public repositories, available at kodekloud.com/ECS-project1 and kodekloud.com/ECS-project2, enable you to follow along as you configure your ECS environment.
ECS Project 1
In this walkthrough, we focus on the first demo project: a basic Node.js application running on an Express server. The following example shows the HTML file served as the landing page:
<!DOCTYPE html>
<html lang="en">
<head>
    <meta charset="UTF-8" />
    <meta http-equiv="X-UA-Compatible" content="IE=edge" />
    <meta name="viewport" content="width=device-width, initial-scale=1.0" />
    <link rel="stylesheet" href="css/style.css" />
    <title>Document</title>
</head>
<body>
    <h1>ECS Project 1</h1>
</body>
</html>
A sample command prompt output for the project might look like:
user1 on user1 in ecs-project1 is v1.0.0 via
The Node.js application is set up so that a GET request to the root URL returns the HTML file:
const express = require("express");
const path = require("path");


const app = express();


app.set("view engine", "ejs");
app.set("views", path.join(__dirname, "views"));


app.use(express.static(path.join(__dirname, "public")));


app.get("/", (req, res) => {
    res.render("index");
});


app.listen(3000, () => {
    console.log("Server is running on port 3000");
});
Another similar command prompt snippet may be seen during container startup:
user1 on user1 in ecs-project1 is v1.0.0 via
The application listens on port 3000. The Dockerfile for this project is straightforward, exposing port 3000 for container communication:
FROM node:16
WORKDIR /usr/src/app
COPY package*.json ./
RUN npm install
RUN npm ci --only=production
COPY . .
EXPOSE 3000
CMD [ "node", "index.js" ]
Note
Ensure that the exposed port in the Dockerfile matches the port your application is listening on.
Configuring ECS via the AWS Console
Start by logging into the AWS console and searching for ECS. Once selected, you will be greeted by a guided wizard, perfect for newcomers to ECS.
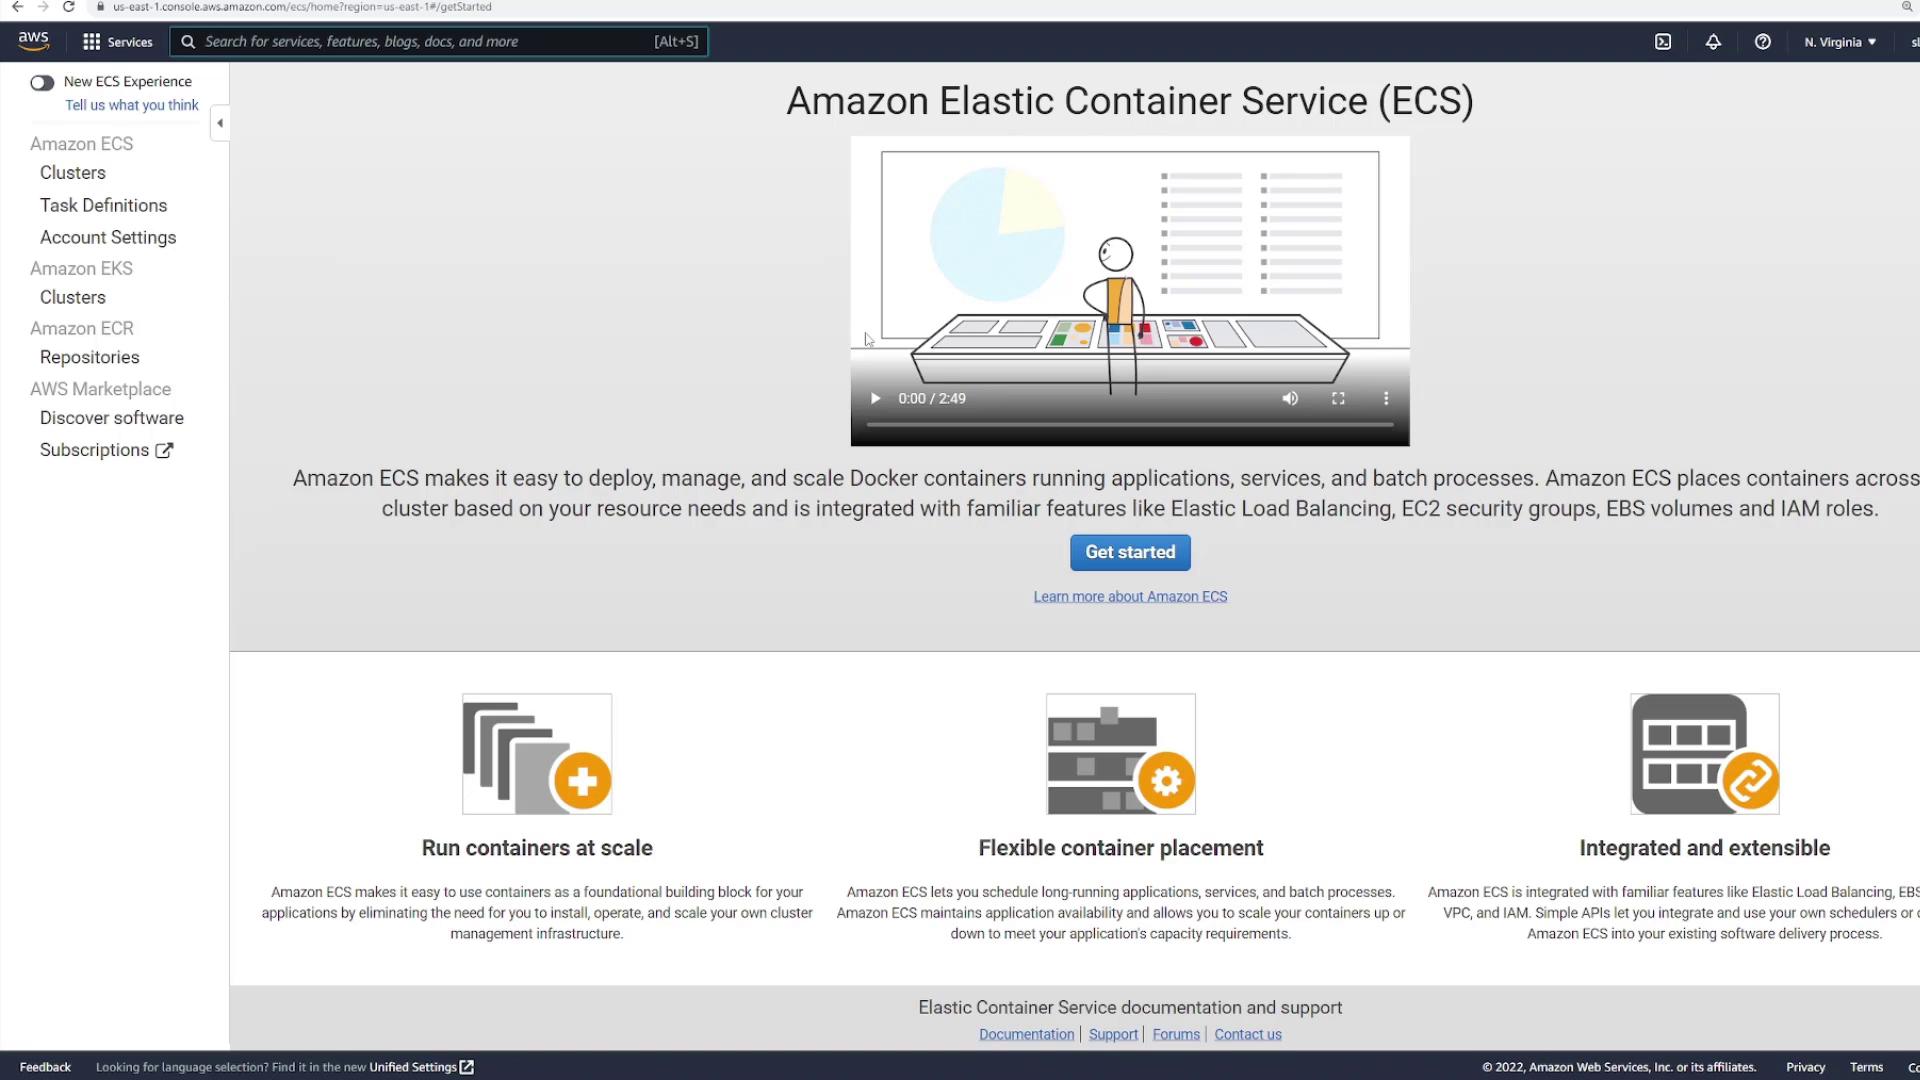
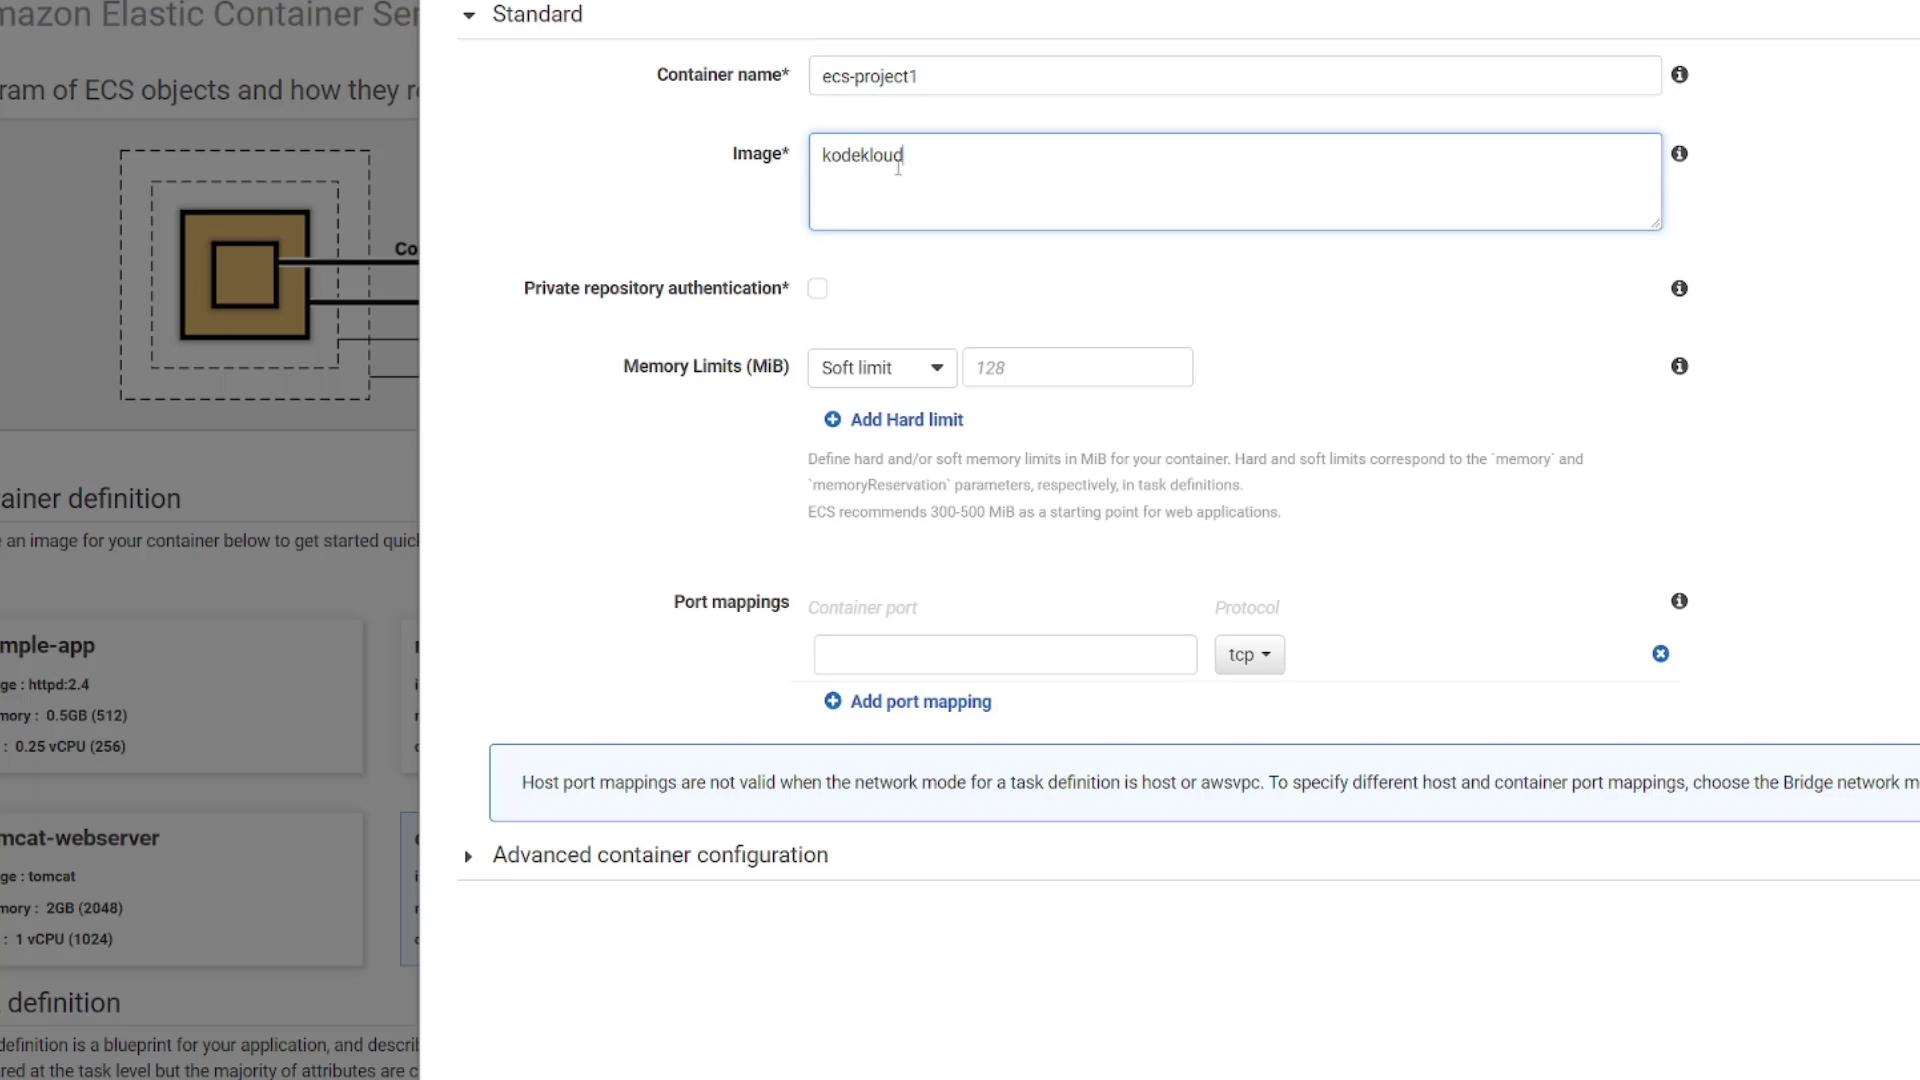
Click the "Get started" button. Although ECS offers several example applications, choose the custom option to manually configure your container. When prompted:
Provide a container name (e.g., "ECS-project-one").
Specify the image as kodekloud/ECS-project1.
Public Repository
If your image were hosted on a private repository, you would be required to supply credentials. In this case, the repository is public.
Optionally, set memory limits as required.
Critically, configure the port mappings appropriately. Because the application listens on port 3000, use 3000 as the container port with the TCP protocol.
Normally, when running a container with Docker, you might map a different external port using a command such as:
docker run -p [HOST_PORT]:[CONTAINER_PORT]
However, in ECS the host port must match the container (internal) port. For instance, if the application listens on port 3000 inside the container, it will be exposed as port 3000 externally. You cannot map, for example, host port 80 to container port 3000 in ECS.
The advanced container configuration options allow you to set health checks (for example, using the command below), environment variables, volumes, and resource limits—mirroring settings you might configure in a Docker Compose file or using a Docker run command, but all managed through a GUI.
CMD-SHELL, curl -f http://localhost/ || exit 1
Once your settings are configured, click "Update," then "Next."
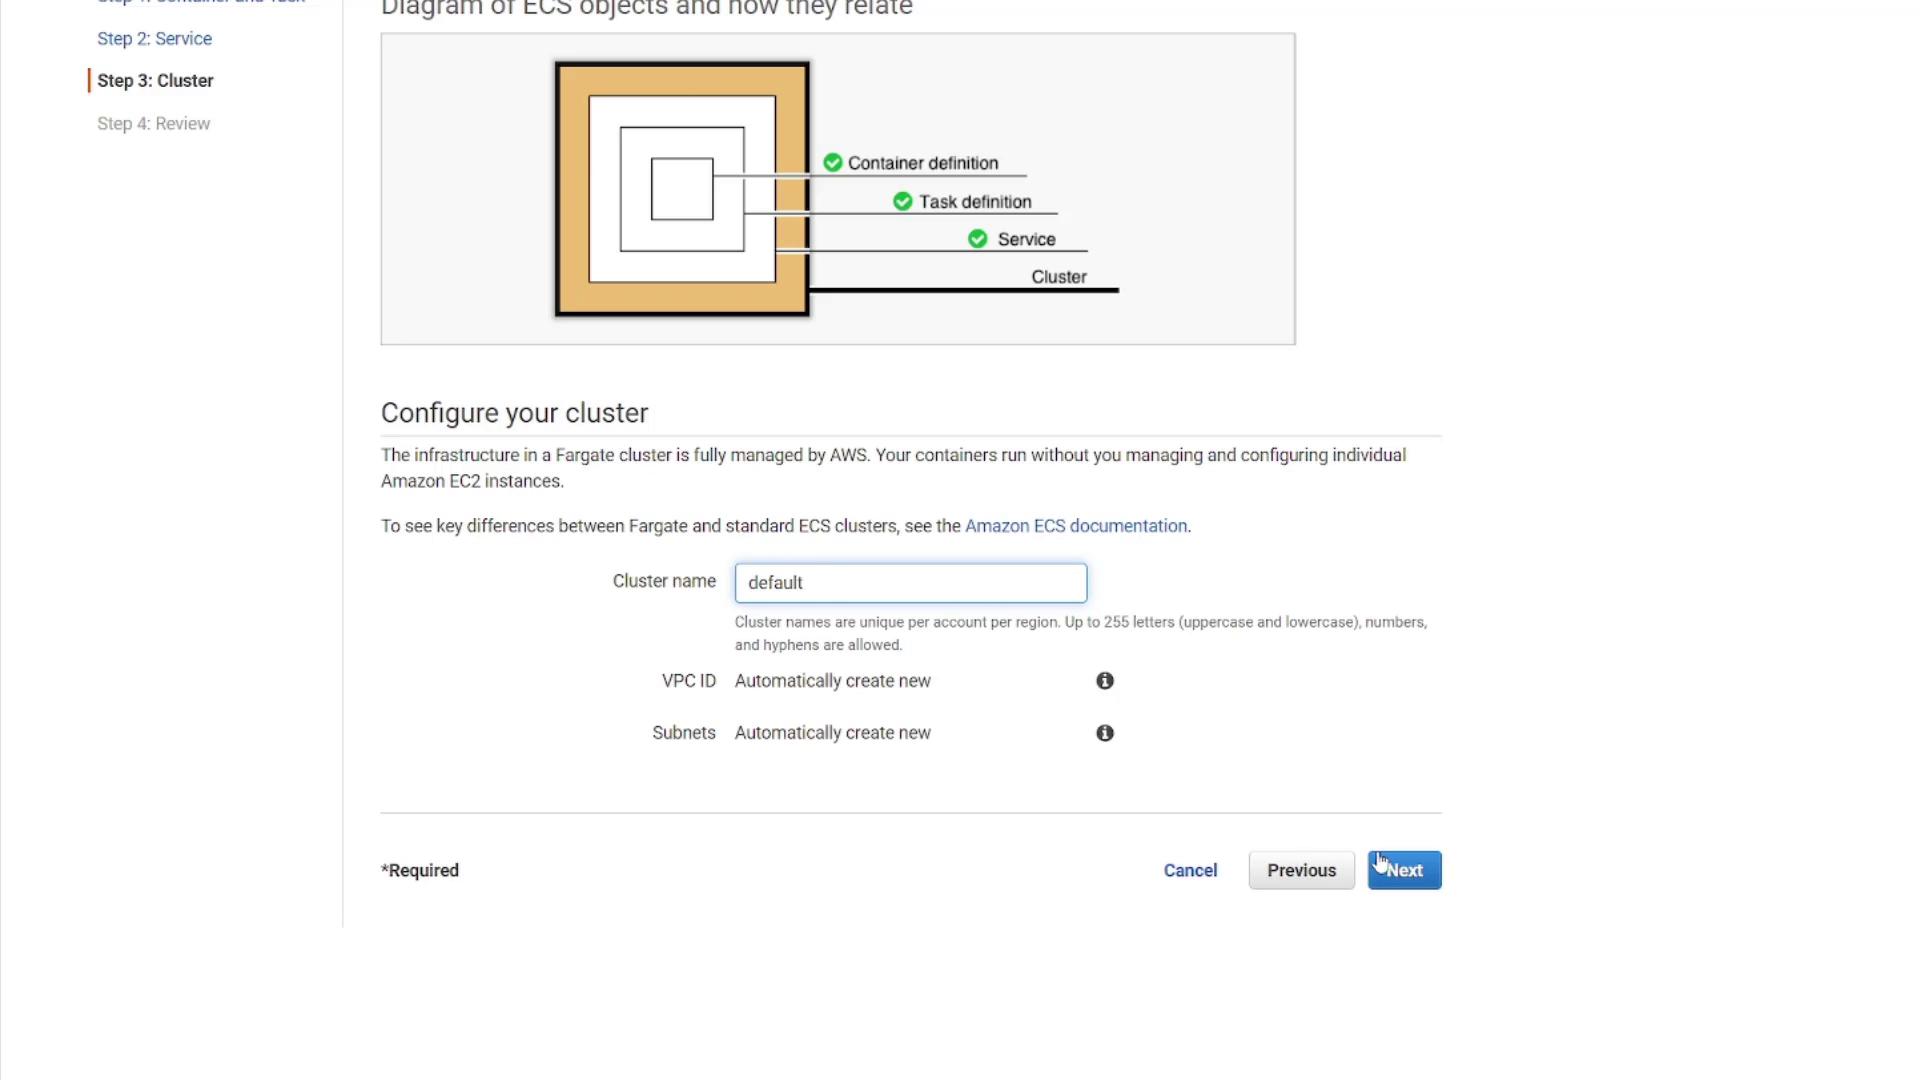
Service and Cluster Configuration
Next, define your service. The ECS wizard will automatically create a service named "ECS-project-one service." While you have the option to attach a load balancer, you can leave it set to "none" for now. The wizard will also create a new cluster with default settings. Remember, the cluster represents the collection of resources where your containers will be deployed.
If necessary, you can configure a load balancer later. For now, continue with the default settings. ECS will automatically create a new Virtual Private Cloud (VPC) along with the required subnets, ensuring that your ECS cluster runs in its own secure environment, isolated from your default VPC.
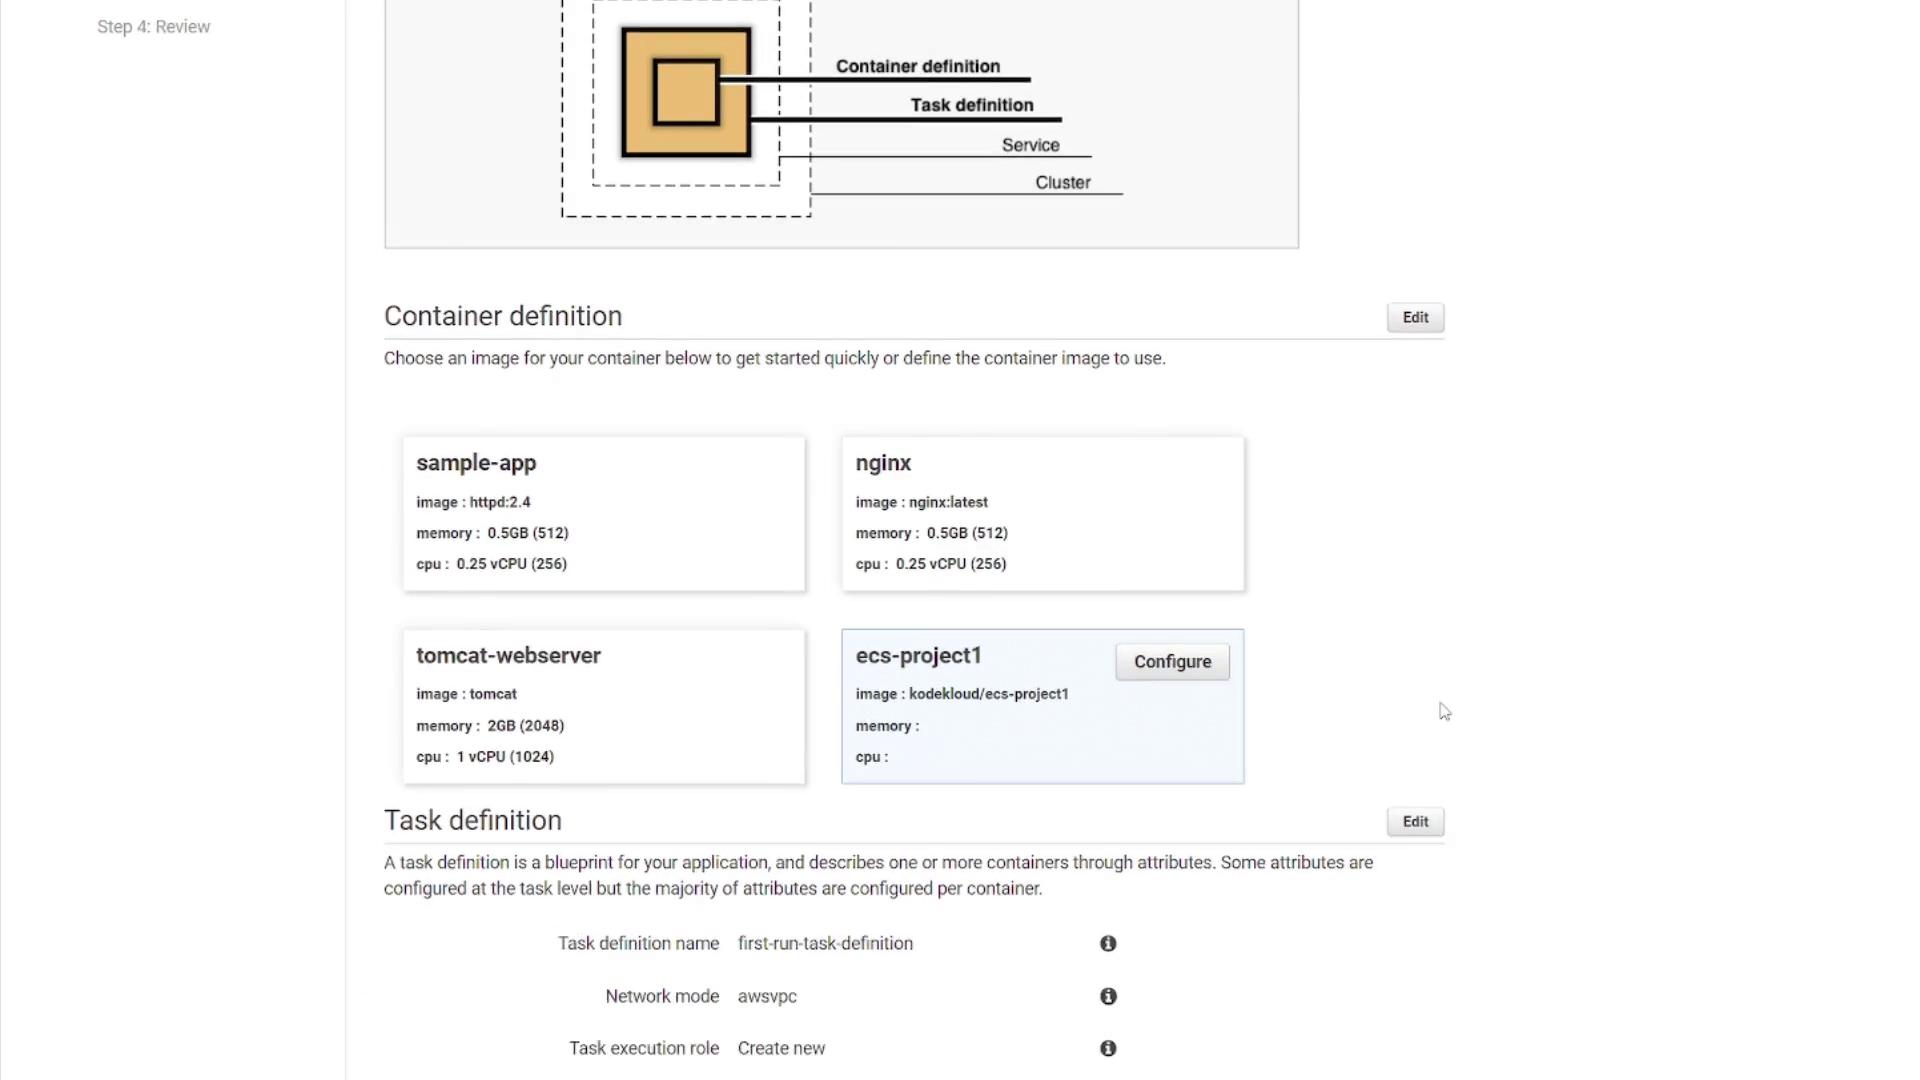
After you review your configuration settings on the summary page—which outlines the container definition, task definition, service, and cluster—click "Create."
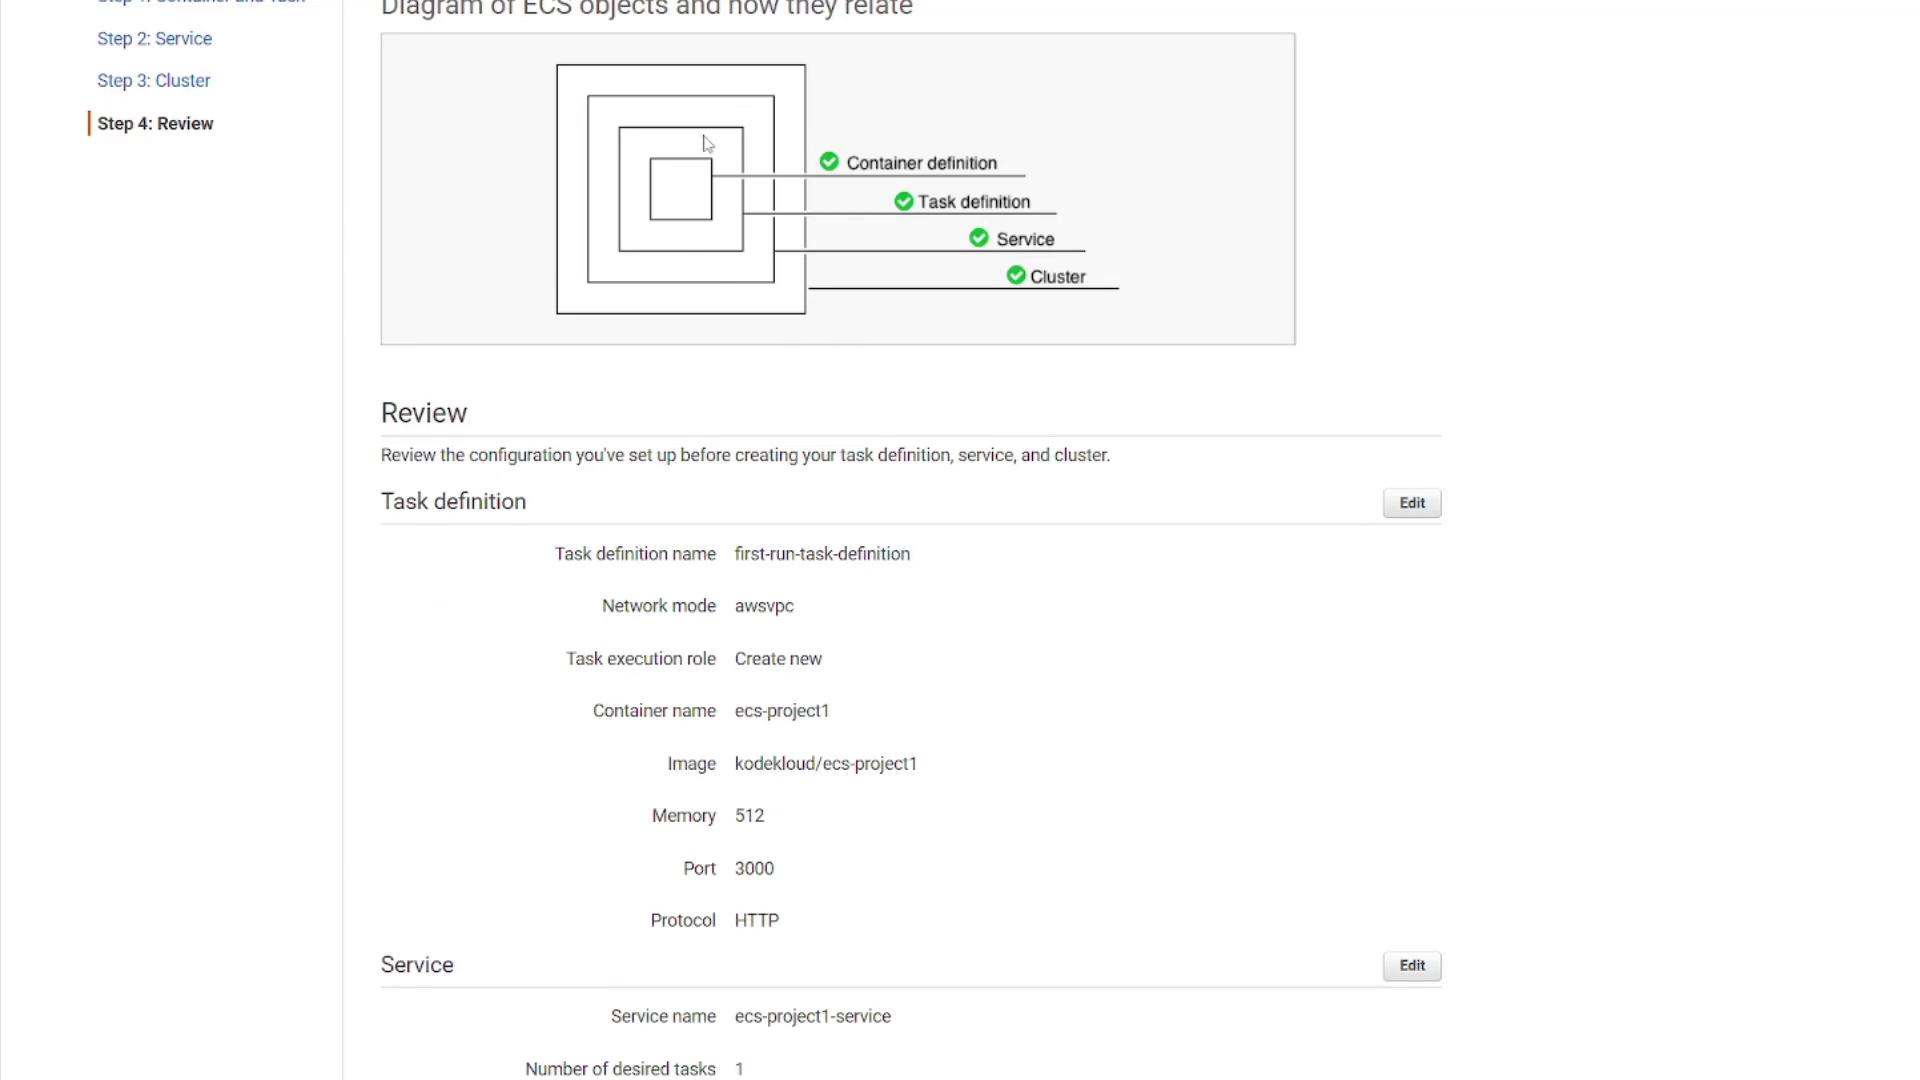
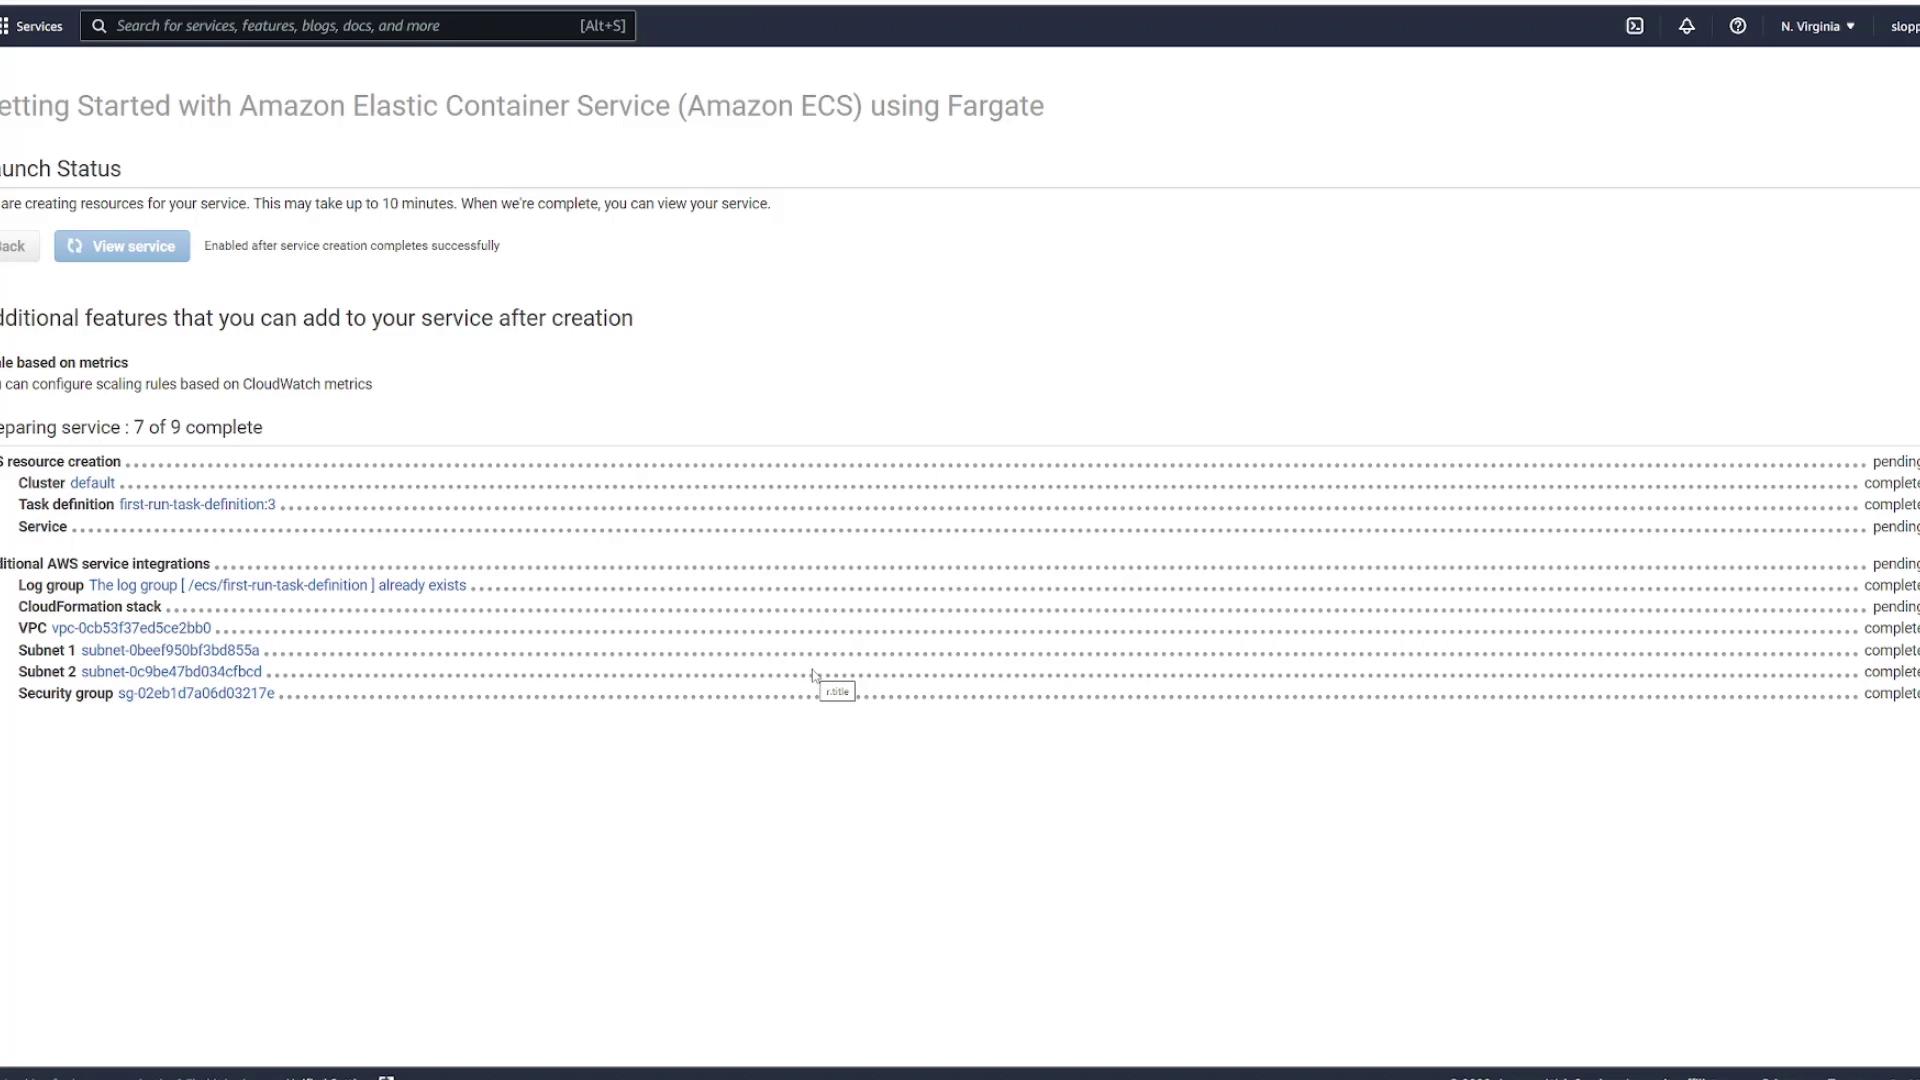
Service creation may take several minutes. Once the process is complete, click "View Service" to review your newly created ECS service.
This concludes the ECS configuration walkthrough. In this guide, you learned how to set up your container, configure service and cluster settings using the ECS console, and understand the port mapping differences relative to a typical Docker run command.
Happy exploring with Amazon Elastic Container Service!
Understanding project configuration
Before validating that your application deployed successfully, it's essential to review all the resources created by the ECS task wizard. The wizard performs multiple behind-the-scenes operations, and understanding each step can help you troubleshoot and optimize your deployment.
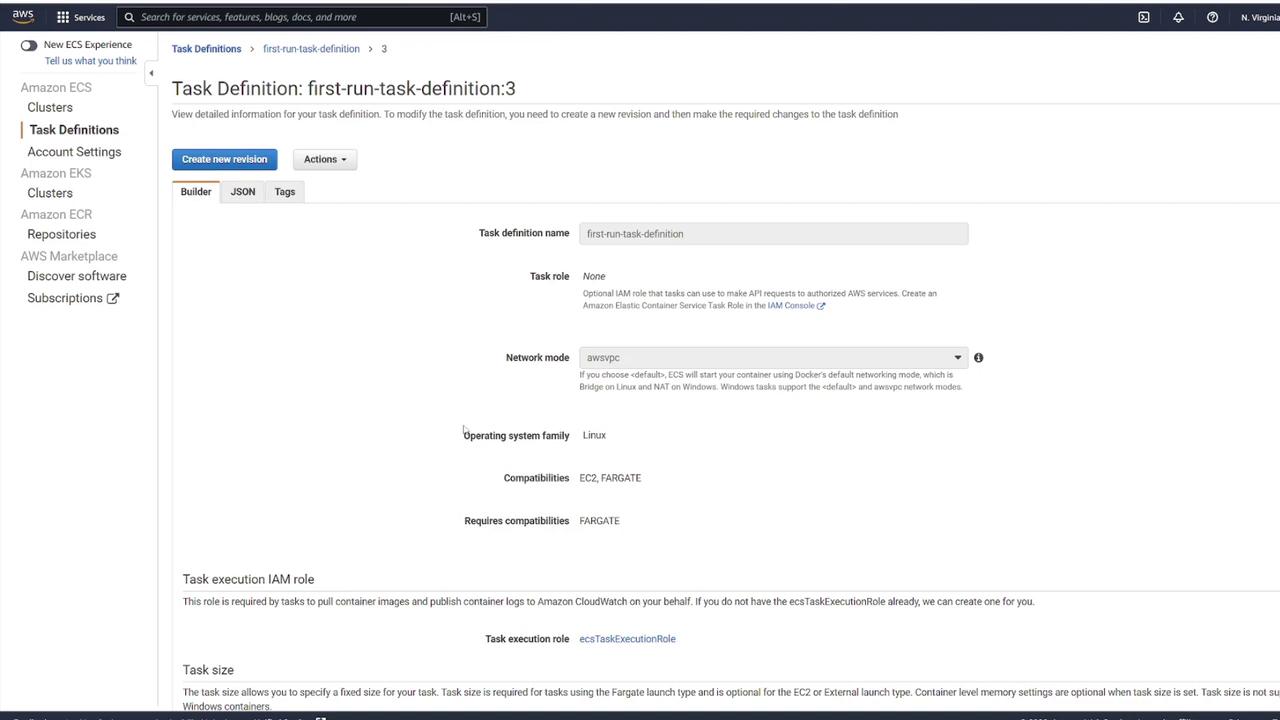
Start by navigating to the Task Definitions section. The Task Definition file is where all container configurations reside, much like a Docker Compose file or Docker run command flags. It includes vital settings such as port mappings, volume definitions, and environment variables.
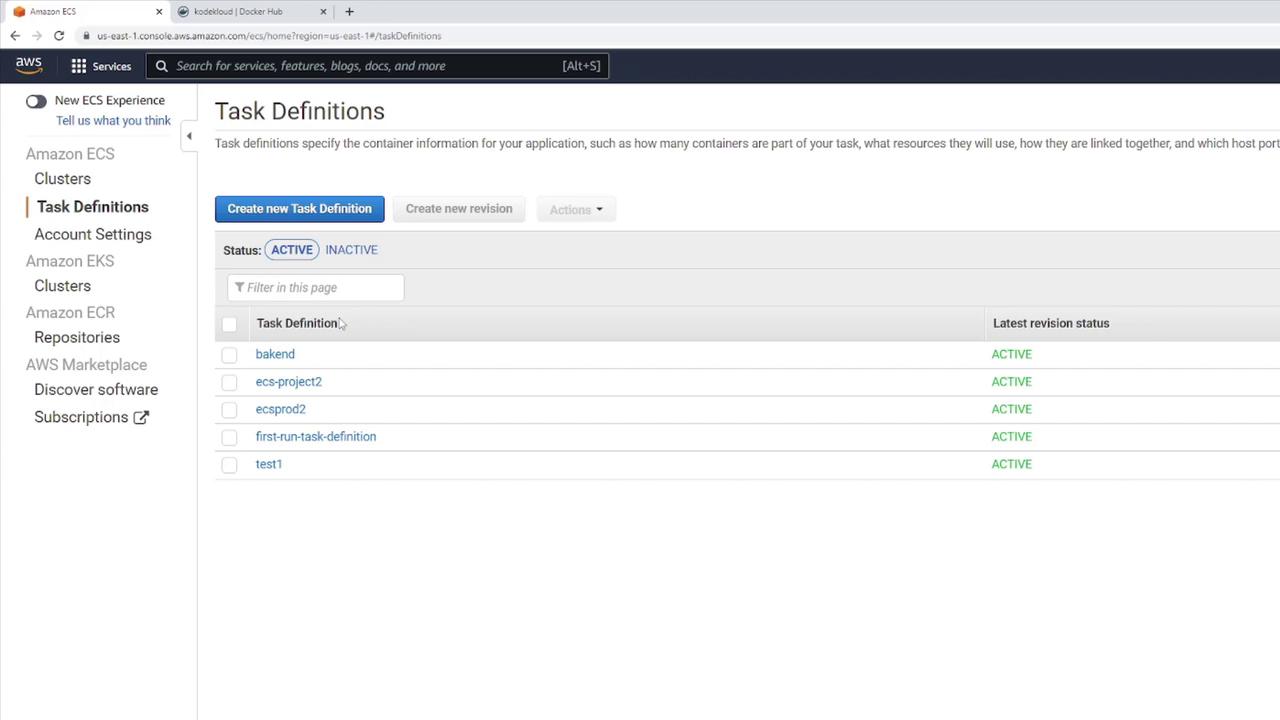
If you are new to ECS, you might find only a single task definition corresponding to your initial run. In cases where multiple task definitions are displayed, select the one relevant to your project. Note that if any container configurations have been updated, multiple revisions will be listed. The highest numbered revision indicates the most recent configuration.
When you inspect a Task Definition, you'll see all of the container configuration settings. Default settings such as using Fargate as the launch type are clearly visible. A scroll through the configuration allows you to review resource allocations like memory and CPU, along with container-specific settings such as host-to-container port mappings (for example, port 3000 mapped to port 3000), volumes, and environment variables.
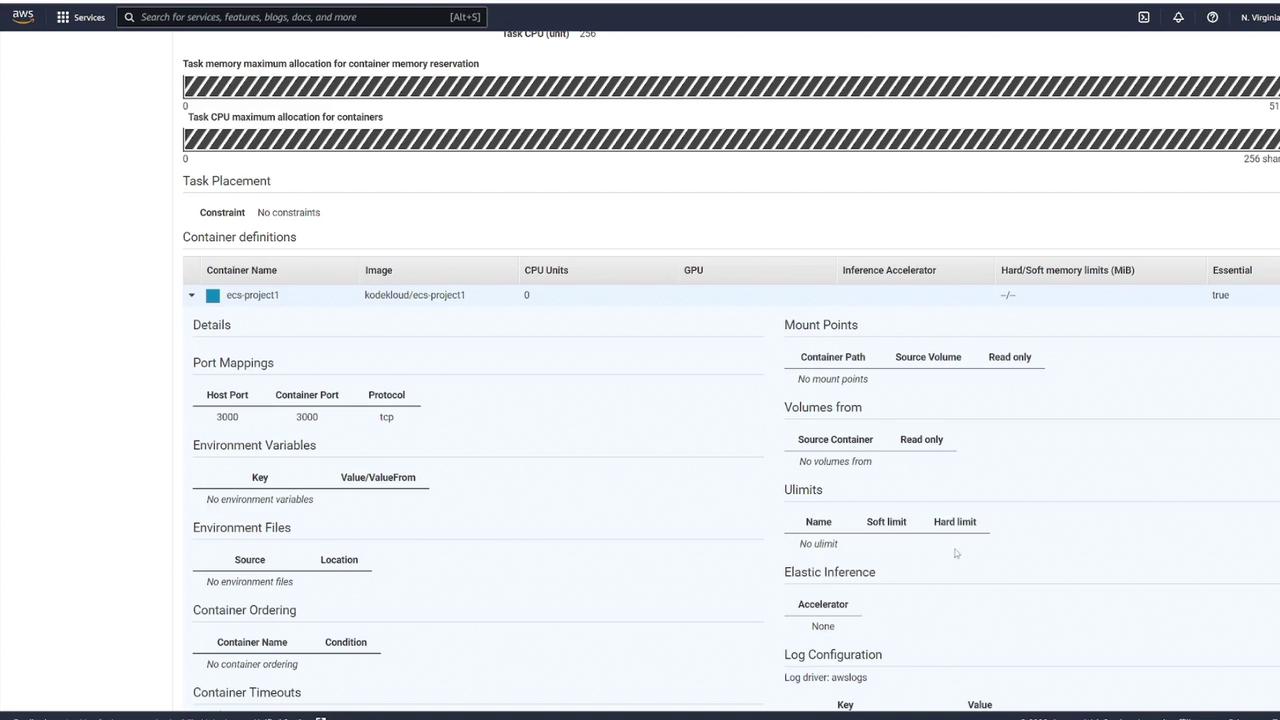
In this example, the task definition contains the configuration for a single container. However, you can define multiple containers within one task definition or create separate task definitions depending on your deployment strategy.
Next, click on Clusters to view the cluster that the wizard created. The cluster represents the underlying resources on which your containers run. In this setup using Fargate, the cluster only contains the necessary configurations for your containerized application. If you deployed with an ECS cluster on EC2 instances, you would have details for each EC2 instance instead.
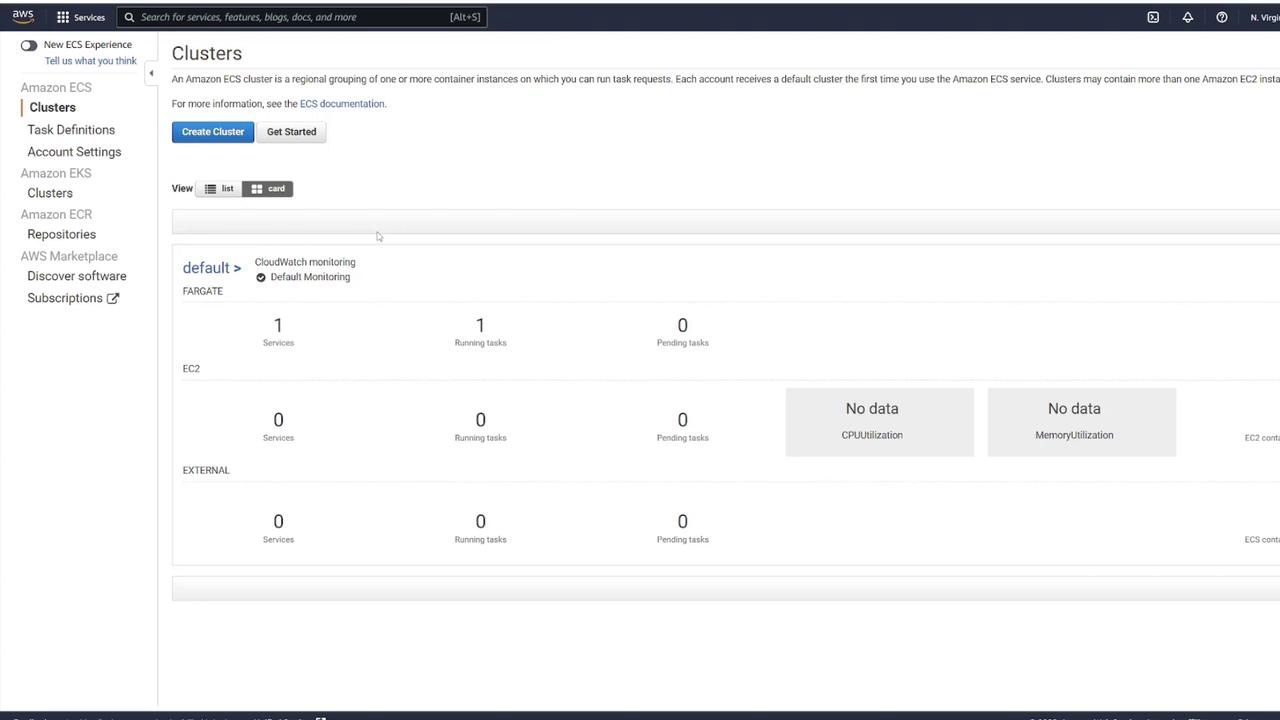
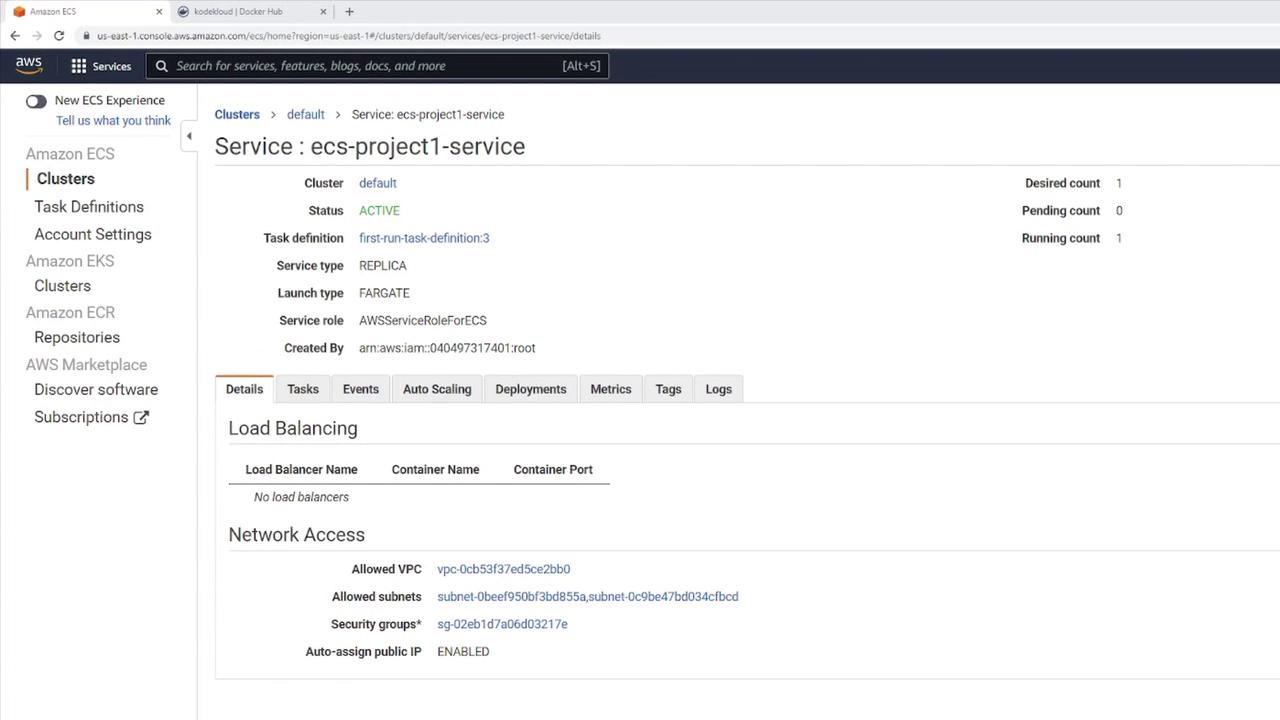
When you select the default cluster, you'll see a list of services created by the wizard. One of these services is named "ECS - project one - service." Its active status is confirmed, along with details of the associated task definition files. The dashboard indicates one desired task and one running task.
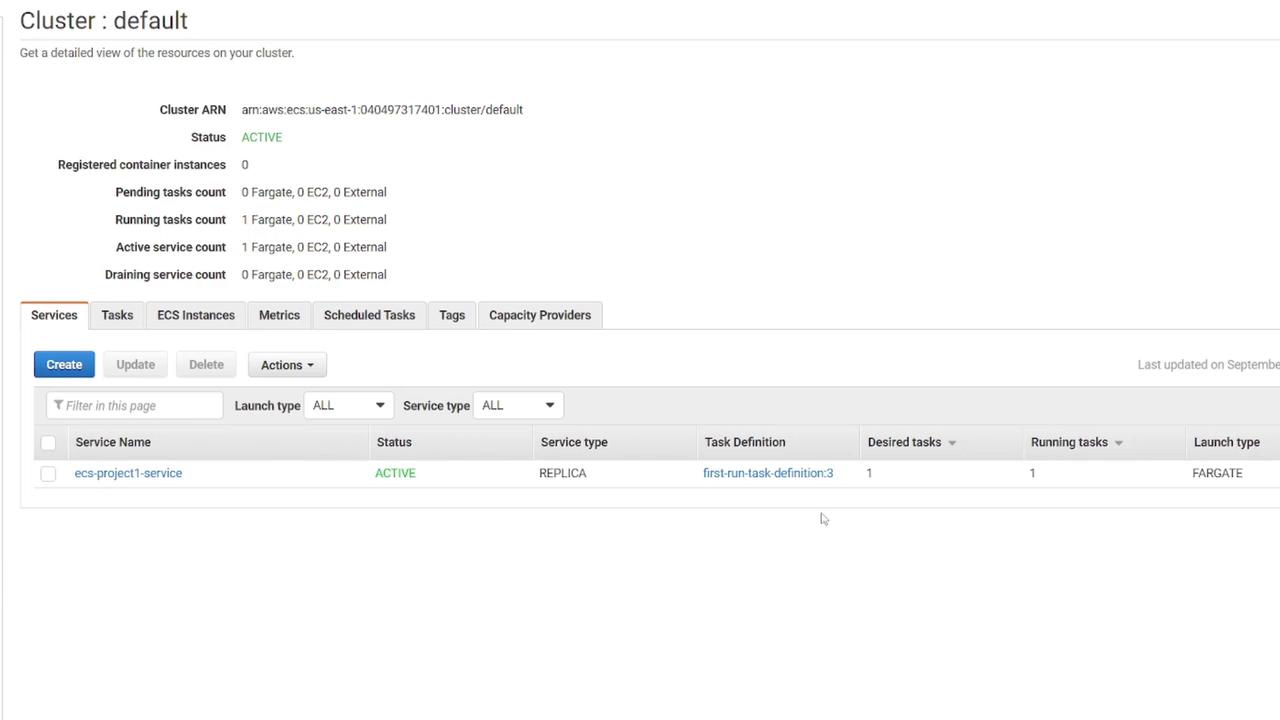
By selecting the service, you can review additional configuration details such as network settings (including VPC, subnets, and security groups). Next, navigate to the Tasks section to examine the running task. Here, you'll notice that the task is active and has been assigned a public IP address. This address is crucial because it provides access to your application.
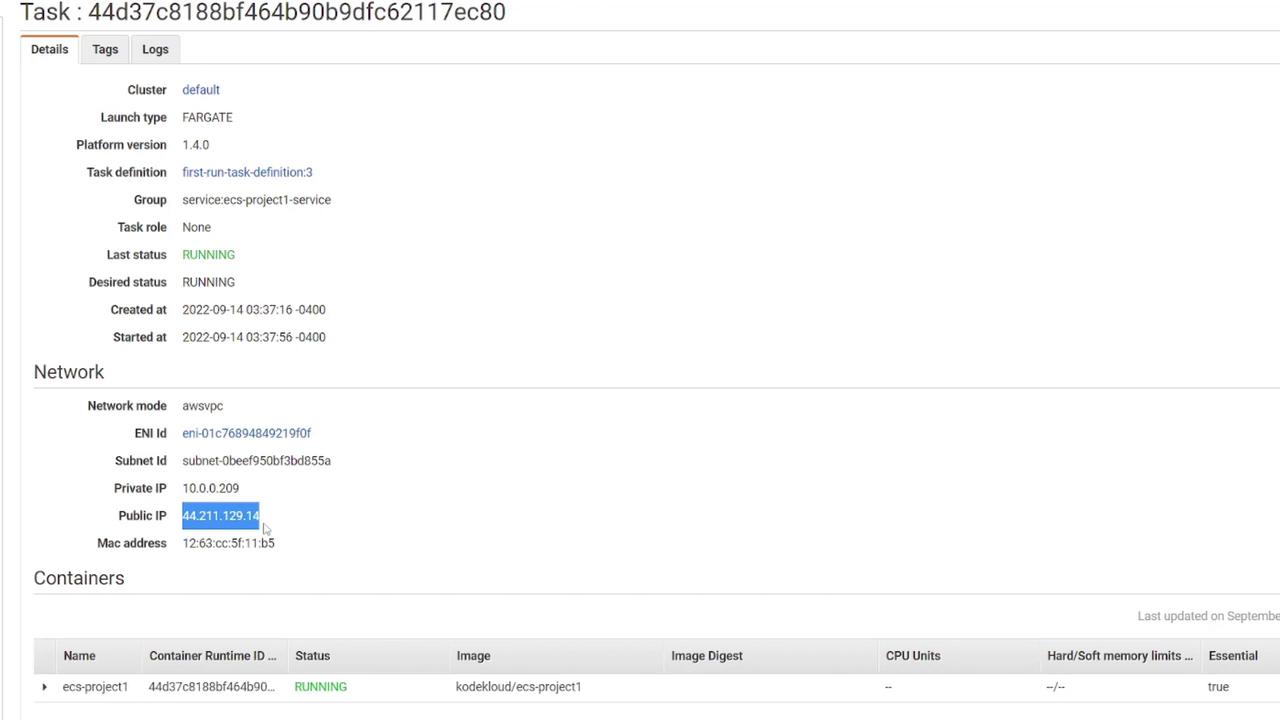
Deployment Verification
After copying the public IP address and opening it in your browser, check that it displays the demo application. Since the application is configured to run on port 3000, accessing the IP on port 3000 should serve a simple HTML file, confirming that the deployment is successful.
Demo Deleting cluster
In this lesson, you'll learn how to delete all resources in your Amazon ECS environment to start fresh without using the quick start wizard. After confirming that your application deployed successfully, follow these steps to remove the active service and delete the cluster.
Step 1: Remove the Active Service
First, navigate to your default cluster and locate the active service you want to remove.
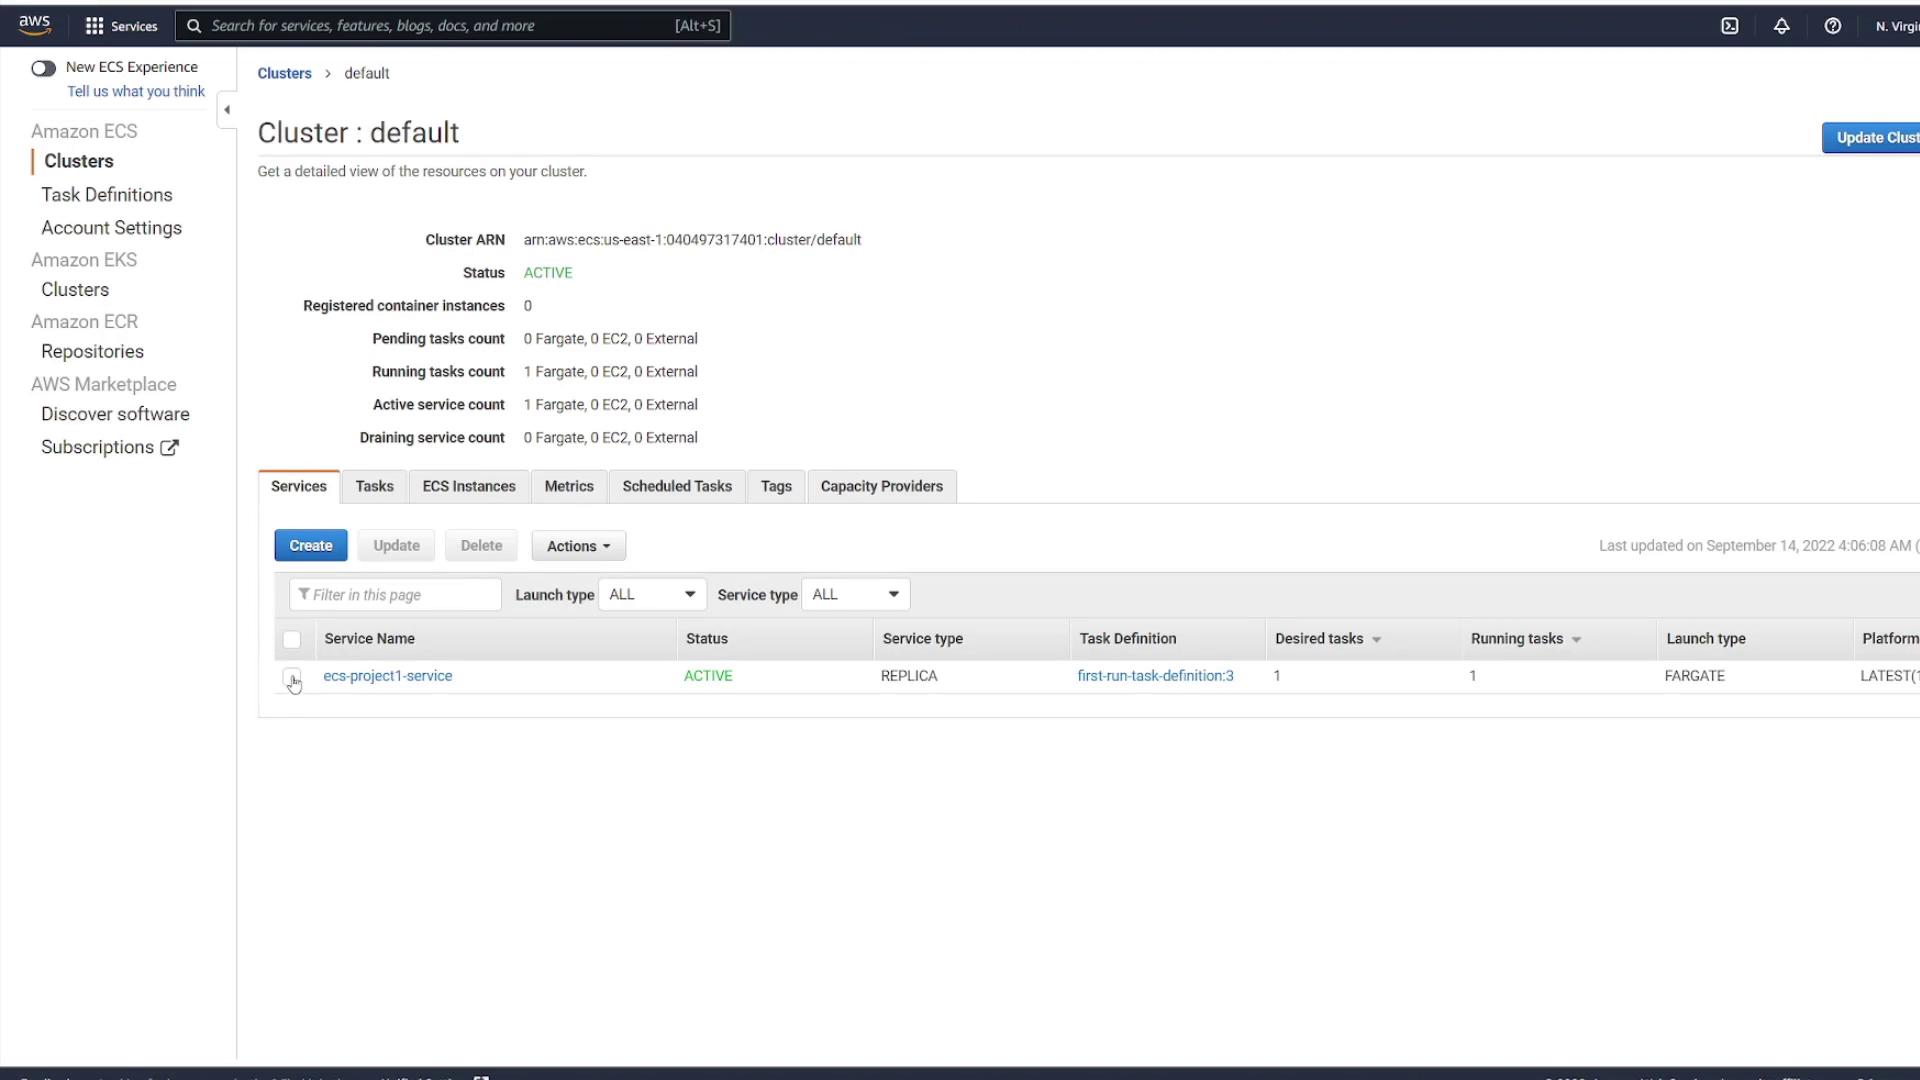
Select the desired service and initiate the deletion process. When the system prompts you for confirmation, type "delete me" in the provided text box. The deletion process may take a few seconds. You should see that all corresponding tasks are automatically terminated; if any tasks remain running, you can delete them manually.
Note
After deleting the service, ensure there are no orphaned tasks before proceeding to delete the cluster.
Step 2: Delete the Cluster
Once the service has been removed, return to the default cluster view to delete the cluster itself.
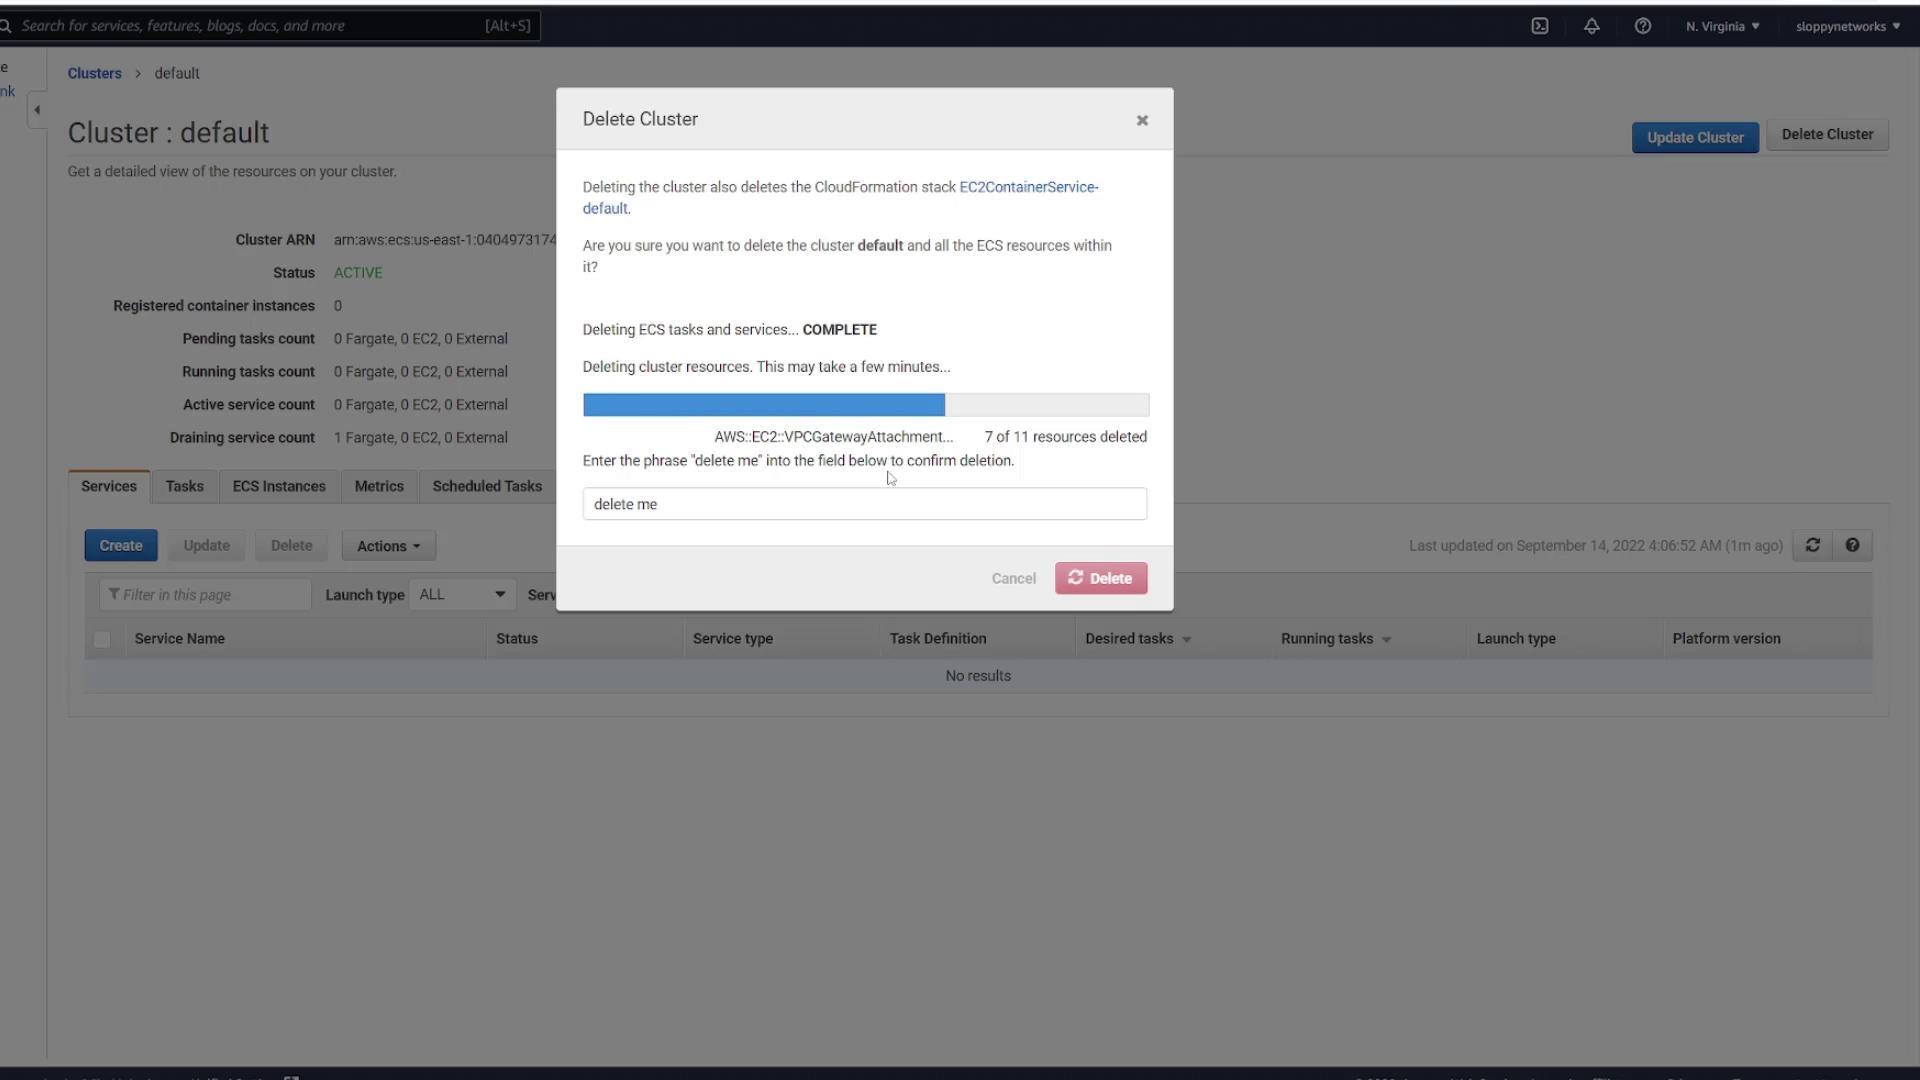
Confirm the deletion, and the cluster removal will begin. You will receive a confirmation message once the process is complete.
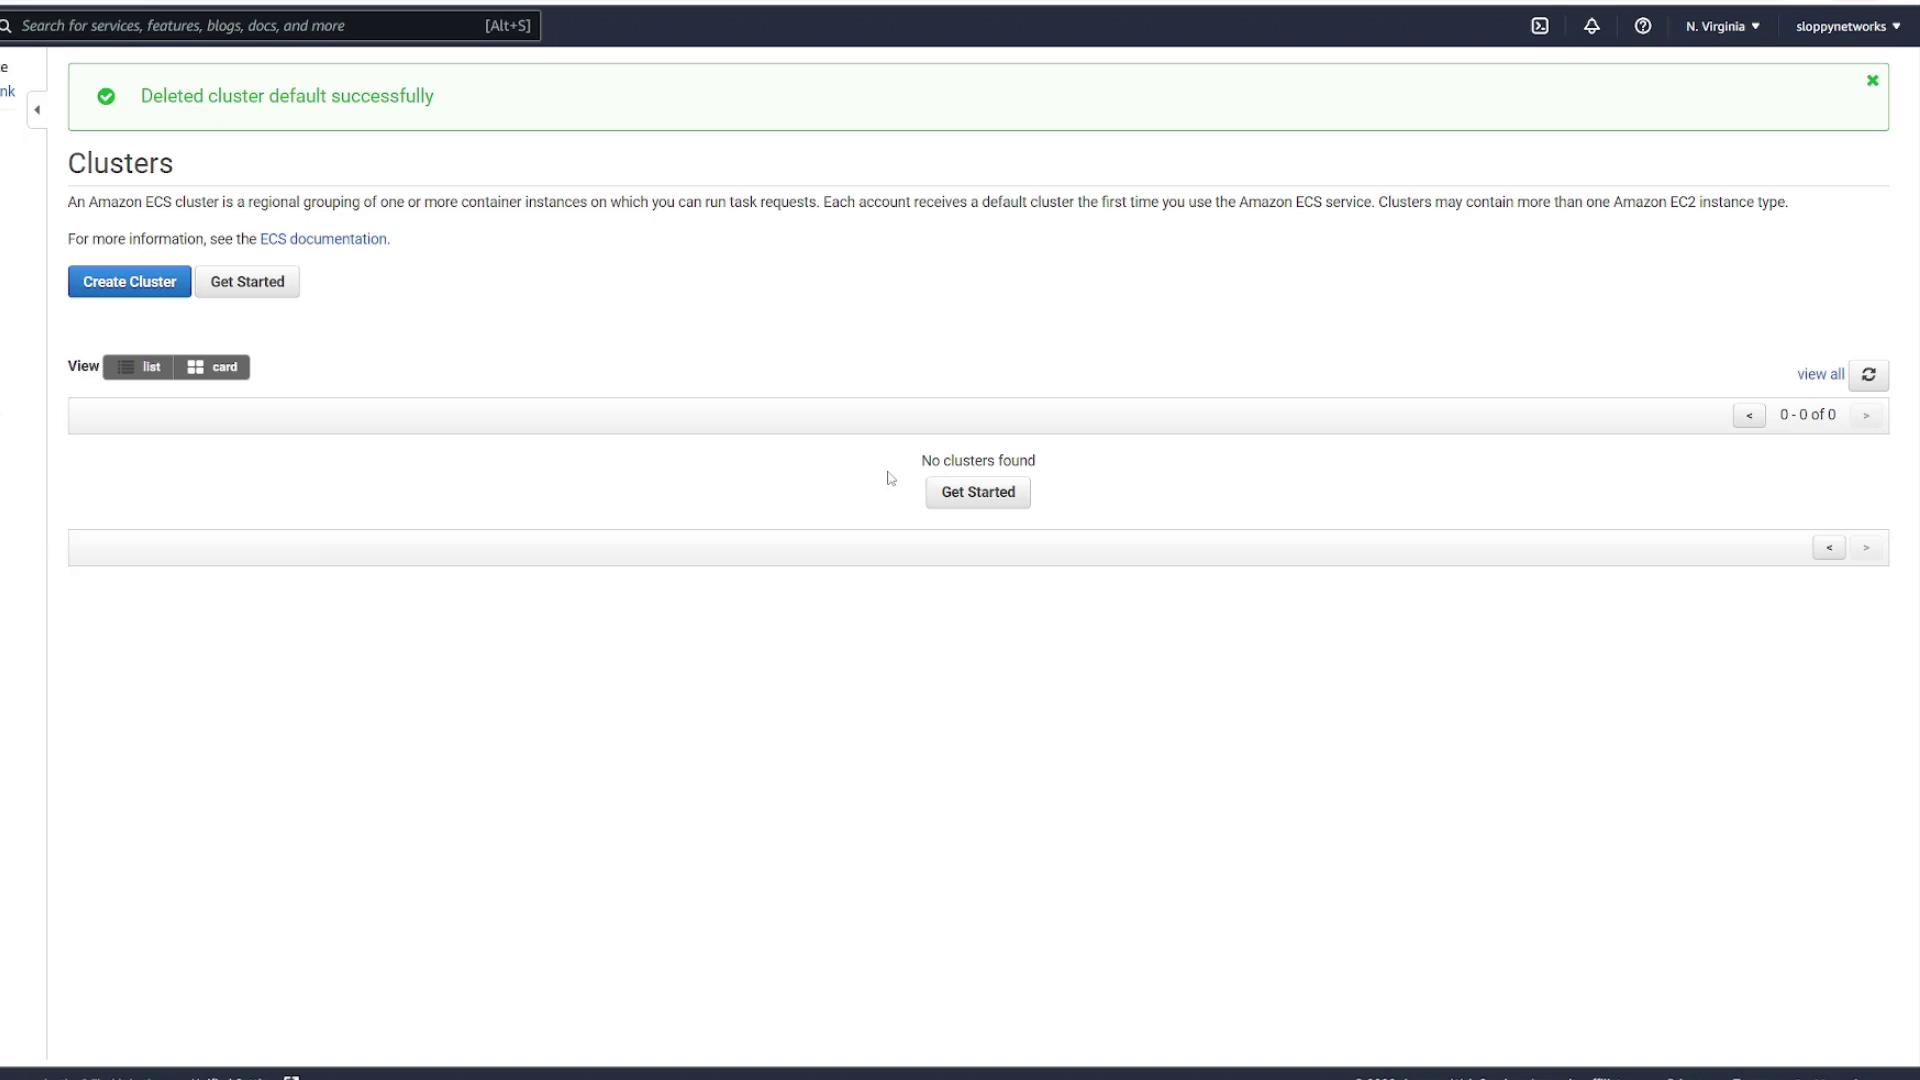
Completion
Your ECS environment is now cleared. You can deploy your applications from scratch without any interference from previously deployed resources.
For more detailed information on managing ECS resources, refer to the Amazon ECS Documentation.
Subscribe to my newsletter
Read articles from Arindam Baidya directly inside your inbox. Subscribe to the newsletter, and don't miss out.
Written by
Arindam Baidya
Arindam Baidya
🚀 Aspiring DevOps & Cloud Engineer | Passionate about Automation, CI/CD, Containers, and Cloud Infrastructure ☁️ I work with Docker, Kubernetes, Jenkins, Terraform, AWS (IAM & S3), Linux, Shell Scripting, and Git to build efficient, scalable, and secure systems. Currently contributing to DevOps-driven projects at Assurex e-Consultant while continuously expanding my skills through hands-on cloud and automation projects. Sharing my learning journey, projects, and tutorials on DevOps, AWS, and cloud technologies to help others grow in their tech careers. 💡 Let’s learn, build, and innovate together!