How to Use Google Chat Webhooks: A Complete Guide
 Robbie Cahill
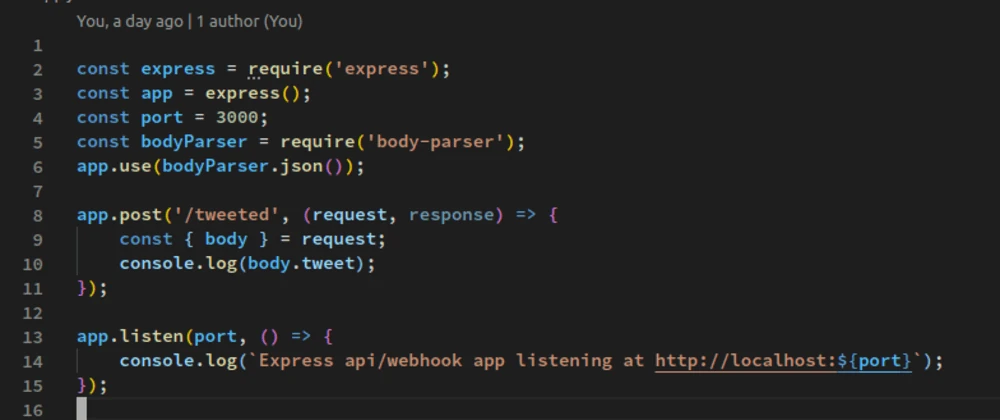
Google Chat has become a central hub for team communication, and its real power for developers is unlocked through webhooks. Webhooks allow you to integrate external services, build custom bots, and automate workflows directly within your chat spaces. This guide will walk you through everything you need to know about using Google Chat webhooks, from sending simple notifications to building interactive bots that can respond to user commands.
We'll cover two primary use cases:
- Incoming Webhooks: Sending messages from your applications into a Google Chat space. This is perfect for notifications, alerts, and reporting.
- Outgoing Webhooks (Interactive Apps): Receiving messages from Google Chat in your application. This allows you to build bots that respond to slash commands and user interactions.
We'll use Tunnelmole, a free and open source tunneling tool, to get a public HTTPS url pointing to your localhost within seconds that you can use to receive the webhook requests.
By the end of this guide, you'll be able to create sophisticated integrations that make your team more productive and your systems more connected.
Part 1: Incoming Webhooks - Pushing Messages to Google Chat
Incoming webhooks provide a simple way to post messages from your applications into Google Chat. Each incoming webhook you create generates a unique URL. When your application sends an HTTP POST request with a JSON payload to this URL, the message appears in the designated chat space.
This is incredibly useful for:
- CI/CD Notifications: Announcing successful builds, deployments, or test failures from Jenkins, GitHub Actions, or GitLab.
- System Alerts: Notifying the team about server errors, high CPU usage, or application exceptions from monitoring tools like Prometheus or Grafana.
- Business Updates: Posting new customer sign-ups, sales leads from your CRM, or support ticket updates.
Creating an Incoming Webhook in Google Chat
First, you need to create a webhook URL within the Google Chat space where you want to post messages.
- Open Google Chat and go to the space (or channel) where you want to add the webhook.
- Click on the space name at the top, and from the dropdown menu, select Apps & Integrations.
- Click "Add webhooks".
- Give your webhook a descriptive name (e.g., "Build Server Notifications") and optionally, an avatar URL for the bot.
- Click "Save".
- Google Chat will generate a unique URL for your webhook. Copy this URL and keep it safe. This URL is a secret; anyone with it can post messages to your space.
Sending Your First Message with curl
The simplest way to test your new webhook is by using curl from your terminal. Let's send a basic text message.
Replace YOUR_WEBHOOK_URL with the URL you copied in the previous step.
curl \
   -X POST \
   -H 'Content-Type: application/json' \
   'YOUR_WEBHOOK_URL' \
   -d '{"text": "Hello from my first webhook!"}'
If successful, you'll see the message "Hello from my first webhook!" appear within a few seconds in your Google Chat space, posted by the webhook app you just configured.
Crafting Rich Messages with Cards
While simple text messages are useful, Google Chat's real power comes from "Cards V2". Cards are UI elements that can display information with rich formatting, images, buttons, and other interactive components.
Let's send a more complex card message that includes a header, some text widgets, and a button.
curl \
   -X POST \
   -H 'Content-Type: application/json' \
   'YOUR_WEBHOOK_URL' \
   -d '{
     "cardsV2": [
       {
         "cardId": "unique-card-id",
         "card": {
           "header": {
             "title": "New Build Notification",
             "subtitle": "Project: AwesomeApp",
             "imageUrl": "https://www.gstatic.com/images/icons/material/system_gm/1x/build_white_24dp.png",
             "imageType": "CIRCLE"
           },
           "sections": [
             {
               "header": "Build Successful",
               "collapsible": true,
               "widgets": [
                 {
                   "decoratedText": {
                     "topLabel": "Commit SHA",
                     "text": "a1b2c3d4"
                   }
                 },
                 {
                   "decoratedText": {
                     "topLabel": "Branch",
                     "text": "main"
                   }
                 },
                 {
                   "buttonList": {
                     "buttons": [
                       {
                         "text": "View Build Logs",
                         "onClick": {
                           "openLink": {
                             "url": "https://example.com/build/123"
                           }
                         }
                       }
                     ]
                   }
                 }
               ]
             }
           ]
         }
       }
     ]
   }'
This JSON payload is more complex, but it creates a much richer notification in your chat space, complete with a title, icon, structured information, and a clickable button that links to the build logs.
Example: Sending a Google Chat Message with Node.js
In a real-world application, you'll be sending these requests programmatically. Here's how you can send a card message using Node.js with the built-in https module.
const https = require('https');

function sendGoogleChatMessage(webhookUrl, cardPayload) {
  const data = JSON.stringify(cardPayload);

  const url = new URL(webhookUrl);

  const options = {
    hostname: url.hostname,
    port: 443,
    path: url.pathname + url.search,
    method: 'POST',
    headers: {
      'Content-Type': 'application/json',
      'Content-Length': data.length,
    },
  };

  const req = https.request(options, (res) => {
    console.log(`statusCode: ${res.statusCode}`);
    res.on('data', (d) => {
      process.stdout.write(d);
    });
  });

  req.on('error', (error) => {
    console.error(error);
  });

  req.write(data);
  req.end();
}

// --- Usage ---
const WEBHOOK_URL = 'YOUR_WEBHOOK_URL'; // Replace with your actual webhook URL

const buildSuccessCard = {
  cardsV2: [
    {
      cardId: "build-success-card",
      card: {
        header: {
          title: "Build Succeeded",
          subtitle: "Project: Web-Frontend",
          imageUrl: "https://www.gstatic.com/images/icons/material/system_gm/1x/task_alt_white_24dp.png",
          imageType: "CIRCLE"
        },
        sections: [
          {
            widgets: [
              { decoratedText: { topLabel: "Branch", text: "features/new-login" } },
              { decoratedText: { topLabel: "Deployed To", text: "Staging Environment" } },
              {
                buttonList: {
                  buttons: [
                    {
                      text: "Visit Staging Site",
                      onClick: { openLink: { url: "https://staging.example.com" } }
                    }
                  ]
                }
              }
            ]
          }
        ]
      }
    }
  ]
};

sendGoogleChatMessage(WEBHOOK_URL, buildSuccessCard);
Save this as sendNotification.js, replace the placeholder URL, and run it with node sendNotification.js. Your formatted card will be posted to the chat space.
Part 2: Outgoing Webhooks - Building Interactive Chat Apps
While incoming webhooks are for one-way communication, the real magic happens when your application can receive events from Google Chat and respond. This is how you build interactive bots, slash commands, and other powerful integrations.
Use cases include:
- Slash Commands: Typing
/deploy productionto trigger a deployment pipeline. - Interactive Cards: Clicking a button on a card to approve a request or update a task's status.
- Chat Bots: Mentioning a bot to ask for information, like
@JiraBot find TICKET-123.
To do this, Google Chat needs to send an HTTP POST request to your application. This means your application must be running on a publicly accessible URL.
The Challenge: Developing Locally
When you're developing a chat app, you're typically running your code on your local machine (http://localhost:3000, for example). This server is not reachable from the public internet, so Google's servers can't send webhook events to it.
You could deploy your code to a cloud server every time you make a change, but this is slow, tedious, and makes debugging nearly impossible. You need a way to expose your local development server to the internet.
The Solution: Tunnelmole for a Public URL
This is where Tunnelmole comes in. Tunnelmole is a free and open-source tool that creates a secure tunnel from a public URL to your local server. It gives you a temporary, public HTTPS URL that forwards all requests to your localhost port.
This allows you to receive webhooks from Google Chat directly on your development machine, making it incredibly easy to build and test your interactive apps in real-time.
Here's a high-level look at how it works:
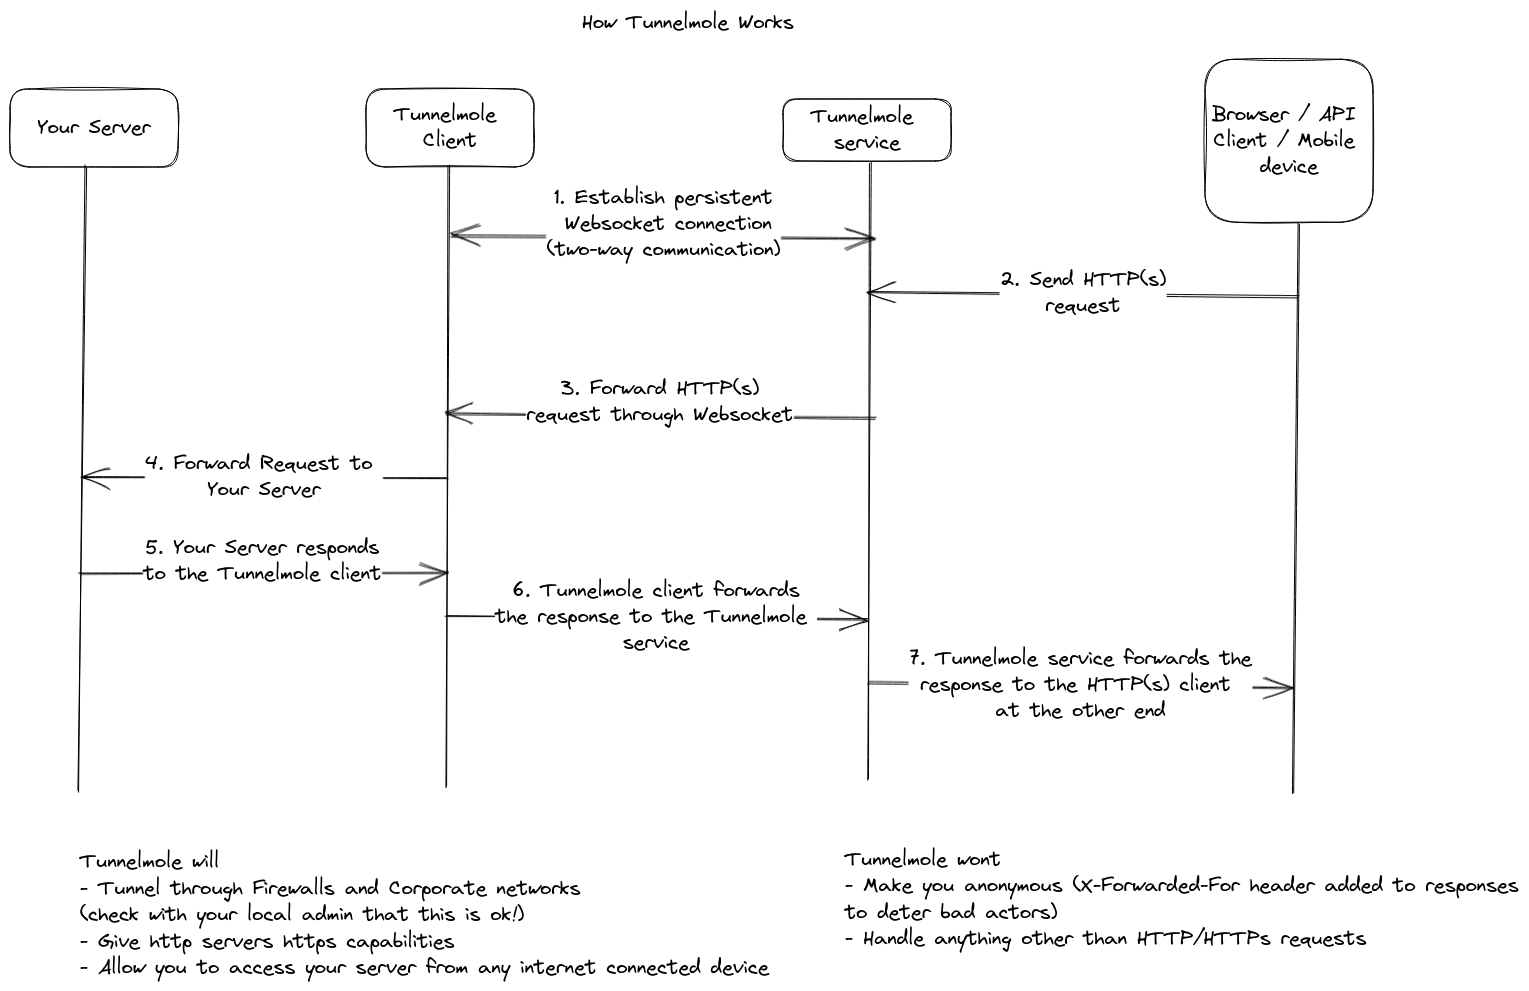
Tunnelmole is a native NodeJS application, and its key features include:
- Open Source: The client and server are fully open source, giving you complete transparency and control.
- Self-Hostable: While Tunnelmole offers a convenient hosted service, you have the option to host the tunnel server yourself for maximum privacy and control.
- Easy to Use: Get a public URL with a single command.
Building an Interactive Google Chat App with Node.js and Tunnelmole
Let's build a simple slash command. When a user types /greet in the chat, our bot will respond with a personalized greeting.
Step 1: Create the Express.js App
First, set up a basic Node.js Express server to handle incoming POST requests from Google Chat.
If you don't have a project, create one:
npm init -y
npm install express
Create a file named app.js:
const express = require('express');
const app = express();
const port = 8080;

// Google Chat sends JSON, so we need the JSON body parser
app.use(express.json());

// The endpoint that Google Chat will send POST requests to
app.post('/', (req, res) => {
  const event = req.body;
  console.log('Received event:', JSON.stringify(event, null, 2));

  let responseMessage;

  // Check if it's an interactive event triggered by a human
  if (event.type === 'MESSAGE' && event.message.slashCommand) {
    const commandId = event.message.slashCommand.commandId;

    // Respond to the "/greet" slash command
    if (commandId === '1') { // Google assigns a numeric ID to your slash command
      const userName = event.user.displayName;
      responseMessage = {
        text: `Hello, ${userName}! Thanks for using the Greet Bot.`
      };
    } else {
      responseMessage = { text: 'Sorry, I don\'t recognize that command.' };
    }
  } else if (event.type === 'ADDED_TO_SPACE') {
    responseMessage = { text: 'Thanks for adding me to this space! Try the /greet command.' };
  } else {
    // Ignore other event types for this simple bot
    return res.sendStatus(204); // No Content
  }

  // Send the response back to Google Chat
  res.json(responseMessage);
});

app.listen(port, () => {
  console.log(`Google Chat bot listening at http://localhost:${port}`);
});
This code creates a server on port 8080. It listens for POST requests on the root path (/), checks if the event is the /greet slash command, and sends back a simple text response.
Step 2: Install and Run Tunnelmole
Now, let's get a public URL for our local server. First, install Tunnelmole.
If you have Node.js installed, the easiest way is with npm:
sudo npm install -g tunnelmole
Alternatively, you can use the one-line installer for Linux, MacOS or WSL:
curl -O https://install.tunnelmole.com/xD345/install && sudo bash install
Once installed, start your Node.js application in one terminal:
node app.js
# Output: Google Chat bot listening at http://localhost:8080
In a second terminal, run Tunnelmole to expose port 8080:
tmole 8080
Tunnelmole will start and display your public URLs. Copy the HTTPS URL.
Your Tunnelmole Public URLs are below and are accessible internet wide. Always use HTTPs for the best security

https://kv2swd-ip-52-87-194-15.tunnelmole.net ⟶ http://localhost:8080
http://kv2swd-ip-52-87-194-15.tunnelmole.net ⟶ http://localhost:8080
Your public URL is now live and forwarding all traffic to your local server on port 8080.
Step 3: Configure Your App in the Google Cloud Console
Now, you need to tell Google about your bot and where to send events.
- Go to the Google Cloud Console.
- Create a new project or select an existing one.
- Enable the "Google Chat API" for your project.
- Navigate to the Google Chat API configuration page. Under the "Configuration" tab, fill out the App details:
- App Name: Greet Bot
- Avatar URL: An icon for your bot.
- Description: A simple bot that says hello.
- Enable "Interactive features".
- Under "Functionality", select "Receive 1:1 messages" and "Join spaces and group conversations".
- In the Connection settings section:
- Select "App URL".
- Paste your Tunnelmole HTTPS URL into the text field.
- Scroll down to "Slash Commands" and click "Add a slash command".
- Name:
/greet - Command ID:
1(This must match the ID in your code) - Description: Says hello to the user.
- Check the box for "Opens a dialog" (even though we're just sending a message, this is a common setup).
- Name:
- Click "Save". The status will change to "Live in production".
- Go back to Google Chat, find your bot in the "Apps" section (you might need to add it), and try typing
/greet.
When you run the command, Google Chat will send a POST request to your Tunnelmole URL. Tunnelmole will forward it to your localhost:8080 server. Your Express app will process the request, and you will see the full event logged to your console. Your bot will then reply with "Hello, [Your Name]!" in the chat.
Conclusion
Webhooks are the bridge between Google Chat and your external applications. You've learned how to:
- Create incoming webhooks to push notifications and rich card messages into Google Chat spaces.
- Use
curland Node.js to send these messages programmatically. - Handle outgoing webhooks to build interactive slash commands and bots.
- Use Tunnelmole to get a public URL for your local development environment, drastically speeding up your development and testing cycle.
With these skills, you can now build powerful, custom integrations that bring your services and data directly into your team's collaborative workspace. Because Tunnelmole is open source, you have the flexibility to inspect the code, contribute to the project, or even host it yourself for complete control over your infrastructure.
Happy building!
Subscribe to my newsletter
Read articles from Robbie Cahill directly inside your inbox. Subscribe to the newsletter, and don't miss out.
Written by