How to Build a Music Streaming App with React Native
 Pagepro
Introduction
Most of us use different music streaming apps daily. Spotify and YouTube Music are the most popular options, but did you know you can easily build a music streaming app with React Native?
In this article, I will introduce you to React Native Track Player, a React Native library that we can use to create a music app. It’s easy to implement, has a simple configuration, and functions that will make your music streaming application look fully professional on digital platforms.
We will discuss its most important functions, and finally, I will demonstrate how to build a music streaming app with React Native. With a little work, in terms of functionality, it will not differ from the top music mobile apps that you can find on Google Play and the App Store.
React Native Track Player
As I mentioned earlier, the article will be devoted to the React Native Track Player package. So it’s worth explaining what it is at the very beginning. As the welcome text in the documentation says:
A fully fledged audio module created for music apps. Provides audio playback, external media controls, background mode and more!
Sounds good, right? By using i,t we will create a fully functional music application that we can control from the application level and externally.
Since we’re talking about the React Native library, we don’t have to build separate native apps for iOS and Android, but one music streaming service for both of them using the same code.
Features of React Native Track Player
Optimized Resource Usage: Designed to use minimal resources for optimal performance for app performance.
Cross-platform compatibility: Works across iOS and Android platforms, aligning with the native design rules.
Media Control Accessibility: Let users control the application through Bluetooth devices, lock screens, notifications, smartwatches, and car systems.
Caching Capability: Allows for the caching of media files, enabling playback when the internet connection is disrupted.
Background Playback Support: Continues audio playback when the app is in the background.
Extensive Customization: Offers customization options like customizable notification icons and lets devs tailor the UI as they want.
Native Modules
React Native Track Player operates on both iOS and Android devices. Underlying this compatibility are two native modules: SwiftAudioEx and KotlinAudio.
SwiftAudioEx is dedicated to operations for iOS devices. KotlinAudio works for Android to guarantee an optimized experience on this platform.
These native modules play a critical role in improving performance by using platform-specific functionalities. Specifically, they enable the storage of playlists in native data structures, which affects the app’s efficiency and performance.
With SwiftAudioEx and KotlinAudio, React Native Track Player delivers great UX, optimizing the library’s functionalities to the core features of each platform.
Why Choose React Native Track Player?
React Native Track Player is an optimal choice for a music app because of its streamlined integration process and cross-platform compatibility across iOS and Android.
The newest version of React Native Track Player, 4.1.2, was released in August 2025. Using native modules for platform-specific functionalities means high performance, and the library’s flexibility allows for easy customization of the app’s UI and functionalities.
A rich feature set, including audio playback controls, background mode support, and easy integration with external devices, offers efficient and optimized performance while saving resources**.**
Supported by extensive documentation and an active community, React Native Track Player is a reliable solution for creating music streaming apps in React Native.
“Working with React Native Track Player has truly simplified my approach to building music streaming apps. Its efficiency and user-friendly design make it a standout choice for seamless cross-platform development. From synchronizing audio playback controls to creating immersive user experiences, this library has transformed the way I work with the apps.”
Michal Moroz, React Native Developer at Pagepro
Don’t have time to build a music app on your own? Use our experience.
Platform Support
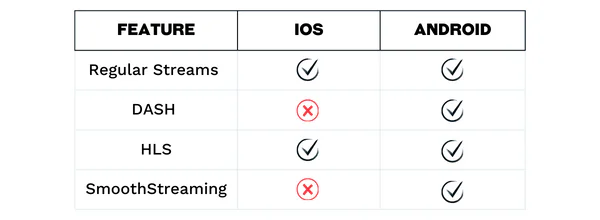
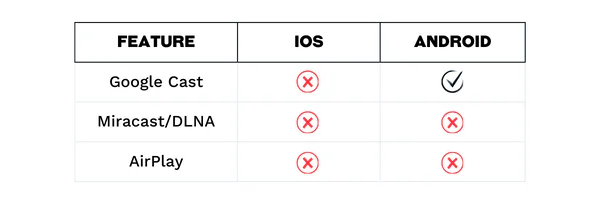
Before making your very own music streaming app, you have to understand that compatibility across different platforms is key. That’s why in this section, we’ll compare the supported streaming types and casting features on both iOS and Android platforms.
Stream Types
Casting
Miscellaneous

React Native Track Player functions
Now we can discuss the most basic functions provided by the library, which we will use later while building the app.
If you are interested in all the events and functions provided by the library (and there are a lot of them’s quite a lot of them), be sure to check the official documentation.
Player
| Feature | Description |
| setupPlayer(options) | Setup player with options. Sample options: minBuffer, maxBuffer, maxCacheSize. |
| play() | Plays/resumes current track |
| pause() | Pause track |
| stop() | Stops playback |
| retry() | Replays the current track if it was stopped due to an error |
| seekBy(offset) | Seeks by a relative time offset in the current track |
| seekTo(seconds) | Seeks current track to specified time position |
| setVolume(volume) | Sets the volume |
| getVolume() | Gets player volume |
| setRate(rate) | Sets the playback rate |
| getProgress() | Gets the playback progress – position, duration |
| getPlaybackState() | Gets the PlaybackState – e.g.ready, playing, paused, stopped. |
| getPlayWhenReady() | Gets the state of playWhenReady |
Queue
| Function | Description |
| add(tracks, insertBeforeIndex) | Adds tracks to the queue |
| remove(tracks) | Clears the current queue and adds tracks to the empty queue |
| skip(index, initialPosition) | Skips to a track in the queue |
| skipToNext(initialPosition) | Skips to the next track |
| skipToPrevious(initialPosition) | Skips to the previous track |
| reset() | Resets the player and clear the queue |
| getTrack(index) | Gets a track object |
| getActiveTrack() | Gets active track object |
| getQueue() | Gets a queue |
| removeUpcomingTracks() | Clears upcoming tracks from the queue |
| setRepeatMode(mode) | Sets the repeat mode – Loops the current track / Repeats the whole queue / Does Not repeat |
Building React Native Spotify
Since you’re familiar with React Native Track Player and its capabilities, let’s start with the development of our music app!
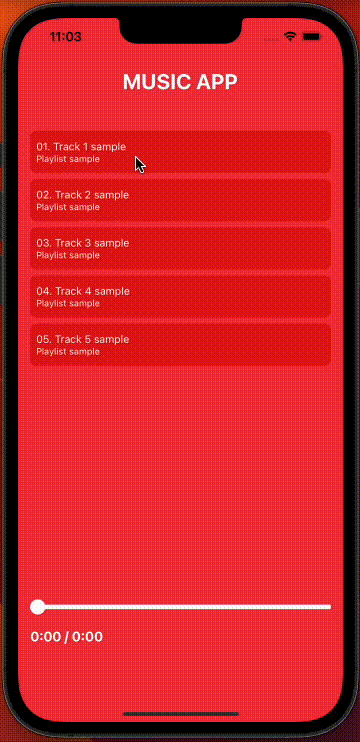
Features of Your App
A fully functional music player showing a sample playlist of music tracks.
Core functionalities include play and pause controls for the active song.
An interactive progress bar illustrating the playback status of the selected track.
The application’s interface will look like this:
Creating A Simple Music Streaming APp
I assume you already have a new React Native project created. If not, read the official Expo documentation.
To begin, start the installation process by adding the React Native Track Player library:
yarn add react-native-track-player
Next, we’ll proceed by installing the progress bar package. For this scenario, we’ve opted for @miblanchard/react-native-slider because of the extensive functionality and easy styling:
yarn add @miblanchard/react-native-slider
Add Service
Next, let’s incorporate the playback service.
It’s crucial to register the playback service immediately after registering the primary React Native application component, typically found in the index.js file located in the project’s root directory:
IMPORTANT NOTE: The configuration and components will be stored in the src directory. If you don’t have one, create it or do it according to your own convention. I will add the paths to the files I used above the code.
To enable background mode functionality in RN Track Player, we need to configure the player to sustain audio playback even when the application is in the background.
Create RNTP-service.js file to manage this configuration.
src/setup/RNTP-service.js
import TrackPlayer, { Event } from 'react-native-track-player'

export const RNTPService = async () => {
 TrackPlayer.addEventListener(Event.RemotePlay, () => TrackPlayer.play())
 TrackPlayer.addEventListener(Event.RemotePause, () => TrackPlayer.pause())
}
Then, in the project root, create an index.js file and import the service and App there.
index.js
import { registerRootComponent } from 'expo'
import TrackPlayer from 'react-native-track-player'

import { RNTPService } from './src/setup/rntp-service'

import App from './App'

registerRootComponent(App)

TrackPlayer.registerPlaybackService(() => RNTPService)
Then, we need to set up the player. In App.js file add setupPlayer.
App.js
import { SafeAreaView, StyleSheet, Text, View } from 'react-native'
import { useEffect } from 'react'
import TrackPlayer, {
 AppKilledPlaybackBehavior,
 Capability,
} from 'react-native-track-player'

export default function App() {
 useEffect(() => {
   const setupPlayer = async () => {
     await TrackPlayer.setupPlayer()

     await TrackPlayer.updateOptions({
       android: {
         appKilledPlaybackBehavior:
           AppKilledPlaybackBehavior.StopPlaybackAndRemoveNotification,
         alwaysPauseOnInterruption: true,
       },
       capabilities: [
         Capability.Play,
         Capability.Pause,
         Capability.SkipToNext,
         Capability.SkipToPrevious,
         Capability.SeekTo,
       ],
       compactCapabilities: [Capability.Play, Capability.Pause],
       progressUpdateEventInterval: 1,
     })
   }

   setupPlayer()
 }, [])

 return (
   <View style={styles.container}>
     <SafeAreaView />
     <Text style={styles.header}>MUSIC APP</Text>
   </View>
 )
}

const styles = StyleSheet.create({
 container: {
   flex: 1,
   paddingHorizontal: 16,
   backgroundColor: '#f53340',
 },
 header: {
   fontSize: 28,
   fontWeight: '700',
   textAlign: 'center',
   color: '#FFF',
   marginTop: 20,
   marginBottom: 48,
 },
})
Once you’ve completed these steps, you’ll have the groundwork laid for a fully functional music player.
Add Player Playlist
Before creating the first component, create an array of songs that the music player will use.
For each song, ensure to include a URL pointing to the audio file. It could be either a file path or a direct URL.
App.js
export const tracks = [
  {
    id: 1,
    url: YOUR_URL,
    title: '01. Track 1 sample',
    playlistName: 'Playlist sample',
    playlistId: 1,
  },
  {
    id: 2,
    url: YOUR_URL,
    title: '02. Track 2 sample',
    playlistName: 'Playlist sample',
    playlistId: 1,
  },
  {
    id: 3,
    url: YOUR_URL,
    title: '03. Track 3 sample',
    playlistName: 'Playlist sample',
    playlistId: 1,
  },
  {
    id: 4,
    url: YOUR_URL,
    title: '04. Track 4 sample',
    playlistName: 'Playlist sample',
    playlistId: 1,
  },
  {
    id: 5,
    url: YOUR_URL,
    title: '05. Track 5 sample',
    playlistName: 'Playlist sample',
    playlistId: 1,
  },
]
Create Track List
In the components directory, the initial addition is the TrackList component. This component serves as a clickable list of songs. Upon selecting a song, it activates the track and generates the music queue.
Pay special attention to the PlaybackActiveTrackChanged event and the onTrackPress function.
App.js
import { FlatList, Pressable, StyleSheet, View, Text } from 'react-native'
import TrackPlayer, {
 Event,
 useTrackPlayerEvents,
} from 'react-native-track-player'
import { useState } from 'react'

const TrackList = ({ items }) => {
 const [activeTrackIndex, setActiveTrackIndex] = useState(0)

 useTrackPlayerEvents([Event.PlaybackActiveTrackChanged], async (event) => {
   if (event.index === undefined) {
     setActiveTrackIndex(0)
     return
   }

   if (
     event.type === Event.PlaybackActiveTrackChanged &&
     event.index != null
   ) {
     const activeTrackItem = await TrackPlayer.getActiveTrack()

     if (!activeTrackItem) {
       return
     }

     setActiveTrackIndex(activeTrackItem.id)
   }
 })

 useTrackPlayerEvents([Event.PlaybackQueueEnded], async () => {
   const repeatMode = await TrackPlayer.getRepeatMode()
   TrackPlayer.seekTo(0)

   if (repeatMode === 0) {
     await TrackPlayer.pause()
   } else {
     await TrackPlayer.play()
   }
 })

 const onTrackPress = async (id) => {
   const currentTrackIndex = items.findIndex((item) => item.id === id)
   const trackPlayerQueue = await TrackPlayer.getQueue()
   const sameTrackFromQueue = trackPlayerQueue[currentTrackIndex]
   const currentTrack = items[currentTrackIndex]

   if (currentTrack.id !== sameTrackFromQueue?.id) {
     const newQueue = items.map((item) => ({
       id: item.id,
       url: item.url,
       title: item.title,
       headers: {
         playlist: item.playlistName,
       },
       playlistId: item.playlistId,
     }))

     await TrackPlayer.reset()
     await TrackPlayer.add(newQueue[currentTrackIndex])
     await TrackPlayer.add(newQueue)
     await TrackPlayer.skip(currentTrackIndex + 1)
     await TrackPlayer.play()
     await TrackPlayer.remove(0)
   } else {
     await TrackPlayer.skip(currentTrackIndex)
     await TrackPlayer.play()
   }
 }

 return (
   <View style={styles.container}>
     <FlatList
       data={items}
       renderItem={({
         item: { id, url, title, playlistName, playlistId },
       }) => {
         const isActiveTrack = activeTrackIndex === id

         return (
           <View
             key={id}
             style={[styles.listItem, isActiveTrack && styles.listItemActive]}
           >
             <Pressable
               onPress={() =>
                 onTrackPress(id)
               }
             >
               <Text
                 style={[styles.title, isActiveTrack && styles.textActive]}
               >
                 {title}
               </Text>
               <Text
                 style={[
                   styles.description,
                   isActiveTrack && styles.textActive,
                 ]}
               >
                 {playlistName}
               </Text>
             </Pressable>
           </View>
         )
       }}
       alwaysBounceVertical={false}
       keyExtractor={({ id }) => id.toString()}
     />
   </View>
 )
}

export default TrackList

const styles = StyleSheet.create({
 container: {
   flex: 1,
 },
 listItem: {
   paddingVertical: 4,
   backgroundColor: '#E21515',
   marginBottom: 8,
   borderRadius: 8,
   paddingHorizontal: 8,
   paddingVertical: 12,
 },
 listItemActive: {
   backgroundColor: '#FFF',
 },
 header: {
   marginBottom: 8,
   color: '#FFF',
   fontWeight: '700',
 },
 title: {
   fontSize: 14,
   color: '#FFF',
 },
 description: {
   fontSize: 12,
   color: '#FFF',
 },
 textActive: {
   color: '#E21515',
   fontWeight: '700',
 },
})
Create Player
The final element you need is the component called player. This component will include the following:
Current song display
Song timer
Clickable progress bar (utilizing the
@miblanchard/react-native-sliderpackage)Play/pause button functionality
import { StyleSheet, View, Text, Pressable } from 'react-native'
import { Slider } from '@miblanchard/react-native-slider'
import TrackPlayer, {
 useProgress,
 usePlaybackState,
 State,
 Event,
 useTrackPlayerEvents,
} from 'react-native-track-player'
import { Dimensions } from 'react-native'
import { useCallback, useState, useEffect } from 'react'

const AudioPlayer = () => {
 const { position, duration } = useProgress(100)
 const { state: playbackState } = usePlaybackState()

 const [isPlaying, setIsPlaying] = useState(playbackState === State.Playing)
 const [activeTrackData, setActiveTrackData] = useState()
 const [isPlayButtonDisabled, setIsPlayButtonDisabled] = useState(true)

 // Util for time format
 const formatTime = (timeInSeconds) => {
   const minutes = Math.floor(timeInSeconds / 60)
     .toString()
     .padStart(1, '0')
   const seconds = (Math.trunc(timeInSeconds) % 60).toString().padStart(2, '0')

   return `${minutes}:${seconds}`
 }

 const play = useCallback(async () => {
   await TrackPlayer.play()
   setIsPlayButtonDisabled(false)
 }, [])

 const pause = useCallback(async () => {
   await TrackPlayer.pause()
 }, [])

 const trackTimeProgress = formatTime(position)
 const trackTimeLeft = formatTime(duration - position)

 useEffect(() => {
   if (playbackState === State.Playing && !isPlaying) {
     setIsPlaying(true)
   }

   if (
     playbackState === State.Paused ||
     (playbackState === State.Stopped && isPlaying)
   ) {
     setIsPlaying(false)
   }
 }, [isPlaying, playbackState])

 useTrackPlayerEvents([Event.PlaybackActiveTrackChanged], async (event) => {
   if (
     event.type === Event.PlaybackActiveTrackChanged &&
     event.index != null
   ) {
     const activeTrackItem = await TrackPlayer.getActiveTrack()

     if (!activeTrackItem) {
       return
     }

     setIsPlayButtonDisabled(false)

     setActiveTrackData({
       title: activeTrackItem.title,
       playlist: activeTrackItem.headers.playlist,
     })
   }
 })

 return (
   <View style={styles.container}>
     {activeTrackData && (
       <View style={styles.activeTrack}>
         <Text style={styles.activeTrackTitle}>{activeTrackData.title}</Text>
         <Text style={styles.activeTrackDescription}>
           {activeTrackData.playlist}
         </Text>
       </View>
     )}
     <Slider
       style={styles.progressBar}
       trackStyle={{
         height: 6,
         width: Dimensions.get('window').width - 32,
       }}
       thumbTouchSize={{ width: 4, height: 4 }}
       animationType="timing"
       trackClickable
       value={position}
       minimumValue={0}
       maximumValue={duration}
       thumbTintColor={'#fff'}
       minimumTrackTintColor={'#fff'}
       maximumTrackTintColor={'#fff'}
       onSlidingComplete={async (value) => {
         TrackPlayer.seekTo(Number(value))
       }}
     />
     <Text style={[styles.text, styles.timer]}>
       {trackTimeProgress} / {trackTimeLeft}
     </Text>
     <View style={styles.buttons}>
       <Pressable
         disabled={isPlayButtonDisabled}
         style={[styles.button, isPlayButtonDisabled && styles.buttonDisabled]}
         onPress={isPlaying ? pause : play}
       >
         <Text style={styles.buttonText}>{isPlaying ? 'PAUSE' : 'PLAY'}</Text>
       </Pressable>
     </View>
   </View>
 )
}

export default AudioPlayer

const styles = StyleSheet.create({
 container: {
   justifyContent: 'flex-end',
   width: '100%',
   backgroundColor: '#f53340',
   paddingVertical: 32,
 },
 activeTrack: {
   marginBottom: 32,
 },
 activeTrackTitle: {
   fontSize: 28,
   fontWeight: '700',
   color: '#fff',
 },
 activeTrackDescription: { fontSize: 20, fontWeight: '700', color: '#fff' },
 buttons: {
   flexDirection: 'row',
   justifyContent: 'flex-end',
   alignItems: 'flex-end',
   marginBottom: 12,
   width: '100%',
 },
 button: {
   backgroundColor: '#fff',
   paddingVertical: 8,
   paddingHorizontal: 16,
   marginLeft: 16,
   borderRadius: 8,
 },
 buttonText: {
   fontWeight: '700',
   textAlign: 'center',
   color: '#f53340',
   fontSize: 18,
 },
 buttonDisabled: {
   opacity: 0,
 },
 progressBar: {
   alignItems: 'center',
   flex: 1,
   width: '100%',
 },
 timer: {
   fontSize: 18,
   marginTop: 8,
   marginBottom: 20,
   fontWeight: '700',
 },
 text: {
   color: '#FFF',
 },
})
Getting it all together
Now that we have the components ready, all that remains is to put everything together.
In the App.js file we import the list and player components. In addition to the components, we need to import a const containing a list of songs.
App.js
import AudioPlayer from './src/components/AudioPlayer'
import TrackList from './src/components/TrackList'

import { tracks } from './src/consts/index'
Next we add the components and pass the tracks array as props to the list component.
 return (
   <View style={styles.container}>
     <SafeAreaView />
     <Text style={styles.header}>MUSIC APP</Text>
     <TrackList items={tracks} />
     <AudioPlayer />
   </View>
 )
And now you have your own music streaming app!
Play around with the player’s functionalities and then add additional functions such as scrolling to the next/previous song, volume control or support for more than one playlist.
Summary
In this short tutorial, you created a simple music player. As you have noticed, the functions and events provided by React Native Track Player make our work much easier, so we can focus more on how the functionality should work rather than how to create it. And this is only a fraction of what this music library provides us.
After analysing the API, you will realize that you can create a React Native track player that supports several playlists with full control over the song being played. Offline support will allow you to download a few tracks to your device and play them offline.
Of course, you can always use the expertise of a mobile app development company to help you build a music streaming app that will work anywhere and that you will be able to monetize.
Need someone to build a music streaming app for you? Use our help.
FAQ
Is React Native good for building apps like Spotify or Apple Music?
Yes, React Native is a solid choice for building apps similar to Spotify or Apple Music. It supports cross-platform development, integrates with audio libraries like React Native Track Player, and allows you to implement features like streaming, playlists, and background playback on both iOS and Android.
What is the best library to build a music streaming app in React Native?
The most widely recommended library is React Native Track Player. It offers cross-platform support, background playback, lock-screen controls, and now includes features like adaptive streaming (HLS, DASH) and caching for offline use. It’s actively maintained and well-suited for building production-grade music apps.
Does React Native Track Player support offline playback?
Yes, React Native Track Player supports offline playback through its caching feature. Developers can allow users to download tracks for later listening, making it possible to enjoy music even without an internet connection.
How do I add background audio playback in React Native?
Background audio playback can be added using React Native Track Player. After installing and configuring the library, you register a service that keeps playback running when the app is minimized. This setup enables media controls on the lock screen, notification area, and external devices like headphones.
Read more
Sources
Subscribe to my newsletter
Read articles from Pagepro directly inside your inbox. Subscribe to the newsletter, and don't miss out.
Written by
Pagepro
Pagepro
Next.js, Expo & Sanity developers for hire! At Pagepro, we take over the technical duties by providing Next.js, Expo & Sanity development teams, so you can focus on the strategic goals of your business, and stop worrying about the delivery so much.