BioBytes PairSync: A Bioinformatics Tool for Basic Information Retrieval and Pairwise Sequence Alignment
 Bryan Castillo
This Graphical User Interface (GUI) application that I developed is to allow users input biological sequences, either manually or by loading from a file. It supports sequences such as the deoxy-ribonucleic acid (DNA), ribonucleic acid (RNA), or protein sequences. Users can retrieve some parameters from the sequence such as nucleotide or amino acid frequency, percentage GC content, transcription, and translation for a nucleic acid while protein sequences can have parameters such as isoelectric point, protein sequence molecular weight, or the open reading frame.
Furthermore, other features of the app is it can perform pairwise sequence alignment demonstrated by several algorithms (Dot Plot Alignment, Local Pairwise Alignment, Global Pairwise Alignment). This is useful App when it comes to gaining rapid insights between two sequences depending on the analysis needed by the user.
Project Demo
Here are some screenshots of the GUI app:
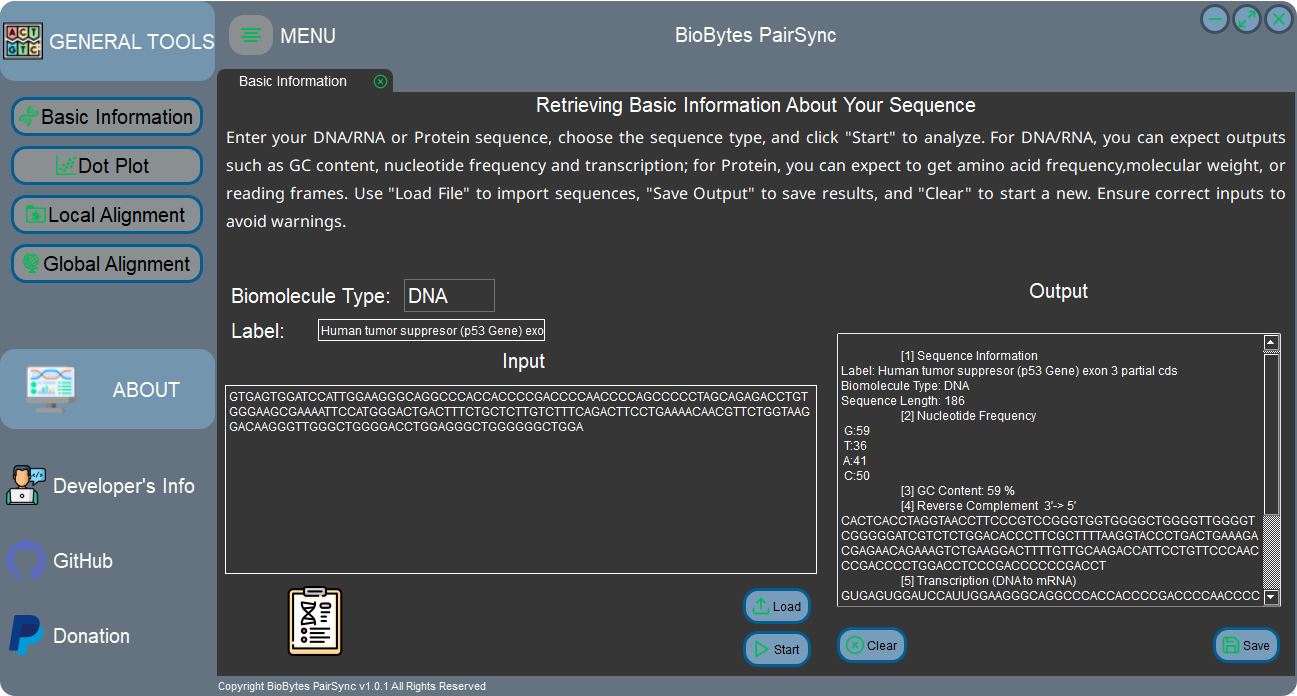
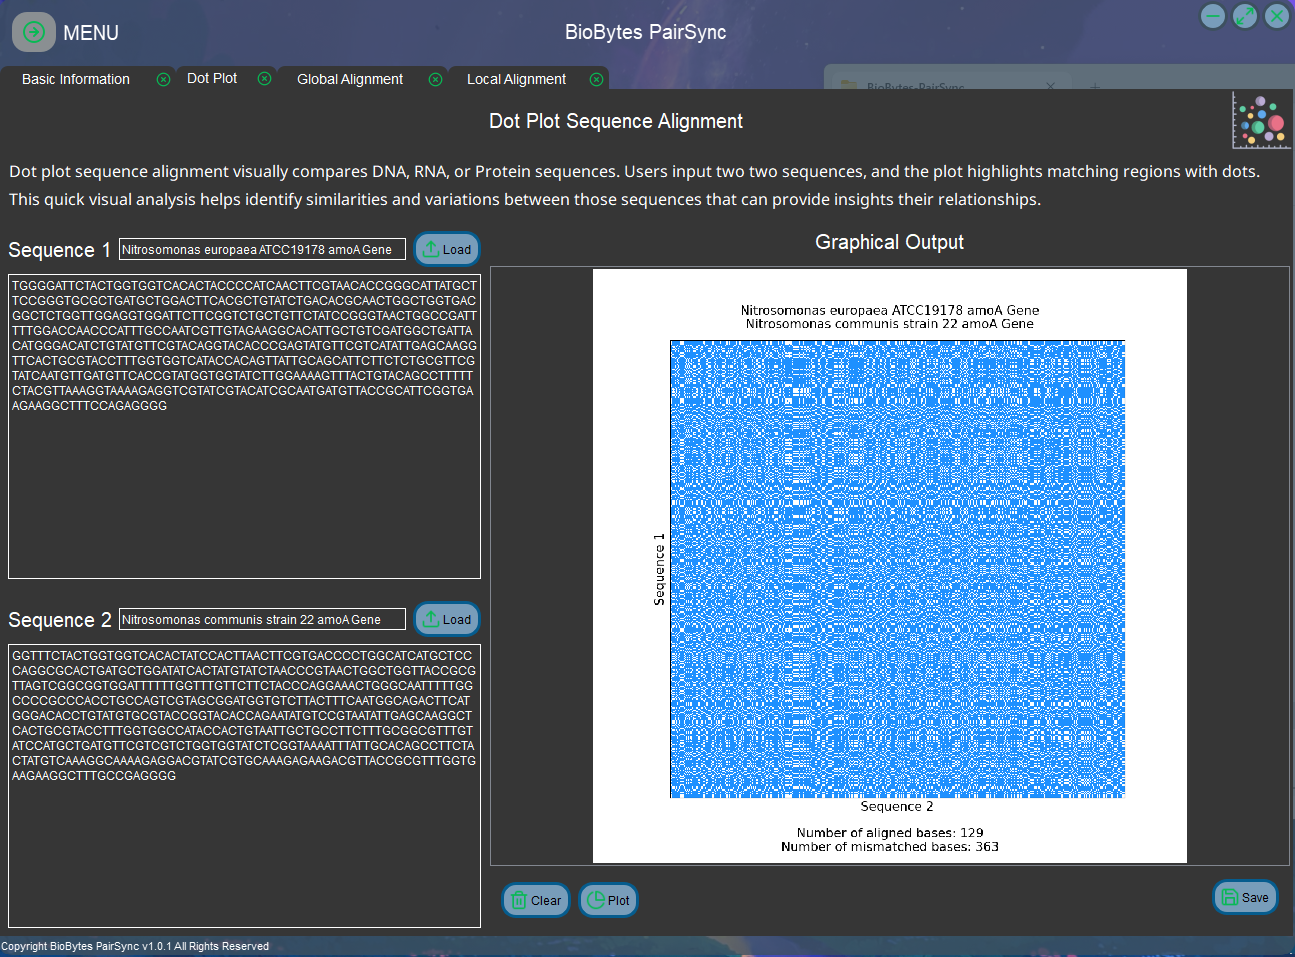
For the installation (Windows 64-bit compatible) and user's instruction of the app, it is available on my GitHub repository:
https://github.com/bryancastillo10/BioBytes-PairSync. Installer is at the Releases page and you can download "biobytes_pairsync_setup.exe"
From Concept to Code
At the advent of technological innovations, the art of coding had become my interest and thought of learning how to create a software along with the application of my domain knowledge which is molecular biology. Eventually, I've also recently learned about the enormous potential and prospective applications of bioinformatics.
As I keep on learning bioinformatics as an interesting field of research, I observed that most of the tools/softwares that were established in this field were commonly demonstrated in frameworks such as Jupyter notebook or command line interfaces (especially when dealing with high level computations) In my opinon, these frameworks are much less accessible for a non-technical person or a biologist that are not well-oriented on a computer system. Thus, a thought occured to me of creating a user-friendly software which is presentable and then demonstrate my fundamental knowledge in bioinformatics at the same time.
Desktop or GUI programs are really cool-looking, and I'm wondering about how they're developed. So, I tried to check into Python libraries, because so far, this is the programming language I am very much familiar with aside from Javascript, that is capable of constructing GUIs. When I first tried to compare the features of the PyQt and tkinter libraries, I found that while tkinter is a lot easier to understand, but PyQt offers a lot more versatility so in the end, I chose PyQt. Moreover, I was inspired by some of the finished GUI apps from PyQt that I saw while browsing the internet.
To conceptualize my idea, I thought first what are the functions of the APP that I want to create. This serves as the back-end section of the code. Meanwhile, the layout and designs which served as the front-end section, I browsed throughout various YouTube channels that demonstrates the use of Qt Designer, a drag and drop software for creating GUI layouts which is available by just installing the PyQt library in your Python environment.
Architecture of BioBytes PairSync
In this section, I'll just provide a discussion about the blueprint of the developed software. The diagram below shows the directory structure of the codes and utilities I used to create the system of this GUI app:
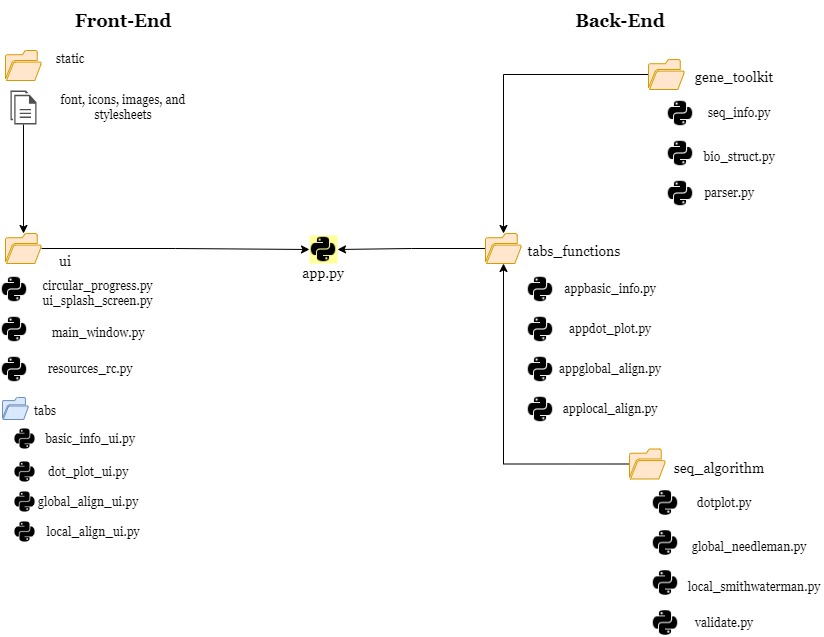
Directory Structure of the Project
app.py: the heart and soul of the application which is the Python script that serves as the bridge between the front-end and backend part of the system. This script also include most of the fundamental functions/methods on how to open/close a tab, dragging, maximize, or resize the main Window, and the execution between the Splash screen & main window.ui library: contains the front-end ui files that were converted into python scripts. This library also includes the scripts for splash screen feature. Generally, this is the design on what the user can see when they open the app.static folder: the utilities folder which includes the font style used, icons, images, and the stylesheet for front-end (.qss file in Qt GUI app)gen_toolkit library: utilizing core Python, the scripts seq_info.py and bio_struct.py works together to create a system for the basic sequence information retrieval feature. seq_info.py contains the Class for calculations, and orientation of the basic information output. Meanwhile bio_struct.py consist of the reference dictionaries for DNA/RNA bases, codons, and amino acid molecular weights. Lastly, parser.py is a script with the class for retrieval if the user input is a NCBI database link for their desired gene sequence. It utilizes the BioPython library feature of fetching the data. As of now, this feature of retrieving the sequence from NCBI is only available in this first feature of the app.seq_algorithm library: contains the classes for the remaining three main features of the app (dot plot alignment, local pairwise alignment, and global pairwise alignment). Instead of using external libraries except for numpy, this library contains those Python scripts for dynamic programming algorithm.In mathematics, it actually portrays the two sample sequences as a matrix, the first sequence is a the upper part while the second one is on the left side. The matrix was initialized, scoring system for matching and mismatching were assigned for each pair in the matrix, and then finally a traceback to finalize the scores. That final score determines the sequence alignment/annotation with respect to each nucleotide bases/ amino acids.
tabs_function library: this part contains the scripts for each tab on how each of the widgets work and connected it to the front-end part, it serves like a reinforcement bridge between the front-end back-end part of the system. It compiles all of the functionality of the tabs before it would proceed to theapp.pyscript.
My Workflow in Coding
The first step I have done is to create the front-end or appearance of the GUI App. In here, I utilized the QT Designer software by which it really took me some time to fully understand how to use it especially when setting up the frames and putting those widgets in a proper place so that you can create a well-oriented layout. It takes some repetitions to follow along the YouTube tutorials I saw and get comfortable with the software. Additionally, I also discovered that to further customize its appearance, you can create a .qss file which has the similar coding syntax as of the CSS, the stylesheet used in web development.
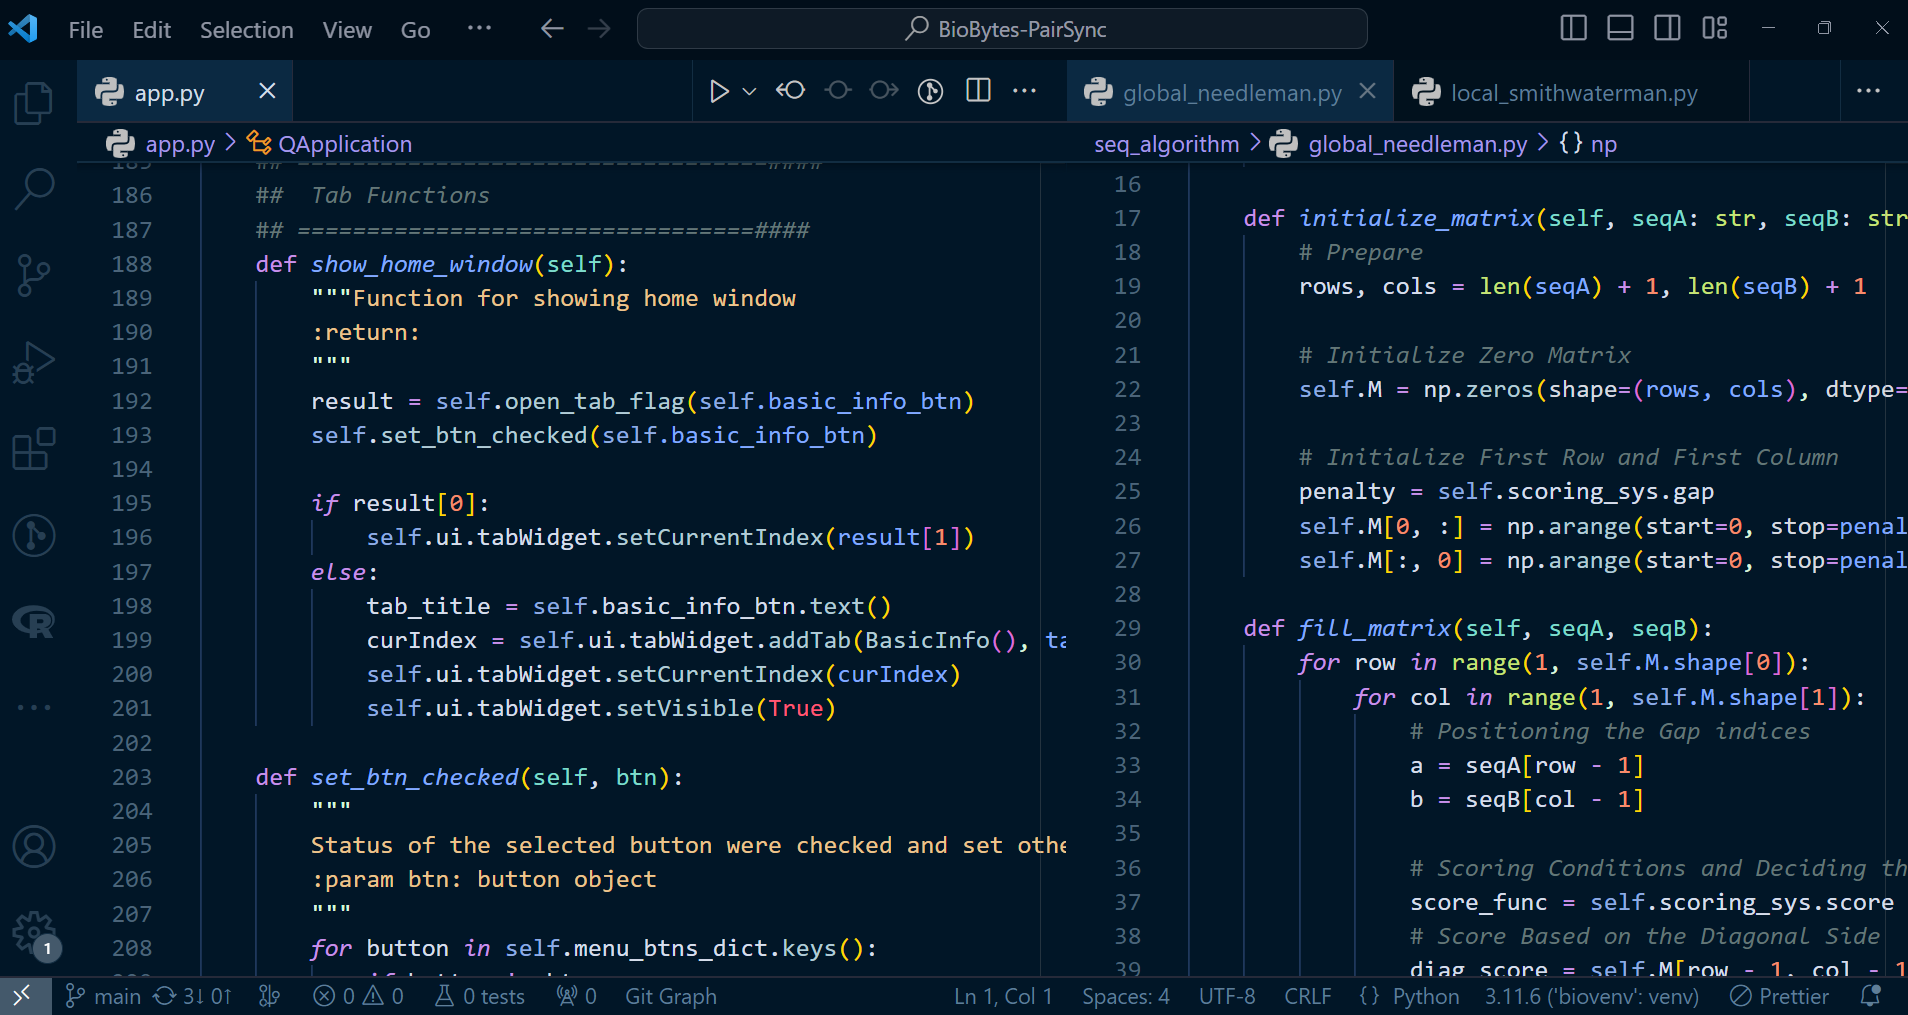
Development Stage
Main window layout or design was created first followed by the initial appearances of each of the tabs. After that, I coded the initial parts of the app.py to be able to achieve the basic functions such as closing,minimizing, or resizing, dragging of the window. As it can also be observed, the appearance were further customize rather than using the default windows frame provided by Qt Designer, I implemented a Frameless Windows Interface, and made som custom widgets to mimic those removed defaults.
The next step is to focus on each tab's backend side. In this part, Basic Information was formulated first which producess the class BioSeq() (gene_toolkit library, seq_info module ) which contains the computations necessary to retrieve those sequence basic information. This include parameters such as nucleotide frequencies, %GC content, open reading frames, and the fundamental transcription & translation of a sequence. After the backend is validated to be working, it needs to be connected to the front-end and check for validity again.
I did the same principle on the suceeding tabs such as the dot plot alignment, local alignment, and the global alignment tab. To simply put: (1) build the backend functions, (2) validate, (3) connect to the front-end , (4) validate if it still works and also add some error handling statements, (5) further polishing if necessary.
It should be noted that we should think the case if the user had an invalid or wrong input. We need to have a code for a pop-up window or any prompt within the GUI to avoid it to crash because we expect at the finished product that no terminal can be seen by the user upon deployment. This would also make the GUI app user-friendly instead of having a technical error would appear on their screen.
When reaching the point of all of those tabs are already fully functional. Auxilliary stuff can be added such as the splash screen, additional buttons and links for more information about the app or the developer's info. Even though it's an optional feature, I believe it's still a good idea to increase the flavors and attractions in an app to pique users' attention.
Conclusion
As a result of my personal effort, I have gained a great deal of new knowledge and developer discipline. It demonstrates to me how the object-oriented programming (OOP) coding style is quite helpful for structuring a system, including how variables and methods can be related to one another. It also give me some insights on error handling by practicing the try-except block in Python. Last but not the least, it allows me to express my creativity in the front-end app design.
To advance in my bioinformatics/data science profession, I am aware that I still need to understand a great deal of tech stacks, but this seems like a solid foundation to start with. Please feel free to leave a remark if you have any fresh idea by which I can continue to enhance this GUI application.
Subscribe to my newsletter
Read articles from Bryan Castillo directly inside your inbox. Subscribe to the newsletter, and don't miss out.
Written by

Bryan Castillo
Bryan Castillo
A researcher with a background in Biological Engineering, Chemistry, and Environmental Engineering. Integrating my skills with programming and new tech stacks.