Set up Semantic-Release and Commitlint to Automate Releases on GitHub (with Next.js and NPM deployment examples)
 Naveed Ausaf
Introduction
What is semantic-release?
semantic-release is a Node.js package that automatically increments version number of the repo in which it is installed. It does this by analyzing Git commit messages to pick out any changes that may warrant a new release. It also compiles such commit messages into a release notes document.
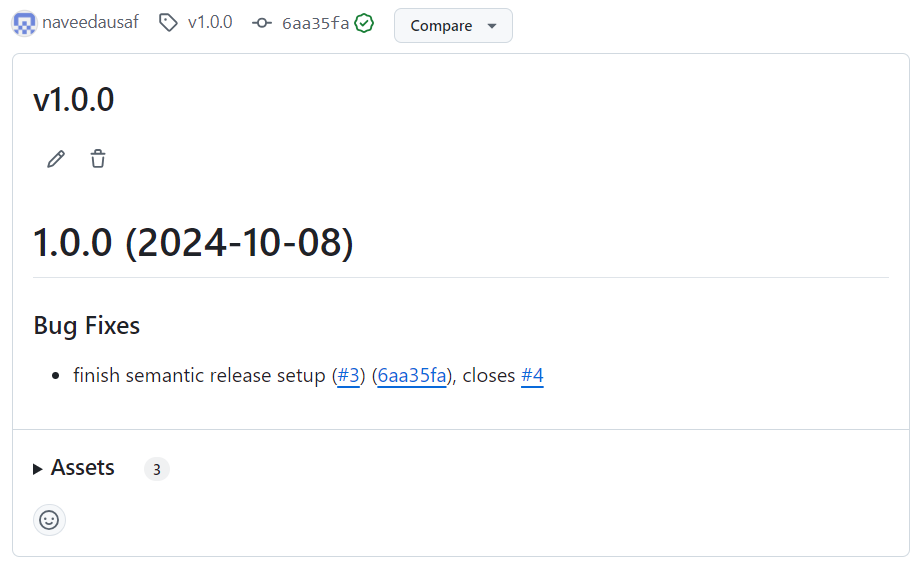
On GitHub, semantic-release can publish a release to the GitHub Release section of the repo. This contains release notes and zips/tarballs for source code and any other assets:
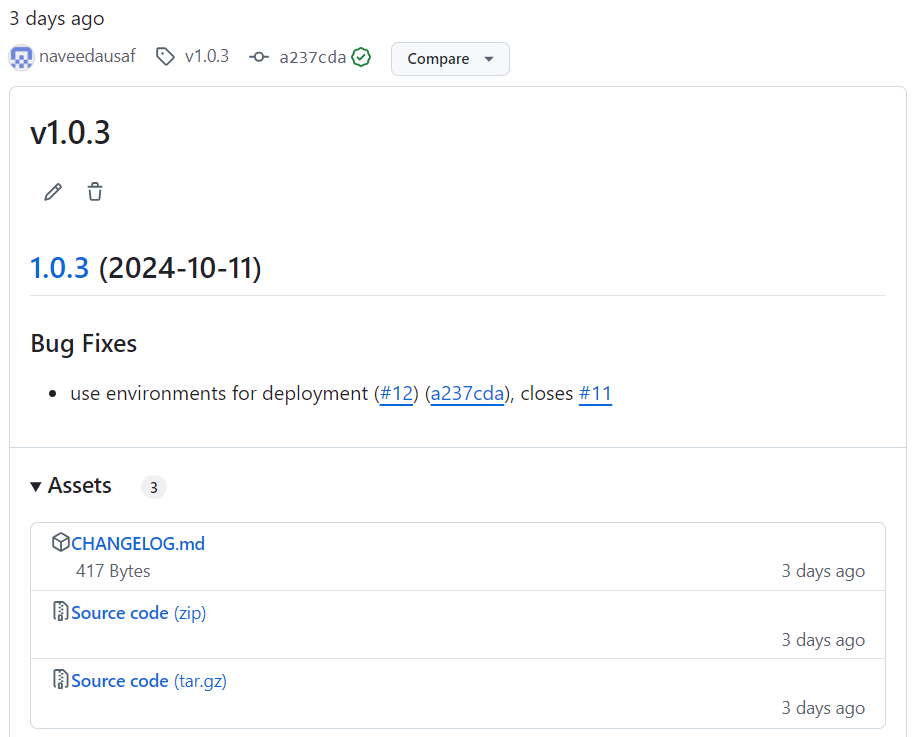
Use of semantic-release has implications for deployment also, which can be made conditional on whether or not semantic-release found any changes that required a new release.
The net effect of using semantic-release is that the developer only has to focus on writing meaningful commit messages in a specific (but easy to use) format. Then, semantic-release, running in CI/CD pipelines, analyzes commits and increments version number if necessary. If it incremented the version number, it would also publish a release with release notes, and ensure that any deployment jobs in the CD pipeline are executed to deploy the new version.
What this post covers
In this post I will show you how to set up semantic-release in your NPM packages and GitHub Actions CI/CD pipelines in order to get automatic releases of the sort described above.
I will provide an example of generating a release for a library package and publishing it to NPM registry, and another of releasing a Next.js React web app and deploying it to Vercel.
The developer workflow I put together is based on pull requests. Specifically:
I assume that you do not push directly to
mainand instead push first to a feature branch, then open a pull request in which you review your changes before merging them intomain.I will set up a number of GitHub Actions workflows as useful checks on the source branch (aka head branch) of an open pull request.
Once a pull request is merged, semantic-release would run on
mainin the CD/release pipeline (implemented as a GitHub Actions workflow) and generate a new version number and release notes, and publish a release to GitHub Releases.
Prerequisites
I assume you are comfortable with the following:
Creating NPM packages with
npm initand installing other packages in your package withnpm installThe common Git operations:
git commit,git push,git pull,git branchandgit log.Opening, reviewing and merging pull requests on GitHub
If you need to learn this topic, MS Learn modules Introduction to GitHub and Manage repository changes by using pull requests on GitHub should provide a good start.
You would gain further practice in pull requests while following along to this post.Basics of writing GitHub Actions workflows.
If you are not familiar with GitHub Actions, MS Learn modules Intoduction to GitHub Actions and Learn continuous integration with GitHub Actions should provide the necessary background.
Key Concepts
Before I show you how to set up semantic-release, I would like to explain a few key concepts.
What is semantic versioning?
Semantic Versioning specification (or SemVer for short) specifies version numbers of the form <Major>.<Minor>.<Patch> e.g. 1.0.12.
When releasing a new version of a project, exactly one of the three components of the project's version number is incremented, according to the following rules:
<Major> should be incremented if the new release contains a change that would break clients of the previous release. If those clients want to use the new release, they would have to update their code or other artifacts.
While it is obvious when the major version of a library would need to be updated - when it would not be compatible with clients of the previous release of the library - for user-facing projects such as web or mobile apps, the situation is more ambiguous. We should never break anything for our users with a new release. Therefore if they have investments in things like data or workflows that they have created, these should be automatically migrated to work with the new release if necessary. Thus ideally, no existing cilents or their artifacts whould ever break.
For such projects, incrementing the major version number can be a marketing decision, such as when there are big-bang changes like a new or a revamped UI or the addition of generative AI features to the app.
<Minor> is incremented if there are new features in the release but clients of the previous version can switch to the new one without breaking.
<Patch> is incremented if the new release contains neither new functionality nor a breaking change, for example if it only contains bug fixes or documentation changes.
How semantic-release works
When semantic-release is run in the root folder of the NPM package in which it is installed (using command npx semantic-release), it scans the commit graph of the currently checked out branch, looking for certain keywords in commit messages. These keywords are defined by the configured commit message format.
There are many different commit message formats (aka commit message conventions). The one used in this tutorial is defined by the Angular project and is referred to as the Angular commit message format. This is the default in semantic-release.
Another popular commit message format is Conventional Commits. It is similar to the Angular format.
Some of the keywords that the Angular format defines are as follows:
fix:as the prefix of a commit message indicates that the commit contains a change that is neither new functionality nor a breaking change.feat:as the prefix of a commit message indicates the commit contains new functionality but not a breaking changeBREAKING CHANGEorBREAKING CHANGESin message footer (i.e. in the last line of commit message) indicates the commit contains a breaking change.ci:orbuild:as commit message prefix indicates that changes in the commit pertain to CI pipeline or build logic respectively.
Based on the semantics of above keywords (described above and fully defined in Angular commit message format) and the semver specification (described in previous section), semantic-release takes fix to indicate that the patch component of the version number needs to be incremented, feat to indicate an increment in the minor component, BREAKING CHANGE and BREAKING CHANGES to indicate an increment in the major component of the version number.
Commit message containing prefixes ci and build are ignored by semantic-release and do not contribute to an increment in any part of the version number. This is obviously an opinionated choice and you can override it in configuration.
When run in the root of the project, semantic-release scans all commits in the commit graph, starting from the most recent commit that has a semver tag up to HEAD (i.e. the latest commit), looking for these keywords. Based on the keywords encountered in commit messages, it decides which one of the <Major>, <Minor> or <Patch> components should be incremented (or none at all, if all keywords encountered were those that do not indicate an increment in any part of the version number, such as ci and build above).
In the picture below the most recent commit on main with a semver tag has the tag v1.0.1. This is the version number of the last release from the branch. So semantic-release would look at the commit message of each of the four commits forward of this.
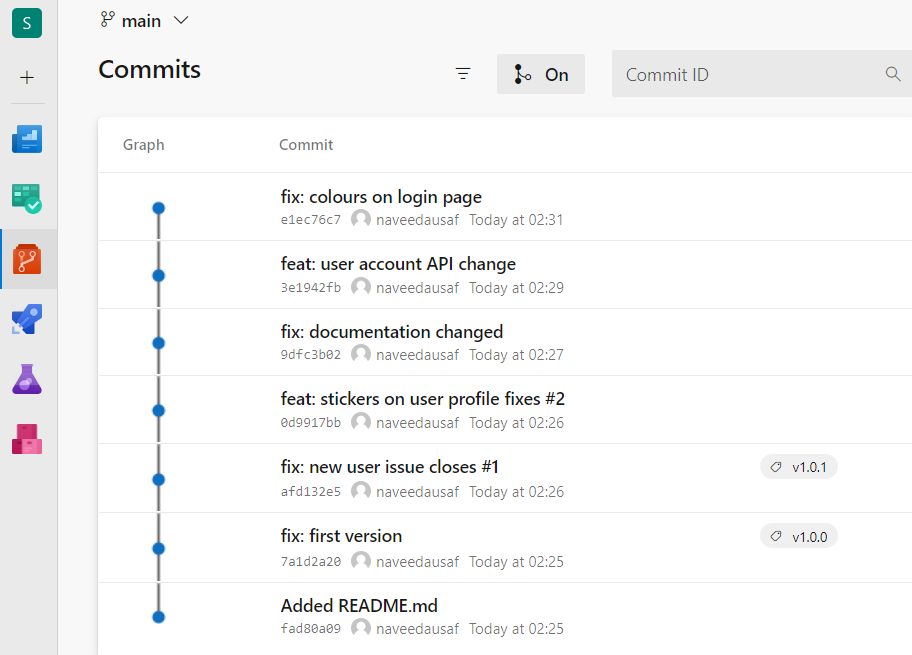
The first two of the scanned commits indicate that <Patch> and <Minor> components respectively should be incremented. If these were the only two commits at the tip of main, the new version number would be v1.1.0: only one component, not both, would be incremented by semantic-release and <Minor> is the more significant one of the two.
However, the third commit encountered has BREAKING CHANGE in its commit message footer. Its complete commit message is as follows:
feat: user account API change

Migrated REST API to GraphQL.
Existing clients will break.

BREAKING CHANGE
Therefore, even though it has the feat prefix in its commit message which indicates an increment in the minor component, this commit is taken to be a breaking change and therefore indicates an increment in the major component of the version number.
Therefore it is the major component in the last version, v1.0.1, that would be incremented to produce the new version number, v2.0.0.
By the time semantic-release has finished running, it would have:
tagged
v2.0.0on the last commit in the graphgenerated release notes for the new version.
Published a release to GitHub Releases section of the repo.
Since a new deployment is only supposed to happen if semantic-release published a new release, and in this case it did, therefore if a Continuous Deployment pipeline were set up on this repo, the tagged commit would be deployed to production also.
NPM Provenance
NPM introduced a provenance attestations feature in 2022 as a measure for improving supply chain security. Under this, if you publish a package to NPM registry from a compatible CI/CD platform (as of September 2024, only GitHub Actions and GitLab CI/CD are supported) then NPM generates an attestation. This is proof that the package came from a specific workflow file or release pipeline in a specific commit in a specified repository.
For example, if I publish the sample package of section Deploy to NPM in this article to NPM, this is what the provenance attestation looks like on the page of the package in NPM:

Thus a provenance attestation provides assurance that the package was published to NPM from an authentic source (the source being a specific workflow in a specific commit of a repo identified by its URL).
I will show you how to check provenance attestations of dependencies of your pacakge. In the example of deploying a package to NPM registry, I will also show you how to ensure that NPM is able to create and publish a provenance attestation for your package.
Initialize a Git repo to follow along
To follow along, you can either fork the starter repo for this article - this is a Next.js React app with a single page - or set up semantic-release in your own NPM package.
To Use the Starter Project
Fork the repo:

Clone your fork to your local machine:
git clone <your forked GitHub repo URL>
Now skip to the section Set up Husky and commitlint below.
To Use Your Own Project
You can also follow along by installing semantic-release in an NPM package you already have, such as a Node.js package, a React app or an Angular app.
In order to do this, please go through the following requirements:
Make sure a local Git repo is initialized in the package.
If your project does not already have a local Git repo initialised, git commands such as
git remote -vwould raise an error:
In this case, you can initialise a git repo by running
git initin project folder.You have a GitHub repo for the package. If not, create it in GitHub.
The GitHub repo is added as a remote named
originin the local Git repo in your package.You can view the remotes with command
git remote -vYou can add a remote named
originwith commandgit remote add origin <URL of your GitHub repo>I am assuming that code would be released into production from a branch named
mainand that this is the branch on which semantic-release would run.If you release from some other branch (e.g.
releaseormaster) then substitute the name of that branch formainwhen going through the rest of this tutorial.In particular, in most of the GitHub actions workflows (
.ymlfiles) shown here, you might need to setrefparameter in actionactions/checkout@v3to the name of the branch from which you release and/or substitutemainwith the name of your branch in workflow triggers.Also, in the various config files created in section Local Setup below, you would likely need to substitute
mainwith the name of the branch you release from.OPTIONAL: I recommend that you have a
.gitattributesfile in your project root which contains the following line (for an explanation, see my post LF vs CRLF - Configure Git and VS Code to use Unix line endings):* text=auto eol=lfIf this file doesn’t exist, you can create it with command
echo "* text=auto eol=lf" >> .gitattributes
Local Setup
I install the following packages in the project (i.e. in the NPM package in which I wish to set up semantic-release):
commitlint lints commit messages. I configure it so that it checks that commit messages comply with Angular commit message conventions. This ensures that semantic-release, which is also set up by default to use the Angular conventions, would be able to parse them.
Husky is used for registering commands to run in Git hooks. I register commitlint with Husky to run in the
commit-msghook. This means that commitlint would automatically run whenever a commit is made to the local repo and if it fails - i.e. the message of the commit does not comply with Angular commit message conventions - thengit commitcommand would fail.Thus the combination of commitlint and Husky helps prevent commit messages which semantic-release cannot parse from getting into the repo.
semantic-release also needs to be installed and configured in the project, although it will be invoked from the deployment pipeline rather than locally from command line.
Set up these three tools in your project by following the steps below.
Set up Husky and commitlint
Open the NPM package in which you wish to set up semantic-release in your code editor
On the terminal, in your project’s root folder, checkout main and install dependencies of yuor NPM package:
 git checkout main
 git pull
 npm install
On
main, check out a new branch namedsemantic-release-setupon which we will set up semantic-release:git checkout -b semantic-release-setupInstall
commitlint:npm install --save-dev @commitlint/config-angular @commitlint/cli conventional-changelog-angularConfigure commit message rules for commitlint: in the root of your project, create a file named
commitlint.config.jswith the following content.If your package.json has
”type”: “module”attribute (this lets you use ES6 modules without the the need for a bundler such as Webpack or Rollup), then replace the top linemodule.exports = {withexport default {in the snippet shown below:/* eslint-env node */ module.exports = { extends: ['@commitlint/config-angular'], parserPreset: 'conventional-changelog-angular', rules: { 'header-max-length': [2, 'always', 72], 'body-max-line-length': [2, 'always', 72], 'header-full-stop': [2, 'never', '.'], 'body-leading-blank': [2, 'always'], }, };This is what the lines of this config file do:
extends: ['@commitlint/config-angular'],says that rules specified in package@commitlint/config-angular, which provides commitlint linting rules for the Angular commit message format (as JS/TS functions, à la ESLint), should be used to lint commit messages. Commitlint rules packages exist for other conventions also.parserPreset: ['conventional-changelog-angular'],I’ll explain in a second what this does. First allow me to explain whatconventional-changelogis.conventional-changelog is a sprawling ecosystem of tools and packages whose unifying theme seems to be parsing of commit messages in a repo according to a specified set of commit message conventions.
If commit messages are written according to a well-defined format or set of commit message conventions, then they describe, in a (quasi-)structured manner, the change that each commit contains. Therefore the commit messages, in order, form a changelog for the repo.Hence the name conventional-changelog for the monorepo of tools and packages that help with parsing and processing such commit messages.
Commitlint itself and the various@commitlint/*packages that it uses or can use all sit within the conventional-changelog monorepo.Commitline uses the parser
conventional-commit-parserto parse commit messages. The parsed messages are then passed to@commitlint/config-angular(configured in previous line) so that linting rules specific to Angular conventions can be applied. Both of these pacakges also sti within conventional-changelog monorepo.What the line
parserPreset: ['conventional-changelog-angular'],does is it configures packageconventional-changelog-angularas the parser preset.A parser preset package provide settings for
conventional-commit-parser.Note that parser preset for angular,
conventional-changelog-angular, is the default in commitlint. However, since you need to explicitly supply the pacakge of linting rules specific to Angular format,@commitlint/config-angular, I feel the parser preset package for the same conventions should also be explicitly configured. This is what I have done.Note that semantic-release uses the same parser,
conventional-commit-parser, and the same parser preset,conventional-changelog-angular, and numerous other packages from conventional-changelog monorepo, but itself sits ouside conventional-changelog.For more details on parser and parser preset, see Appendix: Details of semantic-release Configuration and Internal Workflow at the end of this article.
rulessection declares custom rules, in addition to those given by the Angular rules package@commitlint/config-angularthat we have configured. These additional help me write clean, readable commit messages.For example
'header-max-length': [2, 'always', 72]and'body-max-line-length': [2, 'always', 72],together ensure that lines of a commit message are not wider than 72 characters which is good for readability.See commitlint rules reference for more details.
Install Husky:
npm install --save-dev huskyIf you do not already have a
.huskyfolder in your project root, then initialize Husky:npx husky initOne of the things this command does is it creates a
"prepare"script in package.json.The
"prepare"script is a lifecycle script and one of the conditions under which it runs automatically is whennpm installis run without arguments in the project folder.The command we just ran set up the
preparescript as"prepare": "husky". This ensures that if you or a teammate fetches the repo and then runsnpm installto install project’s NPM dependencies, then Husky would also run.This would register Husky with Git as a handler for Git hooks. Thus if a command has been registered with Husky to run in one of these hooks - we will do this in the next step - Husky would run it whenever Git invokes it to run in that hook.
Register commitlint with Husky to run in Git
commit-msghookecho "npx --no -- commitlint --edit \$1" >> .husky/commit-msgYou should now find a file
.husky/commit-msgin your project folder with linenpx --no -- commitlint --edit $1a the end of it (the\in the command shown above was only used to escape the$character).In this command:
--nosuppresses any promps that npx might show--indicates to npx that subsequent arguments (commitlintwhich is the name of the package we want to run,--editand$1) are all positional arguments, not named options or flags tonpxitself. This prevents--editand$1from being interpreted as arguments tonpx. Instead, the positional arguments are concatenated and executed by npx. Thus the command thatnpxexecutes is:commitlint --edit $1Here:
--editis a commitlint option that reads the commit message from a specified file. This file is specified as$1.$1is evaluated by Git to be./.git/COMMIT_EDITMSG. This file, in the hidden folder.gitwithin the project folder, contains the commit message of the commit in progress.Inspect your
.husky/pre-commitfile and delete it if necessary:rm .husky/pre-commitThis file is autogenerated by
npx husky initthat we executed above.By default it runs
npm run testwhich I do not like to run in a Git hook as it would drastically increase the amount of time agit committakes. Also, if you do not have a “test” script defined in package.json, there would be an error atgit commitwhennpm tun testis executed.If you do not have code in
.husky/pre-committhat you definitely want to run in Git pre-commit hook, then delete the file.Make sure you have an appropriate
.gitignorein project root, as we are about to make our first commit of the tutorial.I usually copy and paste an appropriate one from GitHub’s gitignore collection at the start of my projects.
Now try to execute the following on the terminal in your project’s root folder:
git add .
git commit -m "finished installing commitlint"
The command
npx --no -- commitlint --edit $1we configured to run in Gitcommit-msghook woud run.This means that commitlint would run and lint the commit message.
Since the message does not comply with Angular commit message conventions - it doesn’t have one of the prescribed prefixes such as
fix:,feat:, orci:- commilint would fail.This in turn would make the
git commitoperation fail: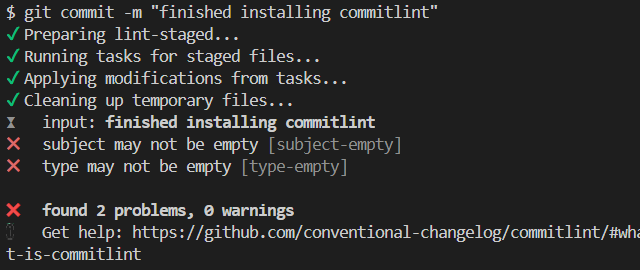
We will fix this error in the next step.
Another error I sometimes get at this point is
ReferenceError: module is not defined in ES module scopereferring tocommitlint.config.js. This happens if I didn’t follow step 5 above properly: my package.json has”type”: “module”, i.e. I have explicitly set the project to use ES6 modules, but thecommitlint.config.jsis still using CommonJS-style default export syntax.To fix this, replace
module.exports = {at the top ofcommitlint.config.js, withexport default {. Then rungit add .andgit commitagain.Now execute the following command that has a valid commit message:
git commit -m "build: install commitlint"This should go through because the commit message header now contains the prefix
buildwhich is one of the prefixes defined by Angular commit message conventions that we configured commitlint with.
Set up semantic-release
On the terminal, in app root folder, run command:
npm install --save-dev semantic-releaseInstall additional plugins:
npm install --save-dev @semantic-release/changelog @semantic-release/execEach of the plugins installed above performs a specific job in semantic-release's internal workflow. Some plugins get installed by default. However, we need a few additional ones from this list, which are what we just installed.
See Appendix: Details of semantic-release Configuration and Internal Workflow at the end of this article for details.
To the
"scripts"section of yourpackage.jsonfile, add:"release": "semantic-release"This would be invoked as
npm run releasein the release pipeline.Create file
release.config.jsin app’s root folder, with the following content.As with
commitlint.config.js, if your package.json has”type”: “module”, i.e. you are using ES6 modules, then replace the linemodule.exports = {withexport default {in the config file:/* eslint-env node */ module.exports = { branches: ["main"], plugins: [ "@semantic-release/commit-analyzer", "@semantic-release/release-notes-generator", [ "@semantic-release/npm", { npmPublish: false, }, ], [ "@semantic-release/changelog", { changelogFile: "docs/CHANGELOG.md", }, ], [ "@semantic-release/github", { assets: ["docs/CHANGELOG.md"], }, ], [ "@semantic-release/exec", { successCmd: "echo 'RELEASED=1' >> $GITHUB_ENV && echo 'NEW_VERSION=${nextRelease.version}' >> $GITHUB_ENV", }, ], ], };semantic-release uses plugins for the various steps in its internal workflow.
Appendix: Details of semantic-release Configuration and Internal Workflow at the end of this article provides detail on semantic-release configuration and several plugins.
However, here I want to quickly explain what the plugins declared in the file above do and how they have been configured:
@semantic-release/commit-analyzerplugin analyzes commits according to Angular commit message conventions (this is the default commit message format but can be changed in configuration of the plugin).@semantic-release/release-notes-generatorplugin generates release notes.@semantic-release/changelogplugin writes out the generated release notes to filedocs/CHANGELOG.md.@semantic-release/githubplugin publishes a release to GitHub Releases together with the text of release notes generated by@semantic-release/release-notes-generatorplugin. It also attached the release notes file,docs/CHANGELOG.mdthat was written out by@semantic-release/changelogplugin.@semantic-release/npmplugin has been configured NOT to publish the package to NPM as we have setnpmPublish: false. Instead, we would use a deployment job in the release pipeline, a GitHub Actions workflow, to publish the package.Later on I will show you an alternate way of publishing a package: publishing directly to NPM from within semantic-release by setting
npmPublish: true.The
@semantic-release/execplugin has been configured to set two environment variables if there is a release:RELEASEDis set to1andNEW_VERSIONis set to the version number of the new release that has been computed by semantic release.These variables are set using the GitHub Actions workflow command syntax by writing them to the environment file
$GITHUB_ENV. This makes them available to all steps and commands that run subsequently in the same GitHub Actions job.We will use these two variables in the next section.
Set ”version” in package.json
In package.json, set "version": "0.0.0-managed.by.semantic.release",
Reasons for doing this are given in the Appendix in the section for @semantic-release/git plugin.
GitHub Setup
In this section we shall
setup GitHub Actions workflows for the Continuous Integration (CI) and Continuous Deployment (CD) pipelines and configure pull requests and permissions.
To set these up, proceed as follows:
Configure a Personal Access Token
In order to tag main (or other configured branch) and publish a release to the GitHub repo's Releases, semantic-release needs a GitHub Personal Access Token (PAT) with write persmissions.
As per GitHub's recommendation, create a fine-grained PAT (as opposed to a classic PAT) as follows:
Create a fine-grained Personal Access Token named
semantic-release-demo(or any other name of your choice) by following instructions given in ”Creating a fine-grained personal access token” in GitHub Docs.BUT, before pressing the “Generate Token” button, note the following:
A fine-grained token is created at the account/organization level, so it is not repo-specific.
Under Repository Access, choose Only selected repositories and select your repo from the dropdown.
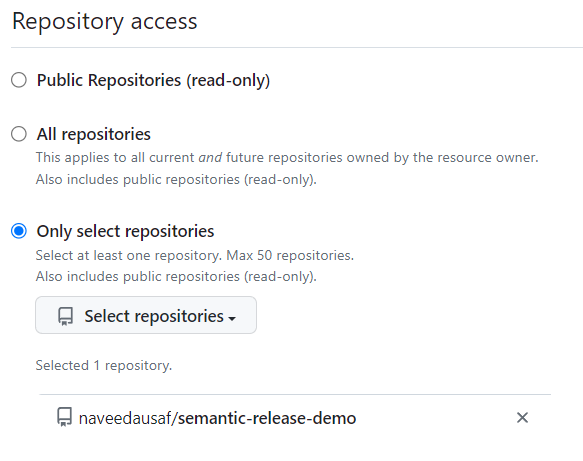
Under Repository Permissions, select Read and Write access for Contents, Issues and Pull Requests.


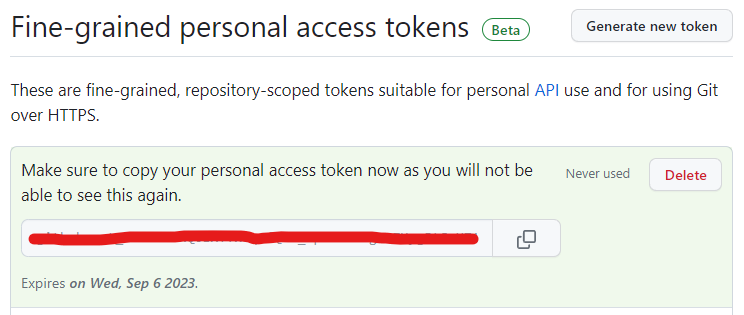
Once the PAT is created, copy the token to clipboard:
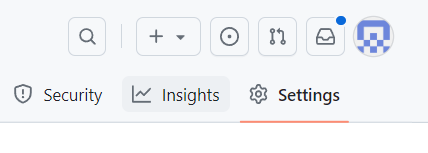
Go to your repo and click Settings in the top right hand corner of the repo page (these are repo settings and NOT account settings):
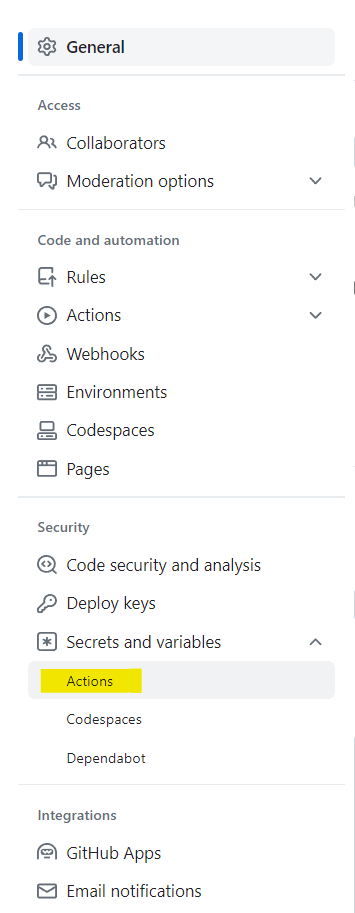
In the menu on the left, click Secrets and Variables, then Actions:
Click the New repository secret button:
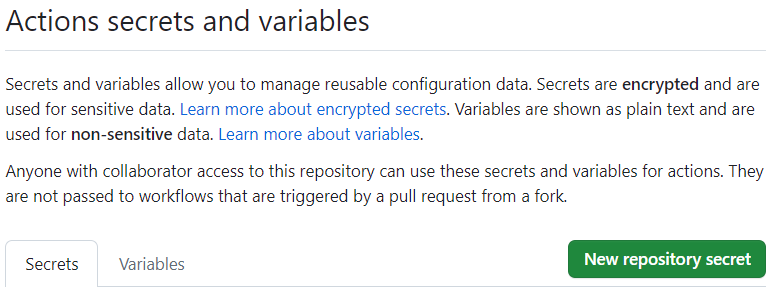
Name the secret
GH_TOKENand paste the token value you copied to clipboard earlier and click Add Secret: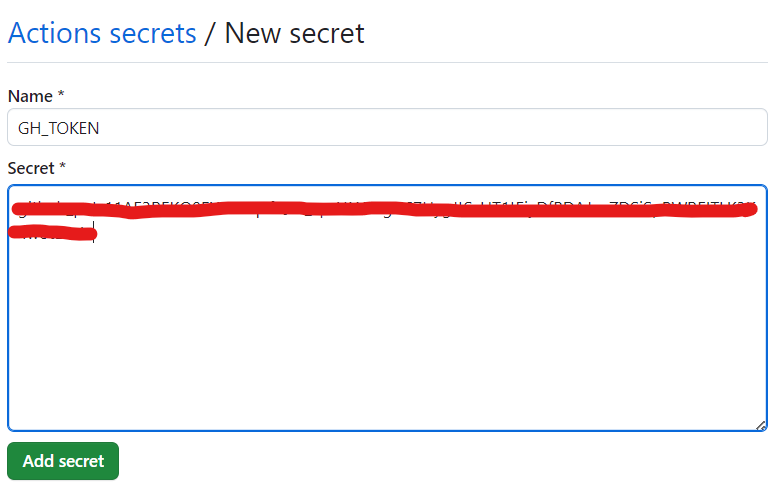
Create Commitlint Check on Pull Requests
In folder .github/workflows in the project root, create a GitHub Actions workflow file named ci-commitlint.yml with the following content:
name: Commitlint Workflow
concurrency:
  group: ci-${{ github.ref }}-commitlint
  cancel-in-progress: true

on:
  pull_request:
    types: [edited, synchronize, opened, reopened]
    branches:
      - main

jobs:
  lint-commit-messages:
    name: Run commitlint
    runs-on: ubuntu-24.04

    steps:
      - uses: actions/checkout@v3
        with:
          # this is needed to get one of the
          # commitlint invocations below (that
          # analyzes commits from --from to --to)
          # to work
          fetch-depth: 0

      - name: Install dependencies
        # If we don't do this, commitlint throws
        # errors aboutnot not finding rules package
        # for commit message conventions
        run: npm ci

      # Using env in steps below below to pass
      # required values from github context rather
      # than accessing properties from github context
      # directly. GitHub Docs recommend
      # that this is better for security as it
      # mitigates against script injection attacks
      - name: Run commitlint on PR source branch commit messages
        env:
          basesha: ${{ github.event.pull_request.base.sha }}
          headsha: ${{ github.event.pull_request.head.sha }}
        run: npx commitlint --from $basesha --to $headsha --verbose

      - name: Run commitlint on PR Title and Description
        env:
          prtitle: ${{ github.event.pull_request.title }}
          prdescription: ${{ github.event.pull_request.body }}
        run: printf "$prtitle\n\n$prdescription" | npx commitlint
REST OF THIS SECTION EXPLAINS THIS WORKFLOW.
The trigger for this workflow is pull_request. Based on the activity types that have been declared in types attribute of the trigger: synchronize (explained here) and edited, opened and reopened (explained here), this workflow runs when:
a pull request is opened/reopened (activity types
openedandreopened)source branch is updated e.g. it gets new commits or a force push (
synchronize)PR title, PR description (aka PR body) or target branch (aka base branch) are modified
When triggered, the workflow runs commitlint to lint messages of the commits on the source branch, as well as the concatenation of PR title and PR description.
Step actions/checkout@v3 checks out the repo so that commitlint can analyze the source branch of the pull request.
fetch-depth parameter specifies the number of commits to fetch, with 0 meaning fetch all commits on all branches.
commitlint needs fetch-depth to be 0 if —from and —to parameters are specified as is the case in the workflow file above, and would throw an error if this were not set on the actions/checkout@v3 action that checked out the code.
A sample GitHub Actions workflow given in commitlint docs also also uses fetch-depth: 0.
Step “Install dependencies” installs dependencies declared in package.json of the package by running npm ci which is like npm install but is more suitable for use in a build/release pipeline environment, as described here.
Step “Run commitlint on PR source branch commit messages”, adapted from commitlint documentation, runs commitlint on commit messages on source branch of a pull request.
If you set up commitlint to run in Husky earlier, then you would lint these commit messages locally before committing and pushing to GitHub. However, running commitlint on these commits again, as done in the workflow above, would flag up any commit messages that did not comply with your commtlint configuration: there are ways that such messages can creep into the repo even if commitlint is set up to run locally via Husky.
When scanning pull request source branch, commitlint parses commit messages from —from commit to the —to commit. In doing so, it excludes the —from commit, parsing only commits that are ahead of it rather than including it, up until the commit specified in —to parameter (which is included).
I provide ${{ github.event.pull_request.base.sha }} as value of —from, which evaluates to (tip of) main. The value of —to is ${{ github.event.pull_request.head.sha }} which is (tip of) the source branch of pull request.
The behaviour I get is that if the feature branch is directly ahead of main, commitlint parses commits from tip of main (exclusive) to tip of the feature branch (inclusive). For me this is exactly the desired behaviour as I always rebase my feature banch on main before pushing it to my GitHub repo.
However, sometimes it does happen that the feature branch diverges from main. In this case, even though —from is (the tip of) main, commitlint lints finds the common ancestor of the two branches, then parses commits from this up to the —to commit which is the (tip of the) feature branch.
For example in the commit graph shown below where the source branch of pull request final-commitlint3 has diverged from the target branch main:

For this commit graph, commitlint would find the common ancestor, the commit 82d7c9 shown with a red frame, and take this as the starting commit instead of main, the commit d57d42, that was specified as value of —from. Then it would parse, excluding this commit, the three commits in a straight line up to, and including, the tip of the feature branch final-commitlint3.
Again, this is exactly the behaviour I want on the odd occasion I forgot to rebase my feature branch on to main before pushing and so there was divergence.
Finally, note that I am passing properties of github context as environment variables (using an env block in a step) in multiple steps in this workflow, as well as in other workflows (see below). I do this, instead of referencing them directly within Bash script in a step, because GitHub advises that this mitigates against script injection attacks.
ASIDE:
Previously in this step, I used expression ${{ github.event.pull_request.head.sha }}~${{ github.event.pull_request.commits }} as value of —-from parameter of commitlint. I took this from the following command taken from sample of using commitlint as a pull request check in commitlint documentation:
npx commitlint --from ${{ github.event.pull_request.head.sha }}~${{ github.event.pull_request.commits }} --to ${{ github.event.pull_request.head.sha }}
Here github.event.pull_request.commits appears to be the number of new commits in the source branch of pull request compared to the target branch.
This led to problems if I had created a merge commit from main directly in the pull request on GitHub.
For example, consider again the commit graph given above:

When I open a pull request to merge final-commitlint3 into main, GitHub alerts me that the source branch of the PR has conflicts:

When I resolve the conflict, a merge commit will be created which points back to both main and the PR source branch final-commitlint3:
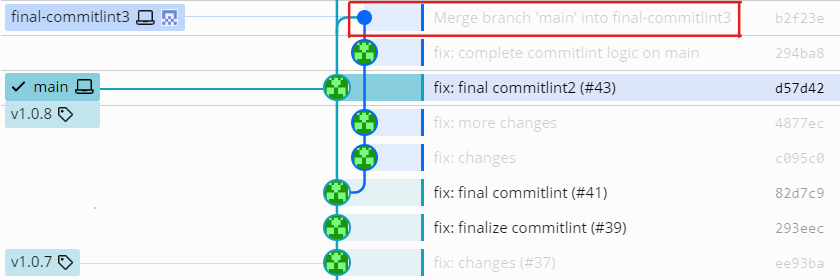
The number of new commits on the feature branch is now 4, including the merge commit just created. So expression ${{ github.event.pull_request.commits }} evaluates to 4. However to walk back these 4 commits from the tip of final-commitlint3, there are now two possible paths.
What I have seen happen is that instead of ending up at the common ancestor of main and final-commitlint3, the commit 82d7c9, the expression passed as value of commitlint’s —from parameter, ${{ github.event.pull_request.head.sha }}~${{ github.event.pull_request.commits }} takes the other path and ends up 4 commits back at commit ee93ba that has tag v1.0.7. This become the —from commit instead of the common ancestor of the two branches as would have been the desired behavior.
The —from value I now use instead, i.e. main, has the behaviour of parsing forward from common ancestor of main and feature branch up to the (tip) of the feature branch. This is exactly what I want.
ANOTHER ASIDE:
If you create a merge commit in a pull request in GitHub like I did above, it always has the message Merge branch ‘<PR target branch>’ into <PR source branch>. You cannot alter it and it does not comply with Angular commit conventions configured in out commitlint.config.js.
Yet commitlint does not raise an error when it encounters this commit message.
This is because this particular commit message is one of the default commit message patterns that commitlint ignores. If you need to, you can add to what commitlint ignores by default by providing one or more test functions in ignores key in commitlint configuration file, commitlint.config.js.
Step “Run commitlint on PR Title and Description” ensures that the concatenation of pull request title and description complies with our commitlint configuration.
PR description, aka PR body, is the topmost comment in the Conversation tab of the pull request:
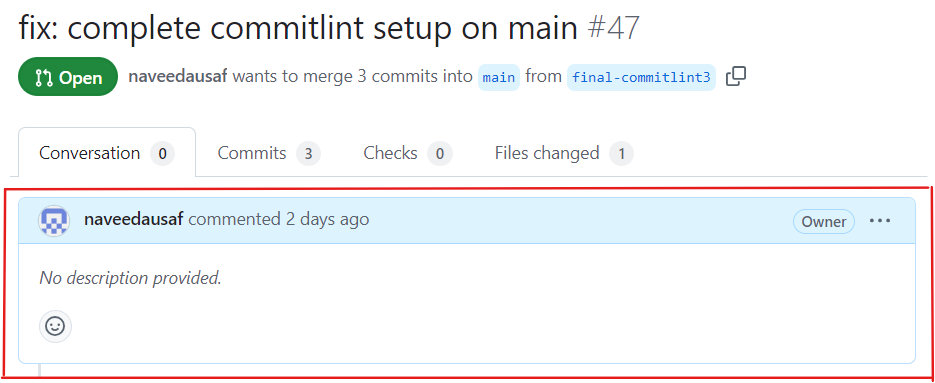
Under the setup given in a later section, GitHub Configuration for Pull Requests, the default message for the Squash Commit that would be created when you merge the pull request would be the concatenation of “Pull request title and description”. Therefore I lint this also.
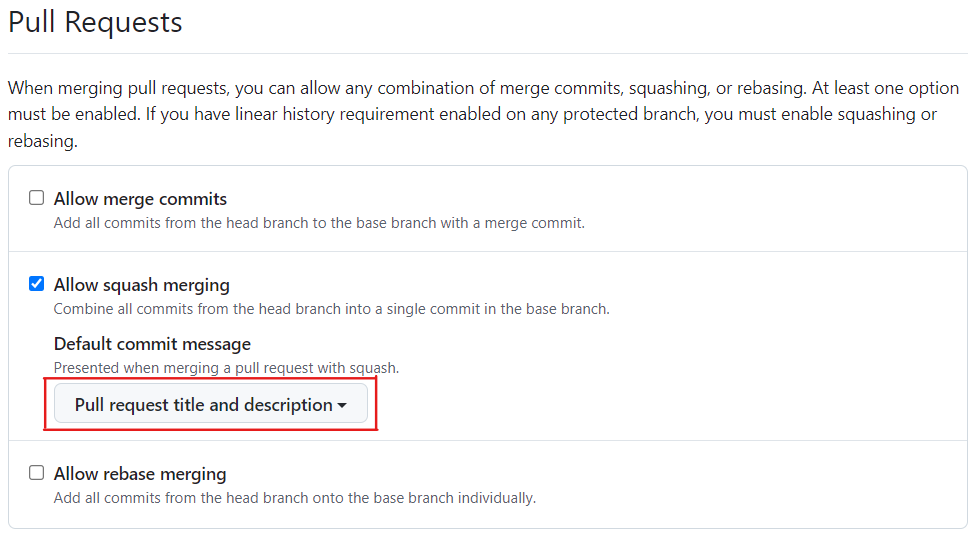
The same check would also make sense if you allow Merge Commits (see screenshot above) as in that case too, you can default the commit message to “Pull request title and description”.
However, if you only allow rebase merging (see screenshot above), and disallow both squash meging and merge commits, then this check would be redundant. This is because in rebase merging, when yo merge the PR, the new commits in source branch of PR are rebased on main, then placed in front of main. The commit messages of rebased commits remain the same and these we already lint in the previous step in the workflow, Validate PR source branch commits with commitlint.
Therefore if you only allow rebase merging, then comment out or delete this step (“Run commitlint on PR Title and Description”).
For more details, see my post The Three Types of Pull Request Merge in GitHub.
Create Linked Issue Check on Pull Requests
Create a GitHub Actions workflow file .github/workflows/ci-verifylinkedissue.yml, with the following content:
# Based on example given in nearform repo:
# https://github.com/nearform/actions-toolkit/blob/master/.github/workflows/check-linked-issues.yml
#
name: Verify Linked Issue in PR
concurrency:
  group: ci-${{ github.ref }}-verifylinkedissue
  cancel-in-progress: true

on:
  pull_request:
    types: [edited, synchronize, opened, reopened]
    branches:
      - main

jobs:
  verify-linked-issue:
    name: Check for Linked Issue
    runs-on: ubuntu-24.04
    permissions:
      issues: read
      pull-requests: write
    steps:
      # PROS: Actually checks that the issue exists in repo
      # CONS: This needs issue ref to be in description of PR, not title
      - uses: nearform-actions/github-action-check-linked-issues@v1
        id: check-linked-issues
        with:
          comment: false
REST OF THIS SECTION EXPLAINS THIS WORKFLOW.
This workflow checks that an issue from GitHub Issues is referenced in the pull request description (PR description is the topmost comment on the PR’s page) using a string of the form <special keyword> #<Issue Number>. An example would be Fix #23.
Keywords other than Fix can be used to link an issue to a pull request and the full list is given here in GitHub Docs.
Because of the setup we shall do shortly, the pull request description would become the body and footer of the commit message (i.e. the content after the first line, aka header, of the commit message) of the new Squash Commit that will be created on main (this behaviour would be the same if you instead did a Merge Commit when merging the pull request). Any issue references of form Fix #<Issue Number> in this commit message would be automatically closed when the pull request is merged.
Another advantage of attaching issues like this is that when semantic-release runs on main, it would output any referenced issues in commit messages in release notes as URLs.
I like to have this check in my repos because I always make sure that all work I push to main references some user story (which would be an issue if you store user stories in GitHub Issues in the repo).
You can reference more than one issue e.g. Fix #32, Fix #34. You can also reference issues without closing them e.g. #32, #34. These will not be closed when the pull request is closed but will go into the commit message and from there into release notes as URLs to the respective issues.
For the workflow above to run successfully, you need at least one issue that will be closed when the pull request is merged, i.e. which is referenced in PR description using one of the special keywords e.g. Fix #32 or closes #60 rather than simply as #<issue number>.
Create Deployment Pipeline
In .github/workflows folder in the project, create a GitHub Actions workflow file named release.yml, with the following contents:
name: Release to Production
concurrency: release-to-prod-pipeline
on:
  push:
    branches:
      - main

jobs:
  create-release:
    permissions:
      contents: write # to be able to publish a GitHub release
      issues: write # to be able to comment on released issues
      pull-requests: write # to be able to comment on released pull requests
    runs-on: ubuntu-24.04
    name: Create Release
    outputs:
      released: ${{ env.RELEASED }}
      newVersion: ${{ env.NEW_VERSION }}
    steps:
      - uses: actions/checkout@v3
        name: Checkout code
        id: checkout
        with:
          # This is needed for semantic-release to work
          fetch-depth: 0

      - name: Install Package Dependencies
        # needed for both commitlint and semantic-release to work
        run: npm ci

      - name: Lint commits on main since last version tag
        run: |

          # Find latest version tag
          # Starts with 'v' followed by a digit.
          # Prevent non-zero exit code from git describe
          # if a version tag is not found by appending an
          # `|| echo "..."` to the git describe statement.
          lasttag=$(git describe --tags --abbrev=0 --match="v[0-9]*" 2>/dev/null) \
            || echo "no version tag found, will only lint commit message of HEAD commit"


          # Compute arguments to commitlint
          if [ "$lasttag" == "" ]; then

          # A version tag was not found (i.e. semantic-release has yet
          # to run successfully for the first time on current branch).
          # So only parse the last/latest commit.
            clargs="--last"

          else

          # latest version tag (that was found) should be mapped to
          # SHA of the commit bearing the tag. This should be --from
          # argument to commitlint (this is excluded when commitlint
          # run) and HEAD should be the --to argument (this would
          # be included when commitlint runs)
            echo "latest version tag is $lasttag, will lint messages of all commits forward of this up to HEAD..."
            clargs="--from=$(git rev-parse $lasttag) --to=HEAD"

          fi

          # Run commitlint with computed arguments
          npx -- commitlint --verbose $clargs
      - name: Create GitHub release
        id: semanticrelease
        env:
          GH_TOKEN: ${{ secrets.GH_TOKEN }}
        run: |
          echo "RELEASED=0" >> $GITHUB_ENV
          npm audit signatures
          npm run release

      # Instead of a separate job, you can have steps to
      # deploy in the same job.
      # However, each would need to be made conditional on
      # env.RELEASED variable (set during npm run release)
      # being 1. For example:
      #
      # - name: Deploy Step 1
      #   id: deploystep1
      #   if: ${{ env.RELEASED == 1 }}
REST OF THIS SECTION EXPLAINS THIS WORKFLOW.
The release.yml file we created above is meant to be the release pipeline, i.e. the workflow which releases your project into production.
This workflow is triggered on a push to main. When there is a push to main, semantic-release will run in a job named create-release in the workflow.
Steps and properties of this job - those that haven’t already been explained for earlier workflows - are described below:
Step “Lint commits on main since last version tag” lints the commit messages of all commits on main since the last version tag.
Normally, only the HEAD commit on main after pull request has been merged should need to be linted. This is because:
Under Squash Merging, there is only ever a single commit created on
main.Under Merge Commit, one or more commits from feature branch are added to
main, but the messages of all of these have already been linted in the pull request check Run commitlint described above, except that of the new merge commit.So in Merge Commit also, only the commit message of HEAD needs to be linted.
In Rebase Merge, all commit messages are from the pull request source branch and their messages have already been checked in the pull request.
Still, verifying the tip commit’s message doesn’t do any harm even if it is not useful.
Indeed, the sample GitHub Actions workflow given in commitlint documentation only lints commit message of the HEAD commit on push event.
Why does the commit message of tip of main need to be linted at all? As described under ci-commitlint.yml above, I set up the PR Title and Description to be the default for commit message of the new Squash Merge commit that would be created on main, and the same default can be used if opting for a Merge Commit.
When I initiate a pull request merge using either Merge Commit or Squash Merge, PR title and description would be filled in as the commit message for the Merge Commit or the Squash Commit that would be created:
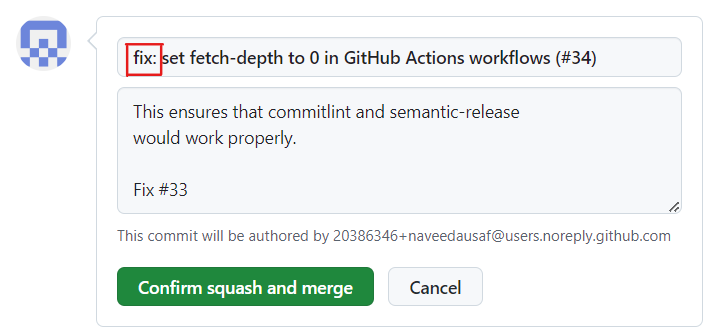
I already lint the concatenation of PR title and description in ci-commitlint.yml (described above) before PR merge. So the message shown above complies with my commitilnt configuration.
However, the problem is that just before pressing Confirm squash and merge I can modify it so that it is no longer compliant and therefore semantic-release would no longer be able to parse it when it runs on main.
For example I can delete the fix: prefix in the picture above.
When semantic-release runs on main and parses this commit message, then instead of throwing an error like commitlint would, it would simply ignore the commit. If this is the only new commit on main that semantic-release had to parse, as would happen under Squash Merge which is what I use, there there would be no release. If there are deployment jobs that depend upon semantic-release actually making a release, those wouldn’t run either.
Yet there would be no notification of there NOT being a release.
Parsing the commit message of tip of main with commitlint before running semantic-release protects against this situation as a unlike semantic-release, commitlint would fail if it comes across a non-compliant commit message. This means whole deployment workflow would fail and we would get notified.
The reason why I lint all commits since last version tag instead of only HEAD is that in the unlikely scenario where two or more pull request get merged at around the same time, there could be multiple commits on main, one from each merged pull request, that need to be linted.
Secondly, doing so protects against two further unlikely events: pushes being made directly to main without pull requests and checks on the pull request not preventing merg in event of a check failure.
Either of these situations can occur because appropriate branch protections on main were not in place or were not operational. The latter case can arise if you changed visibility of your repo from public, where branch protections work, to private where branch protections only work if you have a paid GitHub account.
For more details, you can read my post The Three Types of Pull Request Merge in GitHub.
In the Bash command for finding latest version tag,
lasttag=$(git describe --tags --abbrev=0 --match="v[0-9]*" 2>/dev/null) \
            || echo "no version tag found, will only lint commit message of HEAD commit"
note the following:
I append
2>/dev/nulltogit describethat finds the latest version tag (i.e. a tag that begins withvfollowed by a digit).I do this because if there are no version tags on
main,git describefails with error messagefatal: No names found, cannot describe anything.which be a bit misleading on the console as in this case, the subsequent commitlint command in this step would still lint the HEAD commit.Therefore I hide this error message from console by redirecting it to
/dev/nullby appending2>/dev/nulltogit describe, as explained here.I append
|| echo "no version tag found, will only lint commit message of HEAD commit"togit describebecause otherwise if no version tag can be found andgit describeexits with a non-zero exit code, the whole step and therefore the job fails. This happens because GitHub Actions runner launches Bash with-eoption.However, failure of
git describeis not an error condition for the step which would still want to lint the HEAD commit in this case.Appending an
|| echo “…”ensures that an error is not reported to Bash if thegit describecommand preceding the||fails.
Step “Create GitHub release“ runs semantic-release on main, which is the branch that is checked out by action actions/checkout@v3 in an earlier step as it is the default branch of the repo.
This step is a bash script that contains three commands:
echo "RELEASED=0" >> $GITHUB_ENVsets environment variableRELEASEDto0.The environment variable is set using the GitHub Actions workflow command syntax by writing it to the special environment file
$GITHUB_ENV.We configured
release.config.jsin the previous section so that when semantic-release runs, if it computes that a release needs to be made (i.e. the version number needs to be incremented and release notes published), then it would set this variable to1. We would use this variable in deployment job(s) shown later.npm audit signaturesscans all dependencies of your package and verifies provenance attestations where these are available. Since provenance is a new feature, not all pacakges in the dependency graph would have provenance attestations.Secondly, it verifies the signature of every package.
Every package that is published to NPM is signed by NPM. If a copy of the package stored on a mirror of the registry or in a proxy such as GitHub Packages or an Azure Artifacts feed is compromised, then the signature verification would fail and threfore
npm run audit signatureswould fail.npm run releaseruns the script”release”in package.json which we defined earlier assemantc-release. Therefore this command would execute semantic-release which would run according to its configuration inrelease.config.jsthat we created earlier in Local Setup.
The env block of the step:
- name: Create GitHub release
  id: semanticrelease
  env:
    GH_TOKEN: ${{ secrets.GH_TOKEN }}
sets an environment variable GH_TOKEN to a GitHub Personal Access Token (PAT) read from repo secret also named GH_TOKEN that we created earlier.
This would be used by semantic-release to publish a release to GitHub Releases and comment on pull request and issues and annotate pull requests with a released badge.
Besides the steps described above, the job seamntic-release also defines two job output variables, released and newVersion:
outputs:
  released: ${{ env.RELEASED }}
  newVersion: ${{ env.NEW_VERSION }}
steps:
  ...
Environment variables RELEASED (a 0 or 1 value that indicates whether or not there was a new release) and NEW_VERSION (the version number computed by semantic-release if it did create a new release) are set by semantic-release when it runs in the step “Create GitHub release“ in the job. See discussion of semantic-release configuration file in section Set up semantic-release for details.
When the job has completed, it evaluates the output variables defined in the the outputs object. Thus released and newVersion get set to environment variables RELEASED and NEW_VERSION respectively, which in turn would have been set when semantic-release ran.
While the runner would be torn down and therefore the environment variables would not longer be available after the job has finished, the output varaibles associated with the job would still be available to any subsequent job. A deployment job would be able to read these and take appropriate deployment decisions.
Examples of deployment jobs that use these job output variables appear in Deployment sections later.
The job also has a permissions block:
jobs:
  create-release:
    permissions:
      contents: write # to be able to publish a GitHub release
      issues: write # to be able to comment on released issues
      pull-requests: write # to be able to comment on released pull requests
This block of permissions wasn't needed in earlier versions of semantic-release (I have a project currently using an earlier version and it works fine without this).
This comment in a GitHub issue explains that a contents: write permission is now needed. I have verified that that with just this permission, the workflow is able to create a release in GitHub Releases and create comments on pull requests and on issues linked to pull requests like this:
However, a GitHub Actions recipe in semantic-release documentation states that issues: write and pull-requests: write permissions should be declared to allow semantic-release to comment on issues and pull requests respectively. Therefore I have included them in the workflow above for future-proofing.
I am using ubuntu-24.04 as the runner for the job instead of ubuntu-latest that I would have preferred to use in a tutorial. At the time of this writing, ubuntu-latest maps to the older version of the runner (ubuntu-22.04) which installs Node 18 LTS version. However, several of the dependencies required by semantic-release, such as @semantic-release/github, require Node v20. This threw errors when Create GitHub release job ran on an ubuntu-latest runner:
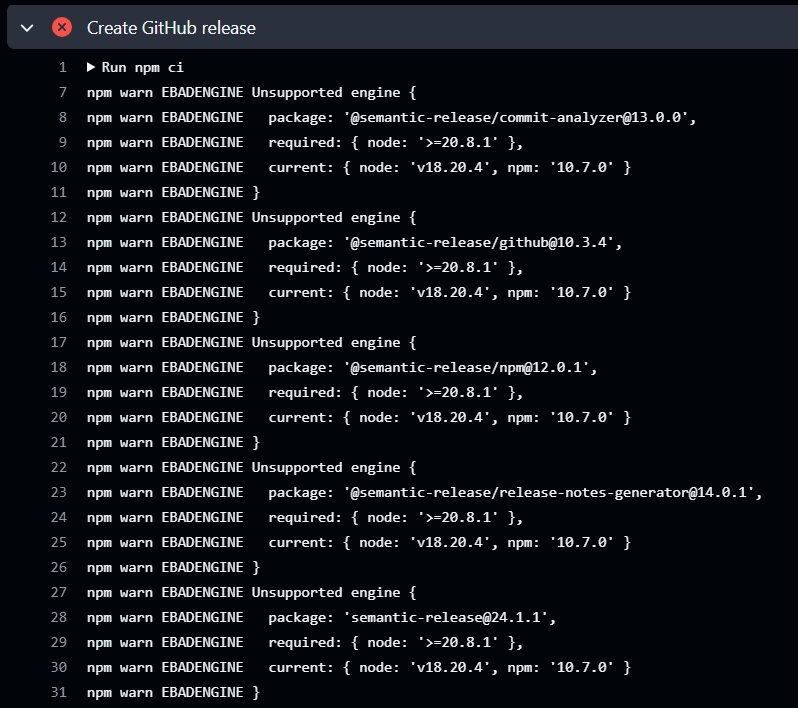
The later version of the runner that I have used, ubuntu-24.04, installs Node 20 LTS instead, which means the job runs fine.
If you need to use an earlier version of the runner, you can either use setup-node action in the workflow to install the version of Node you want (e.g. that current version of semantic-release needs), or install a version of semantic-release which, along with its dependencies, is compatible with the version of Node that is preinstalled on your runner.
Commit and Push
OPTIONAL STEP: If you are not following along with the sample repo and already have build or test jobs in your release workflow, then delcare these as dependencies of the job by uncommenting
needsproperty of thecreate-releasejob:jobs: create-release: # needs: [build, test]I only run semantic-release after a clean build has been done and all tests pass. semantic-release documentation advises the same. This is what uncommenting
needsin the snippet above would do.Commit your work on the feature branch
semantic-release-setupand push it to the remote GitHub repo:git add . git commit -m "ci: set up semantic-release" git push -u origin semantic-release-setup
GitHub Configuration for Pull Requests
In this section we shall configure some useful branch protections on main and pull request status checks.
Go to the Pull Requests tab on the GitHub repo and press the button Compare & pull request:
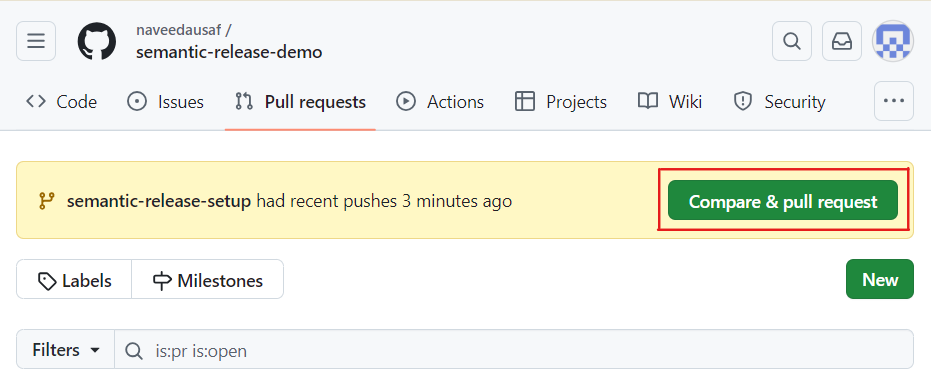
On the Open a Pull Request page that opens, enter title:
ci: set up semantic-releaseThen press Create pull request button:
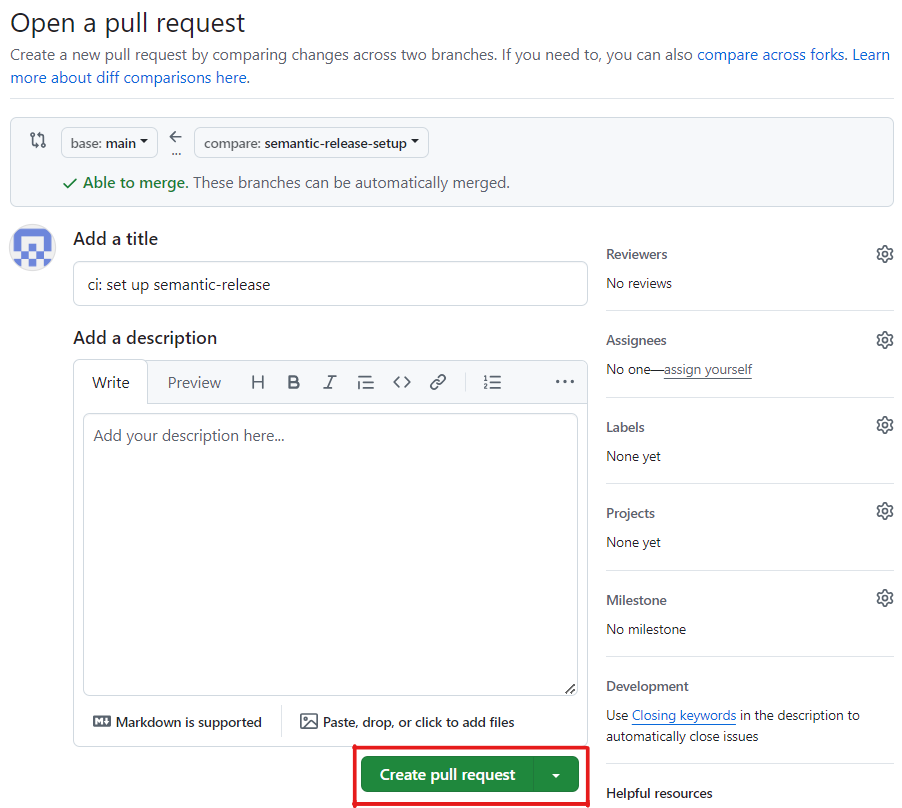
On the page for the new pull request, wait for the two jobs in the workflows we created above to complete:
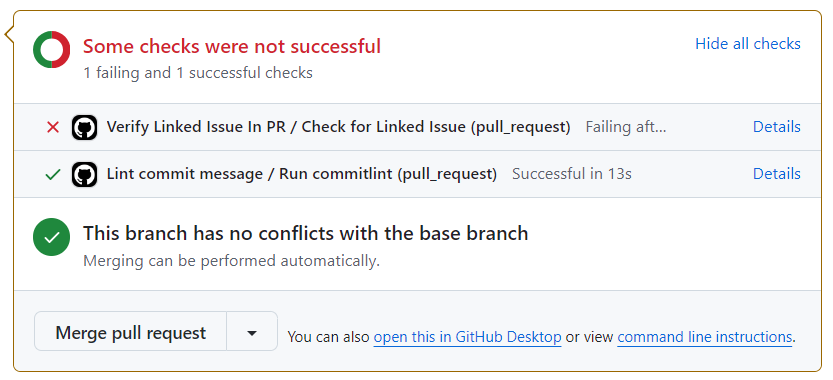
We will address the failing check shortly.
On Settings tab of the repo in GitHub, under Branches, click Add classic branch protection rule if you do not already have a branch protection rule on
main: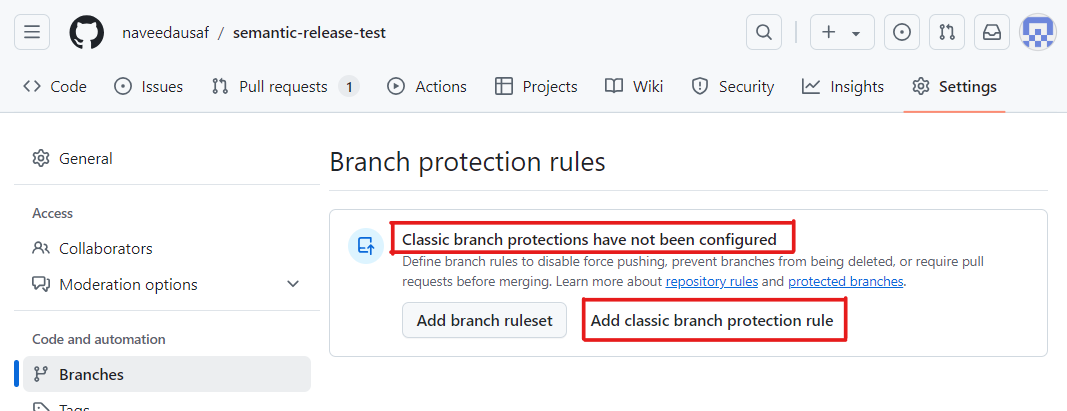
Otherwise, click on the branch protection rule on
mainthat you already have.On the page for the Branch protection rule, fill out the various fields as shown below.
Then press Create or Save Changes: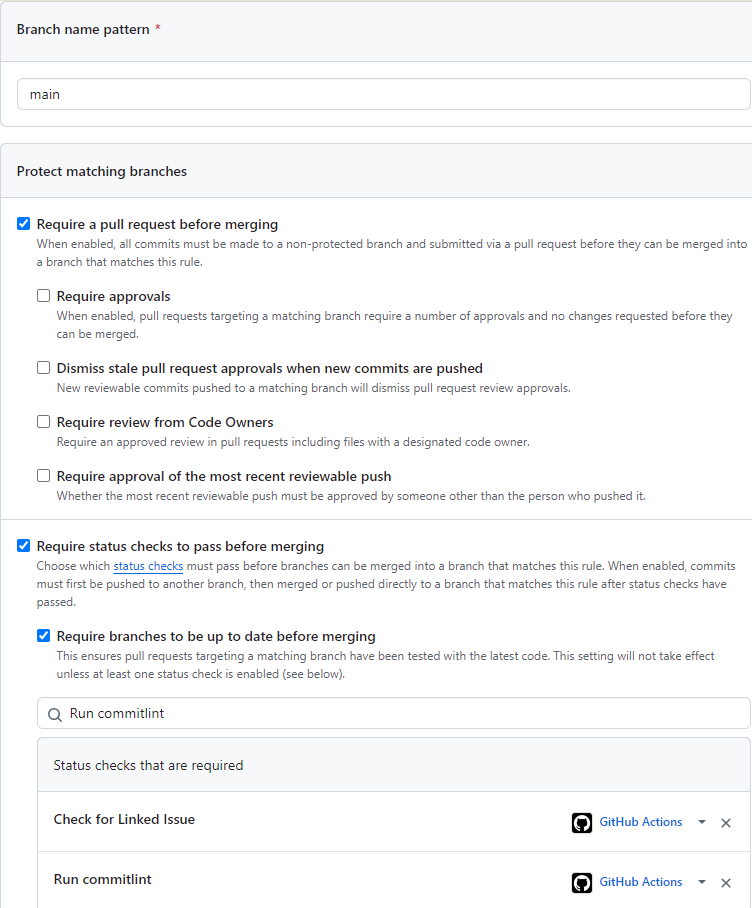
What we have just done is configure the two jobs in the workflows created above as pull request status checks. These need to pass - i.e. the workflows need to run successfully - before a pull request would be allowed to merge.
On this page, I also check Require Linear History and Do not allow bypassing above settings. However, this is not required for this tutorial.
OPTIONAL STEP: On the General tab of repo Settings, scroll down to the Pull Requests section.
Configure it as follows (this change gets saved automatically, there is no Save Changes button to press at the end):
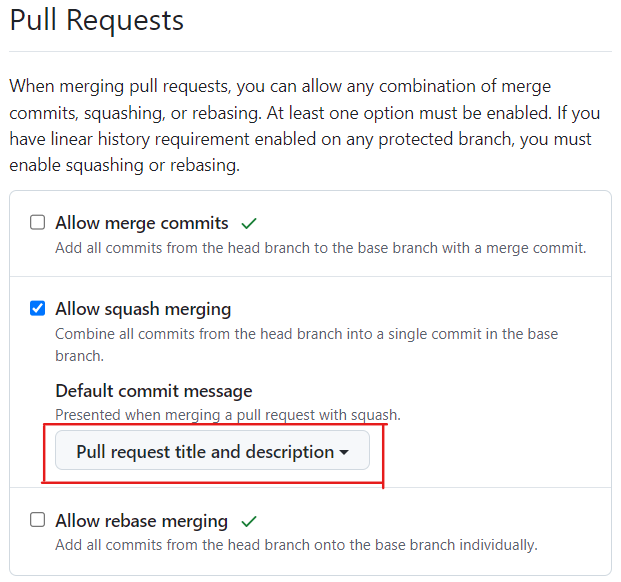
On this page, I also check Automatically delete head branches checkbox, though this is OPTIONAL for this tutorial.
There isn’t a Save Changes button to press as changes get autosaved as you make them on this particular page.
Of the three possible ways of merging the source branch (aka “head branch”) of a pull request into the target branch (aka “base branch”), I enable only one: Allow squash merging.
If you are not familiar with three types of merges, you can find more detail here in GitHub documentation or in my blog post on the topic.
Which of the three merge methods you use, or allow, is up to you. The setup given in this post would work fine with any of the three methods.
However, I personally prefer the Squash Merge method and disallow the other two because:
I prefer to keep my
mainlinear as it’s much easier to understand (e.g. togit bisect) than the sort of non-linear history you get when you have merge commits. Therefore I select option Require Linear History in Branch protection rule formain(in step 5 above).
This precludes the use of merge commits: the Merge Commit option would not be available on a pull request if you have the require Linear History option checked in branch protection rules for the target branch of the pull request: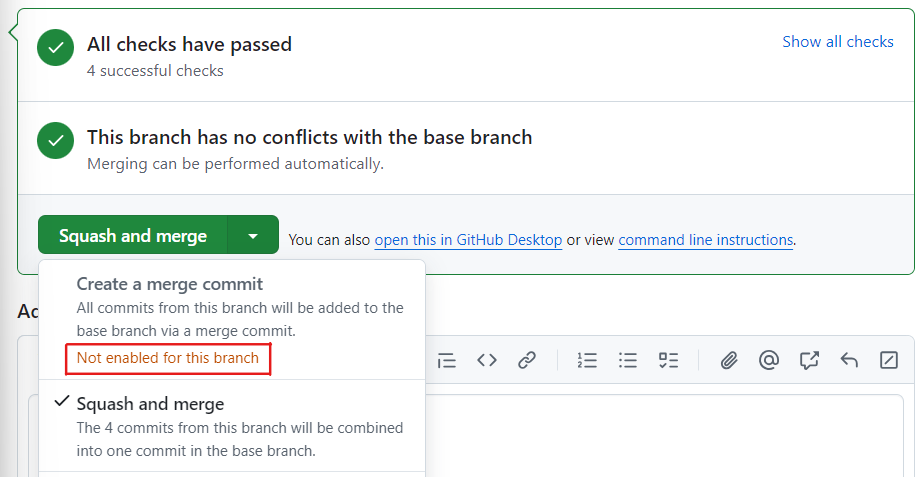
Of the remaining two available merge methods - Squash merge and Rebase merge - I prefer squashing.
I like to merge smaller pull request frequently rather than attempt to merge into
mainseveral days or weeks of work done on the feature branch.For small merges, I find that having a single meaningful squash commit on
mainworks a lot better than having lot of tiny commits onmainthat were obtained by rebasing the original commits in the feature branch ontomain.
Thus with squash merging, I get a linear main on which individual commits are chunky and meaningful rather than a main that is potentially non-linear or has lots of tiny commits. Such a main is easier to understand and reason about.
Go to Issues tab on the repo and create a new issue. with title “Set up semantic-release”.
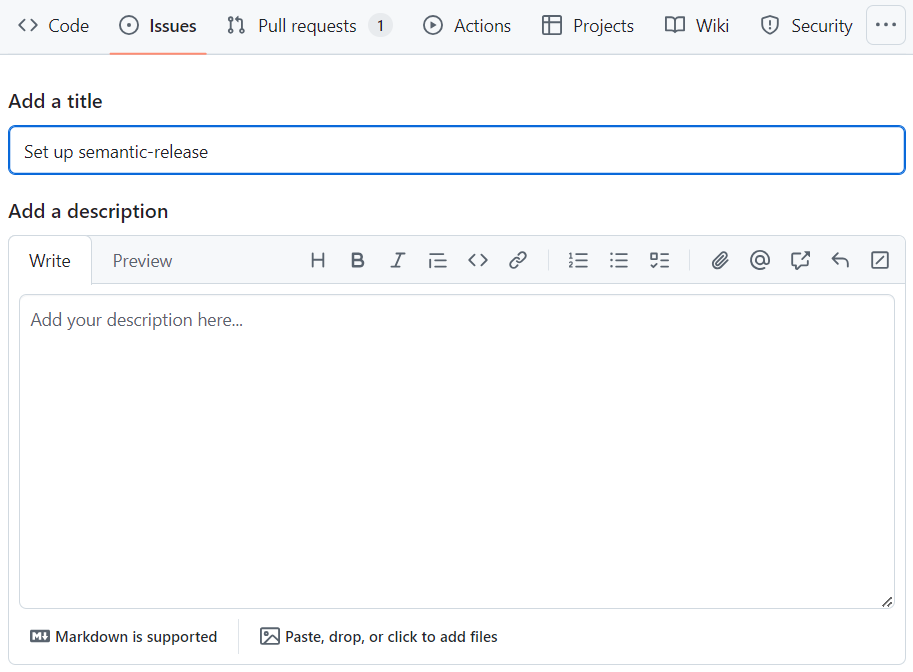
Go back to the pull request you opened earlier and edit the topmost comment. Enter
Fix #<number of issue created above>, e.g.Fix #2, then press Update Comment, as shown below: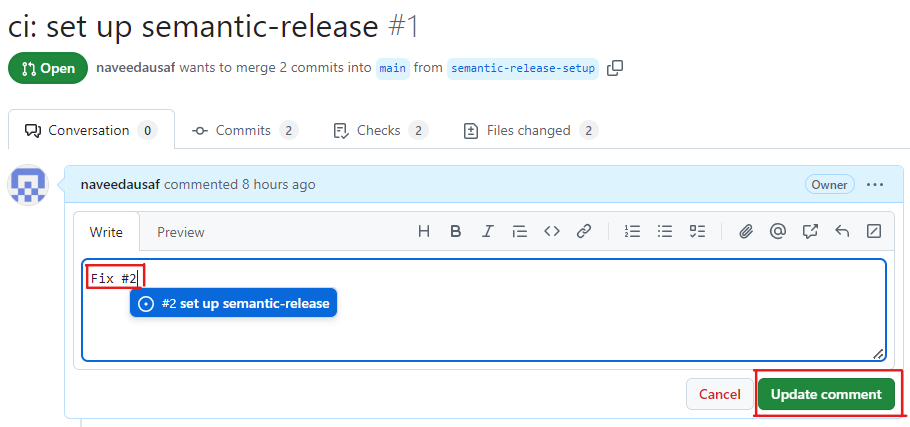
The Verify Linked Issue in PR status check on the pull request should now pass.
Go to Checks tab on the open pull request and make sure there are no failing checks. You may need to wait until the checks have finished running:
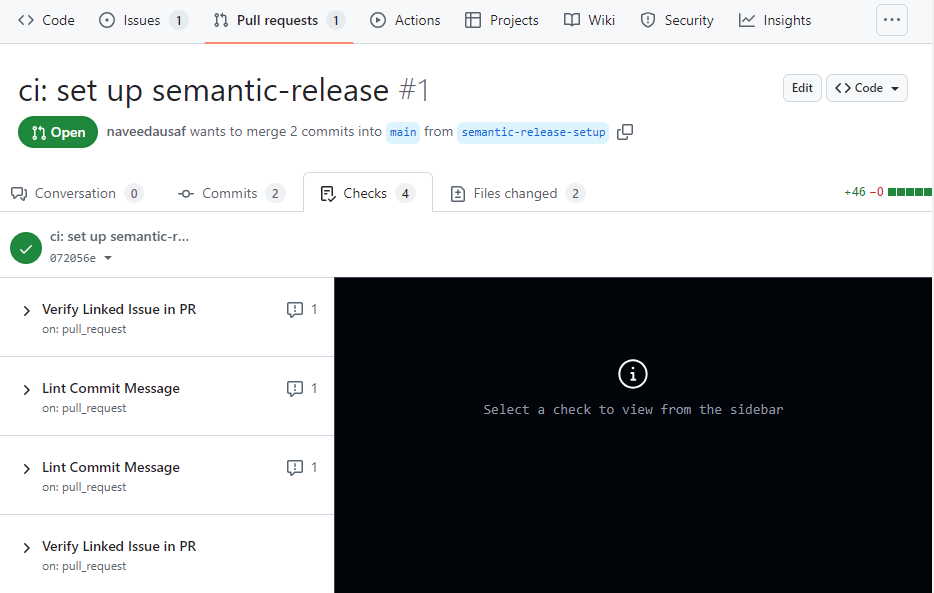
Both the status checks ran again after we modified the pull request description (i.e. the topmost comment on the pull request) and both should now pass.
Go back to the Conversation tab on the pull request. Then scroll down to the page and select Squash and Merge:

Accept the default commit message (taken from the PR title and description) by pressing Confirm squash and merge:

Semantic release setup is now complete.
After PR is merged, release.yml would run and semantic-release release would run as part of it.
However, there will NOT be a release.
This is because we have used prefixes ci and build in the commits made so far. These prefixes are not mapped to an increment in version number by the the default configuration of semantic-release’s commit analyzer plugin, as explained in the Key Concepts section as well as the Appendix.
To actually do a release, you can make another change and commit it with message fix: … or feat: … or that contains the keywords BREAKING CHANGE or BREAKING CHANGES in the commit message body. When this change is merged to main via a pull request, a release will be published to GitHub Releases by semantic-release executing within release.yml.
To see a release in action on the sample app, continue with Deploy to a non-NPM target section below where we deploy the sample web app to Vercel, or go to Deploy to NPM section which shows how to deploy an NPM package to NPM registry (for which another sample repo is provided).
Deploy to a non-NPM target
In this section, you will deploy the Next.js sample app as a web app on Vercel.
If you are following along with your own project then, as long as you deploy to a target other than the NPM registry, you should be able to adapt the deployment logic given here.
In my release pipelines, I only run deployment logic after semantic-release has run and has generated a new release.
If a release was made - i.e. version number was incremented and a release was published with release notes to GitHub Releases - then the job output variables released and newVersion would have been set by the create-release job. I make deployment job(s) conditional on released boolean variable and on the create-release job:
jobs:
  deploy:
    needs: create-release
    if: ${{ needs.create-release.outputs.released == 1}}
semantic-release (running in create-releasejob) may compute that no release should be made. This would happen when the commit message does not indicate a type of change that requires the version number to be incremented (e.g. the ci: and build: prefixes we used above). In this case, its release output variable would be 0 and nothing would be deployed.
This is also the built-in behaviour of semantic-release if you configure it to directly publish the package to NPM registry (as shown in section Deploy to NPM below): it would publish nothing - neither the package nor release notes - if it did not increment the version number.
To deploy the Next.js sample app to Vercel, follow the steps in the subsections below.
Create Deployment Workflows
Create a new branch:
 git checkout main
 git pull
 git checkout -b setup-deployment
Create an account with Vercel if you don not already have one (ideally using your GitHub login).
Follow the steps below to setup your repo as a project on Vercel and obtain Vercel token and other bits from it for use in the deployment job in
release.yml(from this Vercel page).In these steps, create Repository secrets and not Environment secrets or Variables in your repo:
Install the Vercel CLI and run
vercel loginInside your folder, run
vercel linkto create a new Vercel projectInside the generated
.vercelfolder, retrieve theprojectIdandorgIdfrom theproject.jsonIn you GitHub repo, add
VERCEL_PROJECT_IDandVERCEL_ORG_IDas repo secrets with values ofprojectIdandorgId.Retrieve a Vercel Access Token.
Save your Vercel Access Token as repo secret named
VERCEL_TOKEN.
Copy and paste the following deployment job in
.github/workflows/release.yml, underjobs:key:#jobs: # OTHER JOBS HERE... deploy: name: Deploy to Vercel runs-on: ubuntu-24.04 env: VERCEL_ORG_ID: ${{ secrets.VERCEL_ORG_ID }} VERCEL_PROJECT_ID: ${{ secrets.VERCEL_PROJECT_ID }} needs: create-release if: ${{ needs.create-release.outputs.released == 1}} steps: - name: Print version to console run: | echo "New Version Number is: ${{ needs.create-release.outputs.newVersion }}" - uses: actions/checkout@v2 - name: Update Version Number in package.json run: npm --no-git-tag-version version ${{ needs.create-release.outputs.newVersion }} - name: Install Vercel CLI run: npm install --global vercel@latest - name: Pull Vercel Environment Information run: vercel pull --yes --environment=production --token=${{ secrets.VERCEL_TOKEN }} - name: Build Project Artifacts run: vercel build --prod --token=${{ secrets.VERCEL_TOKEN }} - name: Deploy Project Artifacts to Vercel run: vercel deploy --prebuilt --prod --token=${{ secrets.VERCEL_TOKEN }}This uses all three of the repo secrets we created above and deploys the sample Next.js app from
mainto Vercel.Create
.github/workflows/ci.ymlin your project folder, with the following contents:name: CI concurrency: group: ci-${{ github.ref }} cancel-in-progress: true permissions: checks: write pull-requests: write on: pull_request: branches: - main env: VERCEL_ORG_ID: ${{ secrets.VERCEL_ORG_ID }} VERCEL_PROJECT_ID: ${{ secrets.VERCEL_PROJECT_ID }} jobs: audit-signatures: name: Audit signatures of NPM dependencies runs-on: ubuntu-24.04 steps: - uses: actions/checkout@v2 - name: Audit Provenance Attestations and Signatures run: | npm ci npm audit signatures deploy-to-vercel-preview-env: name: Deploy to Vercel Preview environment runs-on: ubuntu-24.04 steps: - name: Show in-progress message in sticky comment id: show-in-progress-message uses: marocchino/sticky-pull-request-comment@v2 with: message: | # Vercel Preview Environment Deployment in progress... - uses: actions/checkout@v2 - name: Update Version Number in package.json run: npm --no-git-tag-version version 0.0.0-pr${{ github.event.number }} - name: Install Vercel CLI run: npm install --global vercel@latest - name: Pull Vercel Environment Information run: vercel pull --yes --environment=preview --token=${{ secrets.VERCEL_TOKEN }} - name: Build Project Artifacts run: vercel build --token=${{ secrets.VERCEL_TOKEN }} - name: Deploy Project Artifacts to Vercel id: deploy-artifacts run: | previewUrl=$(vercel deploy --prebuilt --token=${{ secrets.VERCEL_TOKEN }}) echo "previewUrl=$previewUrl" >> "$GITHUB_OUTPUT" - name: Show URL of PR-specific deployment in Sticky Comment id: show-url-in-pr uses: marocchino/sticky-pull-request-comment@v2 with: message: | # Vercel Preview Environment Released ${{ github.sha }} to <${{ steps.deploy-artifacts.outputs.previewUrl }}> - name: Show deployment failure in sticky comment id: show-deplolyment-failure-in-pr if: failure() || cancelled() uses: marocchino/sticky-pull-request-comment@v2 with: message: | # Vercel Preview Environment Deployment failed.This deploys the source branch of an open pull request to the Preview environment in your Vercel project, every time there is a commit to the source branch.
In this file:
audit-signaturesjob audits signatures and provenance attestations of dependenciesdeploy-to-vercel-preview-envdeploys to Preview environment of your project in Vercel
The cool thing about the Preview environment in a Vercel project is that you can make multiple deployments to it and they would all be active at the same time (and can be accessed at their respective URLs).
So if you have multiple active pull requests in the repo, then the above workflow would deploy the source branch of each of them to the Preview environment but each would get a separate, autogenerated URL. For each open PR, the workflow wuld post the URL of the its source branch’s deployment in a sticky comment in the pull request (using action marocchino/sticky-pull-request-comment@v2).

So effectively, you have PR-specific preview/UAT deployments and multiple of these can be active at any given time.
Preview environment deployments are only accesible by someone who has a Vercel acccount and to whom you have granted access to your project. So the fact that there are many Preview deployments active at the same time, and that they may hang around even after the pull request has been merged, is not really a problem.
There are of course limits to how many Preview deployments may be active at a time but these are very generous, and given here in Vercel Docs.
Details of how long a deployment stays active are given here.
OPTIONAL: Use GitHub Environments
If your repo is public, or if it is private but you have a paid GitHub account, then you can take advantage of the GitHub Environments feature. These provide a nicer DX/UX than a pull request sticky comment of the kind I used above.
For more details and sample CI and release workflows for deploying to Vecel, see my post on GitHub Environments.
If you want to use GitHub environments for deployment jobs, make the following changes to the work you did above:
Define two GitHub environments named Production and Preview in your GitHub repo (go to repo Settings, then click Environments in the nav on the left).
Replace job
deploy-to-vercel-preview-envinci.ymlwith the job of the same name in CI workflow given in the abovementioned post.Replace job
deployinrelease.ymlwith the job of the same name in the Release-to-Production workflow given in the abovementioned post.In workflow
ci.yml, after stepuses: actions/checkout@v2in jobdeploy-to-vercel-preview-env, add the following step:- name: Update Version Number in package.json run: npm --no-git-tag-version version 0.0.0-pr${{ github.event.number }}In workflow
release.yml, beforestepsattribute in thedeployjob, add the following:needs: create-release if: ${{ needs.create-release.outputs.released == 1}}In workflow
release.yml, after stepuses: actions/checkout@v2indeployjob, add the following two steps:- name: Print version to console run: | echo "New Version Number is: ${{ needs.create-release.outputs.newVersion }}" - name: Update Version Number in package.json run: npm --no-git-tag-version version ${{ needs.create-release.outputs.newVersion }}
Commit and Create a Release
Commit your work and create a release as follows:
On the terminal, in project root, run:
 git add .
 git commit -m "fix: finish semantic release setup"
 git push -u origin setup-deployment
Go to your repo in GitHub and in Issues tab, create an issue with a title like “Add Next.js Vercel deployment”.
Take note of the issue number.
Create a pull request from
setup-deploymenttomain.In description, enter
Fix #<number of issue just created>: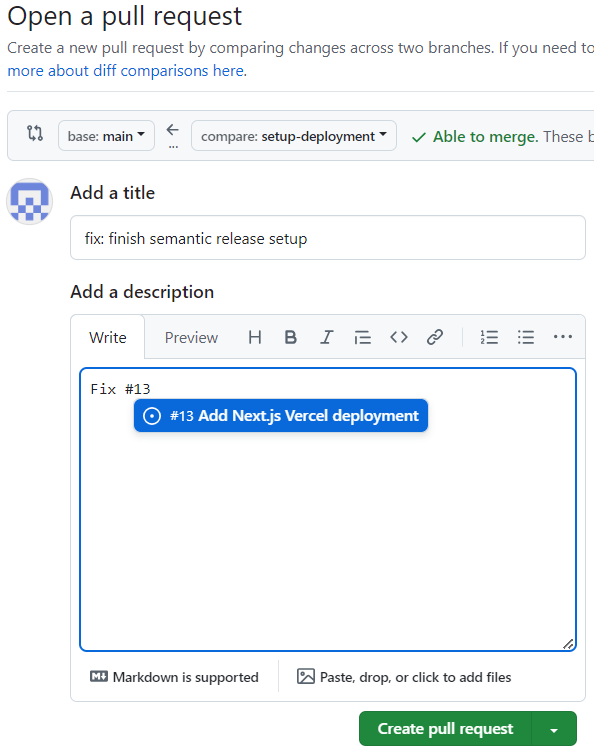
On the page of the pull request just created, you would see the three checks running:

Once the check CI/Deploy to Vercel Preview environment has completed, you should see a sticky comment on the pull request showing URL of the Vercel deployment:

If you set up GitHub Environments using the optional section above, then instead of the sticky comment above, you would see a slightly different one:

Go to branch protections rule for
mainby navigating to repo Settings, then Branches from nav on the left, then edit.
If you do not already have a branch protection rule, create one as described in section GitHub Configuration for Pull Requests above.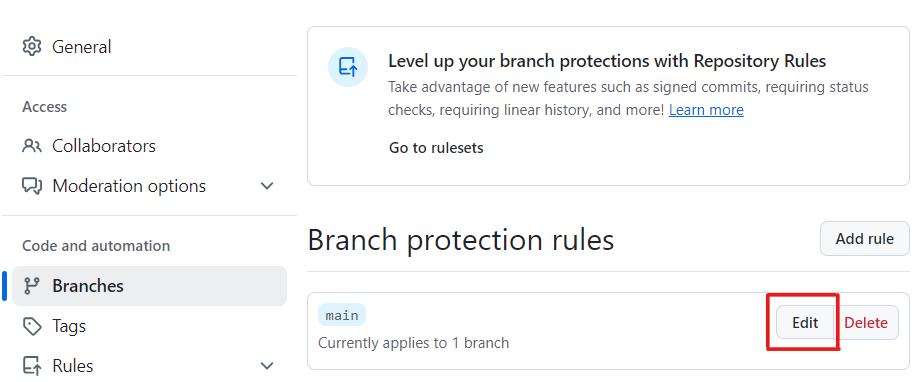
Add the two jobs in
ci.yml, Audit signatures of NPM dependencies and Deploy to Vercel Preview evironment as status checks on the branch protection rule page.
Remember to press SAVE at the end: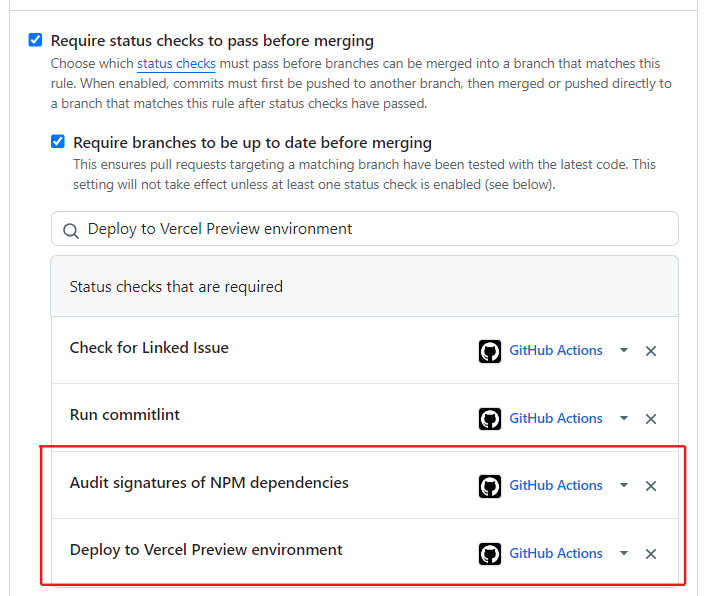
Once all checks have passed, merge the pull request.

Once release.yml has finished running (you can check on Actions tab of your repo), you should see latest commit in main tagged with the version number of the new release :
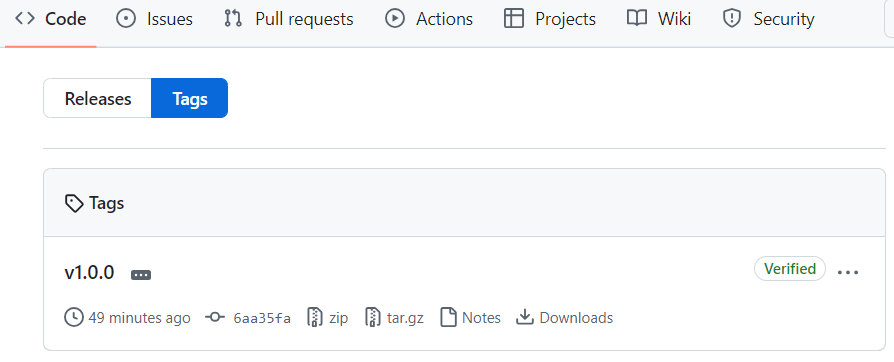
and a new release in the Releases section on the right hand side of the repo home page:
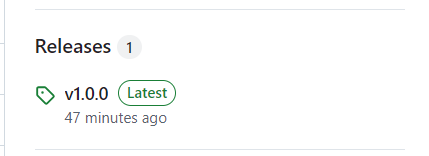
You can navigate to this release from here to see release notes:
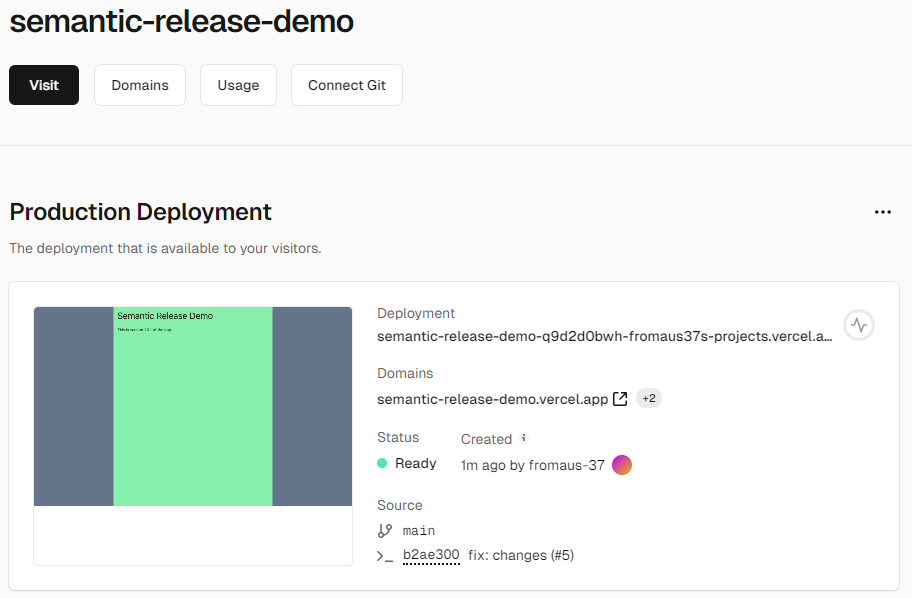
After a while, you should see main deployed to Production environment of your Vercel target.
Go to your project in Vercel to navigate to this deployment:
If you set up GitHub Environments using the optional section above, then click Production in the Deployments section on your repo’s home page:
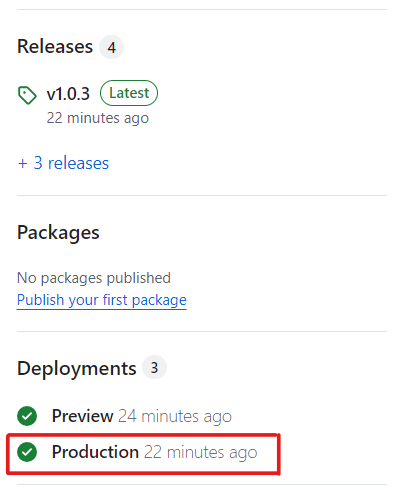
This would take you to the repo’s Production environment where you would find the URL to the deployment made to Vercel project’s Production environment.
Deploy to NPM
If you want to publish the package to NPM registry, you can modify the deploy job in release.yml given in section Deploy to non-NPM target above and use command npm publish instead of vercel deploy. See GitHub Docs for more details on using npm publish in a GitHub Actions workflow.
The other method of deploying to NPM would be to configure plugin @semantic-release/npm in semantic-release configuration file release.config.js. This publishes to NPM within the internal workflow of semantic-release. With this method we do not need to add a deploy job to release.yml.
In this section, I describe the second method in detail, i.e. how to deploy a package to NPM registry from within semantic-release.
Whichever method you choose, there are essentially three bits of configuration that you need to do:
Generate a token with “Read and Write” permissions from your NPM account and make it available as an environment variable so that it can be accessed by the tool - semantic-release or
npm publish- that you use to publish the package to NPM.To allow NPM to compute a provenance attestation, place the following in your package.json:
  "repository": {
    "url": "<URL of your GitHub repo (i.e. of repo home page)>"
  },
  "publishConfig": {
    "provenance": true

  }
To create a provenance attestation, NPM needs to verify the identity of the workflow from which the package is being published to NPM. To acheive this, GitHub Actions creates an Open ID Connect (OIDC) ID token that authenticates the workflow file as belonging to a certain repo and having a certain name and path within its containing repo. GitHub Actions in this case is the OIDC Identity Provider that NPM registry trusts.
The mechanism behind authenticating workloads (jobs in a GitHub Actions workflow would be classified as workloads) using OIDC as if they were users is called Workload Identity Federation (WIF).
To allow an OIDC ID Token to be generated for the job
create-releasein which semantic-release ornpm publishruns, we need to declare anid-token: writepermission on the job, as described in GitHub Docs:permissions: # ...OTHER PERMISSIONS... id-token: write # to enable use of OIDC for npm provenance
To follow along, you can use a GitHub repo for an NPM package that you already have.
Alternatively, you can fork show-version-number repo and implement the steps given below on that. This is a package that simply prints its version number (the value of ”version” key in its package.json) to console when it is run with npx. I have already deployed it to npm and you can try it out by running npx show-version-number on the command line.
Follow the steps below to deploy your package to NPM from within semantic-release:
Make sure that in your repo, you have followed steps for setting up semantic-release from beginning of this article up until the end of the previous section (GitHub Setup).
Create a new branch:
 git checkout main
 git pull
 git checkout -b setup-deployment
In
relase.config.jsin the project root, setnpmPublish: true(previously we set it tofalse)In
.github/workflows/release.yml, addNPM_TOKENenvironment variable toenvblock of thesemanticreleasestep:env: GH_TOKEN: ${{ secrets.GH_TOKEN }} NPM_TOKEN: ${{ secrets.NPM_TOKEN }}In the above, snippet,
GH_TOKENenvrionment variable for the job was already part ofrelease.yml. We have now addedNPM_TOKEN. We now need to store its value as a repo secret which we shall do shortly.In
.github/workflows/release.yml, add permissionid-token: writeto thepermissionsblock of jobcreate-release(reasons for this were given earlier):jobs: create-release: permissions: # ...OTHER PERMISSIONS... id-token: write # to enable use of OIDC for npm provenanceSince we would be deploying to NPM registry, check here to see if the name of your pacakge - in
”name”key in your package.json - is available.If not, find a name that is available and set it as value of
”name”key in package.json. If you do this ,then consider changing the name of your repo as we as of the name of the local project folder to the same value.Add the following in package.json in project folder:
 "repository": {
   "url": "https://github.com/naveedausaf/semantic-release-npm"
 },
 "publishConfig": {
   "provenance": true
 }
Commit and push:
 git add .
 git commit -m "fix: set up NPM deployment"
 git push -u origin setup-deployment
Create an NPM token:
Sign in to your NPM account (or create an NPM account if you don’t have one already)
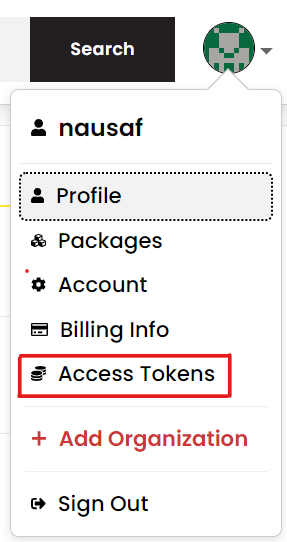
On the account menu, accessible on the top right hand side of your NPM home page, select Access Tokens:
Generate a new Granular Access Token with Read and Write permissions.
Store the value of the token as a repo secret named
NPM_TOKENin your GitHub repo.
Make sure to create a Repository Secret and not an Environment Secret or a Variable (unless you know what you’re doing).In your GitHub repo, create new issue in the repo (for its title, you could use a string like “Set up deployment to NPM”).
Take note of the issue number.Open a pull request to merge
setup-deploymentintomain.
In the pull request Description enterFix #<your issue number>Once checks have completed, merge pull request.
Once release.yml has finished, your package should be deplolyed to NPM. To navigate to it select Packages options from the menu on the left on your NPM home page.
On your package’s page in NPM, you would find this lovely provenance attestation:

Note that in this section I have only shown how to setup deployment in the release (to production) pipeline. Unlike deployment setup shown for the Next.js sample app in the section Deploy to a non-NPM Target above:
I have not shown how to write a CI pipeline to deploy the package to a pull request-specific Preview/UAT environment.
I have not hown how to use GitHub Environments for a better DX/UX
You can add these if you wish as I sometimes do when I deploy packages to NPM registry from my release pipelines.
In particular, a PR-specific UAT environment can be achieved by deploying to GitHub Packages from a CI workflow and showing the name of the package with version number (e.g. show-version-number@0.0.0-pr14), and instructions on how to add GitHub Packages of the repo as a package registry in your local NPM installation, in a sticky comment on the pull request.
Relaxing Commitlint Setup
In the setup given above, you have to provide a commit message that is compliant with the Angular commit message conventions in two places: when you create commits on the source branch and in the pull request title + description.
However, if you only use Squash Merge as I have done in this article, it is enough to lint only the pull request title + description to ensure that semantic-release would be able to parse commit messages on main.
I still lint commits on source branch of pull request, both locally by running commitlint in Husky and in a GitHub Actions workflow when there are pushes to the source branch of an open pull request. The reason this is that it forces me to identify the type of change - fix, feat, BREAKING CHANGE etc. - that I am putting into every commit. This helps me in code review to determine the final type of the merged pull request, which would be put into the PR title or commit message.
For instance, suppose all commit messages on the source branch have prefix fix: except one which contains BREAKING CHANGE in message footer. In this case I would ensure, when merging the pull request after PR review, that the pull request description contains BREAKING CHANGE in the footer.
However, if you only do Squash Merging and find that linting commit messages in source branch of a pull request is too onerous in addition to also linting PR title + description, then you can remove linting of source branch commit messages as follows:
In
.husky/commit-msg, delete the linenpx --no -- commitlint --edit $1In
.github/workflows/ci-commitlint.yml, delete stepRun commitlint on PR source branch commit messages
If you do not use Squash Merging but do use either Merge Commits or Rebase Merging methods when merging a pull request, then source branch commit messages are replicated in commit created in in main on merge. Therefore they do need to be linted.
If you use only Rebase Merging, then PR title + description are not used as message of a commit in main. In this case, to stop commitilnt unnecessarily liting this, delete step Run commitlint on PR Title and Description in .github/workflows/ci-commitilnt.yml
Appendix: Details of semantic-release Configuration and Internal Workflow
Consider the semantic-release config release.config.js given in section Set up semantic-release above:
/* eslint-env node */
module.exports = {
  branches: ['main'],
  plugins: [
    '@semantic-release/commit-analyzer',

    '@semantic-release/release-notes-generator',

    [
      '@semantic-release/npm',
      {
        npmPublish: false,
      },
    ],
    [
      '@semantic-release/changelog',
      {
        changelogFile: 'docs/CHANGELOG.md',
      },
    ],
    [
      '@semantic-release/github',
      {
        assets: ['docs/CHANGELOG.md'],
      },
    ],
    [
      '@semantic-release/exec',
      {
        successCmd:
          "echo 'RELEASED=1' >> $GITHUB_ENV && echo 'NEW_VERSION=${nextRelease.version}' >> $GITHUB_ENV",
      },
    ],
  ],
};
branches: [main] says when run, semantic-release would scan commit history of main.
The rest of the file is configuration of semantic-release plugins.
When semantic-release runs on a branch of a Git repo, it goes through a number of steps that constitute its internal workflow. These steps, in order of execution, are as follows (details on these can be found on Plugins page of semantic-release docs):
verifyConditionsanalyzeCommits: At this step, the type of release - i.e which one of the patch, minor and major components of the previous version number should be incremented - is determined.verifyReleasegenerateNotes: The text of the release notes is generatedprepare: At this step, files such aspackage.jsonandCHANGELOG.mdare created and/or updated.publishaddChannelsuccess: At this step, notifications for the new release are issuedfailAt this step, notifications of a failed release are issued
It is important to note that:
semantic-release uses plugins to execute the steps above.
The plugins included by default are:
  "@semantic-release/commit-analyzer"
  "@semantic-release/release-notes-generator"
  "@semantic-release/npm"
  "@semantic-release/github"
In addition, we installed the NPM packages for, and configured, plugins
@semantic-release/changelogand@semantic-release/execin the config file above.Official plugins are listed here in semantic-release docs.
There is NOT a one to one mapping between steps and plugins.
semantic-release calls every plugin at every step.
However, most plugins respond at one or only a few of the steps (see plugin's documentation for details). For example:
@semantic-release/commit-analyzeronly responds at theanalyzeCommitsstep.@semantic-release/release-notes-generatoronly responds at thegenerateNotesstep.@semantic-release/githubplugin, which is used to publish a release to a GitHub repo using GitHub's built-in Releases mechanism, acts during each of theverifyConditions,publish,successandfailsteps.
The official plugins list states during which steps each of the plugins used in the config file above operates in.
In the subsections below I describe what the various plugins do.
@semantic-release/commit-analyzer plugin
This plugin analyses commits in the commit graph of the configured branch (main in the config shown) and determines the type of next release, i.e. which one of the major, minor and patch component of the version number should be incremented.
To explain how it works, I am going to take the configuration of the plugin in the config file above where all I did was declare the name of the plugin:
module.exports = {
  branches: ['main'],
  plugins: [
    '@semantic-release/commit-analyzer',
and expand it out to fill in the effective default values for the plugin’s configuration settings:
module.exports = {
  branches: ['main'],
  plugins: [
    [
      '@semantic-release/commit-analyzer',
      {
        preset: 'angular',
        releaseRules: [
          { breaking: true, release: "major" },
          { revert: true, release: "patch" },
          // Angular
          { type: "feat", release: "minor" },
          { type: "fix", release: "patch" },
          { type: "perf", release: "patch" },
        ],
      }
The releaseRules object above contains the default release rules used by the plugin to map various bits of information extracted from the commit message to the component of the semver version number that should be incremented. The items of information that are mapped are:
typeof a commit message is the prefix of the message header (first line of the commit message). For example in commit message headerfix: Change parsing logic,typewould befix.
Mapped value oftypeattribute arefeat,fixandperf. Other types such asciandbuildare allowed by Angular commit message conventions. However, since they are not mapped in the defaultreleaseRulesto a release type (major,minororpatch) usingtypeandreleaseattributes, a commit containing such a prefix in its commit message would be ignored by semantic-release unless it indicates a revert commit or a breaking changes (see below).If the commit message indicates that its purpose is to revert to a previous commit (e.g. the commit was created using
git revert), then thepatchcomponent of the version number would be incremented.
Under the Angular commit message conventions (which are the default), a revert commit’s commit message should not only begin with the prefixrevert:, it should also meet additional requirements, as explained here. This is probably why it is not enough to say{ type: “revert", release: "patch"}and the first part of the rule instead says{ revert: “true", ....If the commit message indicates a breaking change then the
majorcomponent of the version number needs to be incremented.Under Angular message conventions (which are the default), a breaking change is indicated by including the phrase
BREAKING CHANGEin the message footer.Footer is the part of the commit message that comes after body and is separated from it by a blank line:
  <header>
  <BLANK LINE>
  <body>
  <BLANK LINE>
  <footer>
In Conventional Commits, which is another set of commit message conventions, a breaking change may instead be indicated by
feat!orfix!appearing astypein commit message header.
To extract the various bits of information from a commit message, such as type from message header and whether or not BREAKING CHANGE was found in message footer, the plugin uses another package, conventional-commits-parser.
The parser needs to be configured with several properties that describe the message structure and allow various bits of information to be extracted from it. These property values are usually provided by a preset which is yet another NPM package. It is specific to the commit message conventions you have decided to use.
The default preset, as shown in expanded config above, is "angular". Based on naming conventions, this translates into the preset package conventional-changelog-angular. Other possible values for preset are given here.
Note that a preset in semantic-release configuration is the counterpart to a config in commitlint configuration. Since we are using the default angular preset in semantic release configuration, we set up commitlint to use config config-angular earlier.
All options for the parser are given in the GitHub repo of conventional-commits-parser. The default preset conventional-changelog-angular provides only some of these options:
{
    headerPattern: /^(\w*)(?:\((.*)\))?: (.*)$/,
    headerCorrespondence: [
      'type',
      'scope',
      'subject'
    ],
    revertPattern: /^(?:Revert|revert:)\s"?([\s\S]+?)"?\s*This reverts commit (\w{7,40})\b/i,
    revertCorrespondence: ['header', 'hash'],
    noteKeywords: ['BREAKING CHANGE'],
  }
}
The plugin loads the parser options above that are exported by the preset, and passes these on to the parser.
If you want to override these, or set other parser options that are not provided by the preset, you can do that in parserOpts object in the plugin’s configuration. All the options you can provide in this object are lised on conventional-commits-parser's README and include the five options, headerPattern, headerCorrespondence and others shown in the snippet above (the snippet shown above would be a valid value for the parserOpts property in the plugin’s configuartion, although by default parserOpts is not set in the plugin’s configuration).
In the parser options shown above, headerPattern is a regular expression that contains three capturing groups: (\w*), (.*) and (.*). These match parts of the commit message as shown below in a screenshot from this example I have created on regex101.
The parser applies the given headerPattern to commit message header, then using headerCorrespondence, it maps the matches of the three capturing groups in order from left to right to type, scope and subject attributes respectively. So for the commit message in the screenshot above, the matches fix, db and change database read logic, become type, scope and subject respectively. The parser returns these attribute-value pairs to the plugin.
scope is an optional part of the commit message in both Conventional Commits and Angular message conventions. It indicates the scope of the change contained in the commit and is usually the name of a component of the system, e.g. db, webapp, paymentsprocessor.
Out of the three items of information that may be extracted from commit message header, the plugin, as per the releaseRules object in its default configuration shown above, only uses type to compute the type of next release. For complete details on how the plugin uses or can use the three properties - type, scope and subject - and how to configure them in releaseRules, see the plugin’s README on Github.
The conventional-changelog-parser matches the header again, this time against revertPattern regex for the Angular commit message conventions. Using the value of revertCorrespondence option, it maps the two capturing groups in the pattern shown to properties revert and hash. These are also passed back to the plugin along with the other properties - type, scope, subject etc. - that were parsed from the header.
revert tells the plugin if the commit indicates a revert to an earlier commit, whose hash is in the extracted hash property’s value.
Since the default releaseRules above match revert to patch, therefore the plugin would take a commit message that matches revertPattern - i.e. from which revert and hash proeprty values were extracted by the parser - to mean that the patch component of the version number should be incremented.
Finally, noteKeywords in parser options simply declares keywords that may appear anywhere in the commit message and not necessarily in the prefix of the commit message header. The parser simply picks these out and returns them to the plugin alongside other parsed information. The plugin doesn’t care what these keywords are. It only cares that parser found at least one occurence of any of the keywords specified in the parser’s noteKeywords option (the default, from Angular preset, is noteKeywords: ['BREAKING CHANGE'],). If this is the case, the plugin deduces there is a breaking change (from code of analyze-commit.js in the plugin’s repo; this file’s default export is called from the plugin’s default export, the function analyzeCommits).
Thus if any of the keywords specified in noteKeywords parser option is found anywhere in the commit message by the parser, given the default releaseRules for the plugin which contain the mapping { breaking: true, release: "major" }, the plugin increments the major version number.
Further details on the plugin’s configuration, including the preset, parserOpts and releaseRules properties described above, are given in its documentation.
@semantic-release/release-notes-generator plugin
This plugin generates the text of the release notes.
Like the commit analyzer plugin, it uses conventional-changelog-parser to parse the commit message and obtain various parts of the message from it, and by default obtains parser options to pass to the parser from the Angular preset (the package conventional-changelog-angular).
As with commit analyzer, you can override the parser options provided by the preset by providing a parserOpts object in this plugin’s configuration.
In order to generate the text of the release notes, this plugin internally uses the package conventional-changelog-writer. This generates the release notes using Handlebars templates. The default templates it uses are here in its repo.
Handlebars.js is a templating toolkit frequently used in web apps. It consists of a templating language using which you create templates, and a library that you can use to substitute text into a template to generate final text output at run time.
Options need to be provided to conventional-changelog-writer and a big part of these are locations of the handlebars templates that the writer needs to generate text of the release notes. The preset typically provides these just as it provides parser options: in the default export of the Angular preset, not only is there a parserOpts object, there is also a writerOpts:
export default async function createPreset () {
  return {
    parser: createParserOpts(),
    writer: await createWriterOpts(),
  }
}
release-notes-generator plugin passes the writer object from the return value of preset-provided createPreset() function to the writer.
You can override writer options by providing a writerOpts object in this plugin’s configuration in semantic-release.config.js. All of the options are documented starting here in the writer’s repo README and include transform which is “A function to transform commits” and mainTemplate which is the main handlebars template.
All configuration settings for release-notes-generator, including preset, parserOpts and writerOpts discussed above are given in the README in plugin’s repo.
@semantic-release/changelog plugin
This plugin actually writes out the changelog contents (generated by release-notes-generator plugin) to a specified file.
We have configured it to write to file docs/CHANGELOG.md. In GitHub setup this file would be picked up and attached as an asset to a release published by the github plugin. In an Azure DevOps setup it could be written out to the project wiki.
 [
  '@semantic-release/changelog',
  {
    changelogFile: 'docs/CHANGELOG.md',
  },
],
@semantic-release/npm plugin
This plugin is responsible for publishing the versioned Node package to NPM.
I have configured it not to publish to NPM, as described in Darragh o' Riordan's post:
 [
  '@semantic-release/npm',
  {
    npmPublish: false,
  },
],
For many Node packages such as React or Angular web apps or API projects it doesn't really make sense to publish them to NPM.
Where it does make sense to publish your pacakge to NPM registry, you can set npmPublish: true, in configuration of this plugin. This is described in detail in Deploy to NPM section above and further details is provided in the plugin’s README.
@semantic-release/github plugin
This plugin creates a GitHub release with the version number generated by commit analyzer plugin and release notes generated by release notes generator plugin.
I have configured it to attach file docs/CHANGELOG.md generated by the changelog plugin to the GitHub release as a (downloadable) asset as shown below:
[
  '@semantic-release/github',
  {
    assets: ['docs/CHANGELOG.md'],
  },
],
@semantic-release/git plugin
The plugin creates a new commit in the repo. This could contain things like the file of release notes (CHANGELOG.md) and a pacakge.json in which ”version” key has been updated to the new version number.
However, semantic-release advises against the use of this plugin and it is not used or installed by semantic-release by default. Also, I have not used it in the setup shown in this article.
By default semantic-release only tags the last commit on the branch on which semantic-release was run with the new (auto-incremented) version number. A new commit is not created. In particular, package.json with updated ”version” is not checked in. I find that this is perfectly good behaviour.
In the past I have used this plugin, and configured it to get the following behaviour:
Store the new version number the semantic-release had generated in
"version"key inpackage.json.
The bash script I used to run in my release pipelines to updatepackage.jsonwith the new version number is as follows. It may have been unnecessary as I think that”version”inpackage.jsonis updated by semantic-release, it’s just not committed to the repo:relout=$(npm run release-dry-run) vnumber=$(echo $relout | grep -o -E 'The next release version is (([0-9]+).([0-9]+).([0-9]+))' | grep -o -E '[0-9]+.[0-9]+.[0-9]+') echo "next version (parsed from semantic-release dry tun output): $vnumber" npm pkg set version="$vnumber"Given that the
@semantic-release/changelogplugin would already have stored the generated release notes indocsfolder in project root, I configure this plugin to take both the release notes and the updatedpackage.jsonwith the new version number, and create a new commit with these two files.
The commit message would be have the special prefix[skip ci]in the commit message so that release pipeline does not run again (otherwise we would end up in an infinite loop as the release pipeline would run semantic-release to create another release).[ '@semantic-release/git', { message: 'fix(release): ${nextRelease.version} [skip ci]\n\n${nextRelease.notes}', assets: ['docs/CHANGELOG.md', 'package.json'], }, ],
The supposed gain from this setup was that:
package.jsonalways contained the latest version numberrelease notes got checked into the repo
However this notional gain did not translate into an advantage in my day to day work:
As a developer I never look at
package.jsonof a package I am working on to find out what”version”it is. If ever I need to find out the current version number of the package, I can always see it on the repo’s web page on GitHub or Azure DevOps.Release notes are always available to view wherever semantic-release published them to (a Release on GitHub, or the project wiki in Azure DevOps). I would never need to look at release notes in my code editor while working on the containing project.
So there was practically nothing to be gained by creating the additional commit.
However, the additional commit was quite cumbersome in practice. It polluted main with (almost) redundant commits. This did not match up well with the fact that I always try to keep the history of my main linear with chunky, meaningful commits and descriptive commit messages.
Therefore the setup I now have is as shown in this article above, where:
I do not use
@semantic-release/gitplugin to create an aditional commit with the modifiedpackage.jsonandCHANGELOG.md.In
package.json, I set"version": "0.0.0-managed.by.semantic.release",.I do this because a package.json with an updated version number is not checked in by the release process. At the same time, the actual version number, as tagged on commits on
mainand as stated in release notes and in GitHub Releases, and visible on the repo’s home page in GitHub, is increasing.Thus the version in
package.json, such as the initial and never-changing1.0.0, can be misleading to someone who looks at the code of the package. Therefore I replace it with"version": "0.0.0-managed.by.semantic.release",to indicate that it is a dummy value.semantic-release itself has its version number set to
0.0.0-developmentin its package.json. However, I prefer the suffix given above as I feel that it more clearly indicates what is going on.Either suffix,
-developmentor-managed.by.semantic.releaseis a valid pre-release identifier as per the EBNF grammar for for a valid SemVer version.
Subscribe to my newsletter
Read articles from Naveed Ausaf directly inside your inbox. Subscribe to the newsletter, and don't miss out.
Written by
