Running Speech Models with Swift Using Sherpa-Onnx for Apple Development
 Carlos Mbendera
I love listening to music and podcasts, in other words, I love audio. Moreover, I enjoy developing cool software in Swift with SwiftUI. Recently I wanted to build something using Speech Diarization and wanted my iOS project to use an on-device model instead of calling some API on a server.
In this article, I’ll be sharing what I learned, break down how I set up my project, a few challenges I faced along the way and more.
Feel free to share any tips and suggestions you may have as I’m still learning.
Speech diarization is the process of segmenting and labeling an audio stream by speaker to identify "who spoke when," enabling a clear understanding of who is speaking at any given time.
Part 1: Research and the Motive Behind my Approach
After numerous hours of Googling research, I found a promising model, Pyannote’s Speaker Diarization 3.1.
If you’re planning to have a python server run your models, then I’d probably suggest using that as it’ll save you a fair amount of work.
What work?
Well, my objective was to have on-device speech diarization. Thus, I needed to convert the model to a format XCode would recognize.
My first instinct was to use CoreMLTools to convert the model.
Unfortunately, this didn’t work.
If you attempt to retrace my debugging steps, you shall eventually find yourself at certain GitHub Issue in CoreMLTools and realize that you’re repeating the journey of a few developers before you.
The alternative? Use the C++ version of the model and have a bridging header for your Swift and C++ code. This may sound intimidating, especially if you’re a native Swift developer who’s never worked with C++. Don’t worry, I’m here to make this as easy as possible.
Part 2: Sherpa-Onnx
Sherpa-Onnx does a lot of heavy lifting and reduces the amount of boilerplate and porting work we’d have to do.
They even have starter projects you can use as a reference for how to structure your project.
However, I did find their projects a bit overwhelming and created my own Starter Project. It’s oriented towards Speech Diarization but you can use it for Sherpa-Onnx’s other models, such as:
Voice Activity Detection
Audio Tagging
Keyword spotting
Speech recognition
Text To Speech
So much more
If you don’t want to clone my Starter Project, you can follow the Sherpa-Onnx build instructions and compile the framework by yourself.
Just clone k2-fsa/sherpa-onnx and follow these build instructions
Please note, if you’re aiming to build for macOS, it has its own seprate build.sh file and that visionOS’s build script doesn’t exist (officially).
On that note, I built a branch of Sherpa-Onnx that supports the VisionOS Simulator and should theoretically support the actual device with a few line changes.
How Do I build Sherpa-Onnx?
Alright, now that we’ve covered the motivation for my approach.
Let me walk through the technicals, starting with building the Frameworks.
Building the Frameworks for iOS
- Clone Sherpa-Onnx
git clone https://github.com/k2-fsa/sherpa-onnx.git
2. Run the Build Script (Either the iOS, macOS or visionOS script)
./build-ios.sh
It will download Onnx Runtime and build Sherpa-Onnx for iOS. You should see a new folder titled build-ios
3. Either use:
The Sherpa-Onnx examples found in folders
ios-swiftandios-swiftuiCreate a new project and the copy the frameworks
ios-onnxruntimeandsherpa-onnx.xcframeworkto your project from the newly createdbuild-iosfolder, create a bridging header and copy the Sherpa-Onnx Swift functions to your new project.
If you used the Starter Project or the Sherpa examples. You should be good to download Models and just experiment.
However, if you’re opting to create your own project from scratch, we have to a few more steps to follow. In particular, we need to set up a Bridging Header and add some linker flags.
Essentially its some boiler plate code that allows our Swift and C++ files to communicate. If you’ve worked with Metal, then this should feel like home.
Your Bridging Header should point to the c-api header file from Sherpa-Onnx
#ifndef OnnxHeader_h
#define OnnxHeader_h

#import "Headers/sherpa-onnx/c-api/c-api.h"

#endif /* OnnxHeader_h */
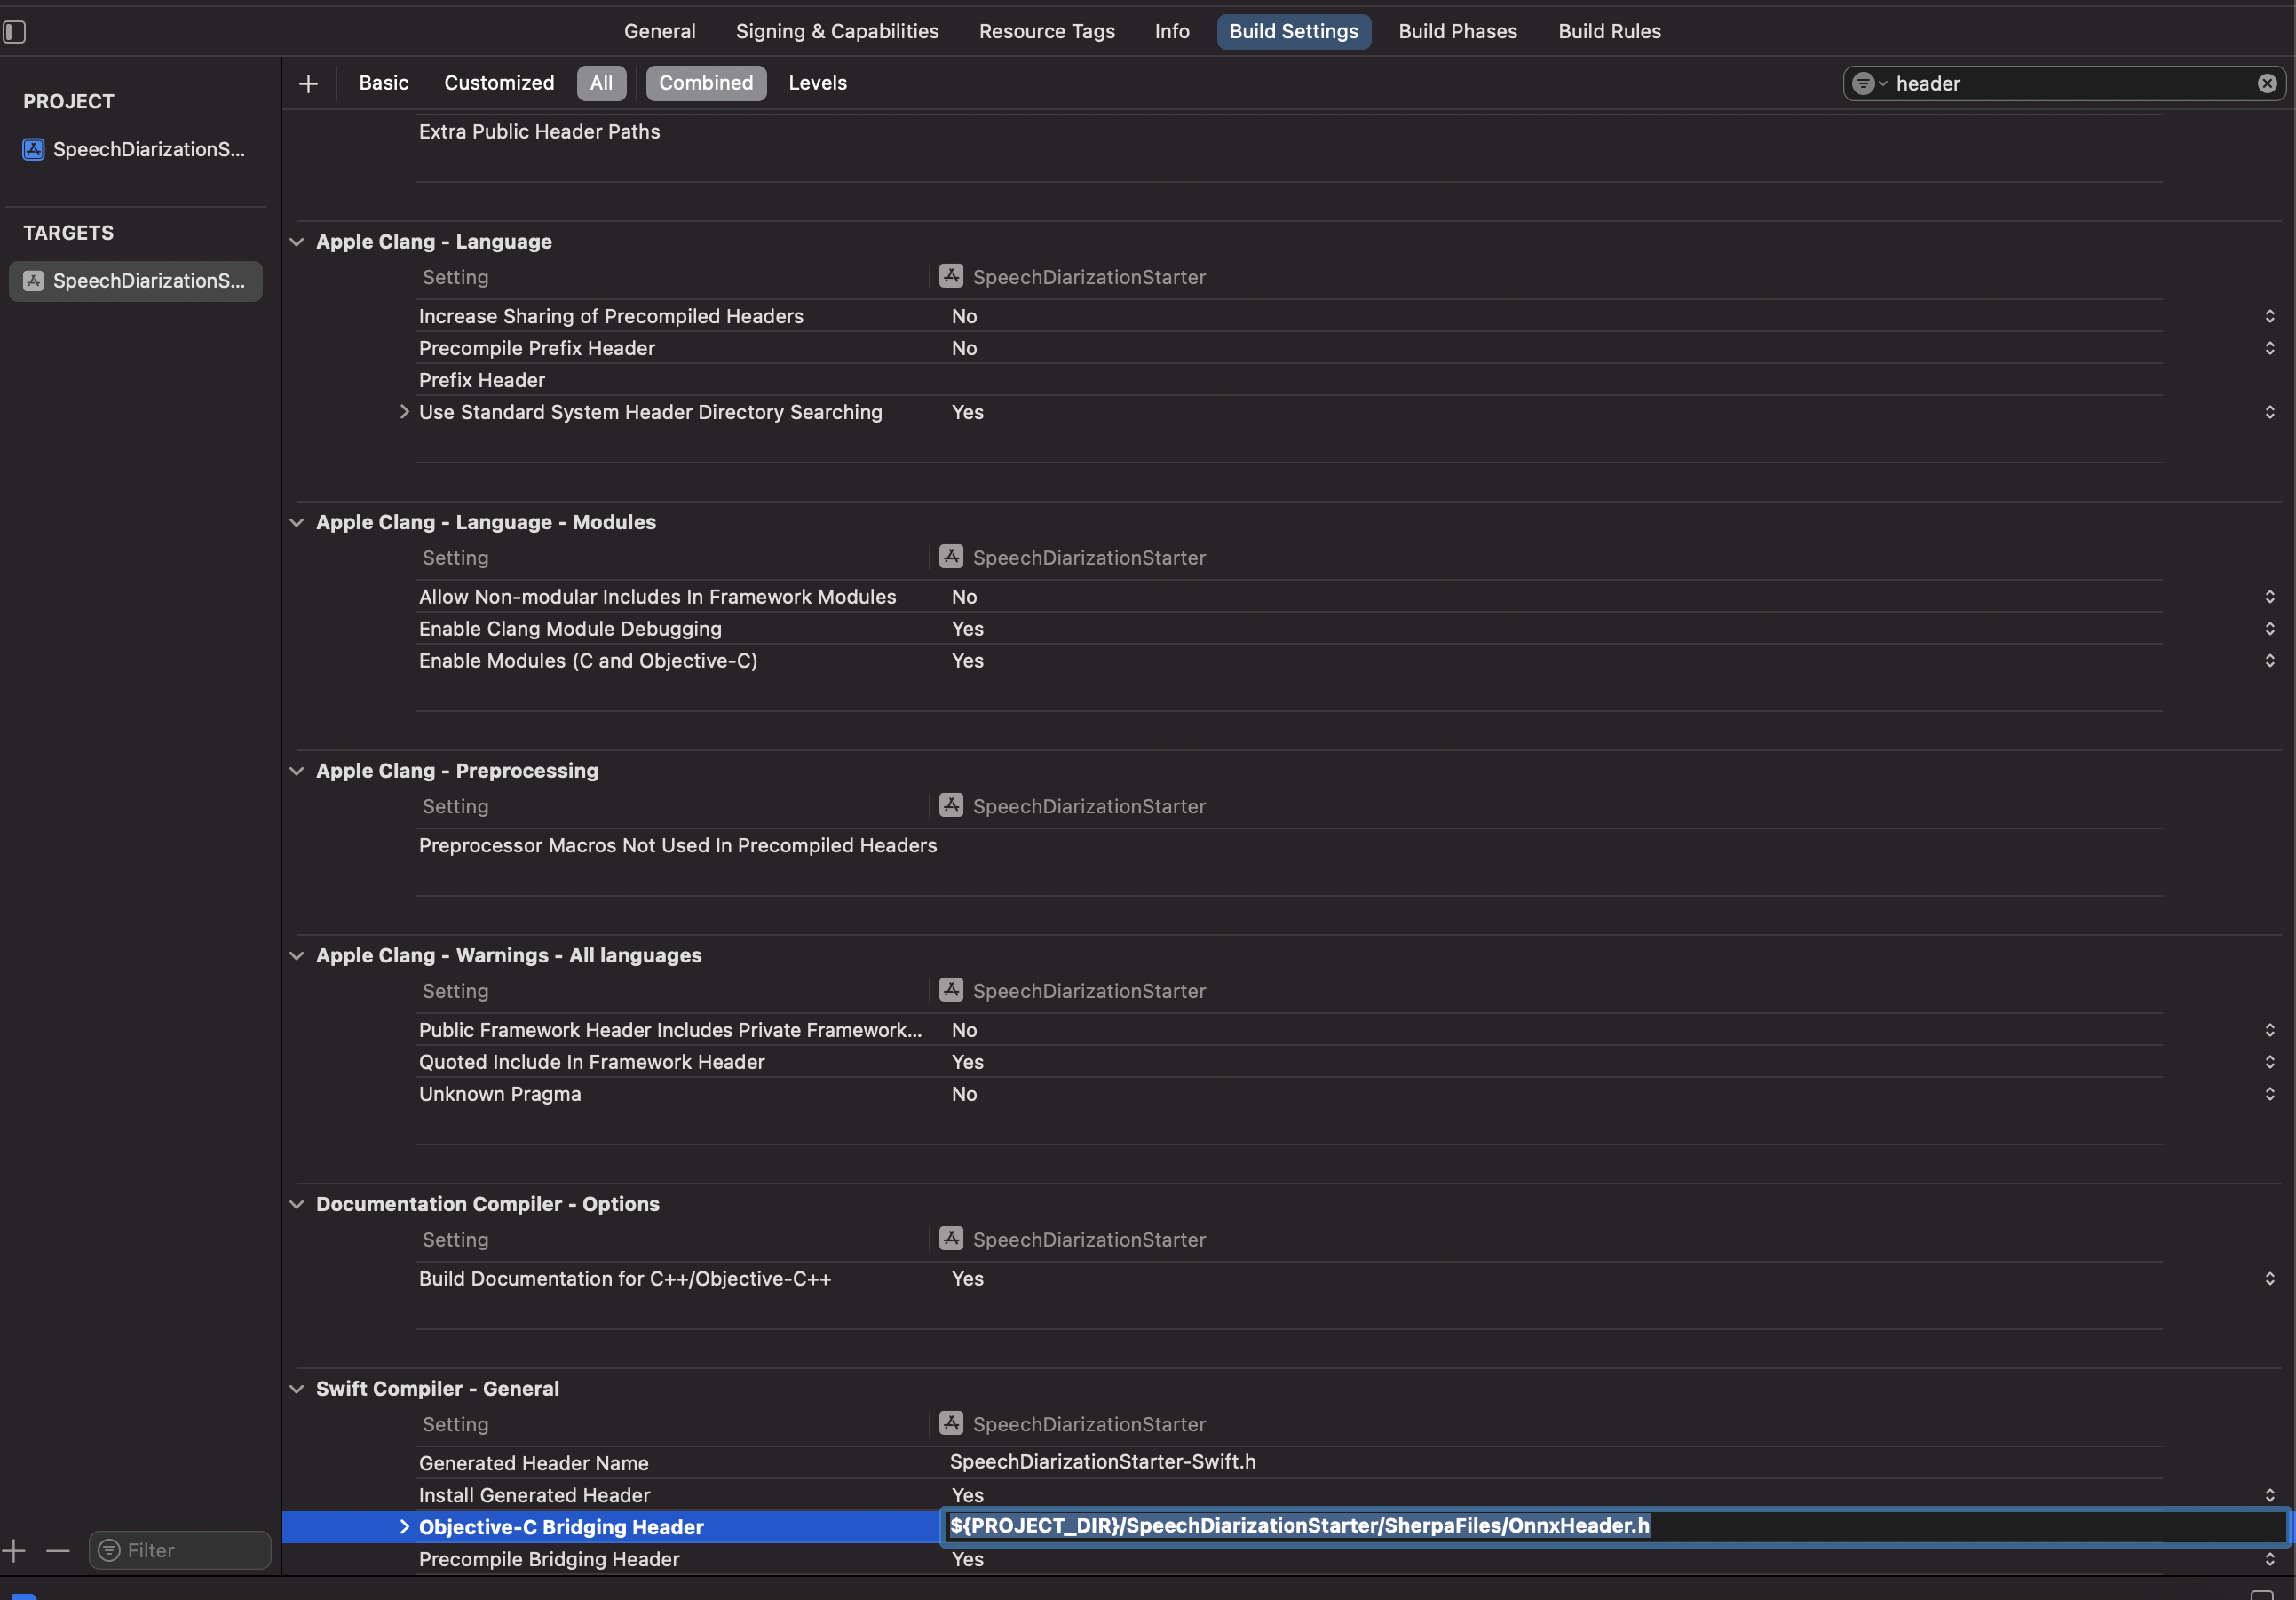
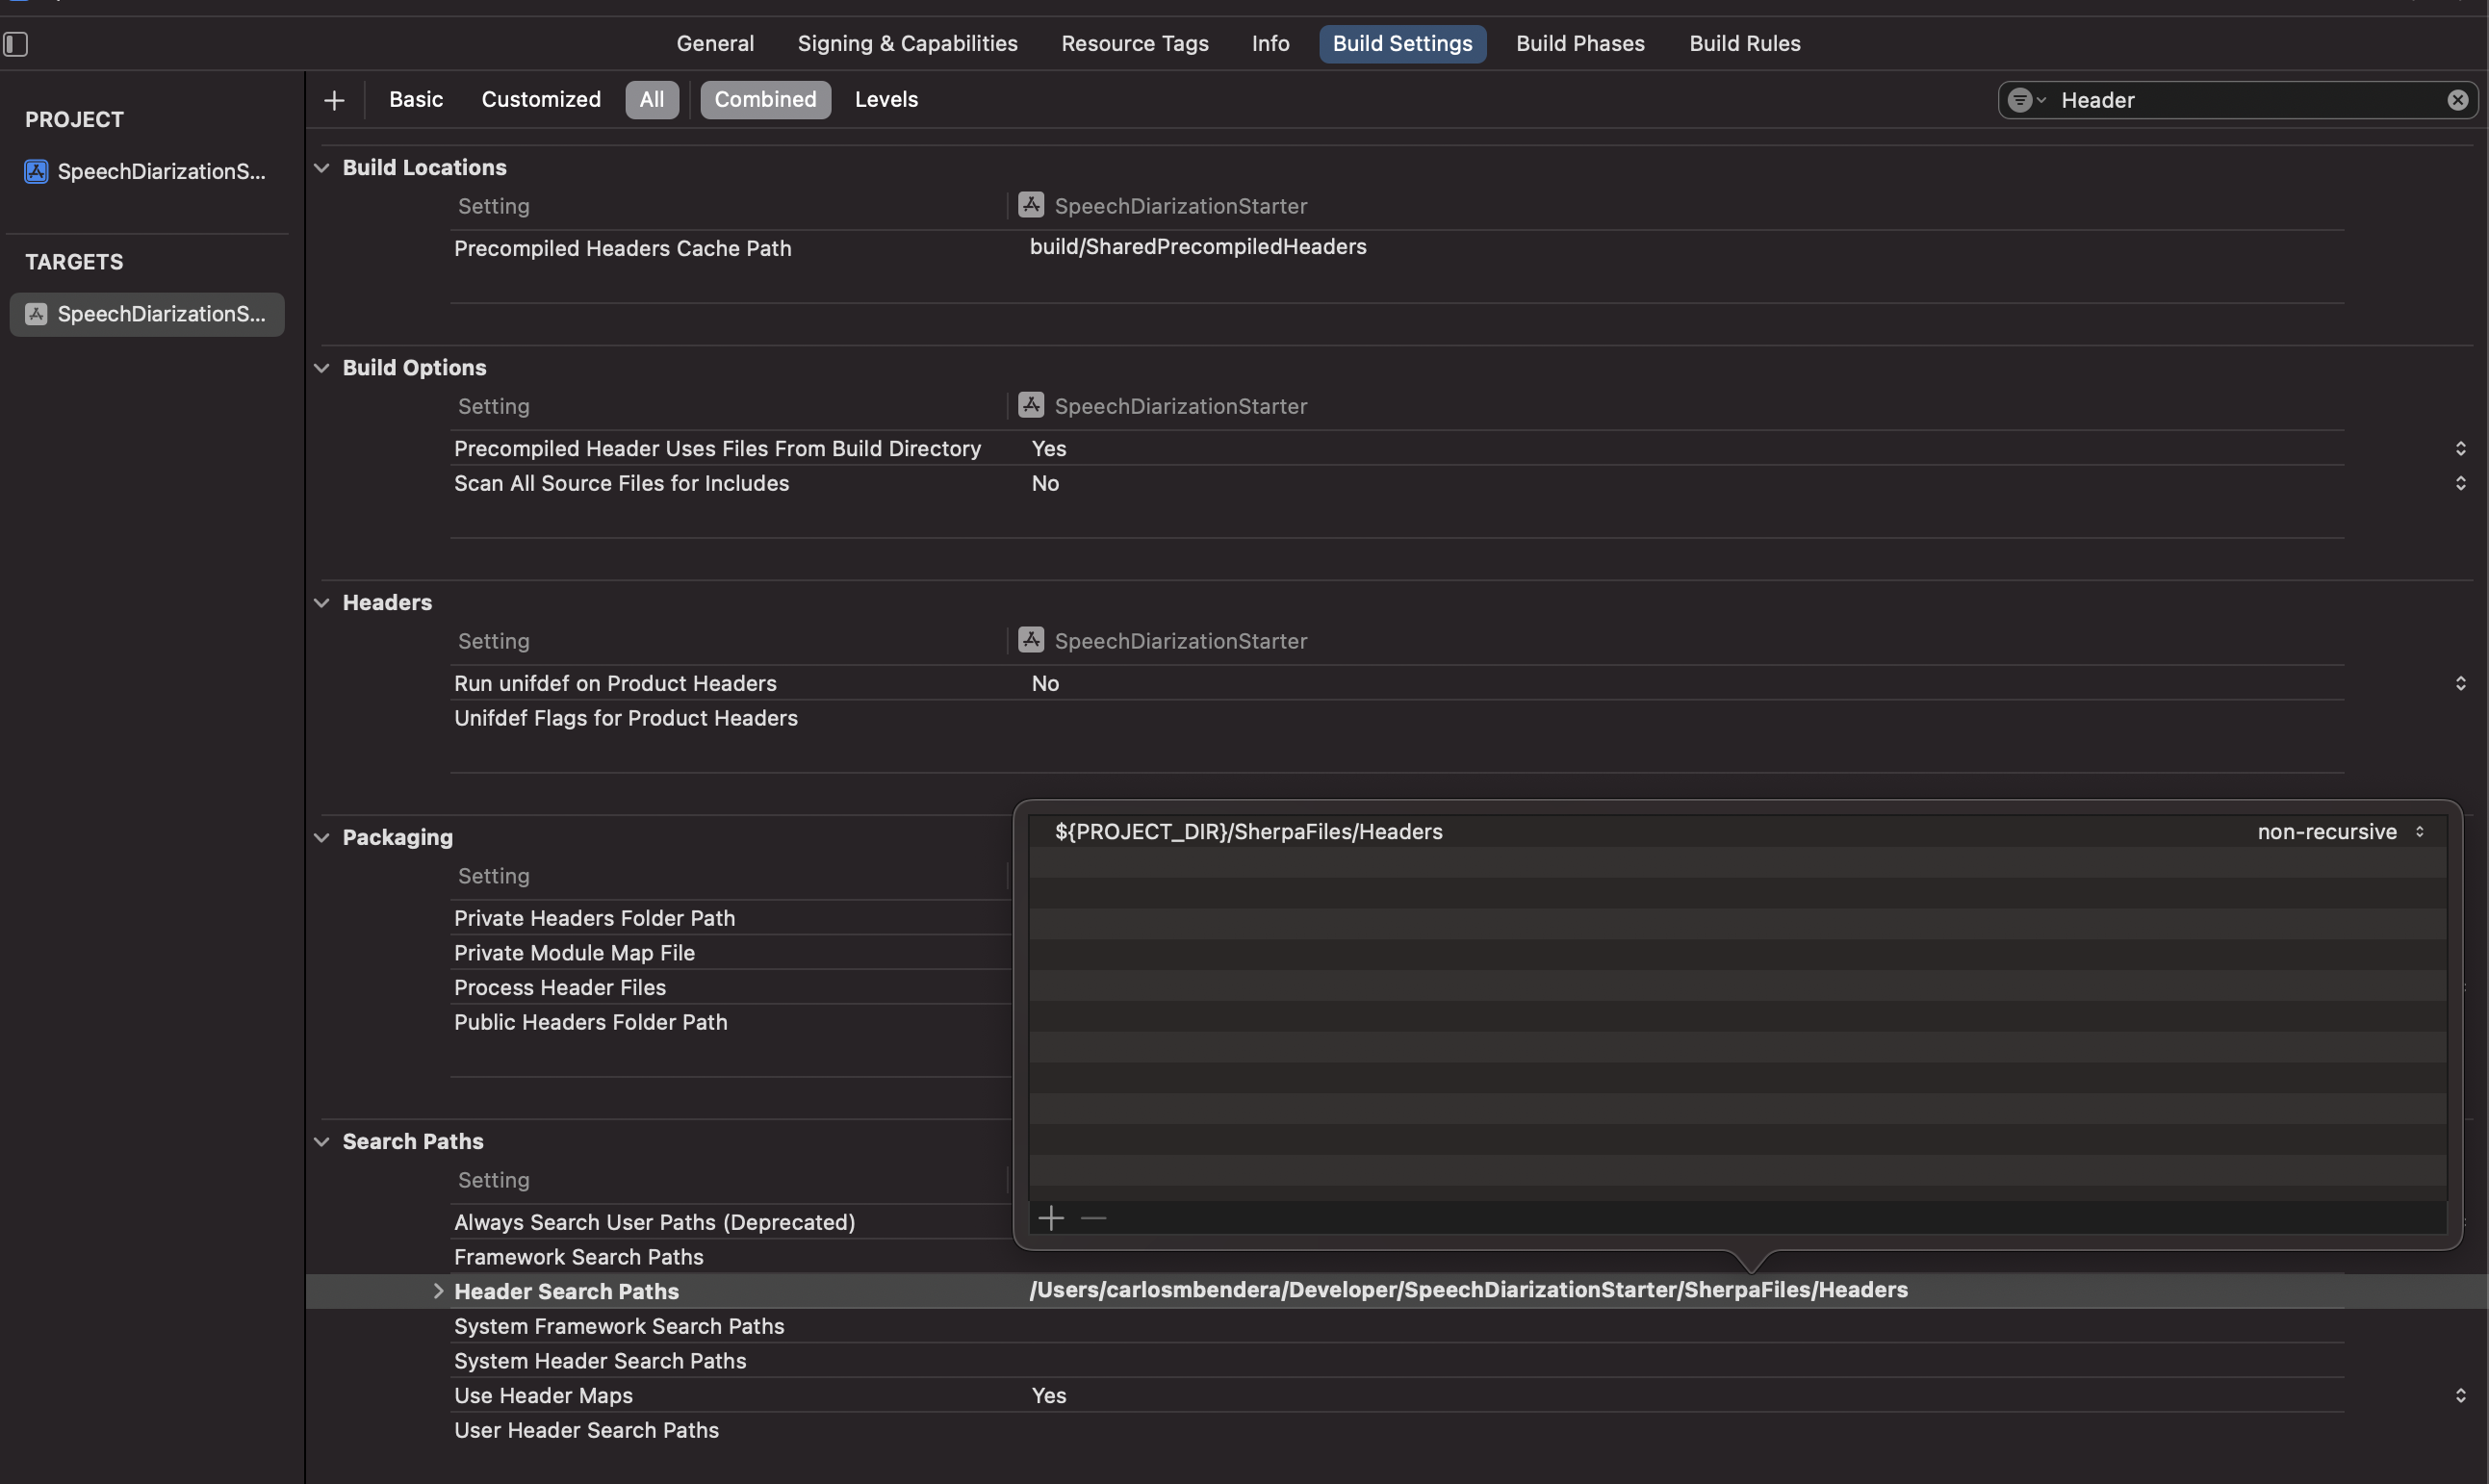
We also need to modify the build settings so Xcode takes note of all the needed files.Specifically:
Swift Compiler — General: Objective C Bridging Header
Set the path the file we just created above

Search Paths: Header Search Paths

Linking — General: Other Linking Flags: Set to
-lc++

Using My Starter Project for Speech Diarization
If you opt to use My Starter Project, you can easily start performing Speech Diarization on clips as soon as you download and add the Onnx-Runtime framework as highlighted in the ReadMe.
To test it out, just add a file titled “Clip.mp4” and run the app.
Show Me The Code
Here’s a breakdown of what’s happening in the background.
Firstly, using AudioKit, we convert the clip to a format the Model accepts. Specifically a 16 kHz, mono, 32‑bit float WAV file. If you want your app size to be smaller and rely on less frameworks, you could probably do this with Apple’s built in AVFoundation. AudioKit abstracts a lot of the code.
Afterwards, we pass the newly converted file to my runDiarization function. This is where all the C++ and Swift interactions occur. Sherpa-Onnx also abstracts this so it looks somewhat Swifty, but be fully aware that pointers are being passed around in the background.
The runDiarization function expects a requires that we have a Speech Diarization model in the project alongside an embedding Extractor Model. The Starter Project has these preloaded, so we’re mainly creating a config for the model. So we pass an expected number of speakers.
This is the ViewModel with all of this code:
import AVFoundation
import Foundation

class SDViewModel : ObservableObject{

    let segmentationModel = getResource("SpeechModel", "onnx")
    let embeddingExtractorModel = getResource("3dspeaker_speech_eres2net_base_sv_zh-cn_3dspeaker_16k", "onnx")


    func runDiarization(waveFileName: String, numSpeakers: Int = 0, fullPath: URL? = nil)  async -> [SherpaOnnxOfflineSpeakerDiarizationSegmentWrapper] {

        let waveFilePath = fullPath?.path ?? getResource(waveFileName, "wav")

        var config = sherpaOnnxOfflineSpeakerDiarizationConfig(
                segmentation: sherpaOnnxOfflineSpeakerSegmentationModelConfig(
                pyannote: sherpaOnnxOfflineSpeakerSegmentationPyannoteModelConfig(model: segmentationModel)),
                embedding: sherpaOnnxSpeakerEmbeddingExtractorConfig(model: embeddingExtractorModel),
                clustering: sherpaOnnxFastClusteringConfig(numClusters: numSpeakers)
        )

        //The SherpaOnnx functions are defined in SherpaFiles/Swift/SherpaOnnx.swift
        let sd = SherpaOnnxOfflineSpeakerDiarizationWrapper(config: &config)

        let fileURL: NSURL = NSURL(fileURLWithPath: waveFilePath)
        let audioFile = try! AVAudioFile(forReading: fileURL as URL)

        let audioFormat = audioFile.processingFormat
        assert(Int(audioFormat.sampleRate) == sd.sampleRate)
        assert(audioFormat.channelCount == 1)
        assert(audioFormat.commonFormat == AVAudioCommonFormat.pcmFormatFloat32)

        let audioFrameCount = UInt32(audioFile.length)
        let audioFileBuffer = AVAudioPCMBuffer(pcmFormat: audioFormat, frameCapacity: audioFrameCount)

        try! audioFile.read(into: audioFileBuffer!)
        let array: [Float]! = audioFileBuffer?.array()

        let segments = await Task.detached(priority: .background) {
               return sd.process(samples: array)
           }.value

        for i in 0..<segments.count {
          print("\(segments[i].start) -- \(segments[i].end) speaker_\(segments[i].speaker)")
        }

        return segments
    }

}
- We also have a few extensions to make accessing the Audio File easier.
import AVFoundation

extension AudioBuffer {
    func array() -> [Float] {
        return Array(UnsafeBufferPointer(self))
    }
}

extension AVAudioPCMBuffer {
    func array() -> [Float] {
        return self.audioBufferList.pointee.mBuffers.array()
    }
}
For reference, the Sherpa-Onnx official examples have a get resource function and this is its implementation.
import Foundation

func getResource(_ forResource: String, _ ofType: String) -> String {
  let path = Bundle.main.path(forResource: forResource, ofType: ofType)
  precondition(
    path != nil,
    "\(forResource).\(ofType) does not exist!\n" + "Remember to change \n"
      + "  Build Phases -> Copy Bundle Resources\n" + "to add it!"
  )
  return path!
}
If you’re using the starter projcet as a reference for your own custom project. Please take note of my Build Settings. Specifically:
Swift Compiler — General: Objective C Bridging Header
Search Paths: Header Search Paths
Linking — General: Other Linking Flags: Set to
-lc++
Pretty Cool Links:
Subscribe to my newsletter
Read articles from Carlos Mbendera directly inside your inbox. Subscribe to the newsletter, and don't miss out.
Written by

Carlos Mbendera
Carlos Mbendera
bff.fm tonal architect who occasionally writes cool software